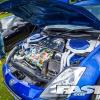
wizurd Posted April 26, 2014 Posted April 26, 2014 Hi. Well having had the zed about a year and a half and managing to resist the urge to change it much in that time i think i've finally given up trying to stop the inevitable, so let the changes commence This is how she started off when i picked her up from LeonK from the forum back in Oct 2012 Stunning condition car with the extras that i wanted: 19" LMGT4 wheels Red Brembo calipers Uprated discs and pads Clear side reflectors and an aftermarket exhaust. 1st mod i made was the addition of some bonnet dampers Really simple mod and a lot nicer than having to use the bonnet stay all the time. Left it a while then but back in Oct 2013 (1 year after getting her) it was P3 service time plus there were some good deals going on Berk HFC's and Uprev's with Abbey. So bit of a trek down to the south east to have these fitted: Plus the service, UpRev, Braided brake lines and also a Wasso Gold Plenum spacer (yum ) These are the Berks fitted up on the car at Abbey All in all really happy with the outcomes from the trip. Gained a bit of BHP and torque but mainly just a nicer drive. Plus of course that great noise from the hfc's. Since then been trying to resist doing anything else but seem to have had a rather large relapse I thought well maybe i'll just tidy up the engine bay a bit, nothing huge. But then thanks to others and their almost pornographic engine bay shots i've not had a choice but to go a bit more all out. Initial changes were to add a nice polished Berk intake tube which i picked up from Atkin666 (cheers again mate) and also a JWT Pop charger (think the pop charger was done earlier but cannot remember lol) That didn't last very long before i had other ideas: So then got the plenum polished as well as the strut brace. Did think about doing it myself but with time ticking on wanted these pieces done quickly. Would have taken me way longer lol Got the work done at Caerphilly Metal polishers. Quite happy with it I did have to do some work though since the plenum was minging on the inside So too was the throttle body, so bit of scrubbing later with some engine degreaser on the plenum and careful work on the throttle body with carb cleaner: Take my word for it the inside of the throttle body was black as night when i first took it off (plenum side) and pretty dirty on the intake side as well. With the throttle body off and having discovered a hydro dipping place just up the road from me decided to make some colour changes. Sprayed up the throttle body Was quite worried about this part since i'd heard of issues when working with the throttle body. But careful masking and all was fine Then changed over the existing silicone hose intake connectors for a set of white samco ones plus picked up some really nice white samco coolant hoses from CS on the forum. Soooooo then the fun bit putting it all on! Was quite straight forward really. Discovered due to the thicker hoses had to get jubilee clips to replace the existing hose clips. To be fair look better since they're nice and shiny. Then topped the coolant back up since i'd had to drain the system to get these changed over. All in put about 5-6 litres back into the car. My only suggestion is to make sure you follow the procedure from the service manual when bleeding the coolant and take time to get it right. So far so good and no air locks I've also got some bits dipped to go back into the engine bay i.e. Looks better in the flesh but this is the best pic i could get. I'm waiting on getting the strut brace and engine cover back from the same guy before i can put them back on. The strut brace is having white feet, the engine cover...... lol well its a little more out there but if it works then personally i'll love it Here's the overall engine shot pre cleaning (gotta spray other brackets, cover surrounds and slam panel plus fit new coolant, power steering and oil catch cans) Pre engine clean I spent a few hours today cleaning the engine bay. I've tried loads of products and none of them have touched the tar and grease thats all over the bay. Then i tried another suggestion, carb cleaner on a rag. Bam sorted strips through the tar and grease a lot easier! so here's some before and after pics of the bay so you can get an idea of how bad it was and how well the carb cleaner works Before: and after: Complete bay shot as its stands. Shortened the coolant overflow pipe a bit since its a bit thick for the clips along the radiator housing so cutting it shorter means that it should stay in place without them. It's the first time i've really tried to clean an engine bay properly like this before. Much happier with the way its progressing now. Going to have to keep stocks of carb cleaner from now on lol There are some rust patches across the bay, mainly by the strut brace mounts. So far just Krusted them and will then prime and colour coat them just to keep them clean. Nearly forgot!! Also got the inside door switch panels dipped since they were pretty scratched up And then the largest purchase for me yet lol (thats not my dolls house either! lol its at my mums) Totally love this Arc exhaust system and cannot wait to get it fitted!! Thanks to Tarmac for sorting the exhaust and also the incoming alloy tanks for the engine bay. Phewwwwww big thread! Hope its not been too boring to read through. Getting the exhaust fitted this week. Was going to do it myself but not really enough time at the mo. Then i'll be doing the other bits to the engine bay, probably doing a bumper tuck and then...... could be anything at this rate, bloody zeditus Apologies if i've forgot to mention anyone thats helped me source parts. If so drop me a message and i'll get this updated. Hopefully will be updating this a bit over the coming months with new changes and the like. Really excited to get this engine cover back, just gotta cross my fingers and hope that the dip works well. Cheers 5 Quote
leonk Posted April 26, 2014 Posted April 26, 2014 Looks great mate. Love what you've done with the engine bay! Quote
wizurd Posted April 26, 2014 Author Posted April 26, 2014 It's hard work with the engine bay. The carb cleaner helped a lot but as you get through one load of dirt then you notice other little things. Its a never ending list not complaining though and cheers for the comment mate Quote
leonk Posted April 26, 2014 Posted April 26, 2014 That exhaust looks fantastic as well, might even release a few more bhp. Quote
Carrie-B1 Posted April 26, 2014 Posted April 26, 2014 Really liking the white, looking forward to seeing the (never quite so) finished engine bay Quote
wizurd Posted April 26, 2014 Author Posted April 26, 2014 Can't wait to get the exhaust fitted LeonK, currently its just looking nice sat in the house. Should release a few more bhp i would have thought. Would need another remap though since i believe the ecu stops mods having effects without remapping Cheers Carrie. I'm hoping the white comes out well. Got white flexible cable hose coming so i can get rid of some more of the black stuff. Spraying up the battery and brake surrounds as well, just got to decide what to do with the slam panel then. Don't want to over do it if that makes sense. Quote
GMballistic Posted April 27, 2014 Posted April 27, 2014 Looking great mate. I was struck with Zeditus from the moment I got my Zed. I find it a lot easier not to fight it and just go with the flow. Quote
wizurd Posted April 27, 2014 Author Posted April 27, 2014 Cheers both. Yer I've been resisting basically to keep the bank happy lol. Sod that now though. Plenty of bits I'm still waiting on to fit yet plus then there's the big two, body kit and FI. Don't think I'll actually end up doing the FI though as it's a lot of money for me. Gotta remember coilovers and other suspension mods actually. See the list never stops! Lol Got her booked in on may 12th to get the little bubble of rust sorted on the back left wing. I'm worried it may be perforated though in which case I may end up needing a whole rear quarter panel and Its been suggested that could total a grand! Getting other quotes on that though just to check. Quote
GMballistic Posted April 27, 2014 Posted April 27, 2014 Cheers both. Yer I've been resisting basically to keep the bank happy lol. Sod that now though. Plenty of bits I'm still waiting on to fit yet plus then there's the big two, body kit and FI. Don't think I'll actually end up doing the FI though as it's a lot of money for me. Gotta remember coilovers and other suspension mods actually. See the list never stops! Lol Got her booked in on may 12th to get the little bubble of rust sorted on the back left wing. I'm worried it may be perforated though in which case I may end up needing a whole rear quarter panel and Its been suggested that could total a grand! Getting other quotes on that though just to check. I've got my Zed booked in at a local sprayers too for exactly the same thing apart from mine is on the drivers side rear quarter near the fuel flap. Funny thing was when he priced it up it got cheaper the more I wanted doing. Getting my d/s skirt sprayed, front bumper and the car d/a polished up as well now. End of May for me and can't wait. Quote
wizurd Posted April 27, 2014 Author Posted April 27, 2014 Oooo if ya don't mind could u send me the price he's quoting for all that work. I've got a quote just to do the rear wing if it doesn't require a new one. Quote
CJRamze Posted April 27, 2014 Posted April 27, 2014 Look at all this nice stuff... This is going to end badly for me! Sent from my One using Tapatalk 1 Quote
mattross1313 Posted April 27, 2014 Posted April 27, 2014 Looking good dude engine bay is coming along nicely, carb cleaner is a cracking idea as that area around the strut brace i really struggle with getting clean. Your going to love the exhaust, i heard humpy's yesterday (he also has berks) and they its gorgeous!! Quote
Almeida1234 Posted April 27, 2014 Posted April 27, 2014 Looks good matey Like the fluid cover and batt cover Quote
Keyser Posted April 27, 2014 Posted April 27, 2014 Resistance was always futile it was just a matter of time Very nice mods mate, subtle sensible and really making that into a very smart Zed Quote
Paddy78 Posted April 27, 2014 Posted April 27, 2014 Looking great Dan, it's really coming along nicely! Quote
Ceejay29 Posted April 27, 2014 Posted April 27, 2014 Nice work Dan, it sounds like you have it all planned out, a clear symptom of Zeditus. The bay is coming along nicely and as for that exhaust....bloody lovely! Keep up the good work Quote
350zedd Posted April 27, 2014 Posted April 27, 2014 Nice work mate.....progressing very nicely The Ark exhaust looks fantastic.....look forward to hearing it in a few weeks time. What are those kinda like "auxiliary" cylinders on the back for? Never seen them before (excuse my ignorance) Quote
wizurd Posted April 27, 2014 Author Posted April 27, 2014 (edited) There's an actual word for them which I can't remember but what they're supposed to do is alter the sound to reduce drone, I believe. Will find out how well next week. Cannot wait! Thanks for the comments all. So far I'm happy with how it's progressing. I'm trying to keep it smart with mods that I think work rather than just chucking bits at her. Fully aware though that as the zeditus develops it's going to be harder and harder to resist going mad lol So far fairly subtle but then you've not seen the engine cover yet As for resisting zeditus I wouldn't bother, just accept it and get modding Edited April 27, 2014 by wizurd Quote
Paddy78 Posted April 27, 2014 Posted April 27, 2014 There's an actual word for them which I can't remember but what they're supposed to do is alter the sound to reduce drone, I believe. Will find out how well next week. Cannot wait! Resonators? Looks class mate. Looking forward to checking it out in a few weeks! Quote

Recommended Posts
Join the conversation
You can post now and register later. If you have an account, sign in now to post with your account.