


G1en
-
Posts
880 -
Joined
-
Last visited
Content Type
Profiles
Forums
Events
Gallery
Store
Everything posted by G1en
-
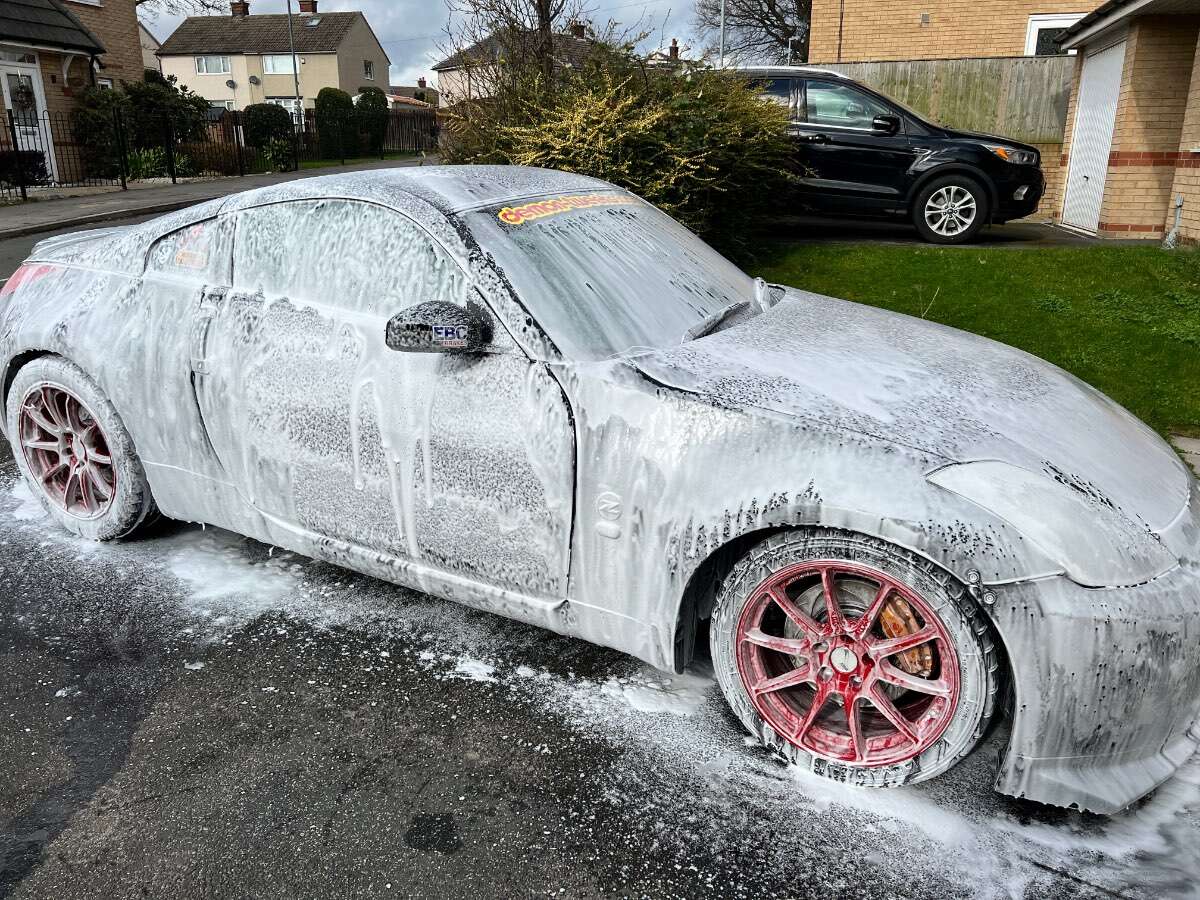
Next Video I have put together in double quick time, yes I know when you watch it, there is no footage of me actually contact washing the car but it was done and a quick detailer used before final shots.
- 269 replies
-
- 2
-

-
- waxandshine
- hillclimb
- (and 2 more)
-
First update 2022 … As i have just purchased a new PC and Go-pro I thought i would document my highs and lows throughout the season. I have decided to enter the connaught speed championship this year alongside the regular harewood championship. The connaught events are all over the country so will be a great experience for me and a steep learning curve. This first video gives a brief introduction to sprinting/hillclimbing with footage from the recent practice day at harewood. Now as i have a full time job, life and 2 kids to try and not kill daily, All the footage will be one take, no prep and minimum editing on the pc, mainly because i don’t know what i am doing anyhow. So with that in mind, i make no apologies for taking 30 minutes of your life you will never get back, but in the lottery odds chances that you don’t mind the content then give it a follow as there will be semi regular updates every couple of weeks (if the car and myself make it through in one piece)
- 269 replies
-
- 1
-
-
- waxandshine
- hillclimb
- (and 2 more)
-
Cheers, just ordered the wilwood master and some more rbf fluid from you. Will get that done and see how it goes.
-
So today was practice day getting ready for sprint/hillclimb season. All was going well until i went to change down to second and it would not go into gear, lifted my left foot to try again and clutch was stuck to floor. My first thoughts were cooked fluid (again) but the fluid looks fine, last changed poss 18-24 months back but i do syphon out and replace the reservoir every couple of months. Only ever use motol RBF top spec stuff. after being towed to paddock and leaving car to cool down for 2 hours i could select gears when ignition was off and the clutch pedal had come back but i could not select any gear when i started the car. Left it another hour, same thing so stuck it in 1st with engine off, started car with clutch down and it bumped off, then i could select all gears again, drove it home fine. so i am trying to figure out the problem as i dont want it happening again, especially if im at an event miles away from home. i already have the uprated xtreme clutch and CSC kit, braided lines, and i have heat wrapped everything i can under the car as i have had this problem twice before, is it the master cylinder? as thats the only thing i havent replaced, or something else? The car was hot but it was only about 7 degrees external and i was only doing a second consecutive run which makes me think the fluid shouldn’t have been close to boiling. is there anything i can try before replacing parts or should i just get a master cylinder and new fluid and try that? final point, reservoir stayed at maximum, no fluid loss, if anything it was slightly higher than max after clutch went to floor (which may mean master is gone) or just normal expansion at temp.
-
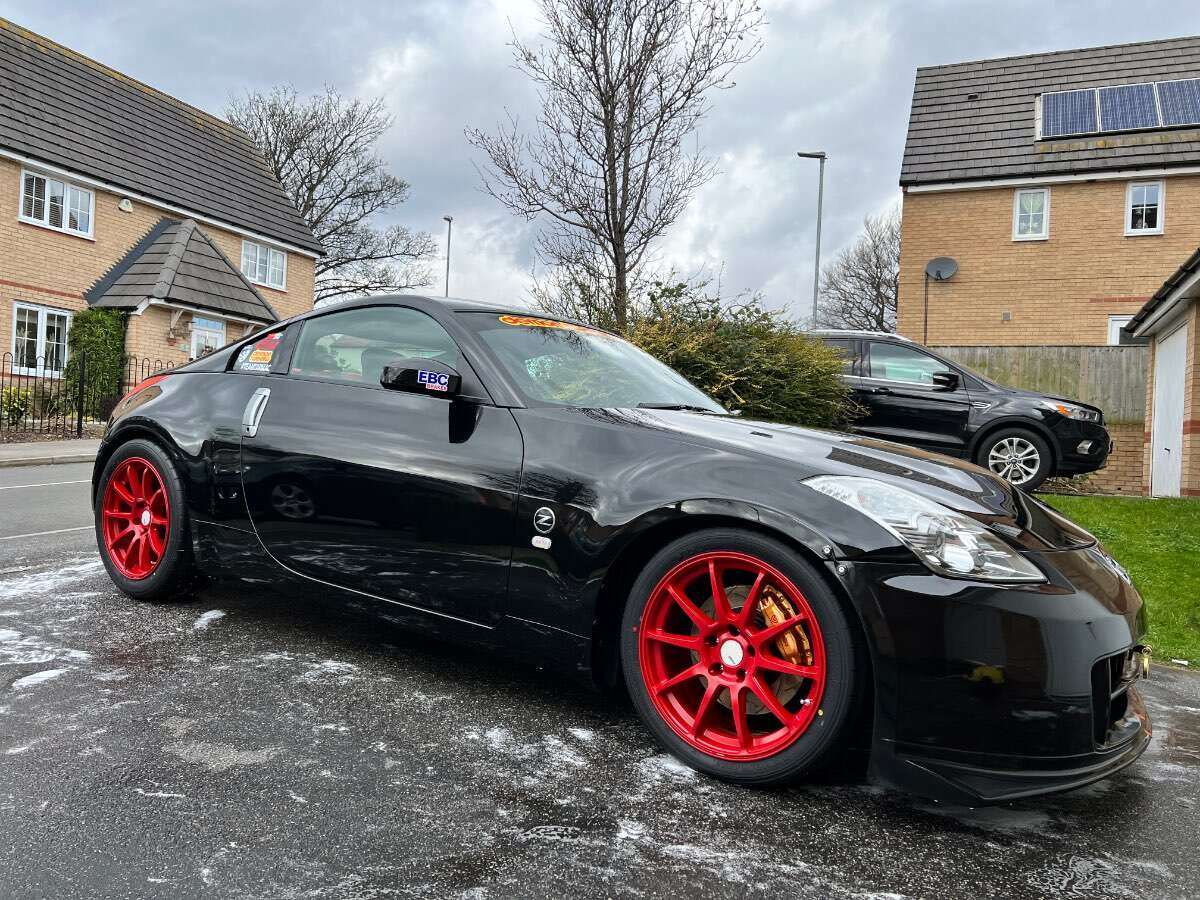
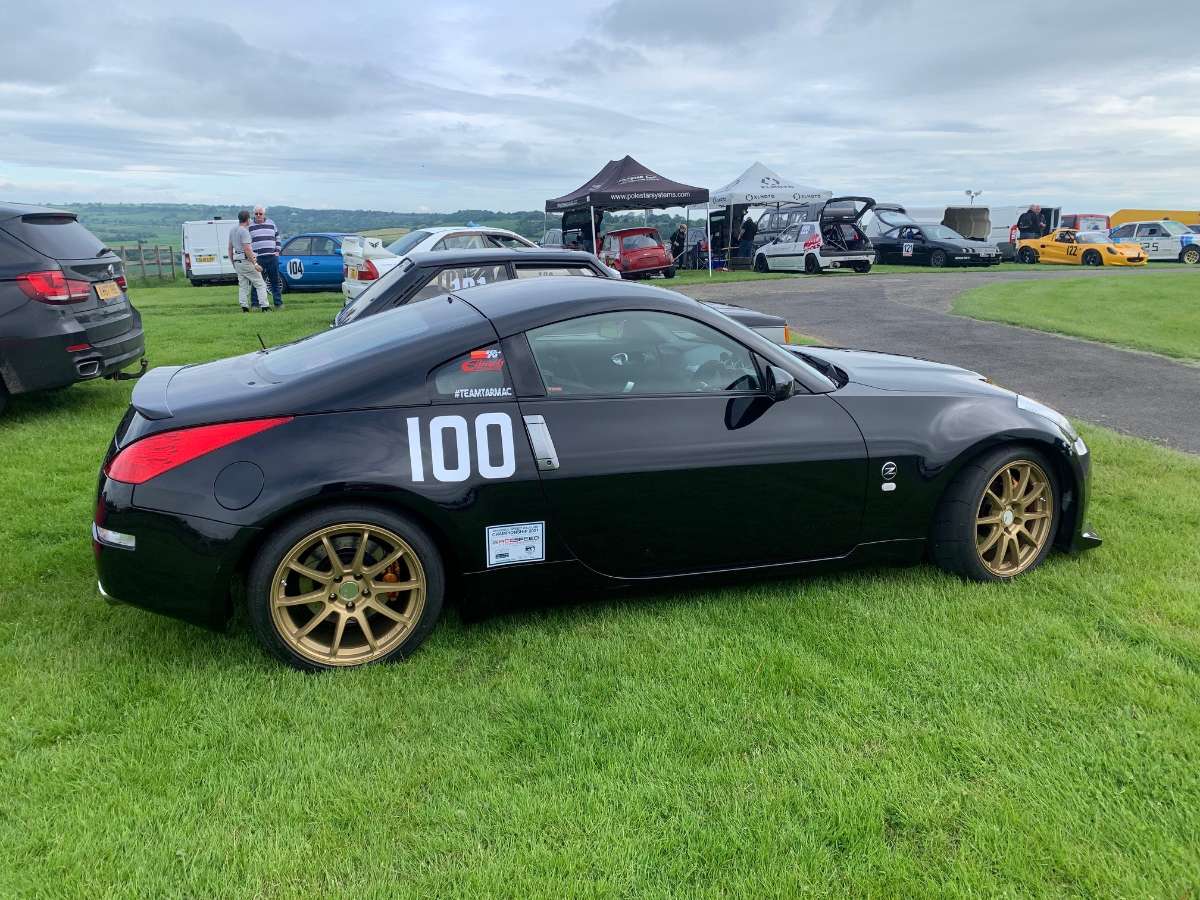
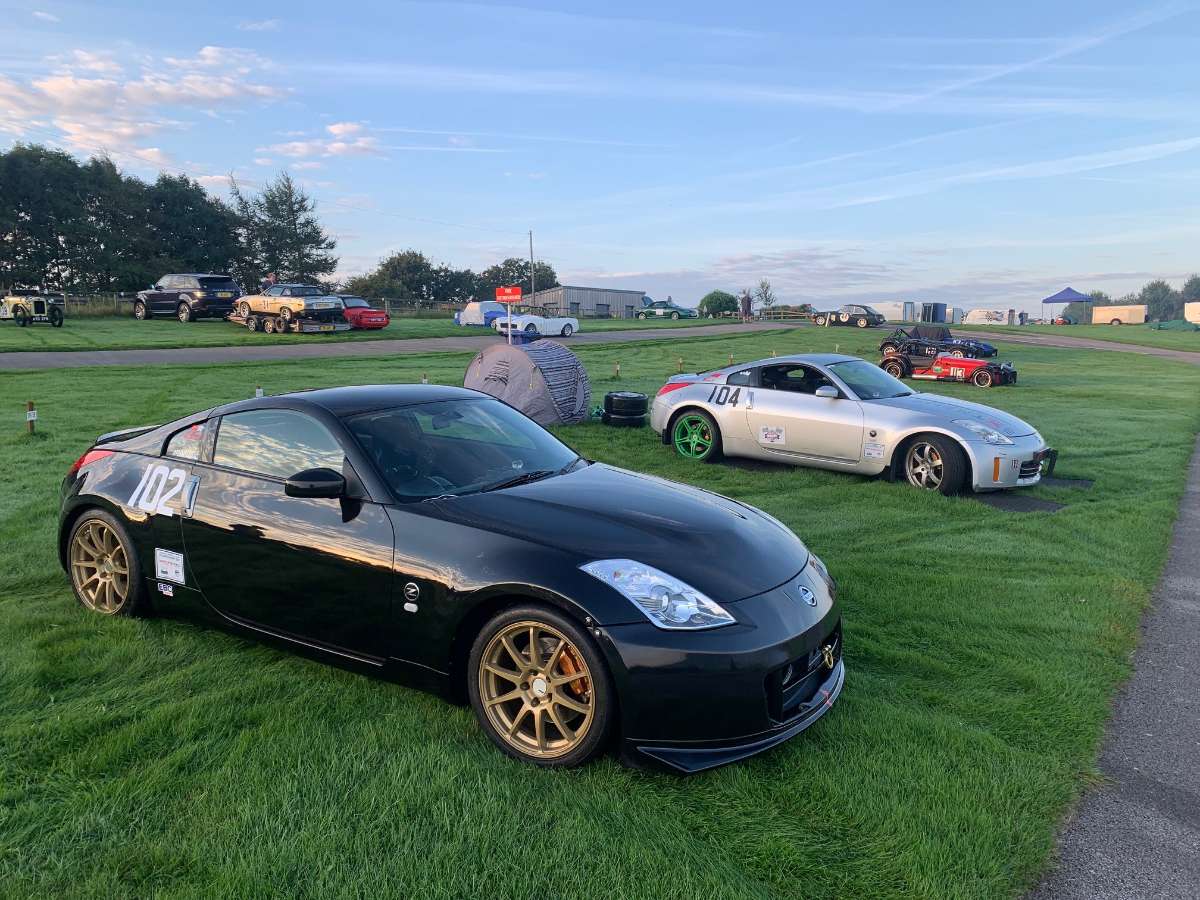
Bath time and track wheels and tyres on ready for season starting next week.
-
Really like that colour/livery, seats look superb as well. Sure you will enjoy it, i bet you were torn between that and a nissan leaf though. Tough decisions in life.
-
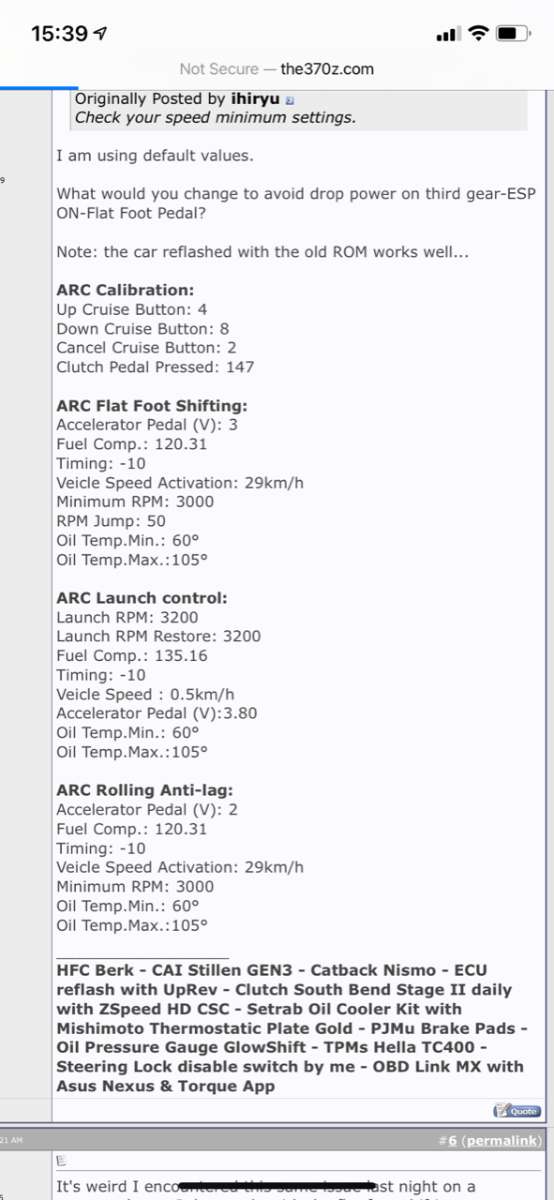
Main points are: every option is selectable/unselectable in the software so if you have just had the car mapped it will prob be the tuner has not selected it or deselected it by mistake. Second point is all the arc features only work when oil/engine is at a certain temperature to protect the car, so it wont work from cold or if too hot. If its worked before and your car is upto temp, not sure why it would just stop working, only thing i can think of is throttle position sensor might have gone faulty as you have to be at something like 95% throttle for it to work so if reading/voltage is slightly off that may be cause?
-

Urgent help needed! Need a stock 350z ECU for Drift Bash Bash tomorrow!
G1en replied to prodrive11's topic in 350Z General
Could you use a fuel additive/ octane booster? You could probably pick some up locally at car parts stores. -
This is a guess but my bet is its for wiring looms for LHD cars so not used on RHD models as they will run down drivers side.
-
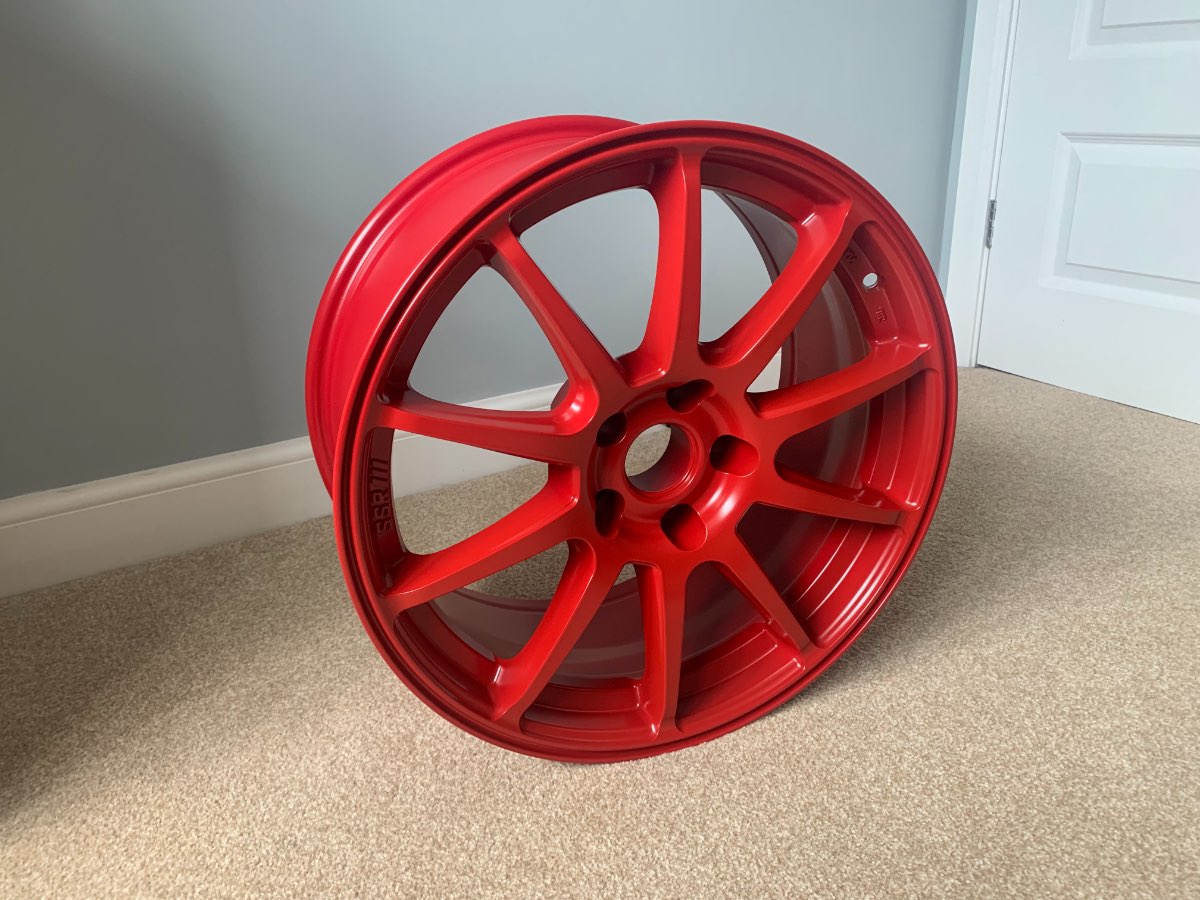
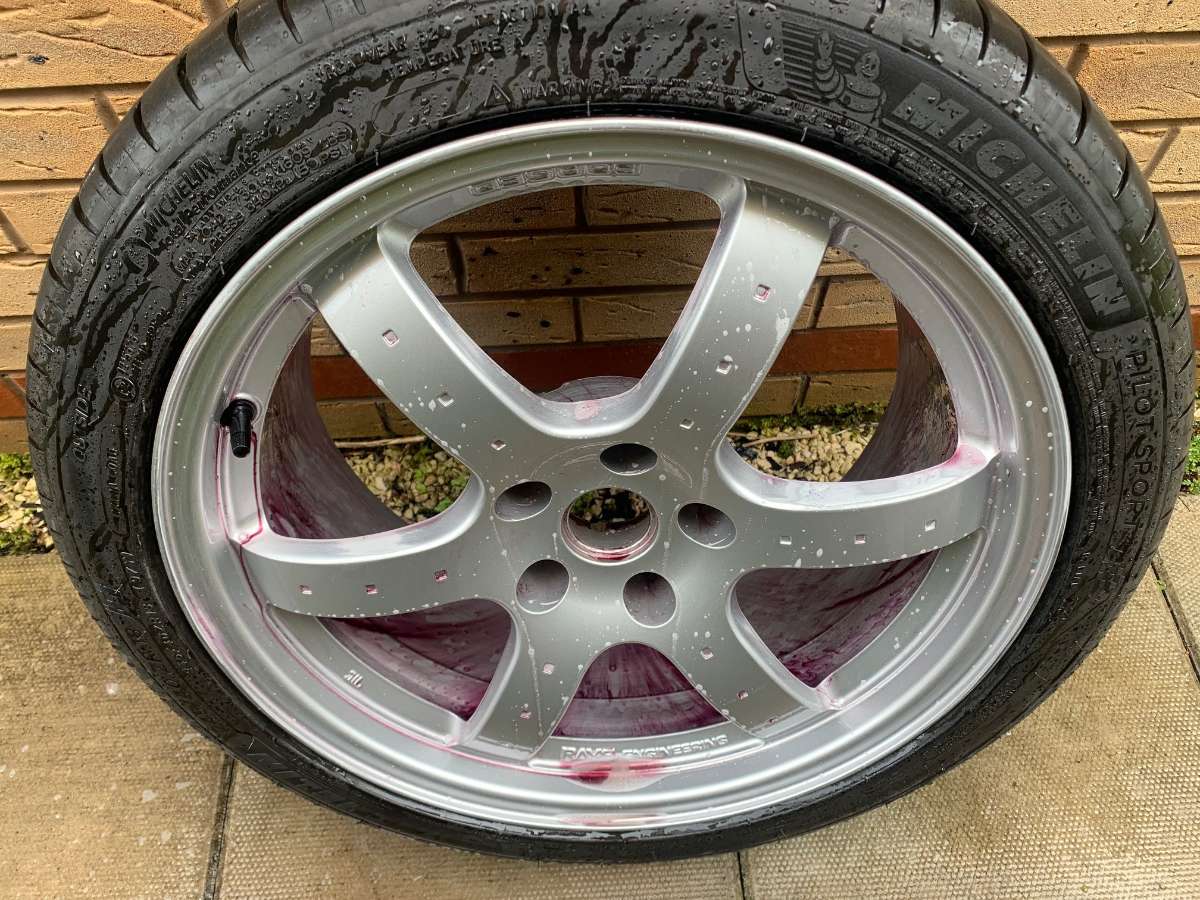
Wheels are back from the powder coaters. Another big thankyou to RAW wheels at York. Highly recommended and very reasonable priced. These cost me £54 wheel inc a repair in one of them. Here is a pic of one below. Gonna get them coated with Gtechniq C5 next week then will await MSA tyre list for next year before deciding what rubber to put on them. I think the colour is Ruby Red with a satin lacquer. There are tons of colours to choose from then you decide if you want matt/satin/gloss finish. I went with satin as thats what the previous gold finish was. Matt is too dull to fit in with the ibisu black paint. Gloss is too much bling as its not a show car so satin is a happy medium for me.
- 269 replies
-
- 1
-
-
- waxandshine
- hillclimb
- (and 2 more)
-
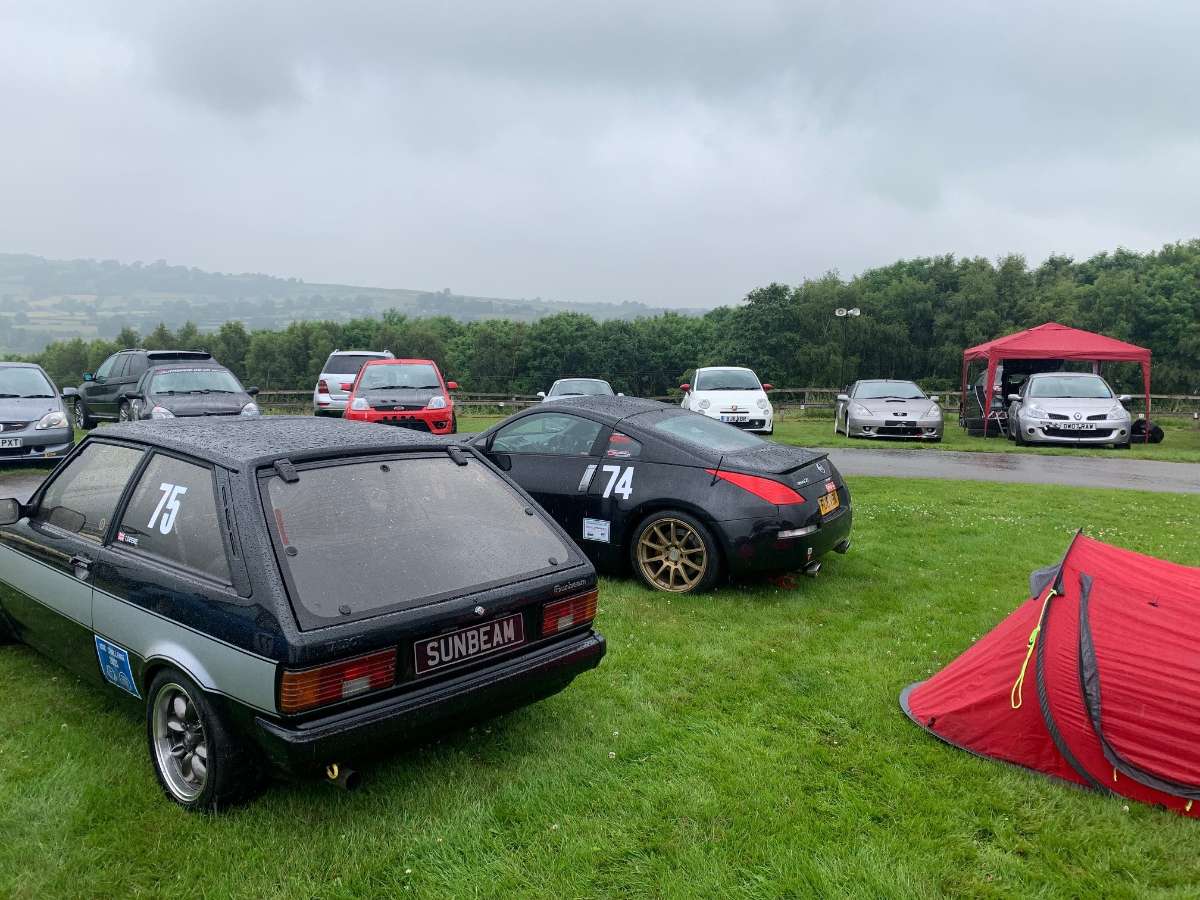
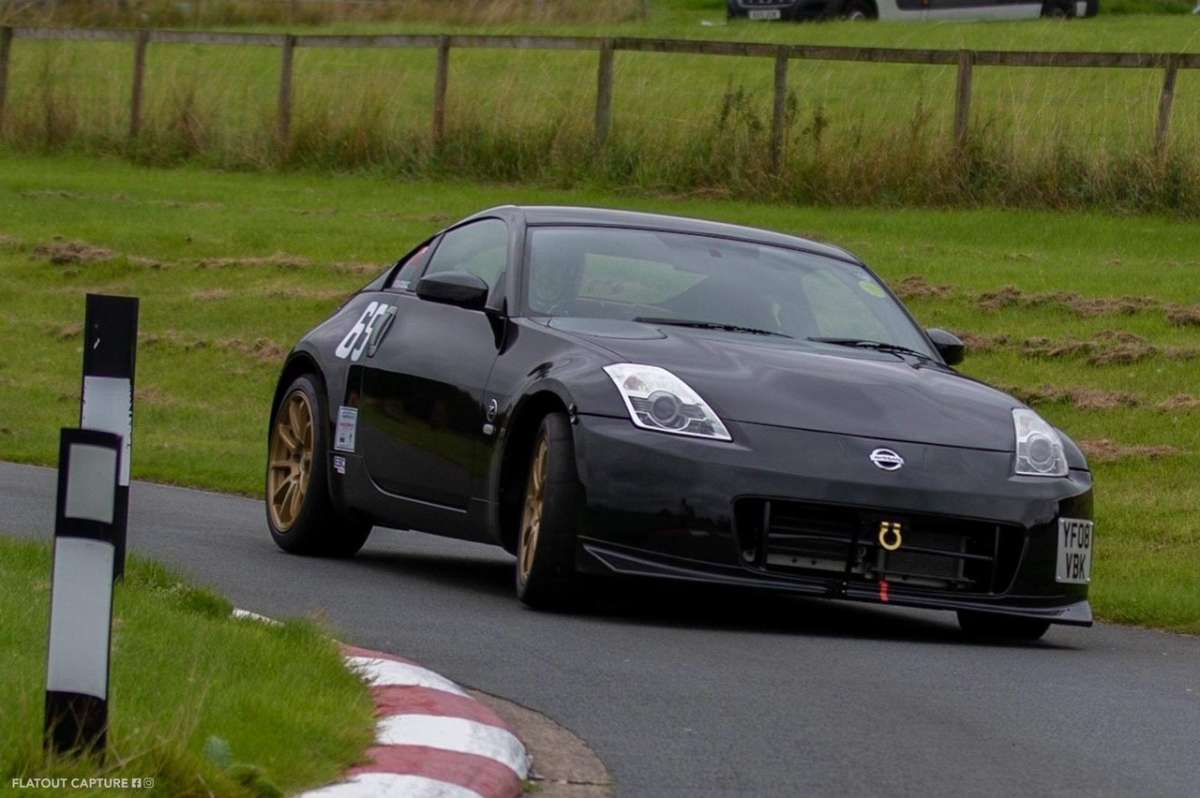
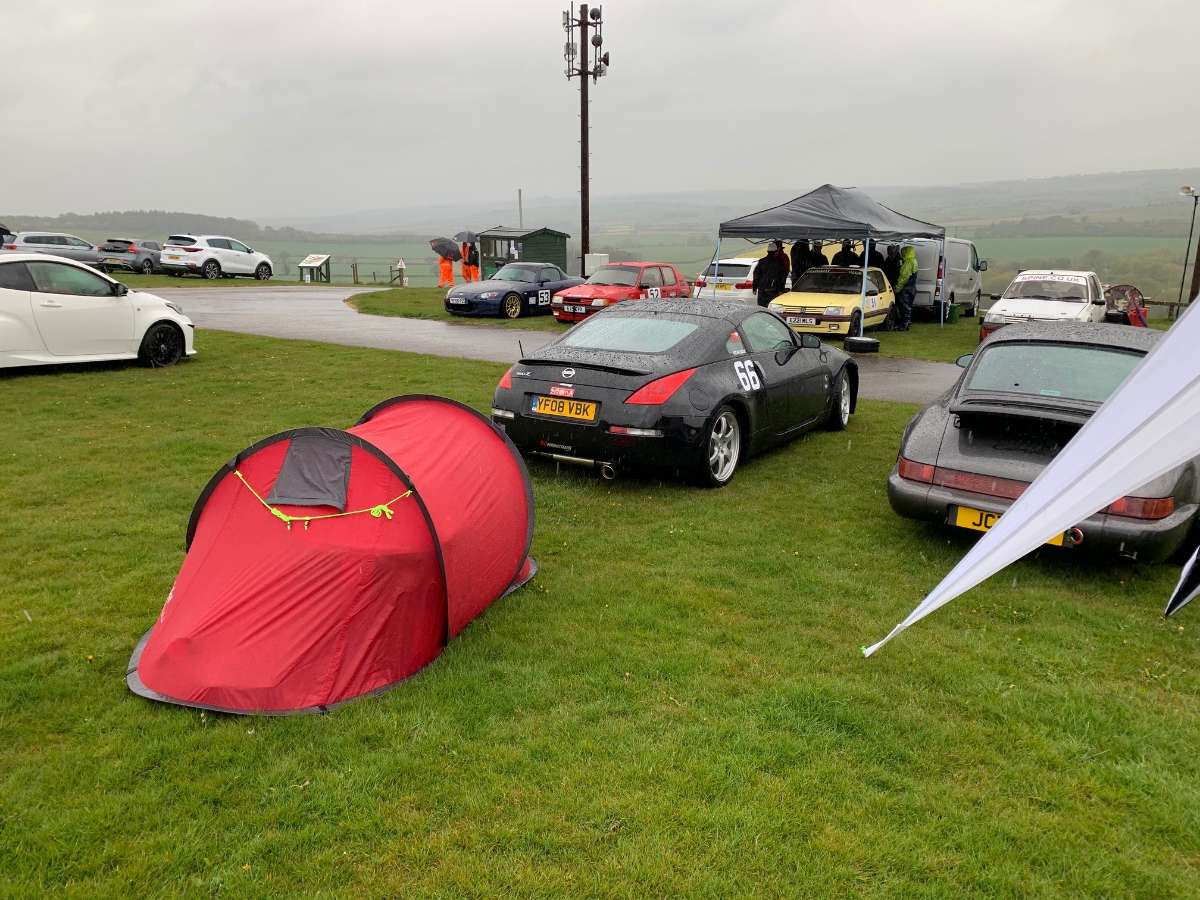
I didn't realise it would post the Harewood pictures so this will be a text rich update. To summerise June meetings onwards at Harewood it basically went something like damp, wet, wet, damp, cloudy, dry, dry so less than ideal for me and the Zed but there was the odd dry run thrown in where you kinda had one chance to set a good time and in the main, I managed it. so i will quickly run through my finishing positions: 06th June - 2nd (64.84) 03rd July - 4th (69.68) 07th August - 2nd (65.66) 08th August - 2nd (64.84) 29th August - 2nd (64.65) 18th Sept - 3rd (64.61) 19th Sept - 3rd (64.72) I did do a 64.4 in practice on the 18th which was mighty frustrating as i realy thought i could better it and get into a holy grail 63 second run. I do thinks its do-able because of 2 points, 1- when i put my best sector times together i get a low 63, now i'm not blasee enough to think i'll get that but a tength slower in every sector still puts me at a high 63, and point 2, the car felt realy good, the best it ever has back in July/august when i made the few tweaks to the roll bars, camber, pads etc.. but i was understeering badly this weekend (18/19th) the track and tyres were hot and i was gunning it so i put this down to over exuberence but i was also hearing a slight knocking noise when turning, so as i was putting my newly refurbed winter wheels on, i checked the drop links, to my suprise (or not) both fronts were very loose, in fact the passenger side had 10mm of thread through the roll bar hole before the nut, now i don't know how they have come so loose but it certainly explains both the knocking and lack of cornering grip for the last few days, i would go as far to say, with 10mm of travel i bet the antiroll bar was almost non existent in functionality, the rear wasn't much better either, one side was tight the other loose, no wonder i was ploughing over marker posts and getting failed runs left, right and centre. But at least its all tightened back now and something i can keep an eye on in future. Its another win for the forum though as its a common problem reported on numerous threads. So where did i finish in the Championship?, I hear you ask, well out of nearly 200 entrants, I achieved my goal of getting into the top 10, finishing in 6th spot with fellow 1C rival Terry a place behind me in 7th. Although never threatening the 1C record consistantly finishing in the 64 seconds earned enough points to keep me in the top 10, 7 rounds from 10 count so luckily the 2 low points from the monsoon days could be discounted. I was also (and Terry) greatly helped by the fact that the class below us 1B had a man possessed in a Honda s2000 literally breaking records with every run meaning the rest of the class were scoring less and less points (as its a countback points system from the class record) as our record is still to be broken, our points are consistant, if that makes any sense?? Unfortunately said possessed spirit is thinking of supercharging his S2000 and moving up into 1C which means I will have little hope of a top 10 finish next year so may have to try something else, I do love the Zed though and it doesnt miss a beat no matter what you throw at it. It seems to egg me on the more i push it. What next? I have just dropped my SSR wheels off at the powder coaters to be refurbed again, no spoilers though, i will keep you guessing and update later in year. When i bought the new pads from Demontweeks I also bought a full service kit which i will do before the MOT in November, I got new gearbox oil as it was last done when i bought the car 5 years ago, new diff oil as the kaaz diff has to have replaced every year, and new Fuchs engine oil and oil filter. I will need new tyres for the wheels as the extremes "may" be banned next year so may have to go back to the nankang AR1's but all the hillclimbing fraternity are holding their breath as the extremes are probably used by at least half the field now due to them being around half to a second quicker in most conditions. Do i boost the Zed? Do i buy another car and try a different class? Do i do a different or additional championship? will have to have a think, the Zed is going nowhere though, thats for sure. I would like to get to a couple of shows next year, this year, they have always coincided with racing and i have been reluctant as its not in the best of display stand caliber at the minute but i know most wouldn't be bothered by this and it will be great to see some fellow owners again. hopefully next year...
- 269 replies
-
- 3
-
-

-
- waxandshine
- hillclimb
- (and 2 more)
-
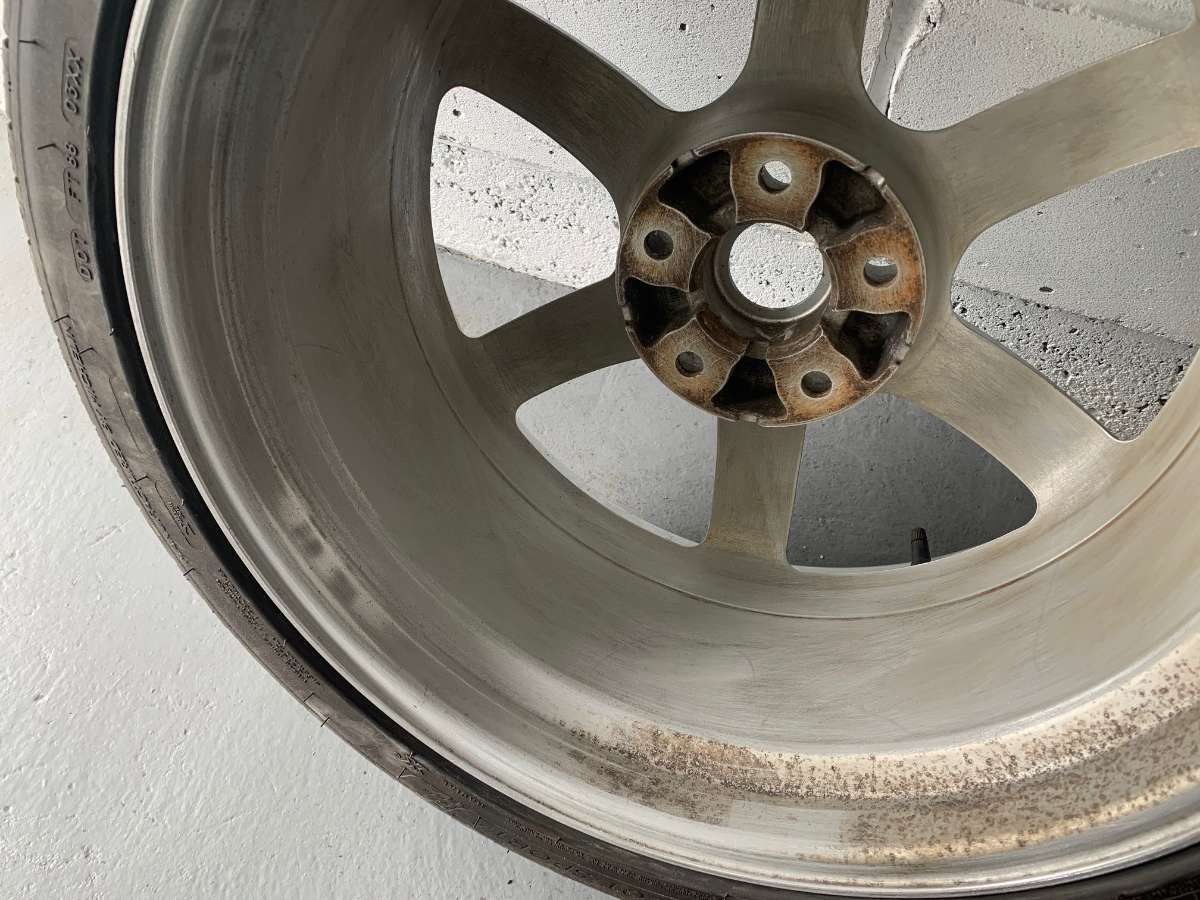
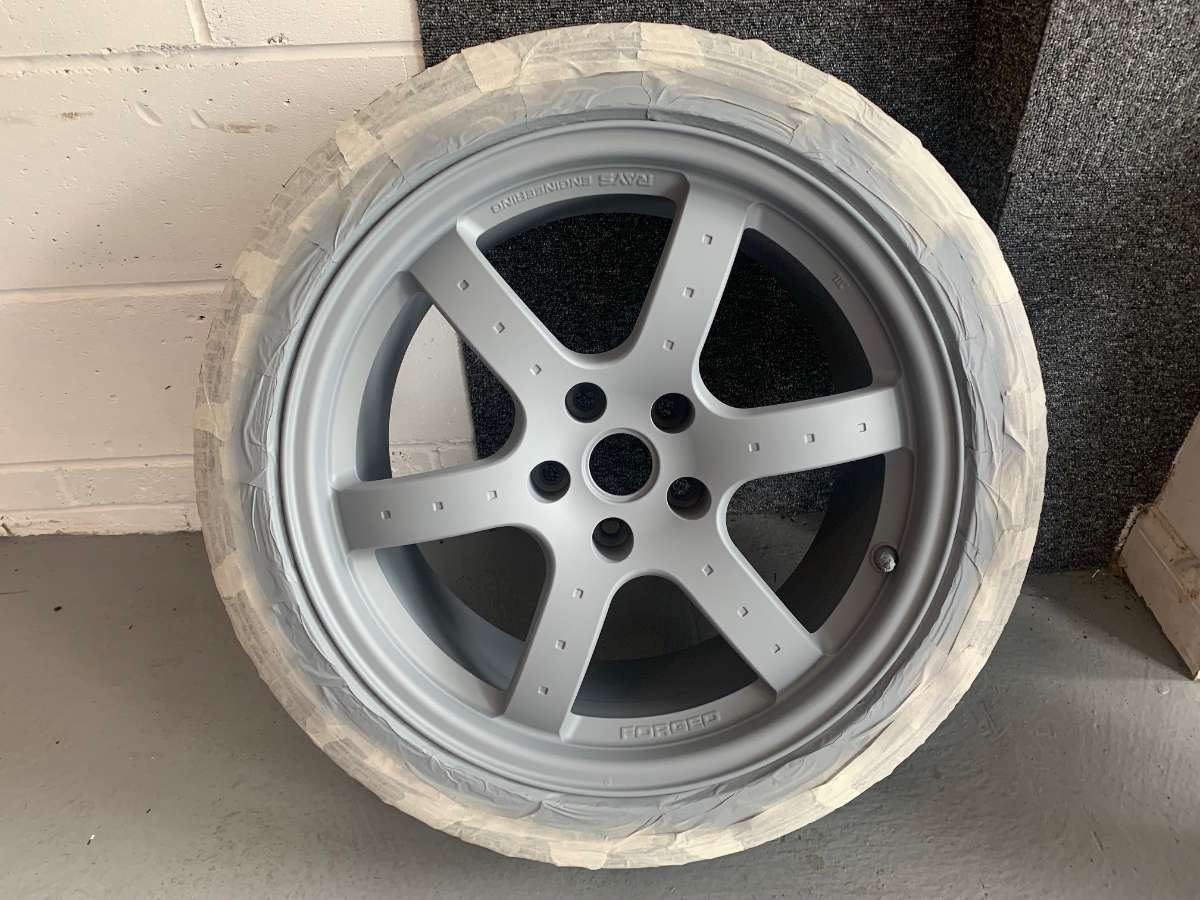
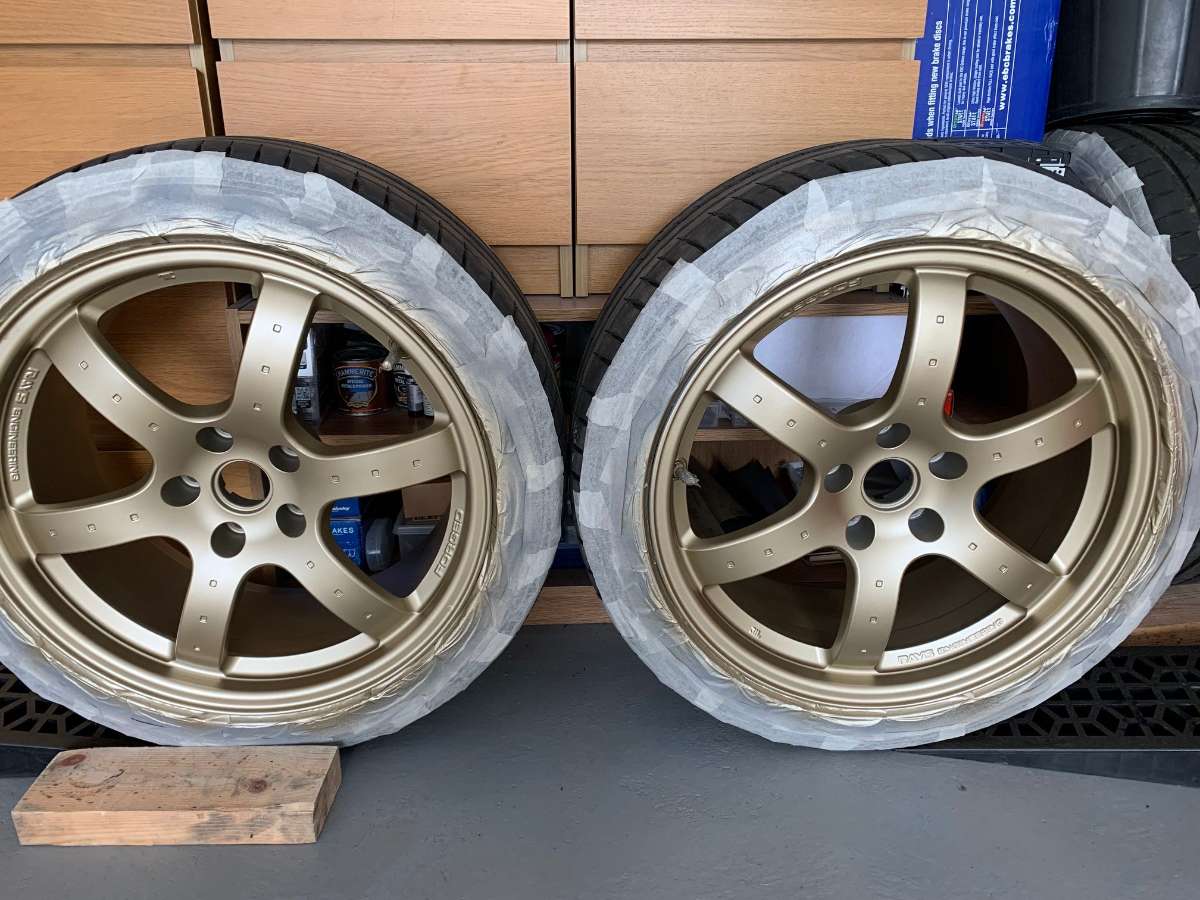
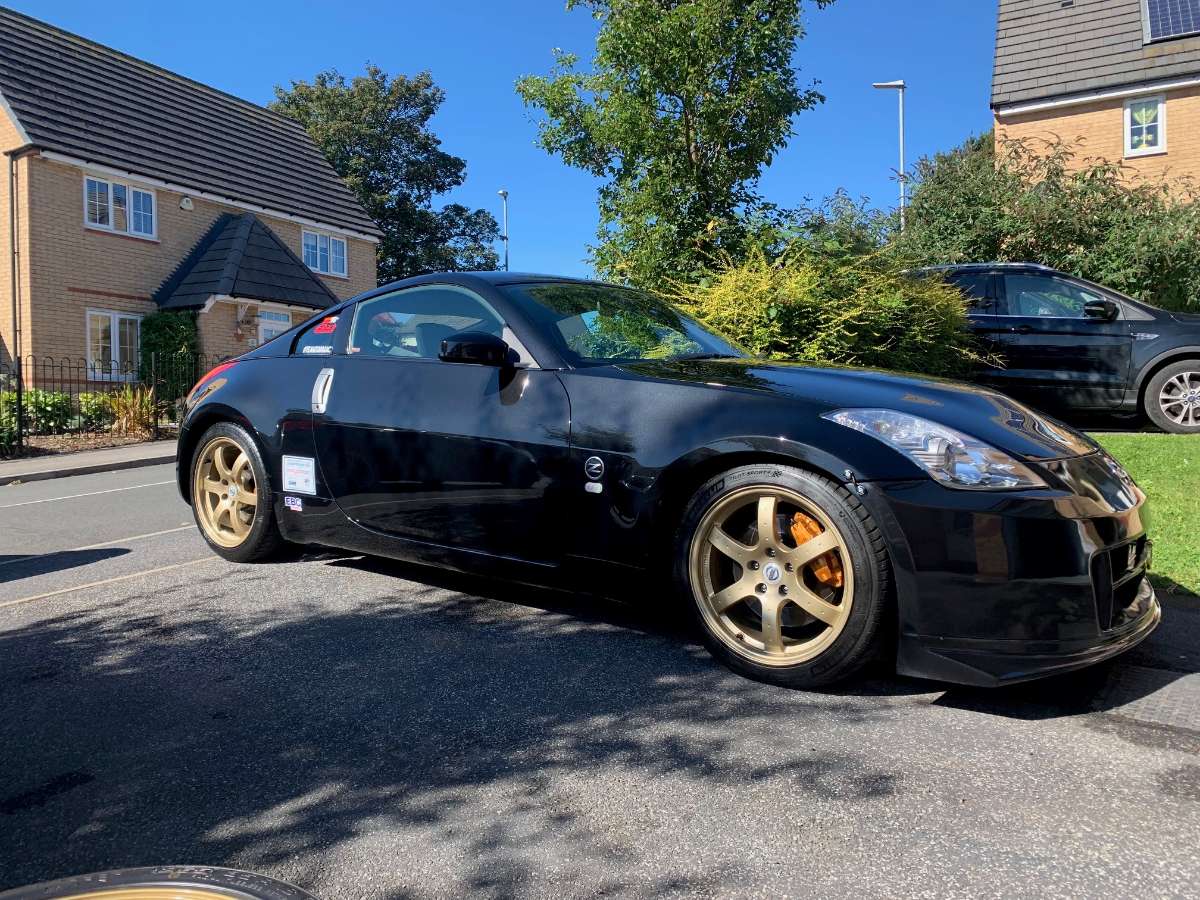
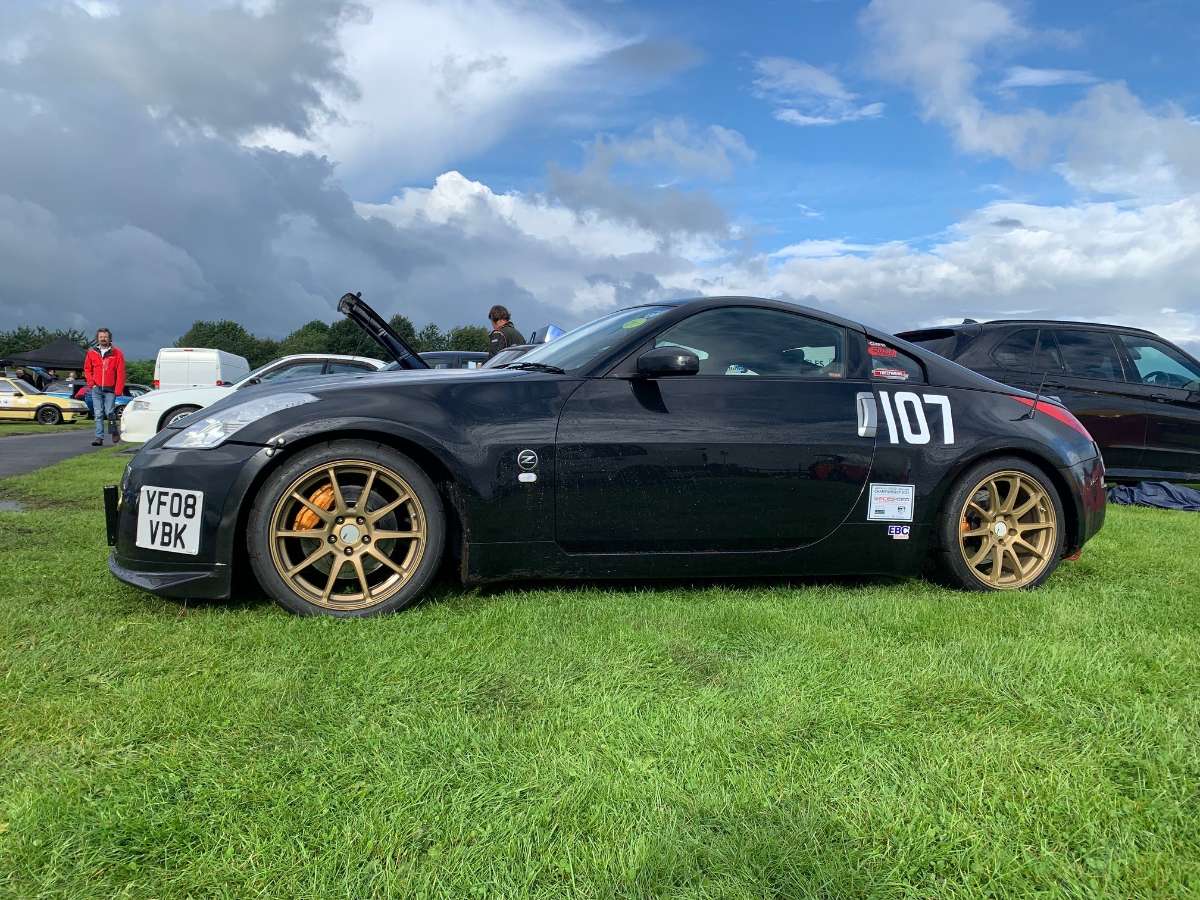
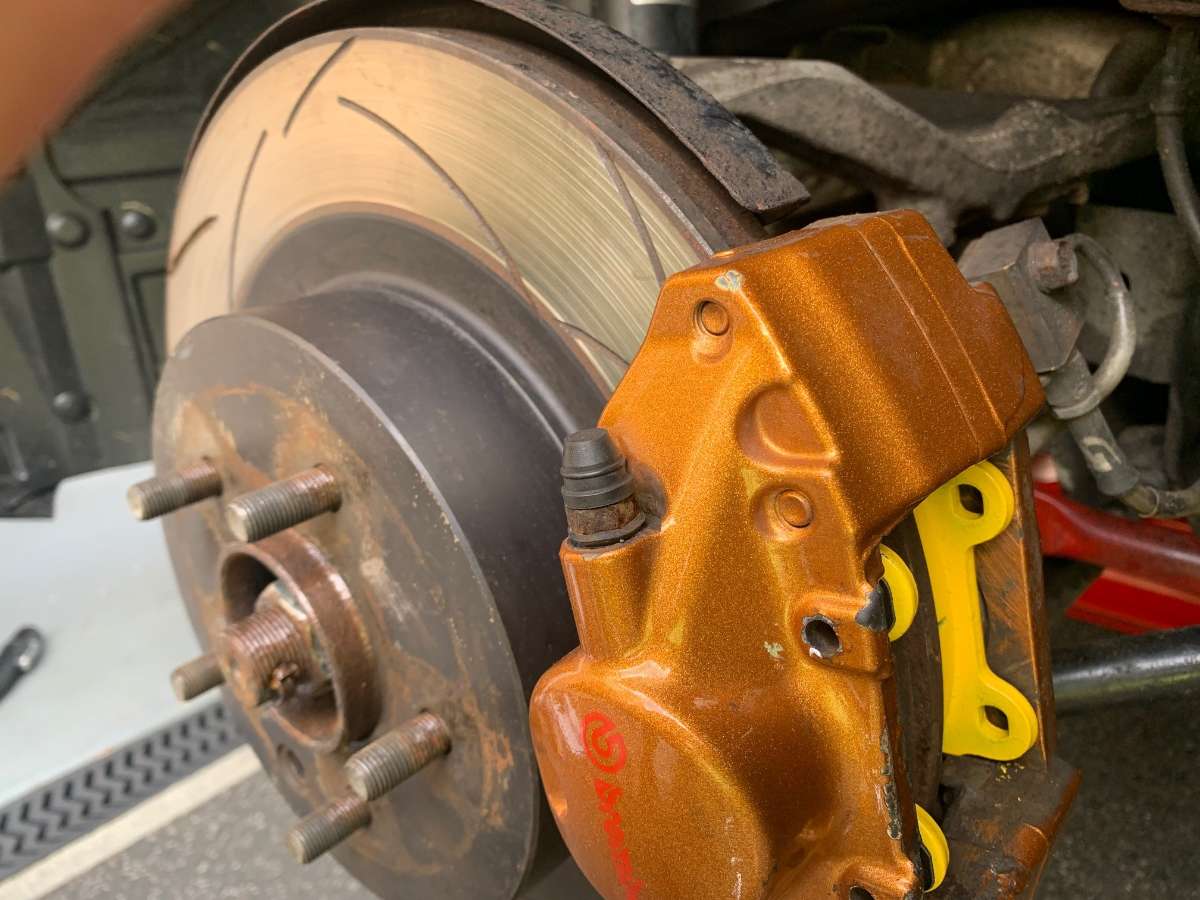
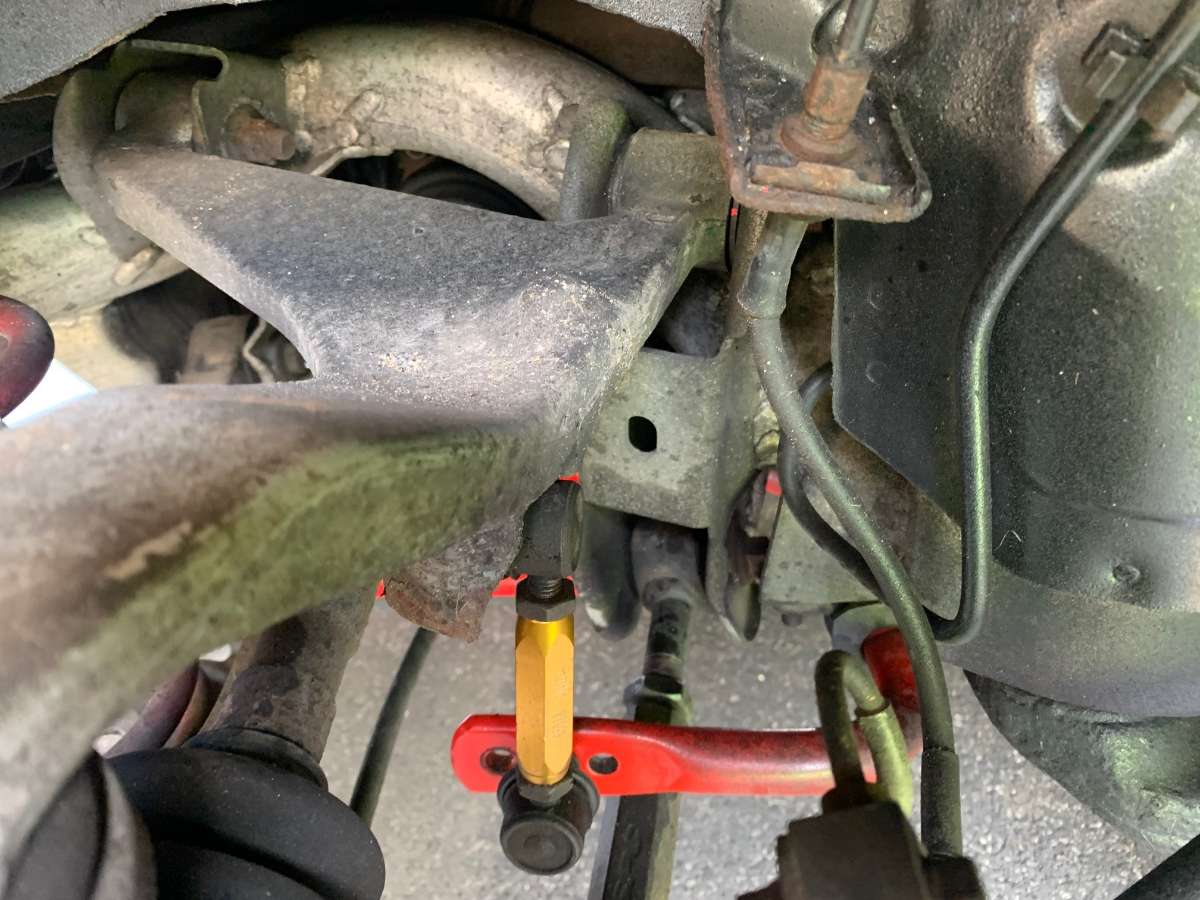
Its about time I updated this, if only for @Kieran O'Quick if no-one else. So I will start by providing you all with a Rays refurb montage. The standard silver rays in conjunction with kerb rash, bubbling, corroding, scratches and all were not looking their best so sometime over the summer i had a couple of days off, or maybe it was the weekend or maybe i just told the wife to do one and i was going in the garage. (on reflection it defo was not the last one) I decided to give the wheels a DIY refurb. I had bought a cheap alloy wheel repair kit from Halfords because its a different type of filler for wheels apparently, one with metal bits in i'll have you know, and some E-Tech alloy spray paint & laquer off of E-Bay. I started by sanding down the alloys with 100 grit i think to attack the corroded and pitted areas which quickly turned into the whole wheel. I then scuffed over the faces with some finer grade stuff, lets go for 800 grit, might have been 400, I tend to rub my finger over it and "feel" for the right courseness, its one of my many particular sets of skills that i use when someone i know is in danger. Anyway moving on, this is what it looked like part way through: I then, once i was happy i had a corrosion free, fairly smooth finish set about washing and decontaminating them. Maybe i should have done this first i hear you ask? But my thought process was if i'm sanding plenty of laquer and/or paint/primer off surely this gets rid of anything sat on top be it muck/iron/salt/ketchup/and even the orange powder from cheesy watsits that will stick to anything. So realy all the fallout remover was cleaning up was the face and spokes, but it still got rid of a decent amount: Now i'm thinking what your thinking, that looks like before the sanding stage... Maybe it was, I honestly can't remember as its 2/3 months later, anyhow, it does prove I did both sand and decontaminate, If you do this to your own wheels, Ill let you decide what comes first. One thing I can catagorically state for certain is i put the paint on in the correct order, Primer first, then colour coat, then Laquer, I would stress to everyone it's imperitive you do them in that order! So at this stage i realised that I had no need for the £15 wheel filler as the small amounts of kerb rash sanded out and blended in with the rest of the rim on each wheel and only a perfectionist would tell close up. With that little win, I went onto the primer, again as this is certainly no tutorial but for the 3 people reading this who might want to try this at home, the primer was a special one that can be used on bare metal and alloy, can't remember the name and can't be arsed googleing it but its also sold at Halfords. Its just come to me, etch primer, so not that special but different to other primers obviously. Anyhow heres the aftershot of 2 coats of primer, I masked the tyres up as it would have been a chew to remove them. Another small win was the PS4 tyres have a nice bead/groove that you can tuck the masking tape into and still leave the full rim of the wheel showing for paint, Other tyres may have this, you will have to check with your current provider or subscription service to see if they offer this VIP feature. I hear Linglongs do also offer this feature as they are constantly heading into kerbs resulting in kerbrash and dents. Onto the Main Paint, and I had 2 cans of satin Gold and 2 cans of Satin Laquer. I thought this would be enough for 4 wheels but it wasn't realy. It was enough for a light first coat and one full second coat but the barrells definately needed another coat, I focused on getting the faces presentable as obviously thats what you look at. (unless your a rear kind of guy, and i'm not knocking that, but you'll be dissapointed with these) joking aside, it does need another can for anybody else doing this but they still came up decent. Laquer was the same story, 2 cans did 2 coats but realy could have done with a third. This was how they looked at the end. I then purchassed a bottle of the excellent C5 wheel armour and gave them a coat of that, left to cure for 2/3 months (not strictly nessacerry but I have only just fitted them to the car today for winter) so its had a while to solidify and hears how the car looks with them on, please with the result for the outlay of around £60 but it also show off the shocking offset of the standard wheels especially on the rear. So Moving on... although this was also sometime over the summer so it could quite easily be moving backwards, I needed some new pads as the Carbonne Lorraines were coming to the end of their life. They had served me well over last couple of years, excellent stopping power but the big negative is massive amounts of dust/fallout that if not tackled straight after use can melt its way onto your wheels and i ended up scratching it off on several occasions. So what to go for, well as i mainly do sprints and spirited driving I didn't need a hardcore track pad but also needed something better than stock. So to much dissaproval i'm sure i went for a cheap option of EBC Yellowstuff Pads At around £110 for fronts and £80 for rears they are on a par with most "OEM type" options but promise that extra bite and temperature control of an occasional track pad. I have to say after a few months and hillclimbs using them they suit me perfectly. Time will tell how long they last but they're good from cold, little dust (compared to my CL6 pads) no squeaks and not overheated yet, although I don't do more than 4/5 heavy brakings in a row. low to medium brake pressure, I would say they are identical to the Carbonne Lorraines, its only when your planting your foot that they might lack the outright friction of a race pad and probably outright heat managment. I then decided with the wheels off and as it was summer (did we get a summer this year?) to stiffen up the anti-roll bars so I was on the softest setting on the Eibachs at both front and rear which is recommended for wet handling but as there was achance we might get a dry day or 2 during July & August I put the front to stiff and rear up a notch to medium. Very easy to do for anyone who hasn't done it before, all you need is a 14mm and 17mm spanner and your away. Actually thats incorrect, you need to have adjustable anti-roll bars and droplinks for a start, and other droplinks may need different size spanners and you need to jack up the front or rear (in the centre) so their is no preload on them, but apart from that its straight forward, pic below: Next up the Harewood hillclimb report for second half of the season and final results I hope your as excited to read it as i will be writing it, i know....... the tension.... its like waiting for the dentist to start his drill. kill me now...
- 269 replies
-
- 3
-
-
- waxandshine
- hillclimb
- (and 2 more)
-
Its the covid price. I have spoke to so many people recently that have had a car a couple of years and have just sold it for more than they paid (all manner of cars) that being said, does seem way OTT but like everything in life, its value is what someone is willing to pay for it.
-
I have done a fair amount of geo setup on the zed. The factory caster is around 8deg, which is way over “most road cars” that run around 4. With my eibach adjustable camber arms (top arms) they allow for changing the caster by around 1 deg each way, i have had to reduce mine slightly to get back in spec. I struggle to think how changing top arms for others designed for a 350z can take 8deg off. I havent seen the moog ones but they will prob be handed. Are you sure they are on the correct side? the other thing to check is toe, if you have a fair amount of toe out, it will make the car wonder off line (but does help turn in/cornering ) like you have experienced. I have never run toe out on rear so unsure if that would effect self centring even if front is ok. You really need to get a full geo/alignment done and see what the numbers are before second guessing.
-
It will be the pumps that have gone. 2 seperate pumps for front/back washers that are next to each other connected to reservoir bottle on drivers side. Mine both packed in at same time, seems highly unlikely but others have had same thing. The headlight washers are operated by pump on opposite side and these hardly ever fail. Luckily you can get the pumps cheap. Blueprint ones are about £20 each, oem are around £40-50 i think. Got mine from clarke motorsport
-
Sorry, won’t be able to make it on 29th as i have a hillclimb event booked. Not had any correspondence yet though or ticket from organisers.
-
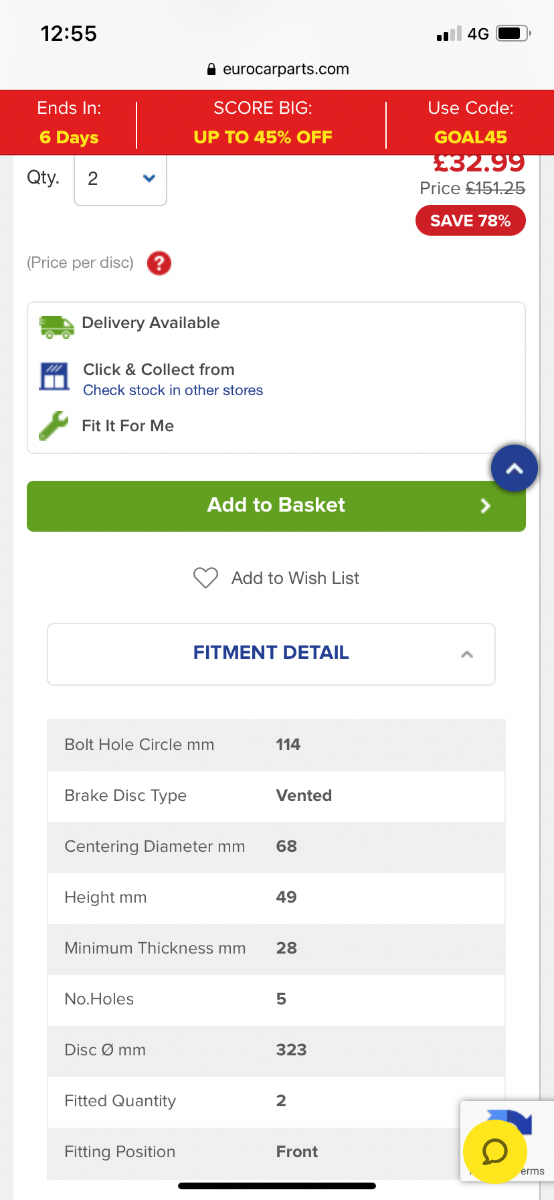
I did for my 2008 uk zed and it still came up with this. Unfortunately for me i am after some cheap rear discs as my pads are eating through rear discs (branded aftermarket) like cake but they have not made the same error with rear discs so just passing this on for anyone in need of replacement front discs. As you say it may be too good to be true but as you can collect them buyers can always check the size when they pick up from store.
-
Not sure Alex, when you click on fitment details it shows this
-
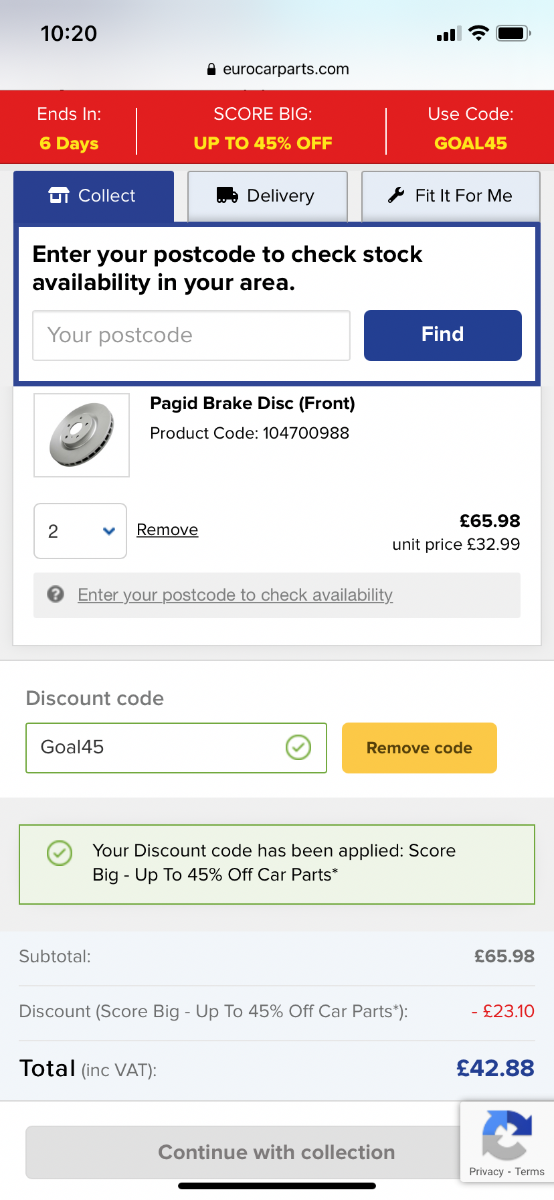
For anyone wanting some “oem type” front discs i think eurocarparts may have made a mistake or want rid of a load, they come up way cheaper than the other front/rear disc options, they are brembo fitment and with current discount code applied are just £42 pair. See screenshot below. Collect from your local store as well.
-
I have a lightweight lithium battery so don't know if this will be any help but voltage when engine off normally reads between 13.4 and 13.9 (it has a digital display on battery so you can check anytime which is useful) in the car on the pod gauge with engine running today it read exactly 14v
-
Yeah, the atom was a different beast, very go kart like and rapid. The lack of power steering is very noticeable having never driven a car (although in the atom thats a loose term) without it. And the generic mid range tyres means the instructor was flapping as soon as he realised i wasn't going to tootle along. The sound advice from him though was drive it smooth. When i spun it was because i turned in too quickly, back end let go and unlike the other cars you have zero aids to save you from looking like A- a hooligan or B- an amateur you cant really save it either as the steering is too heavy and unlike in a go kart your going 70mph not 20mph i would love to have a proper go though with track tyres on a track with run off to see exactly what the limits are. You will enjoy it Stu even if the others will leave you a bit underwhelmed.
- 269 replies
-
- 1
-
-
- waxandshine
- hillclimb
- (and 2 more)
-
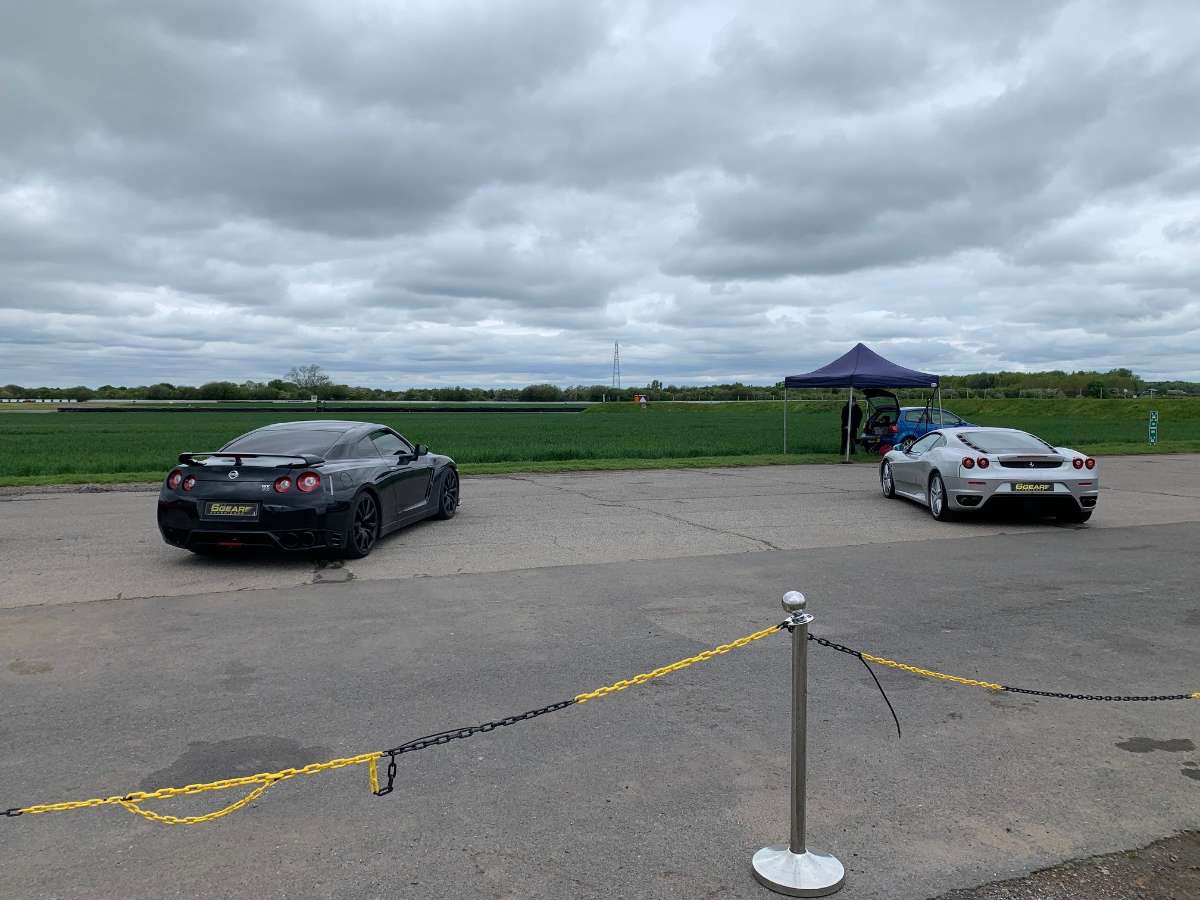
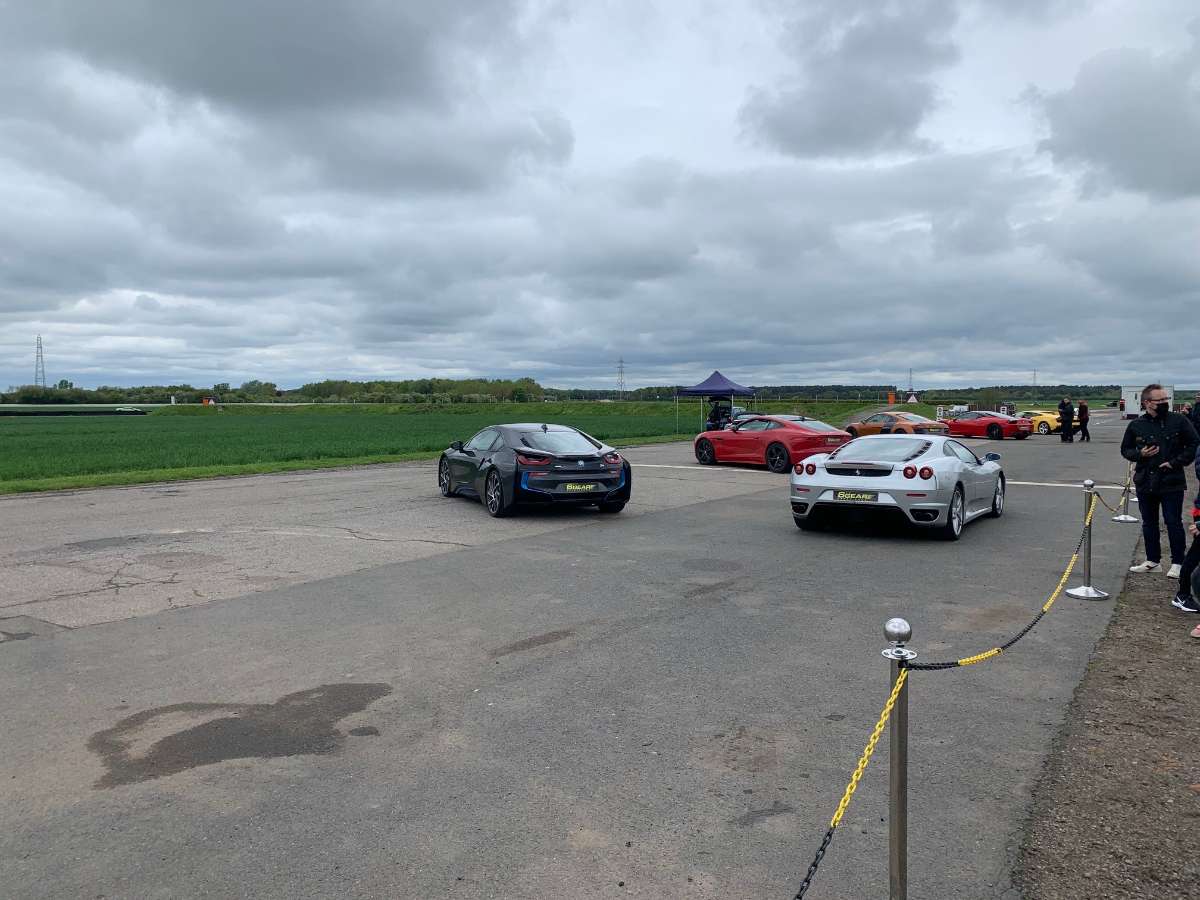
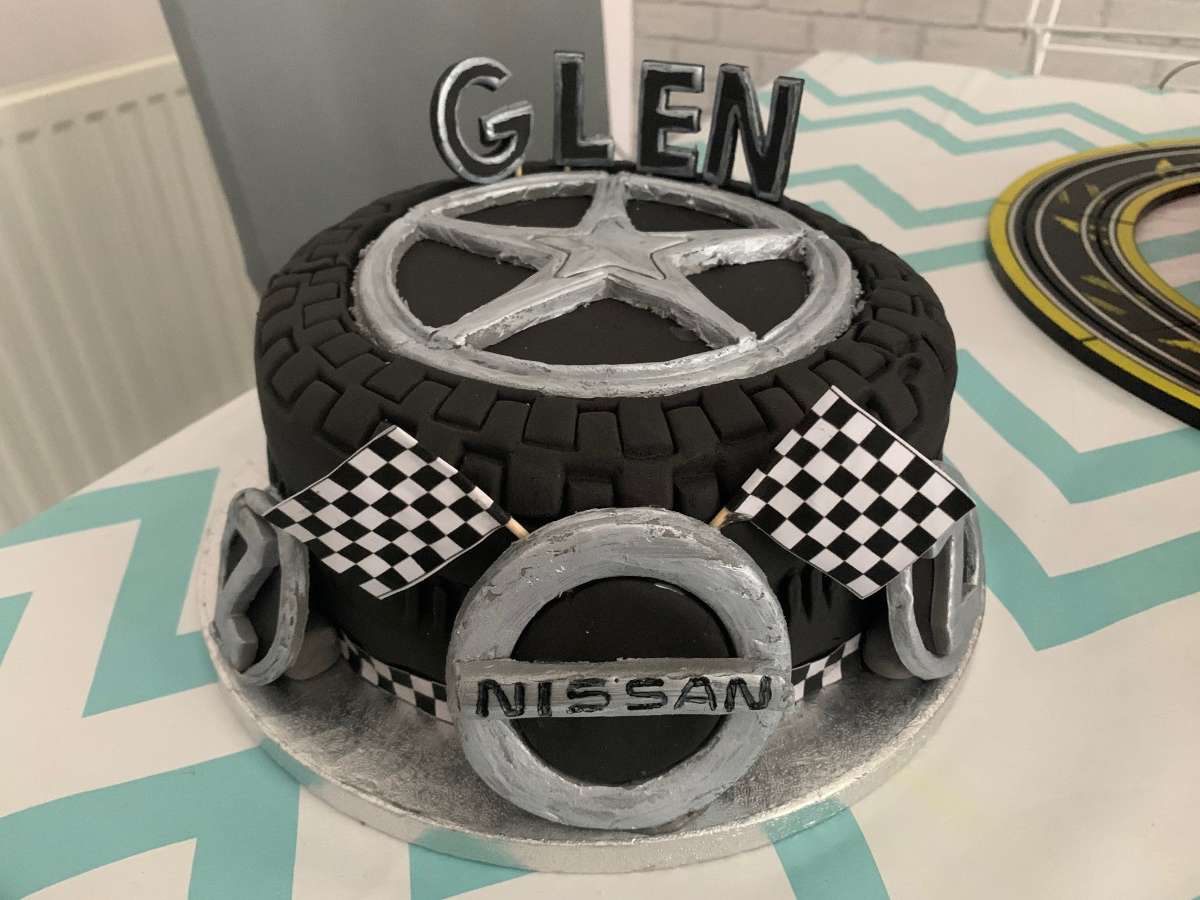
Lets have a little update.... Not much happeened for the first few months of the year during another lockdown but April arrived and so did my 40th birthday. Could not do much as restrictions were in full force but i did get this cake! Then a few days later it was the first hillclimb of the year at Harewood, no spectators or catering but it was still good to get out, stretch the Zed and chat to other petroheads. It was nice weather but bitterly cold as you can see from the picture below, there had been a snow flurry through the night (you can make out the snow topped hills in background) and during the day we had all weathers, rain, snow, sun and cloud. Don't think it got above 5 degrees all day so the tyres were never working at optimum but luckily it was the same for everyone. I was ready to take up battle with Terry once more in his rapid Talbot Sunbeam but unfortunately for him, he could only manage one timed run as he had misfire issues so that put pay to his chances leaving me to take the win in a mediocre 65.63 As mentioned, the track/tyre temp was too low to maximize the Zed and my starts were as usual horrific. I did manage to get a PB in the last sector, steepest part of the track so obviously the cold air did help the intakes and raw power. 1st 350z 65.63 2nd Porsche Cayman S 66.22 3rd Mini JCWorks 66.56 4th Talbot Sunbeam 67.02 Then came the May double header weekend and as many of you will know, much of May has been a washout, It had been P***ing it down all week and was forcast >95% rain for Saturday so friday night I stuck the rays wheels back on with the PS4 tyres, I decided to take the SSR wheels with the Semi slicks on just in case the iphone had got it wrong (and it wouldn't be the first time) Unfortunately the Greater than 95% chance resulted in it absolutely hammering it down all day. I opened the curtains in the morning saying thank god i had put the road tyres on. Forgot to say, what a job getting 4 wheels in the Zed along with all my other gear for a race day but it just squeezed in, 2 tyres on passenger seat leaves about half an inch of room to select first gear, wheel in boot, normal position then another balancing on speakers housing and resting against back of seats and everything else crammed in around them. This was the scene at Harewood for all of Saturday: The picture doesn't really show just how awful it was for everyone, especially the marshalls who were heros on the day. There were actually less "incidents" (crashes) than normal as i think everyone was more intent on trying to stay dry and keeping the car in one piece than actually racing. So with all that and my abysmal history in the wet, I was bricking it. Most people including me were over 80 secs or worse for practice, some were struggling to register a time as it was over the 99.99 on display. But the Michellin PS4 tyres gave me an unexpected confidence in the wet and sure enough i got faster and braver with each run culminating in the last 2 runs registering in 71 secs. I finished feeling that was the best i could do on the day and I think my previous best full wet time (with wet track) was 78 secs with semi slicks so can vouch for what many of you guys may already know that a premium road tyre is better in the wet than a semi slick, and also having driven them in the dry, confirm that the PS4 are a great all rounder. My best time also meant i sneaked the win by just a tenth second and continued my good start to the season. 1st 350z 71.04 2nd BMW M3 71.15 3rd Polo GTI 72.52 4th Mini JCWorks 74.09 Onto the Sunday (9th May) and conditions were forecast to be much better, it was damp to start the day but gradually warmed up and dried out meaning the afternoon runs were approaching optimal if never quite getting there. I did the first run on the PS4s but like everyone else, realising the track was drying rapidly, I put the extreme tyres/wheels on for the timed runs. Terry was back in the fold after fixing his mis-firing engine and we were joined in battle by no less than 7 Porsches' (don't ask me which models, they all look the same..... lame old joke) no but even the drivers (some in the owners club) were asking each other what year/model they were as they had no idea, one thing i did know is that the GT3 that showed up looked mega quick, with its carbon brakes and calipers (a very expensive option, as quoted by the owner) that only just squeezed into the 20" rims it was reassuring to find out he would not be gunning it (or so he told us) It turned out that battle for the win was once again between me and Terry and it went right to the wire, my second run beating his 4th run by just 8 hundreths of a second, its getting like F1 now, they made need to upgrade to thousands second timing! As i held my breath in anticipation of what Terrys last time was, he looked down at the floor and told me I had just pipped him (or held on as i saw it) so a 3rd win on the spin, just. It will be neck and neck every time and Terry won most of the battles last year so i will take this while i can. Luckily @Kieran O'Quick is not competing this year of it would have been another load of second places. Unfortunately with covid restrictions there are no trophies presented but i'm not really fussed. Whats more important is trying to finish in the top 10 at year end (this is out of all competitors, all classes) something which Terry and I have been trying to do for last few years, its going to be very hard but i am currently lying 8th at this early stage so will just keep on giving it everything. 1st 350z 64.77 2nd Talbot Sunbeam 64.85 3rd Porsche GT3 67.95 4th Porsche 911 68.82 On that subject, my starts are always one of the slowest so I thought i would try the ARC launch control feature and see if that offers any help moving forward. Now only one problem with this, and it was a significant one, in that I don't have any cruise control buttons anymore after putting the aftermarket steering wheel and hub on, so I looked online at possible solutions, it turns out that every option requires you to use the cruise module and most people use a braket to go on the boss and then mount the cruise button/module to that. In my opinion it looks gash and i am concerned that in the heat of the moment you could whack them with your knee as i have the wheel in the lowest position. So i searched some more and found that some people have re-wired and routed the module to somewhere else in the cabin, be it cutting a hole in the dash or using the centre console or replacing the heated seat controls. It was all too involved/barbaric for me so I decided to mount it in the blank off panel i had installed recently just below the other blank off for the sat nav. This meant i was not butchering any OEM panels and i had easy access to it as it just meant unscrewing 2 screws rather than half the interior. I could do a full post on just how you re-wire the cruise buttons somewhere else but thats for another day, let me just say i had lots of conflicting info online but I did find one useful post online somewhere which explained which connector the cruise is behind the steering wheel and which colour wire runs to the ecu (or wherever they go) and how they corolate to the colours on the wires od the cruise buttons, as the wires are all different colours, makes it very cofusing, then throw into the mix 4 core wire to use to run to new point in the car and you have for example- pink wire from connector, soldered to blue wire on 4core cable soldered to green/yellow wire on cruise module (and you have 4 to do) so what i would say to anybody trying to do this, triple check everything and write it all down on some paper before you start soldering/heat shrinking. regardless to all that I did it and it worked, i took the car out for a spin and cruise works again and map changing works, all ready to get the ARC features loaded on are Horsham next week. And on that subject, the 2-step launch control works by setting the lower rev limit while stationary then reverts to the normal rev limit when you release the clutch but i read somewhere that you can keep the artificial (launch) limiter stay on upto a certain speed? Jez did not know about this and every video online shows the revs shoot up as soon as moving, but i found this online for arc setting and it does state under the launch control bit a vehicle speed which defaults to 0.5mph I am hoping this can be adjusted to say 10mph which i think would massively help my launches as we start on concrete at Harewood with very little grip so if the car can hold the revs at say 2.5k or 3k until 10mph when your rolling i think it would work better. Like i said, not sure if this is possible but will mention again to horsham next week and update you guys. Final thing to update was as part of my Birthday presents i got a supercar expierence day which I did today. I selected a Porsche 911 (don't you dare ask me which one! lol) a Lamberghini (LP640? or something) a Nissan GTR (as its the Zeds big brother) and the only one i wwas actually excited about, the Arial Atom. Well my expectations (or lack of ) were met by all 4 cars. The lambo, as in previous supercar days i have done, was the most in tune with my driving style, felt the most connection between my buttocks, hands and the road and confirmed to me if i ever win the lottery that I would definately visit their showroom. The Porsche was too numb, and the GTR far too heavy/wallowy for the track at Blyton. incidently as you may know, in order to cater for all abilities and weather they run the cars with all assists on and crappy avon all weather tyres which severly limit the fun for a proper drive, indeed I had it said to me numerous times throughout the day, watch your speed, this is not a track day, its an "experience" day. All 3 of those cars left me feeling like in their current trim/tyres my zed would be faster round Blyton. The Atom on the other hand was a different beast, even with crappy tyres it was like a go-kart on steroids. The acceleration and pick up in any gear was supreme, instructor told me to leave it in 5th and concentrate on driving smooth but i couldn't help but change down, even with that though 4th was fine for even tight corners, the lack of any computer aided assistance, no abs, no power steering is just up my street and i was getting right in the groove until i went out wide to take a corner at full speed, turned in and the back end went round spinning me out. I had found either the flaws of the crappy tires or the limit of my ability. needless to say the instuctor, who was no spring chicken, was breathing very heavily and asked me to return to the pits, Job done. So would i recommend the day, yes and no, for true racers its a waste of time, for someone looking to buy one of the cars its a good way to explore the car much more than you could on a test drive, for Jo Public, its great as they were only driving at 5 tengths and they get their picture taken and feel great. Its put me off ever getting a GTR as they just don't suit my driving style and what i want from a car, think an elise would be be much better for me for the road or an atom as a track day toy, I don't get a thrill from planting my foot and having my eyeballs go to the back of my head only then to have to slam on the brakes and return my eyeballs to the the correct sockets as i can only take the corner at 40mph. would rather sacrifice some out and out speed/power for more nimble cornering and apex speed but each to their own as they say. anyway some pics of the cars at Blyton: So next up will be visiting Horsham Developments as previously mentioned to get some new poly bushings and tie rods, Brake fluid flush and the ARC features added (flat foot shifting, launch control) FFS, no not that FFS, flat floot shifting! will take some serious muscle memory refigeration i expect. And then another round of Harewood at start of June. Ah, also got car aligned before season and got them to check weight, corner balancing. I was pleasently suprised. The car weighed in at 1503kg (with me sat in but very little fuel) 50.7% cross weight again close enough for me that no tweaking was worth the while but also confirmed the front weight bias, didn't take a picture but should have done, i can remember the front axle being over 400kg each side, maybe 430 and the rear 300 and something each side, 330? which again doesn't help with traction off the line but i suppose from factory with the spare wheel and tools, plus standard back box it would have been a bit closer to the perfect 50/50.
- 269 replies
-
- 3
-
-
-
- waxandshine
- hillclimb
- (and 2 more)
-
Lets have a little update.... Not much happeened for the first few months of the year during another lockdown but April arrived and so did my 40th birthday. Could not do much as restrictions were in full force but i did get this cake! Then a few days later it was the first hillclimb of the year at Harewood, no spectators or catering but it was still good to get out, stretch the Zed and chat to other petroheads. It was nice weather but bitterly cold as you can see from the picture below, there had been a snow flurry through the night (you can make out the snow topped hills in background) and during the day we had all weathers, rain, snow, sun and cloud. Don't think it got above 5 degrees all day so the tyres were never working at optimum but luckily it was the same for everyone. I was ready to take up battle with Terry once more in his rapid Talbot Sunbeam but unfortunately for him, he could only manage one timed run as he had misfire issues so that put pay to his chances leaving me to take the win in a mediocre 65.63 As mentioned, the track/tyre temp was too low to maximize the Zed and my starts were as usual horrific. I did manage to get a PB in the last sector, steepest part of the track so obviously the cold air did help the intakes and raw power. 1st 350z 65.63 2nd Porsche Cayman S 66.22 3rd Mini JCWorks 66.56 4th Talbot Sunbeam 67.02 Then came the May double header weekend and as many of you will know, much of May has been a washout, It had been P***ing it down all week and was forcast >95% rain for Saturday so friday night I stuck the rays wheels back on with the PS4 tyres, I decided to take the SSR wheels with the Semi slicks on just in case the iphone had got it wrong (and it wouldn't be the first time) Unfortunately the Greater than 95% chance resulted in it absolutely hammering it down all day. I opened the curtains in the morning saying thank god i had put the road tyres on. Forgot to say, what a job getting 4 wheels in the Zed along with all my other gear for a race day but it just squeezed in, 2 tyres on passenger seat leaves about half an inch of room to select first gear, wheel in boot, normal position then another balancing on speakers housing and resting against back of seats and everything else crammed in around them. This was the scene at Harewood for all of Saturday: The picture doesn't really show just how awful it was for everyone, especially the marshalls who were heros on the day. There were actually less "incidents" (crashes) than normal as i think everyone was more intent on trying to stay dry and keeping the car in one piece than actually racing. So with all that and my abysmal history in the wet, I was bricking it. Most people including me were over 80 secs or worse for practice, some were struggling to register a time as it was over the 99.99 on display. But the Michellin PS4 tyres gave me an unexpected confidence in the wet and sure enough i got faster and braver with each run culminating in the last 2 runs registering in 71 secs. I finished feeling that was the best i could do on the day and I think my previous best full wet time (with wet track) was 78 secs with semi slicks so can vouch for what many of you guys may already know that a premium road tyre is better in the wet than a semi slick, and also having driven them in the dry, confirm that the PS4 are a great all rounder. My best time also meant i sneaked the win by just a tenth second and continued my good start to the season. 1st 350z 71.04 2nd BMW M3 71.15 3rd Polo GTI 72.52 4th Mini JCWorks 74.09 Onto the Sunday (9th May) and conditions were forecast to be much better, it was damp to start the day but gradually warmed up and dried out meaning the afternoon runs were approaching optimal if never quite getting there. I did the first run on the PS4s but like everyone else, realising the track was drying rapidly, I put the extreme tyres/wheels on for the timed runs. Terry was back in the fold after fixing his mis-firing engine and we were joined in battle by no less than 7 Porsches' (don't ask me which models, they all look the same..... lame old joke) no but even the drivers (some in the owners club) were asking each other what year/model they were as they had no idea, one thing i did know is that the GT3 that showed up looked mega quick, with its carbon brakes and calipers (a very expensive option, as quoted by the owner) that only just squeezed into the 20" rims it was reassuring to find out he would not be gunning it (or so he told us) It turned out that battle for the win was once again between me and Terry and it went right to the wire, my second run beating his 4th run by just 8 hundreths of a second, its getting like F1 now, they made need to upgrade to thousands second timing! As i held my breath in anticipation of what Terrys last time was, he looked down at the floor and told me I had just pipped him (or held on as i saw it) so a 3rd win on the spin, just. It will be neck and neck every time and Terry won most of the battles last year so i will take this while i can. Luckily @Kieran O'Quick is not competing this year of it would have been another load of second places. Unfortunately with covid restrictions there are no trophies presented but i'm not really fussed. Whats more important is trying to finish in the top 10 at year end (this is out of all competitors, all classes) something which Terry and I have been trying to do for last few years, its going to be very hard but i am currently lying 8th at this early stage so will just keep on giving it everything. 1st 350z 64.77 2nd Talbot Sunbeam 64.85 3rd Porsche GT3 67.95 4th Porsche 911 68.82 On that subject, my starts are always one of the slowest so I thought i would try the ARC launch control feature and see if that offers any help moving forward. Now only one problem with this, and it was a significant one, in that I don't have any cruise control buttons anymore after putting the aftermarket steering wheel and hub on, so I looked online at possible solutions, it turns out that every option requires you to use the cruise module and most people use a braket to go on the boss and then mount the cruise button/module to that. In my opinion it looks gash and i am concerned that in the heat of the moment you could whack them with your knee as i have the wheel in the lowest position. So i searched some more and found that some people have re-wired and routed the module to somewhere else in the cabin, be it cutting a hole in the dash or using the centre console or replacing the heated seat controls. It was all too involved/barbaric for me so I decided to mount it in the blank off panel i had installed recently just below the other blank off for the sat nav. This meant i was not butchering any OEM panels and i had easy access to it as it just meant unscrewing 2 screws rather than half the interior. I could do a full post on just how you re-wire the cruise buttons somewhere else but thats for another day, let me just say i had lots of conflicting info online but I did find one useful post online somewhere which explained which connector the cruise is behind the steering wheel and which colour wire runs to the ecu (or wherever they go) and how they corolate to the colours on the wires od the cruise buttons, as the wires are all different colours, makes it very cofusing, then throw into the mix 4 core wire to use to run to new point in the car and you have for example- pink wire from connector, soldered to blue wire on 4core cable soldered to green/yellow wire on cruise module (and you have 4 to do) so what i would say to anybody trying to do this, triple check everything and write it all down on some paper before you start soldering/heat shrinking. regardless to all that I did it and it worked, i took the car out for a spin and cruise works again and map changing works, all ready to get the ARC features loaded on are Horsham next week. And on that subject, the 2-step launch control works by setting the lower rev limit while stationary then reverts to the normal rev limit when you release the clutch but i read somewhere that you can keep the artificial (launch) limiter stay on upto a certain speed? Jez did know about this and every video online shows the revs shoot up as soon as moving, but i found this online for arc setting and it does state under the launch control bit a vehicle speed which defaults to 0.5mph I am hoping this can be adjusted to say 10mph which i think would massively help my launches as we start on concrete at Harewood with very little grip so if the car can hold the revs at say 2.5k or 3k until 10mph when your rolling i think it would work better. Like i said, not sure if this is possible but will mention again to horsham next week and update you guys. Final thing to update was as part of my Birthday presents i got a supercar expierence day which I did today. I selected a Porsche 911 (don't you dare ask me which one! lol) a Lamberghini (LP640? or something) a Nissan GTR (as its the Zeds big brother) and the only one i wwas actually excited about, the Arial Atom. Well my expectations (or lack of ) were met by all 4 cars. The lambo, as in previous supercar days i have done, was the most in tune with my driving style, felt the most connection between my buttocks, hands and the road and confirmed to me if i ever win the lottery that I would definately visit their showroom. The Porsche was too numb, and the GTR far too heavy/wallowy for the track at Blyton. incidently as you may know, in order to cater for all abilities and weather they run the cars with all assists on and crappy avon all weather tyres which severly limit the fun for a proper drive, indeed I had it said to me numerous times throughout the day, watch your speed, this is not a track day, its an "experience" day. All 3 of those cars left me feeling like in their current trim/tyres my zed would be faster round Blyton. The Atom on the other hand was a different beast, even with crappy tyres it was like a go-kart on steroids. The acceleration and pick up in any gear was supreme, instructor told me to leave it in 5th and concentrate on driving smooth but i couldn't help but change down, even with that though 4th was fine for even tight corners, the lack of any computer aided assistance, no abs, no power steering is just up my street and i was getting right in the groove until i went out wide to take a corner at full speed, turned in and the back end went round spinning me out. I had found either the flaws of the crappy tires or the limit of my ability. needless to say the instuctor, who was no spring chicken, was breathing very heavily and asked me to return to the pits, Job done. So would i recommend the day, yes and no, for true racers its a waste of time, for someone looking to buy one of the cars its a good way to explore the car much more than you could on a test drive, for Jo Public, its great as they were only driving at 5 tengths and they get their picture taken and feel great. Its put me off ever getting a GTR as they just don't suit my driving style and what i want from a car, think an elise would be be much better for me for the road or an atom as a track day toy, I don't get a thrill from planting my foot and having my eyeballs go to the back of my head only then to have to slam on the brakes and return my eyeballs to the the correct sockets as i can only take the corner at 40mph. would rather sacrifice some out and out speed/power for more nimble cornering and apex speed but each to their own as they say. anyway some pics of the cars at Blyton: So next up will be visiting Horsham Developments as previously mentioned to get some new poly bushings and tie rods, Brake fluid flush and the ARC features added (flat foot shifting, launch control) FFS, no not that FFS, flat floot shifting! will take some serious muscle memory refigeration i expect. And then another round of Harewood at start of June. Ah, also got car aligned before season and got them to check weight, corner balancing. I was pleasently suprised. The car weighed in at 1503kg (with me sat in but very little fuel) 50.7% cross weight again close enough for me that no tweaking was worth the while but also confirmed the front weight bias, didn't take a picture but should have done, i can remember the front axle being over 400kg each side, maybe 430 and the rear 300 and something each side, 330? which again doesn't help with traction off the line but i suppose from factory with the spare wheel and tools, plus standard back box it would have been a bit closer to the perfect 50/50.
- 269 replies
-
- 2
-
-
- waxandshine
- hillclimb
- (and 2 more)
-
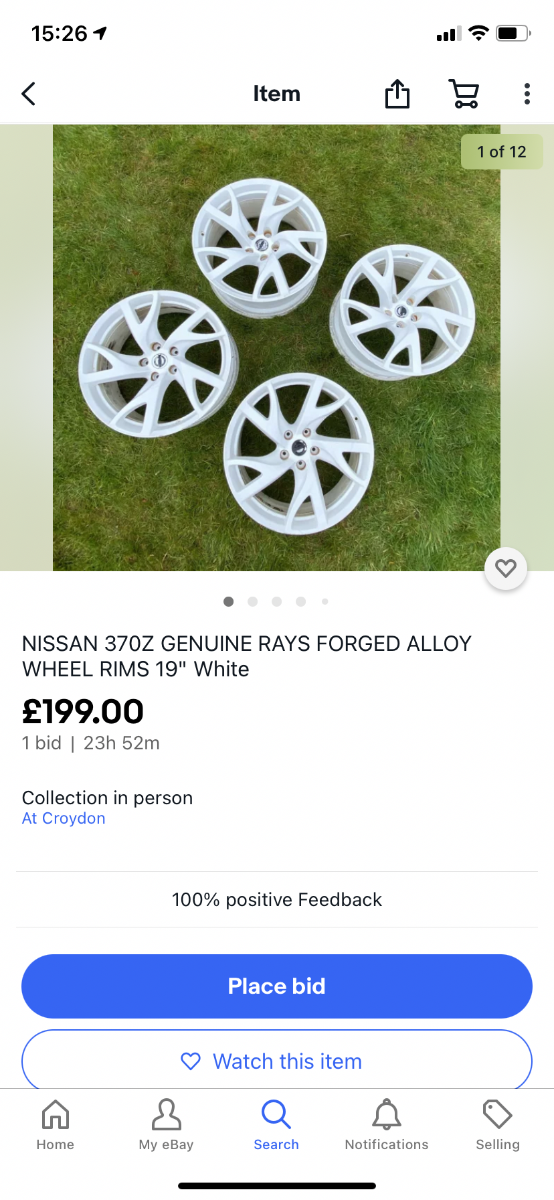
Cheap set of 370 rays for someone, less than 24hr to go
-
Are you wanting oem stuff or aftermarket? I have just about everything except the wiring pulled out of my 350. oem stereo, sat nav, bluetooth unit, sub, amp, speakers.