rothers2901 Posted August 31, 2012 Posted August 31, 2012 Off with the wheels. Remove the bumper. This easily done by either removing the wheel liners to acccess the 3x10mm bolts or it can be done by just prising back the liner where the bumper and wing meet and unscrewing them. Undo the under tray along the front edge and remove the 6 plastic retaining clips along the top edge of the bumper. (There is a Guide for this proceedure) First test fit. (Tip) mask off the front of the wings to protect from any damage especially if your working on your own. The fit is very good for a replica and need very little work if any. Liners now removed as it was a little easier to work round without them in place. Whilst the bumper is in position, clamp it in place and get a small pencil and scribe the position of the two locating holes these will be needed as your datum points for the rest of the fit. You can see the outlines for the original holes but as each bumper is going to be slightly different it's best to mark out the new positions and use them. I used a 10mm wood drill bit as these have a sharp centre point to prevent slipage. Position the top edge of the bumper along the locating holes. Close the bonnet and check the leading edge with the bonnet line. Once happy with the position, scribe a datum line and use this to transfere the hole positions onto the bumper. (10mm wood bit used) The next step was to set the reflectors onto their right position. This is very simple. Lay the reflector in it's positon and transfere the fixing holes onto the bumper (6mm drill). There may be a little grinding of the bumper to get the perfect fit. The head light washer positions were next. (time and care Required here. Mearsure twice cut once) I found that the washer apetures bottom edge ran parrallel with the top edge of the reflector which made the positioning a lot easier. A square was used to transfere the veritcal line which was in may case was 30mm from the corner of the reflector. The bottom edge of the washer apeture was 50mm up from the top edge of the reflector (see Picture) (These measurements are individual to this bumper and may vary to others but it's a good starting point). A simple cardboard template was scribed from the original bumper and used to trace the outline for the new jet location. A 10mm drill bit was used to remove material in the corneers of the opening and a jig saw with a fine toothed blade to cut out the remaining material. It is best to air on the small side when cutting out and remove any excess material to get the perfect fit. (You can always remaove material but cant put it back). Pcictures 3, 4 &5 show the washer jet in position. It's worth noting that the bumper needs to be a specific thickness to allow the washer jet retaining clips to hold it in place. I needed to grind away excess material for this to happen. The washer jet housing bracket has been integrated into the bumper so a 6mm driil bit was used drill out the locating holes and bracket fitted. The next 4 pictures just show the washer jets in place. The next step was to set to number plate and towing eye locations. I have decided to go with the original setting. The towing eye was drilled using a 40mm hole cutter. You will need to drill the retaining holes in the bottm leading edge of the bumper for the under tray i used a 10mm dril bit for this. The bumper is now off at the painters being painted. I will update the thread when it returns. Quote
Wasso Posted August 31, 2012 Posted August 31, 2012 Great guide Bet you can't wait for that to be painted Quote
rothers2901 Posted August 31, 2012 Author Posted August 31, 2012 Great guide Bet you can't wait for that to be painted Christmas will be early this year Quote
Niko Posted August 31, 2012 Posted August 31, 2012 Very nice, where did you get the bumper from? Quote
Ricey Posted August 31, 2012 Posted August 31, 2012 Takes a pair of balls to attack something like that on your own........good effort that man! Quote
rothers2901 Posted August 31, 2012 Author Posted August 31, 2012 Very nice, where did you get the bumper from? RT-Performance. A big thanks to Taras and the team. It only took a week from order, manufacture to arrival. Quote
rothers2901 Posted August 31, 2012 Author Posted August 31, 2012 Takes a pair of balls to attack something like that on your own........good effort that man! Took them out and locked them away till it was done. Like i said earlier measure twice and cut once. The fit is that good if you get it in position first, clamp it, and then commit to the cut/drill Quote
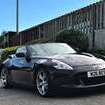
rothers2901 Posted October 2, 2012 Author Posted October 2, 2012 Spoiler back from the body shop. Just love the finish. It took a little more work than expected although the fit is very good the surface required some levling and filling to get the required finish. Metal mesh grill supplied by Zmanalex (thanks). The self adhesive fasteners supplied required extra help so fastened them with the help of araldite. Attached and fitted the light washers. Finished, Grill, badge and side reflectors. Finally fitted. Quote
Beau Posted October 2, 2012 Posted October 2, 2012 Looks very nice, good job Personally, I wouldn't have bothered with the washer jets, so that I could get that smooth look, plus I dont remember the last time I've ever used those jets... Quote
rtbiscuit Posted October 2, 2012 Posted October 2, 2012 nice copy, looks pretty good, and the fit is spot on. Quote
rothers2901 Posted October 2, 2012 Author Posted October 2, 2012 Looks very nice, good job Personally, I wouldn't have bothered with the washer jets, so that I could get that smooth look, plus I dont remember the last time I've ever used those jets... It was all to do with the new MOT regulation that have/are comming in regarding HIDS lights. Quote
Wasso Posted October 3, 2012 Posted October 3, 2012 Looks very good indeed Great job although you've forgotten to put your registration numbers and letter back on..... You should know better unless you're looking to avoid the law Quote
rothers2901 Posted October 3, 2012 Author Posted October 3, 2012 You should know better unless you're looking to avoid the law You can never be too careful Quote
Almeida1234 Posted December 2, 2013 Posted December 2, 2013 I be looking to tackle thus next year good write up. Quote

Recommended Posts
Join the conversation
You can post now and register later. If you have an account, sign in now to post with your account.