taras Posted April 22, 2013 Posted April 22, 2013 When Jables came to us wanting to have new sides and rears it was quick to realise that car rest of the car would need a bit of attention too. Liking the charge speed look but not the vents meant that we had to make a custom set for Chris where we've flushed the vents on the skirts and the rear bumper. Chris's zed was turbo charged and was looking a bit tired at the front where it's had a few sprints on the track. Though the engineering was well thought out, the car had lost the ability of being towed without access to the stock tow hook so we linked him up with Kode uk with a TRS tow strap whilst we addressed the front end of the car. In addition, because of the relocated inductions and oil cooler, we felt that the front needed a bit more ventilation. This was how it started off with half the oil cooler exposed and reflector vent's was the only source of inlet. After our consultations, Chris sent me a photoshopped picture of what the desired end result would had looked like. Before: After: The rectangle carbon cold air feed wasn't doing anything as the inlet was no longer there. in essence it was just blowing onto a hard pipe from the intercooler. That was to be removed and filled. The added vents was to mirror the reflector vents and to increase air inlet to both the inductions on both sides and better cooling to the oil cooler which was only half exposed in the main vent. So with all the planning and decisions made, Chris's zed was booked in for our first job at our new bigger unit in Wembley. 1 Quote
evilscorp Posted April 22, 2013 Posted April 22, 2013 Looks much more aggressive and better! The stuck on carbon intake holes dont do the standard bumper much favours. Quote
taras Posted April 22, 2013 Author Posted April 22, 2013 Looks much more aggressive and better! The stuck on carbon intake holes dont do the standard bumper much favours. True. But wait till you see the real thing. So the job spec: Make flushed CS Skirts Make flushed CS Rear bumper Both spray and fit repair rear rolled arches and blend repair front arches and blend bonnet respray Remove and flush scoop on front bumper Remove and repair front lip Cut extra vents Re-mesh all round Install TRS tow hook Paint front grill, front lip and rear insert in black Here are the progress pics. Quote
kiingsi Posted April 22, 2013 Posted April 22, 2013 Cant wait to see the chargespeed kit finished. I have personally always thought it would look a lot better smoothed. Looking forward to the finished product great work Quote
taras Posted April 22, 2013 Author Posted April 22, 2013 yes we think you're not the only one thinking smoothed vents look good. Many like the rear CS mainly for it's exhaust surround. anyway here's more: Quote
GT4 Zed Posted April 22, 2013 Posted April 22, 2013 Good work as usual Taras! I really like the front vents and looking forwards to the finish of the whole kit. Quote
mattross1313 Posted April 22, 2013 Posted April 22, 2013 So those are CS side skirts with the vents covered over...........hmmm!!! I LIKE those Good work guys, car is taking shape. Quote
taras Posted April 23, 2013 Author Posted April 23, 2013 (edited) yes. Basically the vents have been smoothed over giving it a more subtle look. Its a little bit more work for a different look but it works for those who don't want them. Anyway, here's the car painted. Next off will be everything off the car. Edited April 23, 2013 by RT-Performance Quote
Adrian@TORQEN Posted April 23, 2013 Posted April 23, 2013 Oh, Thomas won't like the idea that he has to do my front bumper again! Thomas, faster, faster! Will come and see you today guys, good work! Want the vents as well! Quote
taras Posted April 23, 2013 Author Posted April 23, 2013 Thomas is very happy now with our new baking booth. To him it's like Christmas came early. So back to the bumpers, lip and skirts. First we do the black. Then the orange and clear coat Quote
KC350Z Posted April 23, 2013 Posted April 23, 2013 Great job cant wait to see it all on the car Quote
ph 7 Posted April 23, 2013 Posted April 23, 2013 Really like the cut out bumper, something new and interesting. A black car with a simple line like this would look great, would tie up with the calipers/reflectors/seat trim stritching nicely. Would be subtle in a good way. Quote
Dannyg Posted April 23, 2013 Posted April 23, 2013 This looks sweet Sent from my LT30p using Tapatalk 2 Quote
taras Posted April 23, 2013 Author Posted April 23, 2013 (edited) I can imagine that too ph7. So now that everything is painted, we just had to put it all together again. First off, new mesh and tow strap. And no more cracked rolled arches too Edited April 23, 2013 by RT-Performance 2 Quote
kiingsi Posted April 23, 2013 Posted April 23, 2013 That looks cool think I'm most impressed with the side skirts though. Look really neat Quote
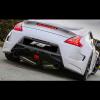
jables Posted April 23, 2013 Posted April 23, 2013 (edited) Huge thanks to Ray, Taras and the other guys at RT, they've done a cracking job. I 'may' have ordered some new 19" wheels to finish this off as the body kit does emphasise the small sized standard RAYS, but for the time being here are a few more snaps. Edited April 23, 2013 by jables Quote
CrumbMC Posted April 23, 2013 Posted April 23, 2013 looks awesome. How much for a set of those smoothed CS skirts delivered? 1 Quote
Oakley350z Posted April 23, 2013 Posted April 23, 2013 Love the rear bumper! Done a good job there RT! Has the car been lowered at all? From the back it looks really low but maybe that's just the bumper? Quote
jables Posted April 23, 2013 Posted April 23, 2013 (edited) Has the car been lowered at all? From the back it looks really low but maybe that's just the bumper? It's sitting on Meister R coilovers on their highest setting (so fractionally lower than stock) but my rear track tyres have dropped it about 20mm due to the 255/35/18 profile. Edited April 23, 2013 by jables Quote
mattross1313 Posted April 23, 2013 Posted April 23, 2013 This looks really really good!! I've always loved the CS rear bumper, still think I prefer it with the vents. The side skirts however looks loads better with the vents smoothed in! This has fast become my favourite side skirt! Quote

Recommended Posts
Join the conversation
You can post now and register later. If you have an account, sign in now to post with your account.