ballistic
-
Posts
387 -
Joined
-
Last visited
Content Type
Profiles
Forums
Events
Gallery
Store
Everything posted by ballistic
-
Hi everyone! 370z 40th Anniversary owner here!
ballistic replied to Kazbatt370z's topic in Introductions & Welcome Messages
any pics for us to enjoy? -
What did you think of the quality?material stitching etc
-
G1en's 95% race car 5% stickers Zed build
ballistic replied to G1en's topic in Member Build Projects
Well, you've started an engine bay theme. Gotta be gold! -
Couldnt agree more; i recent hit the wheels with gtechniq C5, and some long term stuff on glass. But with the paint i enjoy the process. Plus little issues always crop up that need correcting so the 'long term' coating wouldnt last me very long as i would polish it away correcting a defect or something lol. Also, it does seem to me that the very long term protection products do have to sacrifice some gloss for longevity. @ilogikal1 I will look into it mate, thanks. One of the reasons im looking at Perl is that it has multiple uses inside and out.
-
How did i miss this. Looking good. Nice strutbrace. Gonna do a couple more orange bits to compliment? I wasnt aware the HR centre console was a strait swap? Might have to do that too Where did you get the rear indicators? ZLeds?
-
looks good, i cleaned a non-car persons car the other day, and it worked so well on their filthy, brake dust encrusted wheels. Remember the days of wonder wheels and other acids....
-
Looks good, nice and even. I guess if you work them over with a cloth they will become a little more satin? Im in the market for a tyre dressing soon, like Stu ive been waiting forever for my mine to finish. I was thinking CarPro Perl, all round dressing and well rated. BTW if you like Bilt's fallout remover, they have a wheel cleaner which has fallout remover and wheel cleaner in one product. Its very good
-
Ive got some colour match spray paint left so i might give that a go and see how it comes out, if not i would be happy to get one of these if it happens. Either way colour coded > black bung
-
I messaged them, as im ready to order some bits. Got a quick and great reply. I asked if they did anything for the center tunnel and i was suprised with the response. Just waiting on the samples. Hello thereThank you very much for getting in touch with us. Please let us know which item numbers or links you are after, as well as which sample number you are after from the attached colour chart and we can find out the price for you.Alternatively we do offer samples to be sent in the post so you can physically match the colour, here is the link:http://www.ebay.co.uk/itm/Fabric-samples-JF-Customs-/232541803824?hash=item3624925530Regarding the console, we will purchase the console for your model so we can make a template and so will have it ready and listed in 5-10 working days.Best regards
-
Looks good, matches nicely with your dash. What you got going on there? spray or wrap? gonna order this one i think. Just waiting on a reply on best colour match to the Alezan leather.
-
Thats the one im considering (350 version) to deal with the extra power. Let us know how you get on.
-
Yes please, Will be interested in your feedback. What package exactly did you go for?
-
Looks good. TBH i was just thinking of spraying mine with some matching paint i have. What did it set you back? I notice you didnt delete the jet? PS: i recommend using something to repel the rain. I used angel wax H2go, worked well.
-
From everything ive read and seen JWT is right up there. When mine goes thats what i will be getting. Also Adrian is very helpful and will get you everything you need.
-
I still use waffle weave drying towel as thats what i have, work well for dragging or patting method. Dont seem so good for drying where water gathers though. Great otherwise, especially for windows. Ive been wanting to try the plush drying towels, but i try not to buy something unless its replacing something or i dont have. Otherwise it gets out of control lol. As mentioned, care as you would other microfibers, Also try using non-bio/ if poss. @ilogikal1are you using running water and air drying? ceramic coated?
-
It depends on how much time, effort and money you want to put in and what products and tools you have. Can you let us know. Ideally you want a dual action polisher for the best results when it comes to the polishing stage. First thing you need to do is prepare the paint for correction (swirl and defect removal) which will require a thorough decontamination and clean: Pre Wash: 1/ Thorough pressure wash rinse. Youre not just getting the car wet. you want to remove as much dirt as possible with the jet wash. 2/ Optional: Nice if you have it, snow Foam and/or traffic film remover. Allow to dwell for a few minutes, follow product directions 3/ Rinse Basically you are trying to remove as much dirt as possible before making contact with the paint. It will reduce the chances of inflicting any damage during the cleaning. Contact wash: Wash with a microfibre or wool mitt and car shampoo (look up 2 bucket method if you need). If you have a detailing brush you want to work it into areas such as sill, trims and badges etc. Rinse off Decontamination Apply tar remover, especially around arches, bumpers and lower areas, look for trouble spots. Wipe or rinse off (follow product directions). It will be harder to see the tar a black car. Spray on fallout remover, it will break down any iron fallout that has embedded into your paintwork from brakes and general environmental exposure. Rinse off Now onto claying, this is there to remove contaminants of all kinds embedded into your paintwork. The decontamination step previously will reduce the chances of you dragging heavy contaminants across your paint. Think of it like a face scrub. Go slowly with plenty of clay lube. If you drop it get a new piece. Cut a fresh piece every couple panels. Thin slice that you flattened out into a usable shape. It should go yellow and will prob have spots in it. Work the lower parts of the car last. You can also opt for a clay cloth if you want something easier and more forgiving to use. All of this is done to ensure you have the cleanest and best surface you can to start the polishing process to revive the paint, it will enable you to remove the most amount of defects without creating new issues, and will yield the best results. You can skip some stages such as fallout and tar etc. Its all down to how much you want to put in. Main thing is a clean car to start the next stage Paint correction: You have choices here, but from what you have said and the pictures you have two main options: 1) A two stage process, starting with a compund (heavy cut polish) and finishing with a fine polish (finishing polish) 1) The other option is to use a one step polish, they contain heavy cutting abrasives that break down as you polish the area to fine abrasives to give you a finish in one step. The first option will likely yield the best results but is at least twice the time and effort Polish Whether you do it by hand or machine, take your time here. Work in small sections (2x2ft), and strait lines when possible, not circular motions. so up and down and then side to side, 4-6 passes. Then check your work. The more swirls and defects you can remove the better the end result. Some areas may need a second pass. Protection There are a lot of options here but the idea is that you are trying to 'seal' in the finish you have worked to hard to create above. To sum up It may well seem a bit daunting but you can split this over a a few days if you're not driving, weather permitting. So wash and decon one day, next day lightly dust the panel you will work on and start on the polishing. Or wash the car and do the decon step. Then next time you wash do the clay step. Then the next time you wash do the polishing. Honestly its well worth the effort in my opinion, you will love the results of the effort you put in. Its very rewarding and makes the car look so good. Theres plenty of Youtube videos and guides on detailing and loads of helpful people here. Im happy to recommend products for each step or anything else you that im able to help with. Heres my recent thread LOCKDOWN DETAILING . Its not overly detailed but it has some info in there.
-
Down and to the right of the brake fluid cover on an aluminium tag.
-
Gonna do em yourself? @LRF4N I personally prefer yellow or maybe even green or at least a lighter blue. Dark blue might be too subtle behind dark rims and a red car. Unless thats what youre going for, the blue is nice done get me wrong. Just looking at whats around it. Depends on if you want contrast or not
-
The email gives the impression they are not entirely the same? As it stands now
-
Went out for some exercise
-
Looks well done, its all dipped then? What did you do about the texture on the dash? did u need to sand it back?
-
Carbon indeed
-
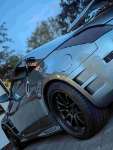
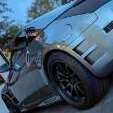
Was out, took a pic Done a bit while in lockdown, loving how its all turned out.
-
Project JDM Whore *Power Enterprise TT Build*
ballistic replied to Ian's topic in Member Build Projects
Especially behind some gloss bacl wheels -
Dear Clien