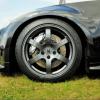
Ogman Posted March 11, 2015 Posted March 11, 2015 (edited) My brother-in-law and I gave the Zed some much needed love with the upcoming show season...I must admit I was really pleased with the results. Products consisted of: Carbon Collective Satsuma Snow Foam Carbon Collective Lusso Shampoo Carbon Collective Mammoth Wash Mitt Valet Pro Bilberry Wheel Cleaner Raceglaze Super Size Detailing Brush Carbon Collective Clay Mitt Dodo Juice Basics of Bling Clay Bar Dodo Juice Born Slippy (Lube for Clay Bar & Mitt) Poorboys Waffle Weave Towel Carbon Collective Panel Prep Surface Cleaner Silverline Silverstorm Rotary Polisher (1500W) Autoglym Paint Pro System (Two-Stage Polishing Kit) Carbon Collective Platinum Paint Coating Carbon Collective Platinum Wheels Coating Carbon Collective Platinum Glass Copious amounts of Microfibre Towels I won't go into too much detail about every step, I'll let the pictures do the talking. However, the steps were as follows: Whole car was snowfoamed to begin with using CC satsuma snow foam. The body was then washed using two bucket method and CC lusso shampoo. Wheels were washed using VP Bilberry wheel cleaner and Detailing brush. Shampoo then rinsed off and not dried (kept the water on the car for use of the clay mitt). Bit of Dodo Juice Born Slippy applied whilst using the clay mitt also helped. I used the clay mitt to do one panel at a time and was rinsing each panel as I went along. I started off with using the clay mitt with a fair bit of pressure on the windows to 'break it in' before using it on the bodywork. For the wheels, exhaust and smaller, more intricate areas I used some good old fashioned clay bar. Then the car was washed again after it had all been done with the clay mitt/bar. Car was completely dried and rolled up into the garage ready to begin polishing. Door handles, badges, rear diffuser, black rubbers and plastics were all taped up in blue 3M tape to avoid being damaged. First of all tried out the Stage 2 'Refine' polish and pad on a front wing to see if it provided enough 'cut' to get out the scratches and blemishes. It didn't quite provide enough in this case so we decided to use the Stage 1 'Renovate', which was then followed with Stage 2 afterwards. This method was adopted around the whole of the car, with many areas also having to be polished by hand. The bulk of the car was machine polished though. This left an amazing finish on the paintwork, but also a lot of excess polish, so the car was rolled back outside to be washed again. Whilst my brother-in-law took the reigns on the polishing I applied a coat of CC Platinum Wheels to each of the powdercoated rays and also to the cobra backbox and tailpipes. Following this wash, after the car had been dried, all the surfaces were 'cleaned' using CC panel prep to provide the base for applying the sealants. Every piece of glass had a coating of CC Platinum Glass applied to the exterior faces. The bodywork was then covered in CC Platinum Paint, one panel at a time. Leaving a beautiful finish and protected Zed. As some of you may know, I then took the Zed to Shelsley Walsh meet on Sunday and it ended up absolutely filthy! However, I didn't have to use my wiper blades once due to all the water just shooting off the windscreen courtesy of the glass sealant. I will be washing the car this weekend as I won't have chance during the week and am sure it will be returned to it's former glory. For now, please enjoy the pictures! Thanks for looking! Edited March 11, 2015 by Ogman 9 Quote
Vlad Posted March 11, 2015 Posted March 11, 2015 Sen this on Instagram - looks amazing mate! When you coming over to do mine? Quote
Ogman Posted March 11, 2015 Author Posted March 11, 2015 Sen this on Instagram - looks amazing mate! When you coming over to do mine? Cheers buddy! I'm sure we could sort something out if you want it doing...won't be this month though as got a lot on already. Let me know though, be more than happy to do it. Quote
Ogman Posted March 11, 2015 Author Posted March 11, 2015 Great work, excellent results there. Why thank you. You definitely inspired me to do a write up! 1 Quote
Vlad Posted March 11, 2015 Posted March 11, 2015 Sen this on Instagram - looks amazing mate! When you coming over to do mine? Cheers buddy! I'm sure we could sort something out if you want it doing...won't be this month though as got a lot on already. Let me know though, be more than happy to do it. Wicked! That sounds good! I don't want to do a full proper detail yet anyway, until my front end properly resprayed but I will message you on FB soon! Keep up good work 1 Quote
Mason Posted March 11, 2015 Posted March 11, 2015 Looks amazing! What's your instagram name? I'm always looking at 350z on there haha. Quote
Ogman Posted March 12, 2015 Author Posted March 12, 2015 Looks amazing! What's your instagram name? I'm always looking at 350z on there haha. Thanks mate. My username is 'ogman' on there too! Like to keep things simple haha Sent from my iPhone using Tapatalk Quote
Durk Posted March 12, 2015 Posted March 12, 2015 (edited) really good job, I could see the car had some serious time spent on it at Shelsley! Shame it got so bad just a day later I'll be looking to do some polishing on mine soon, just need to buy some pads and compound but was a little worried about the quality of nissan paint Edited March 12, 2015 by Durk 1 Quote
RobPhoboS Posted March 12, 2015 Posted March 12, 2015 I was wondering about the Autoglym Paint Pro System, I have various products at home but nothing so far has really done the job. I'll have to try again once I'm finished fannying around with the chassis Quote
Ogman Posted March 13, 2015 Author Posted March 13, 2015 With regards to the two-stage offered from the autoglym I was worried about the soft nissan paint too. This is why we tried with the finer stage first, didn't get enough cut so we opted for stage 1 followed by stage 2. The results are not perfect as there are still some minor defects (me being anal here). But it leaves a great finish with a deep shine. We spent around 6 hours in total doing the polishing so it's just a case of being patient. I've noticed on polished bliss they do a kit specifically for soft paint. May be worth having a go with one of these sets Durk?? Sent from my iPhone using Tapatalk 1 Quote
RobPhoboS Posted March 13, 2015 Posted March 13, 2015 I think I have Meguiars #105 & #205 to use first and various pads to try (it's been ages since I've taken the rotary out!). 1 Quote
Ogman Posted March 13, 2015 Author Posted March 13, 2015 Yeah you can't go wrong with #105 and #205, should leave a nice finish on it. Think the time spent claying the car is essential as it leaves a perfect finish to work on with the mop. Let us know how you get on when you do 👠Sent from my iPhone using Tapatalk 1 Quote
RobPhoboS Posted March 13, 2015 Posted March 13, 2015 Do you know what... that's probably one major area I've been going totally wrong ! I know for sure the last few times I had a go, I didn't do this, washed and dried but not clayed. I'll do that for sure. 1 Quote

Recommended Posts
Join the conversation
You can post now and register later. If you have an account, sign in now to post with your account.