davey_83 Posted November 29, 2018 Posted November 29, 2018 (edited) Love a good snowy........ Are you happy with the positioning of the twin tail pipes? You must be, love this car but personally I feel they stick out too far. Edited November 29, 2018 by davey_83 Quote
mattross1313 Posted November 29, 2018 Posted November 29, 2018 I really REALLY need to stop clicking on this thread. Progressing very nicely mate, plate is smart too. 1 Quote
Silverthorn Posted November 29, 2018 Author Posted November 29, 2018 @davey_83 Yeah I'm very pleased with them mate. I know they're probably not to everyone's taste but they're based off of this car: Its where alot of the inspiration for mine came from really! Absolutely love it. @mattross1313 haha cheers mate! To think I said I'd be keeping it to springs and spacers for the first year of ownership... I've only had it 8 months I'm extremely happy with the plate. Especially since my initials are T J Silvethorn it fits perfectly! 1 Quote
mattross1313 Posted November 30, 2018 Posted November 30, 2018 16 hours ago, Silverthorn said: I'm extremely happy with the plate. Especially since my initials are T J Silvethorn it fits perfectly! Indeed a perfect plate then mate! I've had M44TRS for many years now (Matt Rossetti), it was one of the cheaper options on DVLA and is spot on for me 1 Quote
Silverthorn Posted November 30, 2018 Author Posted November 30, 2018 @mattross1313 ah wow sounds like yours is spot on too! Mine was one of the cheaper plate as well I believe. I think it was around the £300 mark so definitely alot cheaper than most of then out there! Bargain 1 Quote
Silverthorn Posted December 3, 2018 Author Posted December 3, 2018 (edited) Edited December 3, 2018 by Silverthorn 5 Quote
Silverthorn Posted December 21, 2018 Author Posted December 21, 2018 Painted my headlights today. They look sooo much better now the shroud is black inside! Very easy job overall. Took me about 3 hours spread out over 2 days from removing them from my car to fully installed again. I'm very surprised more haven't done it to be honest. Hardrace adjustable front upper control arms installed the other day also. Just waiting to install my stiffer springs for my BC's over Christmas and then it's time for an alignment, again 4 Quote
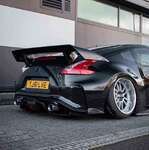
Silverthorn Posted December 24, 2018 Author Posted December 24, 2018 (edited) Popped down Cheddar Gorge today for some photos since i knew it'd be nice and quiet as it's Christmas Eve. It's nice to have some half decent photos of the car when it isn't soaked or stupidly dirty Very happy with how the car has progressed this year! Can't wait for 2019 though! Got quite a few good bits and pieces planned Edited December 24, 2018 by Silverthorn 6 Quote
nissanman312 Posted December 27, 2018 Posted December 27, 2018 On 21/12/2018 at 14:36, Silverthorn said: Painted my headlights today. They look sooo much better now the shroud is black inside! Very easy job overall. Took me about 3 hours spread out over 2 days from removing them from my car to fully installed again. I'm very surprised more haven't done it to be honest. Hardrace adjustable front upper control arms installed the other day also. Just waiting to install my stiffer springs for my BC's over Christmas and then it's time for an alignment, again Missed this update They look great any details on the process The car looks awsome on the whole 1 Quote
Silverthorn Posted December 27, 2018 Author Posted December 27, 2018 (edited) @nissanman312 Cheers mate! The process overall is relatively simple. I just took the bumper off, then disconnected the headlights and pulled them out as well. From memory there is 4 10mm hex bolts and some plastic push clips holding each headlight in. Once the headlight is out you can remove the Phillips screws (6 in total i think) holding the plastic lens to the headlight body then heat the sealant holding the two together. Some people put the headlight in the oven but i didn't fancy that as i didn't want to risk melting the headlight so i just used a heat gun. 5 or 10 minutes or so of heating the sealant and it'll be soft enough for you to pull the two apart. Plastic trim removal tools are really helpful during this! Once the headlight is in two pieces you have to separate the piece shown in the picture below from the headlight plastic lens as they are fixed together. They're held together by a bunch Phillips screws as well. Once you've got that apart you can start stripping it down in to its individual components. It's all very self explanatory once you get the headlight off the car really so it's quite straight forward. Then just paint it all up and pop it back together! For paint i just used one 300ml can of Halfords Plastic Primer and one 300ml can of Halfords Satin Black. I didn't use any lacquer as i didn't want the headlight internals to be shiny at all. For putting it back together i re-used the original sealant as well as topping it up with some black silicone sealant in the places where there wasn't as much sealant as others. On mine the top and bottom of the headlight had plenty of sealant, whereas around the indicator there wasn't very much. Once the old sealant has been reheated and the extra sealant has been added you can just pop them back together. I got the headlight most of the way back together before the sealant went a bit stiff so i had to reheat again before i could close all the gaps. Then it's just the case of popping all the Phillips screws back in and job done! My apologies for the overly lengthy and poorly explained description of all off that so hopefully it kind of makes sense. This first half of this video is quite helpful to see how the headlight removal and how the headlight goes together. Edited December 27, 2018 by Silverthorn 3 Quote
14N Posted January 8, 2019 Posted January 8, 2019 Awesome progress and hats off for doing the headlights. It's something I REALLY want to do. I will, one day..... 1 Quote
Silverthorn Posted January 8, 2019 Author Posted January 8, 2019 @14N Cheers mate! It's my second time splitting a set of headlights now so it wasn't anywhere near as daunting as it was the first time! I was quite tempted to paint the silver plastic rings and the orange piece all black but I'm extremely glad i didn't. Much prefer the OEM Nismo look 1 Quote
14N Posted January 8, 2019 Posted January 8, 2019 2 hours ago, Silverthorn said: @14N Cheers mate! It's my second time splitting a set of headlights now so it wasn't anywhere near as daunting as it was the first time! Well, if you ever feel the need to do a third pair..... 1 Quote
davidv10 Posted January 9, 2019 Posted January 9, 2019 21 hours ago, Silverthorn said: I was quite tempted to paint the silver plastic rings and the orange piece all black but I'm extremely glad i didn't. Much prefer the OEM Nismo look Headlights look great! I was debating exactly the same thing, but went the other way. Yeh yours are exactly like stock Nismo now. Regardless of what else you do or dont do, you just have to paint the main bit black haha. Quote
Silverthorn Posted January 11, 2019 Author Posted January 11, 2019 @davidv10 Agreed! Black internals look soo much better than the stock mirrored finish imo Quote
Silverthorn Posted January 26, 2019 Author Posted January 26, 2019 As some may have seen on Facebook, the wheels are up for sale already I've got myself some Work Kiwamis in GT Silver arriving. Specs of the new wheels are: 19 x 10.5 et12 square I can't wait! Ive also changed spring rates from the stock 10kg front and 8kg rear over to 16kg front and 12kg rear. Much better imo as the BC's were still a tad too soft for my liking! Hardrace adjustable upper control arms also installed the other day 2 Quote
nissanman312 Posted January 26, 2019 Posted January 26, 2019 59 minutes ago, Silverthorn said: As some may have seen on Facebook, the wheels are up for sale already I've got myself some Work Kiwamis in GT Silver arriving. Specs of the new wheels are: 19 x 10.5 et12 square I can't wait! Ive also changed spring rates from the stock 10kg front and 8kg rear over to 16kg front and 12kg rear. Much better imo as the BC's were still a tad too soft for my liking! Hardrace adjustable upper control arms also installed the other day I've not seen it How Much are they up for bud Quote
Silverthorn Posted January 26, 2019 Author Posted January 26, 2019 (edited) @nissanman312 they're up for £1000 ono including tyres mate Tyres are Achilles ATR Sport 2s. 245/35 front and a 275/35 rear Wheels won't be available till my new ones arrive so that'll be around the 9th of Feb or so Edited January 26, 2019 by Silverthorn Quote
dave_7 Posted January 29, 2019 Posted January 29, 2019 where did you buy the front upper control arms from mate? and is there are reason you went with them over any other brand? I've been looking to get some at some point but there are a lot of different ones available Quote
Silverthorn Posted January 29, 2019 Author Posted January 29, 2019 (edited) @dave_7 I purchased the control arms from H Tune mate. They were on a black friday sale at the time so I think I only paid around £275 ish - Bargain! I went with the Hardrace arms as they're nice and easy to adjust and give a large range of camber adjustment - I can go from about 1 or 2 degrees of positive camber all the way to negative 6! Also they are quite easy to make reference measurements with a steel rule due to the simplistic design and flat face. I've read about a few people complaining about their difficulty with adjusting their upper control arms unless they're the SPL style arms and I didn't fancy forking out SPL money as I couldn't justify the cost. I think as long as they're easy to adjust while on the car then that's all that matters imo. Some are very fiddly and would be infuriating if you were making adjustments once in a while. Edited January 29, 2019 by Silverthorn Quote
dave_7 Posted January 30, 2019 Posted January 30, 2019 22 hours ago, Silverthorn said: @dave_7 I purchased the control arms from H Tune mate. They were on a black friday sale at the time so I think I only paid around £275 ish - Bargain! I went with the Hardrace arms as they're nice and easy to adjust and give a large range of camber adjustment - I can go from about 1 or 2 degrees of positive camber all the way to negative 6! Also they are quite easy to make reference measurements with a steel rule due to the simplistic design and flat face. I've read about a few people complaining about their difficulty with adjusting their upper control arms unless they're the SPL style arms and I didn't fancy forking out SPL money as I couldn't justify the cost. I think as long as they're easy to adjust while on the car then that's all that matters imo. Some are very fiddly and would be infuriating if you were making adjustments once in a while. thanks for that i appreciate it. £275 is definitely a bargain!! I'll definitely be keeping my eye out for a similar deal. 100% agree with you there as long as they'e tough enough to take the abuse and easy to adjust they should be spot on. the hardrace stuff always looks very well made from what I've seen 1 Quote
Silverthorn Posted February 5, 2019 Author Posted February 5, 2019 (edited) Getting fitted Friday! Top notch service from Jdmdistro, wheels arrived quickly and are exactly how described so 10/10 in my books. Just remembered I've got some unused polished wheel nuts as well so dug those out... Just gets better and better Edited February 5, 2019 by Silverthorn 1 Quote
Payco Posted February 5, 2019 Posted February 5, 2019 Very nice, looking forward to seeing them fitted. Quote

Recommended Posts
Join the conversation
You can post now and register later. If you have an account, sign in now to post with your account.