


ilogikal1
-
Posts
4,733 -
Joined
-
Last visited
Content Type
Profiles
Forums
Events
Gallery
Store
Everything posted by ilogikal1
-
It is possible even on the softest of paint, trust me. Granted, some marring is likely, but it's not guaranteed.
-
And that changes what about my post? He'll still be paid for the work he's done that hasn't aired, as per his current contract. As there is now official confirmation that there was a physical altercation of some description, he should have been sacked outright, regardless of if his contract had 6 days, 6 months or 6 years left to run. It's a cop out to simply agree not to renew his contract. Sadly the speculation of who's going to replace him, whether the other two will stay, whether the format remains, etc. etc. now begins.
-
But not crossed enough to sack him, just enough not to renew his contract. So in the mean time he's still getting paid as per his still valid contract.
-
Especially in the Fun House.
-
Black Hole. Although Ultra Glaze is the better filler, IMO. Wax will bond better to cleaner paint, so if the Merc is less contaminated then it will last for longer.
-
The leather seats and gear knob look retro-fitted to me - the steering wheel doesn't have the matching orange bit (hand brake should be orange too if it's standard, no?) - and no Bose either; ergo it's not a GT. 5 points minus 1 for the steering wheel because I'm not sure I've seen a facelift with the matching alezan on it. Bah, so close...
-
The leather seats and gear knob look retro-fitted to me - the steering wheel doesn't have the matching orange bit (hand brake should be orange too if it's standard, no?) - and no Bose either; ergo it's not a GT.
-
Claying wont necessarily marr the paint, it can be done without inflicting any damage... I mean not by me, I'm far too ham-fisted, but other people can do it safely. Even if you do inflict marring though, you wont necessarily need to polish. You could opt for a filler heavy glaze, especially under a wax.
-
I am quite amused by the way that the Mirror in particular has taken some of the rumours they have previously published whilst ignoring other, contradictory, rumours that they have previously published (they have "reported" rumours of both a punch being thrown and no punches being thrown) to justify their new rumour of what might be the outcome of an event that might have taken place, possibly, maybe, "according to sources". Because actually finding out facts is too much hard work for today's journalists. Sigh.
-
Maybe because it's the only Z with a "beige" leather interior?
-
Not had this problem myself, but usually whenever there's issues with the controls after taking the console out it's almost always comes down to the ribbon cable from what I've seen and read on here. Not the most helpful, I appreciate, but it's all I can offer.
-
The twins are very enticing, I'll grant you. However one of my twins has run out, so I was only left with #1. I did however have a Mothers Mag & Aluminum Polish (sic) sample from Waxybox, an old pot of Megs Metal Polysh (sic), some old AutoSol, a newer pot of Car Chem Metal Polish and Auto Finesse Mercury. So I thought I'd find out what's "best". Using Twin #1 as the benchmark I'd rate them in this descending order; AF Mercury. Mothers Mag & Aluminum Polish. Twin #1. Megs Metal Polysh. AutoSol. Car Chem Metal Polish. Car Chem is quite a weak polish, great for finishing but anything more than mild surface stains and it just struggles. Also it's quite a thick compound which makes it that bit more difficult to work. AutoSol is very abrasive so it's great for deep cleaning but doesn't finish so well on its own. Meg Metal Polysh, once you get past the ******* stupid spelling of polish on the jar, it's a harder compound so more difficult to work (but not as bad as Car Chem), mild abrasives which finish down well but don't clean as thoroughly as AutoSol. And it stinks. I despise the smell of this stuff nearly as much as the spelling of polish on the jar! The Twins, #1 cleans well with moderate abrasives and some chemical cleaning for good measure but doesn't finish down all that well on it's own (which is where Twin #2 comes in, finishes down very well - and protects - but doesn't clean so well on its own), both are liquid which make them messy to use but very easy to work. Mothers Mag & Aluminum Polish, once you overlook the American-leave-out-whole-letters-just-to-pronounce-it-wrong attitude to spelling, cleans very well being a compound that relies heavily on chemical cleaners with mild abrasives meaning it also finishes very well too and being a cream-like consistency it's very easy to use and work. Auto Finesse Mercury is remarkably similar to the Mothers, but doesn't have that stupid Americanism on the pot. Really that's about the only difference except Mercury seems, to me, to clean marginally better. The Twins are very good when used together. Mercury is better when used alone... at least for adding shiny. The Twins come with the added trick up its sleeve of adding protection as well as adding shiny, so will keep the shiny for longer.
-
First bit's right, but it's 3 chambers isn't it? So technically (depending on which technicality you want to use), it's 1.3, 2.6 and 3.9 litre.
-
LSP teaser; this arrived today courtesy of SuperStu, and it has my name written all over it!Stu made a very generous offer of supplying a sample from his current arsenal (pun intended for those who know what it is ) in exchange for me putting it through a standard ilogikal1 test (so, yeah, I'm taking requests now I guess ). All will be revealed along with a full write up when I get to that point.
-
I had my 10 year service (55 plate too) done recently at Atkin, I asked them to change the gear oil at the same time and was told it's part of that service anyway so I'd say get all the oils changed at the next service - as mentioned above they're not part of the standard schedule so unless you've got anything to say it's been changed, assume it hasn't.
-
Unless you have ABS. Or know how to brake. Your point is only valid if you lock the front brakes; which is different to jamming your foot on the brake pedal in many, many cases.
-
There's much better products available, even when (if) it's applied properly Supaguard is pretty poor.
-
At least he changes the front bumper to put it in it's bubble.
-

New 370z owner in North Yorkshire
ilogikal1 replied to nottyash's topic in Introductions & Welcome Messages
-
Just rub it in, why don't you.
-
D'oh, I forgot the main point of that last post! LSP sitrep; Wax Addict 21 was killed by APC. DJ Acrylic Spritz was killed by APC. Nano One was killed by Tardis. Nano Wax was killed by Tardis. Citrus BSD was fatally wounded by Tardis, killed by fallout remover. Diluted Hydro Coat was killed by fallout remover. Origin was wounded by Tardis, fatally wounded by fallout remover, killed by clay cloth. Connoisseur was wounded by Tardis, fatally wounded by fallout remover, killed by clay cloth. Neat Hyrdo Coat laughed at Tardis, shrugged off fallout remover, was merely tickled by clay cloth. It is currently still standing. I'm impressed by neat Hydro Coat's stubbornness. I'm seriously impressed with Origin and Connoisseur to be honest, as they're "just" waxes. Also, there's an LSP plan forming. Watch this space...
-
So, a few things to report today. All of today's pictures were taken with my phone, so apologies if they're not the best. Firstly a quick picture of Slick Rims beading, as much for reference later on as anything; Whilst HubiRims currently; So... er... yeah, there's that. Today, I decided to remove the Nissan burger before I start polishing during the week. I wanted this off because, a) there was some swirls & RDS around and under the badge (in the gaps) which are incredibly difficult to get to with the badge in situ, 2) I have the JDM Z badge on the front already (P.O. addition), and C) that JDM badge doesn't have stupid gaps in it so no more inaccessible swirls/RDS in future. After my glamorous assistant (no picture of her, so don't ask ) marked up the position of the original badge (I didn't have the heart to tell her the new badge isn't the same size so it only needs to go on straight ) and then having warmed the area up briefly, I used a Stanley knife blade to cut through the sticky stuff (with an old credit card to protect the paint from the knife and for leverage), which left me with this; Then the AutoSmart Tardis came out to play, using make-up pads to soak the area for 10-15 minutes (in the shade, you really don't want Tardis to dry out on the paint!); All gone; Definitely needs a polish now even if it didn't before though; As you can see from that picture, the bumper needs a polish too. As does the rest of the car, although it's not that that bad everywhere else, honest. I've also been playing with several metal polishes recently, if anyone's interested in that at all?
-
Cheers matey.
-
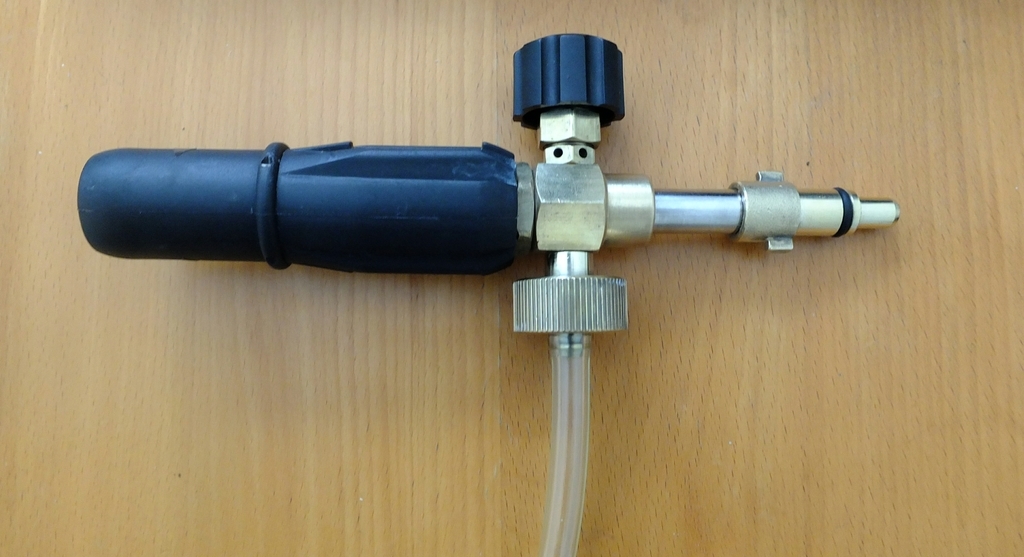
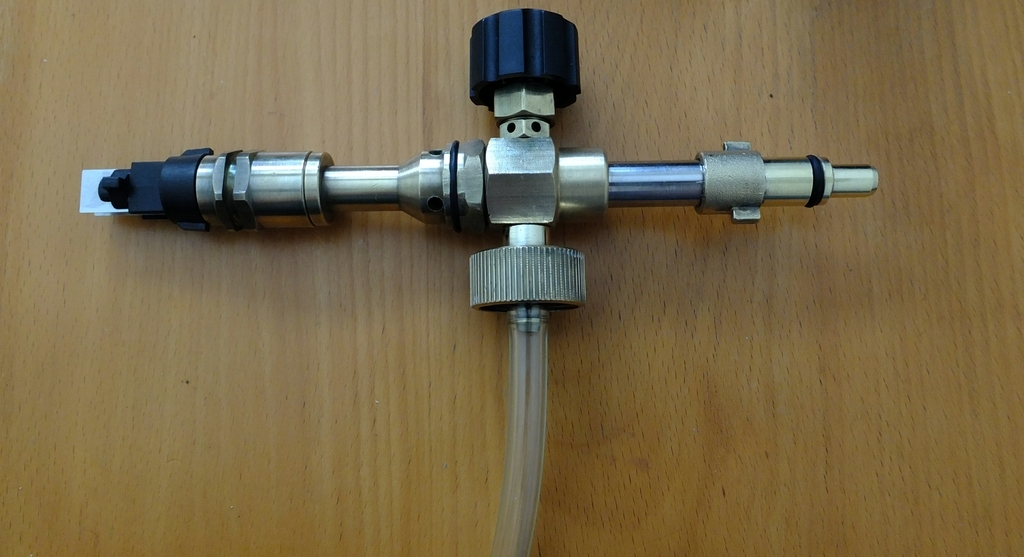
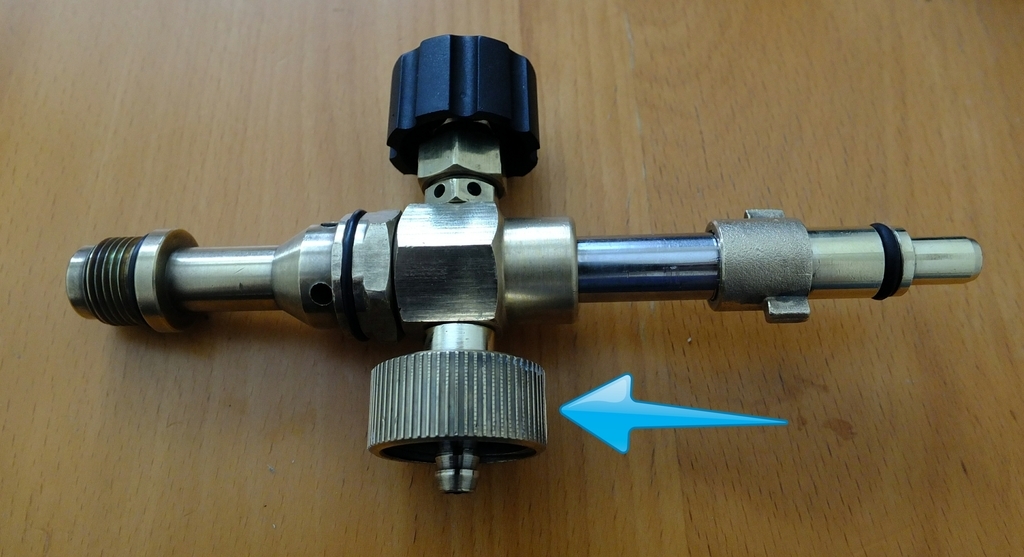
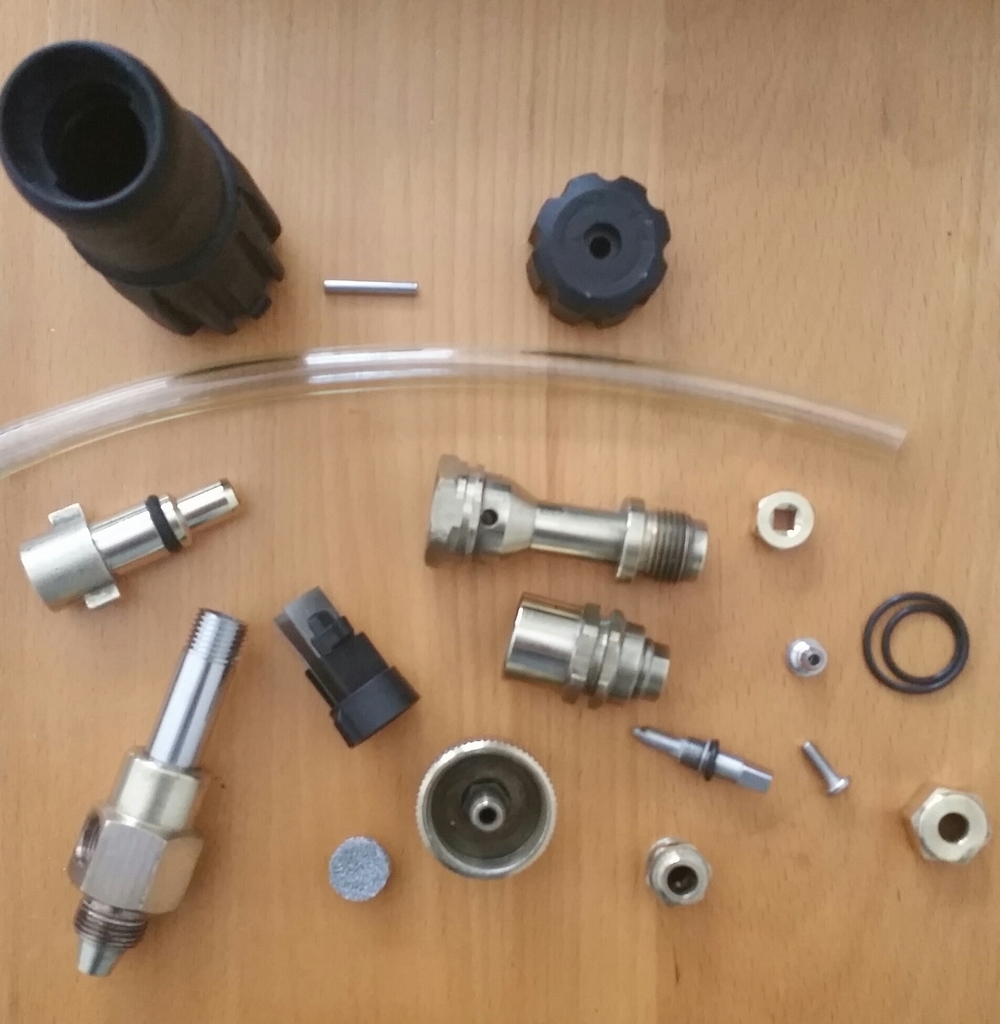
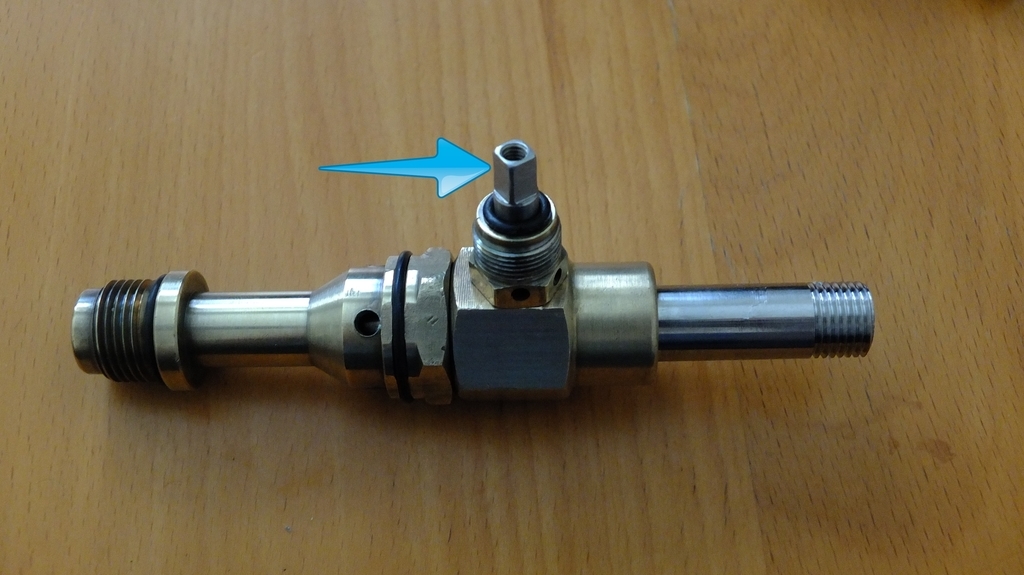
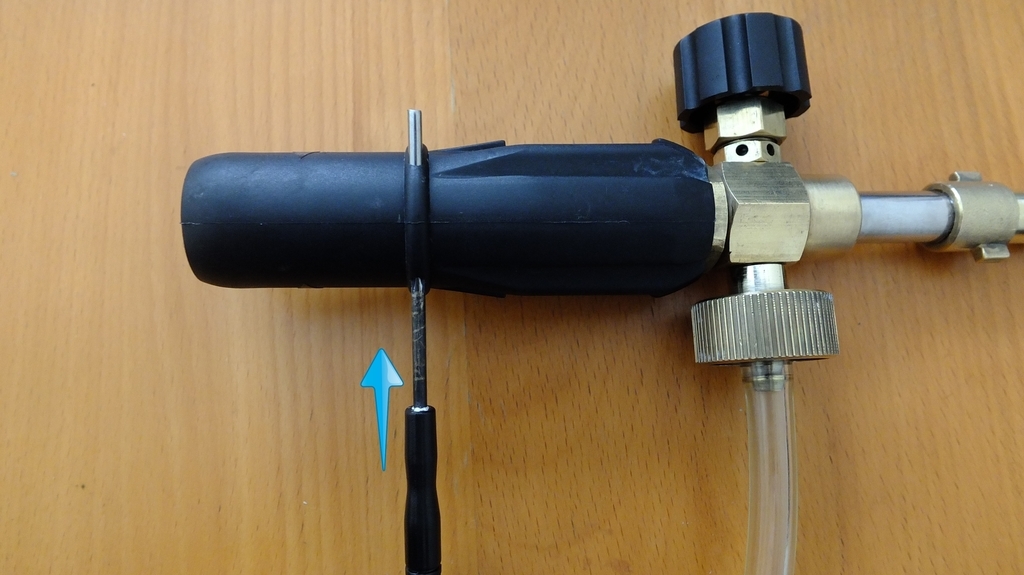
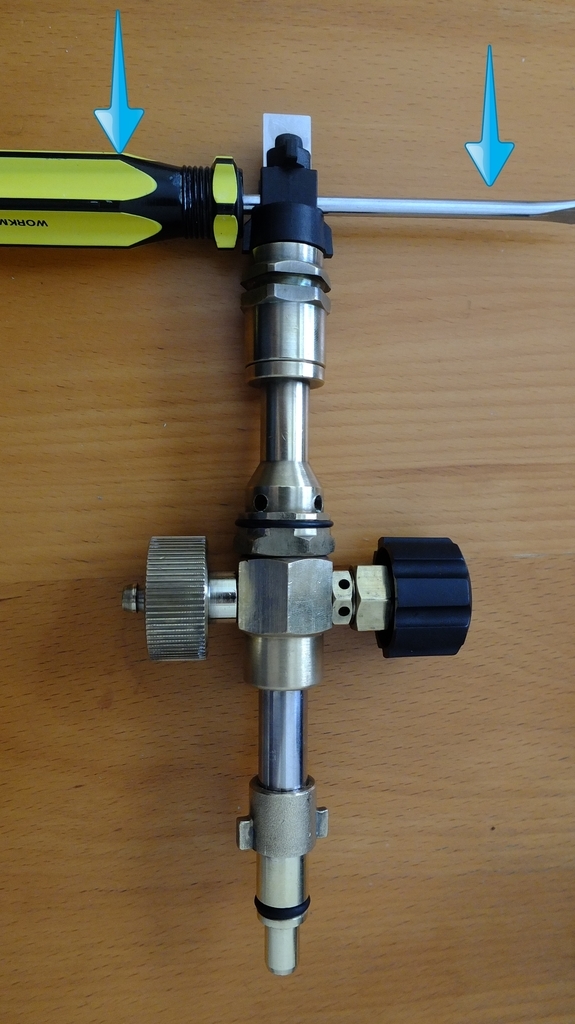
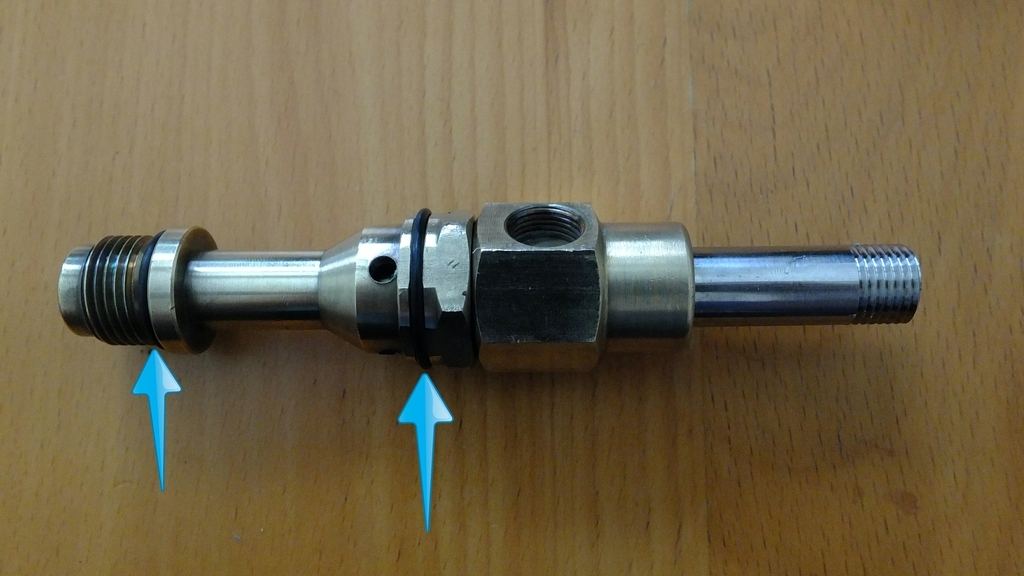
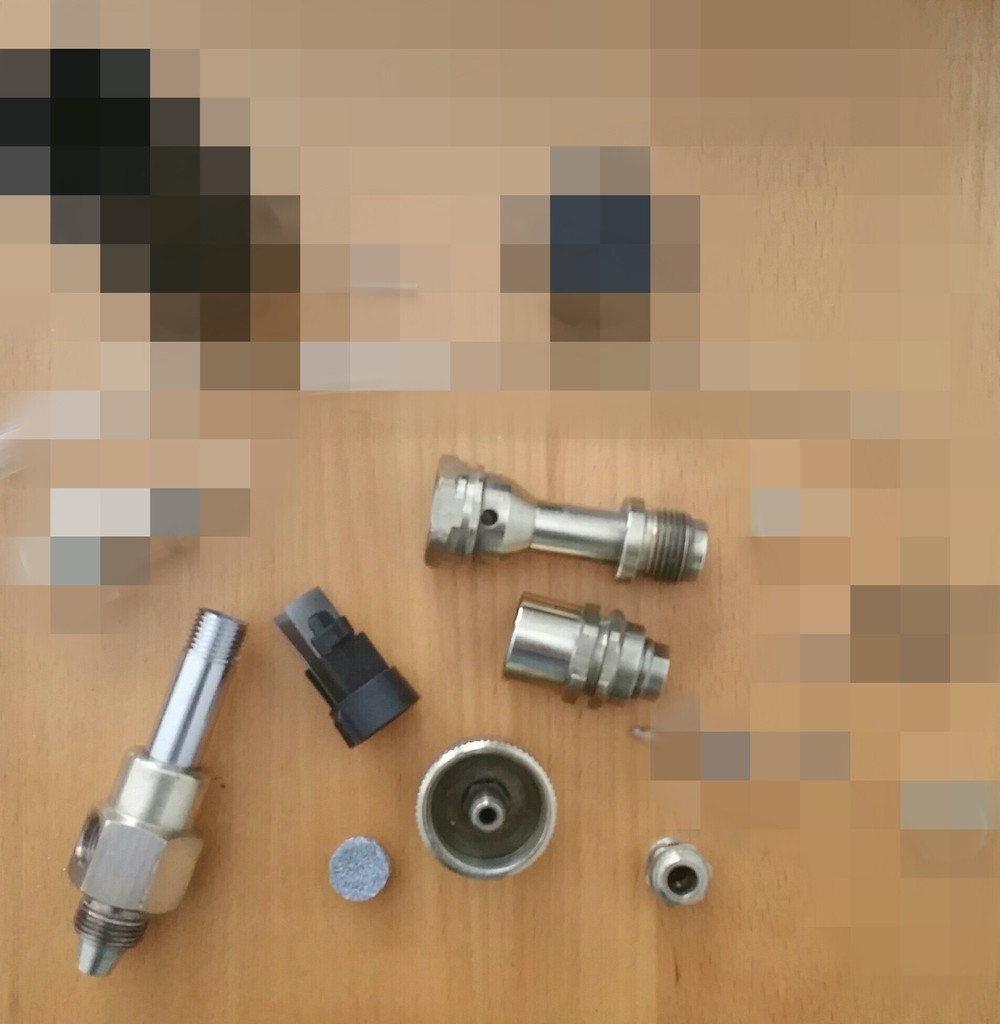
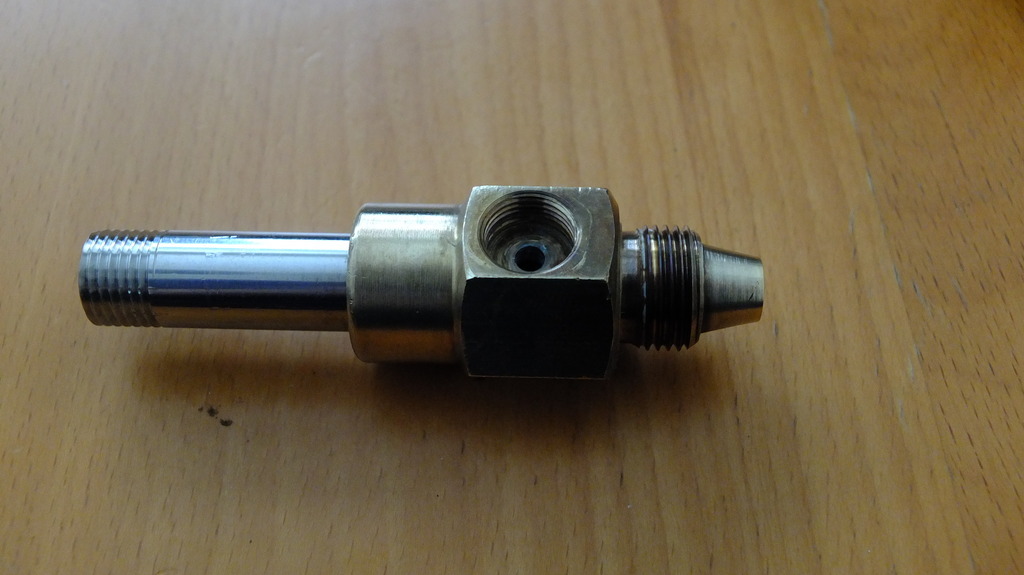
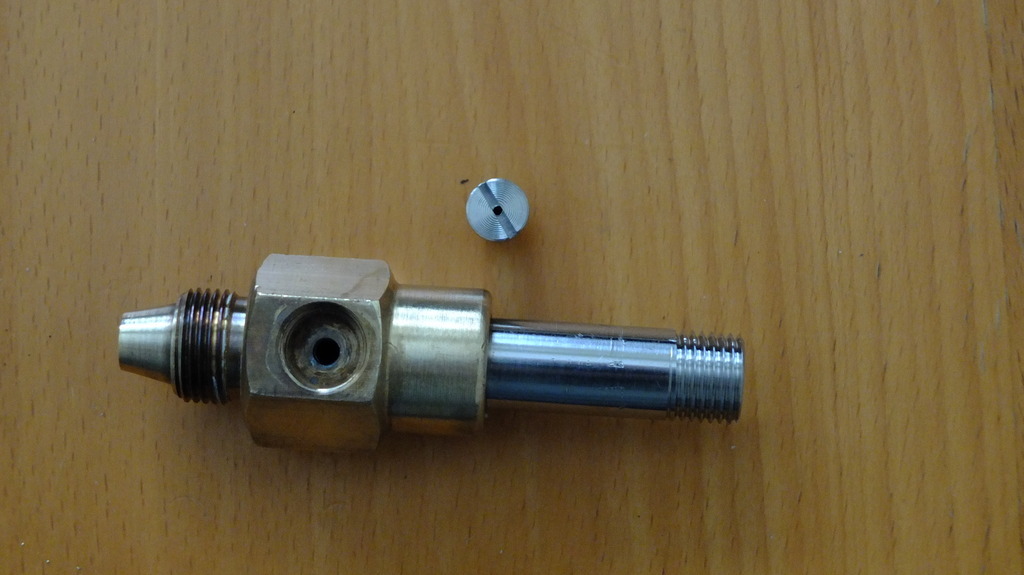
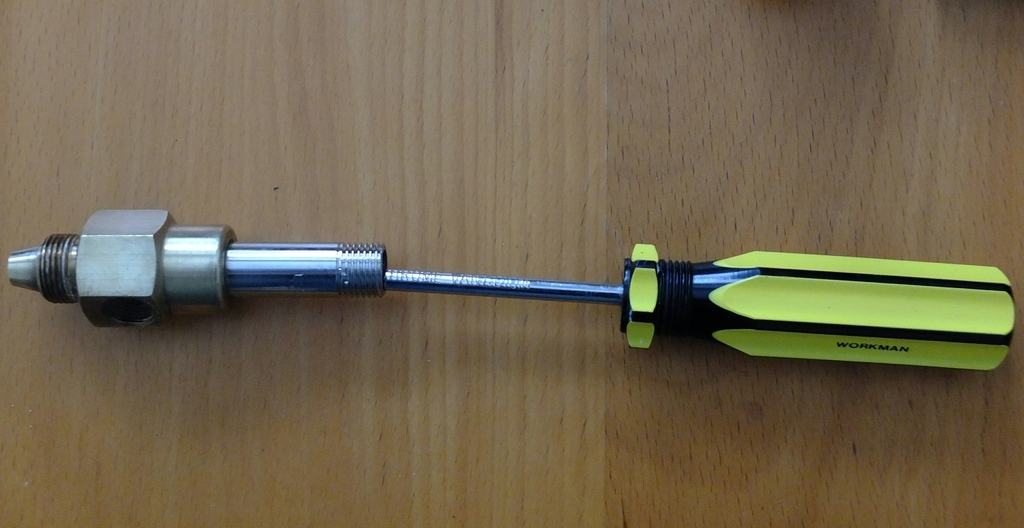
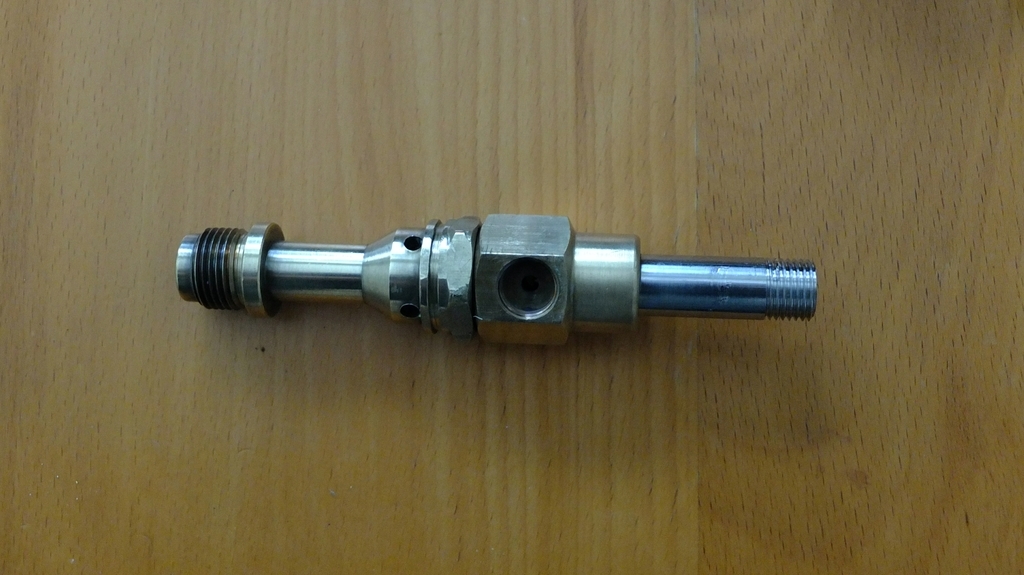
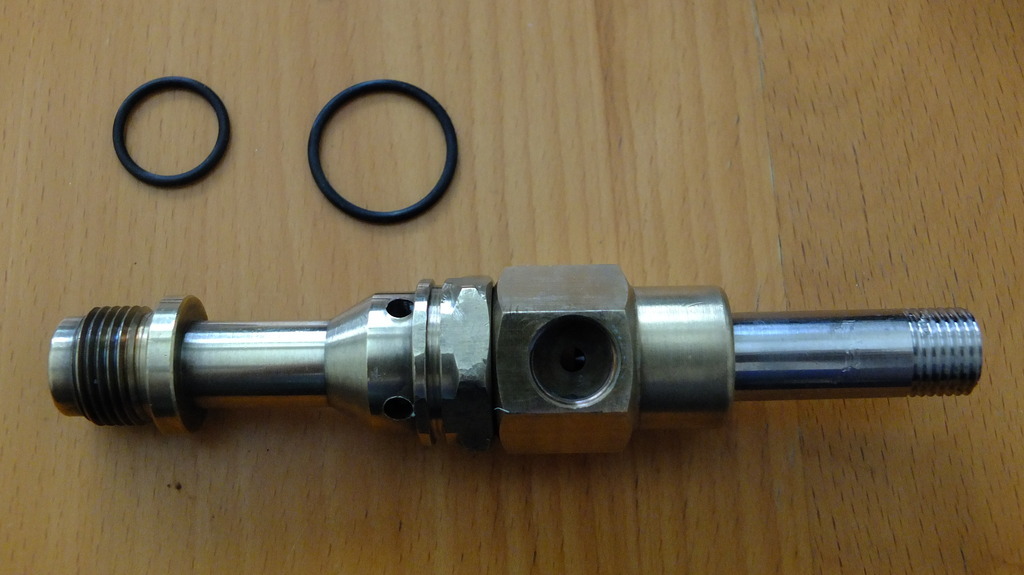
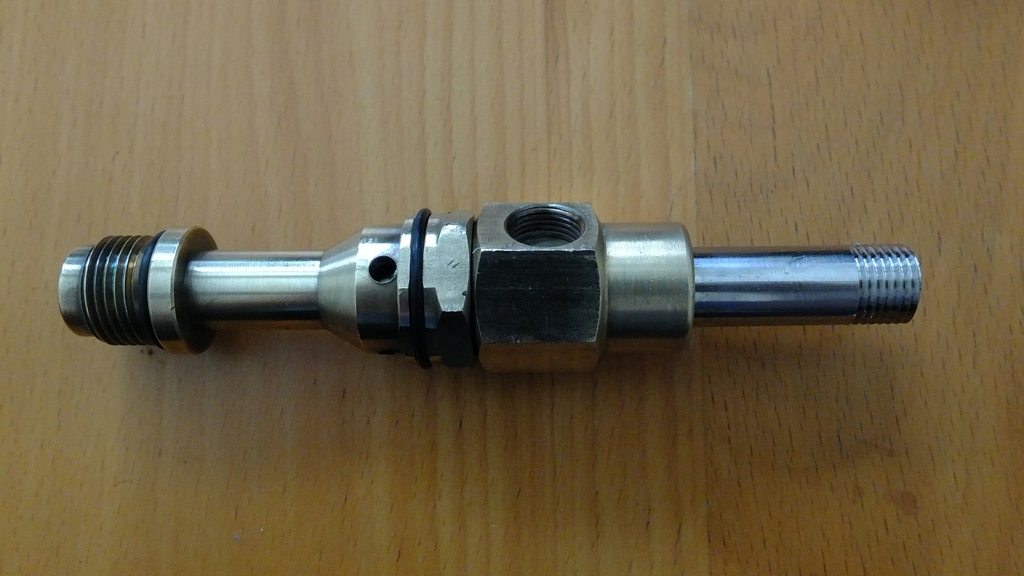
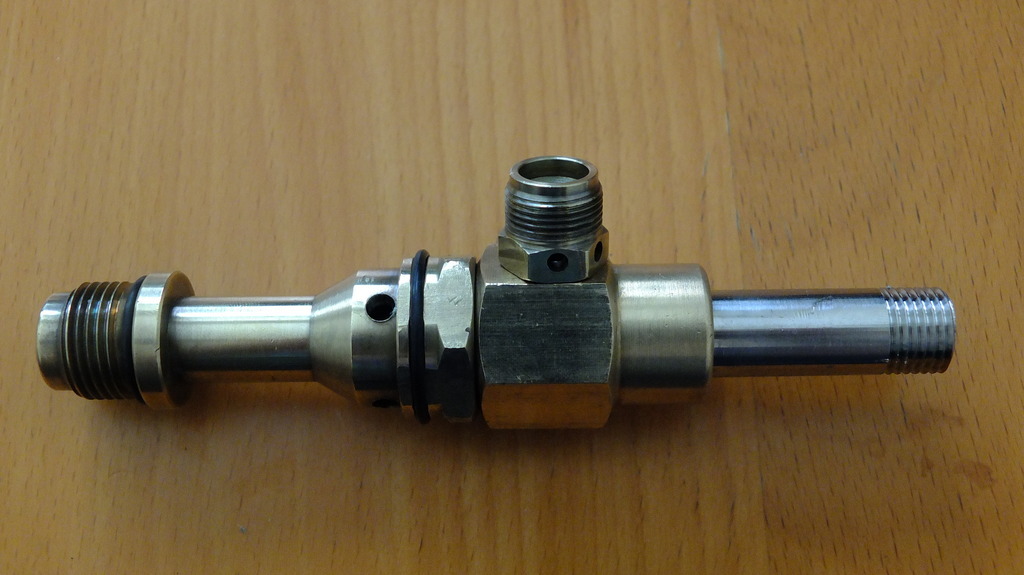
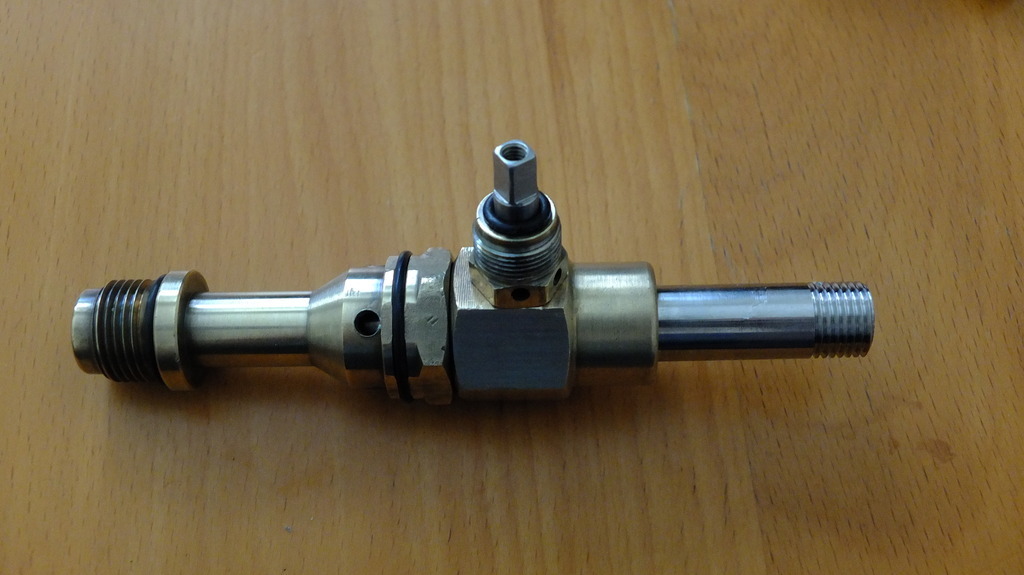
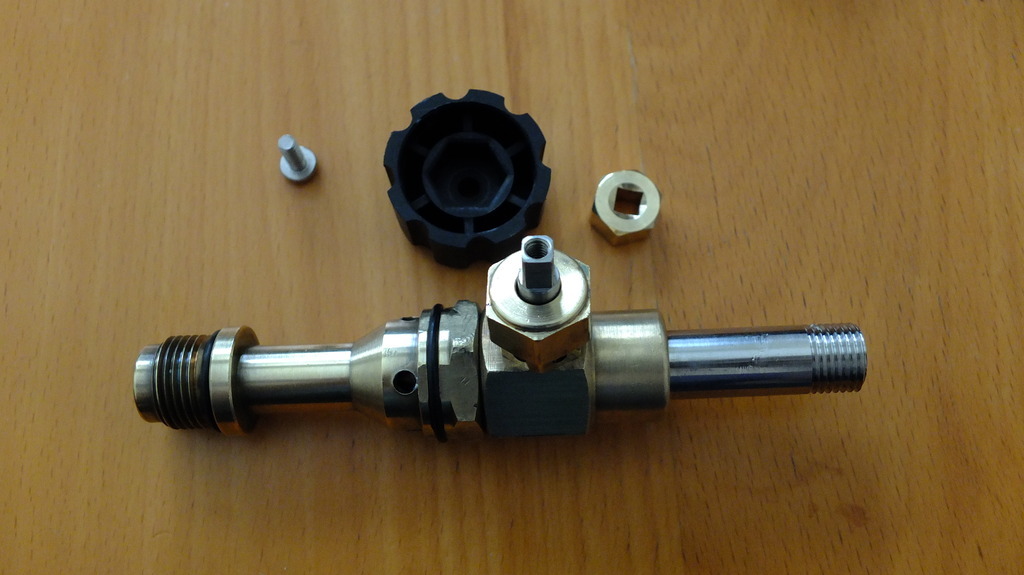
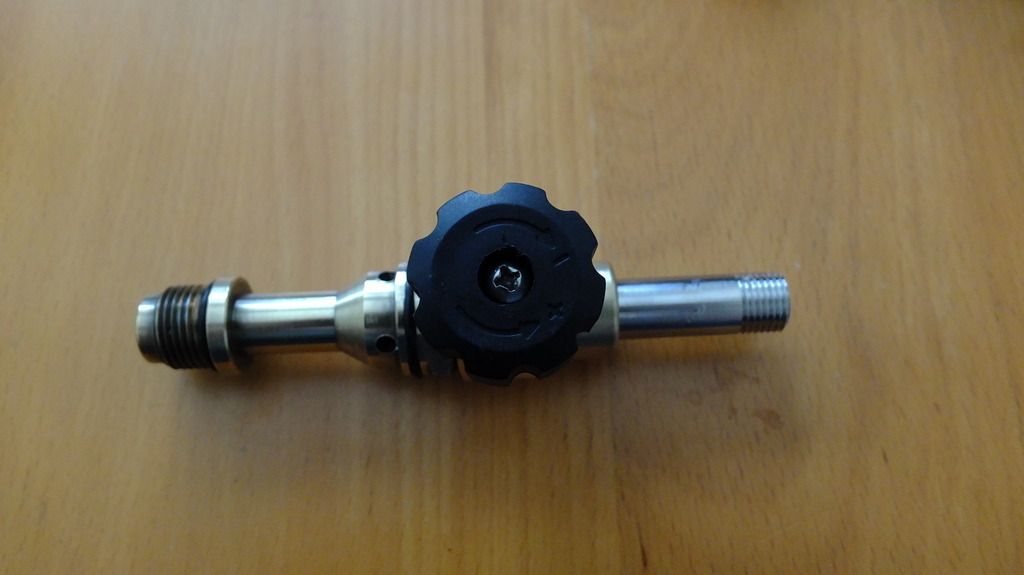
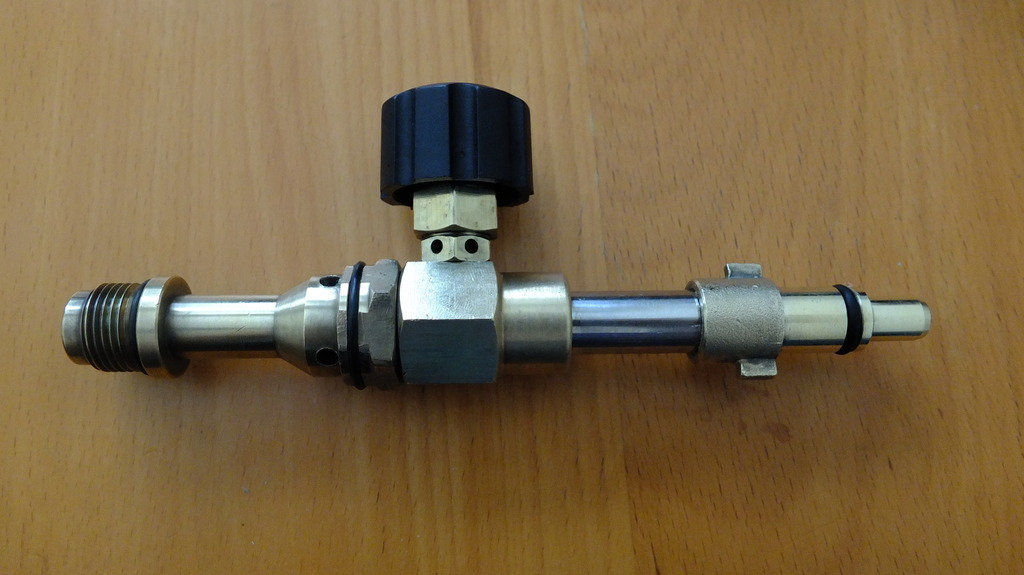
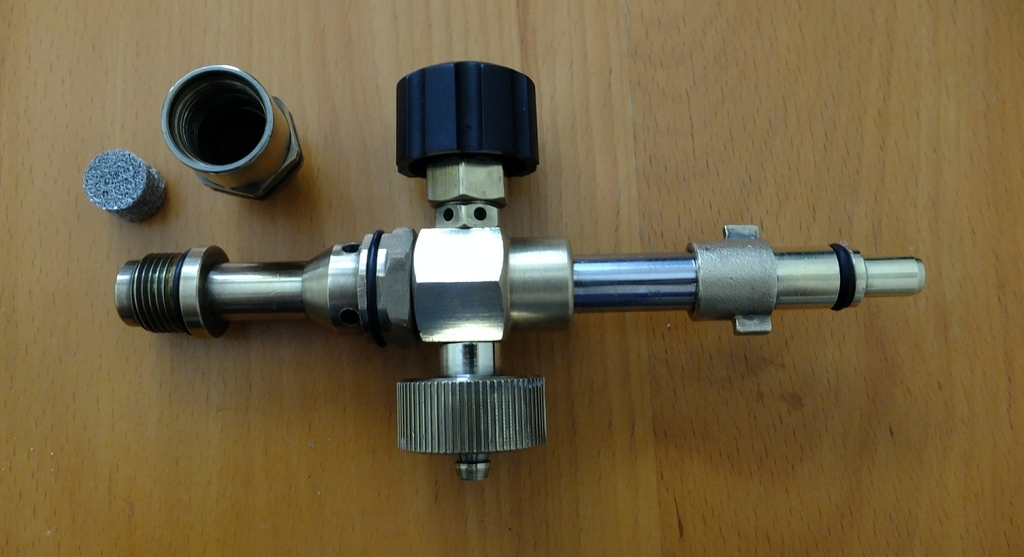
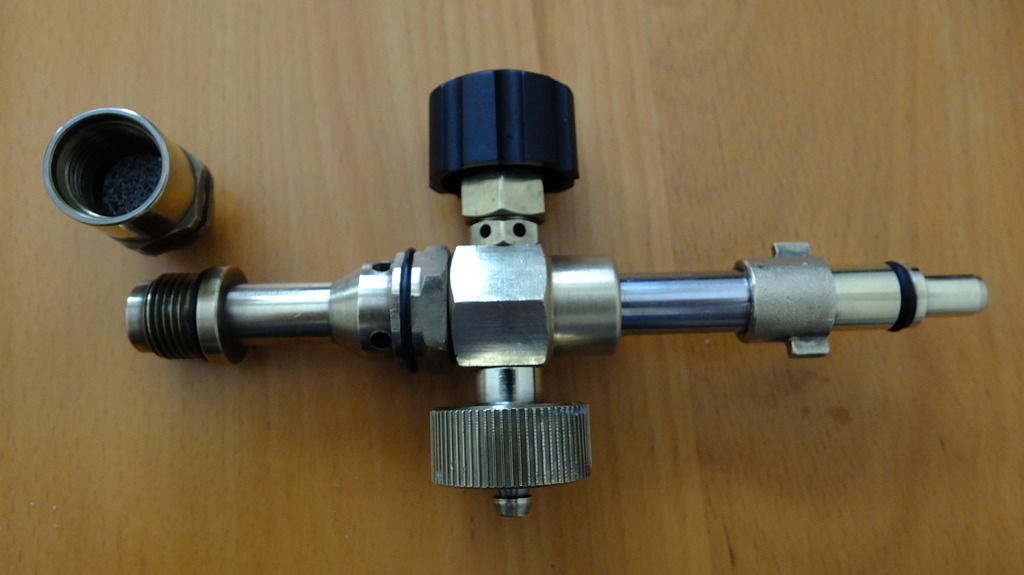
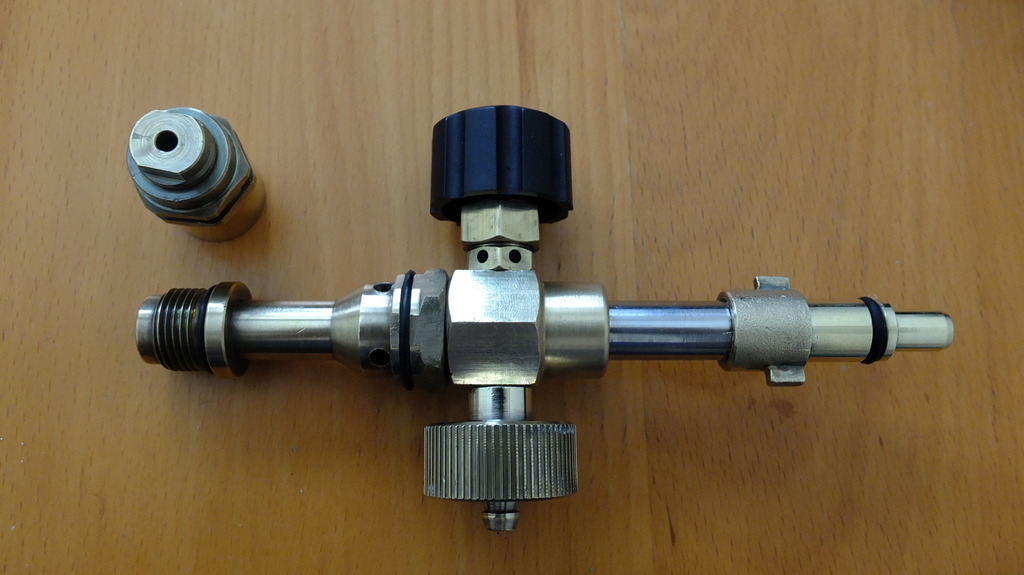
I know there's a number of guides dotted around the interwebs for this but I couldn't see one on here, as I had mine apart I thought I'd stick up a 'how to' for reference. The pictures were taken whilst I re-assembled, but I've re-ordered them so they should work for disassembly (I hope). Ideally you'll need; A flat head screwdriver A Phillips head screwdriver A 22mm socket A 17mm socket An adjustable spanner A vice (can be substituted with a 2nd adjustable spanner) A "poking device" (mini-screwdriver type jobbie) Some optional innuendo. In order to service your lance, you should start with this (give or take a table); You need to remove the nozzle adjuster (the big black plastic thing at the front there ). In the left-most ridge, there is a metal retaining bar with a hole at either end. Take your "poking device" of choice and push the retaining bar through; Remove the retaining bar entirely, retract the "poking device". The nozzle adjuster should now just pull off forward. It may be a little stiff at first, just apply more effort until it comes away. That leaves you with this; The metal retaining bar that you removed, when assembled, sits in the foremost ridge of the brass section (for reference when reassembling) Next, remove the feeder tube from the bottom, this simply pulls off. Next up is the nozzle blades at the front. This just pushes off but can be quite tight, the easiest was is to use a screwdriver to carefully prize it away (remember that it's plastic though so be careful not to damage it). Apply pressure as such; Which leaves you with this; Using the 22mm socket, the front most part simply unscrews from the rest (you might need the vice to hold the rest of the lance at this point, but it is straightforward enough without - I didn't use a vice at all); Inside the bit you've just removed is the metal gauze. Using a suitable poking device through the hole in the front simply push it out the back. Here it is removed; It's usually this part which becomes clogged either by soap scum and/or hard water residue. If your lance is losing it's efficiency but isn't leaking, it's most likely going to be the gauze that needs cleaning, however if you've gone this far you might as well do the rest as well. Next up, remove the rest of the feeder/bottle thread. This just unscrews but you might need a vice-grip to break the seal - bear in mind the lance is brass and thus wrapping all mating surfaces in masking tape to avoid damaging the lance is a good idea. Next up is the pressure washer fixture at the back of the lance; In my case it's a brass Nilfisk fitting whilst some Karcher fixtures are plastic and will look different, however they are all affixed the same way; they just screw off. Next up is the adjuster knob at the top. If you look down it, you'll see a Phillips head screw. Undo this and the black plastic adjuster knob will lift off but there's also a brass nut that lives inside that adjuster knob so be careful not to lose that when you lift it off; Using the 17mm socket, remove the other brass nut that you've just exposed on top of the lace; Next to come off is the actual adjuster as arrowed here; With that last nut removed, this will now just unscrew. Careful not to lose the little O-ring at any point. That leaves you with this; Then you need to unscrew the last part of the adjustment mechanism from the top of the lace; Next up, remove the two O-rings from the front so as not to damage them and place them somewhere safe; Using your vice and/or adjustable spanners, split the two brass sections (the tube at the front from the main body), leaving you with this; Now you could remove the silver tube but this isn't particularly easy (at least without a vice) without damaging bits, as it's not essential to do this I didn't bother. The only difference it makes is the length of the screwdriver you need for the next bit; If you look into the tube you'll see a reducer at the end, screwed into the brass body. It's a flat head screw, so just jam your screwdriver in there and undo it to remove this; And that's it. Your lance in now in this many pieces; These are the parts I usually clean, essentially all the parts that come into contact with the foam solution from the pick up forward; Cleaning is simply a case of placing the desired parts into a descaling solution for a given amount of time - refer to the instructions for your chosen cleaning product. Personally I use 100ml of Bilt Hamber Surfex HD (20% solution) with AutoSmart G101 used neat (other APCs will also work), left to soak over night, then left to dry on a sheet of kitchen roll in order to check and make sure it's actually clean and unblocked before reassembling. Pretty much anything you use to clean either the lance or the car, including just water, tends to taint the finish of the brass parts as such I like to give each part a quick polish using Auto Finesse Mercury & microfibre cloth before reassembling purely to satisfy my OCD. Reassembly is the reverse of the above, with two tips; Firstly; use PTFE tape or thread lock on all the threads - note that you will need to service your lance again at some point in the future so do not use permanent thread lock, it'll just ruin your day some other time! Secondly; getting the nozzle blades back on - those things have unnecessarily sharp corners! The best way I know of is to get leverage by placing a screwdriver sideways between the blades, stand the lance up on it's end (on the pressure washer fitment end) and push down on the screwdriver until the nozzle pops back on; Et viola, one reinvigorated snow foam lance ready to impress the neighbours again. Edited to amend the many spellage mistakes. Edited again to fix the broken picture. Edited further because Photobucket suck balls.


- 15 replies
-
- 10
-
