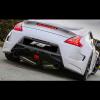
taras Posted September 8, 2012 Posted September 8, 2012 As most of you know, I have sold my matte white HR roadster back in March 2012. This left an emotional and fun emptiness which no other car could fill. So, after long hunting, hungry for a great project car, I've come across a damaged 350z with low mileage and nice potential. The damage was to a O/S rear quarter, where the panel has deformed in few places, many underbody brackets bent, inside body panels in need of replacement, new bumper, lights, etc. No structural or chassis damage though Since pictures always say more than any words, here's a small display of a process that took 4 weeks to complete (never fully completed though i guess ) Arriving on a recovery truck to RT Performance bodyshop Looking very standard.. All these damaged spot-welded panes have to be removed and replaced It's amazing how far away from the point of impact the metal gets deformed Not looking good... but nothing that can't be fixed Pulling with hydraulic jig in right directions for specific time brings the metal to place. Too much pull and you're in worse situation than before All bends on rear quarter are nearly gone now New panels welded replacing damaged ones Successful use hydraulic jig and talented panel beater and you'll end up with minimal filler work Time to de-badge the boot, remove the spoiler and windscreen wiper. All holes have been fibreglassed to create a strong base for the filler. If this is not done to a hole or large indentation (like a badge on front bumpers) then the filler will sink in eventually, leaving a nasty mark in bodywork. "Z" badges have to go too. Also, indentations here to be fibreglassed first, to reduce amounts of filler needed. Welding is another option but we found fibreglassing to be a better way here. Time to loose an OEM bumper and test-fit RT made Amuse style bumper. Fits nicely Flushed means flushed, aerial has to go too! It has been relocated in a boot area, hidden under plastic trims All filler worked parts are now ready for primer, together with RT made Chargespeed style rear bumper All primed Everything has now been rubbed down and masked up for a respray Not the matte look! After the second coat of paint actually.. Freshly lacquered here I decided to go for black and grey theme so far, and the diffuser part of Chargespeed bumper together with a "mouth" of Amuse front were done in black.. Nice Accident? What accident??? Going on a ramp to apply under-body anti-gravel protection. Old exhaust has been removed to gain better access to hidden areas New exhaust and de-cats arrived just in time! This kit is soon to be available from RT Performance at affordable price. I will post some clips of it in action later This was probably after midnight... Luckily no bolts/studs snapped, so I was motivated to carry on Mean if you ask me Gloss black roof wrap to be added to the black&grey theme. Hexis stuff rules! This was latter complimented by dark shade Llumar window tints, can't find any pictures of it being done though A big servicing stage... engine oil and filter, Cosworth panel filter, gearbox oil, rear diff oil, spark plugs, brake fluid, Hel brake and clutch lines, hydraulic fluids... Huge thanks to ZMANALEX for efficient service once again When changing spark plugs I noticed engine oil on some of them. Unfortunately this means rocket covers must be changed to stop oil leak into plug wells. Whilst plenum was off, a quick call to Abbey and a spacer arrived next day. Thanks guys! We also sprayed the plenum cover and throttle body in titanium silver for a fresher look Now with the bumper fitted, exaust looks like it sound - ace!!! And finally some pictures of finished work (not fully finished actually, this is straight from the spraybooth, car still has to be polished when I give a rest having fun ) The project continues and I will try to update this post whenever i get a minute to breathe. So far, next in line is a set of coilovers with adjustable front arms, anti roll bars, a remap, Rota GTR 19" rims, and a crazy a** wrap we have some ideas in mind but not 100% certain yet. Any suggestions? Will keep you posted. Thanks for looking guys Taras Quote
taffyjason Posted September 8, 2012 Posted September 8, 2012 wow, fantastic thread, you've done amazing work there, i know where to go now for my respray ! love the transformation! i have so many questions, but i'll let others comment on the work of wonder first Quote
Will370z Posted September 8, 2012 Posted September 8, 2012 Great job, looked great at the parrot meet and sounded lovely, certainly made an entrance Quote
Jay Posted September 8, 2012 Posted September 8, 2012 Big plus 1 How about a nice matt red with black accents Quote
evilscorp Posted September 8, 2012 Posted September 8, 2012 Two of the same tyre on the rear so doesn't happen again apart from that it looks good Is that a wrap over the door handles? Quote
stanzed Posted September 8, 2012 Posted September 8, 2012 That looks well I bought some Nismo spats which I was going to get you guys to fit along with my Strosek spoiler and some changes to my V2 front bumper but every time I see the Chargespeed rear bumper I want it more and more. Expect a PM from me soon. Great work Quote
glrnet Posted September 8, 2012 Posted September 8, 2012 Two of the same tyre on the rear so doesn't happen again apart from that it looks good Is that a wrap over the door handles? well spotted, took the words out of my mouth, make sure Ekona doesn't see them Good job Quote
chettle Posted September 8, 2012 Posted September 8, 2012 how about a subtle silver/pale blue flip with a dark accents?? That looks ace as it is though, but whats the deal with the backbox? Silencers? Quote
taras Posted September 8, 2012 Author Posted September 8, 2012 Another excuse to prioritize the purchase of new rims and tyres Handles were sprayed in gloss black btw Quote
taras Posted September 8, 2012 Author Posted September 8, 2012 Jay, matte red sounds good actually Hexis recently launched matte silver, matte blue and matte brown pearl Latter looks ridiculously cool Hmmmm... Quote
Ricey Posted September 8, 2012 Posted September 8, 2012 Really enjoyed reading that beautiful look (skip the wheels but their going anyway!). Looks a bloody excellent job. Quote
taras Posted September 8, 2012 Author Posted September 8, 2012 I'll burn those tyres over few weekends Quote
marzman Posted September 8, 2012 Posted September 8, 2012 Looking really cool. Love the black accents, and that exhaust. Quote
taras Posted September 8, 2012 Author Posted September 8, 2012 Now need to think of a colour that would match with all the gloss black parts! Adrian knows what I mean Quote
Keyser Posted September 8, 2012 Posted September 8, 2012 Nice work looks very Like the look - smooth and sleek Bright Green - I always say green Quote
Adrian@TORQEN Posted September 8, 2012 Posted September 8, 2012 Now need to think of a colour that would match with all the gloss black parts! Adrian knows what I mean Not long now, how's my beauty? Quote
ddcboyle Posted September 8, 2012 Posted September 8, 2012 What a difference, i wish i could spray, is it hard to learn? Quote
bronzee Posted September 9, 2012 Posted September 9, 2012 Fantastic job, and even better to see one being saved! Keep the pics coming. Quote
Clown Posted September 9, 2012 Posted September 9, 2012 What a difference, i wish i could spray, is it hard to learn? Bet you wish you could wrap too! Quote

Recommended Posts
Join the conversation
You can post now and register later. If you have an account, sign in now to post with your account.