

cs2000
-
Posts
2,628 -
Joined
-
Last visited
Content Type
Profiles
Forums
Events
Gallery
Store
Everything posted by cs2000
-
I know its a longshot, but offers will be considered if anyone needs/wants these.
-
Will, where are you??
-
Awesome, even I don't know how you have managed that! RT, you can revert to the older firmware from the BETA versions. Simply turn the phone off, hold the home button and keep holding it whilst you turn it on. It will now insist you connect it to the PC and should "downgrade" to 6.1.4 @MartynB85 - yes, all beta builds do
-
I have a dev account too guys so if anyone wants access for a small fee (less than is on any of the sites ive seen today and solely to cover the cost of me buying the account) drop me a PM. Octet, if there's a free way you know then that's cool too
-
SOLD, PS4 now pre-ordered through Amazon. Was going to get an extra controller, but these are prices at £89.99...
-
Seriously, I suspect some kind of secret hidden fuel cell! lol. My average MPG for the past 3 months is 26...
-
Heh, full package then Ive just gone with the dampers.
-
too much information hahah!
-
Simple fix Simple fix then. Get Gas hood dampers, Remove OEM bonnet prop No wonkiness PROFIT!!
-
Knocker throwing? That's a bit extreme.... Sounds messy...
-
Yep, iOS can be boring, but I STILL don't want to use Andriod. Im not bothered about widgets everywhere, id rather just have a good OS that allows me to get $h1t done, which iOS does. Small things are due a refresh, one being the look, which its getting. And there are some cool features being discusses such as location aware locking, such as if you are connected to a WiFi network you have previously used such as your home one, it could disable your PIN code lock since you're in a safe environment. But mostly, iOS has everything that's necessary already.
-
I cant actually believe this "mod" still exists and people think it helps! Personally, id say the effect is non existent, I feel it may even induce a slight blockage
-
how! The past few weeks ive been driving carfully. My route to work involved 80% dual carriageways and then some town driving. Changing under 3,500RPM, using cruise control and (trying) to not exceed 75mph and I get a tad over 300 miles!
-
Thanks for the kind offer, lets hold on it for the moment and see what comes up. No problem at all
-
Tell you what mate, seeing as that stuff is fairly expensive to buy, I also have set of 100% condition 2003 lights removed from my car in favour of a LED set. Do you want me to try tinting mine for you as I already have the spray (bought it years ago and never used it) and then if it works OK we can just do a swap + postage ? Obviously you will have to let me know how dark you would like them.
-
Will, can you not just use the headlamp tinting spray? If you do, be warned it goes on VERY thin and is like water so don't be tempted to spray it thick. Will also need a good polish a few days later to make it smooth again.
-
Looking forward too it *runs away before im chased by a hungry Android mob*
-
The floor already gets hot with the heat shield attached, after a fast drive you can feel the heat in the passenger footwell, I wouldn't be too keen in removing them!
-
no-one else?
-

Matt's Azure Adventure! - Decats & Japfest prep Pg.21
cs2000 replied to mattross1313's topic in Member Build Projects
shouldn't the cooling panel have a small recess to allow the bonnet latch to engage properly?? Something like this (stolen from RT), im sure the dip isn't just for cosmetic reasons. EDIT: or do what kyle suggests! -
So, I picked the black ones up from the royal mail place yesterday, they had a customs fee attached. 3.42 customs (VAT) charge, with a 8.00 royal mail handling fee Anyway, Saturday morning was spent measuring drilling and inserting LED's, then had some personal errands to run and so I got round to the silicone part on Saturday evening. I plan to let them dry all day today, complete the wiring on Monday Morning and get these out Tuesday The Batch n3 of silver reflectors are still on the way to me, somewhere between here and California.
-
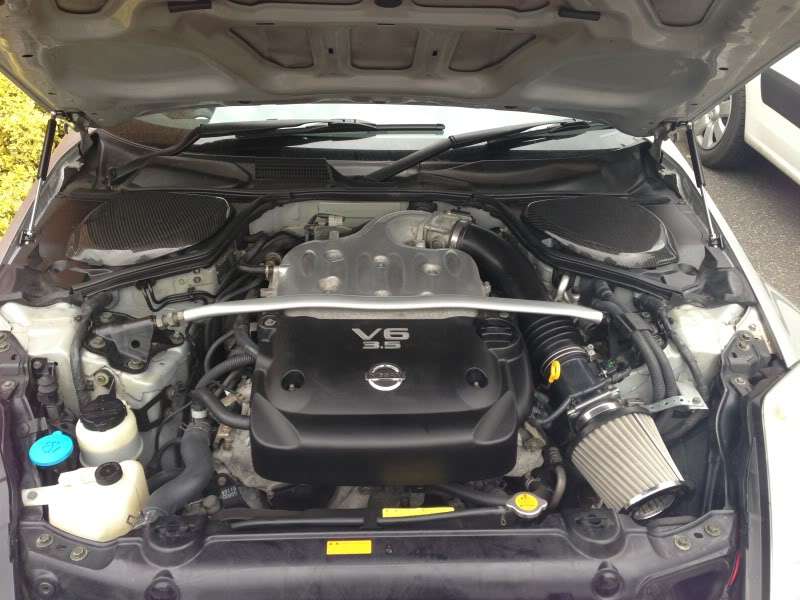
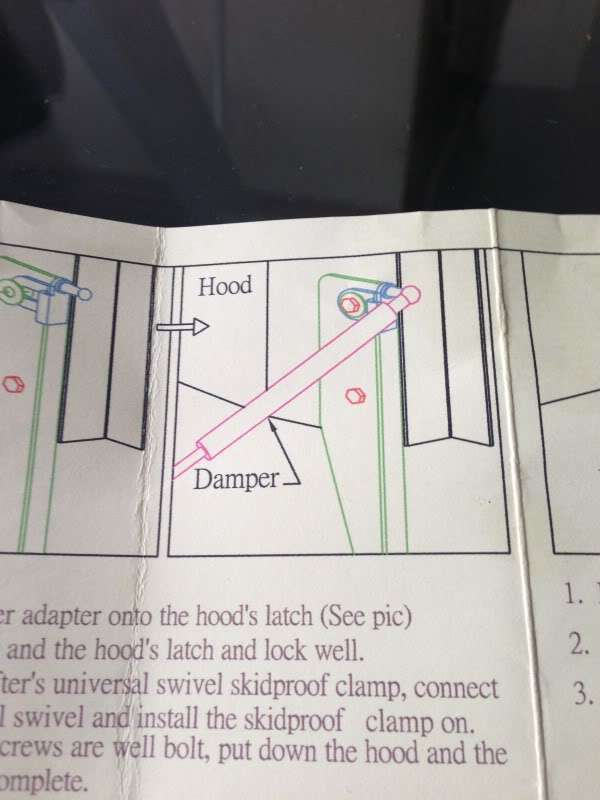
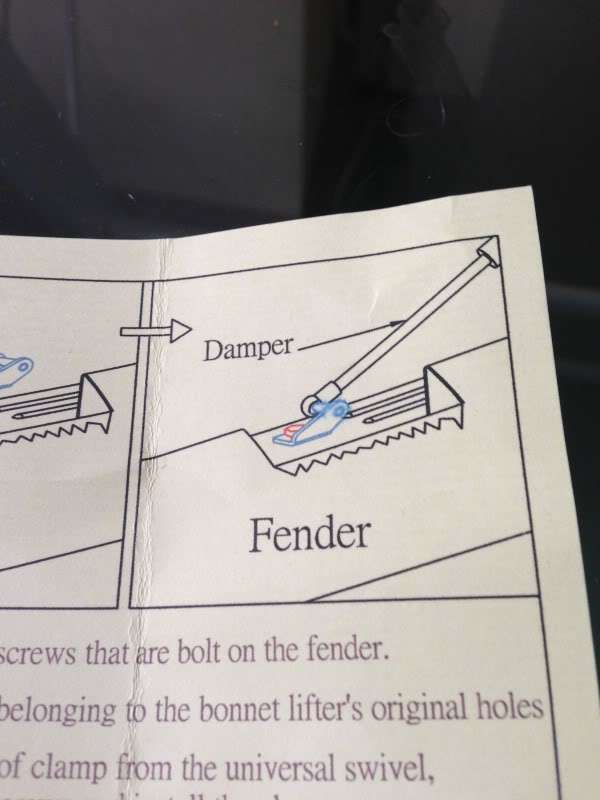
Ok, so new photo (this is also now im the first post) showing them fitted correctly. Heres two photos of my instructions, the first one clearly shows the hood and the larger diameter part of the lifters in contact with it. And now the other picture that shows the thinner part in contact with the wing.

-
No worries at all mate
-
As I say in the guide, I fitted them as per the photo and then reverted them afterwards just didn't take photos of it Cheers RT, in reality its a 10 minuite job in all honestly
-
Hey all, these are pretty simple to fit really but equally you could make a mess of it without knowing till later so thought id do a guide. I got my set from Steve at Redline Styling, this is what you get in the package. This is 2 dampers, 4 fixing mounts, 2 Allen key bolts and a Chinglish instruction set. Please take note, the black brackets are keyed, they have L or R stickers on them, this is from the inside perspective, so if your standing looking at the front of the car everything is backwards. The L bracket goes on the right and the R bracket on the left. So, lets get started by removing the brake fluid cover and popping the clips around it so you're able to remove it from the car. So, once this is out, you can see where I have attached the first of the two fixing points, this is the black bracket with a ball end on it. When you remove the black plastic cover above you will see there is already a bolt in here, this needs a size 10mm socket and it will come undone. Put the bracket over it and then put the factory bolt back in. The pack comes with two Allen headed bolts which replace the standard bolts you have just removed, I chose to stick with the standard bolt however, your choice (if you stick with standard you will have to modify the OEM plastics that normally cover this). When this is on the car, don't do this up fully, 90% orso will do. Next, remove the front bolt from the bonnet hinge, this needs a size 13mm socket and will be pretty stiff but should come off easy enough. Next, attach the bracket too it, you will notice the bracket has a fold in it which sits neatly over the hinge. Again, don't do this up fully, 90% orso will do. So, then you need to take a look at the dampers, to get them to fit and line up you need to remove the small locking pin shown in this photo, to do this simply rotate the pin, the shape of it will pull the pin out of the socket. Then, place the damper onto the hinges. The ends of them, swivel so if the ball and socket don't join up just give them a twist or a pull and make them fit. Once on as shown in the photo re-insert the locking pin you removed in the earlier step. At this stage you need to do the same on the passenger side of the car, the steps are identical. Once you have done this, carefully lower the bonnet all the way down by hand and then allow the dampers to lift it again. You may hear some metal clunking noises as the brackets and thing shift on the bolts. When its back up, tighten the bolts for the brackets fully up and repeat the open/close procedure to ensure the bonnet still closes correctly. Ok, so now you have two choices. I personally used the OEM bolts to affix the brackets to the wing as detailed above, however if you do this the plastics wont fit, so do the following. If however you used the Black Allen headed bolts, they should fit on just fine, skip this step. If you look at the photo below, you will notice two circular shapes on the flat piece of plastic on the edges, these need to be removed. Personally I used a dremmel and cut/sanded these out. Once this is done, go back to the car and re-fit the plastics, and you will have this. Its now just a case of pulling on the OEM bonnet prop and this will pretty easily come out as you wont need this any more.
