


ilogikal1
-
Posts
4,733 -
Joined
-
Last visited
Content Type
Profiles
Forums
Events
Gallery
Store
Everything posted by ilogikal1
-
I know! I was sorely tempted to buy another DI filter, but I’m moving (hopefully very) soon - to a place where washing the car at home will become infinitely more difficult, so my current filter might be re-homed to my sister’s place instead In the meantime, I’m just making do with what I can really. At least I’ve achieved something then.
-
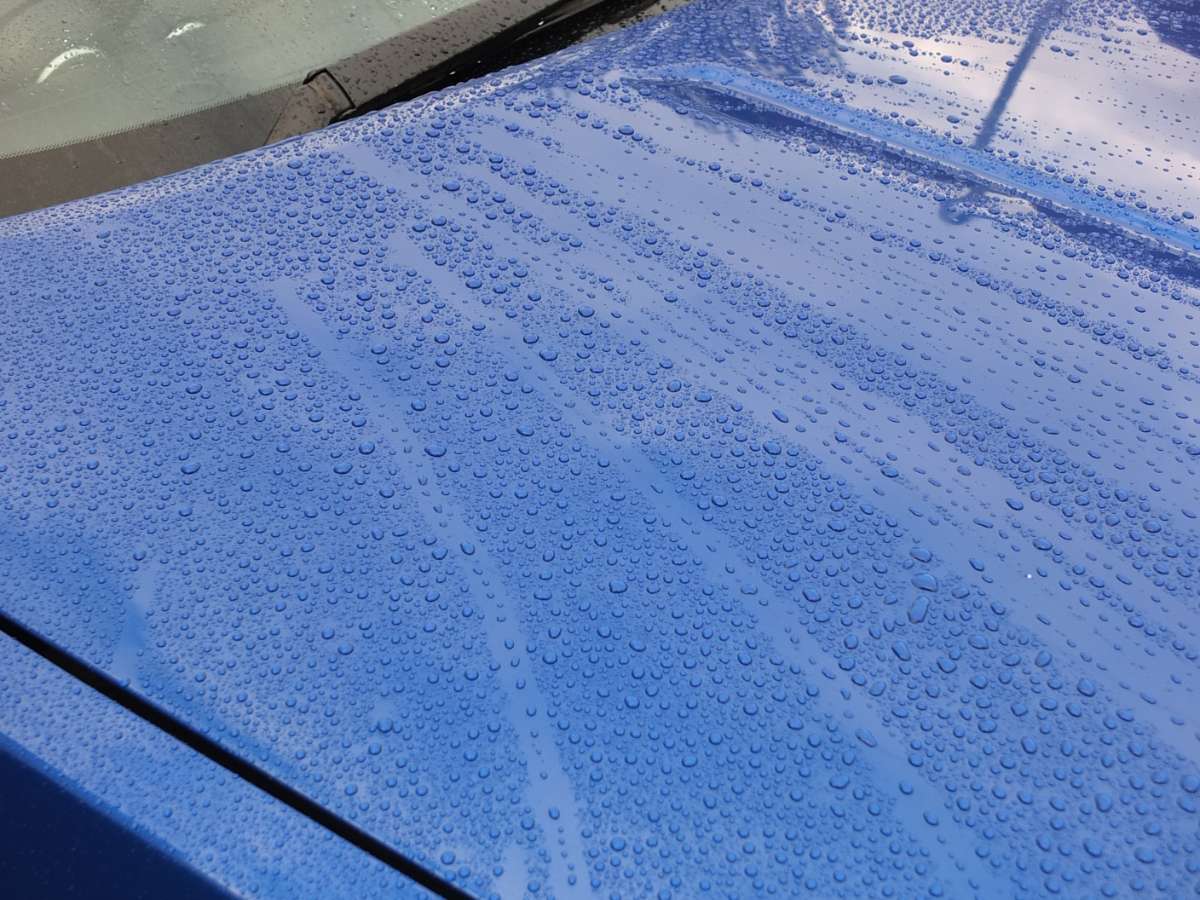
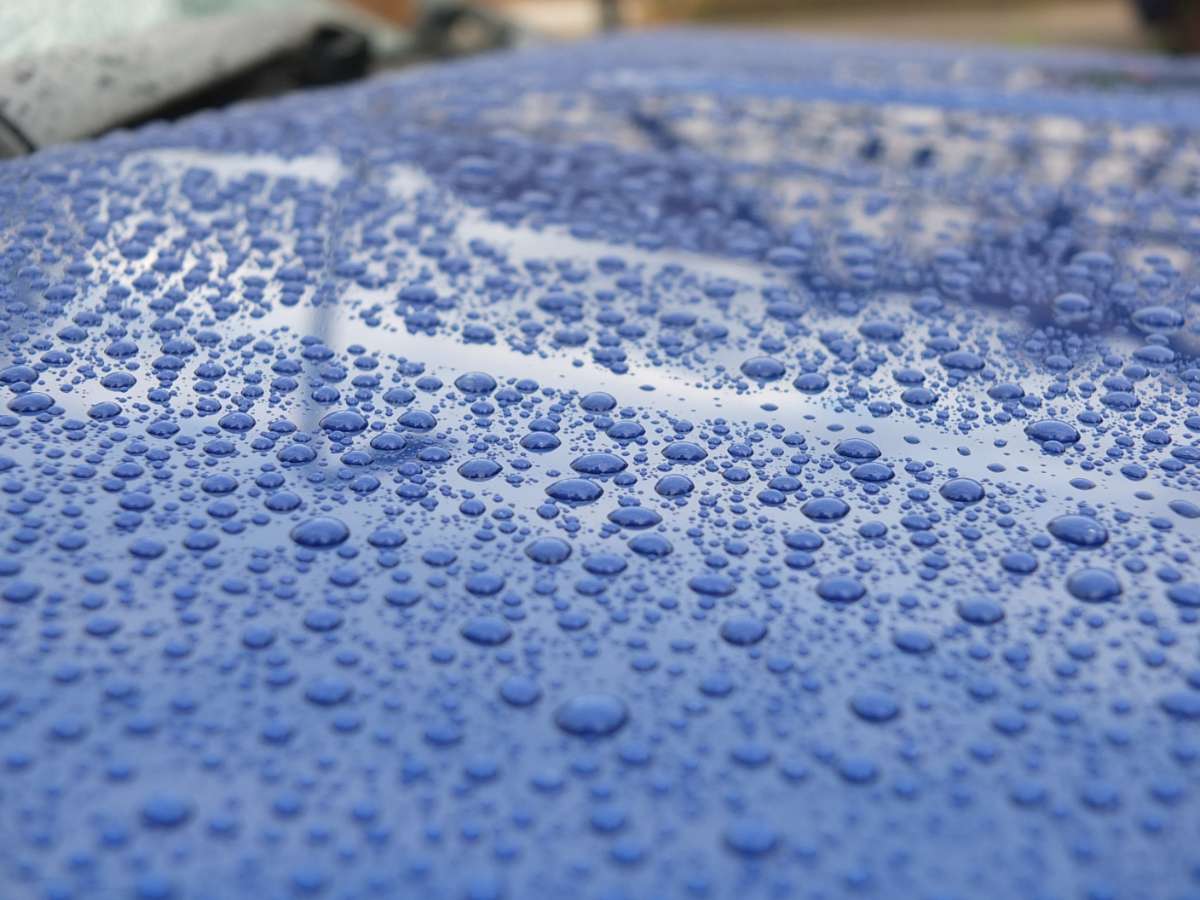
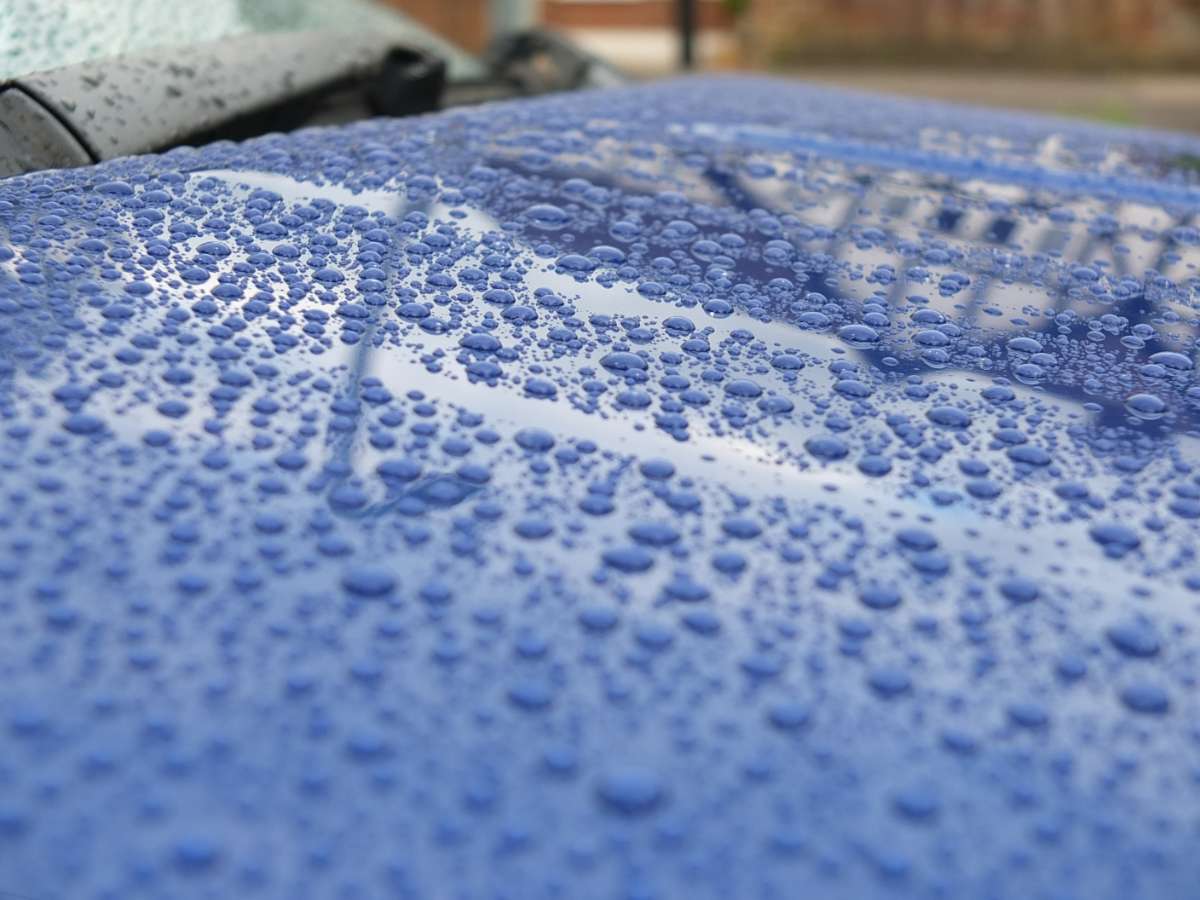
Part 2 also comes with no pictures - although that may change if it rains soon! I also revisited Hydropel on the Renault. It has been applied to some of the car, including paint, plastic trim, chrome plastic trim, glass, gloss plastic trim, polycarbonate and exterior rubber seals. Well, it did suggest it can be used on most exterior surfaces, so let's see. I did reserve some control areas, for testing purposes (and because it's f**king huge, the roof is a pain to reach in its entirety - mainly that, actually). I basically made up my own method of application for this - namely, spray directly onto the panel, spread with a damp microfibre cloth, repeat panel-by-panel, then buff the entire car with a fresh damp cloth. I still observed no hazing. I still wasn't able to over apply. I still think Hydropel smells delightful. I still haven't noticed much added gloss (although I may accept the argument that my expectations have been set unrealistically high by SiO2 coating-based LSP's, such as... well, almost everything Gyeon related actually). What I did notice with this method is that Hydropel doesn't exactly leave a slick feeling finish - it's not grabby (it's nowhere near as bad as Sonax BSD, for example) but the surface felt a little rougher when buffing treated sections than untreated. Visibly, there's no noticeable difference in appearance though so it's something I can easily live with. Depending on how I feel in 8 hours (or tomorrow) I may or may not apply a second coat to random areas. For testing purposes. Unless it rains first, then I won't. But you might get pictures instead. If you're really lucky, I might do a 2nd coat before it rains tomorrow and you get the best of both worlds. Or I might not and it might not rain at all, then you get nothing. Except more words. But that's the chance you take by visiting my thread.
-
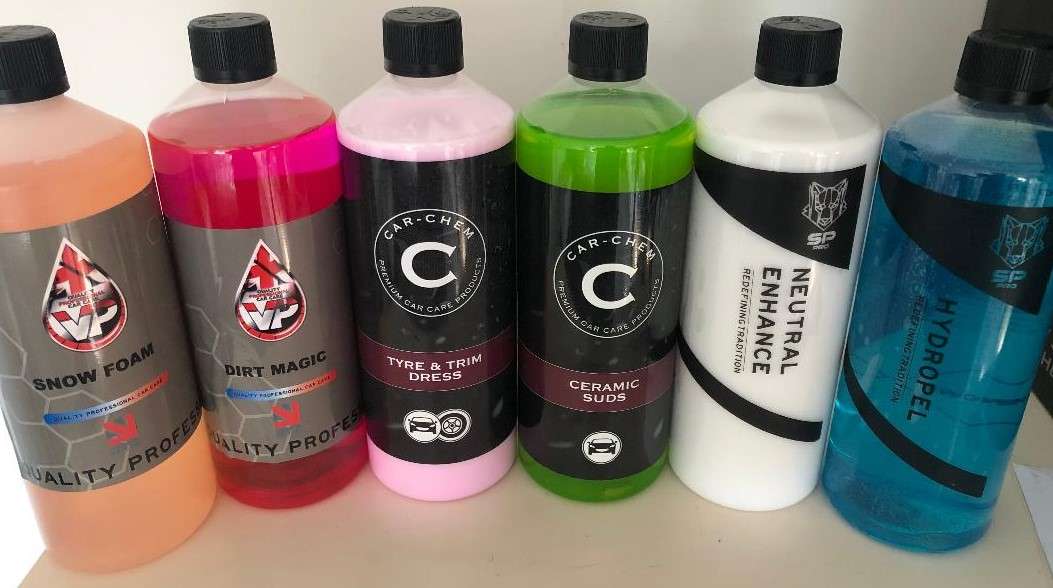
I spent this morning mostly having a lie in. All hail annual leave! But after the lie in, I revisited Car Chem Ceramic Suds and SPP Hydropel; this time on my sister's family wagon - a Renault Grand Scenic. It's not grand but it is f**king big. This is relevant. The car wasn't filthy, but it's a done a few journies up and down the motorway more recently and therefore had a traffic film and some bug splitter on it. I did the usual snow foam pre-wash - note to self, one's foam lance is in dre need of a tear down and thorough clean before the next use! I then moved onto Ceramic Suds. Now, Car Chem have been known to "bribe" (or reward me, depending on how you see it), but then I'm a proper Gyeon fanboy. So naturally I want Car Chem's Ceramic Suds to be every bit as good as Gyeon's Bathe+. So this time, I went a bit easier on the Ceramic Suds and used the recommended 50ml (ish) in 10 litres (ish) of warm (ish) chalk... sorry, water. I say "ish" because nothing was measured. Standard 2 bucket wash, but this time I also rinsed regularly - and by regularly I mean almost panel-by-panel; although I did do the sides in top half and bottom half rather than by panel and the windows were done seperately first. In fact, for those interested, I did the roof (in left and right halves) then rinsed, entire back end then rinsed, side windows, a pillars and windscreen then rinsed, etc, etc. The sides were done down to the swage line first, rinsed, then below the swage line and rinsed again (the lowest, dirtiest part below the silver trim - effectively the sills - were done seperately and last, for those interested), and it should be noted that rinsing was thorough, using a pressure washer and the 15 degree nozzle. I mention all of this because the intention was to avoid streaking. For the most part, I succeeded as well. For the most part - I noticed a little streaking on the bonnet when drying the car (yeah, I do that again now) but it was a vast improvement over the Z. I'm not what the difference was on the bonnet - it was the same shampoo mix, it didn't dry out at all, wasn't in direct sunshine (certainly less than other panels which didn't streak), the panel wasn't any warmer than others or anything tangible that I can place. Fortunately I still have plenty of product left to experiment with! I also mention it because of the durability. The sudden drop off in protection was all the more noticeable on the vertical panels - the top half of the doors were noticeably slower to sheet than the freshly treated lower section of the panel, so I can conclude, categorically, that the protection Ceramic Suds adds barely lasts longer than the wash. Which is disaapointing. It's true that Bathe+ isn't durable enough to be considered an LSP in it's own right, however it's sufficient to last a few days at least. Ceramic Suds, however, seems like it would struggle to outlast the first shower even if you don't rinse it all off when washing. I alsomentioned that I've resorted to drying the car after the wash again - this is more due to the liquid chalk that comes out of the taps around here than anything else, the intention was to minimise water spotting, which sort of worked. I wasn't quite quick enough to eliminate all water spots, but they were limited and the residue was minimal - similar to swirls, the majority of the population wouldn't notice them, but if you look they're there. Ideal world, a quick pass with a paint cleaner would have done nicely, but meh. There's also a reason why I mentioned this. That reason being that on the lower panels, my drying towels picked up some dirt. Now it's absolutely true that I could have been more thorough when washing (inasmuch as there are dirt traps that I really didn't hit thoroughly) but I was vigilent enough that the dirt picked up calls into question the cleaning ability of Ceramic Suds. Which, again, is disappointing. As mentioned, I have plenty of Cermic Suds left to test further, so I'll continue to play with it and will report back. Hopefully, durability aside, everything else (streaking, the cleaning issues) come down to user error and I just wasn't as thorough as I thought I was. It's possible after all. However, interim conclusion: stick with Bathe+.
-

Audi Grandsphere Concept (2021) - pictures, information & specs
ilogikal1 replied to ATTAK Z's topic in Other Cars
The front reminds me of a Peugeot. It doesn’t matter which one, that is never going to be a good thing! -
It's been many, many years since one has even been accused of merely attempting such a thing...
-
Okay, using waterless wash was a major league f**k up... but it ain't a £12k+ 'Teg league f**k up! Don't. Just, please, don't. I don't know if you can tell, but I'm slightly not for that daft idea.
-
Wolf's Nano Wheel Cleaner (Clean & Coat) - DW review. It deosn't last forever, but if it's just for topping up duty it pretty decent, and removes a 'then' from clean then protect... Failing that pretty much any spray sealant would work for topping up, tbh. If you've got a decent base on there, I wouldn't see the need for a dedicated product - throw your Hydropel at it (that's easy enough to use and should be durable enough for regular topping up).
-
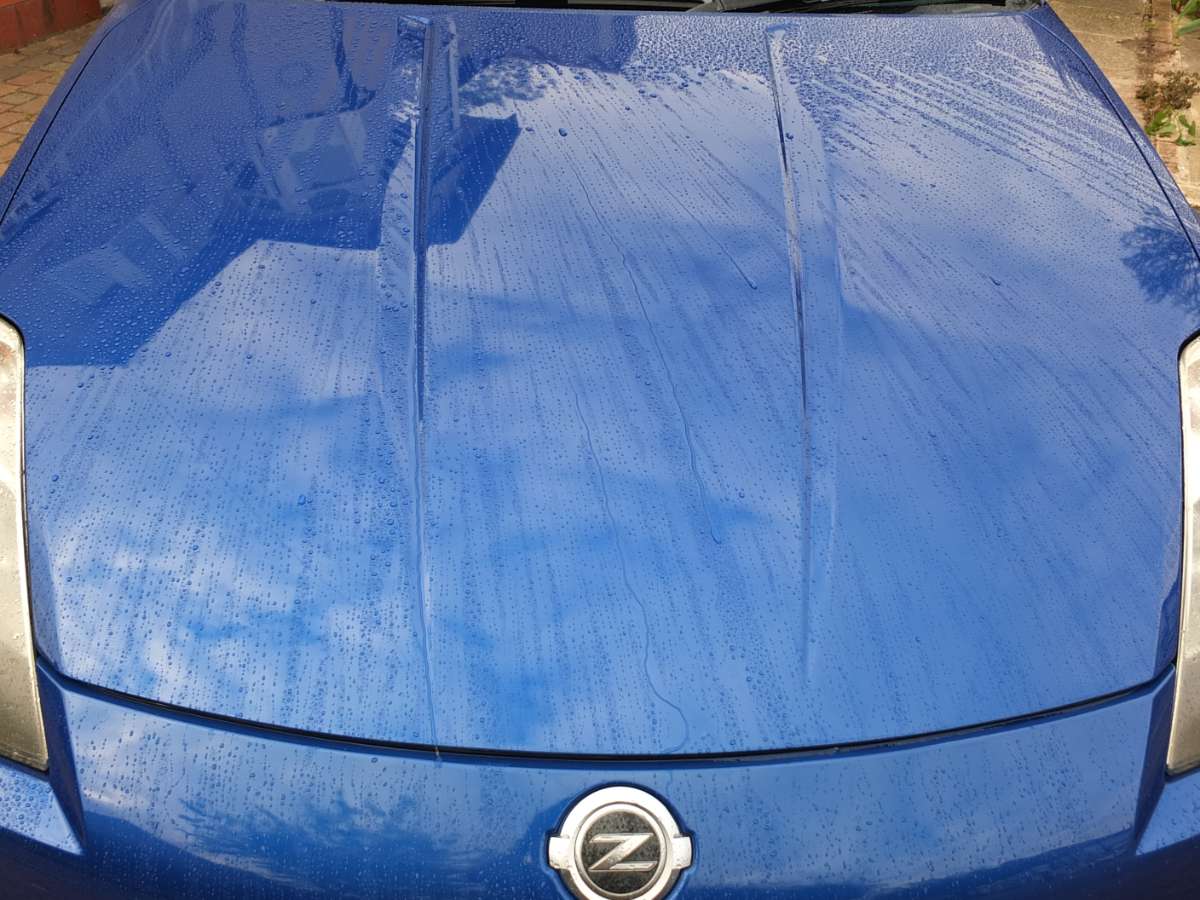
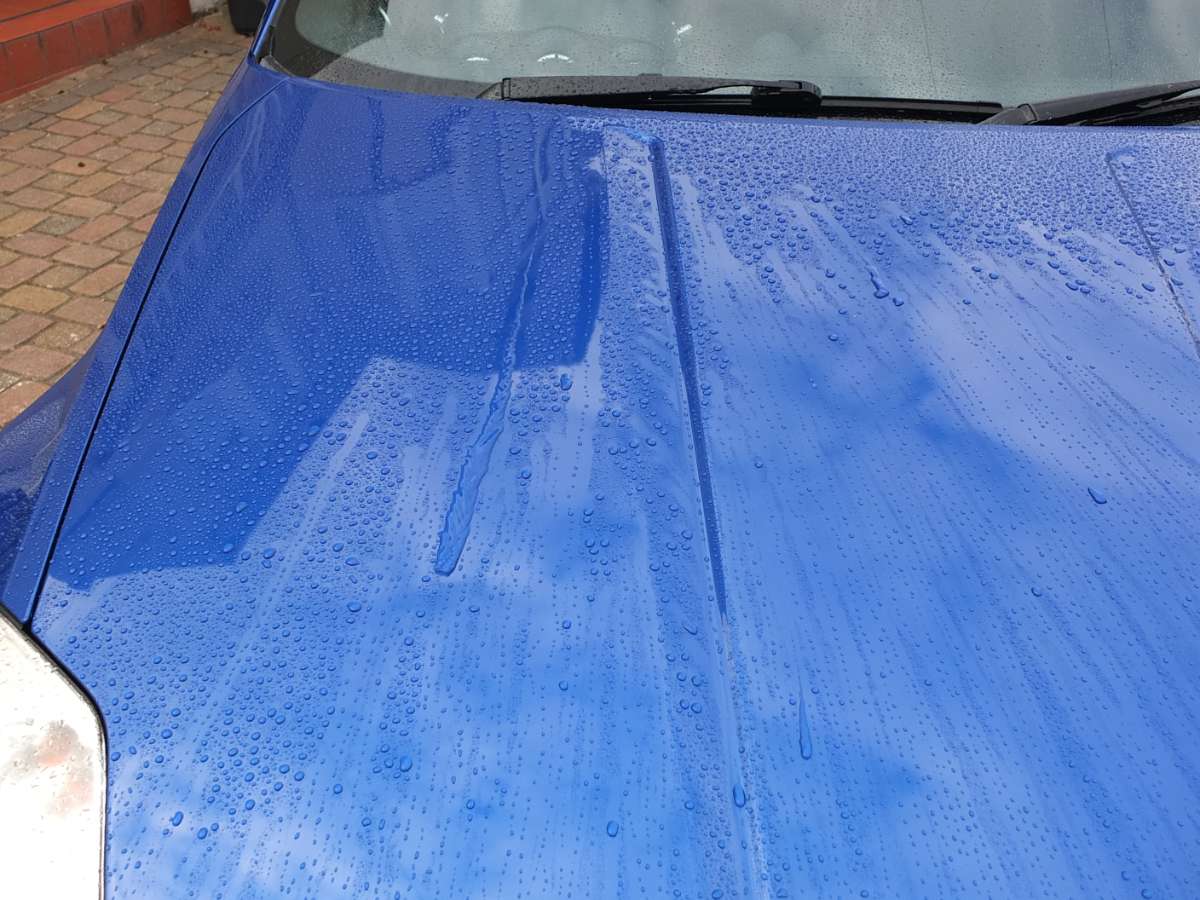
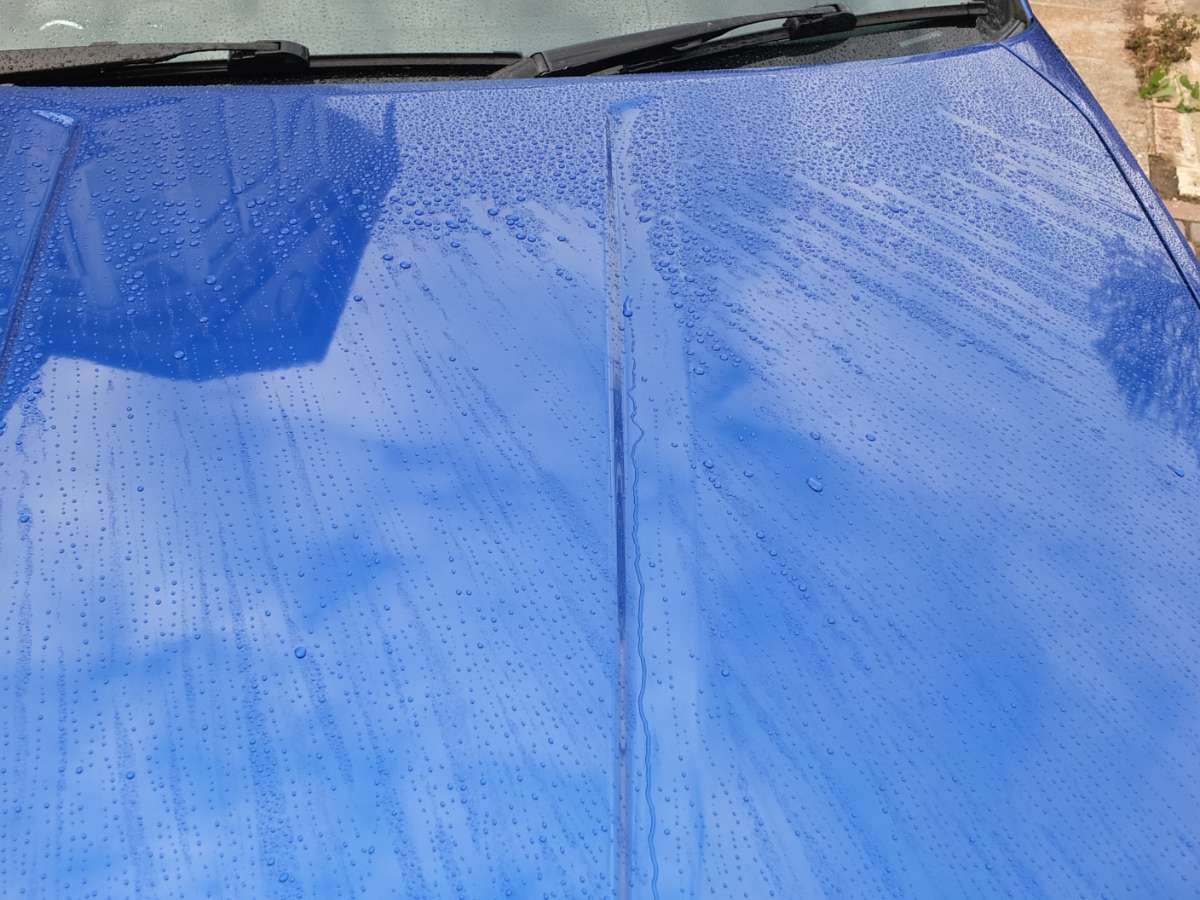
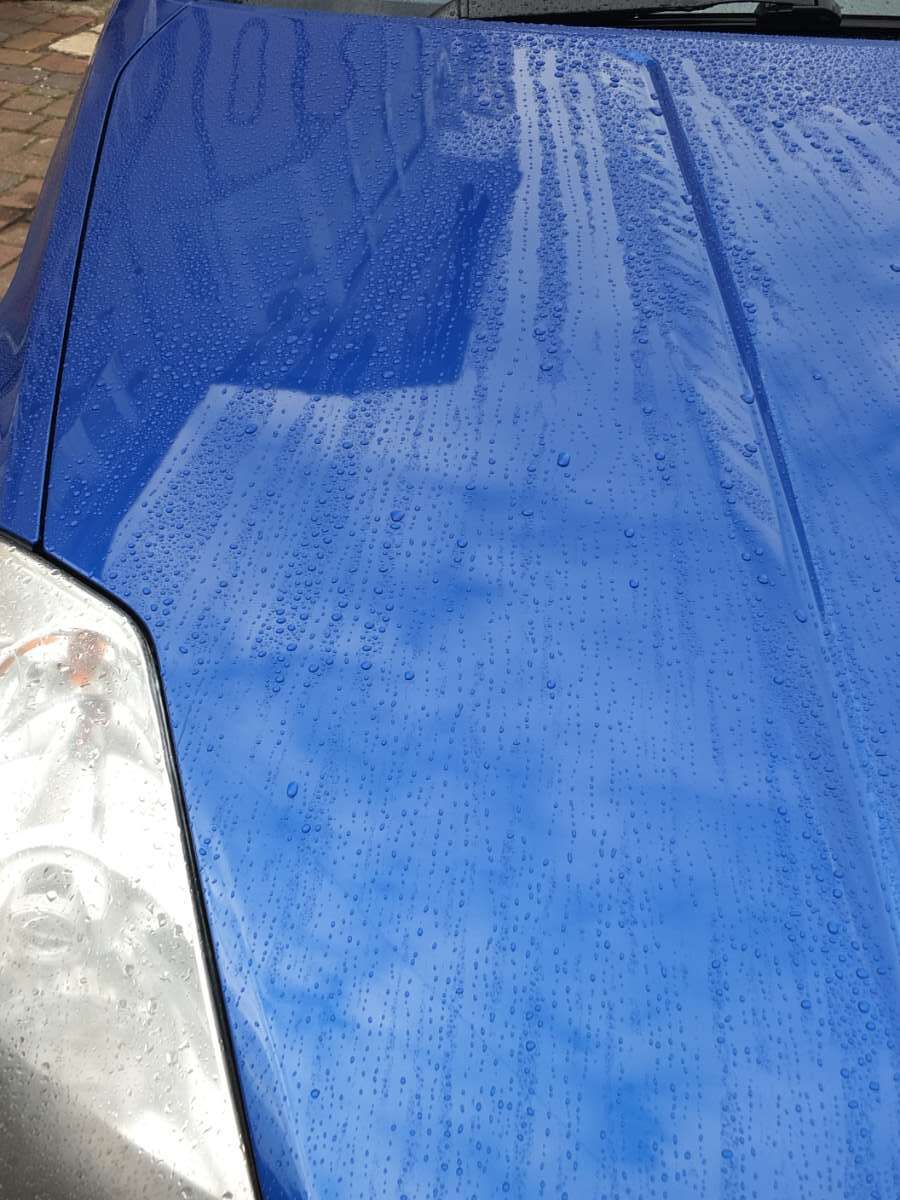
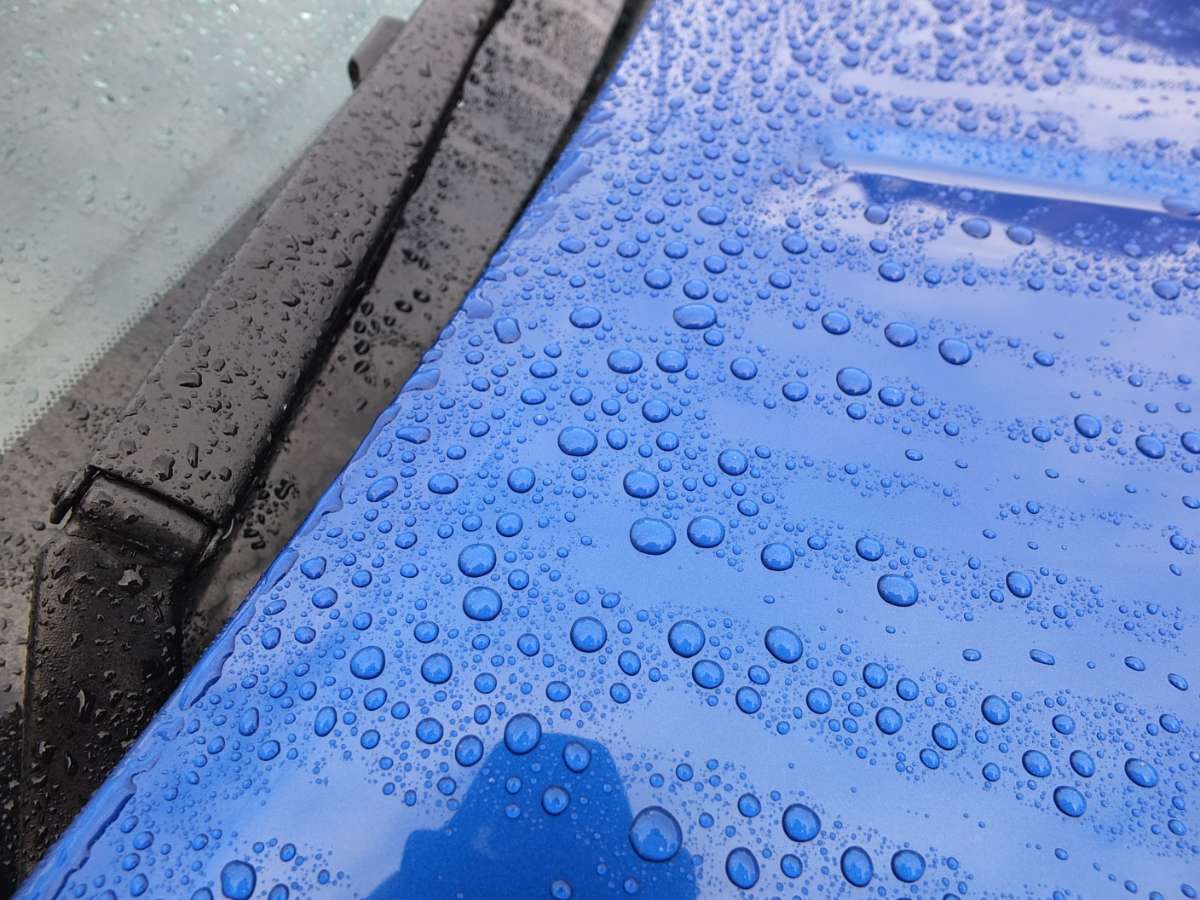
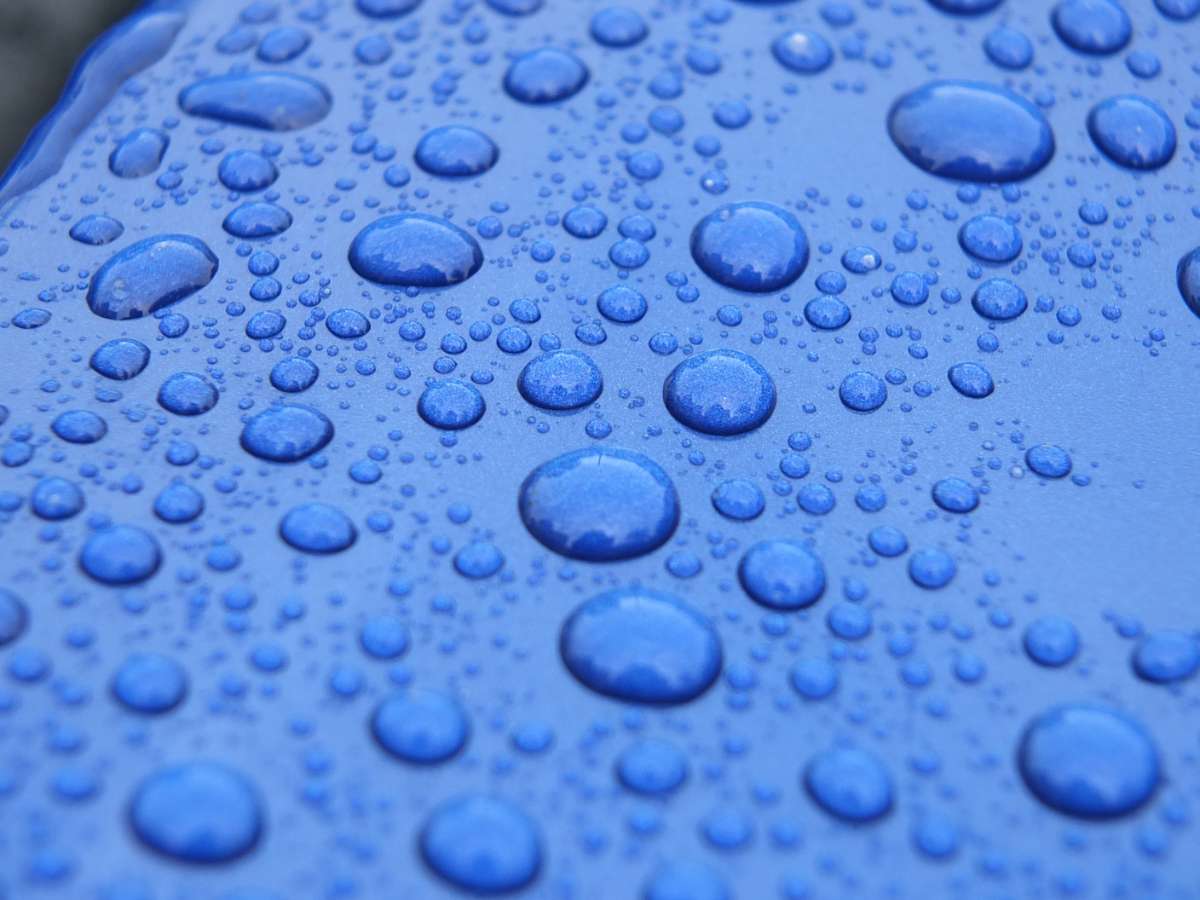
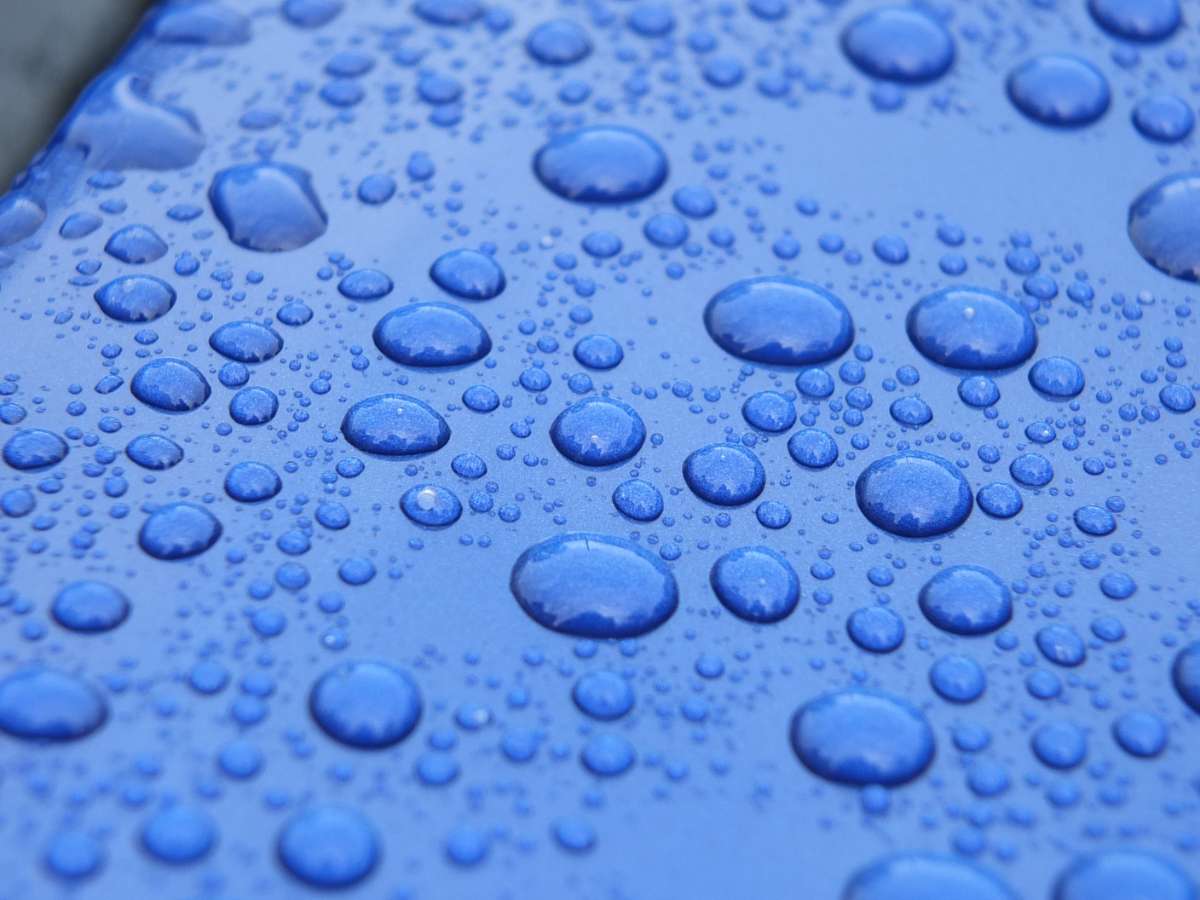
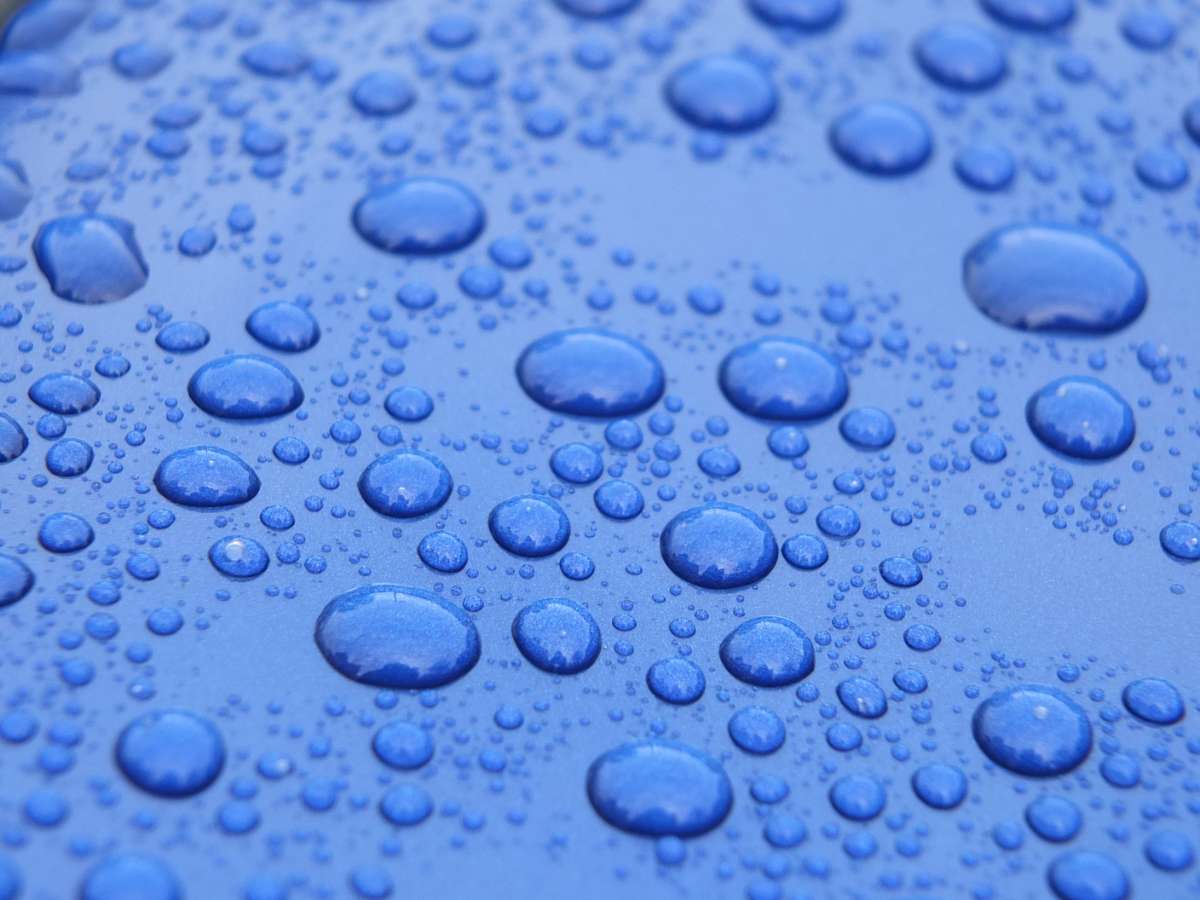
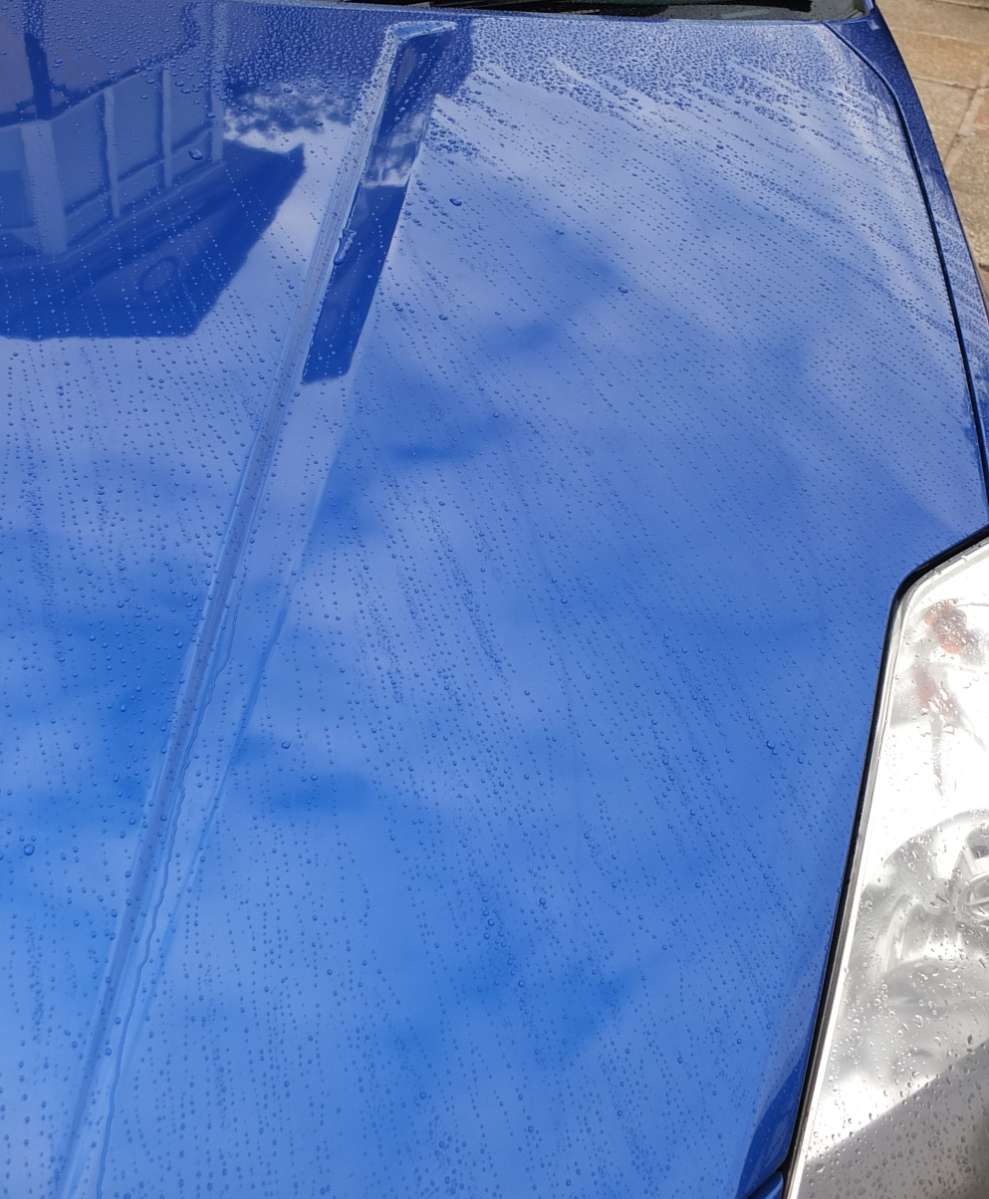
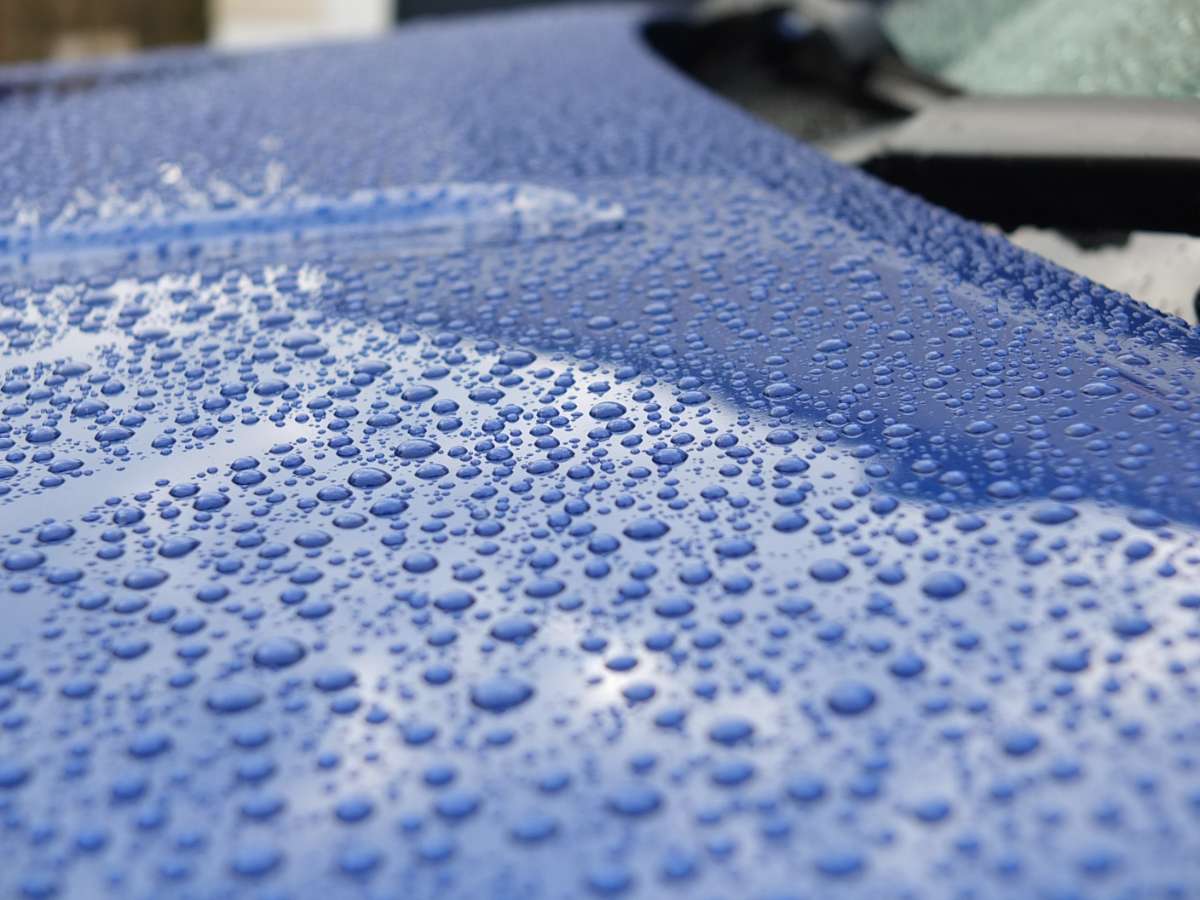
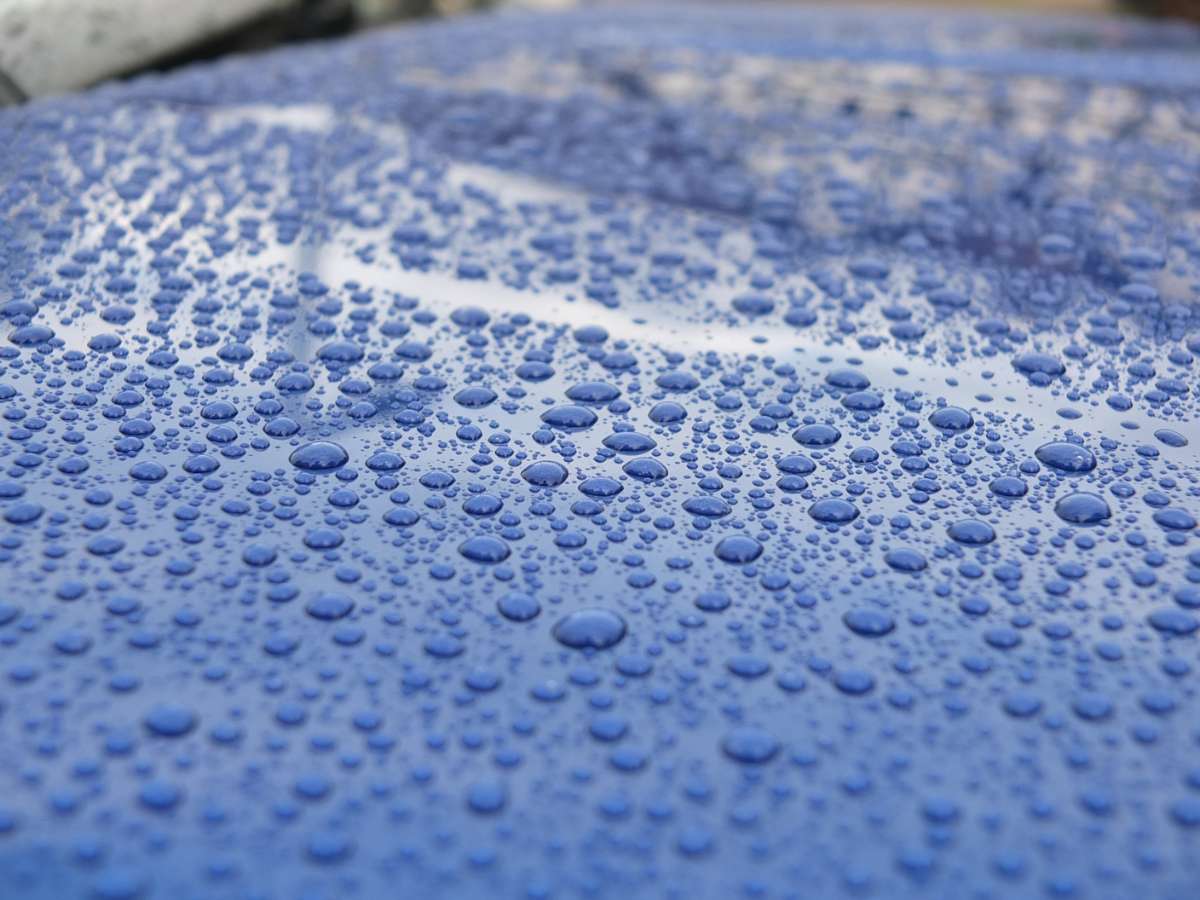
Firstly, I simply must provide a caveat, because that's the world we live in these days. Also, it's kinda what I do in these posts now... As I may have mentioned, the paint isn't especially clean right now, which is likely to affect durability and potentially beading as well. However, I have plenty of both left to do a proper durability (and beading) test following a full detail. For reference, two thirds of the bootlid is currently wearing Hydropel over Neutral Enhance, one third has Lockdown over Neutral Enhance. The bonnet is a similar mix and match; one third (passenger side) is wearing straight Hydropel, one third (middle section) is wearing Hydropel over Lockdown and the final third (driver side) is wearing straight Lokdown. The rest of the car is wearing lockdown. Roughly 1 hour 48 minutes after application, the garden hose did a thing that looked like this: Hydropel sheets a fair quicker better than Lockdown, hence there being more beading on the Lockdown topped section. That said, Lockdown sheets quite well itself. Gloss-wise, Lockdown definitely added more gloss (or glaze) than Hydropel did, although it's difficult to show on the pictures. This angle also shows the sheeting difference. Lockdown Hydropel Still Hydropel Back to Lockdown That's your lot. I'm done. I know I've let you all down, but in the incredibly unlikely (!) event that it rains during a British summer, I will probably spam with beading pics, just because I can now. I will also update as and when the sealants fall off.

-
By which I mean the white one. Otherwise known as this; Car Chem Lockdown. About which, the much more concise website says: I have to admit, following the rather emphatic marketing campaign surrounding the "sample campaign" and subsequent launch of this (it's fair to say Car Chem are somewhat proud of this product), that I was excited about testing this. Also, I will be testing it all proper like when I've managed to give the car a proper detail as well, but for the time being it's put head to head with Hydropel for literally no other reason than I happen to have both sealants to hand. Again, there's a claim of forming a glossy protective barrier. Whilst not hugely glossy, this did seem to add something - not much, but not nothing either. There are, again, claims of easy application and removal. The website instructs: Whereas the bottle instructs: At least there's some consistency here. Now, obviously I followed the instructions to the letter... I sprayed Lockdown directly on a microfibre cloth. I worked in a cross hatch pattern, one section of a panel at a time. I allowed to cure for approximately 1 minute. I did not let the product dry fully (before buffing. I did after buffing...). I buffed with a clean microfibre cloth. I left to cure for 1 hour 48 minutes before applying water and taking pcitures of beading. Becuase I didn't apply a second coat. Again, very easy to apply - just keep buffing until all (non-shampoo) streaks are worked out before moving on and it's straight forward wipe on buff off sealant. I can only imagine it'll easier still applying with a ceramic sponge, because they make application of anything easier. By spraying onto a pad, cermic sponge (or even a microfibre cloth) means it's quite difficult to over apply, but even if you do manage it you just keep spreading and/or buffing. It doesn't smell as nice as the blue one though - Lockdown is very checmically with no added scent. It's not solventy, like coatings are though, so it's not unpleasant to work with. In an effort to maintain complete transparancy, I also didn't feed this after midnight either. And now we return to our regularly scheduled programming.

-
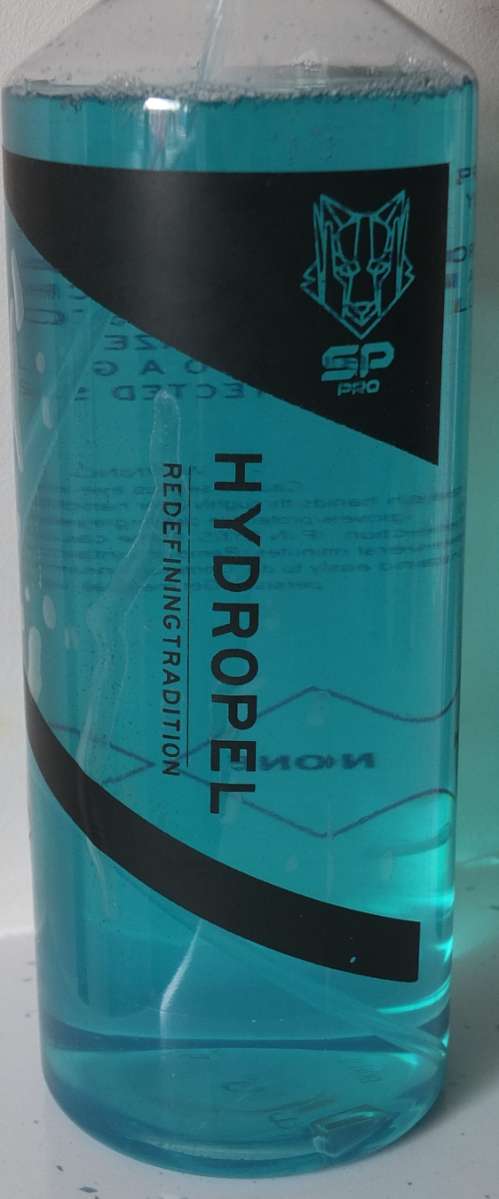
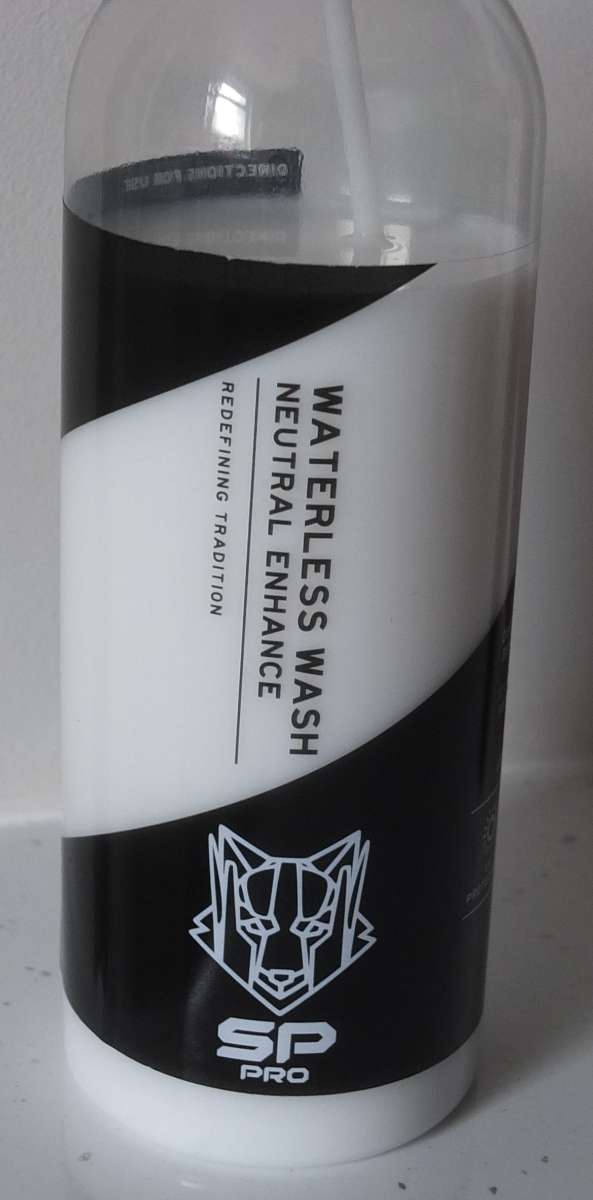
Let me (try to) make it up to you, to myself and to the inanimate object that literally could not give a toss either way. By which I largely mean, ignore the whole incident and pretend it didn't happen. The first step of ignoring it and pretending it didn't happen is to reference the post where I publicly documented the thing that didn't happen. Specifically the bit about a sealant I have used before and a sealant I haven't. Because there was nothing before that bit to reference. Obviously. Having washed the car with Fairy washing up liquid and a scouring pad to get a good, deep clean (I didn't), and having no SRP on hand to make the surface dusty I moved straight onto sealing in the swirls instead. I have two sealants to hand, a blue one and a white one. Starting with the blue one, otherwise known as this; A redefinition of tradition. Or Super Polish Pro Hydropel. About which, the website did gone done say: Ahem. Erm, I mean the website says this: Benefits & Features include: Materials tested on include paint (check) and polycarbonate (whatever the opposite of check is... uncheck I guess) "ensuring" that enitre parts of my car will be protected from all manner of autumn elements. Hydropel could not remove any exisitng wax or sealant, because there wasn't any (Fair washing up liquid, yo). In fact, existing protection from Cermic Suds could be enhanced. Also The premium barrier was applied in single layer. Partly because 8 hours is a long time. Largely because I'm half-arsing it. Despite it being simple and fast to apply. And Not so sure about the surface glaze - although, as previously mentioned, the car is dire need of a deep clean so gloss was limited. However, it does specifically state that it creates a surface glaze, which I cannot say I noticed at all. And this is a guy who regularly applies very similar waxes side-by-side to spot the visible variables, so I unless you're a gloss-meter, you probably won't notice the claimed surface glaze. But then I applied waterless wash to automotive paint, what the f**k do I know anymore... Anywho, the instructions (which I totally read before use, obviously) on the website say: Whereas the bottle label shouts: Now, it turns out I'm (currently) the kind of guy that follows the instructions on the bottle... when I'm conducting a head-to-head test and want to make sure I'm applying the product in the way the manufacturer wants me to rather than however the hell I want to, which is typically how I apply products. Also I'm not the (currently) the kind of guy who checks the instructions on the website until writing about it on the interwebs. So anyway. The website insists on a cool panel. I did not check for that because the bottle suggests no such requirement. The website insists on spraying Hydropel directly onto the surface whilst the bottle demands I SPRITZ HYDROPEL ACROSS MY PANEL AND ONTO MY MICROFIBRE. I will admit, I spritzed the panel but sprayed the microfibre. The website instructs that I use a clean Microfibre cloth. The bottle shouts... well, that thing I just said that equates to a primed microfibre, not a specifically a clean one mind you. Also as mentioned, I loaded the microfibre with product. I'm not sure if that counts as clean or not at this point. Technically it's unclean with product. The website did gone done say to gently wipe the area clean. The bottle yells to WORK INTO THE PAINTWORK IN A CROSS HATCH MOTION. I gently wiped in a crosshatch pattern. The website then directs to use a 2nd microfibre cloth to lightly buff any residue. The bottle, meanwhile, bellows to ALLOW A FEW SECONDS TO HAZE. BUFF TO A GLOSSY PROTECTED SHINE. I allowed a few seconds for Hydropel not to haze (that I noticed anyway) and lightly buffed with a fresh cloth. Now, the bottle mentions nothing about 8 hours between layers (or layers... or anything else barring a warning about serious eye irritations for that matter) and neither bottle nor website mention anything about curing time before getting it wet. So, like Gizmo, I figured there was no timeframe to introducing water. I also didn't feed it after midnight. But this is Hydropel, not a Mogwai, so I have exposed it to sunlight. I can confirm, sublight does not kill Hydropel, which makes it less high maintenance than the (literal) monster from the 1984 comedy horror film. Topical references aside, I can tell you the following things about Hydropel. It's a blue liquid that smells rather delightful actually. I have resisted tasting it. So far. It spreads very easily across the surface. It doesn't seem to haze, but does buff quite nicely. It's really easy to use and seems almost impossible to overapply. I say almost because if you over apply you just spread it further until it dries out, so unless you're pouring this stuff over the panel it's virtually foolproof. I'm not convinced by the claims of adding gloss (or glaze), but it does add protection. Pictures will follow after a brief interlude and a message from our sponsors.
-
Fair.
-
Look, sometimes sacrifices have to be made in the name of science. I'm not proud of it. I'm not happy about it. Mistakes were made, lessons were learned and things will most definitely improve going forward. Now we all just have to accept this and move on. Also, Really, this is all your fault(s)...
-
If it helps, I'm not even sorry. ...Okay, I am, but in my defence the car needs a polish (and a proper detail) anyway and it was literally a last resort. To make it up to you all, there's a new test underway. A write up is coming when I'm not spending my entire day waiting for the Spa Speedboat Racing to get under way.
-
Some of you might want to make sure you're sitting down when you read this one... Streaks aside - which is no easy thing with limited products - there was one other significant problem I encountered. Now, I'm not saying I live in a hard water area but the police use tap water to draw chalk outlines of bodies around here, used car dealers use tap water to write prices on windscreens, pubs use tap water to advertise on blackboards and... some other uses for liquid chalk that exist. So, I'm dealing with streaky shampoo and fresh water spots that look more like someone's trying to repaint the car in white. The water spotting is fresh enough that normally I'd expect both streaks and water spots to be dealt with easily enough with a good wash. Except that's what caused both, and I don't have an alternate shampoo nor a water filter here. But I do have this... ...for all intents and purposes, a shampoo without the water; should solve both. So I actually used this, a waterless wash, on the paint of my own car. Take a moment to let that sink in. Right, now that you've taken a minute, I'll include the following caveats; firstly, I used it very carefully and very liberally. Secondly, I was exceptionally careful not to apply any extra pressure with the cloth at any time. Thirdly, all of my cloths were clean and damp before use - I also used a fresh cloth for every panel and didn't touch the lower panels. Finally, I used it on as damn-near a clean surface as could be (aside from the water spotting). Oh, and one panel had some overspray on from a spray sealant that was sprayed near the pane just as the wind blew in the wrong direction mere minutes before. So that said, in conclusion to this waterless wash thing; the water spotting was hit and miss. Most of the deposits were removed except for the outlines. So not great. The streaks were... not touched. At all. So not good. It didn't seem to make the slightest bit of difference on the sealant overspray either (which was later removed with a microfibre cloth just dampened with liquid chalk... sorry, tap water). Now, obviously, the glass was subjected to the streaking and water spotting as well. Bring not paint, I was much more comfortable applying more pressure and even scrubbing, so I tried both, just to see... Nope. Granted, it removed more of the water spots but didn't remove them entirely. All in all, I think I'd have been no worse (or better) off with a quick detailer. Or much better off with filtered water. Suffice it to say, I'm not converted and the waterless wash will be resigned to underbonnet plastics or non-car duties. I'm not even tempted to use it up on door shuts. Unfortunately I had 1.5 litres of this stuff... Coming up in the next exciting episode, an sealant I've used before and a sealant I haven't. Don't tell me that's not enough to tempt you back!
-
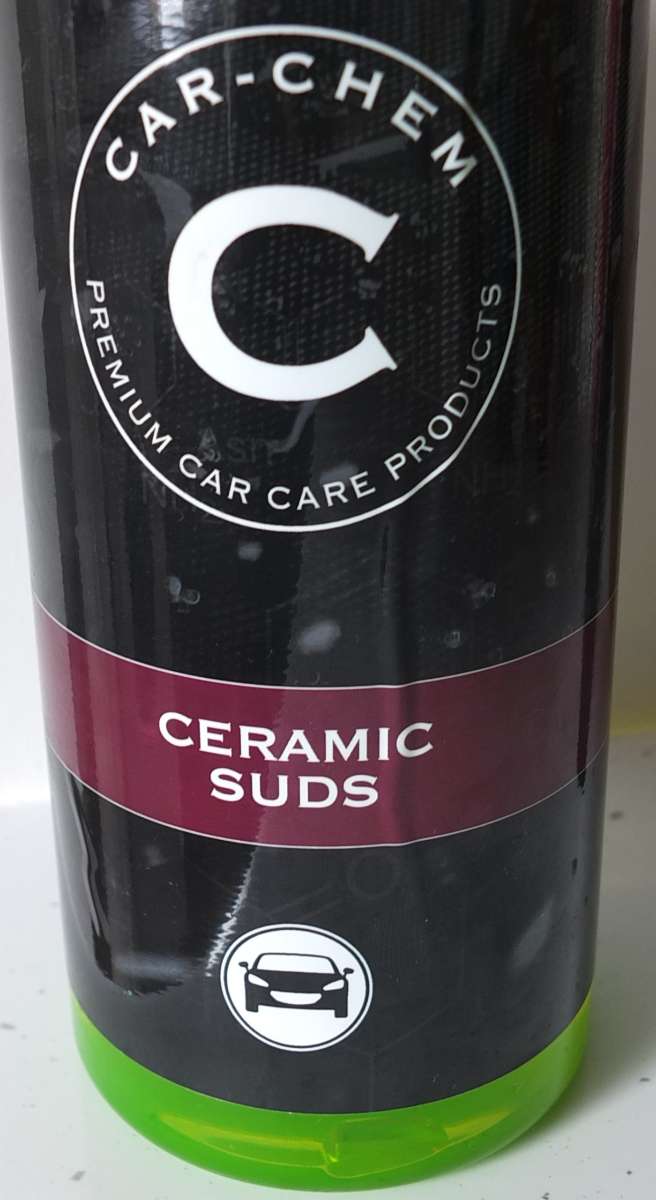
I had a whole "bit" about starting with this picture: But I ruined that by failing to follow through (grow up at the back there, less sniggering please!) in the last update. So instead, today's intro is this. Sorry. Also, sticking with the whole not-really-new-content thing, back on the last page (specifically here), I did a thing with the green stuff. Today, I did another thing with the green stuff. The thing I did today was like the thing I did the last time, but today I did the thing properly. Now, I know you're all following that and not one single person is thinking "what the f**k is this guy banging on about?". So because no one is thinking that I don't have to explain that today I used Ceramic Suds in accordance to the instructions... well, more in accordance to the instructions that last time. Said instructions being: If you haven't clicked on the link already and don't remember a specific post from nearly 3 months ago, here's a breif recap; I fired Ceramic Suds at the car with a foam lance and didn't like it. Well today, I: 1) Alternatively used their Snow Foam as a pre-wash. 2) Then I went off-script slightly. The script telling me to add 50ml of shampoo to a 10l bucket. I have a 15l bucket. But I'm good at maths. So I added 100ml to my 15l bucket. Then topped up with 12.5l (ish) of warm. I chose water to add my warm. 3) Using a wash pad, I applied the solution to my vehicle's surface to clean, working from the top down, making sure all areas are covered. 4) Finally, rinsed before the product dried. As mentioned, I pre-washed with Snow Foam first. To give a base line, this is several minutes after rinsing the foam: Now, either the LSP's added last time are either comepletely worn off or completely clogged up. Or possibly a bit of both. Personally I'd attribute it to approximately 73.09% to column A, 26.91% column B. One thing is for sure following today's wash, the car is in dire need of a claying and probably a deep clean, paint cleanser, the lot. But I'm dealing with limited supplies here, so that'll have to wait. Instead, today was just a wash and quick LSP coat (which I'll come to later). I'll try to refrain from treading too much old ground from just one page ago. To demonstrate my determination to stick that very empty promise, I'll immediately follow that sentence by discussiong the scent. Again. I still wouldn't call it lemon scent (iced or otherwise); it's more checmically scented than citrus, unique, not unpleasant... but not lemon! For those who have tried Bathe+ (yep, I'm even making the same comparisons again.) Ceramic Suds foams up a fair bit in the bucket, more than Bathe+ does initially but like Bathe+ the suds do die down quite quickly. For those who haven't tried Bathe+, you clearly don't follow my recommendations anyway so it doesn't matter what I say. Ceramic Suds does feel quick slick on the surface and, similar to the other aforemoentioned measuring stick, it adds instantly noticeable protection. The water sheeting just from wiping the wash pad over the surface was quite impressive. Whilst the other product beads amazingly, Ceramic Suds sheets impressively instead. Like this (for transparancy, "this" is after the rinsing the first 3rd of the bonnet): As I said, instant protection. I fully intended to test it's durability, having done the same with that other product. So I did. And I can comment on the (apparant) durability... which should tell you something in itself. I also mentioned that I cleaned the car from the top down. That meant starting with the roof. I also mentioned that I rinsed before the product dried. Because I started with the roof, that got rinsed a fair bit more than other areas (because, thorough... is not the right use of that word, but let's pretend it is), and by time I'd finished washing the car and gave everything one last rinse, the roof was showing no signs of protection anymore. I then wiped over the roof again with a clean wash pad and it did again. So I'd estimate 5, maybe 6 rinses (with a pressure washer) and it's gone. I might do a proper durability test for it one day, but I'm not convinced it's going to hold its own against Bathe+. The other thing I noticed today is a lot of streaking. Now there are two likely cuprits for this; too much product (despite my awesome maths skillz) and/or I was working in direct sunlight. I did rinse more regularly after I first noticed it, but that doesn't seem to have made much difference, and the streaking is just as bad on the shaded side of the car as the suuny side. So my primary theory is too much product. I'll try less next and forget to report back. Also, I did notice that whilst Ceramic Suds adds instant protection to paint, it doesn't do anything at all on plastic. The badges and wing mirror bases showed no sign of playing well with Ceramic Suds. Although I can't remember any such issues with Bathe+, I also don't specifically remember it working well either, so it could be more general than just a Ceramic Suds issue. That's your lot for today. I might update you on the LSP(s) tomorrow, if you're good. If you're not good though, I'm going to turn this forum around and we'll just go back home... no, wait, that's something else. Move along.

-
That depends on the all important missing qualifier; upgrade to what? Upgrade to the 370Z steering? Possibly not. Upgrade to complete lack of steering function the original rendered model had? Probably. It’s all in the context…
-
I would have been all over this, having followed your thread since (almost) day 1, but for the timing - fancy keeping hold of it for another year until I've got some money not tied up in a property purchase? GLWTS, Col, someone's going to pick up a very well cared for car!
-
My immediate thought was S2000. My second thought was that it would be quite fitting for Nissan to go with 22 year old styling for this model.
-
Ah, okay then that’s a fair obstacle. I stand corrected!
-
Pretty sure you don't need a driving license to own a car. And it's not like you'll be driving it back here...
-
The QD is only really necessary for any stubborn residue, to save applying too much pressure with a cloth; not essential though. That sounds more like too much product clogging the pad and getting thrown off. As you've found, a little lighter on the polish and you should be fine with that though.
-
Yep, that's quite a lot, depending on what you're using. Assuming you're pre-mixed stuff it should only take 1-2 sprays per panel (although it's one of those things you find yourself getting more efficient with the more you use it). For clay residue, either a thorough rinse or a wipe over with QD should remove everything you need to before polishing. If the white bits flying off were still wet and at the beginning of the passes, then definitely too much product on the pad and what you're experiencing is sling. It's best to prime a fresh pad (assuming a 5inch pad*; 2-3 pea sized spots of product on the pad and spread it around the face of the pad with your finger until it won't spread any more - optional, but often worth doing is to spritz the face of the pad with a QD first. Not too much, one spritz across the pad is plenty, and it just helps to lubricate the pad on the initial pass); but once it's got some product on already, you don't need to add any more than you're using. 2 pea sized drops per section is plenty - again my technique is to spread some polish across the panel/section you're about to work on by dabbing the pad on the panel before switching it on, that way you end up with less product on the pad to begin with but pick up product as you move over the panel. You may find something else works for you though. *If you're using different sized pads, adjust quantities accoridngly. The other thing that causes sling is not having the pad flat on the panel when the machine in on - the Z is a curvy car so smaller spot pads are useful, especially on the quarter panels, pillars and bumpers. There's no secret tip for this though, it's just a case of concentrating and being aware of the angle of the pad and surface. The solid compound left behind is textbook not working the product enough. "Enough" is determined by what you're using, but in all cases you want to keep working it until it's clear and you almost can't see it anymore - most polishes will start to "cure" (as such) like a wax after it's worked, the aim is to get it as thin as you dare really (and that might mean more passes or working over a larger section - with more experience you'll find what works best for you though so keep at it). You can never have enough microfibres when polishing. No matter how many I have, I always need at least 3 more. Always! The foam bottle that comes with pressure washers isn't a proper foam lance so if you don't want to shell out for a lance then switch to a citrus pre-wash - spray on, leave to work for a few minutes, rinse off with the pressure washer. You'll never get good performance out of a snow foam without a proper lance (or at least a foamer pressure sprayer). Although I should note that there are much cheaper versions available than the one I linked to before (e.g.). Just make sure to get the right fitting for your pressure washer if you do get one. The reason the bottle that comes with the machine isn't any use for foam is because it doesn't incorporate the innards of a proper foam lance (which you can see here), so instead of having foam hit the panel, you just get soapy water which foams slightly on impact instead. As I say, if you want to use snow foam then invest in a proper foam lance, otherwise spending money of snow foam will be a waste of money really. Give it another go and let us know how you get on. There's plenty of good detailers (pro and amateur) on here that are happy to share advice - most are less verbose and demanding than me too!
-
Okay, first up, don't use Fairy on paintwork. Granted, the car won't spontaneously fall apart, but it's not designed for cars (or paintwork, etc.). If you need to top up foam with anything (because you're running low) then use car shampoo. (Not aimed at the OP, but more generally; if you're topping up becuase the foam is rubbish, just buy better foam...). Despite what some consipracy theorists would try to convince you of, Fairy is no good for cleaning cars under any circumstances. Next up, wash technique: Foam on a dry car - rinsing first does nothing except encourage the foam to run off quicker, reducing the contact time and therefore efficiency. Whilst you do want the foam to run off (take note Magifoam!) you need the balance between working time and run off, all snow foams that are designed to work (rather than just look pretty - take note Magifoam!!) are designed to work on initially dry panels. You might have seen this coming, but use a good snow foam instead. And a proper foam lance if you're not already. If you don't want to/can't use a proper foam lance, switch to a Citrus Pre-Wash instead which will be infinitely better than using a snow foam badly. Rinse thoroughly & methodically after the foam/citrus pre-wash and before washing. Wash with the 2 bucket method you've used as usual & then rinse again. As Stu has already mentioned, from this point you can do one/two panels at a time. If you run out of time, re-wash before starting again another day (whether you pre-wash & wash will be determined by how dirty the car is when you start again, but I would always recommend a contact wash of any panels you'll be working on as a bare minimum, regardless of how clean the surface looks, before claying). Clay, as you have done. Rinse the panel again. Polish - always start with the lowest cut and only work up (in stages, i.e. polish OR pad, never both together) until you're getting the cut you need. If you're using a DA machine polisher, I'd suggest 6 slow passes to properly work the polish. Adjust accordingly if using a rotary. Work on a small section on one panel (about one 6th of the bonet is a fair area, for example) to start with. When you feel you've worked the polish enough, use the IPA wipe to remove any polish residue and inspect the area - if you need to, step up either the pad or the polish to get more cut, work the polish, IPA wipe and re-inspect. Repeat as needed. Once you're comfortable with the results, move onto the next section using the pad/polish combo that you're most comfortable with. The IPA wipe should be used for removing polish residue to inspect the actual results of the polishing and/or before waxing. There's no benefit/purpose to IPA before polishing. Once you're happy with the polishing, then apply wax as usual. In terms of what you've acheived, whilst you've not tackled everything there is some correction evident. I'd suggest taking it slow with the passes and working the polish for longer over each area. It looks more like you've rushed and just not acheived the correction you were after rather than done anything fundamentally wrong, so hopefully the steps above will help you address that and improve the results you're getting. Don't get too disheartened, just take a bit more time. As above, split the claying across multiple days as well, just clay a panel before you polish it. If you're just picking up the following morning where you left off before, a quick wipe over with a soapy mitt will suffice in terms of re-washing (you could even foam the area and wipe over with a mitt before rinsing if that's easier). Whilst not necessarily essential if you're polishing anyway, I would advise it to remove any micro-particles especially when parked on/near an active road even if it still looksclean, just to minimise the risk of grinding fine dirt into the paint when claying and/or polishing. I wouldn't recommend microfibre pads for soft Nissan paint (hard German paint perhaps though), it's too abbrassive and you're more likley to cause (potentially irrepairable) damage than correction to be honest. On soft Nissan paint you shouldn't ever need to go higher than medium cut polish on a medium cut pad, especially for swirls. If you're sturggling to correct swirls on medium/medium combo, you probably need to look at your technique over stepping up further and even then I'd always suggest an alternative polish to extend the working time over going more aggressive at that stage. Extra care should always be taken for RDS anyway, but it's important to know how much paint you're working with before tackling those.
-
As much use as YouTube videos are, drop our resident professional a message and see if @zippypooz has any helpful advice/input for you. I suspect whether it's user error or media issues, he will be able to identify it.
-
16k in 14 years means it’s spent the vast majority of its life sat around, get a good look underneath - check for rust etc, but also check for dried out bushes and such like that perish through under use. Give the suspension a good once over and see if you can get a feel for how often/much fresh fuel is out in it. If it’s sat with a full tank for long periods of time, it’s going to degrade. Personally I wouldn’t be looking to part with 5 figures for it. That low a mileage is more of a red flag for me than a selling point, the red paint is rare but not worth a huge premium, IMO. Low mileage doesn’t always mean it’s going to cause you less problems, so good luck with it.


