

ross27
-
Posts
285 -
Joined
-
Last visited
Content Type
Profiles
Forums
Events
Gallery
Store
Everything posted by ross27
-
Im just trying to gauge interest as i would be struggling to get the time to do the next set, but good to know people woukd be interested. The halos and lense's cost about 180, and all the paint probably takes it to around £250. I'll update when i start the next set.
-
Would anyone be interested in the lights i have on my car? I am tempted to do my spare set and make the shrouds a lighter silver This time. Id happilly fit them too if someone was local. Would be looking for your lights in exchange and a payment to cover the cost of the halos and paint. (i.e no labour)
-
I'll take a set for the 370z if you can get them?
-
Ive got a feeling this is Sy's car (or was his car if he has sold it now?) Fangs were painted black. Seen a couple of white ones in the area recently.
-
Just take your time and you will see all the connectors. Just remember not to unlug the sensor plugs. The most awkward one is getting your hand up to the washer hose connector, as you have next to no play in the bumper. I kind of pulled the undertray back to get my hand up. Now ive done it once, i recon i could have a bumper off in about 15 mins.
-
Once you have taken off all the pop rivets and bolts, the bumper will pull out from the lights/under the wings. It will come free, but feel restricted. First thing to disconnect is the washers. The washers are fed from the reservoir which is on the driver side. There is a rigid hose that comes from under the reservoir over to the bumper. This elbow has a squeeze type connector. You squeeze it together, and it then pulls off from the tank. Next is the three sensors located in the post above. The top centre one is behind the plate. You need a 10mm socket, and need to remove the two nuts on the back of the sensor, and then it can hang free. DO NOT disconnect the plugs. Next you have to tackle the sensors behind the fang area. These are tricy, but are only two small hex screws. You need a 10mm socket to take these out. Once the screws are out, the plastic cover unclips from the bumper, and can hang free, with the sensor attached. If that is not clear, let me know. Unfortunately i did not take photos when i done mine as i was running out of daylight!!
-
All sorted thanks to Alex!
-
Looking for a wheel jack from a 350z/370z to stick in beside my newly acquired spare wheel. Let me know if anyone has one they are not wanting!
-
Thanks guys!
-
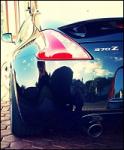
Apologies for the lack of updates! Had the sealed up, got some waterproof wiring connectors, and finally installed them last weekend. Could probabky have the bumper off in around 10 minutes now i now my way around it. Tricky parts were making sure to remove the pop-up bonnet sensors, without unplugging. Im told that even with the battery disconnected, unpluging these can thow a fault. It is hard to photograph the Halos on my phone at night, as it cannot handle the brightness. I will need to dust off the DSLR and try and get some better shots. The halos come on with the side lights. Very happy with the results, however part of me still wishes i painted the shrouds a lighter silver.
-

Fuel gauge - last dot not lighting up,when filled up?
ross27 replied to Brayster's topic in 370z Technical
Mine done it for a period of time last year, but it hasn't returned since!! -
I made my own exhaust when i owned a Mazda 3 MPS, and i used a QTP valve on mine. Open was straight through, and closed went through a large silencer. If my 370z didnt already come with a custom exhaust, i would have made one for it too!
-
Doubt i could even get mine off the drive! Fortunately i left the Focus out in the street, but even then i think it will be a struggle. Meant to snow right up to mid day tomorrow!!
-
You could buy a few sets of DS2500 front pads and bring them back with you and sell on. Vivid Racing have them on offer for only $150, however the postage to uk is $110!! Let me know if you are keen, as id definately take a set off you http://www.vividracing.com/catalog/ferodo-ds2500-front-brake-pads-nissan-370z-0911-p-150899074.html
-
My car was doing the same Josh, and it was just the brake fluid. I put in some Mobil Dot4. Im sure it is dot3 standard, but i believe they can mix okay.
-
ASDA: 245/40/19 98 Y - £196.20 (FITTED) 275/35/19 100 Y - £216.60 (FITTED) Total - £825.60 Unfortunately they cannot compete when it comes to the MPSS. Edit: I am getting local quotes of £8-10 per tyre for fitting.
-
Im i the market for front tyres, and ive always heard good reviews on the MPS2 & 3. Never had any experience of the MPSS but everywhere i read reviews, everyone is raving about them. If this is any interest to people just now, Oponeo is the cheapest i can find: Oponeo: 245/40/19 98 Y - £161.00 each 275/35/19 100 Y - £196.00 each Total - £714.00 Tyre Leader: 245/40/19 98 Y - £163.89 275/35/19 100 Y - £200.89 Total - £729.56 Its also worth noting that if you are happy to use tyres manufactured in 2010, Tyre Leader have the 275/35/19 at £185.19. Anyone got any other places worth checking? I will be placing an order in the next week or so!
-
It is 245/40's you are after, not 45's. Unfortunately, they are a bit more: http://www.camskill....:_2_Noise:_71dB Nope I have a base 370z with 18s ... Like these http://pages.ebay.co...id=151430977934 Clocked the 18" after i hit send! Sorry mate! Im needing two front tyres, so i have been scouring every site out there for decent prices!
-
It is 245/40's you are after, not 45's. Unfortunately, they are a bit more: http://www.camskill.co.uk/m55b0s326p102433/Michelin_Tyres_Car_Michelin_SuperSport_Pilot_Michelin_Super_Sport_-_245_40_R19_%2898Y%29_XL_TL_Fuel_Eff_%3A_E_Wet_Grip%3A_A_NoiseClass%3A_2_Noise%3A_71dB
-
Looks great!!! If i had any colour other than black, i would have done the same
-
100% agree. If only there was a Black Edition in my price range when i was buying! This car is lovely, and worth every penny you are asking!
-
Any plumbers around?Leaking bath into downstairs flat!
ross27 replied to skidder's topic in Off Topic Discussion
The reason i asked about weather was due to a problem i have had recently. Moved into a house in Sept and have been non stop DIY. Before plastering the living room i notice a damp spot down the wall and up high at the ceiling. Being under the bathroom i thought it was the plumbing, but it actually was perished sealant on the bathroom UPVC window. Water was getting in at the edges of the sill, dripping down inside the wall but behind the gyproc/tiles, and appearing in the living room below. If it has been raining a leak could be a possibility? -
Any plumbers around?Leaking bath into downstairs flat!
ross27 replied to skidder's topic in Off Topic Discussion
Hopefully ive not missed you say it already, but where is the water appearing in the flat below? Above solid ceiling? Down a wall? At low level? Also, if you did empty a full bath, how much of that water would you say appears down stairs? What has the weather been like? Are the rainwater downpipes internal or external to the building? Trying to rule out any other possible causes. -
Finally got round to sealing these back up. First off i got the heat gun, and softened up the existing glue. Once warm i worked it back into the groove, as when i split the lights, it left a distinct channel where the lens sat. A nice smooth bead all round should allow the lens to re seal itself again. Anywhere it looked thin, or i knew a fair amount came off on the lens, i added in a small amount of butyl glue. In total, i used a 2-3mm diamater bead of glue all round, just to be safe. Before: After: Then for re assembling, i again got the heat gun and softened up the glue in the channel, then loosely applied the lens back on. Next i took headlamp and placed it in my makeshift oven, and heated it up for about 15 mins each. This is the same process i used for opening the lights, and it works surprisingly well. All sealed up: And a hint at what else i have been up to with the car:
-
Looks spot on Josh! Might just have swayed me to push the button on an order!

