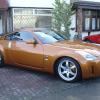
Gervais Posted June 5, 2010 Posted June 5, 2010 I didn't see the point in doing a project thread when i bought it as it was supposed to stay standard :o But I've done a few mods and have some planned so there may be some interested peeps Bought the car in Feb, got to the dealership to pick it up and it was gleaming in the sunshine And then i got it home It's GT spec and spec is as follows 3.5v6 - 276 bhp LSD Xenons Climate control Brembos cruise control lightweight RAYS Full heated leather Bose sound system including sub Folding mirrors etc etc... First thing i did was change the number plate bulbs Then as the weather started to get better i gave it a proper going over, polish and waxing it etc Sun had gone by the time i finished hence it looking more brown than orange Then a few days later it snowed Then I took it back to Nissan as i had it booked in from when i bought it so they can replace the Rear CV's under warranty and also look at the radio as it was skipping CD's. Got Qashqal number 1 Very hi spec as it was an ex demo, boaty and slow as hell but very comfy! Got the car back with the CV's replaced but had to book it in again as a new stereo and body control module were on order (all free ) Went back a couple of weeks later and i got Qashqai number 2, this one had nicer wheels and Sat nav with reversing camera built in. I then wired in a phono lead to the tape deck and ran it into the cubby between the seats so I can use my MP3 player without changing the head unit. Got hold of instructions on wiring the mirrors up so they fold when the car is locked so wired this in. (Big thanks to AlexZ!) Then i set about checking all filters and fluids etc and found a few leaves in my air box so they were promptly sucked out with the hoover Next were some 'Z' badges from egay, ended up getting 2 of them 30 quid cheaper than usual :cool: to I also debadged the boot lid. I gave it another good clean, polish and wax and this time the sun was still out :cool: Was bored so thought I would check the throttle body and give it a clean, there was alot more dirt than expected! nice and clean Fitted it and then reset it and it seems to pull more smoothly. Today i was bored and finally decided to do something i had been pondering for a while, had a quote from a sign place up the road and they wanted £50. Then he mentioned that i should try spraying it instead and then if it goes wrong vinyl it I remembered I had some black paint and laquer left so this was what happened... Bumper off Bumper taped up and ready Bumper prepped to reduce the huge stone chunks which were missing Then spray time Sprayed the grill and the lower part of the bumper And the final result I also sprayed the splitter so it wouldn't look out of place Fitted back on the car Didnt cost a penny and looks much better imo :cool: Future plans are: Clear out the fob light (I have the LED bulbs to replace the fog but cant get the back lights off ) Facelift LED lights 20mm wheel spacers all round 30mm eibach lowering springs 'Z' badges for the wheels Y pipe back exhaust - Thinking scorpion of japspeed K2 And if i intend to keep it long enough and money allows Supercharger conversion. :cool: Quote
ATTAK Z Posted June 5, 2010 Posted June 5, 2010 I like it you're going down a similar route to me only mine's GM Quote
captain Posted June 5, 2010 Posted June 5, 2010 Excellent. Can you give an idiot's guide to the respray on the lower bar below the grille. i.e. how did you prep and what did you spray it with. Ta. Quote
IanS16 Posted June 5, 2010 Posted June 5, 2010 Very tidy, looks brand new The grill/lip spray looks awesome too Quote
Gervais Posted June 5, 2010 Author Posted June 5, 2010 Thanks for the comments everyone Captain - Firstly I washed the grill and lower bumper thorughly to remove any dirt/bugs etc. For the lip I used quite a coarse sandpaper at first to even out the areas stones have smashed into. I then used a slightly less abrasive paper (280) and then 400 with plenty of water to get it smooth. Sprayed on a light coat of Halfords satin black spray that I had lying around. I rubbed this layer back a bit with the 400 grit again as wasn't happy with it. I then applied 3 more coats of the satin black leaving it 15 mins inbetween each to dry as it was quite a warm day. I wanted to do more coats but ran out of paint I then used halford laquer and gave it a 4 coats of this to try and help it last against stone chips. Most people would have used some primer to begin with but I did the top and lower grills on my golf and they were fine for two years. Don't do what i did though and get your spray cans mixed up as i nearly sprayed it silver thinking it was the laquer can, and this was after i ran out of black paint Hope that helps I should have taken pics along the way for the guide section Quote
buster Posted June 5, 2010 Posted June 5, 2010 good work mate....black and sunset do really work well and i should know Quote
Millzzz Posted June 5, 2010 Posted June 5, 2010 Think I'm going to do that lip spray to mine Next week now! Quote
Gervais Posted June 10, 2010 Author Posted June 10, 2010 Went to DVLA this morning to get my plate sorted. Quote
maz0 Posted June 10, 2010 Posted June 10, 2010 If your a little tiny man, that plate will be class! Quote
Gervais Posted June 11, 2010 Author Posted June 11, 2010 I would say I'm average, was the only one i could find to work with my name and have the first part mean something Quote
Gervais Posted June 16, 2010 Author Posted June 16, 2010 Throttle controller came yesterday but no one was home to sign for it. Managed to get the girlfriend to collect it for me today. Was very simple to fit (didn't take pics as was too excited ) Heres some pics on where im mounting the display for now. Eco mode - goes from 1-5 Normal Sports mode - goes from 1-7 and one further out I was sceptical about the difference it would make but it really does make a huge difference, only been out for a short drive but I am more very happy with it Big thank you to Leon for supplying it Quote
captain Posted June 16, 2010 Posted June 16, 2010 Coming along. Now get the number plate position, bumper-tuck, exhaust and wheels sorted and you'll have a half-decent car. front: back: Oh...............and a stubby. Quote
Gervais Posted June 16, 2010 Author Posted June 16, 2010 Front plate i may sort when the bumper get's resprayed due to all of the chips. Not too sure on the bumper tucks and the wheels are defo staying Either Exhaust or LED rears next, but gotta pay insurance this month so they may be a couple months away Quote
buster Posted June 16, 2010 Posted June 16, 2010 Front plate i may sort when the bumper get's resprayed due to all of the chips. Not too sure on the bumper tucks and the wheels are defo staying Either Exhaust or LED rears next, but gotta pay insurance this month so they may be a couple months away you could always put wheel spacers on m8 .will make a hell of a differants.i used 20mm front and 25mm rear fills the arches so much nicer. bumper tuck is a free mod and easy. and the stubby is pretty cheap to do.. but looking good m8. Quote
HEADPHONES Posted June 16, 2010 Posted June 16, 2010 Love the first 2 pics. Paint is "ON FIRE" Bumper looks more aggressive too Quote
Pimm Posted June 16, 2010 Posted June 16, 2010 Your car is looking very nice matey. I never liked this colour but my buddy Captain has the same colour and it has grown on me Your rear foglight is easy to do you do not need to take the whole bumper off, it will not take long to do Best of luck and keep the pics coming Quote
Gervais Posted June 17, 2010 Author Posted June 17, 2010 Buster - Spacers and stubby are on the list I did buy a stubby but the base didnt fit that on the car properly so returned it and will get an s2k one. Pimm - How can you do it without getting the bumper off? As i was having trouble with my rear lights as they seem stuck in the top lug and i've already cracked one (good excuse to get LED ones though ) So was going to do that when i have the new ones. I've already got the LED fog bulbs shipped over and ready just couldnt get my rear lights off Thanks for all the comments Quote
Pimm Posted June 17, 2010 Posted June 17, 2010 Buster - Spacers and stubby are on the list I did buy a stubby but the base didnt fit that on the car properly so returned it and will get an s2k one. Pimm - How can you do it without getting the bumper off? As i was having trouble with my rear lights as they seem stuck in the top lug and i've already cracked one (good excuse to get LED ones though ) So was going to do that when i have the new ones. I've already got the LED fog bulbs shipped over and ready just couldnt get my rear lights off Thanks for all the comments Do a search for (clear fog light) and there is a how to ! The rear bumper will loosen enough so once the rear lights are off you can get your hands down inside and take out the lights in the bumper. The bumper only needs to slide back at the top about 6 inches and the rest is history. I will search for the link Quote

Recommended Posts
Join the conversation
You can post now and register later. If you have an account, sign in now to post with your account.