Sargara Posted October 18, 2016 Posted October 18, 2016 (edited) I decided it's probably about time to make my own topic now, after all I've owned the car for almost 2yrs now but never really felt I'd done enough to justify it or quick enough for that matter! So what follows will be abit of a re-cap of the past year+ to get up to speed with things I bought the car from Junction17 (... I know!) and it was a completely standard GT with 32k on the clock. The first thing I did was eBay a set of Ray alloys as it needed new rubber all around so it was the perfect time for man maths! Rays on with new rubber: The standard aerial above didn't last long either. That was next on the hit-list: All fitted: Next up was cleaning up the appearance. A clean set of (dealer unbranded) number plates and some Plasti-dip for the bumper: (excuse the flash) It was my first attempt at Plasti-Dip and I'm happy with the result: The next cosmetic mod to be done was to address the wheels so some spacers were ordered and fitted during a brake refresh: And fitting shortly after some (slightly rusty....) BlackDiamonds discs: That was it for cosmetics and my attention then shifted to the performance side of things and my most expensive mod to date was ordered: This was fitted to compliment a plenum spacer, velocity stack airbox mod and panel filter. My friend who also has a 350z had booked us both in for a remap at Horsham and I wanted to make sure everything was in place ready. On the day: My mates: And the result from all that? Pretty chuffed! With that out of the way I decided to tidy up the interior, an aftermarket gearknob and a Royal Steering retrim were fitted. Before: After: Which almost brings me up-to-date with where my car is currently, the last area of attention which has been the lights. I sourced a (2nd hand via the forums) pair of rear LEDs fairly easily which were probably the easiest modification to fit: And fitted along with a fog-light clear out: So that brings me up to where the car is currently essentially. This is just the bits I grabbed pics of along the way and doesnt cover the boring/routine stuff like: - Banana Arms - Oil sump leak (twice) - P1 Service + all fluids + sparks - Window Motor etc that have all eaten into my zeditus budget along the way Edited October 18, 2016 by Sargara 3 Quote
Si8pny Posted October 19, 2016 Posted October 19, 2016 Surprising the difference the rear lights have made. Do you have any further plans for it? 1 Quote
Sargara Posted October 19, 2016 Author Posted October 19, 2016 Hi Si8pny, yes its already in progress actually which is sort of the motivation for creating this topic. I'll post full details up soon when they are fitted. And getting some decent pictures of the car is also on the to-do list! Quote
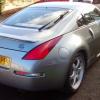
Sargara Posted October 19, 2016 Author Posted October 19, 2016 (edited) Popped out on my lunch break to try and get some worth while photos as a stop-gap until I can arrange a session with my mates SLR: Edited October 19, 2016 by Sargara 1 Quote
davey_83 Posted October 19, 2016 Posted October 19, 2016 (edited) Beautiful, also its grey not silver 286bhp prior to remap, wow these engine do respond decent to breather mods!! Any more plans? David Edited October 19, 2016 by davey_83 Quote
Sargara Posted October 19, 2016 Author Posted October 19, 2016 Beautiful, also its grey not silver 286bhp prior to remap, wow these engine do respond decent to breather mods!! Any more plans? David Its registered with the DVLA as Silver, that's good enough for me The headlights posted above are the current plans, then maybe a Tarmac lip if I need more black to balance them out. In an ideal world, I'd like a set of 18 Varrstoen ES222 but I cant justify the price with perfectly good rubber still on the Rays currently. Quote
Sargara Posted November 2, 2016 Author Posted November 2, 2016 Mmmmm... Depo headlights "Soon" (weekend hopefully). Quote
Jay M1988 Posted November 8, 2016 Posted November 8, 2016 Any update on fitting your depo light's bud? interested in getting a set myself just wanted your opinion on fitting Quote
Payco Posted November 8, 2016 Posted November 8, 2016 Looking good. It must be a gem. Junction 17 car that is still running. 1 Quote
Sargara Posted November 8, 2016 Author Posted November 8, 2016 (edited) Any update on fitting your depo light's bud? interested in getting a set myself just wanted your opinion on fitting Yeah had them fitted at the weekend and adjusted as best they could to compensate for the LHD beam pattern, however I noticed I'm getting condensation/vapour due to the cold currently so there's still work to be done. Quick phone pics to show you what i mean: Everything works as it should plug and play, the fitment isn't quite as good as OEM but "fine" and the side/side adjustment wheel has compensated for their throw being LHD. The light output (beam pattern and amount) is definitely an upgrade over my pre-face-lift OEM lights. The only observation is their construction isn't as sturdy as OEM, they feel more flimsy/flexible if you know what i mean? (but you get what you pay for at the end of the day). I wanted to modify the cutoff shield by removing the bulb housing for access but I couldn't undo the 2 bolts pictured in the end: You can see the shield if you look through the bulb opening: I've got a night-time picture of the OEM light output and when I get chance I'll take another with these fitted, its just so damn cold and miserable at the moment in the evenings I cant be bothered Edited November 8, 2016 by Sargara 2 Quote
Jay M1988 Posted November 8, 2016 Posted November 8, 2016 They look spot on mate bar the condensation. I'm sure you'll get them sorted, easy fit? or did you get someone to fit them. Quote
Sargara Posted November 8, 2016 Author Posted November 8, 2016 They look spot on mate bar the condensation. I'm sure you'll get them sorted, easy fit? or did you get someone to fit them. Yeah that's what I'm hoping too, headlight condensation seems a common issue if google results are anything to go by ranging from trapped moisture when fitted, to lack of ventilation, to damaged seals requiring silicone. Either that or I wait for the weather to change and the problem goes away on its own in hotter weather. I had them fitted by CougarStore in the end as i wanted the beam alignment done properly, the install is straight forward: Quote
Sargara Posted November 19, 2016 Author Posted November 19, 2016 (edited) I managed to get another look at them today and narrow the condensation issue down to what the root cause is. It appears that the rubber seal on the back of the cap to access the bulbs is either too large or too poor quality and is deforming with heat, you can see the play in it below: No permanent solution yet as I was hoping it was just a case of "oh they weren't fastened correctly the first time". So its worth baring this in mind if you take the plunge like i did but other than that I cant fault them for the price I paid (£380). In regards to the light output: OEM: DEPO: (Different bulbs as they aren't interchangeable and different days hence the lighting/colour. Both are 4300k Phillips). Edited November 19, 2016 by Sargara Quote
Hodaka Posted November 22, 2016 Posted November 22, 2016 When you have time, do you mind posting a pic of the light output against a wall? Maybe from 10-20 meters away? No rush at all, just curious to see the light output in more detail. Also good to see you managed to find one of the possible causes of the condensation. I did a quick search just now and some people said it's worth checking the ballast has been seated properly as well. Oh and someone else suggested plonking some silica gel packs in there. Anyhow hope you get the condensation sorted! I've recently installed my aftermarket headlights (that I further modded) and it's suffering from condensation as well. 1 Quote
Sargara Posted November 22, 2016 Author Posted November 22, 2016 When you have time, do you mind posting a pic of the light output against a wall? Maybe from 10-20 meters away? No rush at all, just curious to see the light output in more detail. Here you go mate, hope this is what you meant (about a cars length away) let me know if not: Quote
Hodaka Posted November 22, 2016 Posted November 22, 2016 Thanks a lot for taking the time to post, but a bit further away (3-4 car length?) and against a single colour surface would be awesome! Sorry, being a pain! As I say, no rush at all as I'm just being nosey!!! From what I can see, the output looks pretty wide though! Is it just me though, or could it do with aiming a bit more to the left though? Quote
STYLZ Posted December 22, 2016 Posted December 22, 2016 Looking good mate, did you manage to adjust the beam far enough to suit RHD cars? I've seen some OEM ones for sale in the States and was wondering if anyone knew if they're adjustable also?? Quote
Sargara Posted December 27, 2016 Author Posted December 27, 2016 (edited) Looking good mate, did you manage to adjust the beam far enough to suit RHD cars? I've seen some OEM ones for sale in the States and was wondering if anyone knew if they're adjustable also?? Adjusted at point of fitment yeah. You can see the light cutoff in the above picture is flat so it doesn't kick-up at the sides and is easy to avoid glare/dazzling in that respect. No idea about OEM's sorry, I suspect you'll have to take a punt and find out. My pre-facelift OEM's had a kick to the light pattern though, worth baring in mind that even if you can adjust them they might not be as flat as the above DEPO image. Edited December 27, 2016 by Sargara Quote
Sargara Posted December 27, 2016 Author Posted December 27, 2016 Might as well add todays effort seeing how I already bumped the topic replying to STYLZ. Wasted a bit of time trying to de-salt the car this afternoon. The condensation issue has practically disappeared too with the milder weather we are getting, Quote

Recommended Posts
Join the conversation
You can post now and register later. If you have an account, sign in now to post with your account.