Hodaka Posted April 7, 2016 Author Posted April 7, 2016 Now for a more mammoth post. I've been wanting to do something with my headlights for a while. I couldn't really afford to get a set of facelift bixenons, so I toyed with the idea of doing something with my existing lights. Other than possibly painting the inner plastic bits (other than reflectors), I wondered if it's possible to make my own angel eyes. I didn't expect them to look as good as properly manufactured ones, but I thought it's worth looking into, especially as I enjoy DIY anyway. After a bit of research, I found some info about making some from acrylic rods. Simply put, you cut grooves into the back, shape them into circles, shove some LEDs at either end and tada! Simples! I promptly ordered some acrylic rods off eBay. Once they arrived, I tried cutting some test grooves and shone an LED at the other end. Here's what it looked like, although the photo makes it look much brighter than it actually was. I was pretty happy with that, so I found myself a cylinder that I could use to shape the acrylic rod around and measured the circumference. I measured this out on the rod, and then marked every (2-3mm? My memory fails me!) for the grooves. I also left a bit of extra length at either end as well. I then used a rotary tool (my first time using one!) to cut out grooves: Here's the same rod, but from the front (grooves on back): I then placed it on some tin foil so that I can put it in the oven to soften it up. I shaped the foil so that the middle section was raised, as I wasn't sure if it's a good idea for it to rest on the hot rack. I can't remember the exact temparature I set the oven to, but it was quite low. I left it in there for a few minutes until I could see the rod sagging. I then pulled it out, shaped it around my cylinder and held it there until it cooled down and hardened. Was a bit of a challenge trying to hold the cylinder and shape it at the same time, as I used a poster tube which is quite light. I had to hold the top of the tube with my chin while I held the acrylic Here's the crude circle I ended up with: After that I had to sort out the LEDs. I wired up 2 LEDs in series alont with some salvaged resistors from the DLR (version 1) I made. I then ground the tips of the LEDs flat, so that I could glue them onto the acrylic. Finally, I glued some tin foil to the back side of my angle eyes, so that the light gets reflected forwards. And this is what I ended up with: Super ugly, but I was very happy with it as a proof of concept. So I ordered some "mega" bright LEDs, some smaller resistors and tried again a week later. Here's a comparison photo of version 1 and version 2. Hopefully I don't need to point out which one version 2 is: Much better! And that's without a reflector on the back of the new version - I had ordered some proper reflective tape, but it hadn't arrived yet at this point. Even with that much light escaping, it was much brighter than the old version. The grooves were much cleaner and evenly spaced too, although not perfect. And that's pretty much as far as I got, the reason for which you'll see on my next post. I said this would be a mammoth post, but I decided to split it into 2 halves. 1 Quote
glrnet Posted April 7, 2016 Posted April 7, 2016 RespectðŸ‘come on then, we're waiting😉 Sent from my Zed using Nangkang tyres front, RE040's rear Quote
Hodaka Posted April 7, 2016 Author Posted April 7, 2016 Respectí ½í±come on then, we're waitingí ½í¸‰ Haha, I'm working as fast as I can! 1 Quote
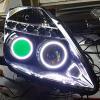
Hodaka Posted April 7, 2016 Author Posted April 7, 2016 (edited) While playing around with angel eyes, I realised that it's not going to be a quick job. I'd have to take off my headlights, open it up and figure out how to attach/wire it all up without it looking like a mess - all of which I'd never done before. My zed is my daily, so although I live super close to work I couldn't face the concept of cycling to work for the unforeseeable future. I'm pretty lazy, and god are those bike seats painful until you get used to them! So I started looking for a cheap second set of headlights. I saw atomic350z post a pair of headlights with a crack on one of the lenses. I didn't see this as much of an issue for me as I could work on his set first and transfer the lens off mine once I'd finished. While messaging him however, I noticed a pair of these pop up on eBay: They're the Junyan/Spec-D headlights. Possibly not to everyone's tastes, but I quite like them. They already had the angel eyes, so I wouldn't have to open up the headlights. I was also unsure if angel eyes on the pre-facelift headlights would look good, as the projector lens is small. The starting bid was £55. A late night and one last minute bid later, I had won them for £77 + £10 postage. Could have got them cheaper if it wasn't for 1 idiot bidder (hopefully not on here ), but I digress. The only downsides I was aware of at the time were that: I kind of preferred the blacked out version, but I thought I could address this in the future The guy had snipped off the connector as he needed it I had no idea if they were LHD or RHD headlights Anyway they arrived a week or so later. The guy had packaged it extremely well - probably one of the best packaged items I've received from eBay. I got home that night eager to start, and removed the bumper and headlights. And with the help of my friend, father-in-law and a multimeter, figured out what each pin did. Here's what it was on mine (2004 UK model) in case it helps others. Note that the clip area is at the bottom, and that they're the same on both sides. I never know if I should refer to it as the negative terminal or ground, but you get the idea. This set of headlights doesn't come with a self-leveling motor (which I now know is a legal requirement), so I didn't bother working out what each of them do. I then went ahead and snipped off the connector on my OEM headlights - this was a painful/scary step for me. I spent the following night wiring it up and zip tying the ballast to the headlight unit. The wiring was an absolute mess, but here's what I ended up with: If you have a keen eye, you'll notice the bullet connector on the headlight to the left. As I had the headlights out, I thought I may as well add this to the sidelight wire for my DLR rather than crimping. Excited, I put them back in. I was quite liking the look! Just the sidelights on And during dusk the following day The second picture was taken the day after installation. I knew I had to aim the headlights, but I left that until the following day as I knew I wouldn't need to use my headlights on my way to/from work. As you can imagine, the headlights weren't without it's issues. I noticed 2 of the LEDs were dead and some misting happening inside the lights: And then I turned on the HIDs and WOAH! My driveway is pretty flat - that's some high aim! I also noticed the green hue from the left hand light, and also the incorrect cut off (highlighted in red). I tried adjusting the aim using the screws, but it didn't seem to make much difference. I now know that I just wasn't turning it enough times, but at the time it felt like I had already maxed it out. I wasn't happy with them at all, so off came the lights! I desoldered the connector, reconnected it to the OEM headlights and put them back in. I decided that I didn't fancy the concept of switching the connector back and forth, so I put them back on the OEM headlights to the best of my ability, i.e. heat shrink, clean as possible solders etc... The idea is to buy/fabricate connectors for the aftermarket headlights. Nothing's as simple as it seems, and that's especially true with eBay Now I had to sort the following issues: Incorrect cut off Terribad aim Green hue 2 dead LEDs Misting Angel eyes a bit dim during the day. Not a major issue but I wanted to look into seeing if I can improve them at all No self-leveling. This is something I doubt I can do anything about Not like they're going to be legal without the self-leveling motor anyway, but I'm yet to see if these are E-marked A lot to think/research about and do! Edited April 7, 2016 by Hodaka Quote
ZEUS Posted April 7, 2016 Posted April 7, 2016 I do like reading your posts Hodaka, so well written Quote
ZEUS Posted April 7, 2016 Posted April 7, 2016 And I bet your neighbours loved you for lighting up there houses Quote
Stutopia Posted April 7, 2016 Posted April 7, 2016 Fair play putting in the time and effort installing these and then going back to stock (rather than blinding everyone) whilst you're working through the issues. Quote
Hodaka Posted April 7, 2016 Author Posted April 7, 2016 I do like reading your posts Hodaka, so well written And I bet your neighbours loved you for lighting up there houses Really? Thanks! I always thought I suck at copy writing! And yeah, I did try to take that picture as quickly as possible as I was a bit conscious of that! Fair play putting in the time and effort installing these and then going back to stock (rather than blinding everyone) whilst you're working through the issues. Yeah, it was a pain but I felt it just wasn't worth the risk. Quote
PPod Posted April 7, 2016 Posted April 7, 2016 Nice build thread Lights are looking really nice. Quote
Hodaka Posted April 8, 2016 Author Posted April 8, 2016 Opening the headlights The first thing I wanted to sort was the incorrect cut off, but to do that I had to figure out how to dismantle the headlights. I'd heard about putting them in the oven, but to me that wasn't really ideal as: I was scared It would be a tight fit in my oven I didn't want to have to remove all the electronics/bulbs. The LED driver for example is glued on from what I can tell The in-laws were staying with us, and I thought they might think me strange So the other option was to use a heat gun. I prepared myself as much as I could by reading and watching various videos. I had recently bought some pry tools as I had to replace the screen on my mobile (LG G3, hate it). I decided that that my approach would be to use the heat gun, and slowly pry my way around the headlight. I removed the screws around the edge of the housing and started heating the corner of the headlights. I had no idea how to use a heat gun, so I tried using different heat settings/distance/attachments and slowly started sticking pry tools in: I carried on until I had exhausted my supply of pry tools: I had thought that if I worked my way around like this, I would eventually open it. I didn't seem to get anywhere though - I think the pry tools were too small. I gave up for the night and carried on researching for different approaches the next day. That's when I came across this video: It seemed like a really good, simple approach, so I went home that evening feeling very optimistic. But surprise surprise, this turned out to be unfruitful as well. I didn't have anything good to cable tie it onto and struggled with the lights wobbling around. As a final resort, I decided to be manly and use my bare hands. I heated up the lights, again starting at the corner, and gently pulled the lens away from the rest of the housing. To my surprise, after a few attempts it started separating! It took a while, but I think I managed to open up the headlights in under an hour with this approach. The second set of headlights was faster, probably taking about 30 minutes. Needless to say, I was extremely pleased that I'd finally done it. Quote
Hodaka Posted April 8, 2016 Author Posted April 8, 2016 (edited) Dismantling the headlights It goes without saying, but to get to the cut off plate (is that what it's called?) I'd have to disassemble the rest of the light. I pretty much did this by fiddling around, but I documented how I did the second headlights below in case it's of interest to you, or you've bought the same pair of headlights as me and have to do something similar. I started by opening up the high beam bulb cover. It's just a rubber cover that you can pull back: Inside you'll see 2 connectors that power the bulb: I found it a bit hard to remove using fingers, so I used a pair of pliers to pull them off: I then proceeded to remove the high beam reflector. I really can't remember why I did this as I swear you don't need to... but I'll cover it anyway just in case there was a legit reason! If you look inside the hole (check me out with my technical lingo ), you'll notice that there's 3 screws that hold the reflector onto the metal frame. You can only see 1 of them below, but I've circled the rough locations of all 3: Once you unscrew those, you can remove the high beam reflector. NOTE - The "12V55W" text has an arrow below it. This indicates the orientation, i.e. when reassembling make sure this points upwards. I took a photo from behind the reflector below to further clarify the locations of the 3 screws: I set that aside and moved onto the HIDs. On these particular headlights, there's a screw on cap that covers the bulb. I simply twisted this off: Inside you'll see a metal spring that holds the bulb in place. Simply unclip it from the hook, and pull the bulb out while being careful not to touch the glass casing. Although I didn't bother, gloves may come in handy! You'll also need to disconnect the connector in there, which I believe is a grounding wire? Here's what you should end up with: Now flip the headlights so that you're looking at the front face. You'll see that there's a single screw below the projector: And POOF! It's gone! On the backside of the lights, you'll see 2 adjustment screws around the HIDs: These screws serve 2 purposes. The first is to adjust the lights, and the other is to hold the metal light frame to the back housing. You just need to unscrew both of these to release the HID projector + frame. There's quite a lot of thread, so make sure you unscrew them at a similar rate not to put undue stress on the parts. Again, as there's a lot of thread, an electric screw driver comes in super handy! And out comes the projector + frame: Here's another angle: On the front side of the projector, you'll notice 4 screws. These hold the metal casing for the actual projector lens: Carefully unscrew these and remove the metal + lens. Careful not to drop the lens, and not to put your dirty mitts on them. This will then expose the offending cut off plate. We're getting close! On the back of the projector, you'll notice a further 4 screws. These hold: The metal frame to the projector The front/back of the projector together, between which the cut off plate is sandwiched Once you unscrew those 4 screws, everything will come apart and you're ready to sort out the cut off plate Edited April 8, 2016 by Hodaka 1 Quote
Hodaka Posted April 8, 2016 Author Posted April 8, 2016 (edited) Sorting the cut off plate I was originally planning to make my own cut off plates out of aluminium, but after having a look at the parts, I decided that the existing plates could probably be flipped. The only thing preventing me from doing so was a groove cut into both the plate and the reflector portion of the projector: Here's the flipped plate, where I've marked out where the groove in the metal reflector is: I lined up the screw holes the best I could, and marked the groove from the back: Here's the marked out section with my rotary tool: Being new to all this, I thought it's probably best to protect myself: And proceeded to cut out the groove: Then started reassembling everything. Here's the flipped cut off plate, once I'd secured it back in: When reassembling, it's just a case of reversing what you did, so I won't bore you with that! One thing I did do is give various bits (bulb, lens etc...) a wipe down with IPA (99.9%) to degrease. Testing the unit There's still a lot to do, so putting these back on the car to test was a no go. I had to find an alternative way of powering the headlights. I had a couple of computer PSUs lying around so I used these to test the headlights as they provide 12v and more than enough current. Things to note: There's 1 pin that has 5v at all times (standby power), but for you to turn on the rest of the power supply, you need to connect one of the pins to ground. This replicates the process of pressing the power switch on the front of your computer. Some power supplies also require a dummy load to turn on. It's part of the features to protect your computer Although I have no idea how, it seems like it is possible to break your PSU by doing this. I must have done something wrong, as the PSU broke shortly after taking the above photo. It now only turns on for a split second, before switching back off. My guess is that it's one of the protective features kicking in, but I couldn't get it working again for the life of me. In the end I resorted to using an old laptop power supply I had lying around from around 10 years ago. Here's an article which I found useful about the PSU And this brings us to our final shot: The cut off orientation is all good now Updated list with items added: NEW - Bad light distribution NEW - Cut off isn't as clean as I would like. There's a bit of light above the hot spot, that extends above the rest of the beam Incorrect cut off orientation - Sorted Terribad aim Green hue 2 dead LEDs Misting Angel eyes a bit dim during the day. Not a major issue but I wanted to look into seeing if I can improve them at all No self-leveling. This is something I doubt I can do anything about Not like they're going to be legal without the self-leveling motor anyway, but I'm yet to see if these are E-marked From what I currently understand, the new items could be due to bad bulb placement, crappy projector, or focus. Still need to look into. And that's it for now folks. This is the mammoth post I was actually referring to earlier! I also lied and split it into multiple parts. Edited April 8, 2016 by Hodaka 2 Quote
Hodaka Posted April 13, 2016 Author Posted April 13, 2016 Just a quick update today. This week I decided that I want a change from fiddling with my headlights. I've been looking at them way too long, and I'm in no rush to fit them as there's so many issues I want to address first. Rather than being sensible and moving onto one of the other things on my to-do list, I thought this would be the "perfect" time to try painting some interior parts. I've never really painted anything before, so I knew the first one would take some time. I decided on the rear strut bar cover as I don't mind not having that for a while. So I took it out yesterday annnnd... I decided that I also want to add some lights to it while it's out. As I say, I'm trying to keep it short today so I'll do a proper write up once it's done, but below is my first version of the strut bar cover lights: Off On A few notes: I'm planning to hook it up to the boot light so that it only turns on when the boots open. Otherwise I think it'll be super distracting driving at night, as it'll be reflecting in the rear view mirror It doesn't look as bad in the pictures, but I want to improve the light distribution You can see some of the light through the plastic, but this is only really noticeable when it's pitch black. I think painting should solve this issue You can't see it in the pic, but this is a demo version so the wiring/soldering is abysmal. Need to address that too Now for bed 4 Quote
jumping350 Posted April 14, 2016 Posted April 14, 2016 great work and write up love the rear zed lighting up Quote
Hodaka Posted April 14, 2016 Author Posted April 14, 2016 great work and write up love the rear zed lighting up Thanks! Quote
Hodaka Posted July 15, 2016 Author Posted July 15, 2016 (edited) Been ages since I've updated this thread, but I have been working away very hard (for a noob!). Although I'll post proper updates later once it's done, but here's a list of things I've been working on: Painting headlight housing satin black Completely stripping the wiring as it's a mess Replaced the old HIDs with new eBay specials. May look into upgrading the projector housing and get a proper set of HIDs in the future. Waaaay in the future as I've now been working on these since April (?) so I'm a bit sick of them! Replaced the halos with COB LEDs Adding PWM to the halos so that I can dim them when the low beam is on, i.e. it's dark Adding demon eyes Decided rather than having the halos + 5 "spider eye" looking LEDs, I'd replace the latter with sequential indicators Some pics and videos for a sneaky peaky Bought some stuff: Version 1: Found out about Arduino clones - size comparison (bottom left vs red board): Version 2: Version ??? Edited July 15, 2016 by Hodaka 2 Quote
davey_83 Posted July 16, 2016 Posted July 16, 2016 Kid you got mad skills, I'd take a headlamp apart to that degree and it would never work again lol Quote
Hodaka Posted July 16, 2016 Author Posted July 16, 2016 Kid you got mad skills, I'd take a headlamp apart to that degree and it would never work again lol Cheers man Although I put it down to having a bit of an OTT personality + trial and error + doing a TON of Googling! There's still a lot of potential issues that I can think of, but I have no idea if it's an issue I need to address etc... so I guess I'll leave it for now and sort if/when needed. Quote
Randy_Baton Posted September 20, 2016 Posted September 20, 2016 (edited) I just came here to view the spoiler, pretty amazed at what else I've seen! Got the same spoiler delivered today. Did you attach it yourself, just wondering if its a one man job. Edited September 20, 2016 by Randy_Baton Quote

Recommended Posts
Join the conversation
You can post now and register later. If you have an account, sign in now to post with your account.