Husky
-
Posts
14,070 -
Joined
-
Last visited
Content Type
Profiles
Forums
Events
Gallery
Store
Everything posted by Husky
-
i think i just wee'd myself that looks AMAZING!!!!!!!!!!!!!!
-
again matey. im sure you'll post some piccys when youve mastered it we wont settle till we see some
-
this was just on http://www.youtube.com/watch?v=5UbHSNs1jx0&feature=player_embedded
-
see the other thread viewtopic.php?f=116&t=29002
-
im not saying you dont love or care for your dogs. just dont chop any more appendages off eh Just on the argument of this and the way its gone, would you prefer selective breeding to produce a dog that has a shorter tail or a tail thats docked at 3 days old in a painless fashion? I have seen badly docked dogs but I have seen lots of dogs that have been docked and they dont seem unhappy or are missing something. Not advocating docking at all, am more for let nature take its course, but it happens and always will cause we all have our own opinions i dont think any selective breeding should happen as it promotes very unhealthy genetic traits. why should you choose between the two??!!?? the dog doesnt NEED the tail docked unless its actually working! if its working then yes when its v young do it to prevent very bad damage in future.
-
TOP GEAR NEW SERIES THIS SUNDAY !!!!!!!!!!!!!!
Husky replied to Tarmac@TarmacSportz's topic in Off Topic Discussion
1 too staged yes sometimes, they seem to spend less time making features so they need to script them to get the most out of the time they have the presenters. 2 those trucks were cool, bowler wildcat feature too. -
im not saying you dont love or care for your dogs. just dont chop any more appendages off eh
-
Boxers look great with tails - even happier than usual. Anyone who could ever advocate docking for aesthetic reasons needs to get their heads looked at i didnt ** that out
-
tails should only be docked on an ACTUAL working dog, the reason for this is simply the lesser of two evils. if you chop a dogs tail off for any other reason i will come and chop your **** off
-
350Z wheels will fit which other cars????Adapters?
Husky replied to givememorepower's topic in Wheels
stew i have this V8S/C next to my desk that might fit.. ? -
personally i like stews
-
seat sensors do exist, no idea if zed uses it though
-
something like this:
-
Could do it in Vista too aero flip its called
-
viewtopic.php?f=13&t=29434&hilit=windows+7 already discussed
-
ROFLMFAO :lol:
-
bone dry day, straight road... i thought you were meant to crane them onto the back of trucks not drag them..? loved him washing his hands before turning the wheel
-
i thought that
-
With that cover out of the way, remove to two screws holding the handle to the door (these are 10mm): With the screws removed, the handle will pull out from the door Now that the handle's out of the way, we remove the panel that holds the buttons. It has clips all the way around - I started at the rear, went around one side to the front, then it lifted out pretty easily: Once you have the assembly off, follow the same steps as the driver's side above: - remove the housing from the assembly by prying the fasteners loose - remove the control box from the housing - remove and replace the LEDs (note the location of the notches) - test by plugging into the wiring harness NOTE - the drivers' side controls must be connected in order to test the passenger side - snap the control box into the housing (ensure window actuator is centered) - snap the housing into the assembly - reinstall the assembly onto the door Door Handle Mounted Controls END

-
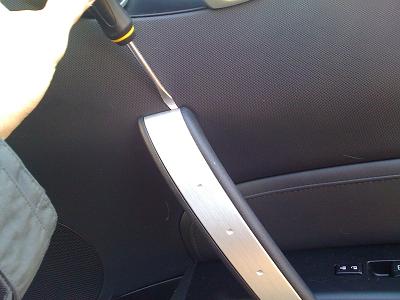
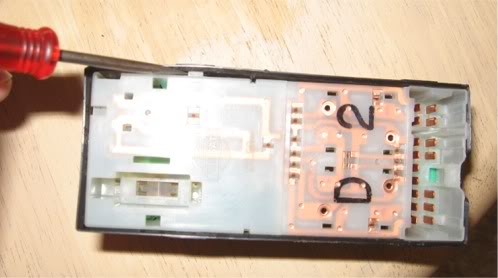
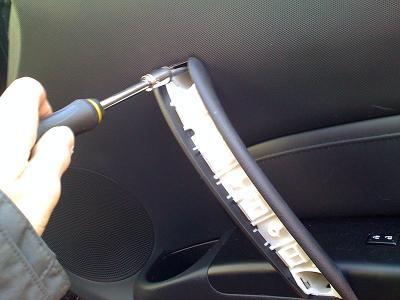
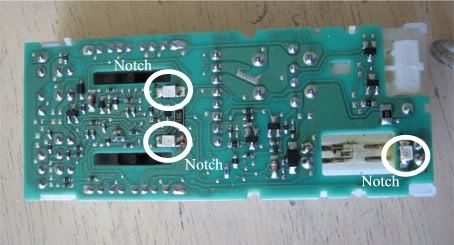
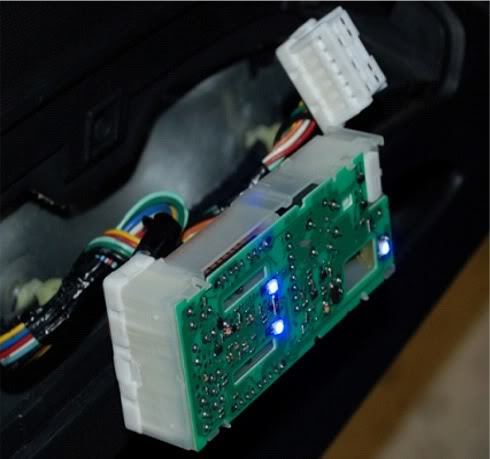
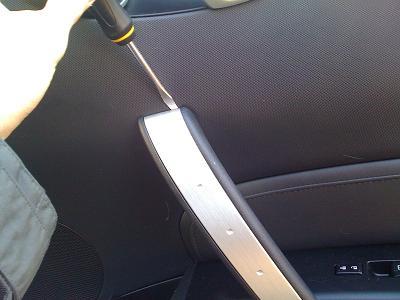
You should now see the circuit board. Remove the LEDs that are circled. Notice the orientation of the notched corner of each LED. The notch designates the Cathode end. The new LEDs must be replaced in the same orientation. The pic shows the relative location of the notched corner with the word "Notch". After soldering in the new LEDs, take the board to the car, connect the large connector and turn the ignition key to ACC. You should see all three LEDs light up. If the LED's do not light up, double check the orientation and / or resolder and try again. Once your LEDs are lighting, you are ready to reassemble Check to make sure that the power window actuators on the circuit board are centered in their respective slots. If they are not centered, move them into the center of the slot. Snap the control box back into the housing and check the action of the switches. Everything should have the same feel as before. Snap the control box back into the door handle assembly. Reconnect the wiring connectos to the door handle assembly and before you snap that back into place on the door, turn the ignition to ACC and check the operation of the window switches, the door locks, the mirror control and the passenger side controls kill switch. If all the switches are working normally, snap the door handle into place in the door. If not, make sure the wiring connectors from the door are snapped in tight, if still no good, take the assembly apart and confirm the window actuators are centered in their slots. Insert and tighten the securing screw and replace the plastic cap. The process for the passenger side door is identical except that there is a slight difference in removing the door handle assembly and there are only two LEDs to replace. First, use a flat edge to pry up the top part of the brushed aluminum cover plate:
-
http://hallofrecord.blogspot.com/2009/1 ... -cars.html
-
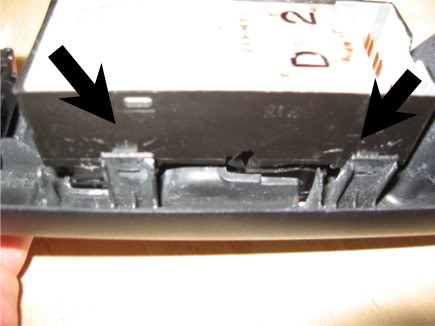
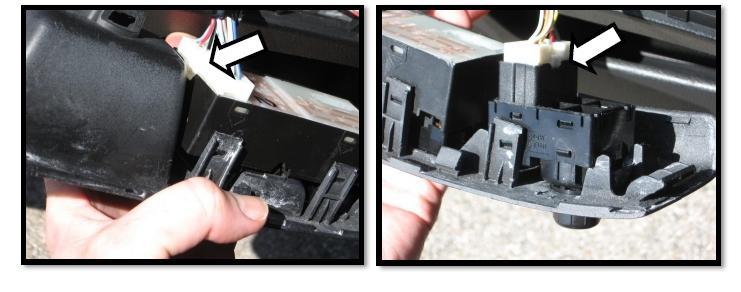
The release tabs for the connectors are located on the outboard sides of each connector. Use a small flat blade screwdriver to press on the release tab and pull the connector free. Grasp the ends of the connector when removing; do not pull on the wires. After the connectors are loose, take the assembly to your work area. Use the small flat blade to pry the retaining clips loose and remove the control box from the assembly. This may take a bit of back and forth as the clips tend to want to jump back into position. Be careful you dont pry too hard and break a clip. Use the small flat blade screw driver to remove the control box housing. When the housing is loose on all sides, pull it straight up and off. The control buttons will come up with the housing. You do not need to do anything else with the housing, set it aside.


-
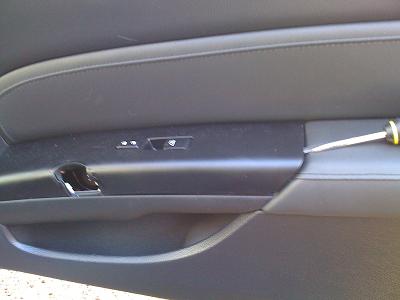
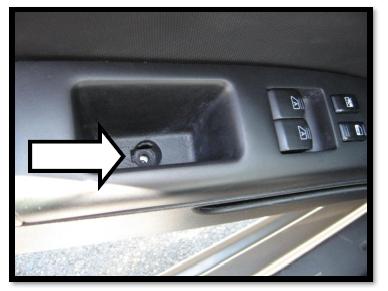
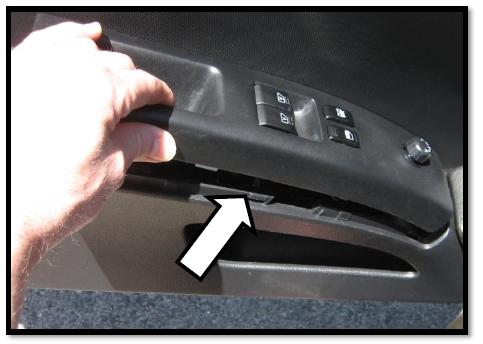
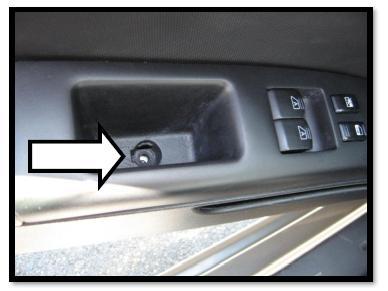
still writing, please dont comment Credit for alot of these instructions goes to Ibz i adapted some of them onto 350z-uk.com with his permission. It is worth bearing in mind these pictures are from a left hand drive vehicle so will differ slightly from your own. This thread will form part of a larger collection providing a guide on how to change the interior lighting and gauge colours. Door Handle Mounted Controls Use the tip of a small flat blade screwdriver to pop off the screw cover at the bottom of the door grip area. Use a #2 Phillips head screwdriver to remove the screw Grasp the outside edge of the door grip (may take two hands) and pull slightly back and up on the door grip piece until it snaps out of place from the door panel. It may be easier to wrap a medium sized flat blade screw driver blade in electrical tape and pry the grip loose in the area indicated by the arrow below. Turn the door grip upside down and unplug the two connectors going into the control box.


-
you'll find lots of help and ideas here Alot of people start with a stubby aerial as their first mod rather than the flagpole, nice and cheap and sets you on the slippery slope
-
thanks guys, still some bits to polish off and all the rest of them to do