

steve3000
-
Posts
150 -
Joined
-
Last visited
Content Type
Profiles
Forums
Events
Gallery
Store
Everything posted by steve3000
-
I've done a couple of these - takes about a couple of hours to do properly and can fit a switch too to keep the tape deck (if you *really* want it!). Steve
-
Just a thought, but is your window closing properly when you shut the door? On the coupe the window drops/raises when you open/close the door and this didn't work properly on mine when i bought it & leaked both sides. Had it fixed under warentee but only took the guy 2 minutes (I think he just reset the mechanism???). Steve
-
No probs, glad it worked Steve
-
Is that the satellite radio connector? Might be wrong but I thought those were only on the US spec BOSE radio? Steve
-
Just the one motor. There's a nut at the end of the wiper arm which holds it onto the mechanism. If this has come off, the arm could be loose as you describe. Bonnet up and follow the loose arm down to the bottom, there should be a little black cap - remove this with a screw driver and you'll probably see a loose nut - tighten up, and all should be good ... hopefully Steve
-
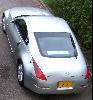
2005 Veilside 350Z - CHEAP, QUICK SALE NEEDED! £14,500!!!
steve3000 replied to Z Boy's topic in Zeds For Sale
Bad luck on the job. Our company announced today they're getting rid of half the people on my site - we'll find out who in the last week of December... Hope you can find a way to keep the car, looks awesome! Steve -
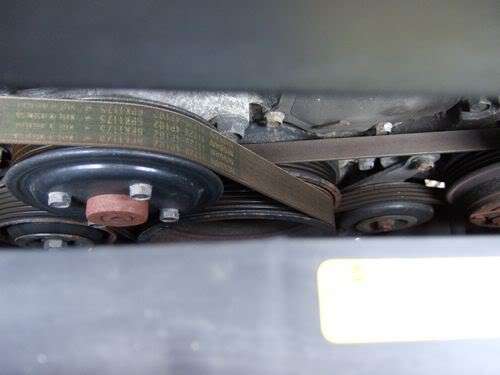
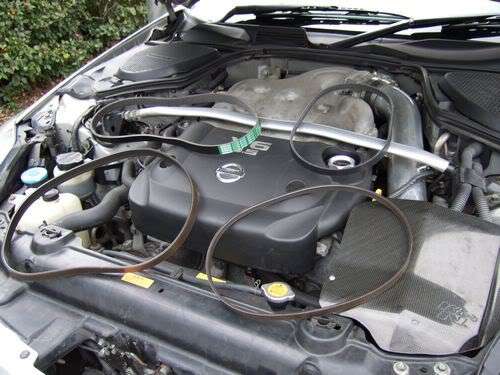
FYI: The two belts are the same on JDM and UK models, the part numbers are 117204P102 (alternator belt) and 11920AG900 (a/c belt). Cost was a quite reasonable £35 from the local nissan dealer. Steve
-
Hello, A squeaking timing belt would be very bad on any car... But no the Z doesn't have a belt - it's chain driven. As you say, the most likely source of the start-up squeek is one of the aux belts (probably the alternator belt, but always worth changing them both). The two belts are the same on all models JDM and UK, part numbers are 117204P102 (alternator belt) and 11920AG900 (a/c belt). Should cost around £35. Give you local nissan part store a call. Also check out my how-to guide for swapping them over, in the guides section: click here. Steve
-
Excellent write-up - and a great topic to cover! Steve
-
The 10mm screw under the ashtray is for the handbrake handle travel adjustment - which is worth a go before the MOT - it could solve the problem if it's just tightening the cable that needs doing. If the shoes are slightly worn, you can try the shoe adjuster on each wheel, takes a bit longer tho! - Take a look at step 23 of the non-brembo rear-brakes change guide I posted last week How to: Change non-Brembo rear discs & pads Otherwise changing the shoes is a relatively easy job if you own a set of spanners, breaker bar and a trolley jack - release handbrake, take the discs off (as in my guide), loosen handbrake cable adjuster at the ash-tray to make shoe removal easier, remove brake shoe holding pins and springs - then the shoes should pull apart and come out Steve
-
Nice one I was trying to work those out just the other day!!! Cheers, Steve
-
Try living in San Francisco - problem solved Seriously tho, as others have said, it does sound like the wheel bearing. Unless you've got lowered suspension and/or non-standard alloys, which could be rubbing? Steve
-
Had my screen done recently, not an original Nissan part, but seriously can't tell the difference! ...unfortunately, however, the Laurel and Hardy act cracked one of the screen's side trim panels when they took the old screen out, and I'm still chasing them for a replacement... Make sure you watch them doing the job! Steve
-
Upgrade to Brembos??? - My thoughts... Since I have non-brembos, I seriously looked into upgrading to brembos. I read through several reviews and comparisons between Z’s with non-brembo and brembos (check this out, if interested: http://www.zeckhausen.com/Testing_Brakes.htm). Overall the impression I got is that brembos are definitely the best option if you are regularly racing on the track – the larger discs giving better heat dissipation when repeated braking from very high speed which helps avoid brake fade. But at road speeds there’s very little in it – both stock brembos and non-brembos have very similar stopping distances. Also remember that big improvements can still be had sticking with the non-brembo setup - improved non-brembo discs are available from DBA (4000 series ~£400 for a full set) or EBC (groved/dimpled GD ~£250 for a full set) and pads from Endless (SSS ~£250 all round set, VN ~£150 all round set) or EBC. When I put all this alongside the cost of upgrading to Brembos (at least £6-700 for at set of second hand Brembo callipers and brake lines and another ~£500+ for brembo discs and pads), I decided that spending the money on improved discs and pads for the non-brembo setup would give me the improvement I wanted at the best cost! So I went ahead and ordered an all round set of EBC GD groved discs and Endless VN pads. Steve
-
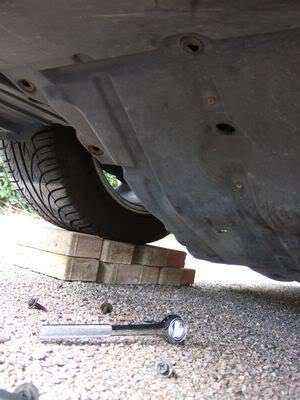
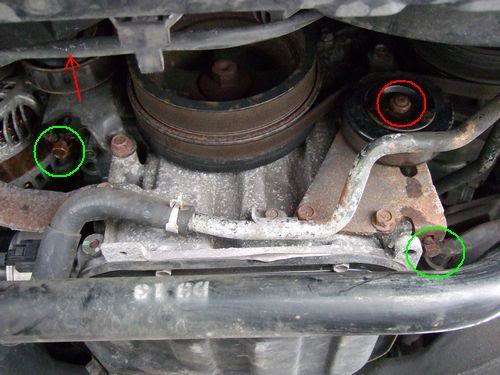
Non-brembo rear discs & pads change in pictures. Rusty old discs and worn pads – definitely time to change! Since I have the JDM non-brembo brakes, I did consider upgrading to the full UK brembo setup (read this, below). However after doing a lot of reading around this I wasn’t convinced about the benefit of going to brembos just for road use, so I decided instead keep the JDM setup but upgrade the discs and pads. So here I’ll be replacing the rusty old stock JDM discs & worn pads with new EBC grooved/dimpled discs and Endless VN pads. Changing the rears 1) Chock the front wheels, loosen the rear wheel nuts and release the handbrake. 2) Using a trolley jack and block of wood, lift the rear of car up from under the diff (UK models have a cover below the diff which you’ll need to remove…but they also have brembos, so you’ll need a different ‘how to’ as well ) Lifting the Z – I used some hardboard under the jack and stands to spread the load over the very soft tarmac on the drive. 3) Place axel stands under the sills – again use a block of wood to protect the sills Up in the air 4) Remove the wheels and inspect the old discs/pads Worn discs and pads 5) Undo the top calliper guide bolt (14mm bolt, green in picture below) Calliper guide bolt (green) and calliper mounting bracket bolt (red) 6) Swing the calliper open to reveal the pads Calliper opened and the old pads Note: The back of the calliper rests perfectly on the suspension arm behind 7) Remove the old pads (and shims, if fitted) Comparing the old pads with new Endless VN pads 8) If you’re just replacing the pads, skip to step 31 below… 9) Now loosen the calliper bracket bolts (22 mm bolts) – I found these f***ing difficult to remove, mainly because access around them is very restricted and the bolts had really seized into position. Soaking in WD40 or similar is a good idea, but didn’t help much for me. On each side I managed to undo one bolt using a 45cm breaker bar, which just about fits in the space ok. The remaining bolt I eventually removed using a 60cm breaker bar, but had to jack up the car up almost to the top of the axel stands to get that in. (This was definitely the most difficult step – the fronts were 100 times easier!) Calliper mounting bracket bolts 10) If you’ve managed to loosen the calliper bolts, have a break & a cup of tea, everything else will be easier from now on. 11) Use a piece of string to support the weight of the calliper & bracket (tie around the upper suspension or break line mounting points), then remove the bolts completely and move calliper and bracket to one side. Calliper and bracket removed 12) Now use some pliers to remove the handbrake adjuster cover Removing the handbrake adjuster cover 13) Ensure the handbrake is released, then turn the disc by hand, until the adjuster hole is either: just before the 12 o’clock position for the left-hand (passenger) wheel; or just after the 12 o’clock position for the right-hand (driver) wheel. 14) Use a torch to spot the handbrake adjuster wheel Handbrake adjuster wheel through the adjuster hole 15) Use a large flat screwdriver to push/rotate the wheel upwards 4-5 turns (see below for clear picture of the wheel with disc removed). By rotating the wheel upwards, you loosen the handbrake shoes, and make removal of the discs possible. 16) Now lift the disc away from the hub. Rear disc removed – see the handbrake adjuster wheel & brake shoes 17) Check the handbrake shoes are in good condition, give them a wipe with some spray-on brake cleaner fluid. 18) Also give the hub a quick clean. 19) Before mounting your new disc, follow any cleaning instructions to remove oil/grease from the surfaces (give them a good wipe with white spirit). Don’t forget to do the same on the inner surface where the handbrake shoes will contact. 20) Place a thin smear of copper grease on the hub to stop the disc seizing onto the hub in future, then align the new disc with the handbrake adjuster and fit. New disc in position 21) Place a couple of wheel nuts on and loosely tighten by hand, this will keep the disc from falling or moving and rubbing against the calliper when refitting. 22) Remove the string and refit the calliper/mounting bracket to the hub. Tighten the 22mm calliper mounting bracket bolts to 87 Nm. Bracket refitted around new disc. 23) You now need to set the correct handbrake adjustment for the new discs. Do this with both sides of the car at the same time to avoid problems. 24) Check the handbrake is released then rotate the new discs until you see the handbrake adjuster wheel through the hole. 25) Use a large flat screwdriver to turn the adjuster wheel downwards until you cannot turn the disc by hand. Do this for both sides of the car. 26) Once you cannot turn the disc, turn the adjuster upwards 3-4 notches, until the disc turns freely. Again, do this for both sides of the car. 27) Now gradually pull the handbrake, until you reach the fourth notch. 28) Check that you cannot turn the discs on both sides of the car. (tip: you can pop a wheel onto the studs to give you better leverage) 29) Release the handbrake and confirm the discs turn freely. Adjustment is complete! 30) Refit the handbrake adjuster cover. 31) Before fitting the new pads, take a look at the old pads – if they have shims and covers fitted, remove these and clean thoroughly. (Don’t worry if you don’t have shims/covers – copper grease is a perfect substitute.) Clean shims (in black) and their metal covers. (Inner pad/shims on the left, outer pad/shims on the right) 31) Dab some copper grease over the shims’ surfaces and fit them to the new pads. If you don’t have shims or covers, dab a film of copper grease over the outside of the pad – around where the calliper/piston will contact. 32) In order to fit the new pads, you’ll need to push the calliper piston fully back into the calliper. Do this either by hand (if the piston isn’t too tight) or use a G-clamp and a block of wood (to protect the piston). Note: This will push a lot of brake fluid back into the reservoir under the bonnet, so keep an eye on this as you push the piston in – you will need to remove some fluid to avoid overflow! 33) Now fit the pads into the calliper bracket and close the calliper over them. Tighten the top calliper guide bolt to 27 Nm. New pads fitted over the new discs! 34) Dab a small amount of copper grease on the inside of the wheels, where they will contact the discs – to make sure they doesn’t seize onto them in future. Then refit the wheels. New rear discs and pads fitted! 35) Remove stands and lower car to the ground. 36) If you replaced the discs, recheck the handbrake adjustment is ok by applying handbrake and try to push the car (if you followed procedure above, it should be fine – but always best to check!). 37) Finally, if you’re going to replace the front discs/pads, do those now. Otherwise you just need to bed in the new pads by carrying out a few brake-tests from 70 to 30 mph – follow bigphil’s procedure here. Once you’ve bedded the pads in, you’re done Steve P.S. After bedding in my Endless VNs on the EBD grooved discs, the JDM brakes feel much more responsive and definitely a great improvement over stock!
-
Thanks! I can't actually find the aux belt change interval mentioned in my (2003) service guide under the Z section (ie. 9000 mile service interval page). 5 years/72000 miles is quoted for cars with 18000 mile servicing and that's the norm for many other cars, so would be the best bet. Also my belts were looking quite worn (cracking rubber) at 60k/5 years, so it was definately the right time for mine. Steve
-
Thanks. You could possibly replace the tensioner pulleys and water pump pulley, but a/c pulley is on a clutch system so that'd be tricky and alternator would be difficult as it is integrated...I guess crank pulley would be a tough bolt to budge too... Unless you're building a strip-down race car it's probably not a worthwhile saving for the weight, but would be good for show though. Steve
-
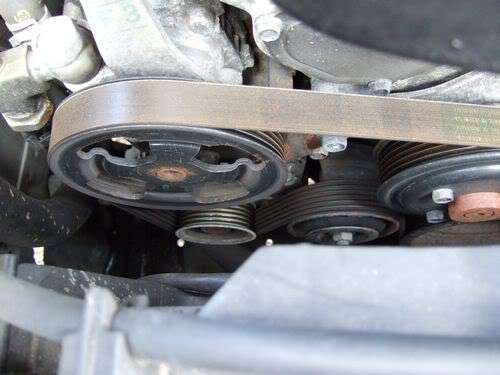
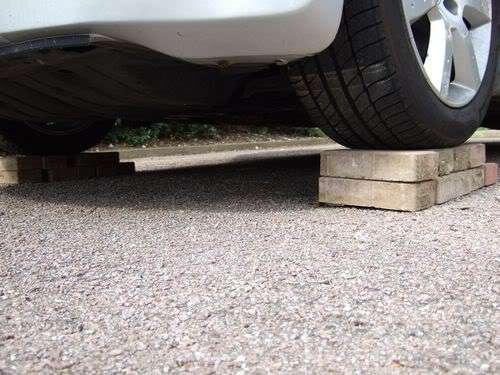
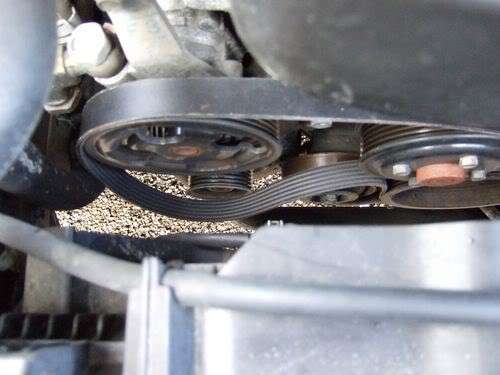
Aux drive belt change on the Z - in pictures View from above – belts as seen looking down from the open bonnet (Left: alternator/water pump/power steering pump belt; Right: A/C belt) View from above - alternator/water pump/power steering pump belt Procedure to change belts: 1) First check the tension of current belts using ruler and strong thumb pressure. Working from above, line up the ruler at with the belt at the mid point between its two upper pulleys and press firmly. Record the number of mm deflection you achieve for each belt – you will need this later. [Note]. 2) Drive car up on ramps (or jack up and use stands) DIY ramps – ideal for lowered cars! 3) Remove undertray – 14 screws (10mm socket) and one clip at centre (prise middle of clip outward to release) Undertray removal (rotate 90) 4) Locate the two idler wheels and spray some WD40 on the central nut of each (red in picture below). Idler wheels, viewed from under front of car, looking up. Central (locking) nuts in red, tensioner bolts in green. 5) Have a cup of tea 6) Loosen central nut (14 mm socket) by a couple of turns on both idler wheels – but do not remove completely. This will allow you to adjust the tension using the tensioner bolt (green in above pic), directly below each wheel. 7) Release tension on each idler wheel by undoing the tension bolts a few turns (12 mm socket), until you have enough free play in the belts to remove them. 8) Remove the two belts. Comparing old (front) belts with new (back), check both are correct before fitting(!) 9) Fit new belts (remember to fit a/c belt first) – you may need to slacken off the tensioner bolt for each idler slightly further to get enough clearance to fit the new belts. Routing new alternator belt when fitting 10) With new belts correctly in place, tighten the tensioner bolts for each of the two idler wheels, until you can feel the each belt is no longer loose. 11) Now check tension at centre of each belt (as in step 1). The ideal deflection for the new belts should be slightly less (1-2 mm less) than with the old belts you recorded earlier. [Nissan specify 3.5-4.5 mm deflection @ 98 N pressure (10 kg) for a new alternator belt and 8-9 mm deflection @ 98 N (10 kg) for a new a/c belt]. 12) Adjust tensioner bolts accordingly and recheck tension - until correct tension reached. Do not overtighten, as this could lead to excessive wear of the pulleys/belts. 13) Tighten the centre bolts of each idler wheel to 35 Nm. 14) Fire up the engine, and run for 20-30 seconds, then turn off. 15) Recheck tension on each belt – it may have changed slightly, if it is now outside the recommended values, loosen the idler wheel central bolts and go back to step 12. 16) Refit the undertray. 17) Drive car off ramps (or lower form jack/stands). Job done! Steve
-
Don't try cleaning it with carb cleaner - hopefully you should be ok Mine's gone in the bin now, I'm not running the risk of contaminating the oil with the flakey silver paint from mine. Steve
-
Thanks for the info - yep, mine isn't original then, pic below - see the silver paint peeled to show blue colour. Steer clear of these ones! Steve
-
Just to clarify - what do you mean by 'high up' the pedal travel. I had a new clutch fitted last year and the new bite point is now very close to the pedal fully pushed in. Very true - the OEM clutch lasted 55k for me. Steve
-
Hummm yeah I suspect it's not genuine - had a look on ebay and there are some cheap painted ones there...definately recommend staying away from those! Steve
-
Hi, Does anyone have a spare oil filler cap lying around? I urgently need to replace my broken NISMO cap (see post here). PM me if you have one and I'll get straight back to you. Cheers, Steve
-
Hello, I was cleaning my engine bay this afternoon - used a bit of carb cleaner spray to help mop up the oodles of oil left around the oil filler cap from it's last service at Nissan. But when I tried to clean the 'NISMO' oil cap, the thing started dissolving and turning blue! Worryingly the silver paint seems to have been coming off even the bottom of the cap - which would be in contact with the engine oil... Thankfully, as far as I can see there's no sign of any getting down the oil filler pipe though. The oil cap came with the car, so I'm not sure it's a genuine article - best keep an eye out thought, when cleaning the eninge bay - just in case you've got one of these... Steve PS. I'm now after an OEM cap if anyone has one spare? (link here)
-
Yeah, I knew she'd pass, the handbrake adjustment was a one-off it was getting dark when I was putting the new rear brake discs on! Took some piccies of fitting the front&rear discs too, so will pop them up as a how-to for non-brembos when I get a minute. Steve
