V1H
-
Posts
320 -
Joined
-
Last visited
Content Type
Profiles
Forums
Events
Gallery
Store
Everything posted by V1H
-
After many days of angle grinding and test fitting I managed to fit the M brace, too. I must have shaved off half a kilo worth of metal dust, as well as, buy a new angle grinder. My old one died of this job. The metal dust crept and settled down EVERYWHERE! Took me a couple of days to wipe clean the car underside and all garage afterwards. The air humidity slowly turned all metal dust into rust. I painted the exposed steel fins with Hammerite Black paint. Now the 4th and last under-brace is installed... phew Clearance might become a bit of a headache - only time will tell. The 6-pint brace has about 9 cm clearance from the road. That's lower than my front Amuse bumper...
-
Simply stunning! Is this the AN02 or AN05 finish?
-
I have currently no plans to upgrade my VLSD. It'd be an expensive mod. There are still other mods to be done, e.g. Torqen BBK, Braum seats (and maybe ultimately forged engine).
-
Good advise. It's certainly true for the suspension not to make it too stiff. I think a stiff chassis, on the other hand, should help the suspension to do its job best. Not too long ago I changed my rear Eibach anti-roll bar to its lowest setting (still 67% stiffer than stock) and it helped a little with wheel spin at traffic junctions. My Torqen dampers have always been on the softest setting, too.
-
With me struggling to put down power in corners, I recently read up on chassis reinforcements and it seems people notice improvements in handling. So I went ahead and purchased a set of four under body braces (sourced through TORQEN and Ebay). They're all from lightweight T6061 aluminium. Top to bottom, these are: Soul Function 6-Point Mid Chassis Brace [#NSZ4RC3021L] Megan Racing 4-point Front Chassis H-Brace [#SB-HBIG07-R] Soul Function Rear Lower M Brace [#NSZ4RC3021L] Megan Racing Rear Lower Tie Brace [#MR-SB-NZ34RL-R] So far I successfully installed all but the M Brace: The M Brace fits a U.S. 370Z's LSD housing just fine, but not my GT style finned LSD housing (stock). I have to decide whether to skip the installation of the M Brace, or flex away some fins to create clearance. I'd be quite tempted to trim the LSD housing. I do hope that this steel protrusion (shown in below photo) isn't hollow inside, or I'd create a leak when I cut it off.. The big 6-point Brace also gave me a little clearance issue with my driver side custom mounted lambda sensor. Nothing really that could've been anticipated. But I gently pried the brace by a couple millimetres and it clears now fine. Note, that brace requires the creation of two new mounting points on the under body via (supplied) rivet nuts. The rivet nuts installation was the most difficult part, if you're not familiar with them. Also note, this brace replaces your two stock Suspension member sub stays, so they have to first be removed:
-
too bad I cannot attend, I'll be out of country that time. But I'm gonna be at the JapFest Donnington on 13th of July
-
Bulletproof. Absolute fabulous and rock solid.
-
[SOLD]nissan consult 3 £65 SOLD.........................
V1H replied to milseyman's topic in 350z Parts For Sale
Perfect! How can I get in touch with the seller? Cheers. -
[SOLD]nissan consult 3 £65 SOLD.........................
V1H replied to milseyman's topic in 350z Parts For Sale
I'm interested in it! Have a persistent hood pop dash light ON that I hope will fix it. (Sensors seem fine) I would be able to run the Consult from within a WinXP virtual environment, won't I? If not i have a spare laptop that I can install XP onto. Hood Light video -
Yes, y-axis says Flywheel HP
-
Haha, the savage torque of a 370Z TwinTurbo can be uncontrollable in 3rd.. i know
-
Wow, 14 psi that is risky high! Would quickly make your motor pop. Either the WG goes south, or maybe, you have a leak in the vacuum hose so the BCSV doesn't apply enough vacuum to open the WG?
-
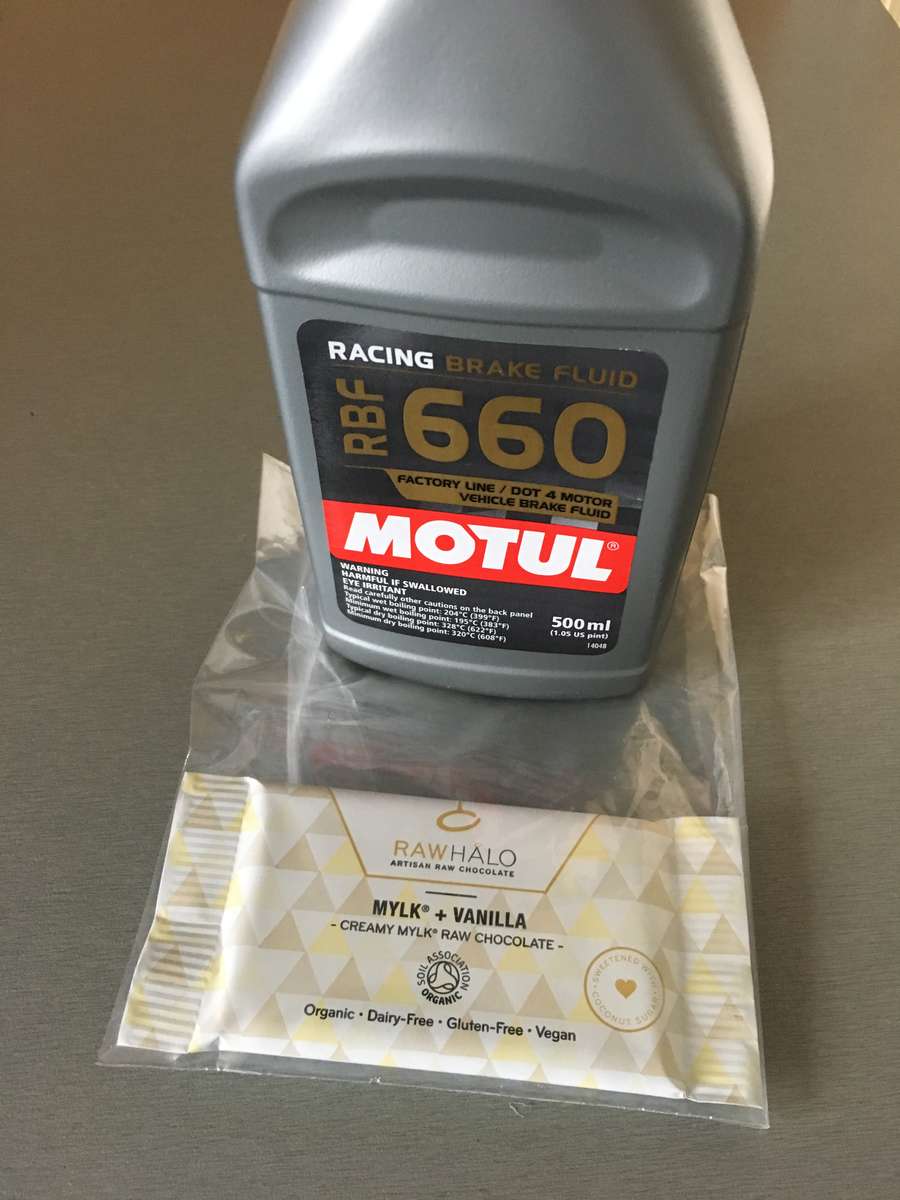
Another big thanks to @Adrian@TORQEN for supplying me with upgraded clutch fluid and pampering me with what's my first indulgence in the famous Torqen chocolate
-
How do you notice boost creep? My boost does droop as rpm rise (see below dyno plot), but it has been doing so from day 1. I understand this might be normal but also read it can be due to slightly too soft WG actuator spring load but has nothing to do with a boost leak. When I observe my Boost gauge I can confirm my boost decreases from 0.44bar @3500 to 0.33bar @7000 (I'm driving on the green Low-Boost setting) but this behaviour is stable.
-
I agree, at 7 psi you should see another 100bhp on top of your current result. I dont know my timing, but i know I have a very safe (rich) A/F. As u see from my torque plot, it drops quite steeply in the upper rpm range. I’m guessing Jez pulled my timing there to completely eliminate knock. (Very conservative tune). AAM actually recommend disabling knock and ignoring mild knock up top. But that was a no-go for Jez Either way, definitely go get a proper local tune. I reckon, Sebastian will have (blindly) added a huge safety marging in timing and/or fuel maps.
-
Recommendations appreciated! I did it anyway, wrapped my roof in gloss black, too [Hexis SKINTAC #HX20890B] Quite like Tint Studio's job. (But I can always undo a vinyl wrap, or part of it. )
-
Thanks m8, I have 20" forged wheels dressed in MPS4S. Please refer to my post on page 8 for full details
-
Last thing I am contemplating doing before winter is vinyl wrapping my roof in black. Here is an animated GIF simulation. Any comments whether it's a good idea?
-
Thanks guys! Here another little update, I just turned my seat belts into bright red colour. I LOVE the new look of them I uninstalled the factory belts (left) and sent them to Jason @JW Auto Trim. He swapped the belts for red ones and returned them very quickly (right): Reinstalled, looking like this:
-
Went to TRAX@Silverstone last Sunday. Weather was good and the day out was much fun @Adrian@TORQEN @Jonnymonno @V1H
-
A couple weeks ago I fitted new exhaust tips (Audi RS oval style) but the original cutouts on my rear bumper weren't quite big enough for them. After some consideration I opted for the most work intensive but most striking solution: Chop of parts of the bumper and fit a home-made rear diffusor! (I always fancied a rear diffusor on my amuse bumper but there is no available aftermarket solution) In addition, such diffusor ought to allow a better view onto my Helmholz Resonators, I reckoned With much dedication and ample time spent on details, I think I did a good job, but see for yourself Oh.. while I was at it, I also rebuilt my front splitters/skid pads. All powder coated in Candy Red to match my wing mirrors First I cut away large parts of the rear bumper (red lines) Then I used cardboard cutouts to design mock-up diffusor blades until I was happy with the shapes. Here my left mask (digital) Now I bought tough 3mm alu sheets and cut out the shapes... .. and bent them until everything fitted perfectly. I fabricated diffusor mounting points from metal (sorry, not shown) and attached them to my bumper with fibre glass mats and resin (Halfords body repair kit). I drilled holes in the according places and countersunk them, as I wanted to use black countersunk hex strews for a flush neat look, and sanded the surfaces, ready for painting (Additionally shown are the new front splitters) I sent them off for powder coating (Thanks @Jonnymonno for help ) … And the finished product:
-
1. andy James +1 - Paid Track time 12.20/13.40 2. Humpy - Paid 3. Nso93 - paid 4. ShortPaul 5. Andy_Muxlow - Paid 6. Chippychip123 +1 - Paid 7. Jay84 - Paid 8. Coopen87 - Paid 9. Vroom811 - Paid 10. 14N - Paid 11. reeceybeaney +1 - Paid 12. Buster - paid 13. Shire - paid 14. Daveo132 - Paid 15. Keith Olive - Paid 16. Dra1975 - Paid 17. Mark350Z - Paid 18. Killick.Z - Paid 19. KG350z - Paid 20. Lewis Schwier - Paid 21. Adrian @ TORQEN - Paid 22. Jonnymonno - Paid 23. Kryptek49 - Paid 24. V1H - Paid
-
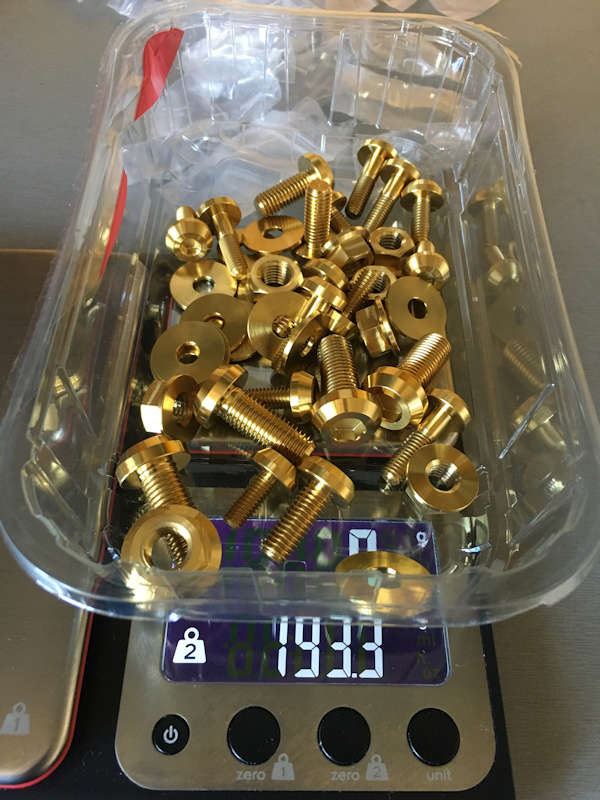
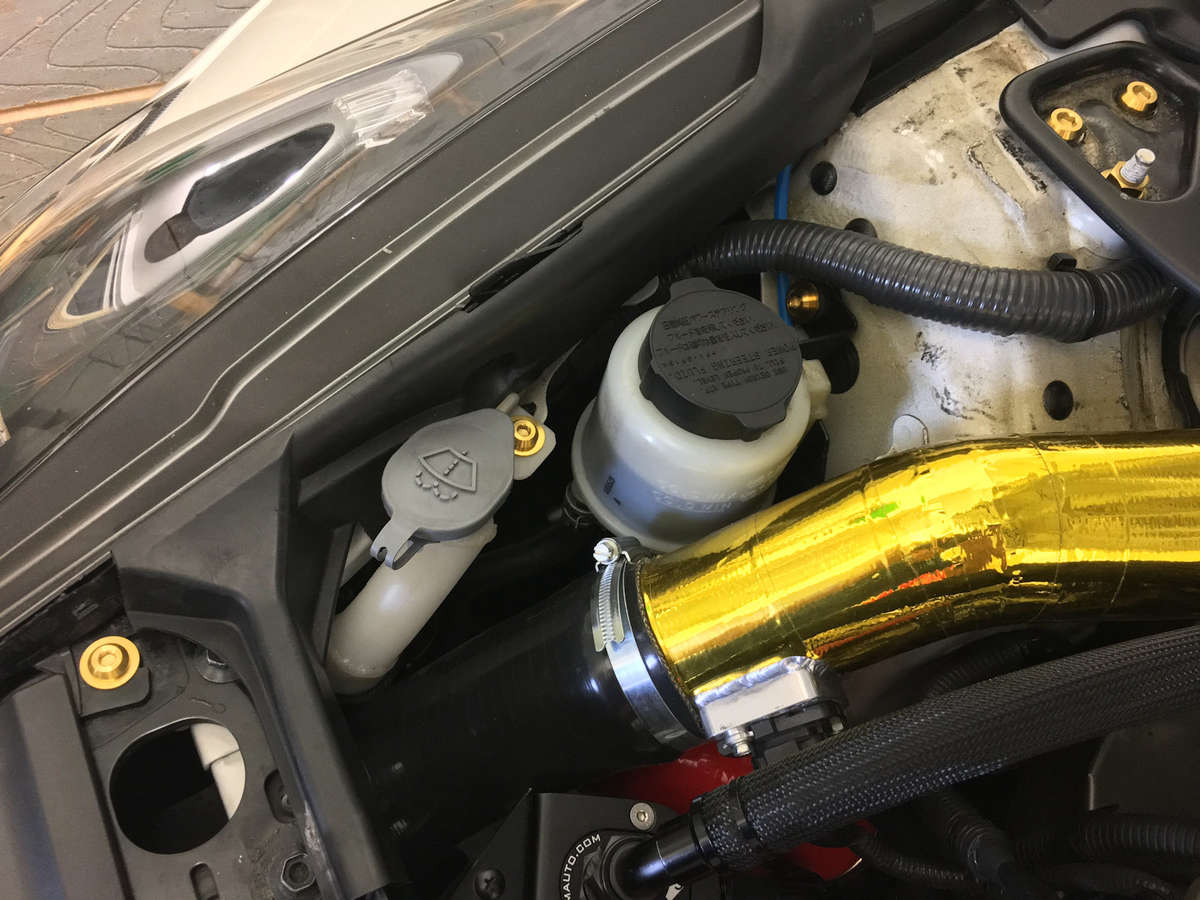
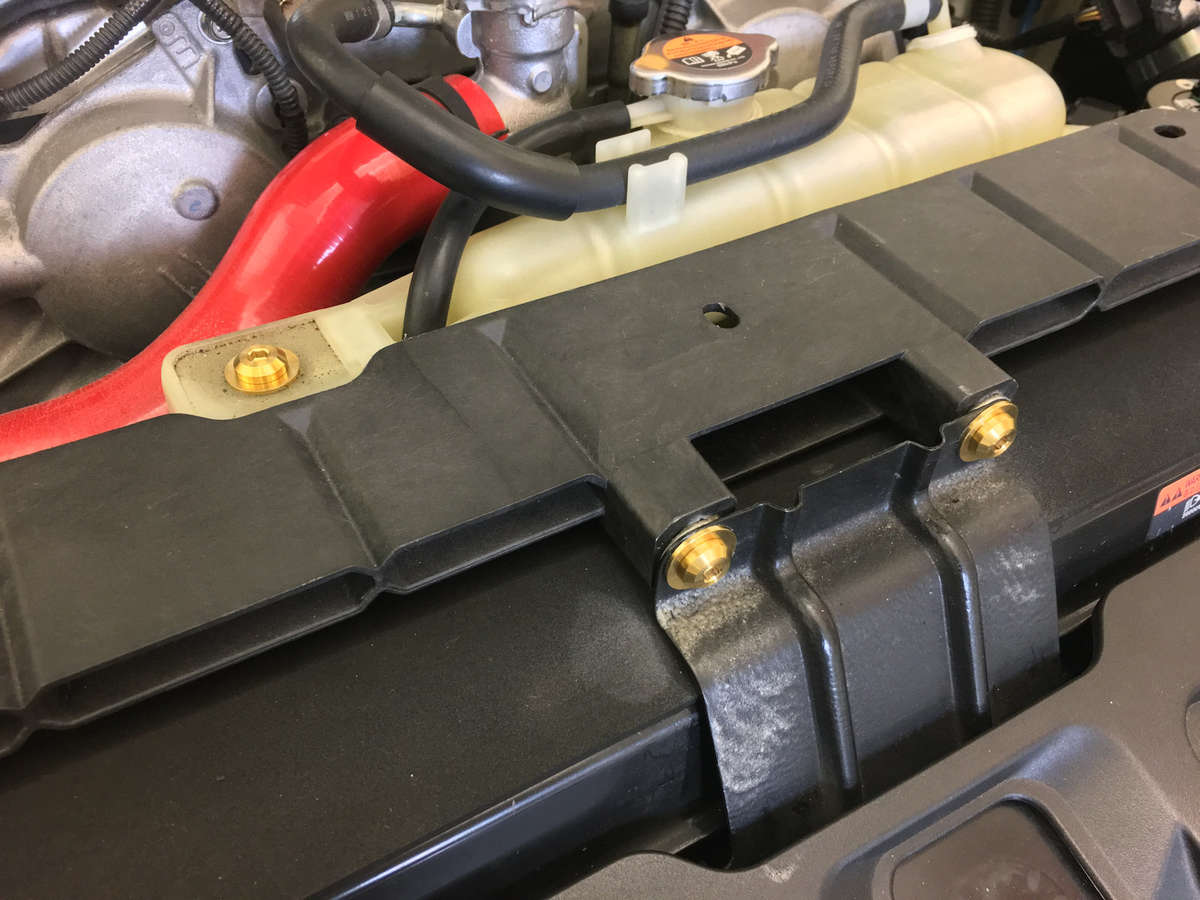
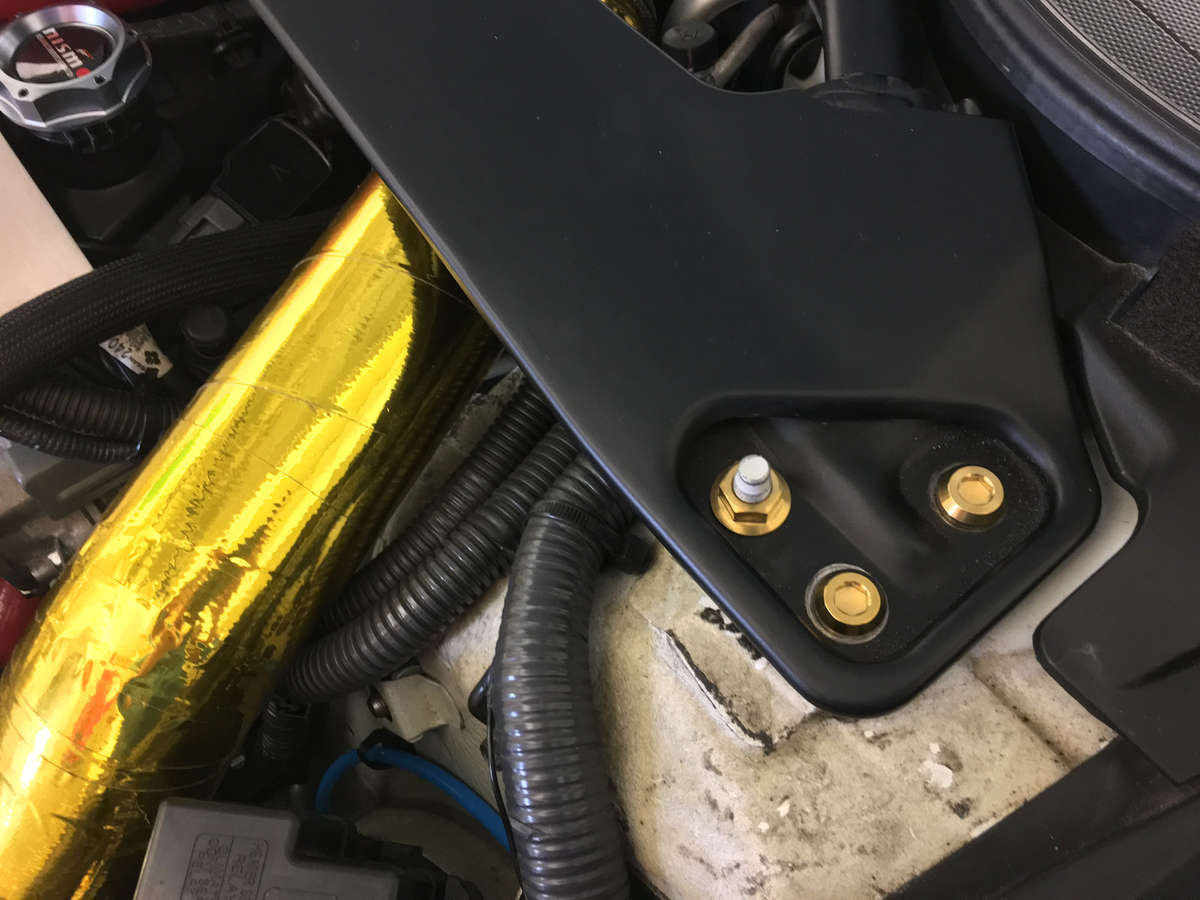
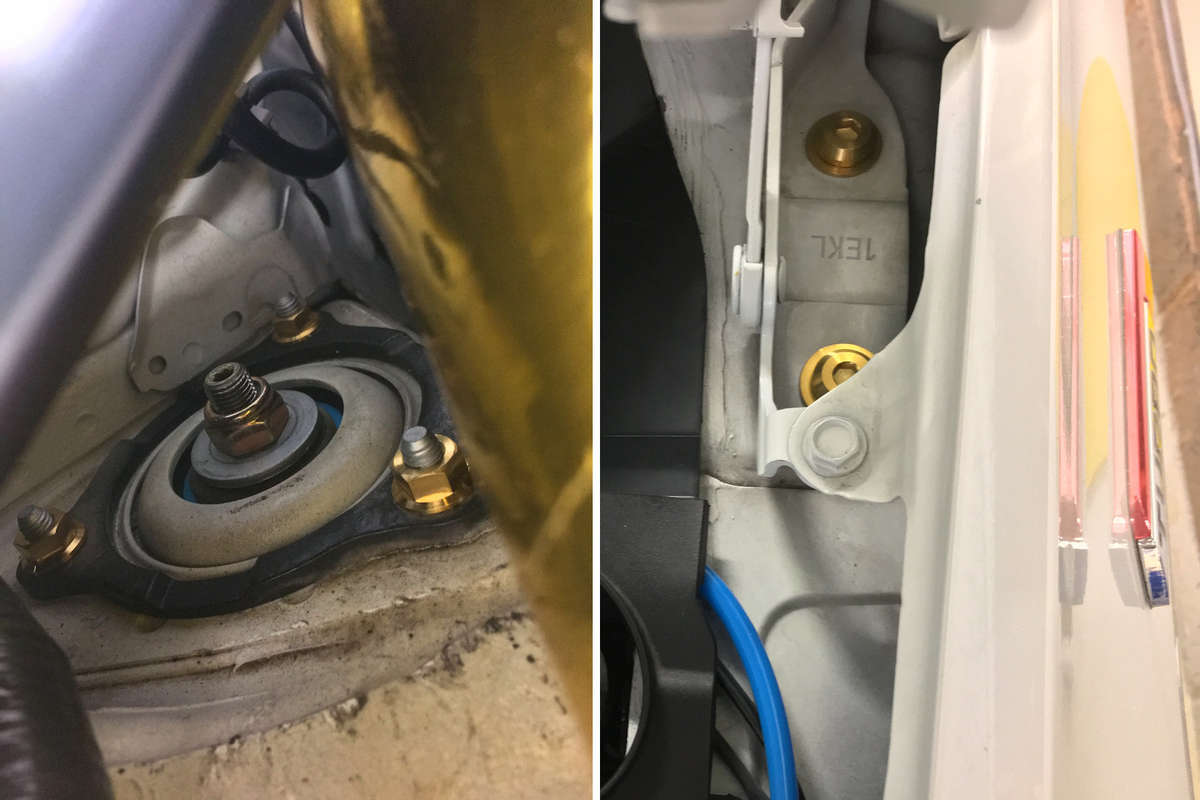
@Adrian@TORQEN was so incredibly kind to sponsor me a little sweet gift, the gorgeous Torqen Engine bay Titanium bolts kit [#TRQ-Z34TIB] The kit includes 40 bolts/nuts/washers made of 6AL-4V Grade 5 Titanium, gold colour finished. Total weight is 193.3 g (1/3 weight saving over stock). The Titanium fasteners also feel a lot harder and stiffer. Once tight, there is so much less flex felt in the wrench/ratchet than tightening steel fasteners! BEAUTIFUL Here photos after the install:
-
*** TORQEN *** 370z TORQEN Engine bay Titanium hardware kit
V1H replied to Adrian@TORQEN's topic in TORQEN
Here the promised photos after installation. Btw, weight saving is one third, the Titanium fasteners feel a lot harder and stiffer when tightening. Once tight, there is so much less flex felt in the wrench/ratchet than tightening steel fasteners! One thing worth noting, the Titanium bolts and nuts have different 'head types', which one should be prepared for, as follows (maybe worth mentioning on the Torqen page?): | OEM | Ti kit M10 bolt | 14mm | H8 (Allen) M10 nut | 14mm | 15mm M8 bolt | 12mm | H6 (Allen) M8 nut | 12mm | 13mm M6 bolt | 10mm | H5 (Allen)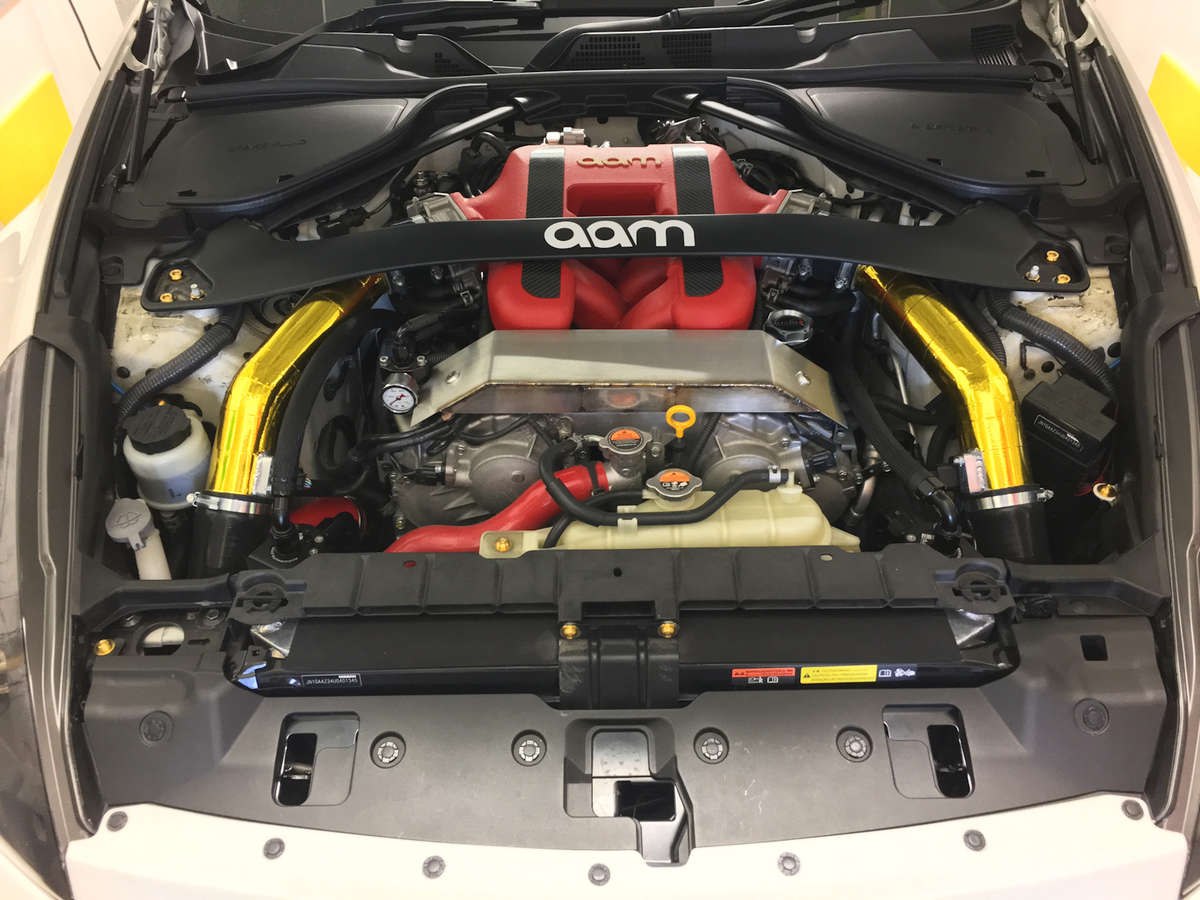
-
*** TORQEN *** 370z TORQEN Engine bay Titanium hardware kit
V1H replied to Adrian@TORQEN's topic in TORQEN
Yes will do! Woa, the bolts arrived the next day! You're unbeatable, and thx again for the beautiful b-day gift!! Gonna install them later today. They are mindbogglingly lightweight, just 193.3 g the entire 40-piece set !!!!!!!!! Sooooo gorgeous to look at