V1H
-
Posts
320 -
Joined
-
Last visited
2 Followers


Recent Profile Visitors
9,077 profile views


V1H's Achievements
Z Dedicated (3/7)
221
Reputation
-
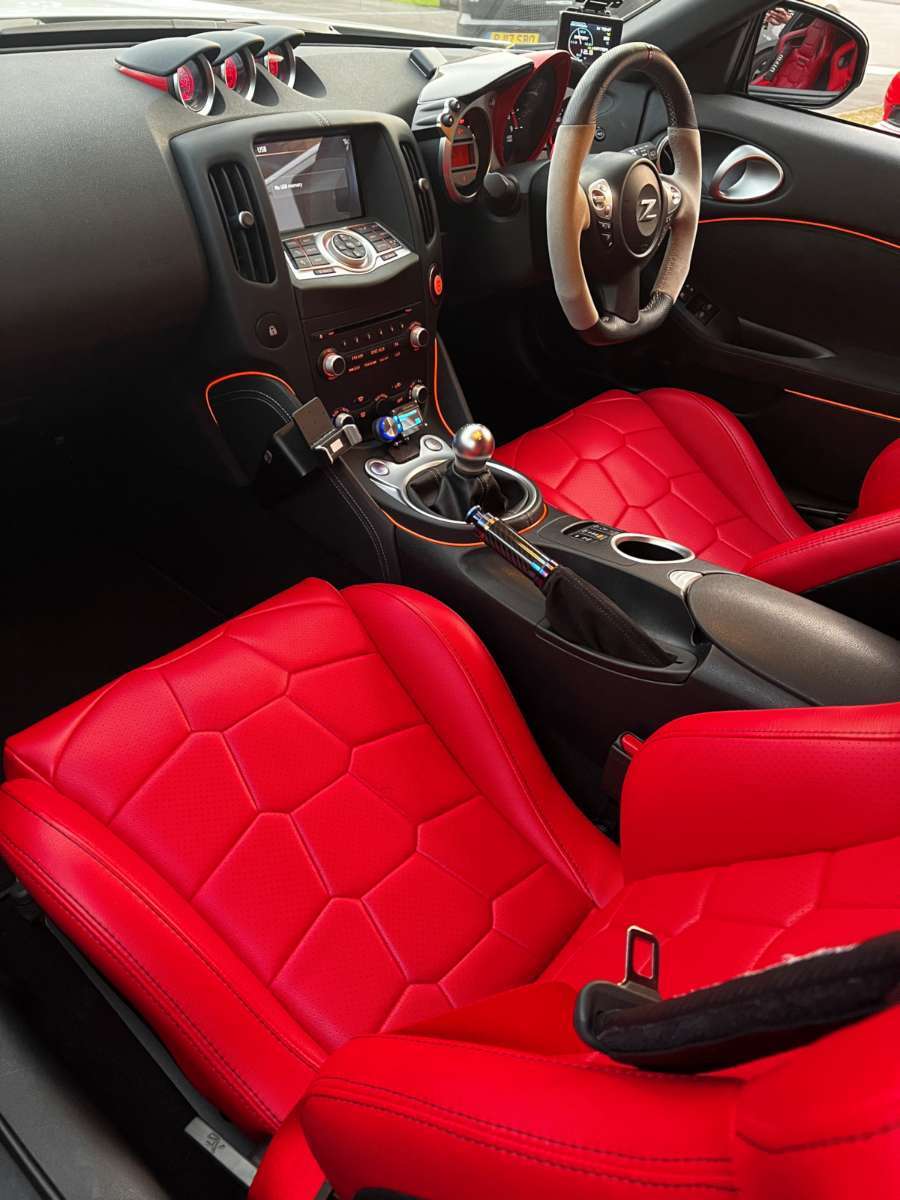
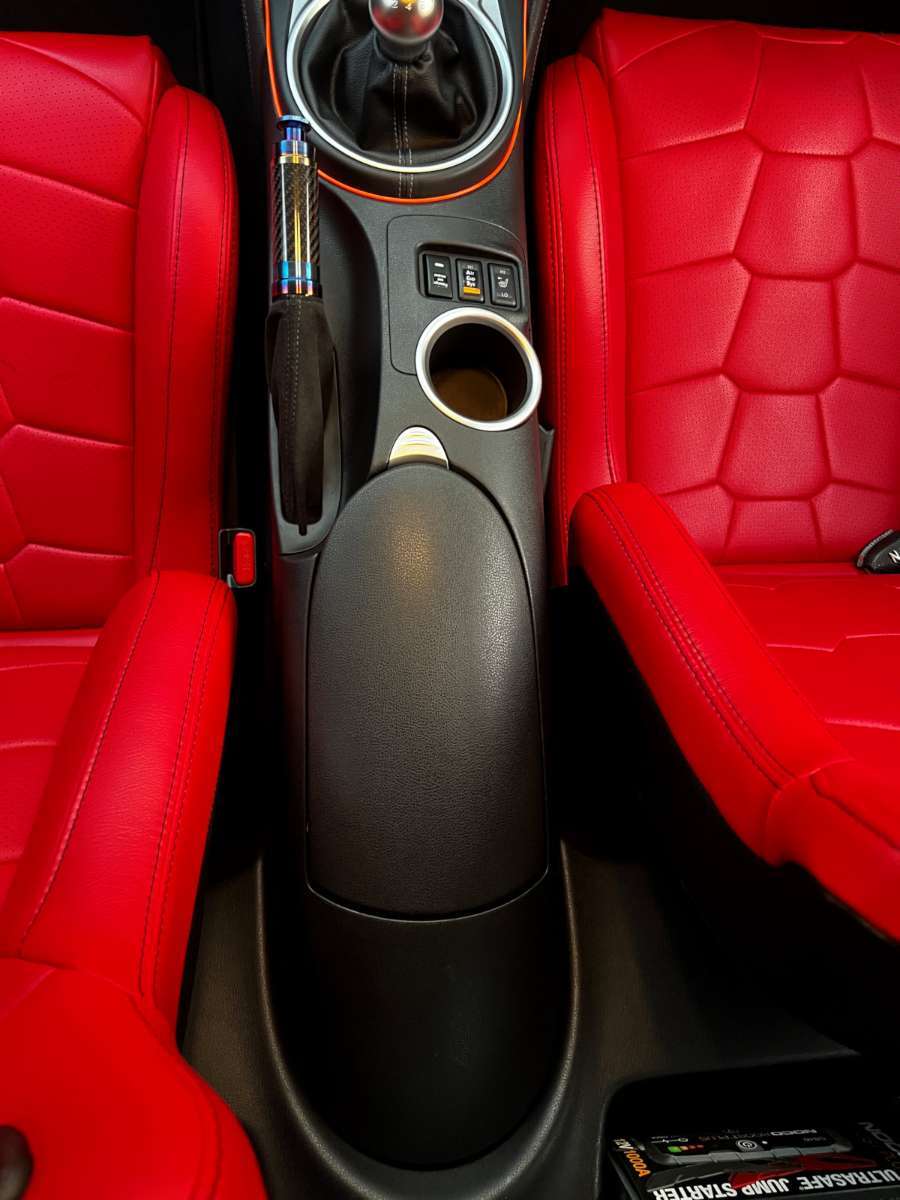
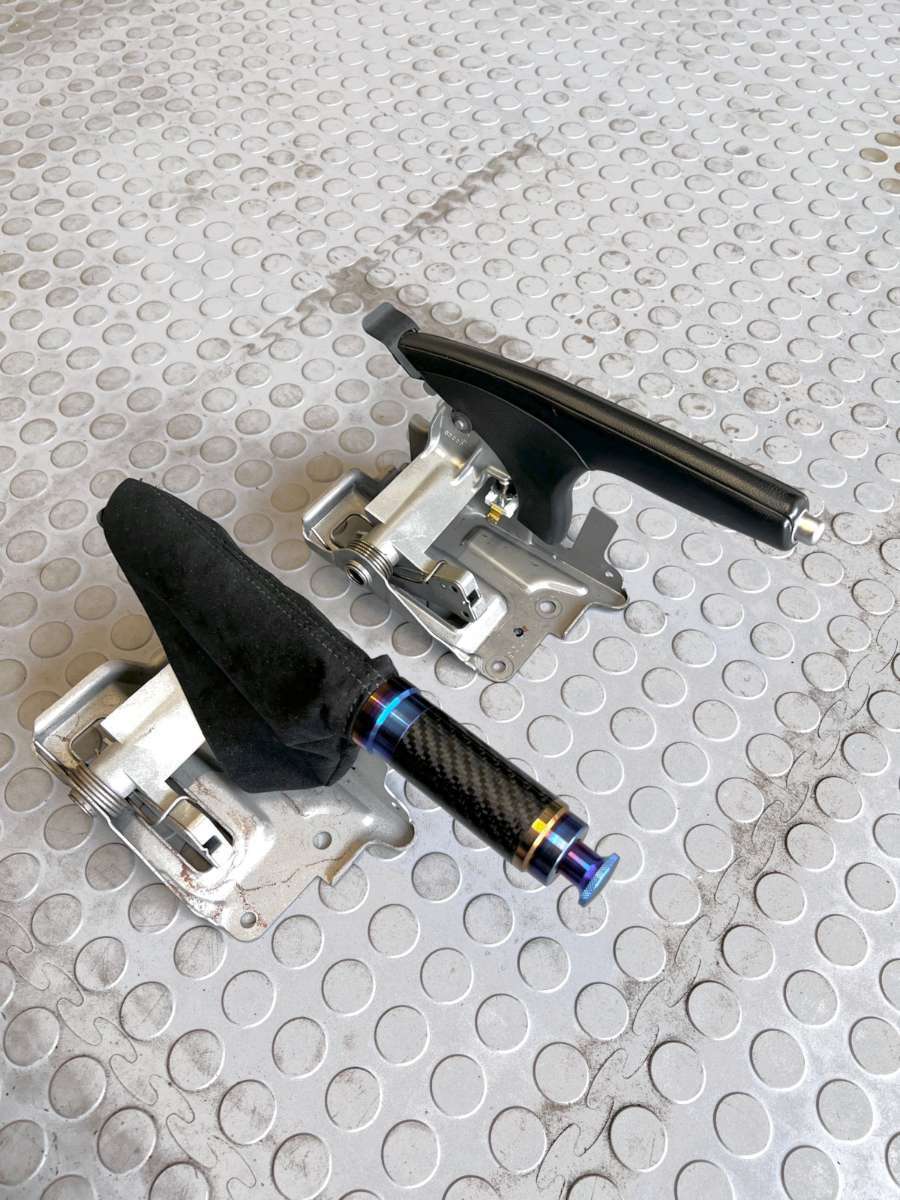
Here the OEM vs new carbon/burnt titanium piece: Because the handle is now thicker, I found it best to first remove the rubber lining the opening on the console: Now the new handbrake would just fit through the opening when putting the centre console back in place. The rubber lining can be slid back and push into place at the end
-
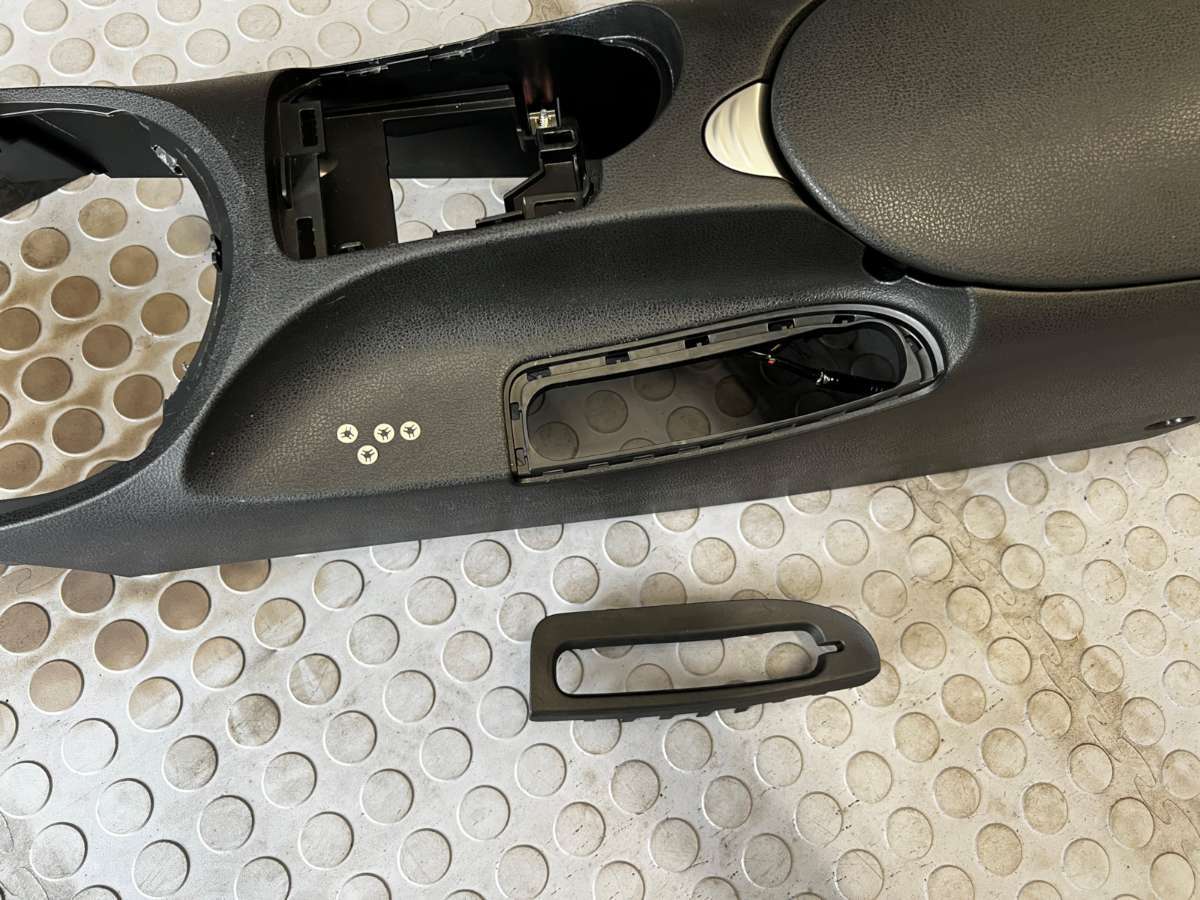
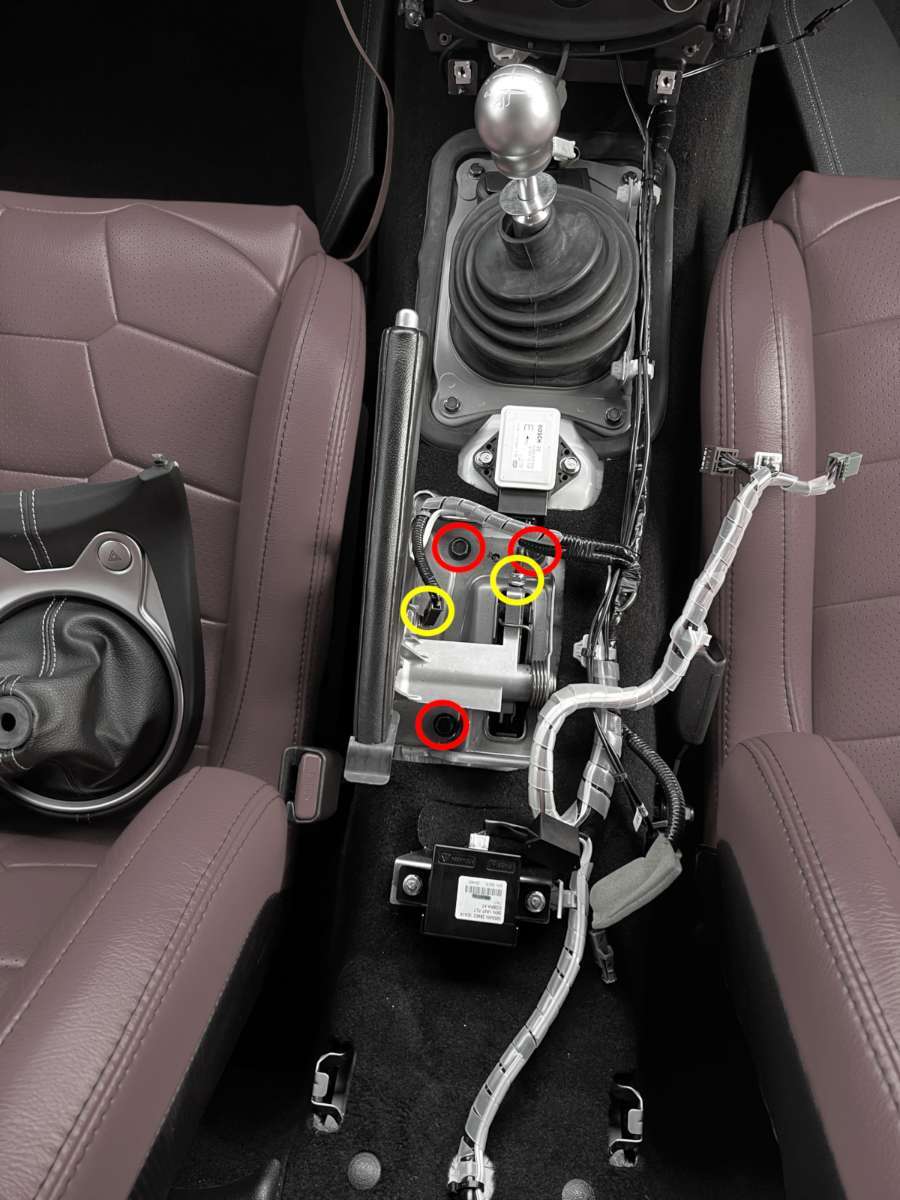
Yesterday was great sunny day and I installed the handbrake. The centre console trim needs to come off and you get access to the handbrake. Remove the three M12 bolts, one M10 nut holding the Bowden cable and disconnect the connector.
-
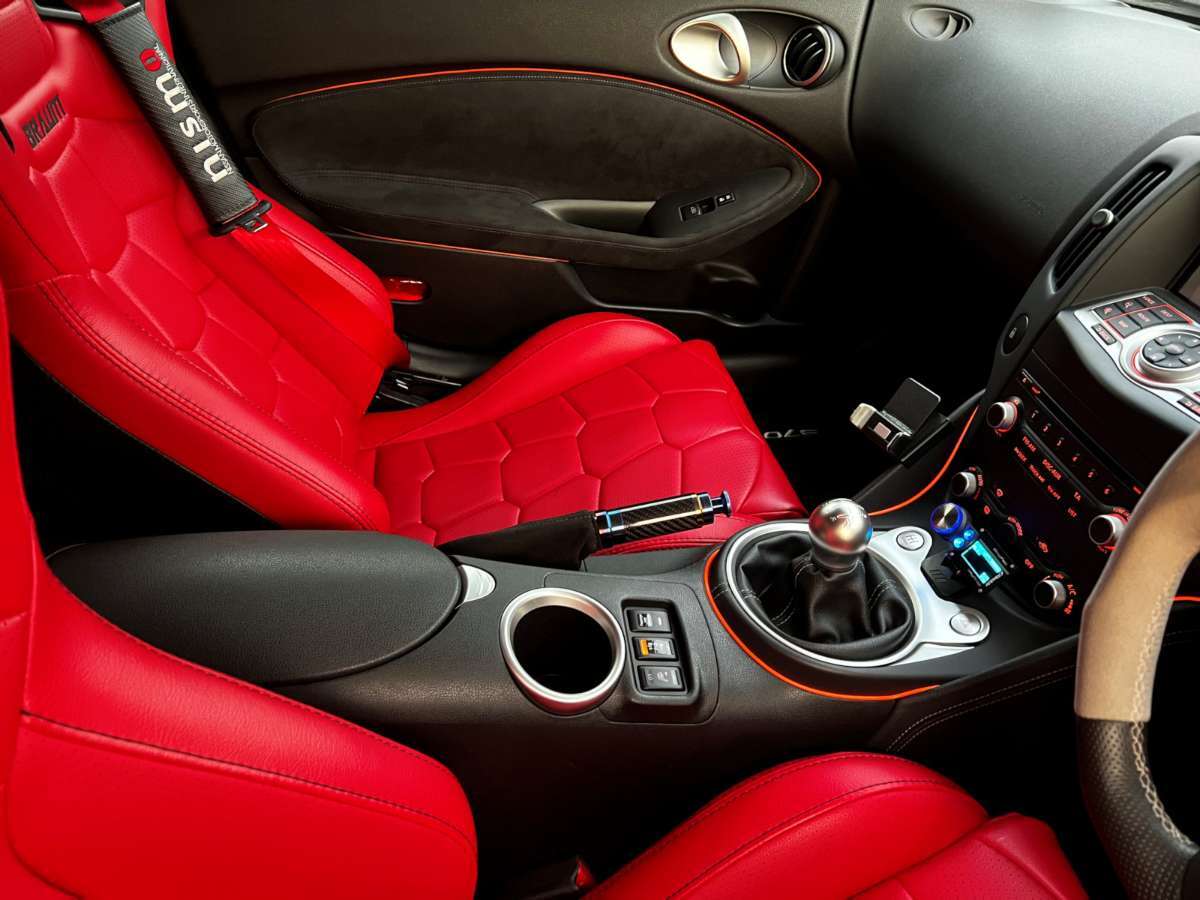
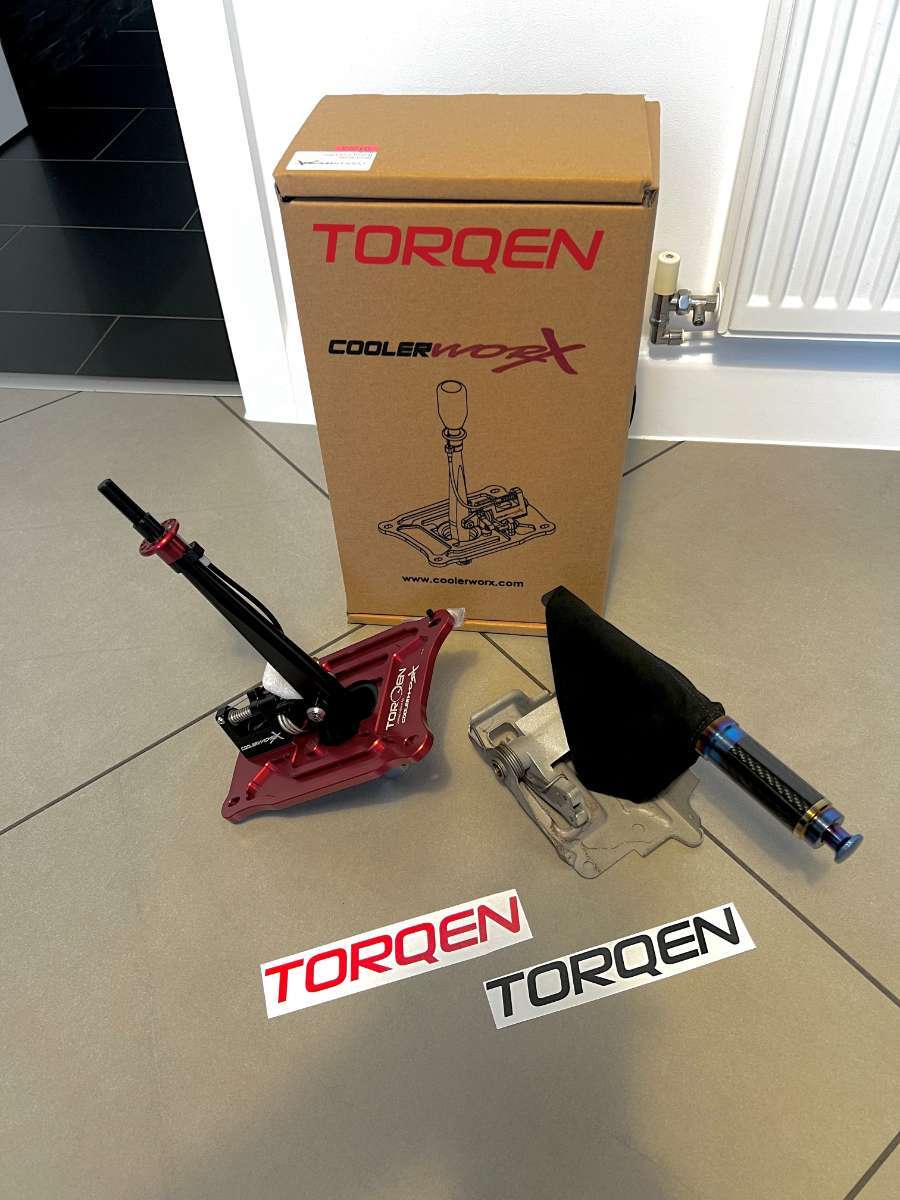
At the Torqen ft Tarmac Sports summer meet last month I marvelled at their latest Limited Edition products and couldn't resist getting each a - Torqen x Patrick Galligan Limited Edition Handbrake (25 globally) [#TRQ-PG-HB] - Torqen x CoolerWorx PRO Short Shifter - Limited Edition (25 globally) [#TRQ-CLRWX-370Z] The OEM handbrake has been the last 'ugly' sight in my otherwise upgraded interior. And the short shifter just blew my mind when I tried first-hand the non-pro version of it and thought 'OMG, I gotta have that in my life!' 🤩 It shifts with unreal precision!
-
Very sorry I cannot attend today as planned. Am in Germany this week on holidays for personal reasons. Wishing you all a fab and sunny meeting 😀
-
That looks very good 😍
-
1. davey_83 2. pintopete58 3. George1966 4. Rhysos 5. Headphones 6. Monkey1983 7. budbongo 8. SHEZZA 9. Justthejedi 10. V1H Sounds great! Would love to come and bring my son and wife (second car) to combine this meet with a museum event :)
-
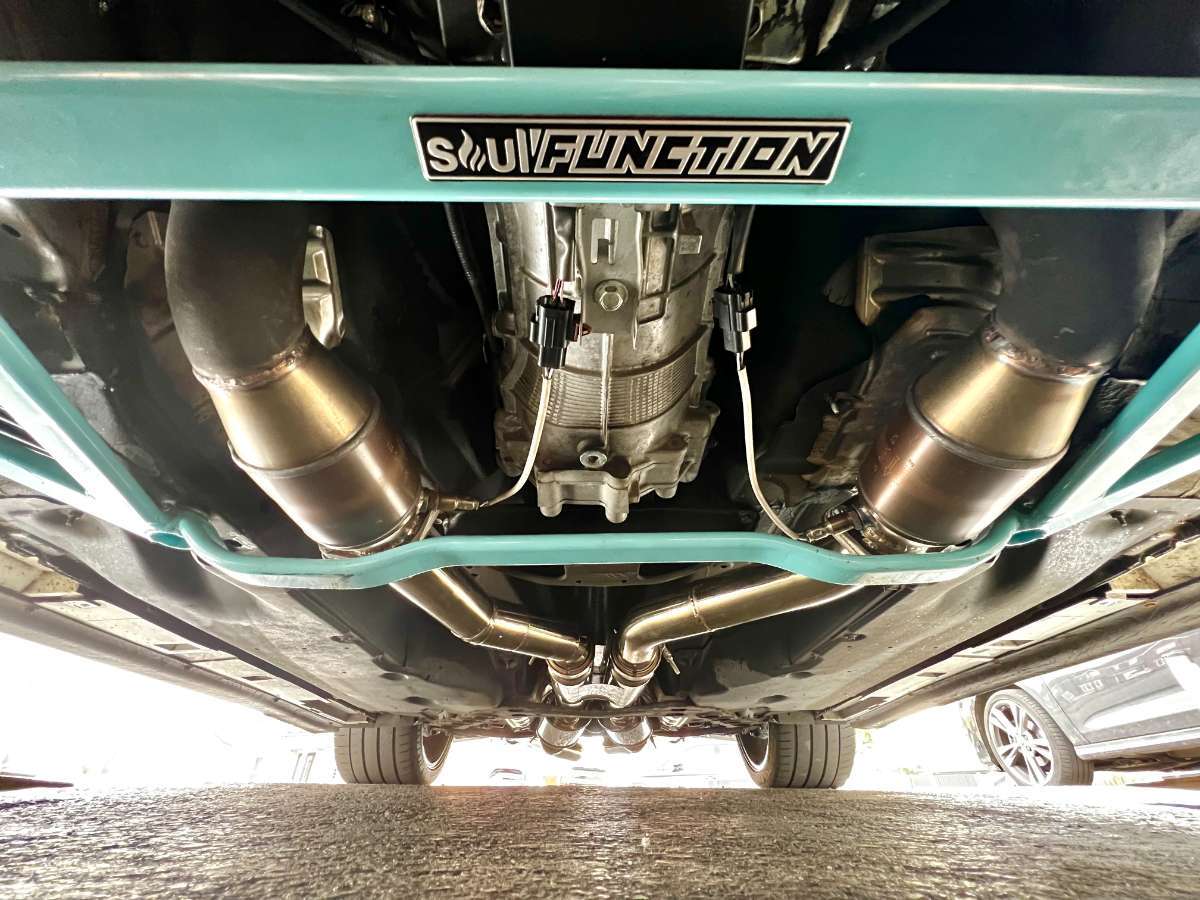
The other thing I recently did, I replaced my 200-cell HFCs that came with my AAM TT kit. The fact that they don't pass emissions is a nuisance and sooner or later I wanted peace of mind (regulations get more stringent, or if it ever came to selling it some buyers might be put off) I bought some quality 200-cell HFCs from HJS Emission Technology [#90 95 0085-HD] that actually comply with Euro 5 spec. I stumbled across it on a German BMW forum. The ppl there were actually concerned with passing emissions). Needless to say a pair of cats cost a small fortune (£1160). I had @Jez @ H-Dev install them for me and retune the car. The welding job was not quite as straight forward as I anticipated; the cats have also 3" in/out and the same length as my old ones but are slightly larger in diameter and were binding against the underbody. But H-Dev did a fab job, as usual🙂 I am now missing the original ceramic coating I had on my cats, other than that they just look a bit beefier: Fingers crossed for September when my MOT is due that the investment was worth it 🤞
-
I wasn't quite happy with my latest infotainment upgrade, the Pure Highway 400 DAB+ Radio adapter. The reception was okay further afield but I had never signal on my home street, while my wife's BMW (with shark fin aerial) has great DAB+ reception at home So I removed it all and started over. I now have an active roof-mounted whip style aerial (I also tested an Eightwood active shark fin style aerial, which wasn't great either) together with a DAB+ radio adapter that accepts an external antenna and has an AUX output as I wanted to again use the Z's iPod audio input (much cleaner than piggy-bagging the signal on a free FM frequency). More specifically I opted for: AutoDAB GO+ with touchscreen control (I discarded the included glass-mount antenna) Universal (Ebay) Roof-mount 12V-active amplified DAB+ FM radio aerial with SMB connector (I cut off the FM/AM coax cable as I didn't need it) I cannot emphasise enough how much of a difference the roof-mounted antenna has made over the inside glass-mounted aerial!!! Now I'm getting over 50 DAB+ stations on my driveway! BOOM!🤯 The installation was however considerably more involving but well worth it! I needed to consult the workshop manual to get the headliner removed within half a day in preparation for drilling a hole through the roof. interior side panels, boot panels, seat belts, etc. has to first come off 🙃 I found it best to use this type of drill when drilling large diameter holes into thin sheet metal. I need some 20-odd millimetre hole: With the new roof antenna on, the car loos almost like a race car with telemetry com's 😅 Make sure the rubber seal sits flush on the roof to be water-proof. And beware of the airbags and explosive charges around the roof area. The SMB coax from the aerial was routed straight across the roof to the AutoDAB GO+ while the 12V cable of the aerial I routed along the passenger side to a 12V IGN source I have in the foot well area. The AutoDAB's power cable I ran straight to the passenger A-pillar and spliced into said 12V cable, while a bolt on the A-pillar served as ground. The AUX output cable of the AutoDAB also runs to the left and down the A-pillar and then to the centre consolde cubby where the iPod input is (I simply reused the audio cable I had laid for the Pure Highway unit; just cut and re-soldered)

.JPG.b1db07da185fdcbf0c91622a62fb25bd.JPG)
.JPG.afd8b10012def38ade3612941fc0b6df.JPG)
.JPG.d5c066b766db756ef719086c442fc244.JPG)
.JPG.a4c7a614498ba9a47e17f8948f345be4.JPG)
.JPG.28a7dabb4e41810f7f5dfb3332be944e.JPG)
.jpg.e08d7f32415d1590f5c54594bf1bda5f.jpg)
-
The Nissan Dealer made me do it - My build thread
V1H replied to Jonnymonno's topic in Member Build Projects
-
1. andy james Paid 2. Zelda Paid (11:20 track) 3. George 1966 Paid 4. Andy_Muxlow Paid 5. Buster- paid 6. nismoandy -paid 7. SamTripp52 8. DAZ8235 - Paid 9. JonLonghorne99 - Paid 10. SuiSid - Paid 11. LAB99 - Paid 12. Millicano - Paid 13.Sebastian PAID (Track 10:20, 12:20, 14:20) 14. SHEZZA - Paid 15. MicktZZZ - Paid (just once on track at 12:20) 16. Monkey1983 - Paid 17. DrMurderDeath - Paid 18. SH23 - Paid 19. Azurez33 & +1 - Paid 20. Harrm +1 paid 21. Marcos +1 paid 22. Paul_K Paid 23. TommZ +1 Paid 24. StormtrooperZ +1 Paid 25. tauvp Paid 26.Nathaniels350z +1-paid - Track 14:40 27. Whiskeymedicine +1- Paid - Track 12:20 28. Jonnymonno +1 - Paid 29. Patrick John - Paid 30. Stoker11 + 1 - Paid 31. Chris141084 - Paid 32. Humpy - Paid 33. harvers - Paid 34. Buptaboy - Paid 35. jayb_370z+1 - Paid 36. V1H - Paid
-
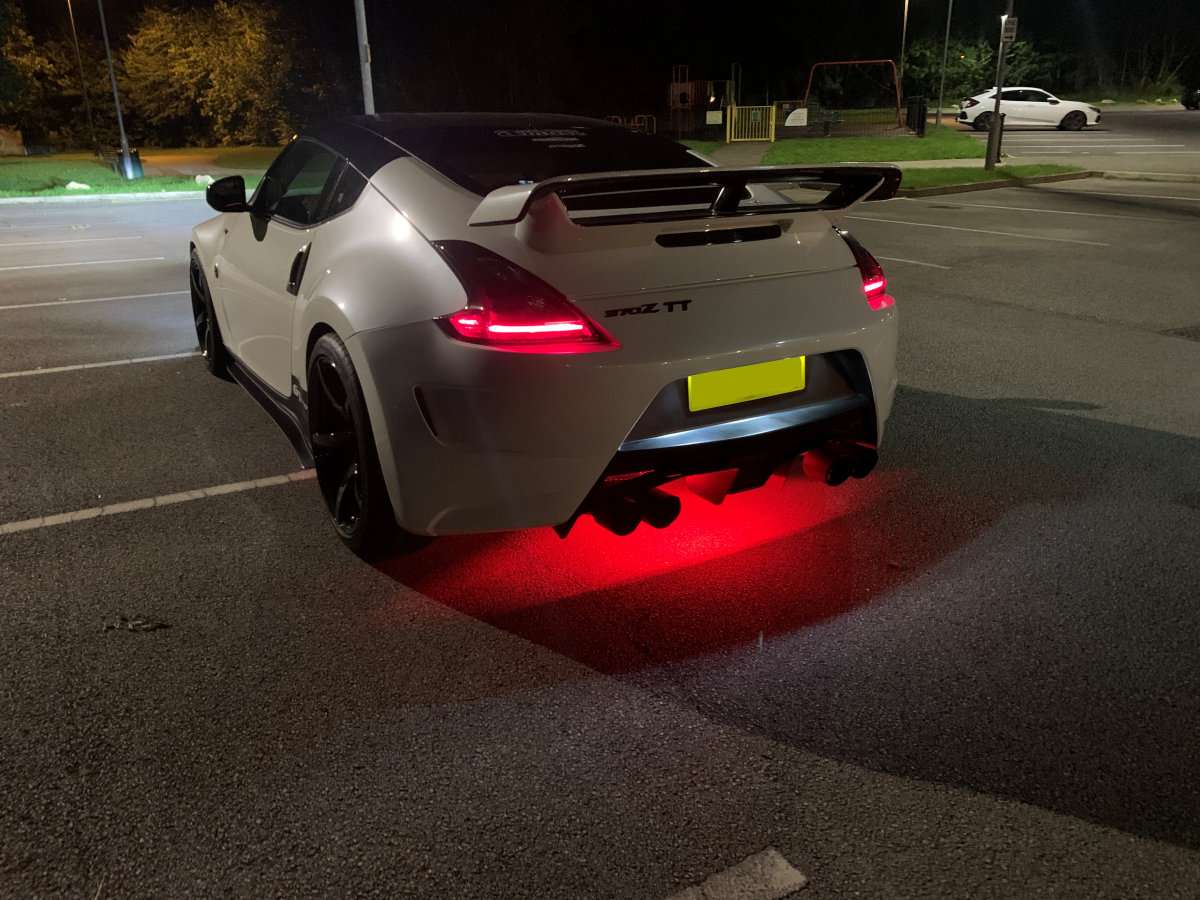
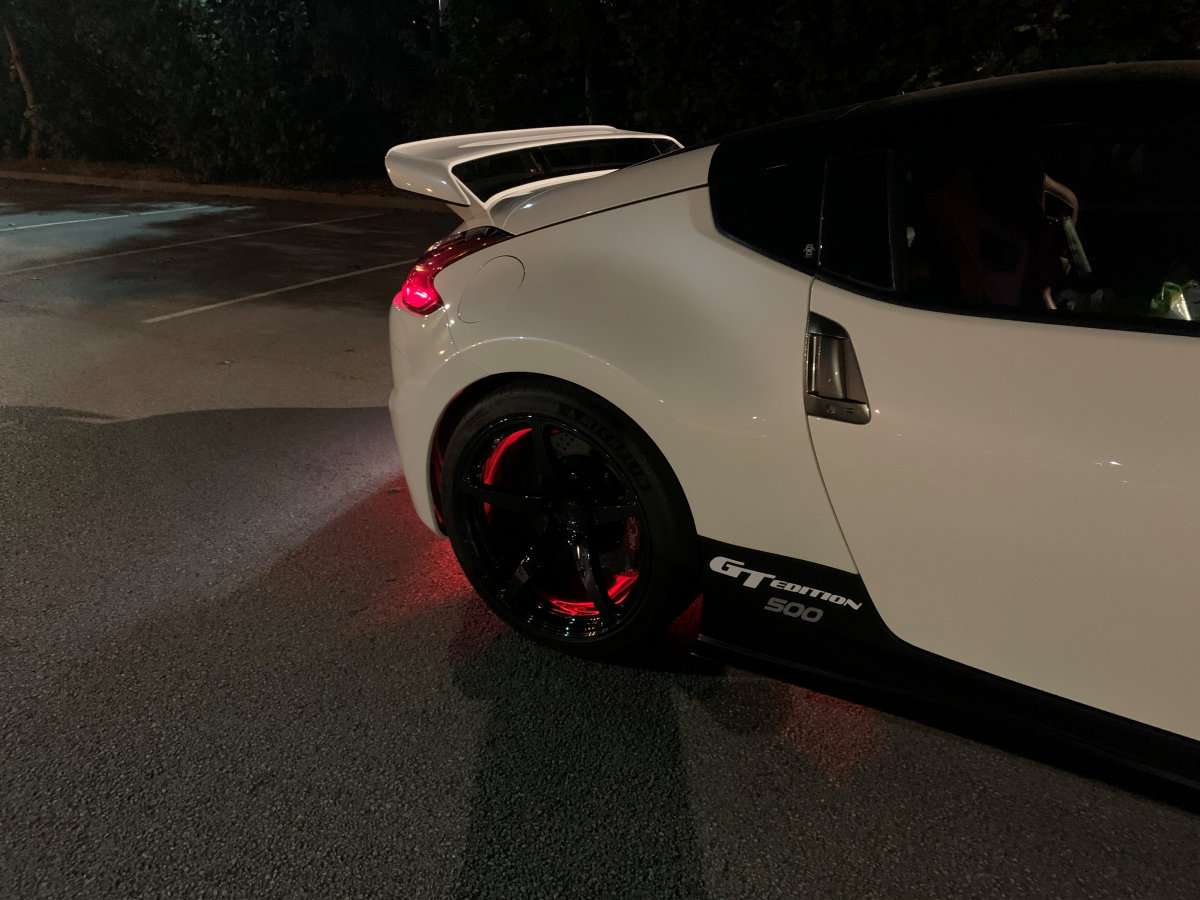
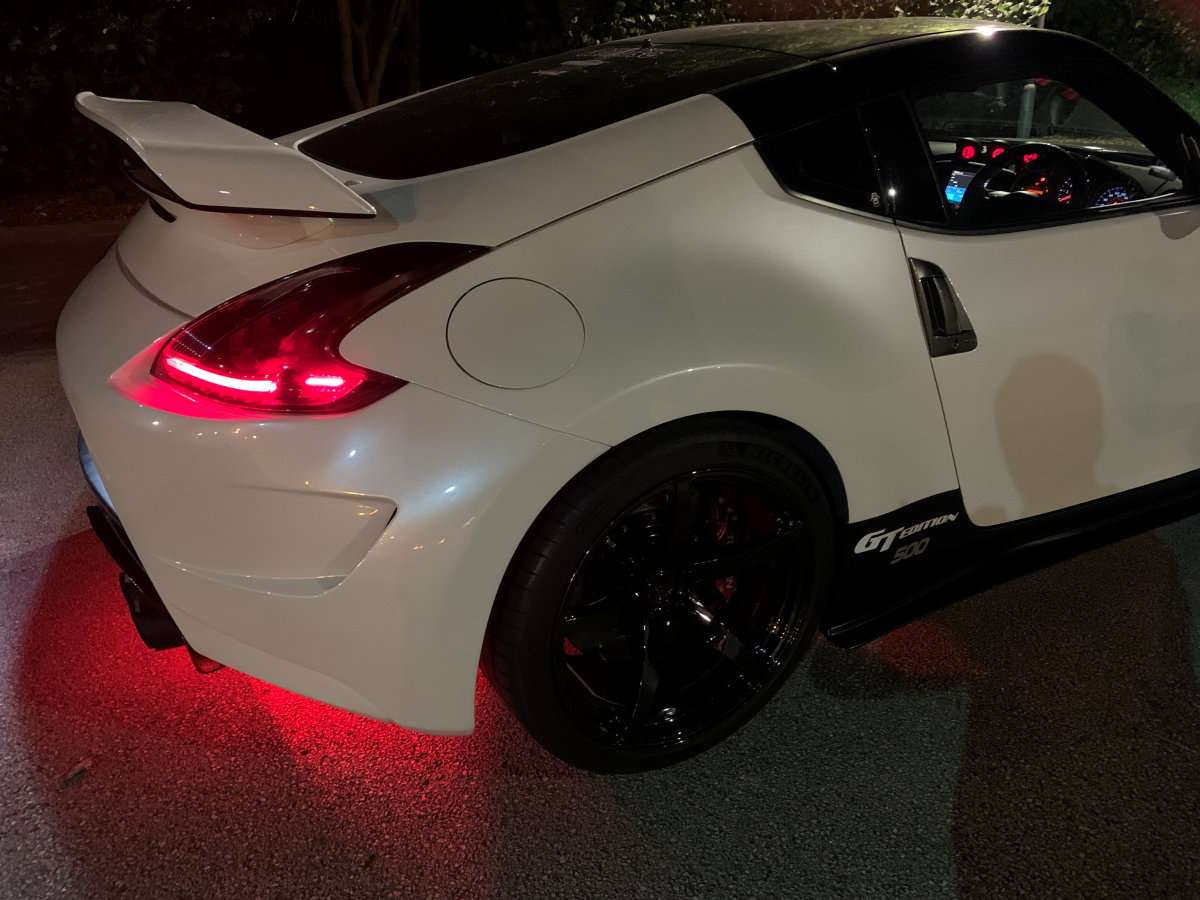
A massive thanks to @Adrian@TORQEN for sourcing me my new ultra rare Esprit GT Wing 262F from Japan! ❤️ The wing and stands are full carbon (3.2 kg) and drag angle is 3-way adjustable. Frankly it looks baller 🤪 I still have to deal with the issue of patching up the stock mounting holes and respraying the hatch, some time later.
.jpg.0227bc33e4bb1c3604ef185900f7f2fd.jpg)
.jpg.166651435b1a0ebc80945cbf6d60301e.jpg)
.jpg.13bed0c7ee43dbec419b3ed8c5865611.jpg)
.jpg.7c90e0bc408302fb599d5577661a5b94.jpg)
.jpg.73848a516b81c0ffa8e9e7ccc82e16ce.jpg)
.jpg.7d6aafb638df050bb5d0391dd2cd427f.jpg)
-
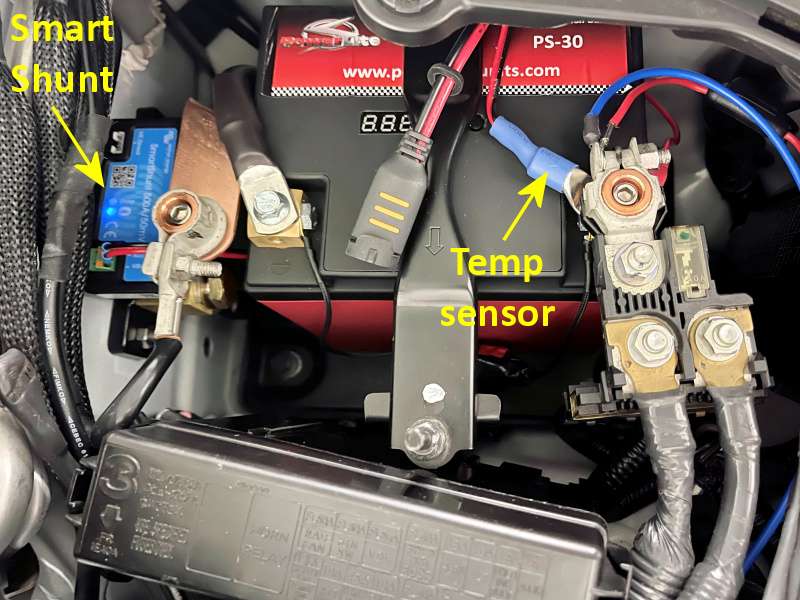
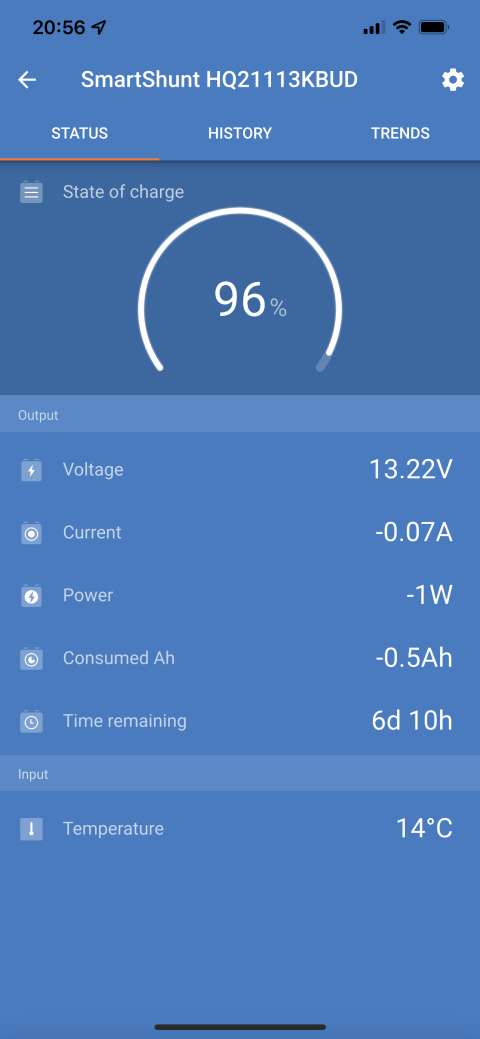
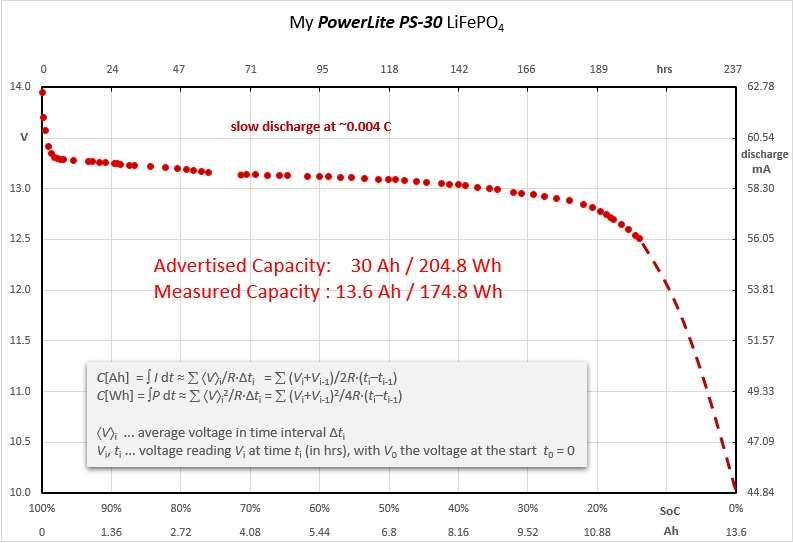
New battery monitor Got rid of my BM2 BLE Battery Monitor (Bluetooth), which only reads voltage and is clearly made for Lead Acid battery monitoring. Replaced it with a Victron Energy SmartShunt 500A (Bluetooth) [#SHU050150050] with optional temperature sensor [#ASS000100000] to better monitor my LiFePO4 battery. The smart phone app now informs me about not just voltage but also current draw (in and out) and power consumption. But most importantly, counting those amps in real-time allows the app to account for actual Amp hours drawn from the battery, and thus, true State-of-Charge (SoC) reading. Deducing SoC from mere voltage reading is very inaccurate with Li-based batteries since they have very flat discharge curves across most of the SoC range. I did however set up the App not with the batterie's nominal 30Ah capacity, but 13.6 Ah from a true measurement I made earlier. I have a suspicion high under-bonnet temps kills my LiFePO4, which is why I added a temp sensor. I will monitor the temps next time I drive. I read somewhere that LiFePO4 shouldn't see above 45°C, ideally max 30°C. 🤔 Or is it the 70+ Amps the stock alternator charges it with that it can't handle long term? Here a screenshot of the app. My Z draws 70mA (precision multimeter) in garage rest and the SmartShunt very accurately reads 0.07A, too. This is quite a feat given the shunt is built to pass 500 A at just 50 mV voltage drop (0.1 mOhm). It also displays the remaining time until my battery is empty. I set alarms to recharge before then 😉 Here the actual capacity measurement of my (second) just half year-old PowerLite PS-30.
-
Item sold now.
-
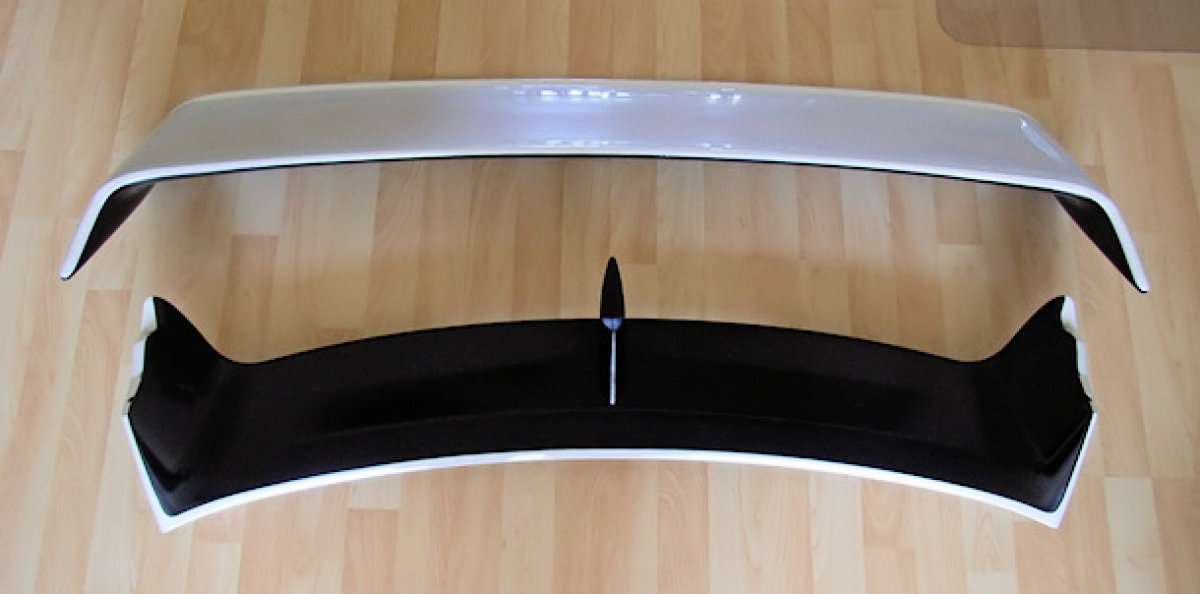
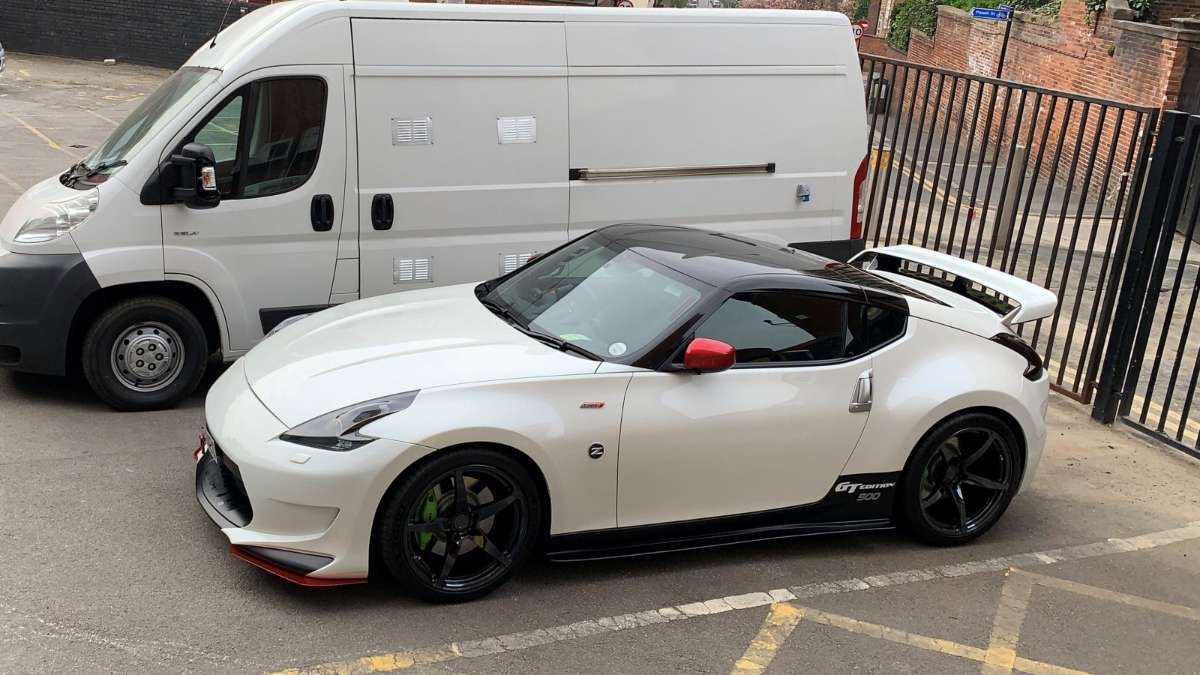
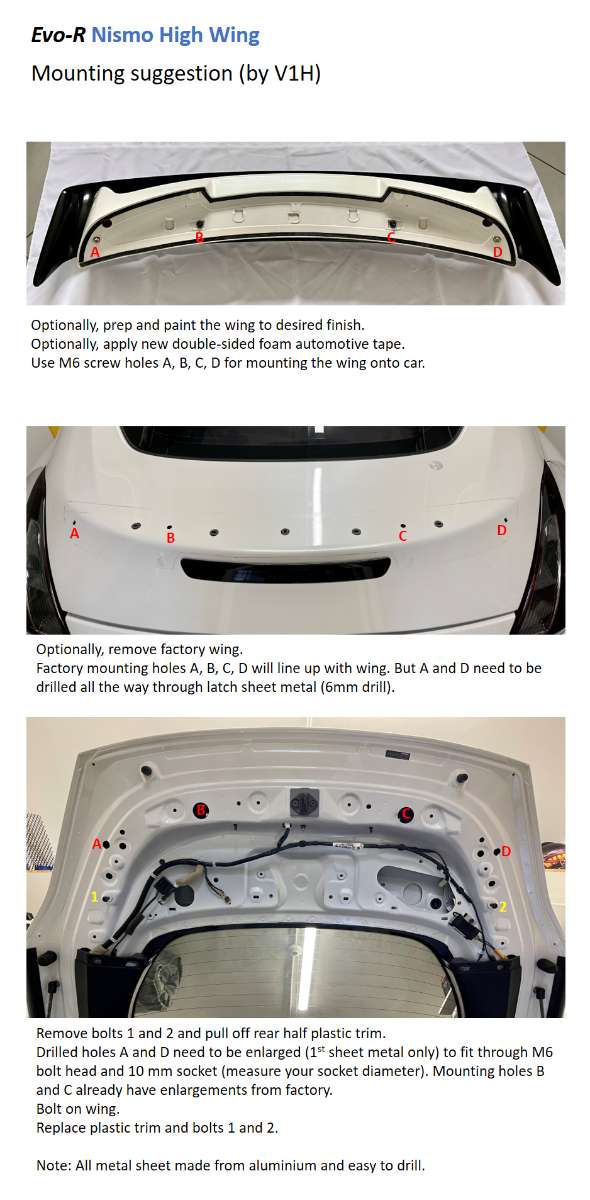
Selling my Nismo High Wing by EVO-R Motorsports (SKU 50-1885). Comes painted in satin black/pearl-white. Made from FRP (4.47 kg). 130 cm wide. Asking price £500 ONO + £34 postage, or collection in person. Here lots of pictures and a personal installation guide:

(1).jpg.91d70bc15250cd12c675d16442171428.jpg)
(2).jpg.9f1a7625f675cf7338cf7cc5208e8b2c.jpg)
(3).jpg.49f9cb9e3cbeccc617e78003860a45c2.jpg)
(4).jpg.e5b5d8f4493e005d6fa03d4c5f38c939.jpg)
(7).jpg.7e62bdd410f49632183e1972755fef60.jpg)