V1H
-
Posts
320 -
Joined
-
Last visited
Content Type
Profiles
Forums
Events
Gallery
Store
Everything posted by V1H
-
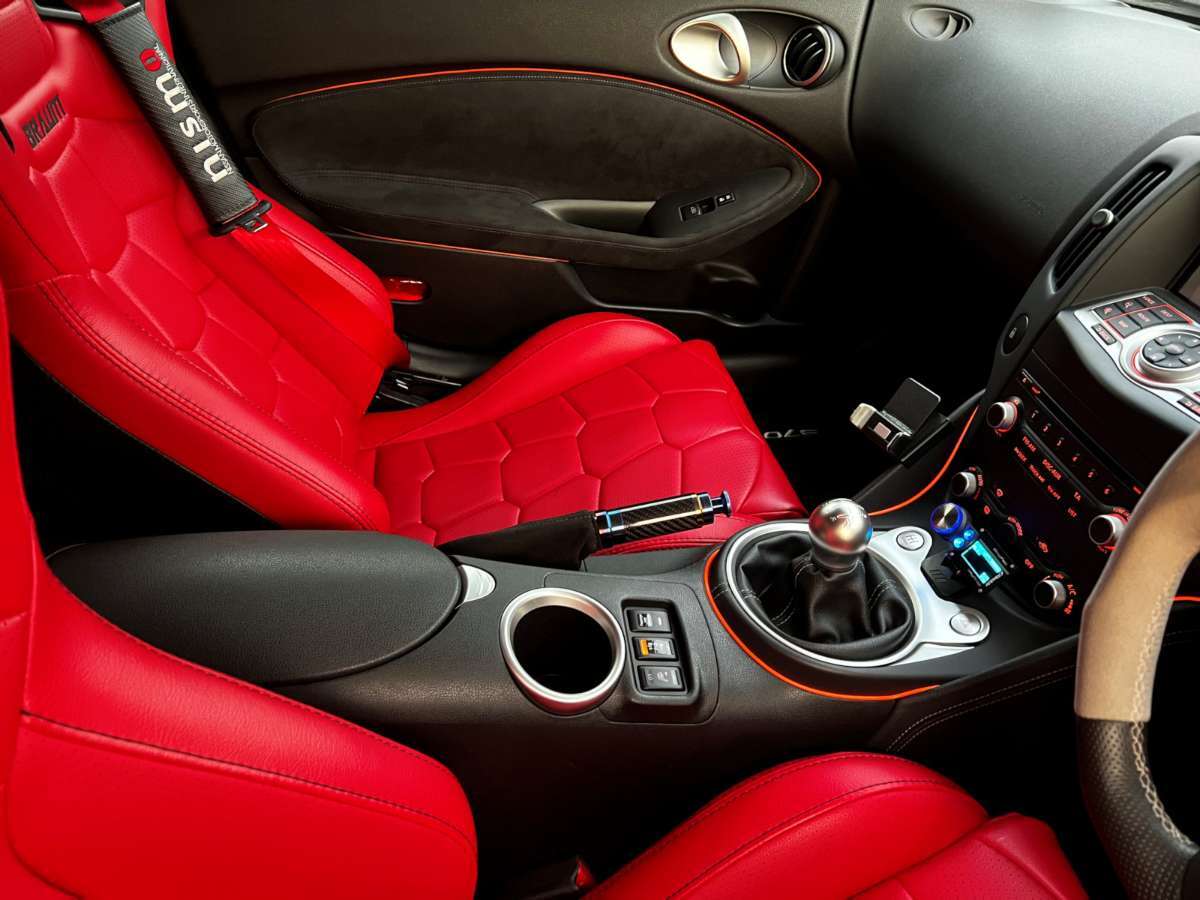
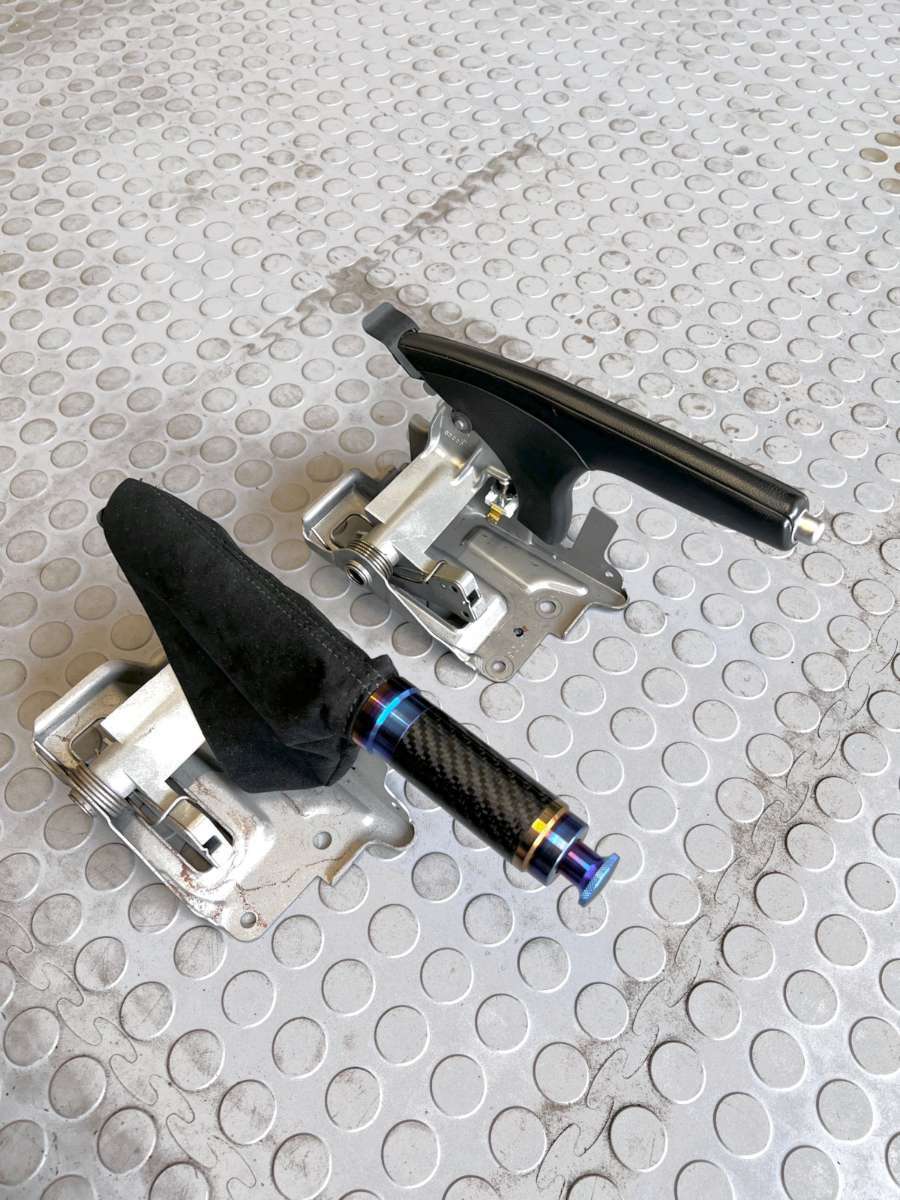
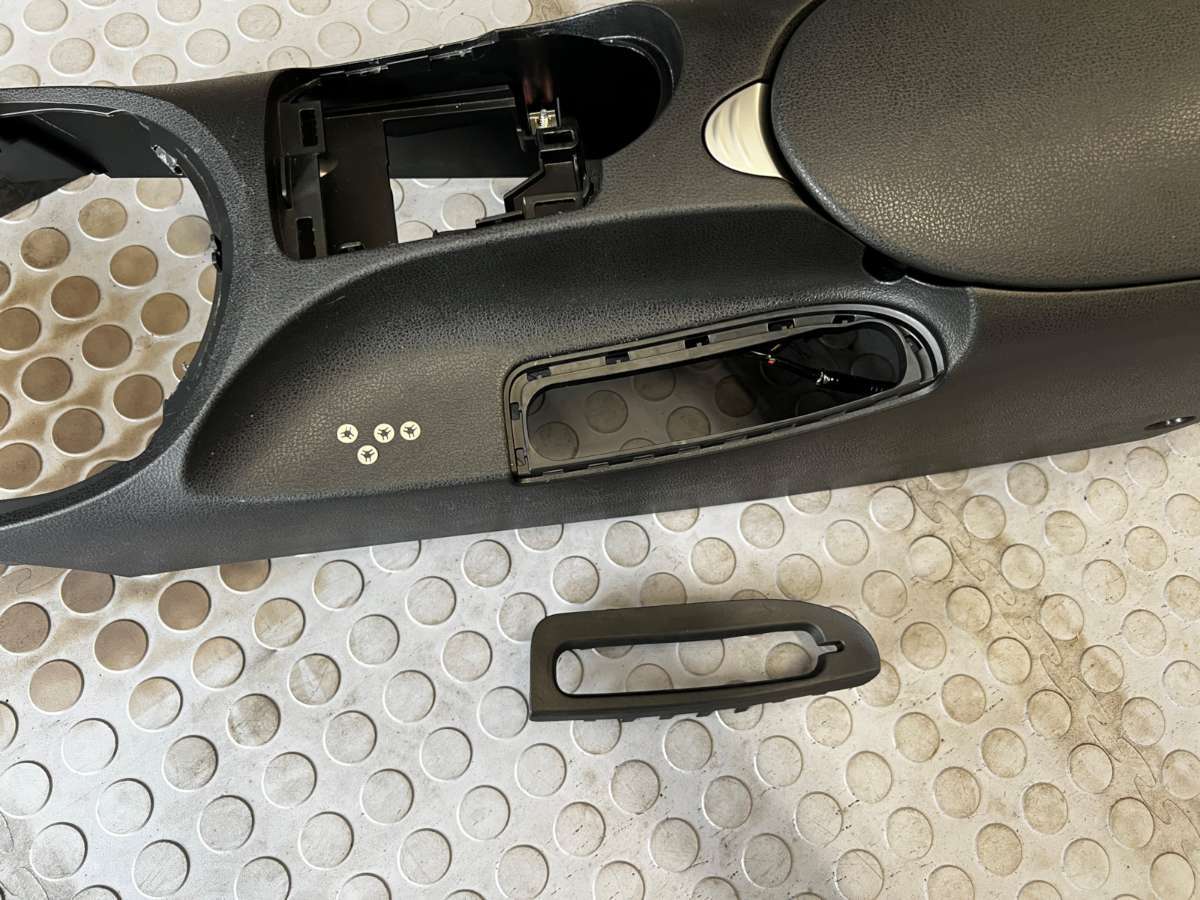
Here the OEM vs new carbon/burnt titanium piece: Because the handle is now thicker, I found it best to first remove the rubber lining the opening on the console: Now the new handbrake would just fit through the opening when putting the centre console back in place. The rubber lining can be slid back and push into place at the end
-
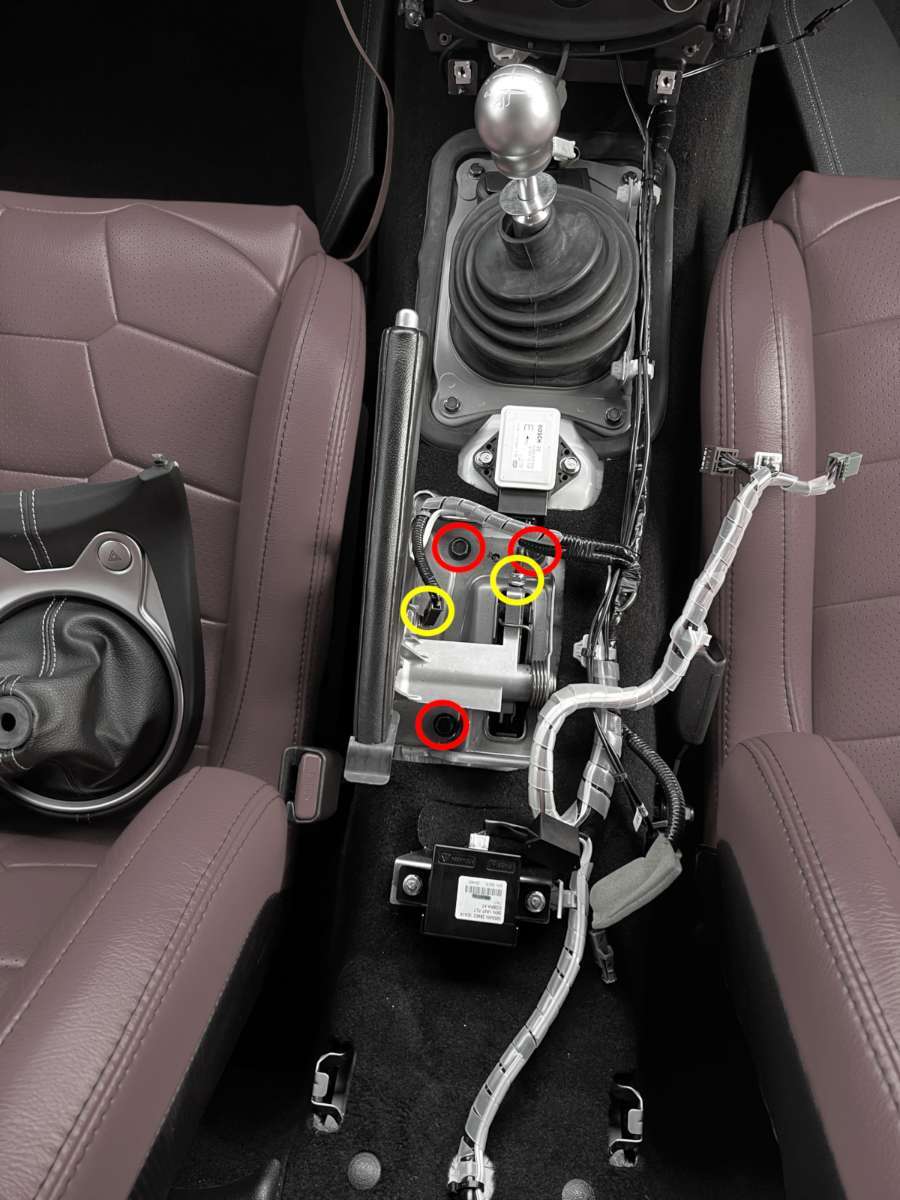
Yesterday was great sunny day and I installed the handbrake. The centre console trim needs to come off and you get access to the handbrake. Remove the three M12 bolts, one M10 nut holding the Bowden cable and disconnect the connector.
-
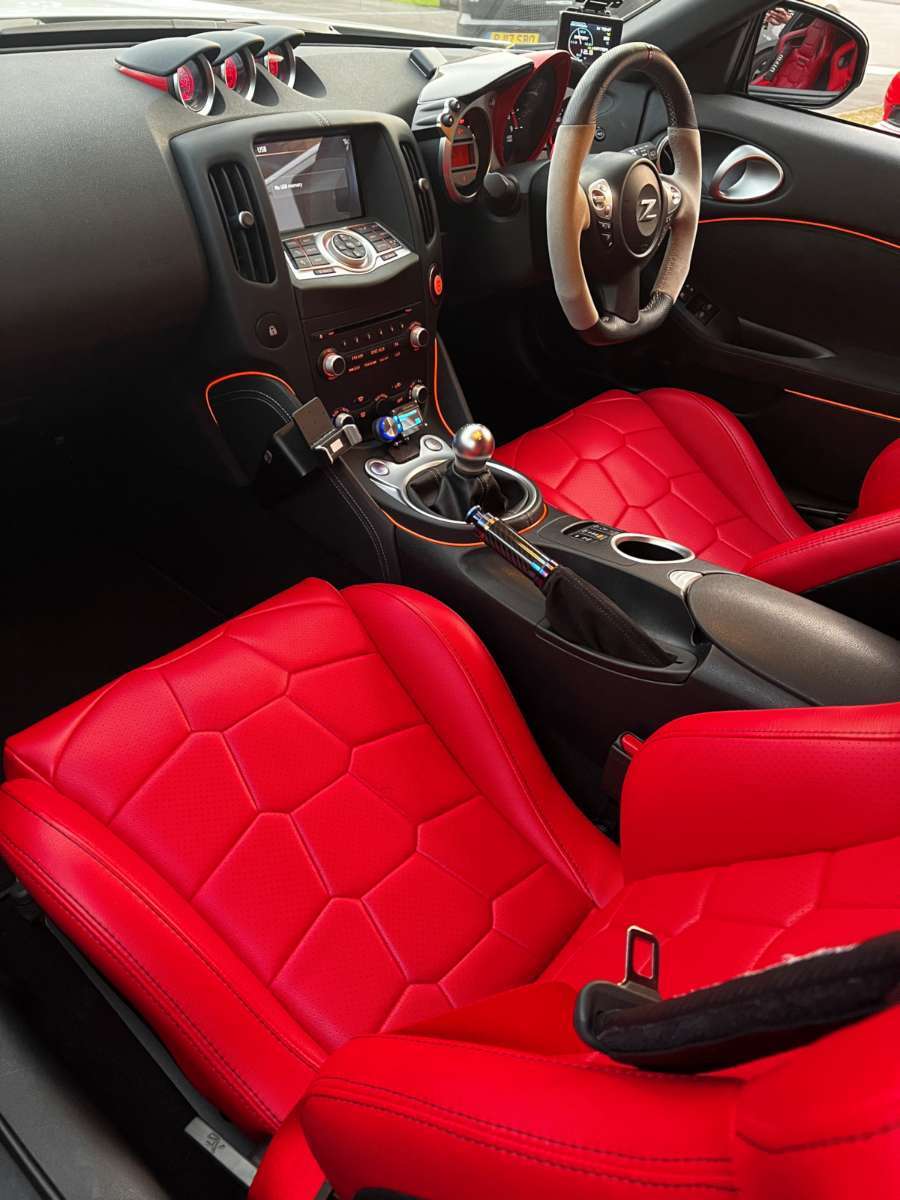
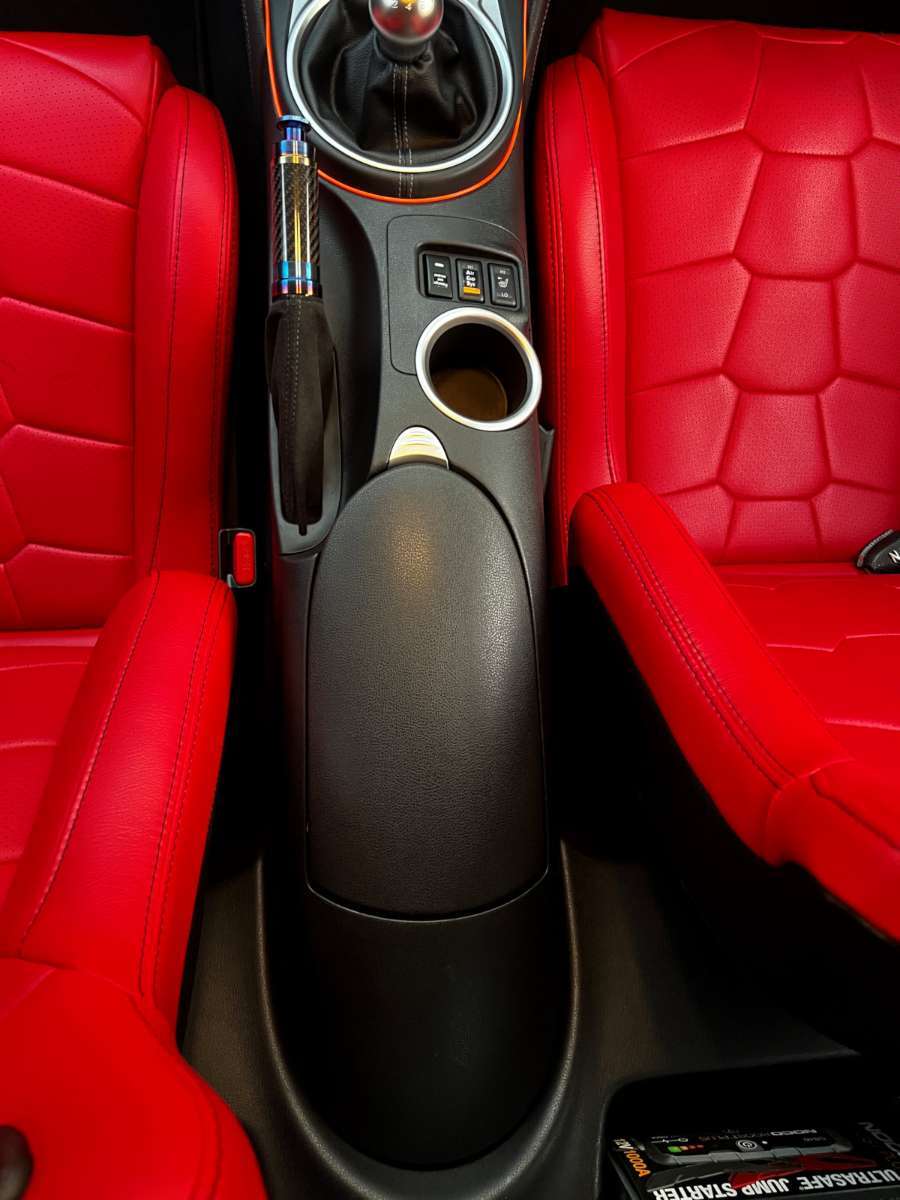
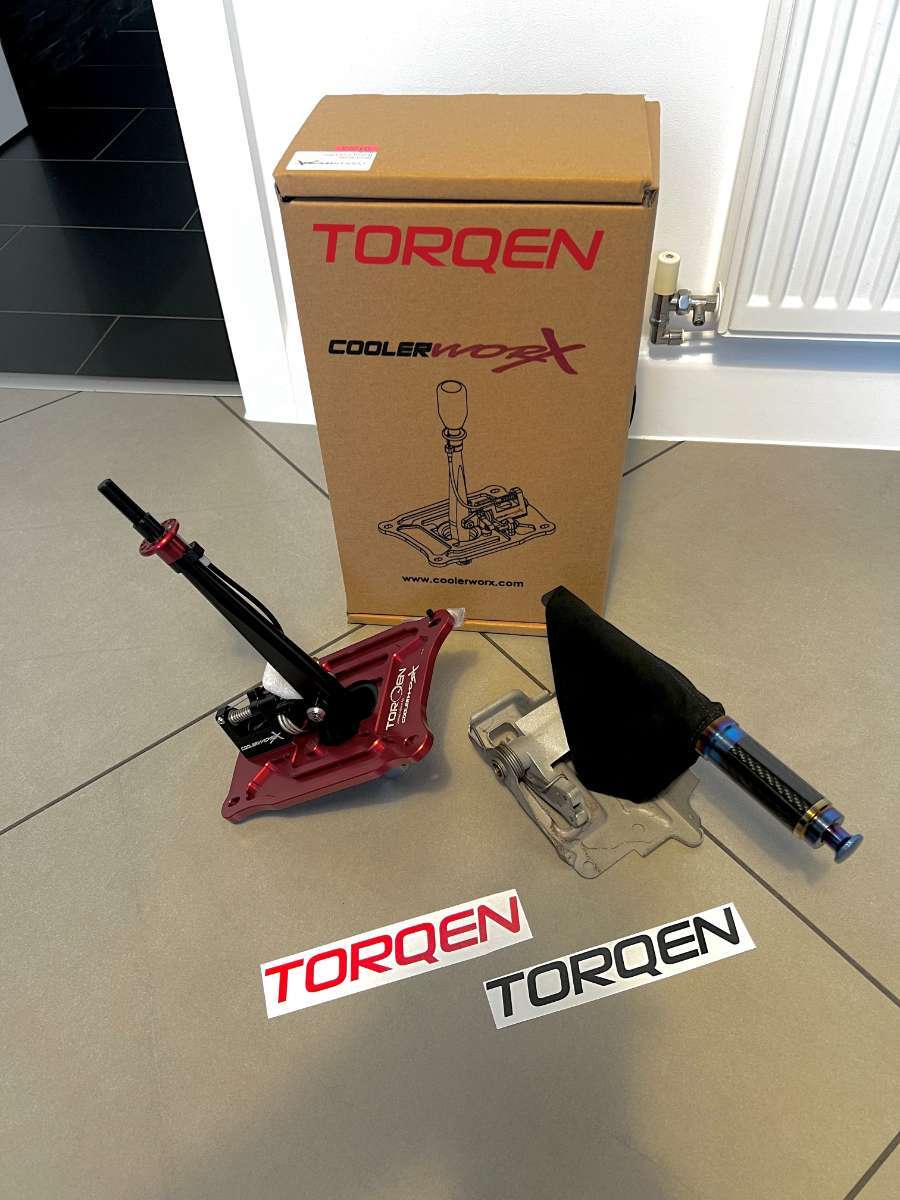
At the Torqen ft Tarmac Sports summer meet last month I marvelled at their latest Limited Edition products and couldn't resist getting each a - Torqen x Patrick Galligan Limited Edition Handbrake (25 globally) [#TRQ-PG-HB] - Torqen x CoolerWorx PRO Short Shifter - Limited Edition (25 globally) [#TRQ-CLRWX-370Z] The OEM handbrake has been the last 'ugly' sight in my otherwise upgraded interior. And the short shifter just blew my mind when I tried first-hand the non-pro version of it and thought 'OMG, I gotta have that in my life!' 🤩 It shifts with unreal precision!
-
Very sorry I cannot attend today as planned. Am in Germany this week on holidays for personal reasons. Wishing you all a fab and sunny meeting 😀
-
That looks very good 😍
-
1. davey_83 2. pintopete58 3. George1966 4. Rhysos 5. Headphones 6. Monkey1983 7. budbongo 8. SHEZZA 9. Justthejedi 10. V1H Sounds great! Would love to come and bring my son and wife (second car) to combine this meet with a museum event :)
-
The other thing I recently did, I replaced my 200-cell HFCs that came with my AAM TT kit. The fact that they don't pass emissions is a nuisance and sooner or later I wanted peace of mind (regulations get more stringent, or if it ever came to selling it some buyers might be put off) I bought some quality 200-cell HFCs from HJS Emission Technology [#90 95 0085-HD] that actually comply with Euro 5 spec. I stumbled across it on a German BMW forum. The ppl there were actually concerned with passing emissions). Needless to say a pair of cats cost a small fortune (£1160). I had @Jez @ H-Dev install them for me and retune the car. The welding job was not quite as straight forward as I anticipated; the cats have also 3" in/out and the same length as my old ones but are slightly larger in diameter and were binding against the underbody. But H-Dev did a fab job, as usual🙂 I am now missing the original ceramic coating I had on my cats, other than that they just look a bit beefier: Fingers crossed for September when my MOT is due that the investment was worth it 🤞
-
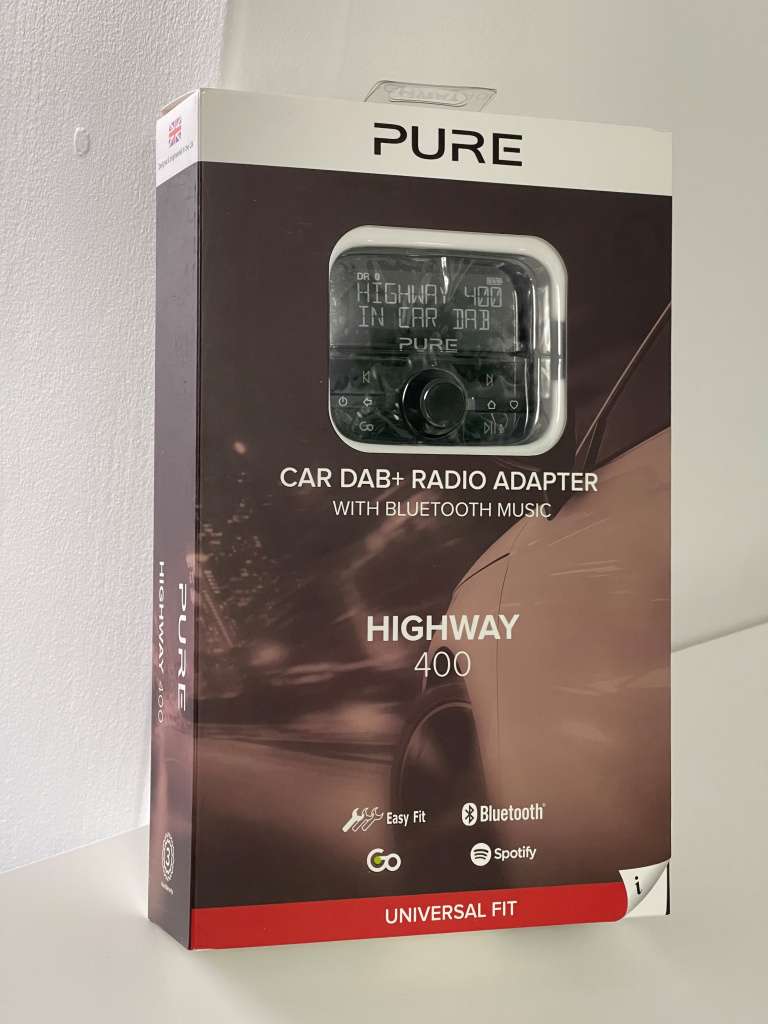
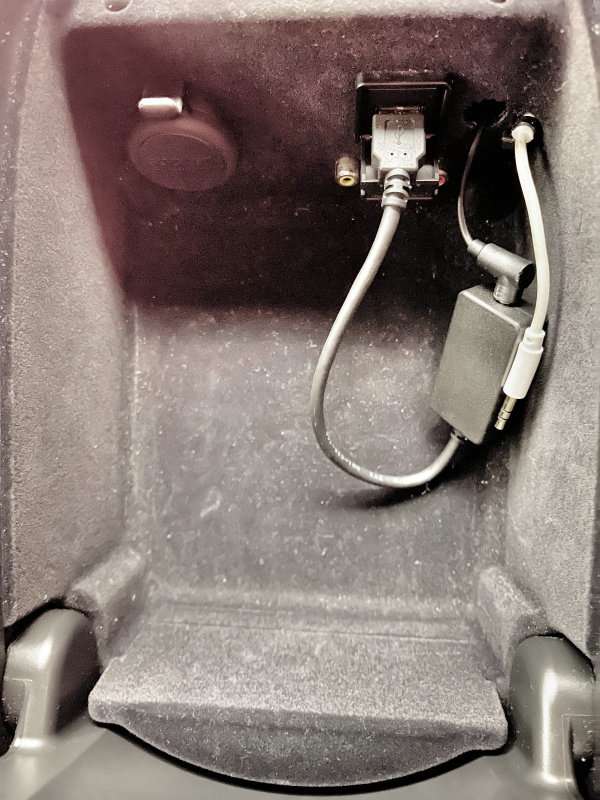
I wasn't quite happy with my latest infotainment upgrade, the Pure Highway 400 DAB+ Radio adapter. The reception was okay further afield but I had never signal on my home street, while my wife's BMW (with shark fin aerial) has great DAB+ reception at home So I removed it all and started over. I now have an active roof-mounted whip style aerial (I also tested an Eightwood active shark fin style aerial, which wasn't great either) together with a DAB+ radio adapter that accepts an external antenna and has an AUX output as I wanted to again use the Z's iPod audio input (much cleaner than piggy-bagging the signal on a free FM frequency). More specifically I opted for: AutoDAB GO+ with touchscreen control (I discarded the included glass-mount antenna) Universal (Ebay) Roof-mount 12V-active amplified DAB+ FM radio aerial with SMB connector (I cut off the FM/AM coax cable as I didn't need it) I cannot emphasise enough how much of a difference the roof-mounted antenna has made over the inside glass-mounted aerial!!! Now I'm getting over 50 DAB+ stations on my driveway! BOOM!🤯 The installation was however considerably more involving but well worth it! I needed to consult the workshop manual to get the headliner removed within half a day in preparation for drilling a hole through the roof. interior side panels, boot panels, seat belts, etc. has to first come off 🙃 I found it best to use this type of drill when drilling large diameter holes into thin sheet metal. I need some 20-odd millimetre hole: With the new roof antenna on, the car loos almost like a race car with telemetry com's 😅 Make sure the rubber seal sits flush on the roof to be water-proof. And beware of the airbags and explosive charges around the roof area. The SMB coax from the aerial was routed straight across the roof to the AutoDAB GO+ while the 12V cable of the aerial I routed along the passenger side to a 12V IGN source I have in the foot well area. The AutoDAB's power cable I ran straight to the passenger A-pillar and spliced into said 12V cable, while a bolt on the A-pillar served as ground. The AUX output cable of the AutoDAB also runs to the left and down the A-pillar and then to the centre consolde cubby where the iPod input is (I simply reused the audio cable I had laid for the Pure Highway unit; just cut and re-soldered)

.JPG.b1db07da185fdcbf0c91622a62fb25bd.JPG)
.JPG.afd8b10012def38ade3612941fc0b6df.JPG)
.JPG.d5c066b766db756ef719086c442fc244.JPG)
.JPG.a4c7a614498ba9a47e17f8948f345be4.JPG)
.JPG.28a7dabb4e41810f7f5dfb3332be944e.JPG)
.jpg.e08d7f32415d1590f5c54594bf1bda5f.jpg)
-
The Nissan Dealer made me do it - My build thread
V1H replied to Jonnymonno's topic in Member Build Projects
-
1. andy james Paid 2. Zelda Paid (11:20 track) 3. George 1966 Paid 4. Andy_Muxlow Paid 5. Buster- paid 6. nismoandy -paid 7. SamTripp52 8. DAZ8235 - Paid 9. JonLonghorne99 - Paid 10. SuiSid - Paid 11. LAB99 - Paid 12. Millicano - Paid 13.Sebastian PAID (Track 10:20, 12:20, 14:20) 14. SHEZZA - Paid 15. MicktZZZ - Paid (just once on track at 12:20) 16. Monkey1983 - Paid 17. DrMurderDeath - Paid 18. SH23 - Paid 19. Azurez33 & +1 - Paid 20. Harrm +1 paid 21. Marcos +1 paid 22. Paul_K Paid 23. TommZ +1 Paid 24. StormtrooperZ +1 Paid 25. tauvp Paid 26.Nathaniels350z +1-paid - Track 14:40 27. Whiskeymedicine +1- Paid - Track 12:20 28. Jonnymonno +1 - Paid 29. Patrick John - Paid 30. Stoker11 + 1 - Paid 31. Chris141084 - Paid 32. Humpy - Paid 33. harvers - Paid 34. Buptaboy - Paid 35. jayb_370z+1 - Paid 36. V1H - Paid
-
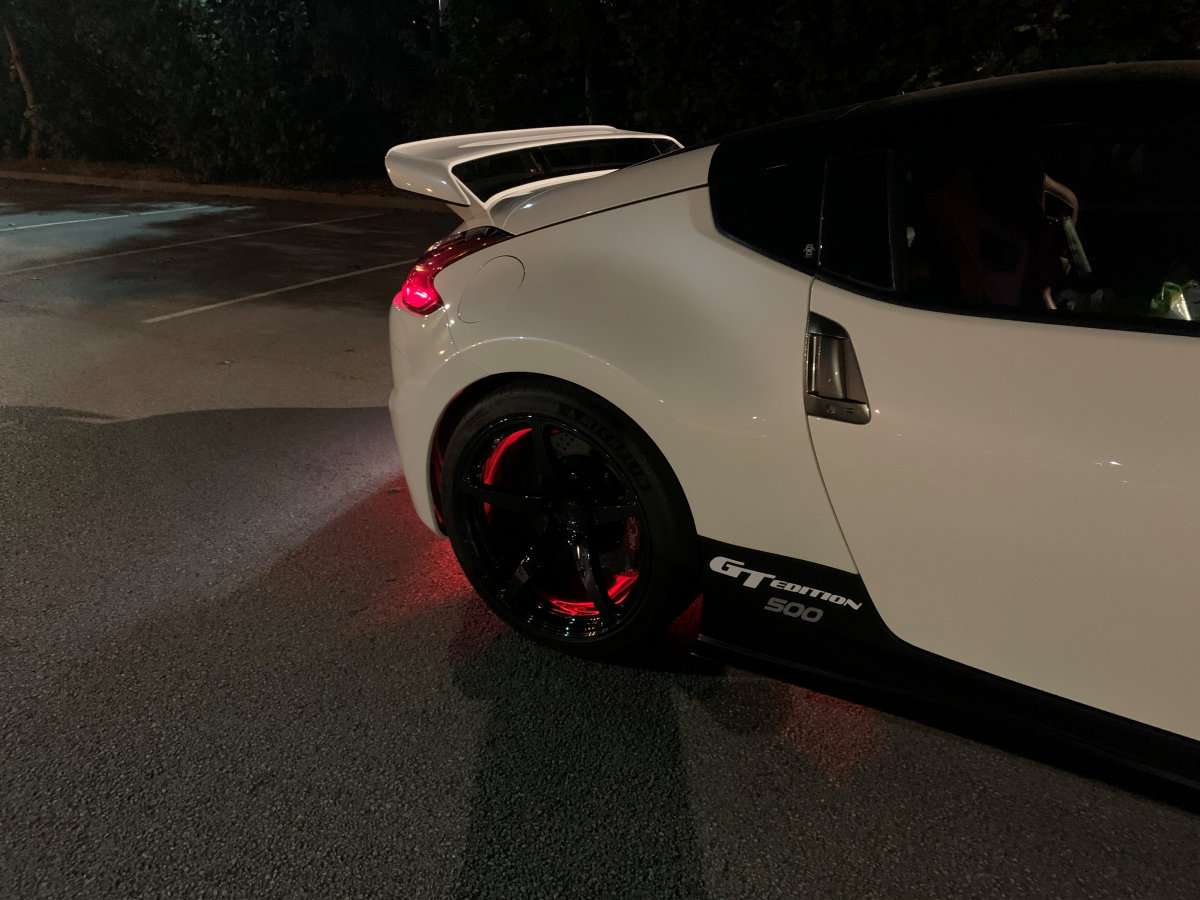
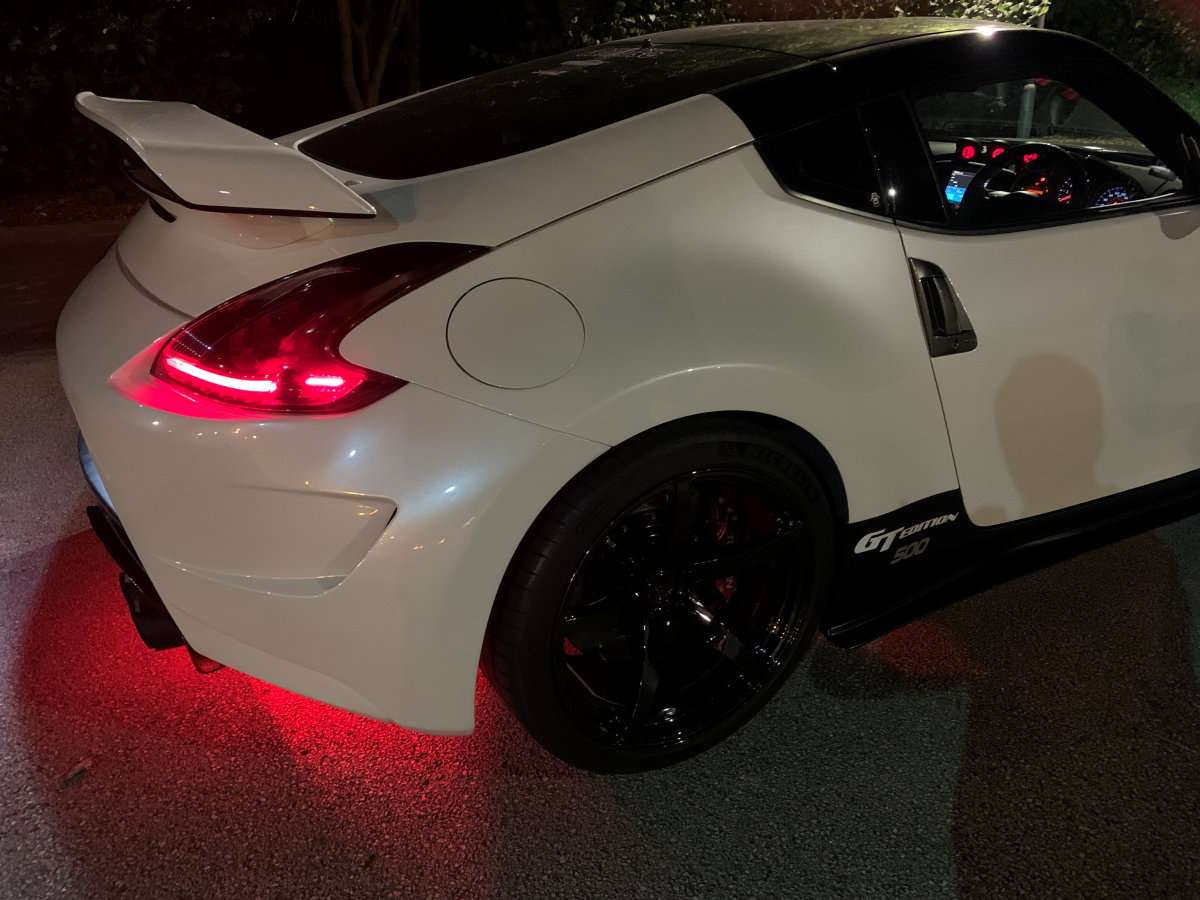
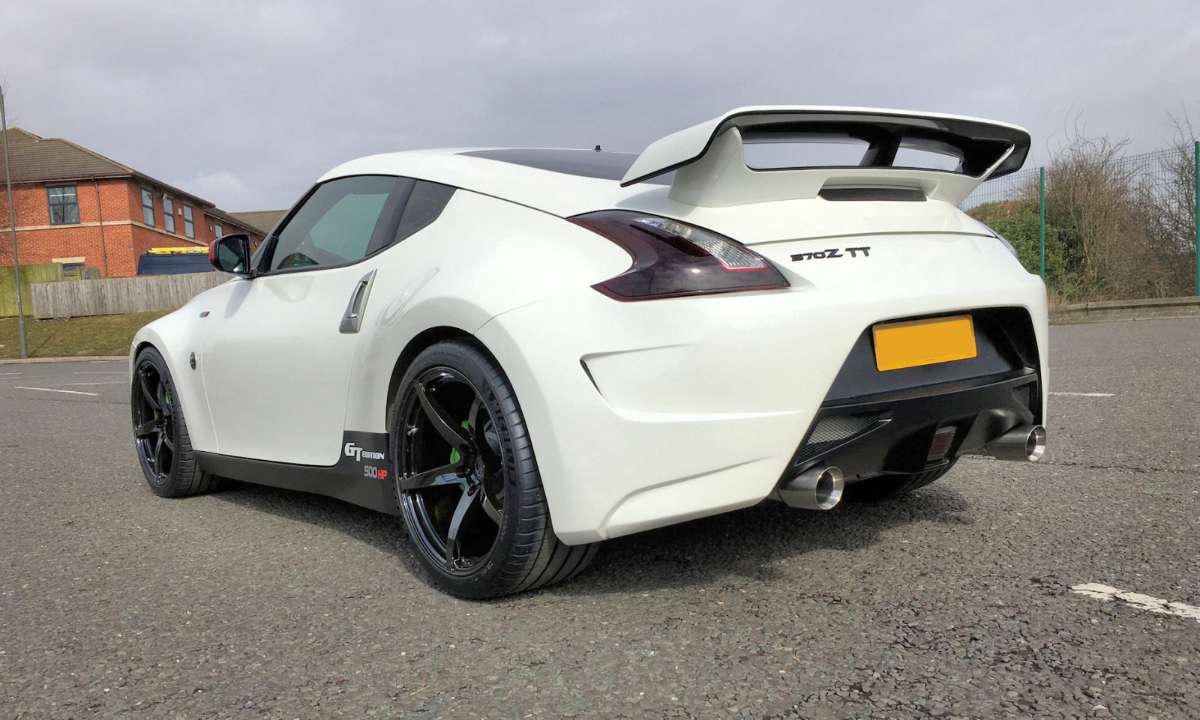
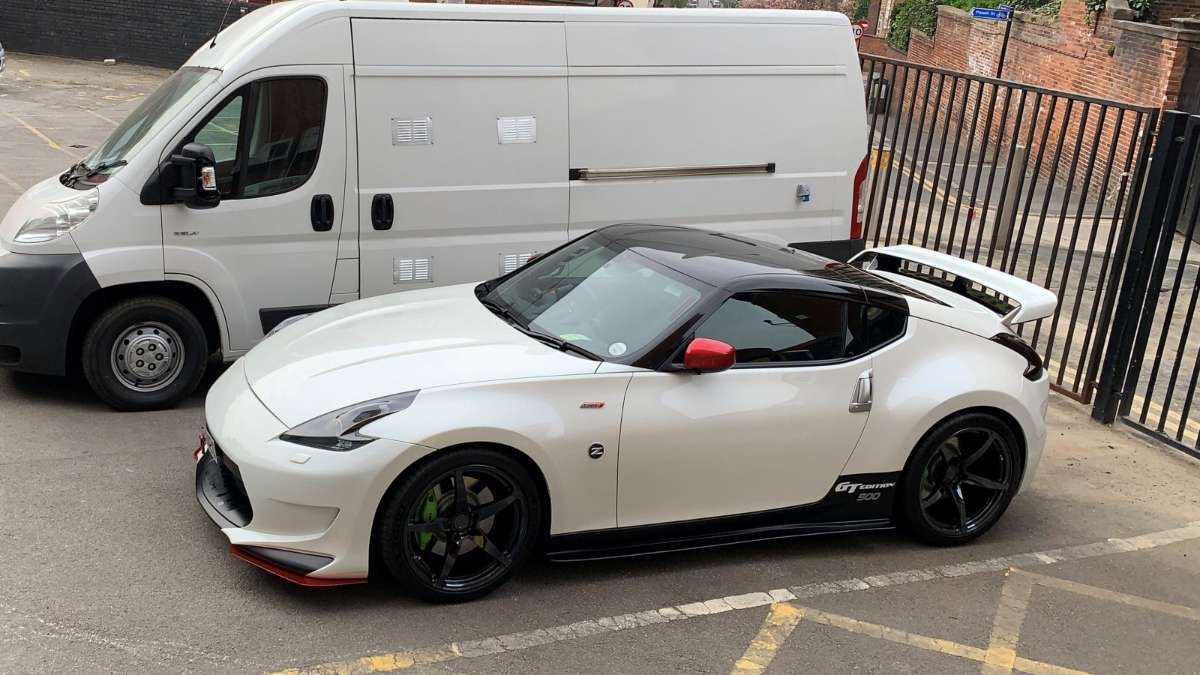
A massive thanks to @Adrian@TORQEN for sourcing me my new ultra rare Esprit GT Wing 262F from Japan! ❤️ The wing and stands are full carbon (3.2 kg) and drag angle is 3-way adjustable. Frankly it looks baller 🤪 I still have to deal with the issue of patching up the stock mounting holes and respraying the hatch, some time later.
.jpg.0227bc33e4bb1c3604ef185900f7f2fd.jpg)
.jpg.166651435b1a0ebc80945cbf6d60301e.jpg)
.jpg.13bed0c7ee43dbec419b3ed8c5865611.jpg)
.jpg.7c90e0bc408302fb599d5577661a5b94.jpg)
.jpg.73848a516b81c0ffa8e9e7ccc82e16ce.jpg)
.jpg.7d6aafb638df050bb5d0391dd2cd427f.jpg)
-
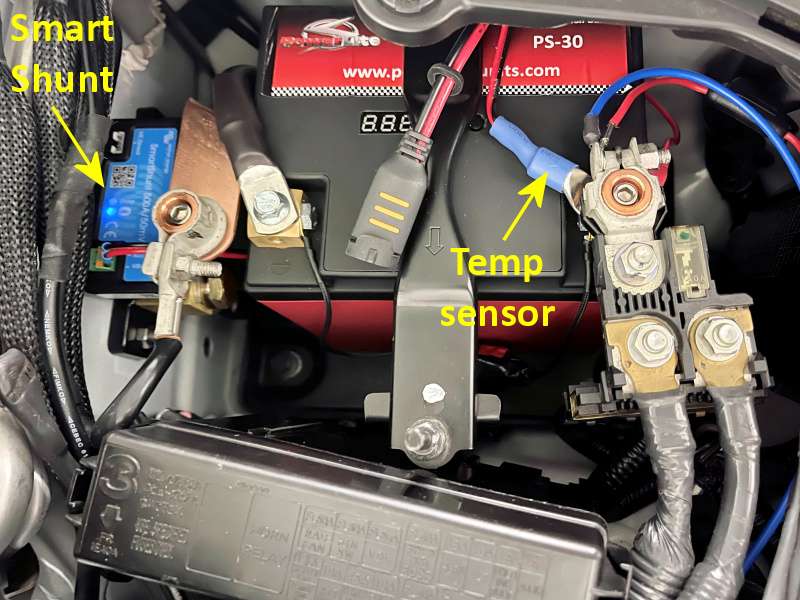
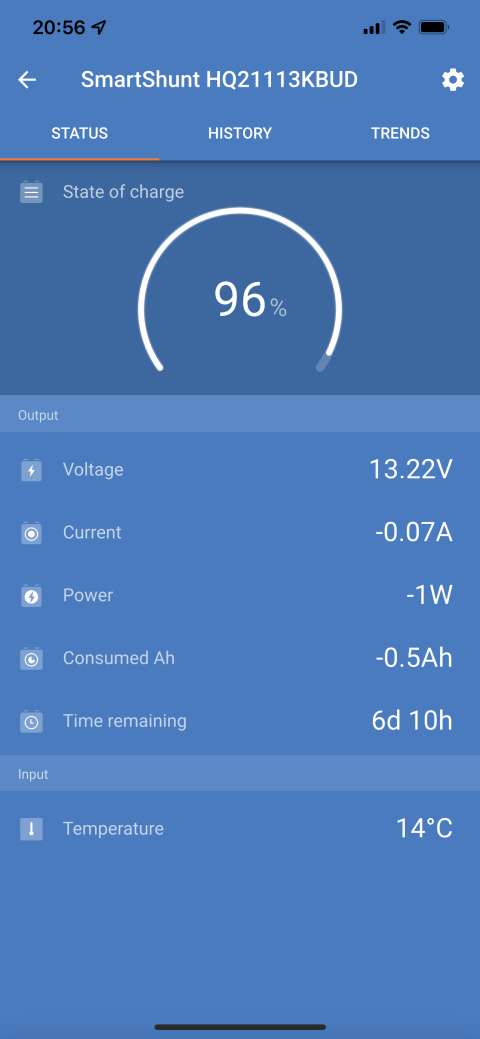
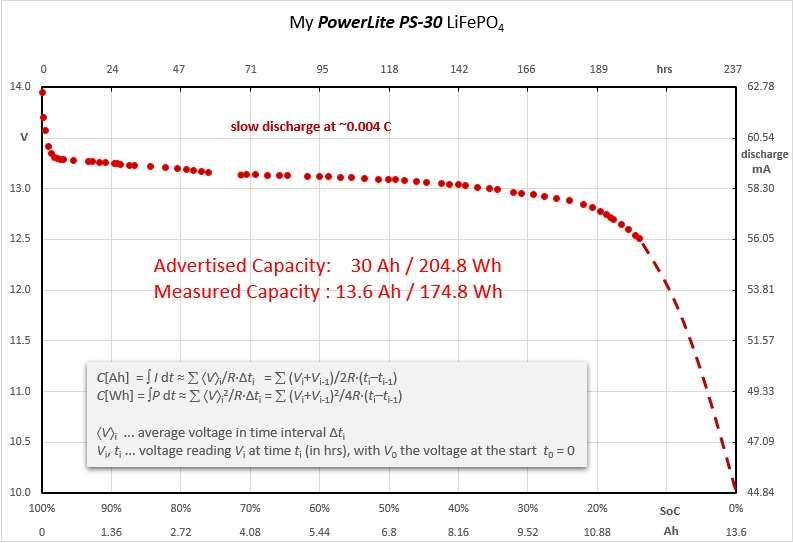
New battery monitor Got rid of my BM2 BLE Battery Monitor (Bluetooth), which only reads voltage and is clearly made for Lead Acid battery monitoring. Replaced it with a Victron Energy SmartShunt 500A (Bluetooth) [#SHU050150050] with optional temperature sensor [#ASS000100000] to better monitor my LiFePO4 battery. The smart phone app now informs me about not just voltage but also current draw (in and out) and power consumption. But most importantly, counting those amps in real-time allows the app to account for actual Amp hours drawn from the battery, and thus, true State-of-Charge (SoC) reading. Deducing SoC from mere voltage reading is very inaccurate with Li-based batteries since they have very flat discharge curves across most of the SoC range. I did however set up the App not with the batterie's nominal 30Ah capacity, but 13.6 Ah from a true measurement I made earlier. I have a suspicion high under-bonnet temps kills my LiFePO4, which is why I added a temp sensor. I will monitor the temps next time I drive. I read somewhere that LiFePO4 shouldn't see above 45°C, ideally max 30°C. 🤔 Or is it the 70+ Amps the stock alternator charges it with that it can't handle long term? Here a screenshot of the app. My Z draws 70mA (precision multimeter) in garage rest and the SmartShunt very accurately reads 0.07A, too. This is quite a feat given the shunt is built to pass 500 A at just 50 mV voltage drop (0.1 mOhm). It also displays the remaining time until my battery is empty. I set alarms to recharge before then 😉 Here the actual capacity measurement of my (second) just half year-old PowerLite PS-30.
-
Item sold now.
-
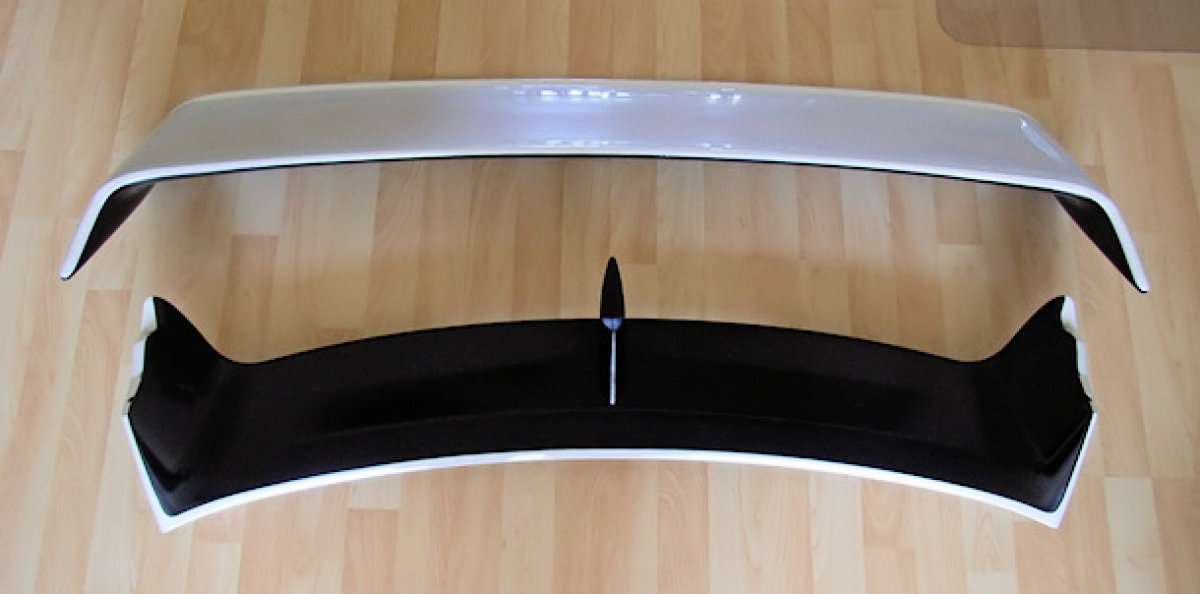
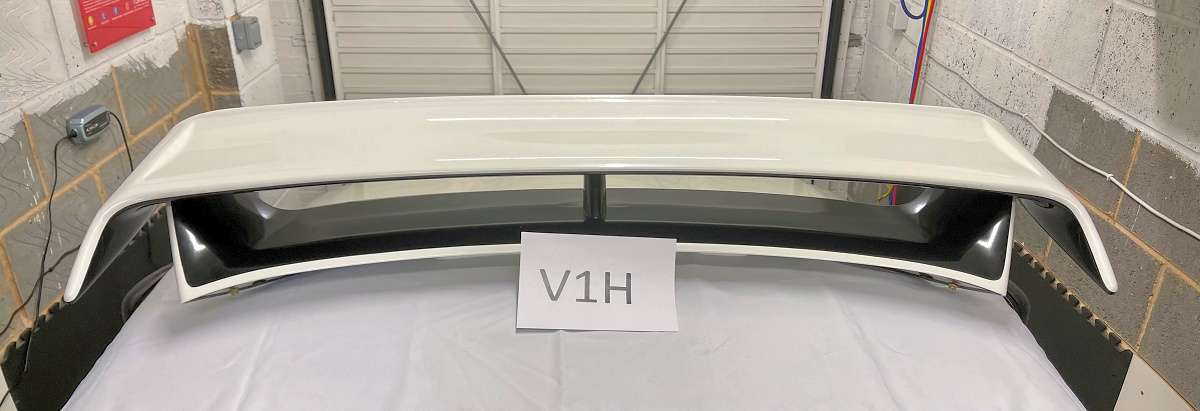
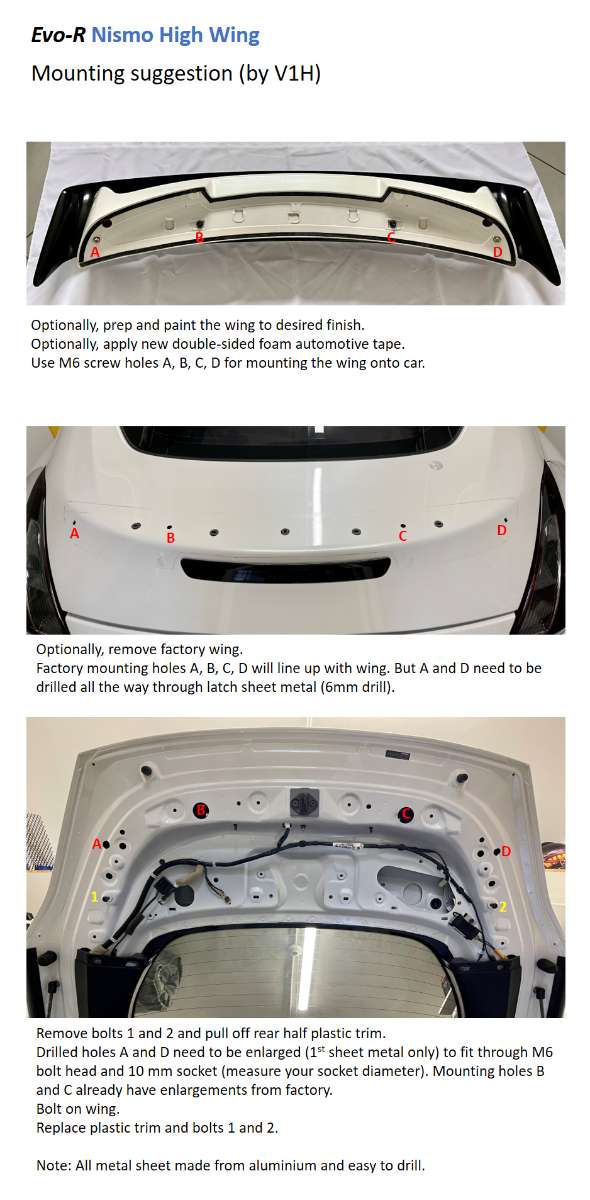
Selling my Nismo High Wing by EVO-R Motorsports (SKU 50-1885). Comes painted in satin black/pearl-white. Made from FRP (4.47 kg). 130 cm wide. Asking price £500 ONO + £34 postage, or collection in person. Here lots of pictures and a personal installation guide:
(1).jpg.91d70bc15250cd12c675d16442171428.jpg)
(2).jpg.9f1a7625f675cf7338cf7cc5208e8b2c.jpg)
(3).jpg.49f9cb9e3cbeccc617e78003860a45c2.jpg)
(4).jpg.e5b5d8f4493e005d6fa03d4c5f38c939.jpg)
(7).jpg.7e62bdd410f49632183e1972755fef60.jpg)
-
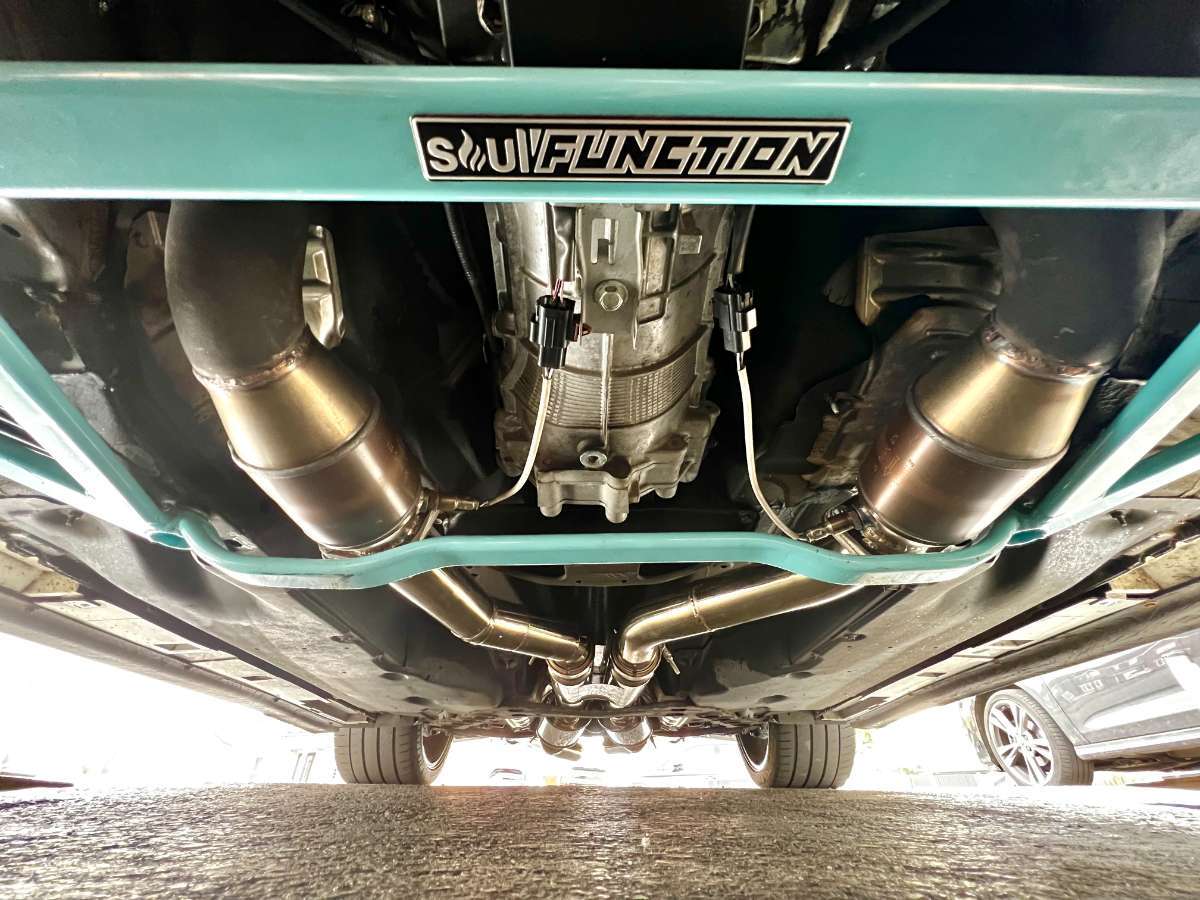
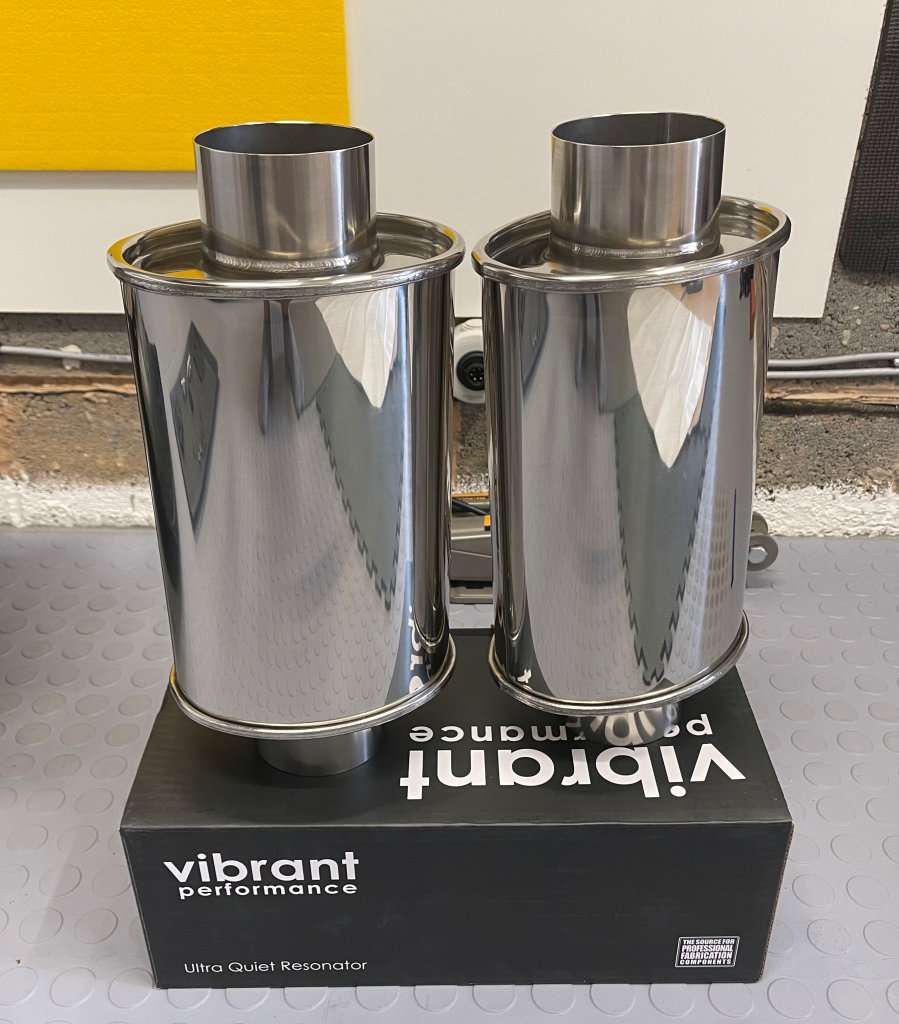
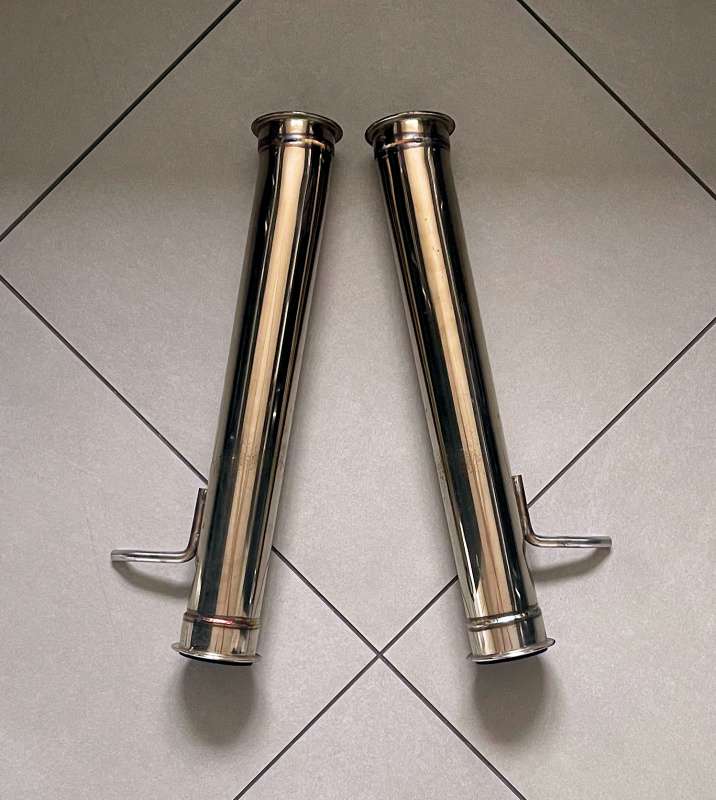
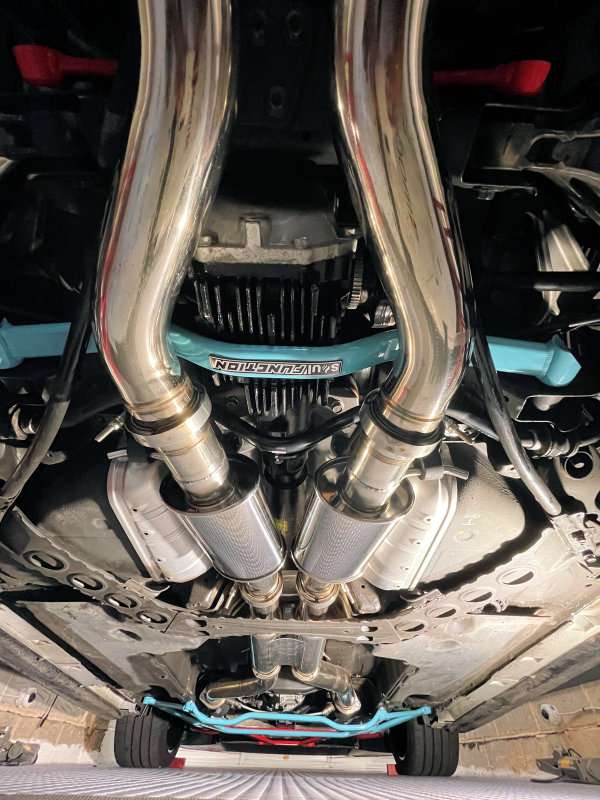
Here we go, the silencers are in and I just fired her up in my garage. Instant reaction: I ABSOLUTELY LOVE THEM !! 🥰 I havent measured dB before or after but my exhaust feels approx 30-40% quieter. It's still a loud cold-start but not obnoxiously loud anymore (and neighbours should thank me). Neo will also be pleased I hope when he sits in it next time. Fitment is excellent in the driveshaft tunnel, when done right. I removed my Motordyne midpipes, cut them up myself and positioned the silencers exactly before I took them to a TIG welder. Else there might have been clearance issues. Original 3" midpipes Midpipes with Vibrant Ultra Quiet Silencers (before TIG welding). This mod adds 3.37 kg weight. Fitted back onto the car. Clearance all round.

-
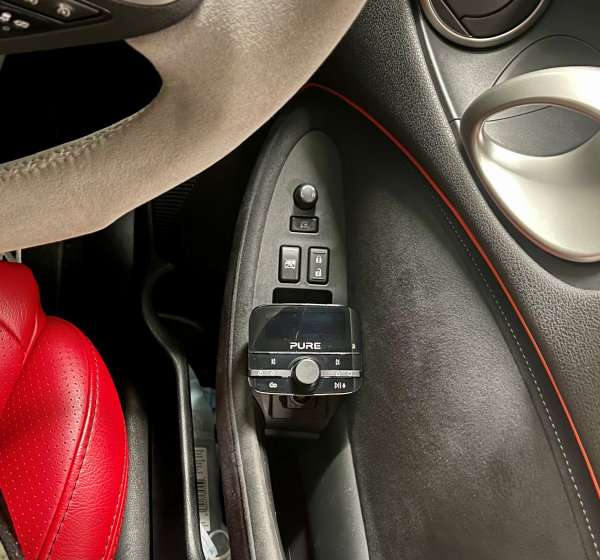
I now installed the DAB+ and found 67 stations right away. There is the occasional drop out when driving around town but radio reception is better than the factory FM radio. I'm not yet decided on the mounting location of the wireless Display unit (battery operated). An alternative might be the door panel: The DAB+ antenna is attached inside the windscreen, virtually invisible with my sun stripe hiding the receiver unit. The power cable is routed to the nearest cigarette lighter socket and uses the included 5V adapter. A magnetic grounding cable slides in between the roof liner to bare roof metal. A third cable is for optional audio Line-In to the factory radio. The Highway 400 can be piggy backed by either hook-up to an unused FM frequency or via said Aux-in/Line-In. I opted for the latter (quality is said to be better). That is, feeding the audio signal via the Z's USB/iPod port in the centre console. In below image, the black audio jack is routed to here straight from the Antenna/Receiver on the windscreen. (The white audio jack is the Line-In cable from my Android Infotainment Unit, but it becomes obsolete now with the Highway 400. The short Audio jack-to-USB adapter came with my Android Infotainment Unit, which might otherwise have to be purchased, e.g. this but cheaper) I can also play any music from my smart phone via the Highway 400, when in BT Mode, and I used the Pure Go App initially to notify me about an Antenna Firmware update. I needed to use a Windows Laptop to upload this update, though.

-
From a long time I've been wanting to get a car fire extinguisher, you never know, Youtube is full of burnt-down builds. So I bought from Amazon a Firexo 500ml Extinguisher (good for all fires A, B, C, D, E, F, that is, incl. LiFePO4 battery!) and a Kap Industries fire extinguisher bracket through Tegiwa Imports. I like the extinguisher is NOT SIMPLY RED and my mounting location in front of the passenger seat hides it almost entirely yet is in direct reach in an emergency.
-
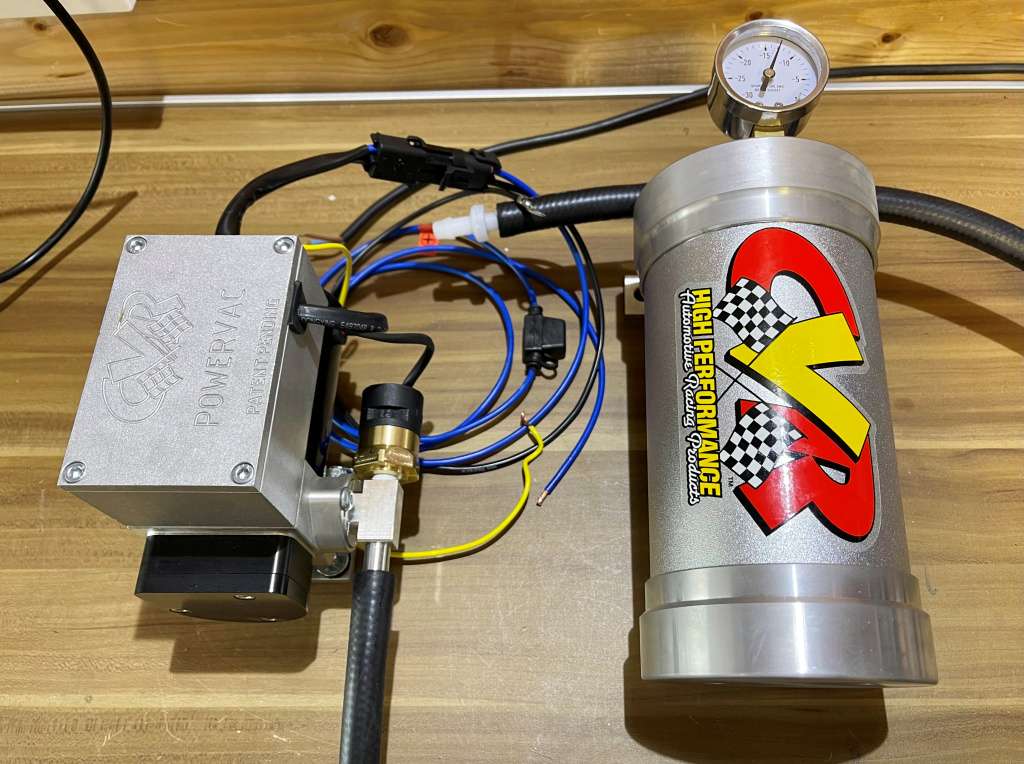
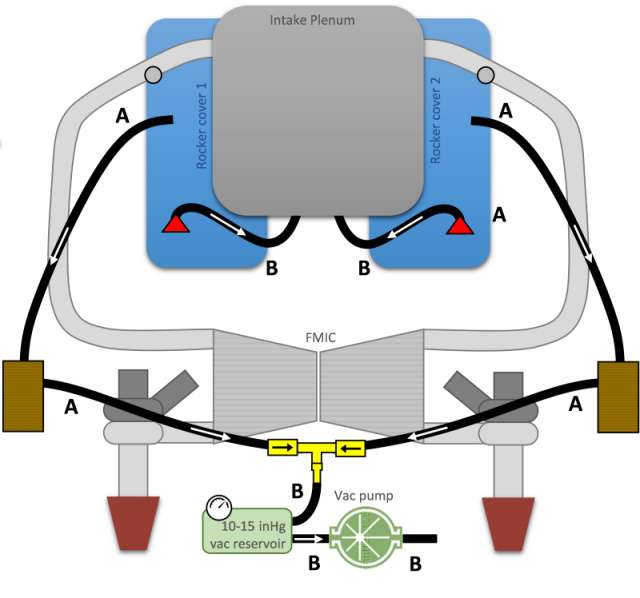
I installed said PCV vacuum pump upgrade and all is working as intended. I will have to cover 100 to 300 miles to see whether this helped reduce my Turbo oil consumption/leak. With very limited space availability on my Z I mounted the pump and reservoir behind the front bumper, next to the FMIC, and the 2 directional check valves by the bottom of the radiator fans. The hose plumbing uses over half a dozen AN-10 fittings (read, "very expensive" for what they are). My custom PVC setup cost me now a whopping £1188 in total.. ouch 🙄 Update After ~250 miles of driving to JapFest Silverstone and to work, I checked my turbo oil traps and both, passenger and driver side, are virtually empty! I would normally have accumulated about 20 ml and 80 ml in the passenger and driver side trap, respectively. This strongly suggests to me that my formerly VTA-PCV setup (vent-to-atmosphere) caused my excessive turbo oil leakage and with crank case vacuum now available at idle and load conditions, this issue seems fixed ☺️
.jpg.636bf9645198bc703a2e8bf5f8661fd1.jpg)
.jpg.0b058e6766c1b7cbbf691a211d6d40b0.jpg)
-
I reckon it'll be the only one in Europe and probably only a handful in US/Japan.😬
-
Hi buddy, the pandemic has been a bit quiet in terms of modding and most recently I only swapped my knackered heavy duty CMC with a stock Nissan CMC since RJM Performance isn't getting its 'RHD act' together any time soon. My pace is however building up again. There are 4 things lined up: 1) Final Infotainment upgrade with a DAB+ Radio adapter, since the 370Z FM radio reception sucks balls 😅 This will be the Pure Highway 400 V2 EU/UK [#151603] 2) 'inspired' by my 5yr old son who loves to drive in my Z but dislikes the noise when I accelereate, I am going to slightly tone down the noise with a pair of 3" straight-though silencers courtesy of Vibrant Performance Ultra Quiet S/S Resonator [#1142], which I got for a steal at Amazon US. 3) Upgrading my PCV system with a vacuum pump to improve performance and reduce blow-by of my current 'vent-to-atmosphere' style. It'll operate like this: But the main driver for this upgrade is my hope in combating the Borg Warner Turbos' significant oil leak into the intake charge pipes. I believe the oil drain stalls or is insufficient with my current VTA-style crankcase pressure. After lengthy research on PCV evacuation I decided I want an electric vane-style pump (which are almost always brake booster pumps unless you pay real racecar money) I need to make sure the pump is not running constantly. Therefore I sourced via Summit Racing the CVR 12V Electric Vacuum Pump [#VP655] and CVR Vacuum Reservoir [#VPR700], along with a bunch of AN-10 fittings, check valves and vacuum hoses. But I will get into more detail when I am there. 4) A new sick Rear Wing, still on order with @Adrian@TORQEN - the absolutely baller Esprit GT Wing 262F in wet carbon finish as seen on this stunning Varis-bodied 370Z. My EVO-R Nismo High Wing will have to go...
-
Because I have tinted rear window and an obstructive Nismo wing out the back, my rear mirror view has been very poor. I now installed a Rear Mirror Dash Cam, the Wolfbox 12" 2.5K G840H [Amazon]. I chose this particular model after reviewing the market because it has the largest display: 12" IPS touchscreen (1920x380 pixels) and uses the better SONY IMX415 Starvis sensor for superior night vision, among others. A quick spec summary: Front Cam Rear Cam 6-layer glass lens IPS68 waterproof F/1.55 aperture F/1.8 aperture 170° FoV 150° FoV 2560x1440p @25fps 1920x1080p @25fps The mirror also features a GPS antenna, G-sensor, parking assist, 64GB TF card and lots of stuff I don't really need. All I need it for is a brilliant rear view and for that... it blew my mind! The clarity, brightness and field of view are such a tremendous improvement that I wonder why I drove for the past 7 yrs with the OEM mirror - every low visibility sports car needs that! I tucked the cables neatly under the head liner and ran them down the left A-pillar (power cable) and along the left side to the back end (rear cam cable), respectively. The rear cam cable them runs underneath the trunk plastic trims to the rear bumper (had to come off for camera installation). Note, the power cable cannot be hard wired to the car ignition (12V) but must use the included cigarette lighter adapter (5V)!
-
Would've loved to attend this meet but am already commited to TORQEN HQ meet on that day
-
I'm now a happy owner of TORQEN's brand new and exclusive XB LED headlights [TRQ-HDL-Z34-RHD] ! While there are aftermarket headlight options for the 350Z, I am thanking @Adrian@TORQEN for bringing the very first aftermarket 370Z headlights to the UK Especially, this set features state of the art 'Triple Kuria-optic Bi-LED projectors', sequential turn signals and DRLs. The light output is mind-blowing! It's definitely brighter than my Philips D2S HID Bulb (or the stock HID bulbs for that matter). (Promo video here)
-
PREMIUM CONNECT INFOTAINMENT Upgrade - STAGE 3 I am attempting to upgrade my stock touchscreen, Because it is a resistive one, its touch sensitivity is low (dragging gestures on the new Android system is difficult) and the screen brilliance and contrast is substantially reduced, I am converting resistive to capacitive touch screen (typical for phones and iPads). Note, any touch screen is merely a transparent coordinate tracking screen on top of the actual colour display. I stumbled across this IndiWork 7" capacitive touch screen (sourced through car-solutions) with matching dimensions to the 370Z OEM screen. I will also need their capacitive-to-resistive touch screen converter [#CT6-4 V1.1] (also sourced through car-solutions) so that the 370Z infotainment system keeps thinking it's a resistive type. Display brilliance and touch sensitivity should be much improved. I uninstalled my display, opened it up and very carefully lifted off the topmost glass panel (the actual touch screen). I needed a carpenter knife to break the double-sided sticky tape seal in between. Simple prying would shatter the glass. You can see just how light-robbing the resistive touchscreens are; cpacitive ones are perfectly clear. Also, the resistive screen has a blurring effect to it when you look through it - awful! All I need to do is take off the flexible 4-wire FPC cable and connect its screen end to the converter's 4-pin output, making sure the 4 wires for Left, Bottom, Right, Top won't get mixed up. [meanwhile, parts have arrived] I wanted a compact solution without external cables running off the Display unit, so I fitted the res-to-cap-converter board to the aluminium case like so (there is not enough space inside of it): The converter's power supply (ACC & GND) I directly sourced from the display unit. The Big grey 24-pin connector 'M75' has ACC at pin#23 (red cable in next photo). GND is at pin#12, but since all aluminium case is grounded too I bolted the ground cable directly to the case (back cable in next photo). As mentioned, I cut off the FPC (flexible printed circuit) cable of the original resistive touchscreen, exposed the gold contacts with a sharp knife and soldered 4 (arbitrarily coloured) wires onto it but kept track of their order: my BLU-ORN encodes for Left signal my YEL-YEL encodes for Bottom signal my WHT-WHT encodes for Right signal my GRN-GRN encodes for Top signal Those 4 wires then run to the controller (right middle connector in above photo) for signal conversion. I had to do a bit trial-and-error testing in the car so see which pins on the controller are for the L/B/R/T signals (see above photo, inset). The new capacitive touchscreen also comes with an FCP cable, which runs via a 6-pin connector on a tiny PCB to the controller's left hand side plug. Then, carefully closing up the unit, job done. In comparison to the OEM touchscreen, the new one looks so crisp and vibrant as if one swapped an LCD for an OLED! And the touch sensitivity is amazing! The gentlest of touches instead of hard taps is now required to operate the screen. Dragging and scrolling menus is a breeze now. I love it!