

d95gas
-
Posts
731 -
Joined
-
Last visited
Content Type
Profiles
Forums
Events
Gallery
Store
Everything posted by d95gas
-
Spent the afternoon taking all the interior plastics out to run in my new Phono cables and some other stuff. At the same time decided to run the wiring in for the Reversing Camera I got from eBay (Hong Kong). The camera is the one that replaces the reversing light holder. Now these are normally straight forward, but this one has confused the hell out of me due to its wiring. As it came out of the box, you have: Jack type connector which you wire in to give power to the unit, so earth and 12V - Straight forward. Then off the camera, you have the long cable with the Phono at each end to connect camera to the head unit All seems simple enough......until you look at the long phono cable. At each end, where the phone plug is, there is also a red thin cable wired in, approx 10" long, that goes into the phono plug. Got the multimeter out and check for continuity from the red wire to either the negative or positive side of the phono plug, and get nothing. Do a continuity check from the red cables on each end of the phono......and you get continuity. what the heck its using I don't know, and there is no indication in the wiring diagram for the camera, what these red fly leads are for. Had anyone else come across this, and have you resolved what they are for? This is the exact same camera below.....doesn't show you the phono plug side of the lead though:
-
The company is just in the processes of registering on here as a trader, their name is "North East Custom Coatings", I'm sure Michael will be along soon to introduce himself and the company. I think he is just going through the process with the admins.
-
Have a read of the pictorial guides, it really is easy, few screws and a few clips and it's out........and there is always plenty of people on the forum willing to help and advise.......you are never alone.
-
That looks amazing can't wait to get my interior started (unfortunately I have to wait) Was it difficult to remove the interior trim without causing any damage (broken clips/lugs etc) It's actually very easy to remove it all, have a read of the guides on the forum, you can easily strip the lot in an hour.
-
Custom-Creationz.co.uk - Boot Dividers, Subwoofer Enclosures and parts!
d95gas replied to cmr1991's topic in Member Traders
Have you thought about a small sub box (10") for the default Sub location? I have seen a good few images around the web of boxes that have been done and are adequate for a fair amount of subs. Not all of us want thumping base, but do like get some half decent lows when listening to music. I am in the process of trying to sort something for a 10" JBL which requires 0.67 cu ft, but am afraid my woodworking skills leave a lot to be desired :-) -
If I remember rightly, the lacquer they use is this new anti-scratch stuff that is hard wearing. Although I am still going to be conscious that I need to treat it better in order to keep it looking pristine. The other panels I have just done a couple of "HubiKote" on them. This is a sealant wax, and not only does it give an amazing gloss finish, it does add another layer of protection. I can only see how it goes over a period of time.
-
Cheers bud, I will give Alex a shout No probs. FYI ~ It's Chris who runs Tarmac Sportz. Alex is the zman. Oh bugger....... No wonder nobody is talking to me. :-)
-
** Tarmac Polished Strut brace Group buy **
d95gas replied to Tarmac@TarmacSportz's topic in Tarmac Sportz
Am I too late for this Group buy Alex ? Looking for one in RED Thanks -
Cheers bud, I will give Alex a shout
-
I do know they have already contacted the "admins" about becoming traders on the forum, so hopefully won't be too long now.
-
Couple of the members wanted to know about the full centre console, whether it was just dipped on the top, or the whole thing. The answer is "The whole thing" was dipped, apparently took a few goes to get it right, I know most of the sides cannot be seen......But I would of known, apart from anything else, the guys themselves wouldn't of let it go out in a "half" state. Any quick vid as a walk-around of the centre console. Had to convert to low quality to keep the size down. Had to do it as a link as I am not too familiar on how to embed video into the thread. 18Mb Video walk-around of Carbon Dipped Centre Console
-
They did actually offer to do that, but to be honest, the extra its going to cost in time and effort, its probably just as easy for me to get some replacements and get them done, at least should I ever get bored or get rid, I have the option of putting everything back to OEM. Fair enough I always kept my oem bits too, I meant a diy job, all you need is some filler and a plastic scraper Sent from the golf club... I will give that some thought, seems a lot simpler when you put it like you did .....I was over complicating......Halrauds here I come
-
Cancel that request.......just looked at their feedback......shame really as they had good prices.
-
Has anyone purchased any of the "All St*rs" products from eBay. Currently looking at the strut brace they do for the 350Z: Anyone purchased one? Whats it fit like with the Plenum spacer? I know they are based in France, but prices for the product and shipping seem pretty good, just not sure what they are like to deal with. Thanks
-
I am emailing them tonight, so will mention the possibility of a group buy on a few of our specific items like the Engine cover, Slam panel, etc. I am keen to get the new owners on here as I know their work is spot on and nobody will be disappointed. I also travel all around the country so don't even mind meeting up with people and handing back completed parts or picking parts up.....anything to save money.
-
They did actually offer to do that, but to be honest, the extra its going to cost in time and effort, its probably just as easy for me to get some replacements and get them done, at least should I ever get bored or get rid, I have the option of putting everything back to OEM.
-
Sure the guys can sort you out with whatever you want
-
SOLD to Jetpilot - Subject to payment. Scot_F91 is first reserve if Jon pulls out.
-
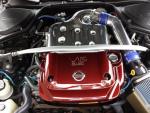
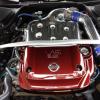
thanks to all the brilliant comments. I've got a long way to go yet as the previous owner had started a blue theme under the bonnet, so I now have to swap all the anodised bolts, hoses, etc.......so watch out for items going up for sale. Just fitted the engine cover and aftermarket slam panel. Again apologies for the crap pics we really dont show off the Candy Apple Red to its best: If anyone can advise on the size of hose I need to swap out the two on the intake manifold, it would be appreciated. Saves me having to strip them down and measure. Also need to order the Earthing kit from our friends at Horsham Developments. Also now realise I am going to have to purchase aftermarket smooth covers for the Battery and Fluids covers, so I can them have them dipped the same, if anyone can point me in the direction of anyone who does these in fiberglass......not worth me purchasing them in Carbon just to dip over the top. Once again thanks for all the kind comments. Graeme
-
Hi Vlad, The whole lot was dipped, so Top and sides are fully dipped and covered. I will do some more pics tonight and upload.
-
I have just replaced the aftermarket Carbon Fiber engine cover that came with the car, I have had the original dipped, so this Carbon one is surplus to requirements. If I had to score the quality and finish of this one, I would say its a 9/10. The reason it doesn't get full marks is there are a couple of pin prick type bubbles in the carbon finish. This are located on the top: bottom left corner. It does not spoil the finish, the plain carbon just wasn't my cup of tea. As for price, I am trying to be as fair as possible, as I don't want to rob anyone. Looking at prices around the web on places like eBay, and some overseas forums, I think, and hope, I am being fair with £75.00. Ideally I would prefer collected, but I am happy to securely package if someone wants to arrange their own courier, of which there are plenty. Payment, pref bank transfer, but happy to take PayPal as gift unless you want to add 4% to cover charges. If anyone wants more pics, give me a shout and I can email some over. I hope the quality of the goods I have sold previously through the forum, and the way the transaction was handled, will vouch for my honesty with the description above. Now for the pics: Thanks for looking Graeme
-
Thanks guys.... Sorry you cannot see Pete..... don't know why and can only guess it must be your end as everyone else is seeing them. They are hosed on my Dropbox account so should be fine. Graeme
-
Cheers Keyser....... Thought you might
-
Yep I love the stuff, when its done right and to a high standard, you cannot fault it, gives a stunning finish. To those "Non Petrol Heads", they are totally amazed when they see it, you would think I had been to the planet zog to buy it Obviously you can see the engine bay is going to be themed Candy Red, which I think will really stand out against the Blackness of the rest of the car. The Candy Apple Red Carbon actually originated (the idea) from my Wife's MR2, as this is what she had done to elements of her engine bay (and by the same guys). Watch this space.......
-
Thanks for all the great comments guys......Really looking forward to getting this all fitted........Just trying to persuade a certain member to commence another group buy on the coloured bolt sets Interior might be back together for the weekend, dont want to rush it as I have a full audio install to do as well including aftermarket sub.
