


Hodaka
-
Posts
661 -
Joined
-
Last visited
Content Type
Profiles
Forums
Events
Gallery
Store
Everything posted by Hodaka
-
No idea bout the scraping, but whereabouts on the exhaust is the rattling coming from? If it's towards the front/middle then it could be the heat shields on the cats rusting off? Happened to mine, so it would rattle at low RPM. I used some jubilee clips to secure it on, until I save the funds to get HFCs.
-
Look forward to seeing pics!
-
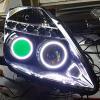
Mmmmm... Depo headlights
-
I'm not knowledgeable enough to verify it's validity, but I heard you should use a relay harness when installing HIDs into cars that originally came with halogens. From what I understand the current draw from the ballast spikes quite high on start up (10A+), so it could blow a fuse (some people even say it's possible to damage your wiring harness ). The other problem you face is apparently flicker which happens due to the ballast not being able to draw enough current. As I say, I don't know enough about it to be sure, but may be worth researching into! You mentioned someone added HIDs anyway, so maybe it's fine.
-
I pulled up next to a 370z at the traffic lights on the Farnham by pass (heading west) yesterday at 7pm. You had a personalised number plate starting "A3" and I *think* it was black. Sorry, my memory's absolutely shocking so I can't actually remember the colour! Anyhow as we got going again, I was matching your speed to say hi. I think you got the wrong impression (you didn't look my way so probably didn't realise I was in a 350z) and thought I was trying to race you as you put your foot down when I gave up and tried to head on on my journey.
-
Hi guys, Please excuse my non-technical lingo... but you know there's 3 bolts in each wheel arch that needs to be removed when taking off the bumper (DE)? Well for the 2 outer ones, they seem to screw into white "receiver" things. I think the threads of these have worn away on mine, as the bolt never fully tightens when I'm screwing it back in. I did search the forum and the internet, but I haven't had much luck as I have no idea what I'm searching for! Please could someone let me know what they're called/where I can get them? No rush, but it'd be nice to replace as the N/S of my bumper has a 2-3mm gap between it and the wing. Thanks in advance! Hodaka
-
Hope you manage to get some business rolling in soon
-
Please don't take this the wrong way as I'm really just trying to help, but I think Search Engine Optimisation (SEO) is the wrong approach to be taking if you're looking for immediate work. Even if you do everything right with SEO, it'd still take a while (probably a few months) before you see any change to your ranking. You're unlikely to get any significant traffic to your site unless you put a lot of effort in optimising your website (relatively speaking, the easy bit) and then building links back to your website consistently over a long period of time. Once you start getting traffic to your site, then you need to start worrying about effectively converting them into paying customers. I'm no marketing/SEO/anything expert, but what sort of other avenues have you looked at? In my opinion, anything would be more productive than SEO. For example I've listed ideas that immediately came to mind below. I'm sure you would have thought of / tried some of them, and not all of them will be good ideas, but just to try and help: I assume you have business cards, but if not, get some from a website such as Vista Print. Hand them out like there's no tomorrow to anyone you speak to. Well, maybe not quite everyone. Might be weird if you start handing your business cards out to cashiers at Sainsburys! Create some flyers (even if it's super simple ones that you create yourself) and drop it through people's letter boxes Putting an ad in your local newspaper? Register to area based websites such as Streetlife and keeping an eye on it in case someone is looking for painters Joining various business groups. This seems to be one near you ( http://youruptonupon...-association-2/ ) although I have no idea how helpful it'll be. There might be a Chambers of Commerce in your area that host networking events as well. I hate those kind of things, but if you're desperate it might be worth a shot? Is it worth contacting various related businesses (builders, boat yards etc..?) to see if they need more help? Or maybe they're unhappy with the painter they currently outsource to? I don't know if this is related/applicable at all, but my colleague gets furniture from FreeCycle and upcycles them and sells them on. She does it on the side and lists whatever she gets on eBay as collect only (or free delivery within a certain area). Might be worth doing that while you try get more relevant work in? I'm out of ideas for now! No idea if any of the above is helpful as I have absolutely no idea about your industry... It sounds like you're going through a hard time so just trying to be as helpful as I can. If you do have any money you can use to market, I'd maybe try Google AdWords. It's basically a way to advertise your site/service whenever someone searches for a certain key phrase, e.g. "painters". You only get charged when someone clicks on your ad and you have a lot of control over when the ad is shown. E.g. You can set it to only appear if they're within a certain area, set the time of day it shows, set the maximum amount you want to pay per click, daily budget etc... Definitely worth looking into, but I'd read up about it first. My ex-colleagues dad was a carpenter and had a positive ROI on it. Also my driving instructor (director of the driving school) had great success with it - I think he said that he was paying £20 on average for a student, which is pretty insane! I'm rambling on... Hopefully some of the above word vomit was helpful!!!!
-
Doh! Didn't even notice this was for the 370z!
-
I've hardwired my dashcam using one of those piggy backs. I then ran the wires up the A pillar, then tucked the rest into the headliner and to the dashcam. Here's mine: The piggy back - can't remember exactly which fuse I tapped into, but I used a volt meter to check which one comes on with the ignition. Now I look at it, I don't think I checked the value of the fuse that was supplied. Isn't yellow 20A?! Might check it out later. The power supply - I just tucked this away here as the cable was long enough to reach the camera. Ground - There's a grounding point here that I used for the ground for the power supply Only tip I have is be mindful of the orientation of the piggy back. Apparently you want the 12v side to be this one: Makes sense really, else the current for your piggy back circuit goes through the original fuse (becomes series instead of parallel). Hopefully I'm making sense! As long as you piggy back IGN or ACC (?), then it would automatically turn off when the ignition isn't on.
-
Yeah I agree, the way they've conducted themselves is absolutely abysmal. Really wanted to parts though and it's mainly broken headlights I'm buying (interested in the HID projectors), so there wasn't an alternative unfortunately.
-
I've been using eBay a lot this year. Although not the same issue as you, the issues I've faced are: The seller marked an item as free postage. After I won the auction he contacted me saying it was a mistake and I needed to pay £10 for postage. He wasn't apologetic at all, so I complained saying it was his mistake and he had plenty of time to correct the listing (1 or 2 weeks, I can't remember) and that I think it's unreasonable to demand that I pay for postage after the listing's ended. He just reiterated that it was a mistake and I need to pay him £10 - again, no apologies. I contacted eBay, who basically said the seller was in the wrong and I could cancel the order if I'd like. I didn't want to cancel the order so I had to cough up the extra £10. It's mainly the fact he wasn't apologetic at all that annoyed me. Also doesn't eBay say that if you bid then it's "legally binding" or something along those lines? If that's the case, then how are sellers allowed to do stuff like this? This is happening right now, but I bought an item (headlight) which said collection or buyer to arrange courier. I won the auction and contacted the seller to ask a suitable time for the courier to pick up. He replied saying that there'd be a £20 fee for materials and time to package the headlight, which I thought was a rip off. I won the listing for £16, so I think he was just trying to recoup as much as he could (why they don't use a reserve price I have no idea). Anyhow I paid this as well as it was a bargain and I didn't want to give the seller a reason to pull out. Contacting him since has been a bit troublesome, as he says that he's having issues receiving messages from eBay. I found his email address from the PayPal invoice and emailed him directly to get the address & day for pick up. I sorted the courier (UPS) out and they were meant to pick up yesterday. Today, the tracking still says "Order Processed: Ready for UPS", which from what I understand means that they haven't picked up yet. I'm keeping an eye on it and will investigate if no updates by tomorrow. Not sure if it's UPS slacking or the guy "not being in" or whatever. Other than those 2 issues, I've had a nice experience with eBay.
-
Yum yum! I'll try and keep an eye out for your thread. I'd definitely be interested!
-
Thanks for the comment guys Was an absolute PITA getting to where I am, but I'm pretty pleased with the results. Still stuff I would have liked to add, e.g. reverse protection diode, a constant current driver etc... but for now I'm glad to be done
-
Genuinely saddened to hear this. I never met him but conversed with him a few times on the forum and he seemed like a really nice guy. RIP James and hope your beloved Zena goes to a good home...
-
As for the strut cover, I had to cut out more plastic to make way for the LEDs: Here's a pic with the LEDs in place: And the back: I then painted the strut bar cover: And here's the end result: Looked good from above, but I couldn't think of a good mounting method and I really wasn't happy with how messy the circuitry was. I therefore went back to the drawing board. After a bit of thinking, I remembered perfboards/protoboards. I thought it would be a great way of providing an actual rigid structure for the circuit: I cut it into strips, stuck on some reflective tape and poked holes into it: And soldered the components: Here's a comparison of version 2 (top) and version 3 (bottom): I was much happier with this, so I mounted it to the strut bar cover. I used epoxy to stick some standoffs to the cover, then used screws + washers to hold the circuit in place. In an attempt to prevent electrical shorts, I covered the circuit board and undersides of washers with electrical tape: Much better I was happy enough with the above that I installed it back in the car. In terms of wiring it up, I tapped into the boot light. A very big thing to note if you ever do something similar, is that the positive side of the boot light is always live! It's actually the ground that gets broken (?) via a switch! I had to redo the wiring as I thought it's the live side that gets switched... I did do some searching after I found out, and noticed a few other members on here have faced the same issue. PITA! Anyhow, I don't have a good pic of it installed so I won't bother. A few weeks later my wife messaged me to say her brake light was out. I told her to meet me at Halfords after work and I replaced it for her. I also polished her exhaust (no, don't even go there!) as we both had some time. During this I had my boot open for a while, and then we noticed some smoke rising from the strut bar cover! I disconnected the circuit as quickly as I could! The circuit I built was designed for 14.5v, and the engine wasn't even running, so I don't think it was an issue with the circuit itself, but an electrical short. By this stage I was pretty fed up of this project, so I decided to leave it for a while. I went back to tinkering with my headlights - I'll post about that in the future once I actually finish the project! A few months went by. From time to time, I would think about this project and how I could next approach it. I ordered a few bits and pieces, and decided to give it another shot a couple of nights ago. The first thing I did was scan the Z emblem: I then traced over it in Adobe Illustrator: And used a free software called Fritzing to design my own PCB (printed circuit board): Which I then printed on a piece of heat transfer paper (mirrored) using an old laser printer my colleague gave me I then got a piece of copper clad PCB, cut it roughly to size, scuffed it with sandpaper (400 grit) and cleaned it with IPA. Then I used an iron to transfer the above heat transfer onto the copper: I then used Seno GS to etch the PCB. Here's what it looks like out of the box: And during use (it's reuseable): After a few minutes, the PCB was etched: I then used acetone to clean off the toner: And then the soldering began! In this iteration, I opted to use surface mounted devices as I'd been wanting to try it out for a while. And gosh... they are absolutely tiny! Here's a resistor: As per my previous versions, the LEDs were soldered in triplets: After soldering each triplet, I tested it: All good! So I continued... All of the above was surprisingly easy! From scanning the Z, until finishing the circuit board took maybe 3-4 hours. Surprisingly much easier and quicker than the other versions! Anyhow now that I had the circuit sorted, I went onto thinking about a mounting method, starting with the Z emblem. In the previous version, I had plonked some hot glue onto the LEDs then stuck the Z onto that. I really wasn't happy with it, but at the time it was the only thing I could think of. This time however, I decided to screw the Z onto the cover. I lined them up and drilled a hole: Here it is with the screw in place. I was careful not to overtighten it: Then the PCB was just screwed into the standoffs that I had from the previous version. This time, I decided I better stick a fuse on it! The only thing I had lying around was one of these waterproof mini blade fuse holders, so for now I stuck that on. It was a bit of an afterthought - you might be able to tell from the fact the red wire is much longer than the black, which annoys me but oh well. Also the lowest value fuse I had was 5 amps, which is waaay too high. I'll come back to that in the future and replace the holder and fuse with something more suitable. While I was at it, I also stuck on a proper connector rather than bullet connectors. Just a cleaner solution in my opinion. And here's the final product. It looks quite dim under the bright LED bench light I have, but it looks nice in the dark, which is what it's designed for. And there you have it! If you made it this far, I'm impressed! P.S. Sorry, I really did try and make it short, but I always seem to fail at that...
-
Evening! It's been a while since my last proper update! I've got lots of things bubbling away, but I've "finished" my strut bar lights, so I thought I'd post about those. I have a habit of droning on, so I'll do my very best to be as concise as possible! In short, the goal was to paint my strut bar cover, as well as putting some lights under the zed itself. First I removed the strut bar cover: Here's what it looks like underneath. The Z emblem is held on by 5 rivets (?): So I ground the plastic rivets off: With a bit of encouragement, i.e. poking it with a screwdriver, the emblem came off: I then sanded away the posts: I then traced the Z emblem: And cut out a piece of acrylic: After a bit more cutting & sanding: My plan was to use the 5 holes + 1 that I was going to drill. Here's the layout I came up with: So I cut/sanded/ground the plastic so that the LEDs would sit flush: I also stuck some masking tape on the acrylic Z to try and diffuse the light: I decided to stick some reflective tape on the underside of the Z emblem: After I'd stuck it on: I put it all together and tested it out: I was happy with the progress, but not with the light distribution. A lot of Goolging later I came across someone saying that you can cut off the domed part of the LED to increase the angle of light emitted. Here's a pic, along with another shape I tried: To me, the flat LED seemed to distribute the light more, so I went with that. Another thing I read is that you can drill an indentation in the flat top to further increase the angle. So I thought I may as well And to make things more hasslesome, I sanded the LEDs... Again, to try and increase the angle of light: I then wired up the LEDs in triplets along with resistors. These were then wired in parallel: I also bought some actual diffusal film so stuck that on with super glue. I didn't think it would help much as the LEDs would be so close to the film, but again, I thought it's worth a shot! In retrospect though, I would have preferred to have scuffed up the acrylic instead as I couldn't get the diffusal film to stick perfectly on the acrylic:
-
How could you tell?! Sounds like a plan! You'll need some steady hands though - something I don't have Just a couple things that pops to mind in case it helps. Sorry if you've already thought of them, I have no idea how much experience/knowledge you have so thought I may as well type them out! I believe these are bixenon headlights so the cut off shield will be attached to a solenoid. Although it depends on how they're designed, you may need to hold onto the solenoid somehow to prevent it from moving around when sticking on the tape. For example if your solenoid pushes the shield forwards and downwards, you'll need to use a hook like tool to keep it in place while you push the tape on with tweezers. As you're adding tape, that means you're blocking more of the light. Although you'll have to do it and see, if the light decrease is too much, you could try shimming the bulb. Please note that this would probably cause your output to be smiling/frowning. I'd be very interested to know how you got on. I think Depo headlights are an awesome option if you can't (like me) or don't want to fork out for the OEM lights. Even if it has some issues other than the cut off, I think it's a great place to start. I won't lie, I'm a tad jealous
-
Haha no problem at all
-
I believe you just need to move across the bulb, ballast, cable and grounding clip from your OEM lights across. Not sure but you might need to switch the bulb holder thing across as well - the springy metal bit. Things you may find of interest: BulletMagnet's thread (including output shots) Video of installation
-
Yeah same here, it just suddenly happened with no warning. Very strange...
-
I had the exact same issue a couple of weeks ago. Might be worth a read - http://www.350z-uk.com/topic/111802-bonnet-stuck/ Good luck
-
I have no idea about the exact projectors Depo headlights use, but you'd need to open them up (either in oven or with heatgun). You'd then need to take the HID projector apart and change the cut off shield. If it's a flat shield you could probably just turn it around and reuse it like I did in my build thread, but if it's a curved shield you'd probably need to make a custom shield. If you're thinking about doing it yourself, I'd recommend you check out https://www.hidplanet.com/forums/ , lots of useful info there. I think they'll never technically be road legal though, as I don't think they have self-leveling motors? Also from what I've seen, aren't most aftermarket headlights dot-approved (no idea if it's legit) but not e-marked and we need the latter? I don't think the above would stop me, but my finances do
-
I'm sure others will chime in shortly with more useful info, but from the videos I watched I believe you need to apply quite a thick layer as that'll help make the removal process a lot easier.
-
WANTED... set of origional headlights for my prefacelift 350z
Hodaka replied to Chris.sawyer1990's topic in Wanted
