

Randy_Baton
-
Posts
1,322 -
Joined
-
Last visited
Content Type
Profiles
Forums
Events
Gallery
Store
Everything posted by Randy_Baton
-
Your link doesn't work as a link http://www.siriusprojects.co.uk./ I don't normally like the carbon interior but yours looks great. Is it dipped or proper carbon?
-
 Looks like we'll be ending up with a similar car, black badges are on next months list! Not sold on the front black badge though, for some reason I don't like it, but plenty of others do. I might go for the fairlady name badge rather than the 350z name, toying with the idea of using both. You'll be after a black roof next If you want a set of mirrors and door handles to spray up and then swap onto your car I've got some for sale in my signature. I prepped and sprayed up a spare set over 4 days. Its much easier and you don't lose the use of your car whilst your doing it.
 -
No its a thick elastic loop, the tablets held on by the front of the tablet case being flipped over to the back and tucked in behind the elastic. I only use the tablet for a sat nav on long journeys so wanted something I could remove easily. I just keep the elastic loop in the armrest. The elastic loop is held together by iron on wonder web, so the back side looks a bit ghetto, but you can't see it. The other option would be to sew it together but i'm a man.
-
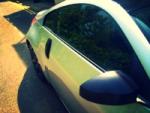
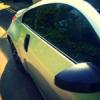
Okay, I've been around for long enough now, so its about time I posted a few pics of my car. As you'll read below its pretty much a forum built car, still holding out for my free sticker though. Thanks go to 14N, CS2000, Flyboy, Peteman23, Steve 230z, Japex, Clark Motor sport, Tarmac and probably a few others Picked up my Car from Tradelink end of Sept '13 Carbon wrapped my b-pillars, all by myself, and put 3 light layers of clear coat on it to give a light shine. Although I was enjoying listening to my old tape collection, next came the Bose hack, including hacking an old phone mount into a custom cubby hole holder and inventing the simplest way to mount a tablet. I'm currently waiting for copyright to come through. Although its phone mount I actually use it for an ipod classic, its got 160gb of music on it so no chance of getting bored! I just have to operate it sideways! Now for my copyrighted quick release easy tablet mounting method. I'll be selling these custom mounts on the forum soon... Twelfty pounds. I only use a tablet for a sat nav and only use it every few months or so, so wanted something removable. Next came a seatbelt cushion - again installed all by myself. Original 14N Tonneau cover, Steve350z stubby and a cargo net and floor mats from Clark Motorsports - Standard behaviour. As 14N has stupidly updated his design I might need to get a better one now, but I'm sure I can sell an original batch 14N for more then I brought it for , right! I could even fake his signature on it and everything. I then had a bit of a mare trying to install CS2000s LED reflectors, basically brought some second hand, broke them had to rebuild them myself then install them. Probably a 4 month process but you can read about it in CS2000s thread if you want! I faired slightly better with CS2000s LED interior and side bulb replacement kit. Got my roof wrapped and rear and 1/4 windows tinted by Ultimate Wraps in Dudley following a recommendation from 14N. Pictures in the second link below. Thats not my number plate, long story got me pulled over at one point, but all fine now. https://www.facebook...Ultimatewrapsuk https://www.facebook...542545599175286 Had the wrap done in the middle of winter when it was freezing and think the cold weather followed by a 4 hour drive the next day did weird things to the tint (as shown below). it had 24 hours to cure and I kept the heat down on the drive. Thankfully over the next week it mostly went back to normal, just a couple of hardly noticeable white spots left now and Jack at UW offerd to fix it for free anyway. Managed to build up a detailing kit at some point... Also installed SGS uprated struts from the forum group buy & Boot Popper reconditioning from PeteMan35 - Boot still won't upon up by itself but gets past the catch first time and only needs a light touch to help it on its way! I've also added a Cosworth air filter and Flyboys mirror fold module, which took about 6 months to get right, my fault though! I've also installed a new greener air filter... My clutch started to go after Christmas so had Ross at Japex install a new clutch, flywheel and a slave cylinder and uprated hose from Clark Motorsport The inside of my car was bit dinged up so I resprayed the door switch panels and also tried to buffer out the silver door pull, I got rid of the scratches from the door pull but obviously also got rid of the brushed aluminium look. Didn't like the polished aluminium look so painted in gloss black and like it better than the OEM look. I have a spare door pull for sale, if you want to try this without using your own one. I tried a layer of clear coat on the screw cover to see what it would look like on the rest of the finish. Too shiny, so no clear coat for the rest of it. This is what I keep in my car, speed wipe and baby wipes for the bird poop and stripper scent for the ladies . Do'n knock it until you've smelt it, just don't tell women what its called, they are never impressed. I've also learnt a man can never have to many micro fibres (for the big bird poop) I've also recently painted my wing mirrors and door handles gloss back and added side steps/diffusers from the Tarmac group buy. I have my old door handles and wing mirrors for sale if anyone wants to try this. It means you can play around without removing the parts from your car, thus giving you more time to spend on the prep and finish. I've also carbon wrapped my kick plates but couldn't get the bubble out the corners, so will be removing at some point and replacing with aluminium kick plates. Might take a photo of my attempt for the forum lols. Plans for the future: Nismo V1 wing with the top part gloss black or maybe just keep the OEM lip and paint it black Aluminium kick plates from Steve 350z - If i can get in time next time he has stock! 2006 Airbox conversion from flyboy Probably get a new gear knob as mines a bit tatty, I like the OEM shape but will probably try a Nismo at some point. Paint restore, there are a few deep/ wide scratches that won't come out with scratch x2.0. I can probably touch up and polish a few of them but think the bonnet bumper and passenger wing will need a respray. If I don't get round to buying a house this year I might get the leather redone, I think custom seats would really set the car apart. Possibly replace the windscreen, but I'm going to try polishing out the chips first. Then I'm done, obviously...
-
Haven't got this month's, so so so can't comment on the quality but curing time shouldn't make any difference to the finish unless you're layering and there isn't normally enough in a waxybox kit for 2 layers. Usual wax timings are apply, wait 15-30 minutes for it to haze, then buff off and wait 1-24 hours for it to cure before layering. The buffing stage should remove any smears
-
I think people round here value their paint to much to use a car cover. http://www.amazon.co.uk/Autoglym-Bird-Dropping-Wipes/dp/B0028HCGFA I just use cheap microfibers and a spray of speed wipe/quick detailer. I live by the sea, massive seagulls email every where. I've learnt not to park under trees.
-
Zed was my first car!
-
Probably not the same thing but when my cruise control stop working it was intermittent and was due to my clutch going. I could set a speed but if I tried to up the speed with the switch or use the switch to return to the previous speed after slowing down it would cut out.
-
-
spray painting window wipers and centre console
Randy_Baton replied to drginger's topic in 350Z General
For the wipers there are plenty of threads on here http://www.350z-uk.com/topic/74417-windscreen-wiper-arms-respray/ I used halfords grey primer and satin black. The more thin layers the better, but if you put loads of layers on its best to wet send more often. Think I probably used 4 primer coats and 4 paint coats with no clear coat. Some of mine has chipped off (only very small parts) but it was the first time I'd sprayed anything and I did it in an unheated garage in the middle of winter so the prep wasn't the best. I've not seen any decent threads on spraying the centre console that contain 'after' pictures. I've got a few small marks on mine, I was going to try touching up the ones that are hardly visible with a range of grey marker pens over the weekend. Not expecting amazing results just trying to make them marks less visible. I'll take some shots along the way. -
hello, I'm Faye, also known as fayelady_z
Randy_Baton replied to Fayelady_z's topic in Introductions & Welcome Messages
Just goes to show the 350z is becoming the new Nova. -
It was the ace cafe meet, check out the Incarnation thread. Are you Brighton based?
-
From what I've heard you're not allowed to have a stubby in public in Dubai.
-
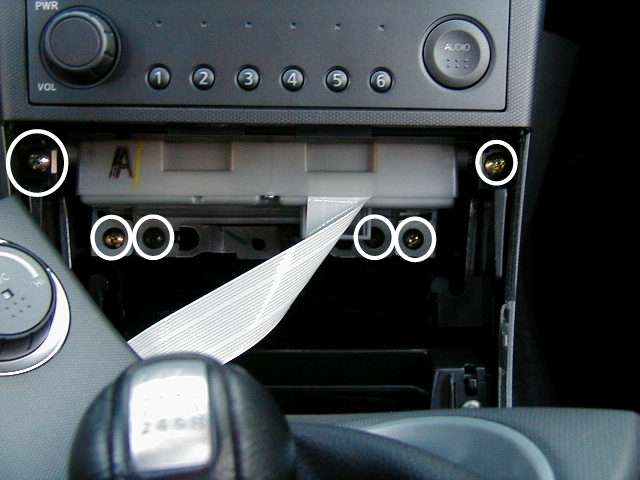
The cubby hole isn't your problem, the screws in the cubby hole hold the centre console to the car, you've got round that problem. already. The stereo is held in to the centre console via 4 screws in the side, Its best to get the whole console out then undo the screws, but you can do it by leavering it forward. The thing I had issue with was getting the the metal feet (shown at the bottom of this picture) out from behind the white plastic thing. I had taken out the screws that go into the holes but it was still hard to get out. I think you've got the same problem. You need to loosen the screws that hold the white box in to give you more wiggle room. I think you need to play around with these screws. Each picture is from a different model US at the top, UK (non HR) at the bottom. Hopefully yours is similar. http://www.350z-uk.com/index.php?app=core&module=attach§ion=attach&attach_rel_module=post&attach_id=5451

-
This from America but it looks like a HR, 2 screw on top. Full guide: http://liljerk.morph...Z/dash_removal/
-
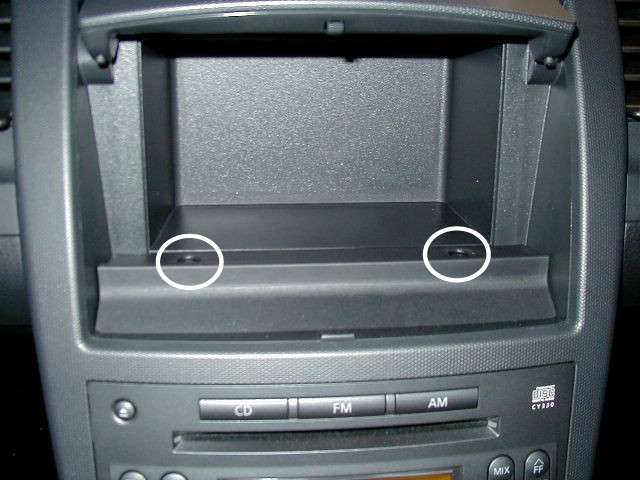
As there are no number stages in the OP, do you mean the top picture or the bottom picture attached below (presume its the bottom!)? I've not got a HR so can't confirm if you should have the screws but this guide didn't come from a HR. When you try to pull it out can you tell where its catching. The probelm I ahd with mine was getting the the unit round the white plastic box at the bottom.
-
*SOLD* Door Handles £60 for the pair Wing Mirrors £90 each - NOTE the Mirrors are cracked (because I'm an idiot!) hence the price. The motors in the casing work fine and the actual casing is in good condition. Couple of paint chips on this side, surface is actually quite smooth so would require minimal sanding (if any) before respray. If you just the need the surrounds and your mirrors are fine you can just use your own mirrors. Other options are for OEM replacements (£41.50, last time I checked), or take the broken mirrors to a glass shop and get them to cut you some new mirrors to fit the back plate, it'll probably be half the price but they may not be able to provide ones with a heating element. *SOLD* Passenger side door pull £20 I tried to polish out the scratches on mine it worked but looked too shiny. Its next to impossible to get back to a brushed aluminium look unless you have a professional set up. I just opted to paint my polished one gloss black and think it looks a lot better than OEM anyway. I should probably get round to starting to a build thread, but if you want a photo of how mine looks now I can get you one. Payment by paypal or bank transfer (PM me), price includes delivery. Alternatively you can pick up from central Brighton and knock a few quid off. See my build thread for what I did with my spare set (link in signature)
-
Flyboy-Mirror Auto Fold Module - GROUP BUY 2017
Randy_Baton replied to flyboy's topic in Member Traders
Hi, just to say finally got mine working today, its only been like 6 months or something! It was only my third attempt though. The only wire I couldn't check without removing the door panel was the one behind the speaker and that's where the issue was. If it helps anyone else trouble shoot: after the first install my mirror open and close switch reversed but the auto fold didn't do anything, so I just left it as it was too cold to mess around. The next attempt I just re-checked the connections that I could get at through the arm rest, this was all of them bar the splice behind the speaker. After this attempt the open and close was still reversed and the auto fold still didn't work. I did however notice that I could hear the auto fold black box clicking when the auto fold function should have kicked in. So it just looked like the signal just wasn't getting to the mirrors. This time I had the door panel off for some other work so I thought I'd check the connection behind the speaker and after clamping down the splice a bit harder, it now works fine, the open close button is still reversed but that doesn't have any real impact on use. After re-checking the connection I did make sure that the wire wasn't touching the magnet on the back of the speaker, but don't think this would have interfered the signal anyway. Thanks Flyboy. -
Nope
-
Oh my god now the car won't start! The drivers side window works, but when it gets to be top if I hold he witch down it starts clicking like crazy. If I try to turn the engine on the car won't start!
-
Haven't touched the driver side and the passenger switch on the drivers side does nothing either. Is there a way to manually wind the window up?
-
I've just replaceded my door handle and mirror on the passenger side but had my window down whilst doing it. Just finished and now my window won't go back up! Help!!!!
-
hello, I'm Faye, also known as fayelady_z
Randy_Baton replied to Fayelady_z's topic in Introductions & Welcome Messages
And quite a few of you are coming to visit me in Brighton this weekend. Say no more -
hello, I'm Faye, also known as fayelady_z
Randy_Baton replied to Fayelady_z's topic in Introductions & Welcome Messages
Welcome to the forum, what's going on with the number plate in this photo? Tiny! I don't think many people will have your gearstick, always good to be unique. If it's a silver zed it'll probably have a black roof/wing mirror/door handle combo before too long. -
Unless you've parked under a tree a quick rinse should get you back to where ever you were before.
