Elliot350
-
Posts
217 -
Joined
-
Last visited
Content Type
Profiles
Forums
Events
Gallery
Store
Everything posted by Elliot350
-
350z DE Injector Dynamics 1000cc Price reduced further!!
Elliot350 replied to Elliot350's topic in 350z Parts For Sale
Only the injectors left guys!!! -
350z DE Injector Dynamics 1000cc Price reduced further!!
Elliot350 replied to Elliot350's topic in 350z Parts For Sale
Is still available yeah il send you a pm! -
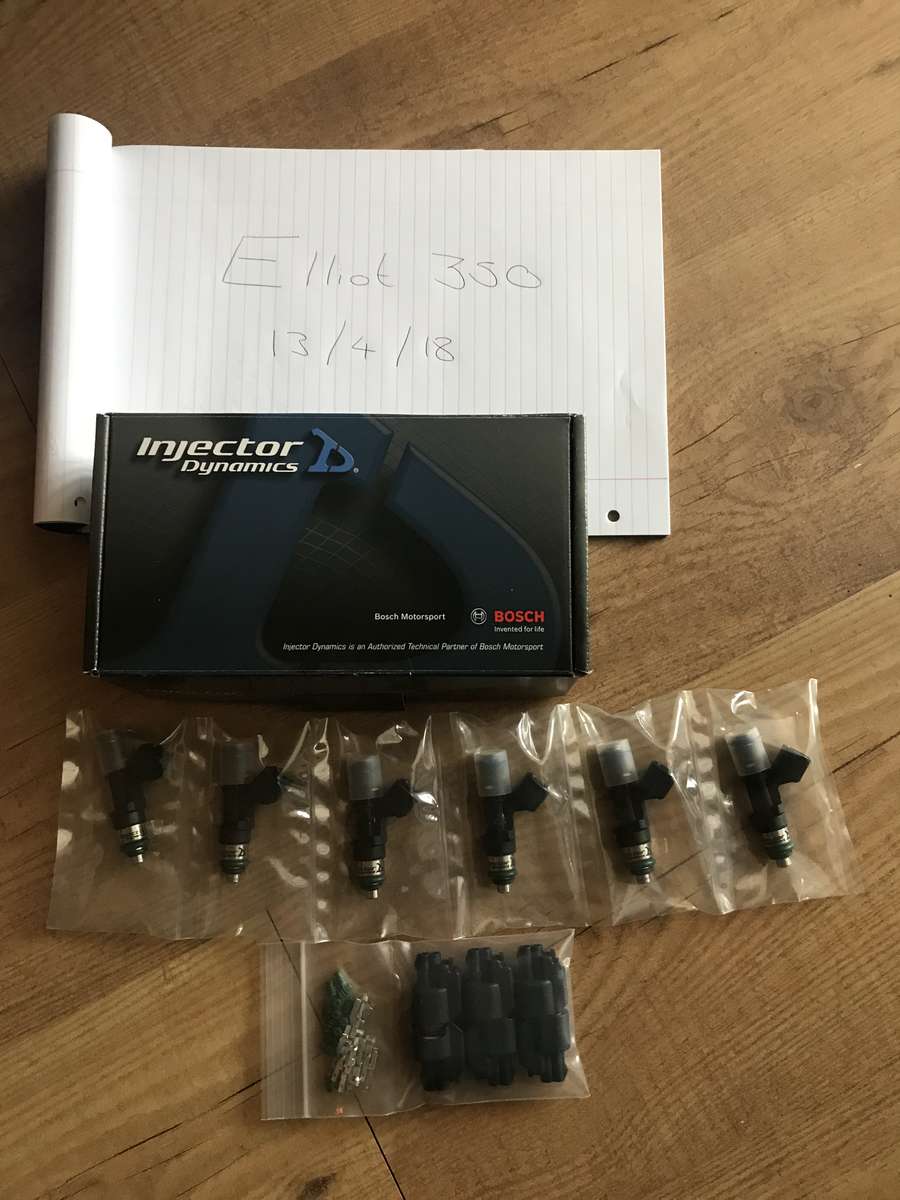
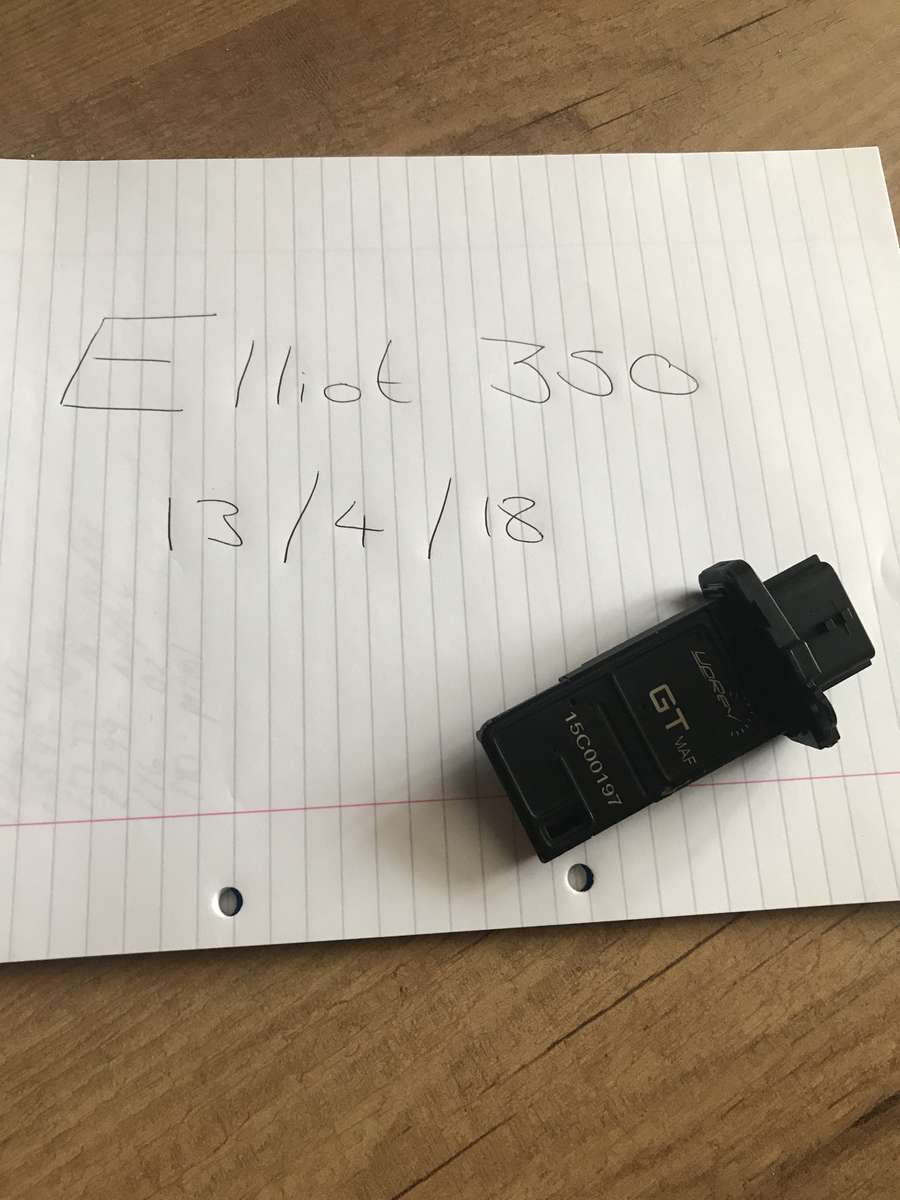
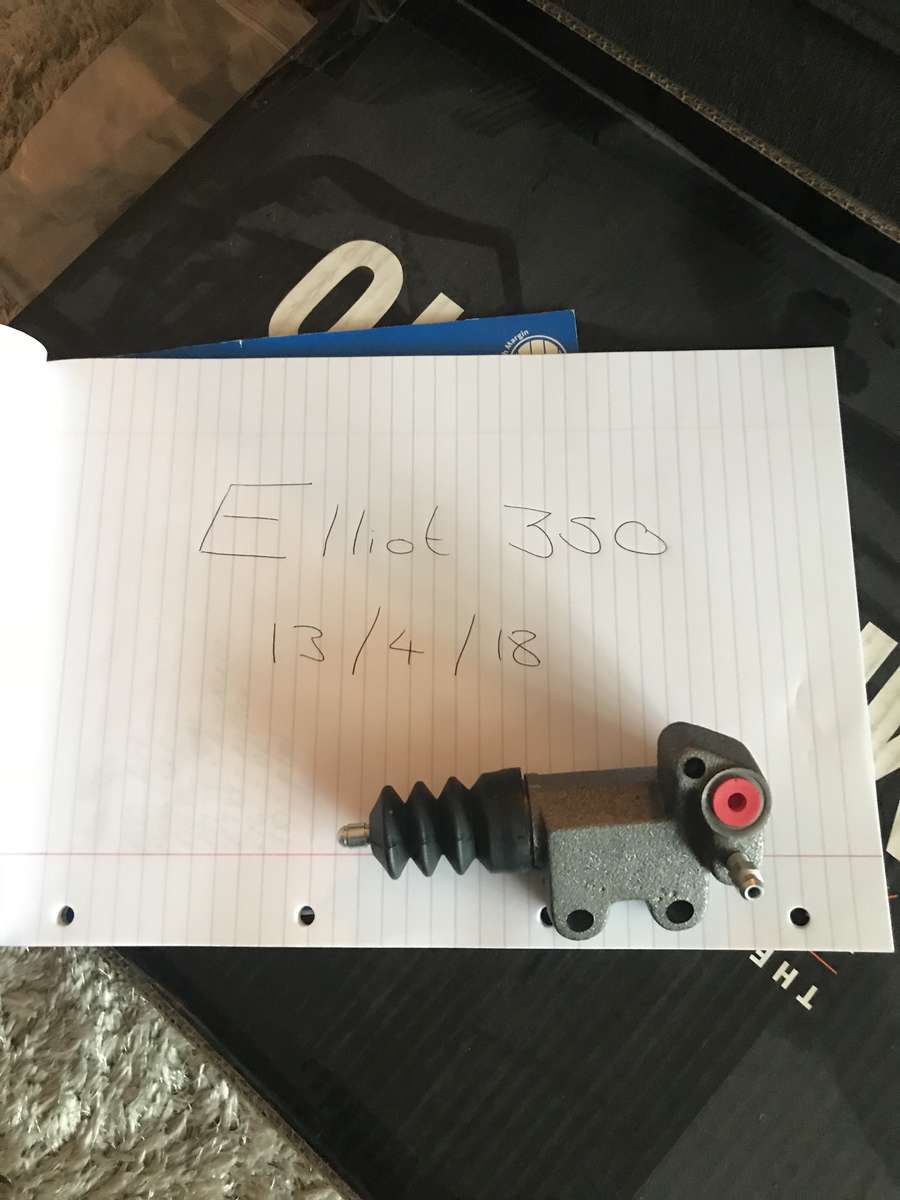
Hi guys Had these injectors for when I planned to turbo my DE 350. Here goes... Injector Dynamics 1000cc injectors x6. all brand new in the packaging with plugs to re pin the oem injector loom, dog leg leads can be purchased if you don’t want to affect the factory wiring. Believe these should be good for 600hp plus! £500 would prefer these to be collected due to the value of them. located in Kent ME3 Cheers Elliot

-
Hi guys, its a long shot but am after a STILLEN supercharger for my DE. Mainly as an alternative to doing my custom turbo set up as the money required to complete this is just too much. If anyone has a kit about and is looking to sell then I’d be very interested. Cheers Elliot
-
Gunmetal 350z build, 04 plate gt pack
Elliot350 replied to Elliot350's topic in Member Build Projects
A little more preparation getting ready for eventual turbo install have mounted the FPR to the back of the fire wall. Hoping to get the return line run and modifed bucket fitted soon. The front chain cover was looking really 'brown' and tired; bit of elbow grease with some steel wool and wire brush has cleaned it up a little. Unless the engine ever gets removed it will most probably stay as is, otherwise I'd love to get it painted up!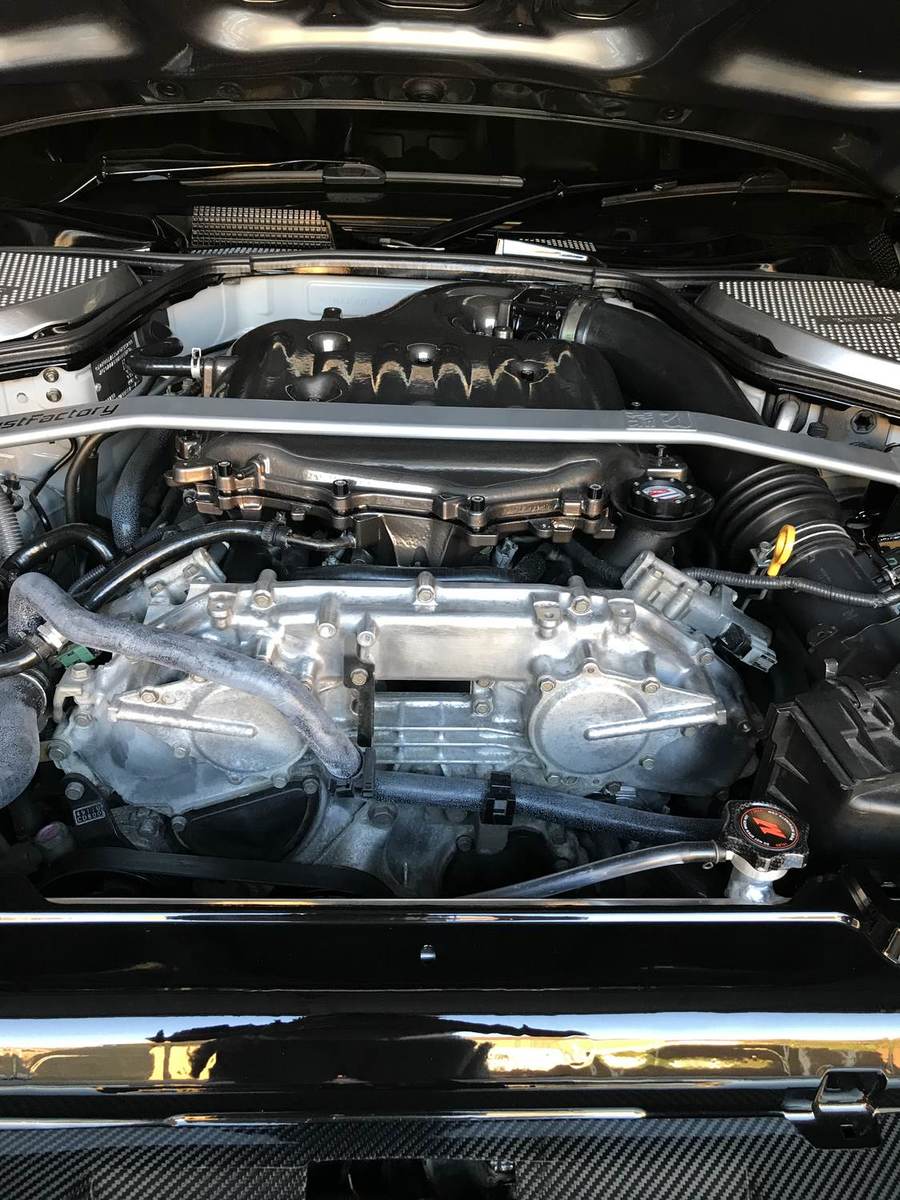
-
Gunmetal 350z build, 04 plate gt pack
Elliot350 replied to Elliot350's topic in Member Build Projects
I hate textured plastics, on most of my cars have had the scuttle painted along with most other plastics lol! -
Gunmetal 350z build, 04 plate gt pack
Elliot350 replied to Elliot350's topic in Member Build Projects
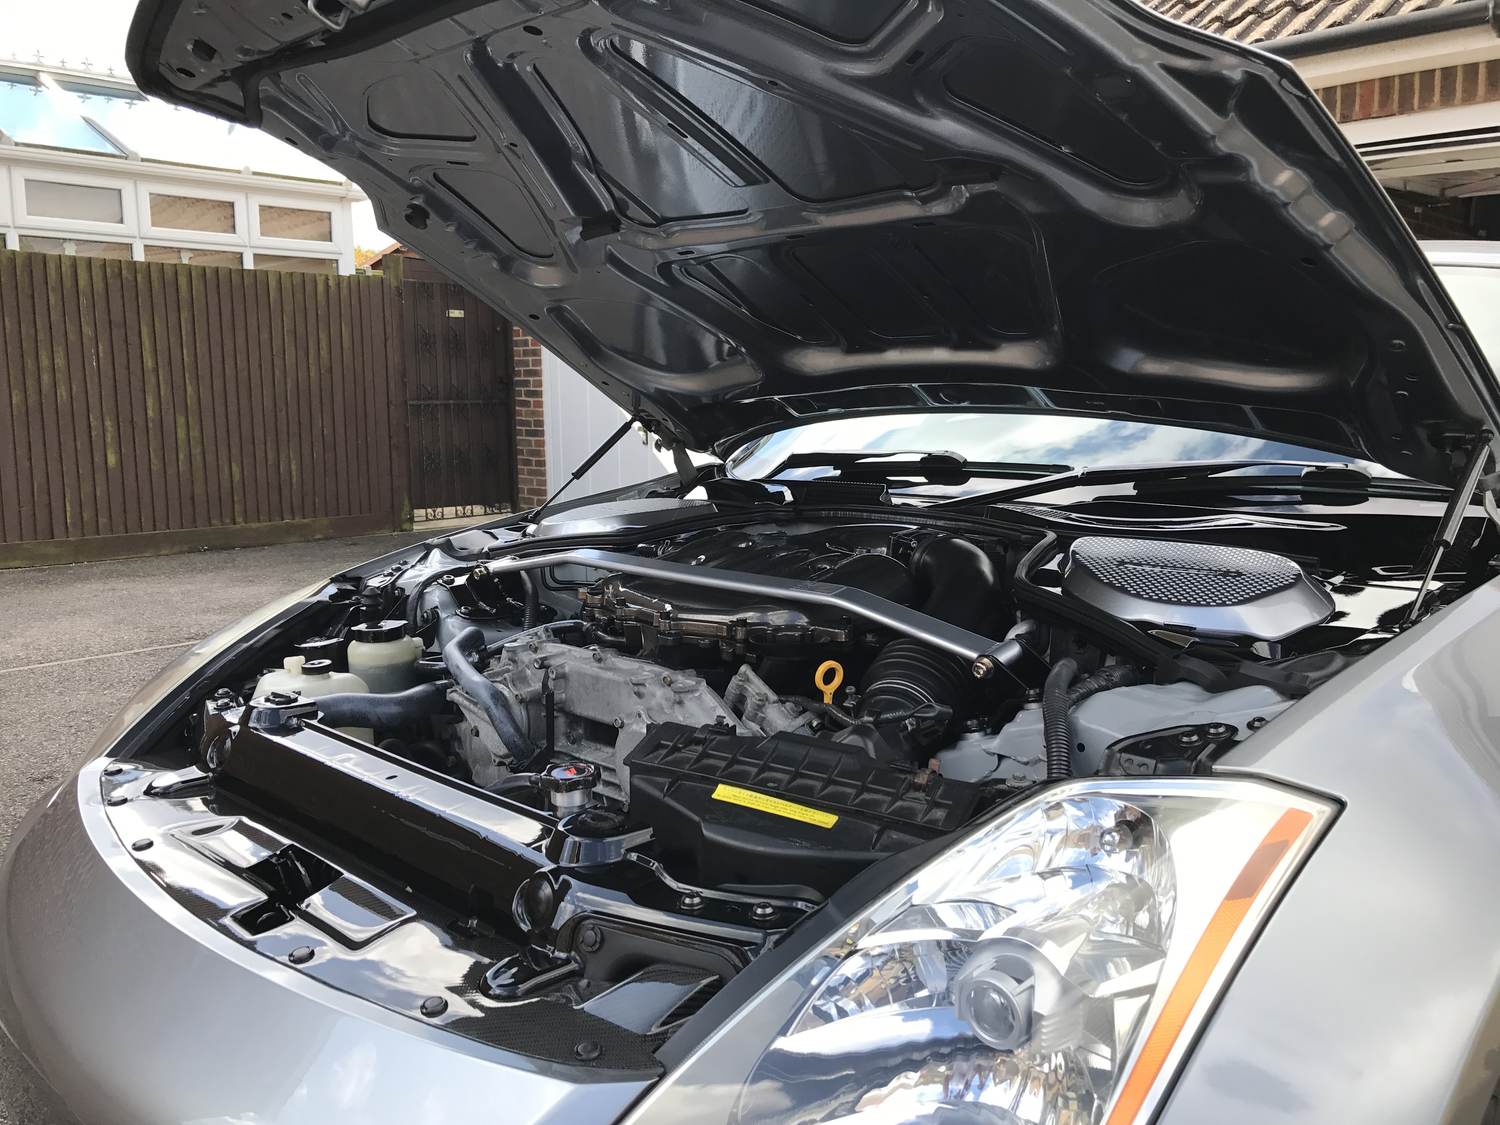
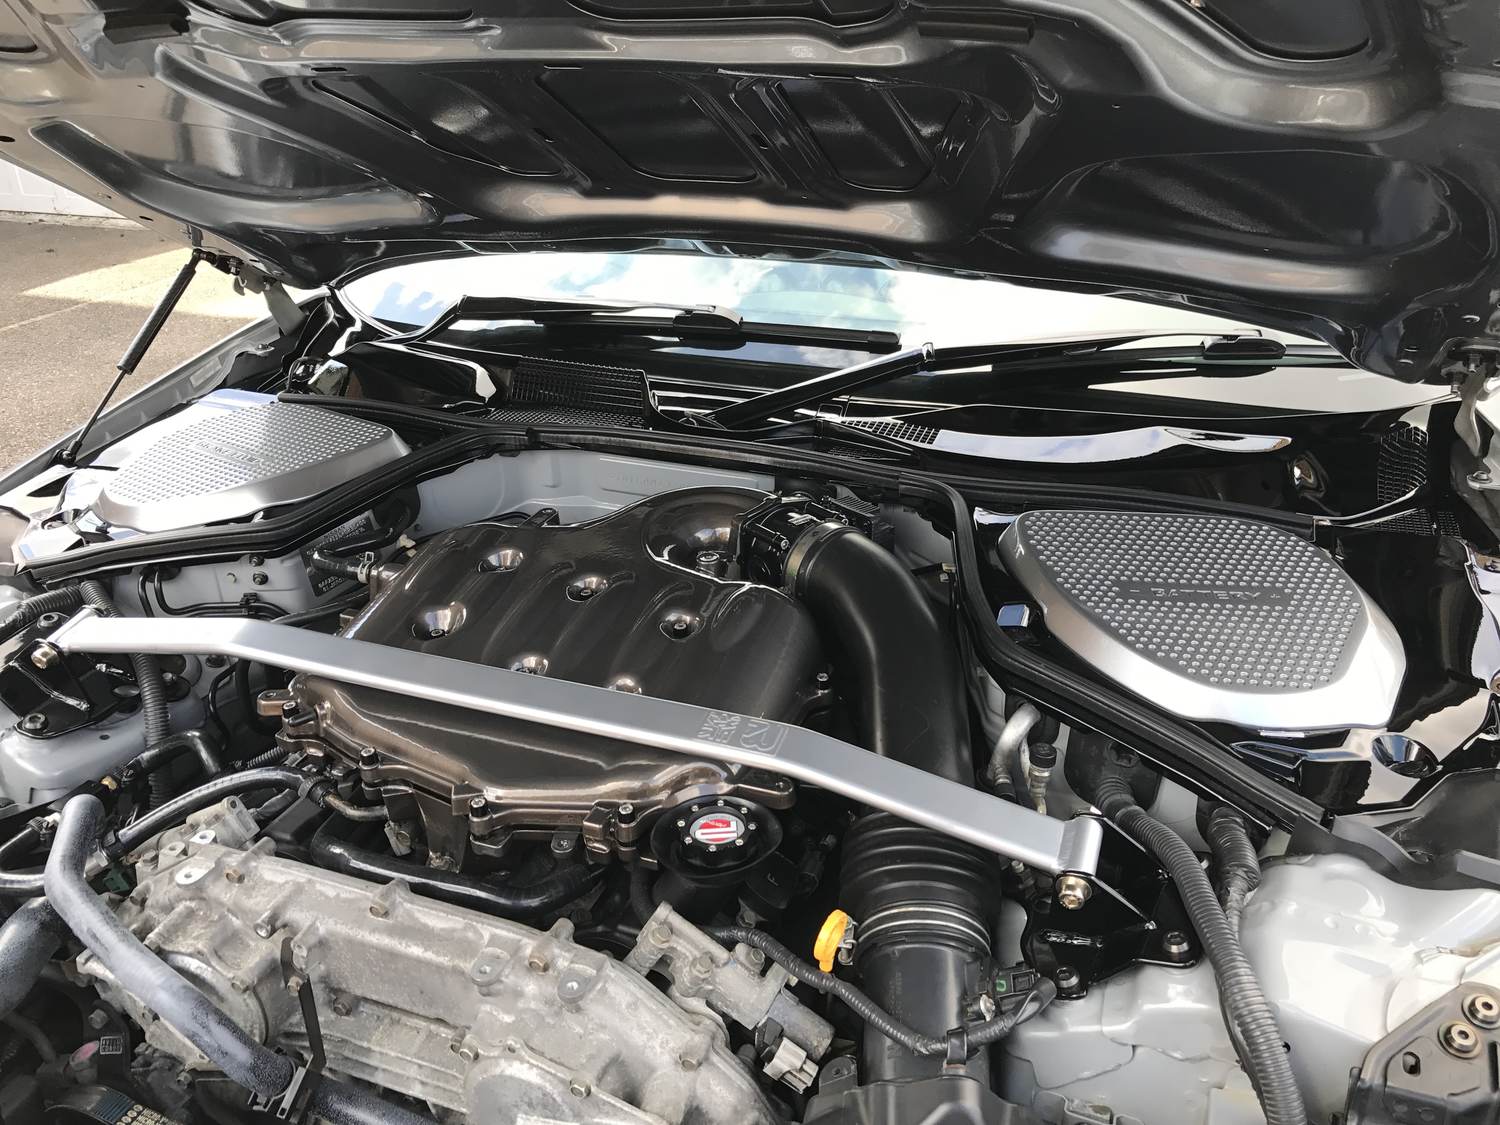
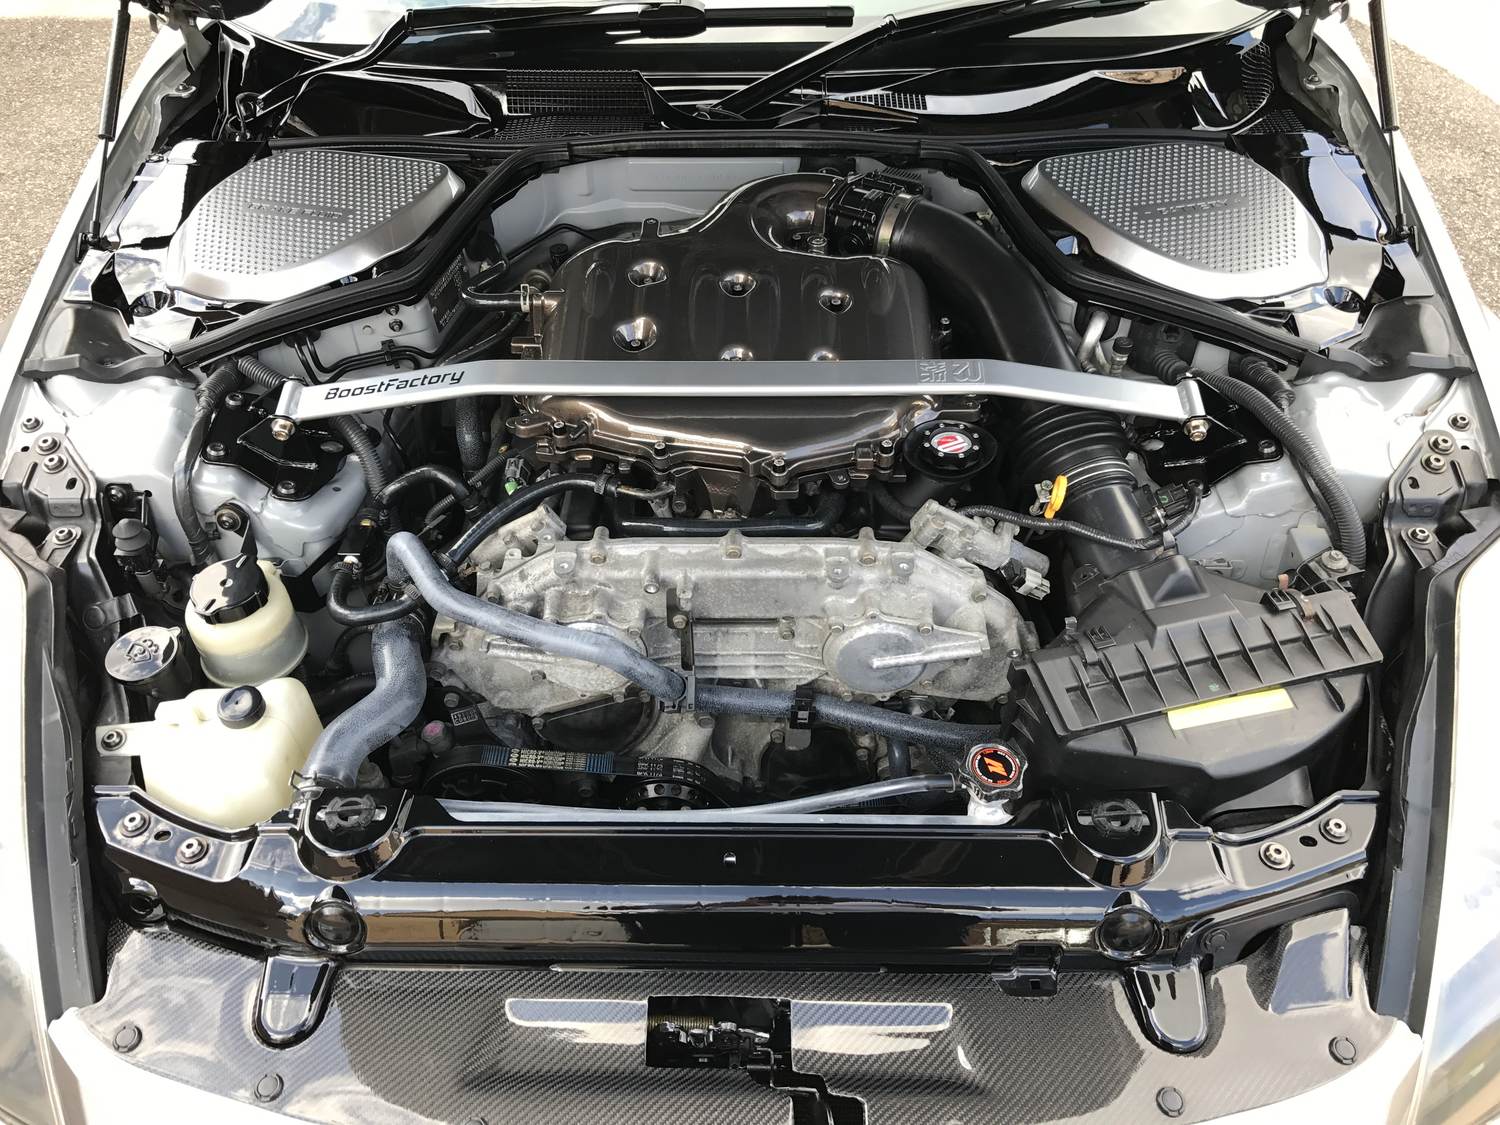
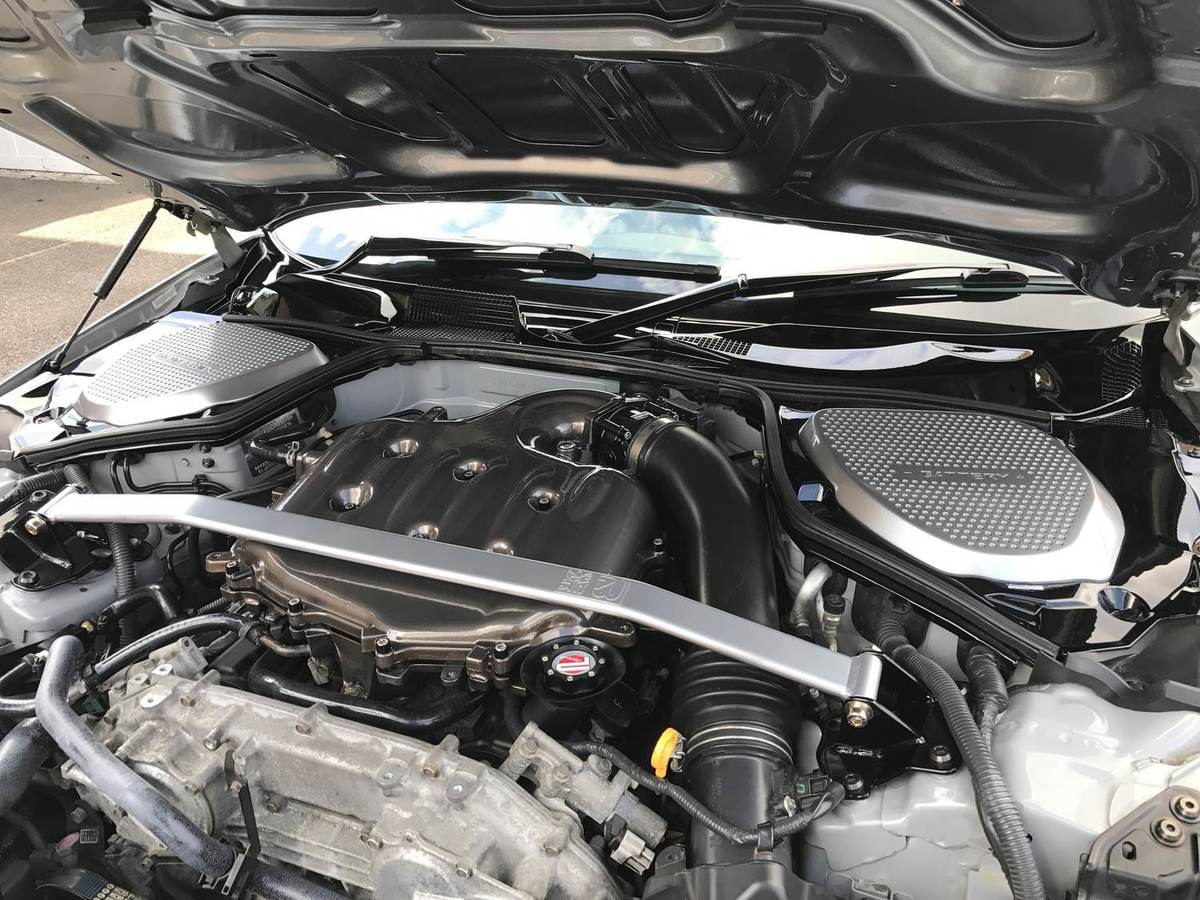
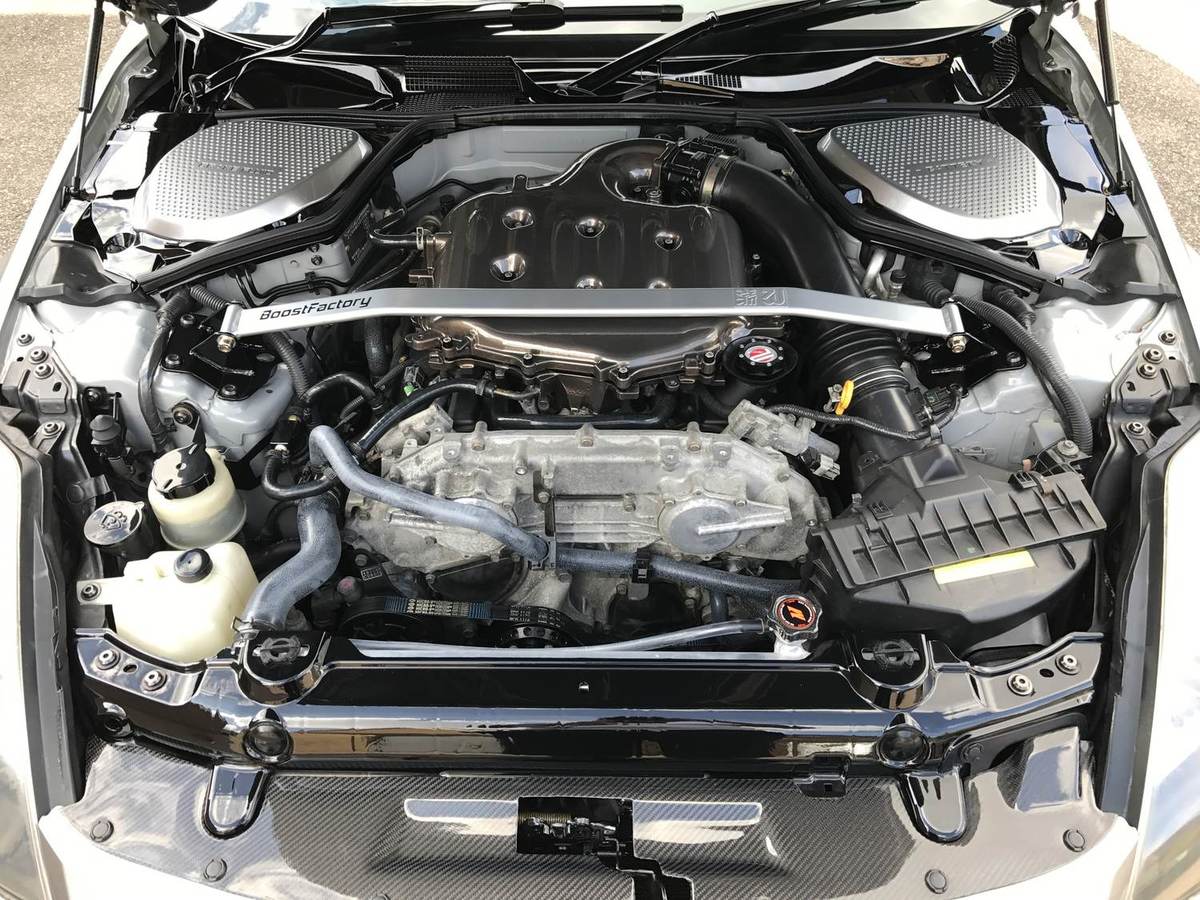
Please excuse all the posts, the way of posting photos to forums seems to get harder and harder!! Last but not least have some pictures of the engine bay as it stands. Coolant hoses are due to be changed as they have gone funny (toxic Nissan fluids!). Am pleased with under the bonnet now, in my opinion is close to how I think it should have looked from factory. Let me know what you all think. Cheers Elliot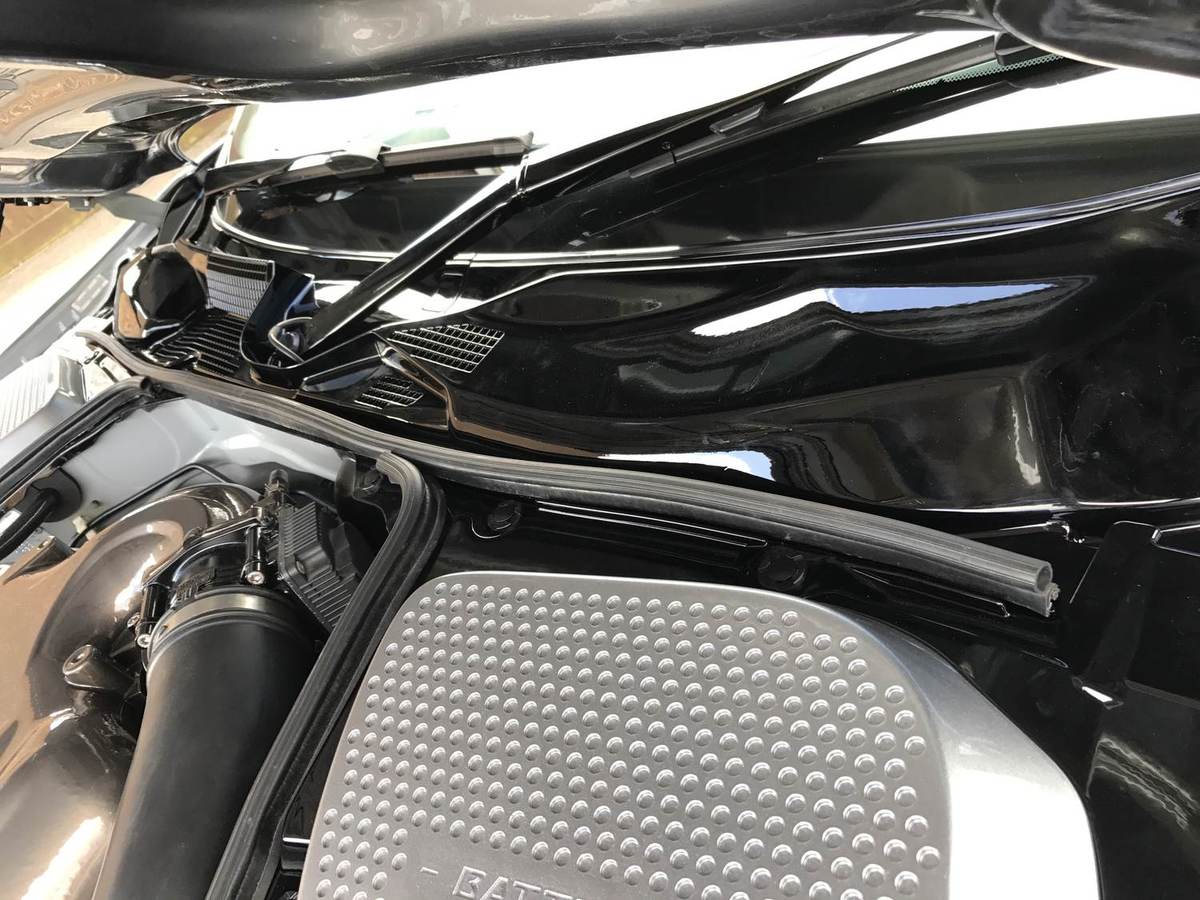


-
Gunmetal 350z build, 04 plate gt pack
Elliot350 replied to Elliot350's topic in Member Build Projects
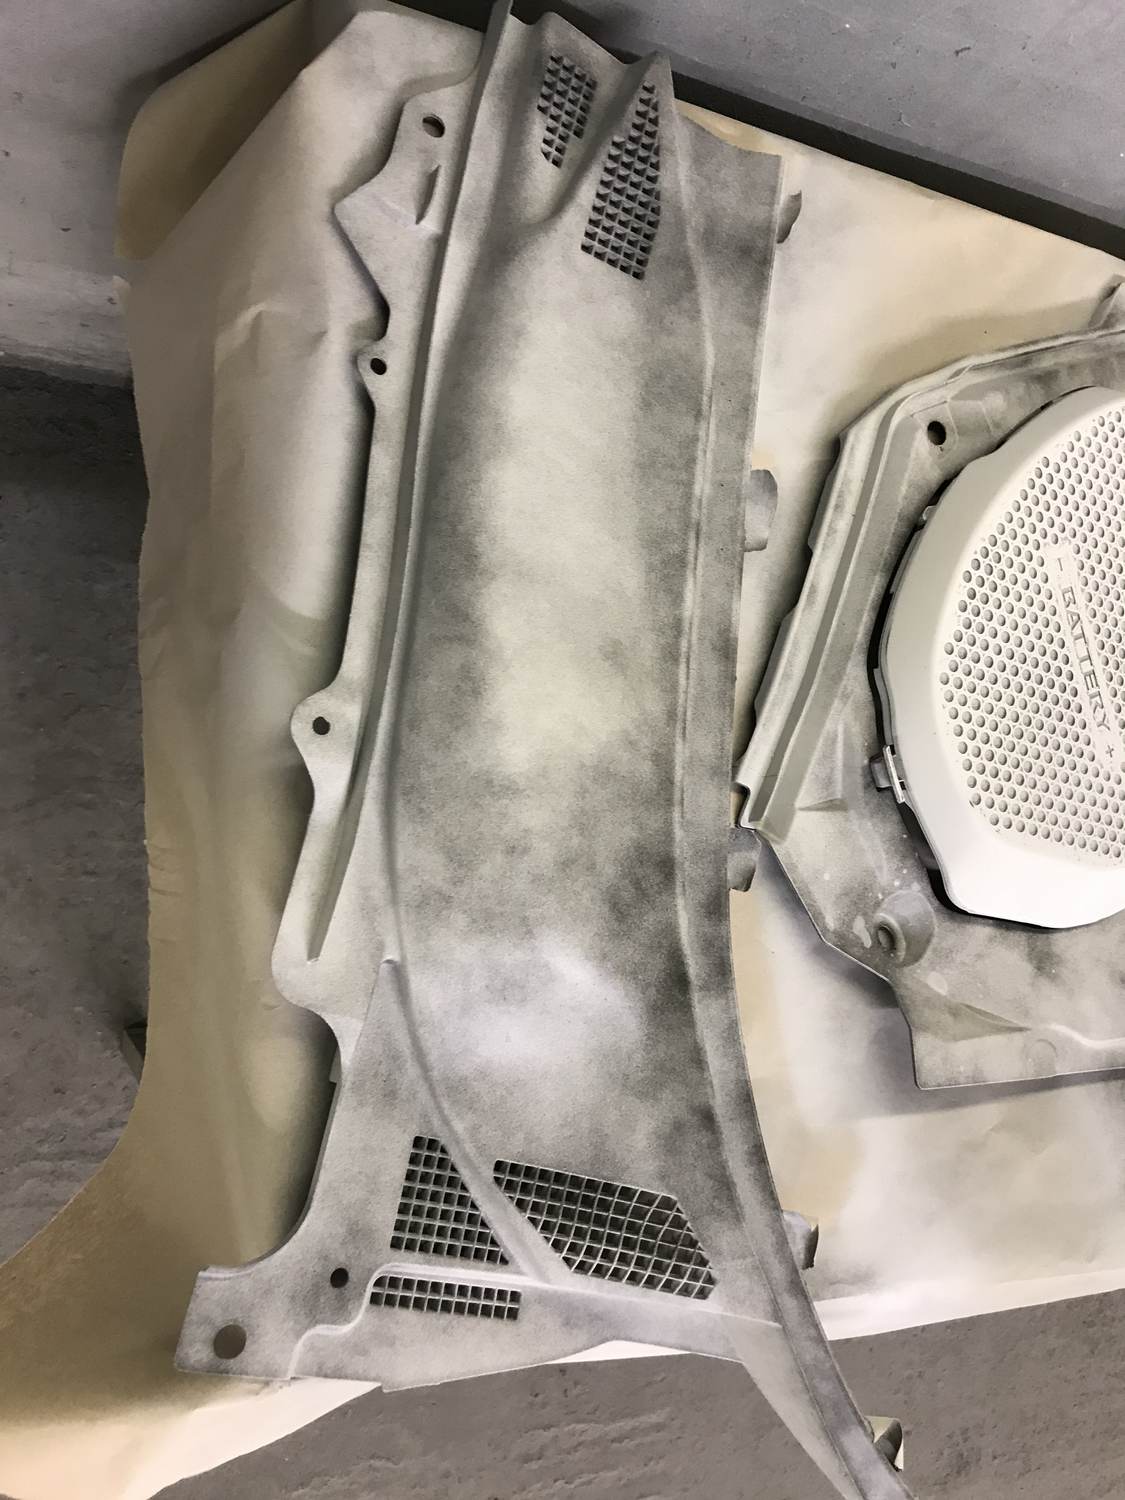
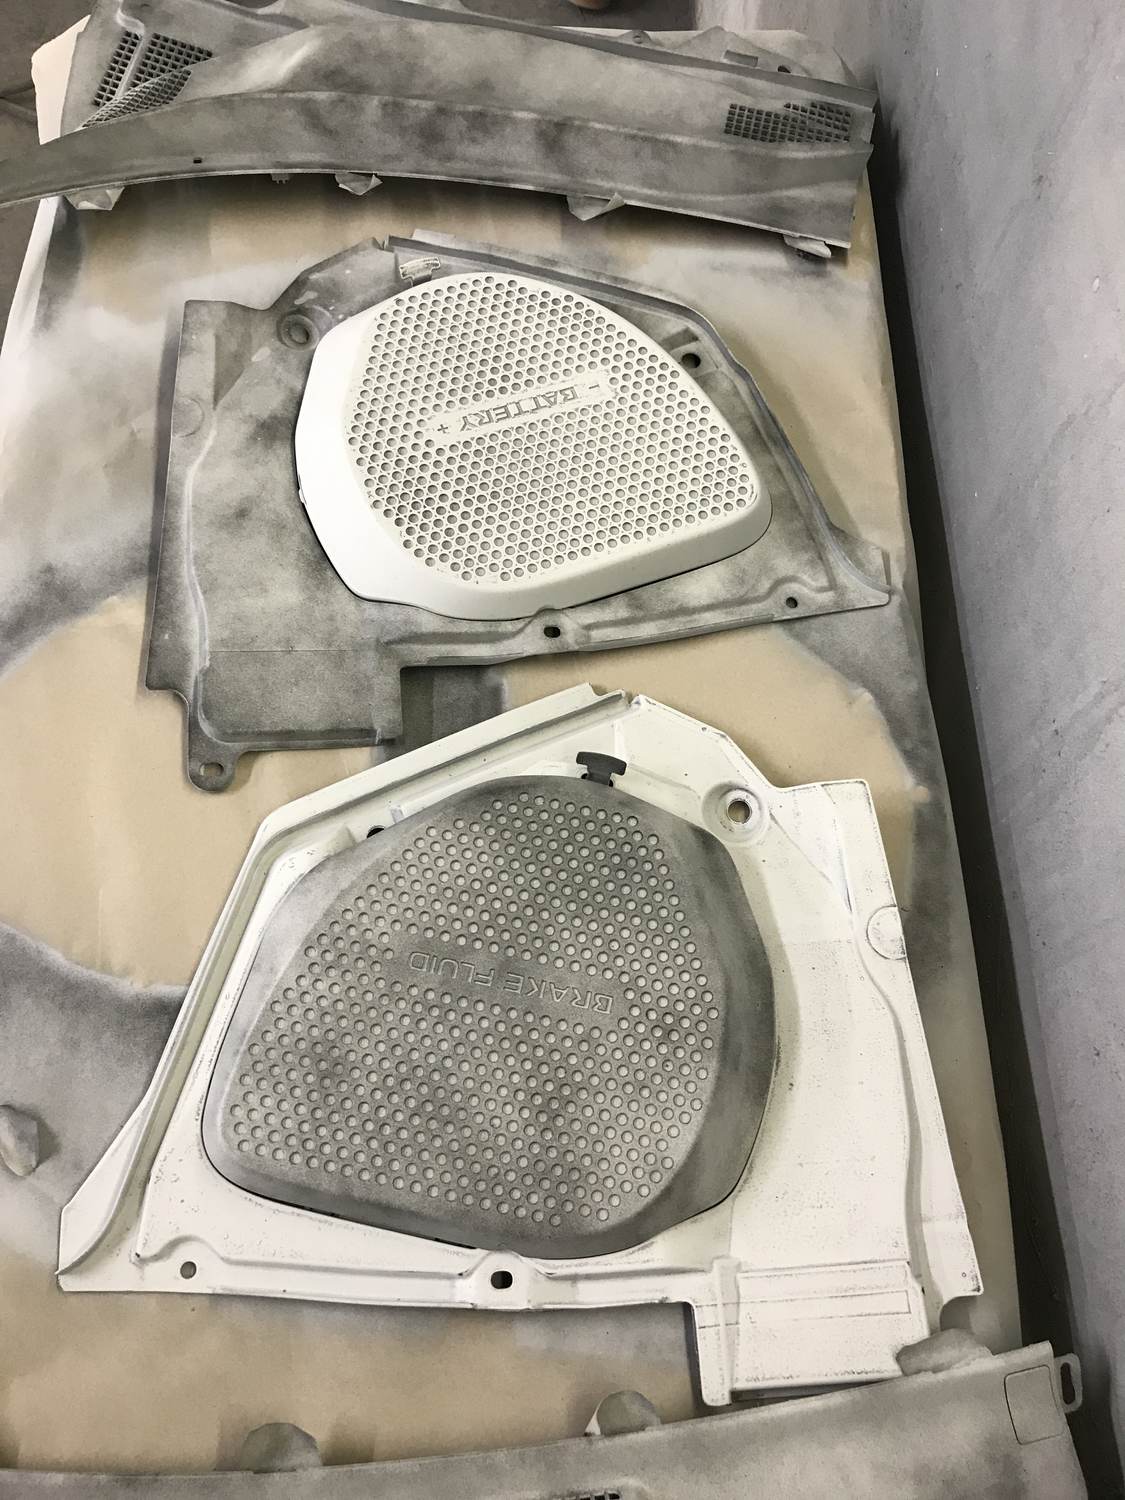
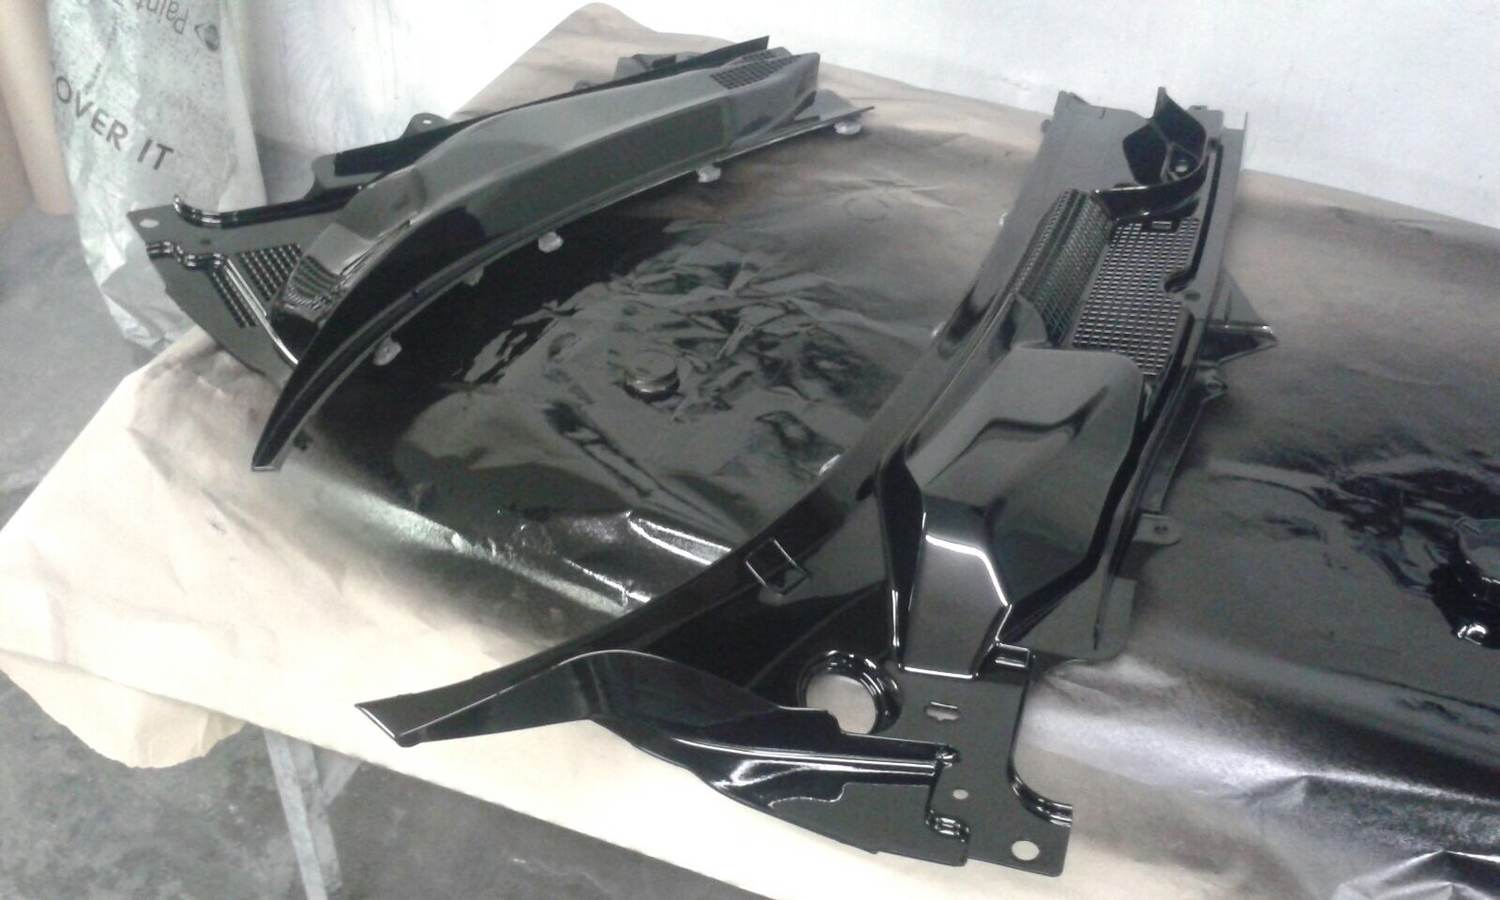
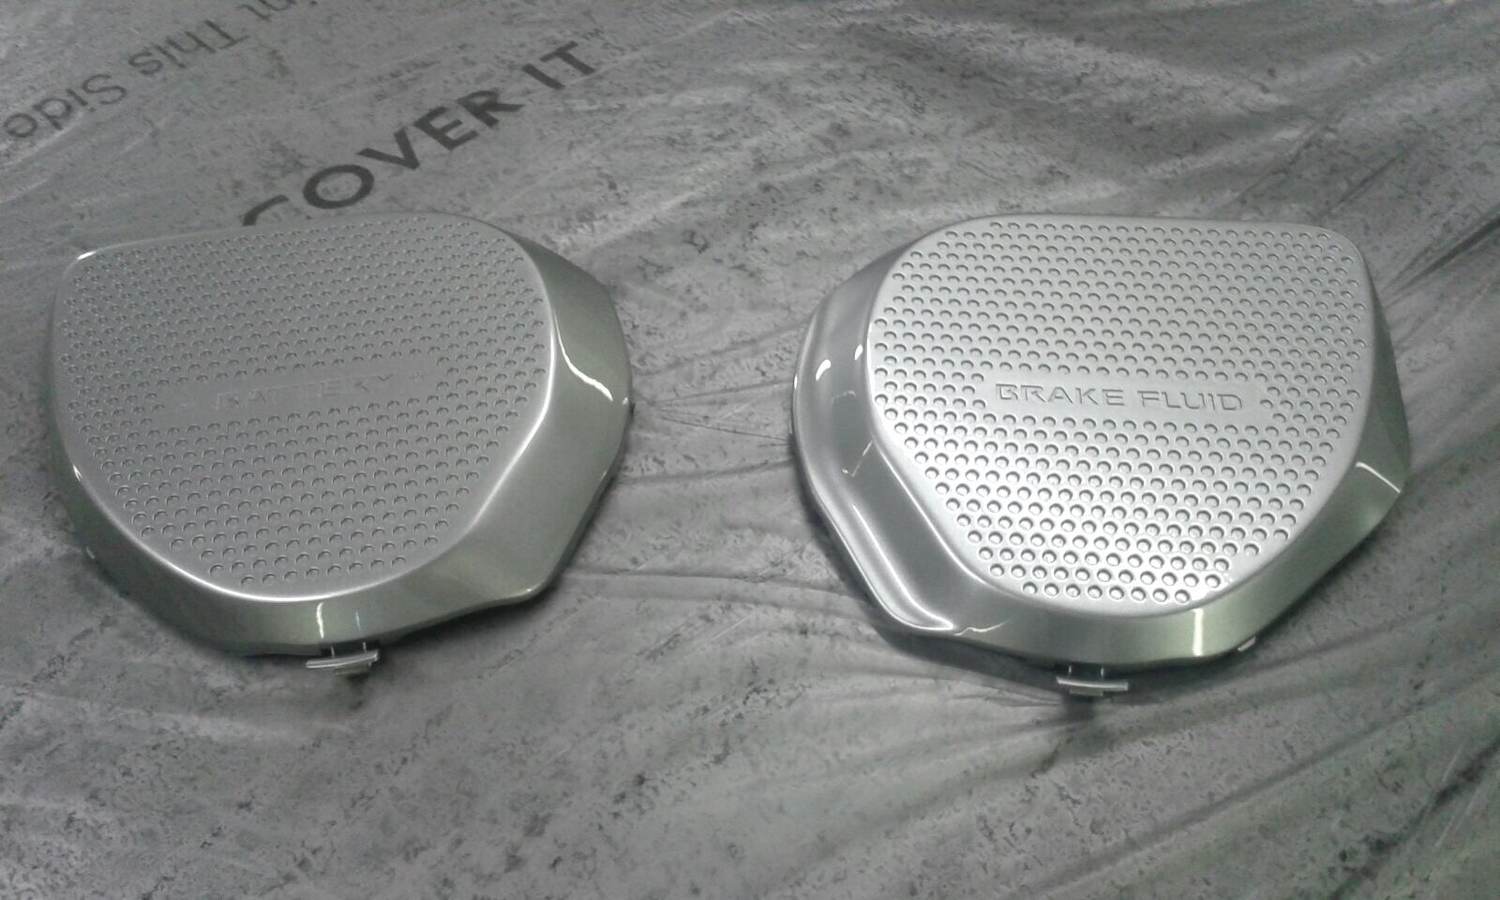
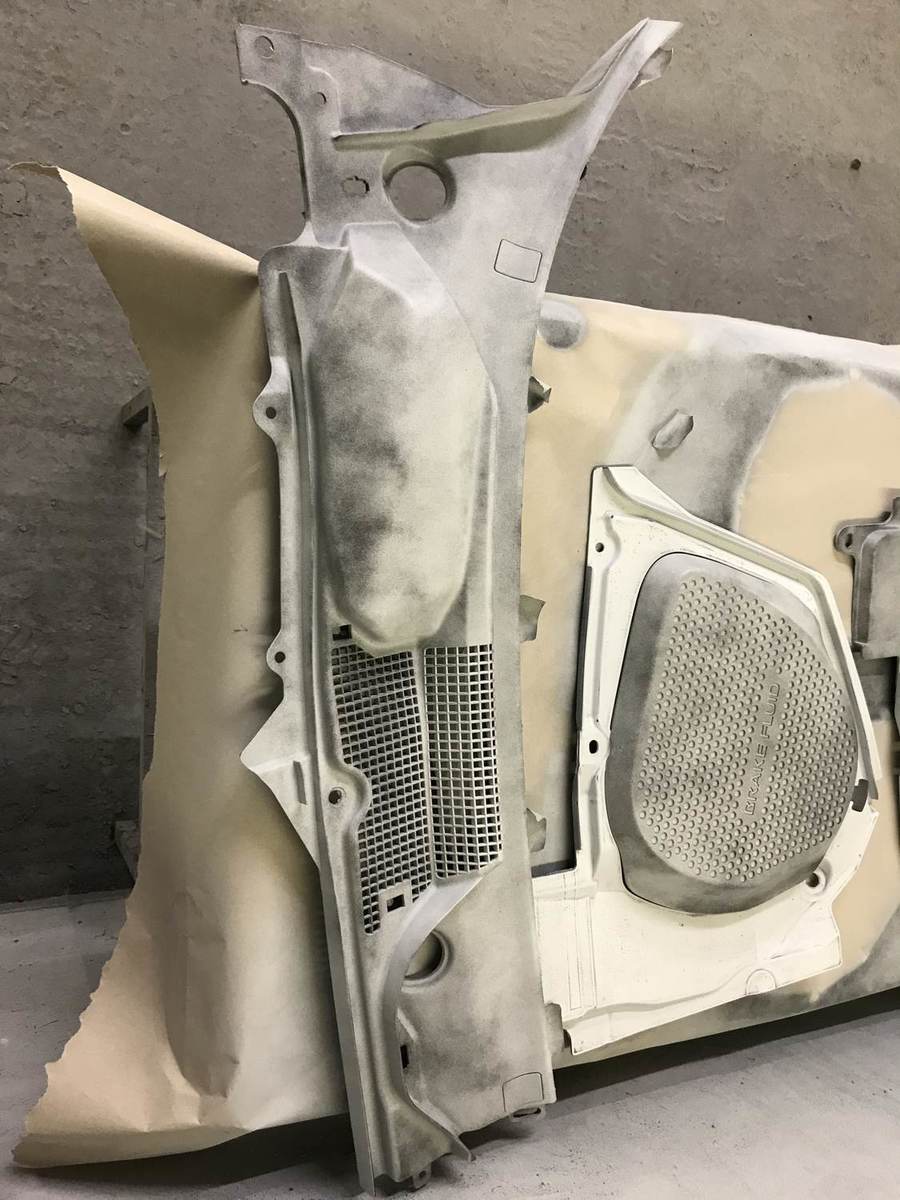
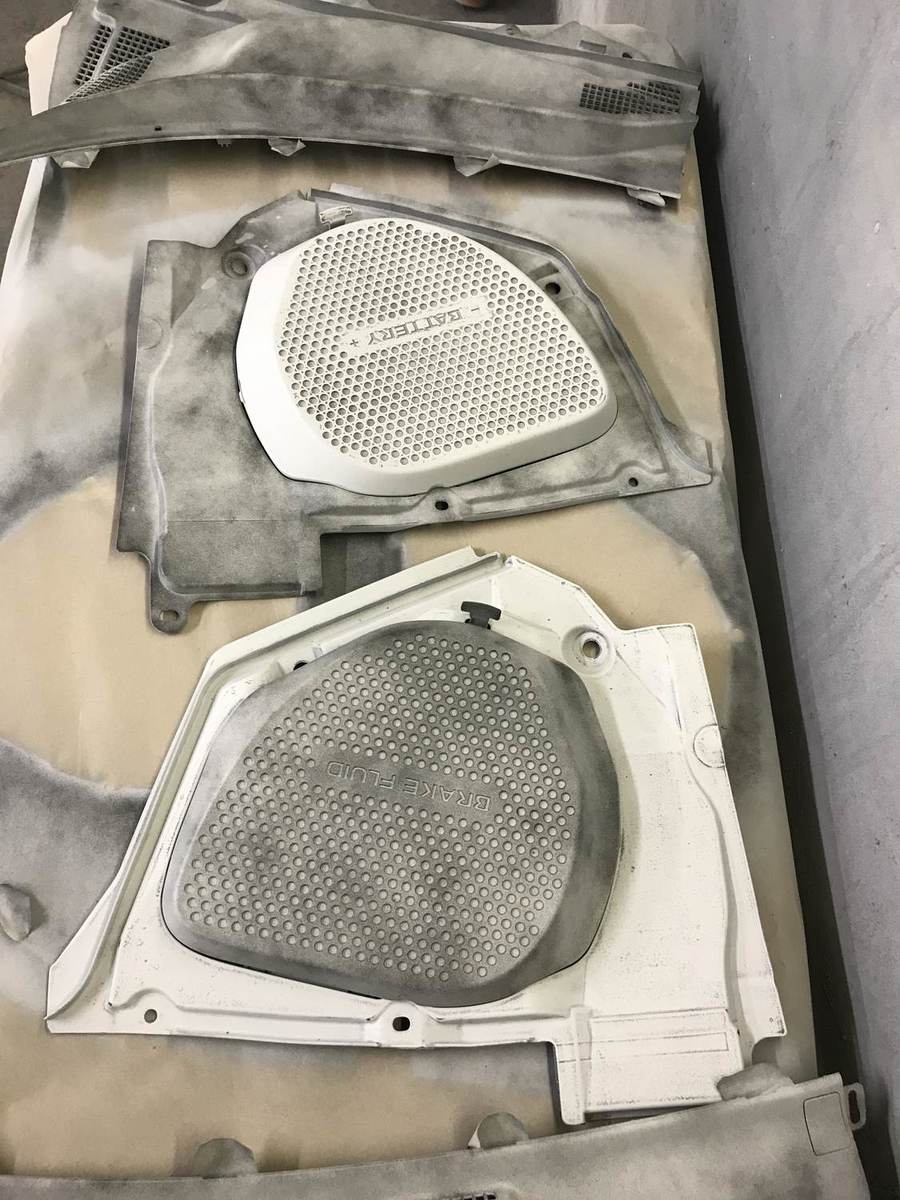
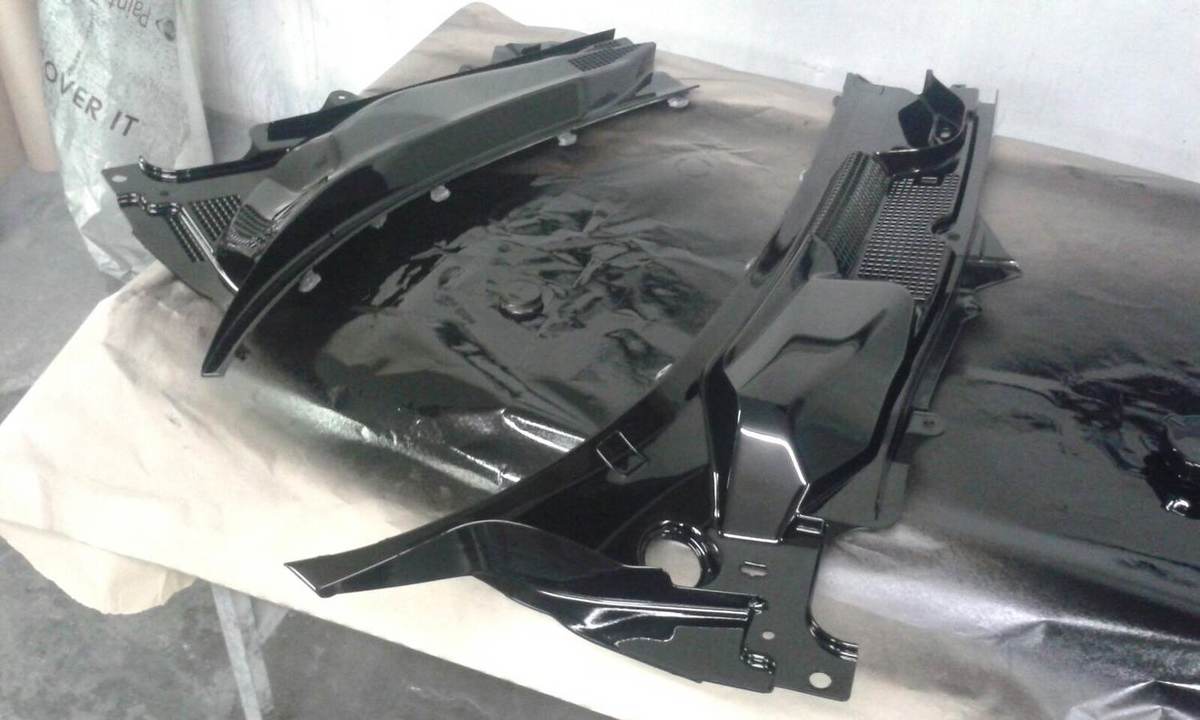
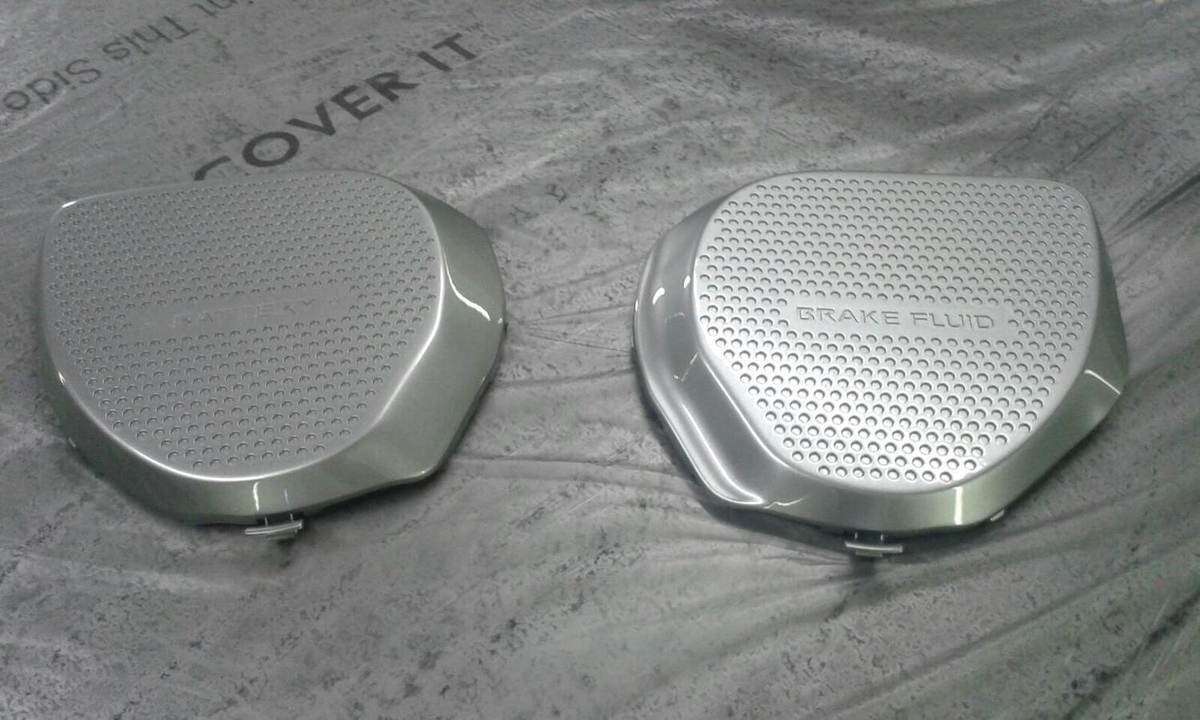
After having a broken A pillar window trim for the best part of two years and having no window rubber installed on the passenger side it was time to drop her off with my mate to get it sorted. While it was there I decided to have the windscreen scuttle painted black along with the battery and brake covers freshened up at the same time. Along with some smooth caps to complete the look in the engine bay. First off all plastics were prepared, adhesion promoter applied and primed and guide coated ready for more flatting! once the guide coat had been flatted back they were ready to be painted in 2k solid gloss black.... The battery and brake reservoir covers were painted body colour to break up the black a little. Am over the moon with the finish and completed look. No need for any back to black silicone spray anymore!! Cheers Elliot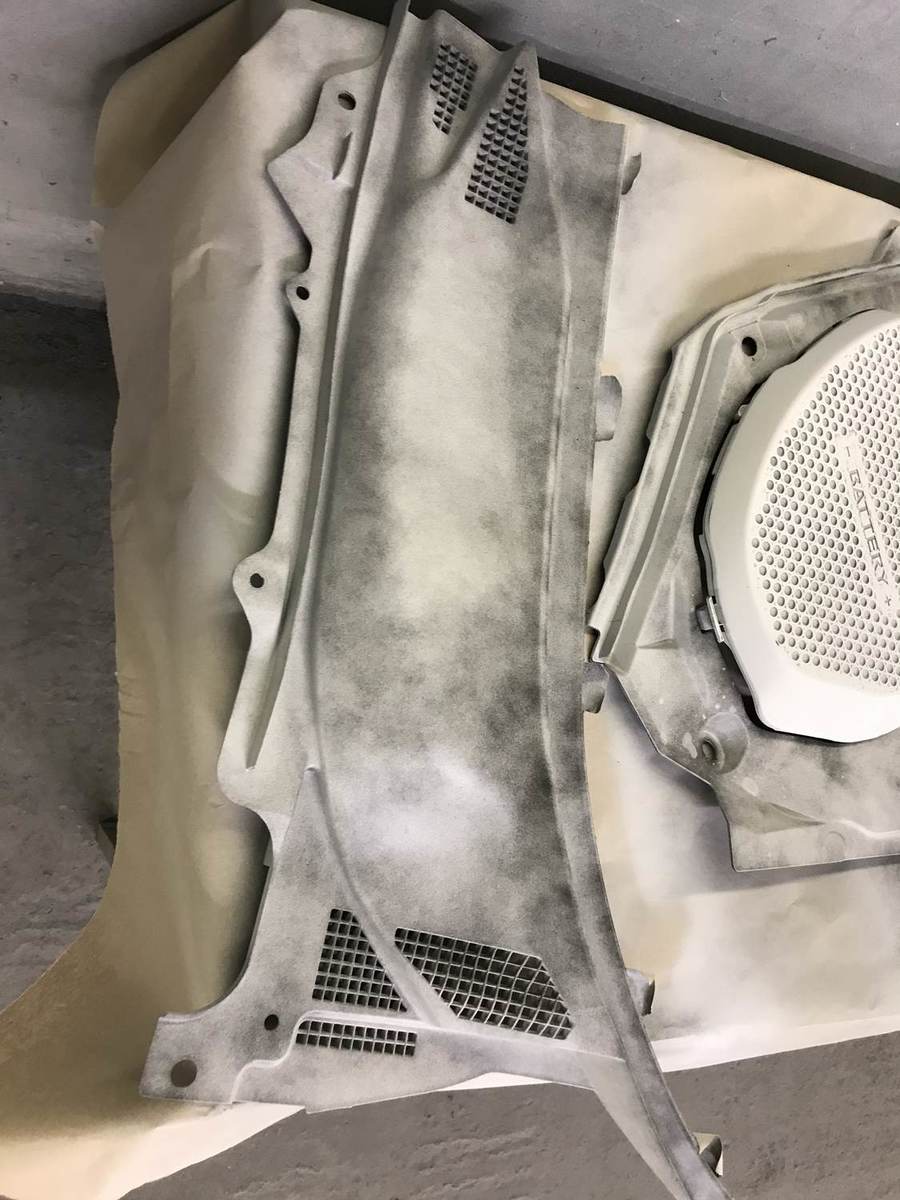
-
Gunmetal 350z build, 04 plate gt pack
Elliot350 replied to Elliot350's topic in Member Build Projects
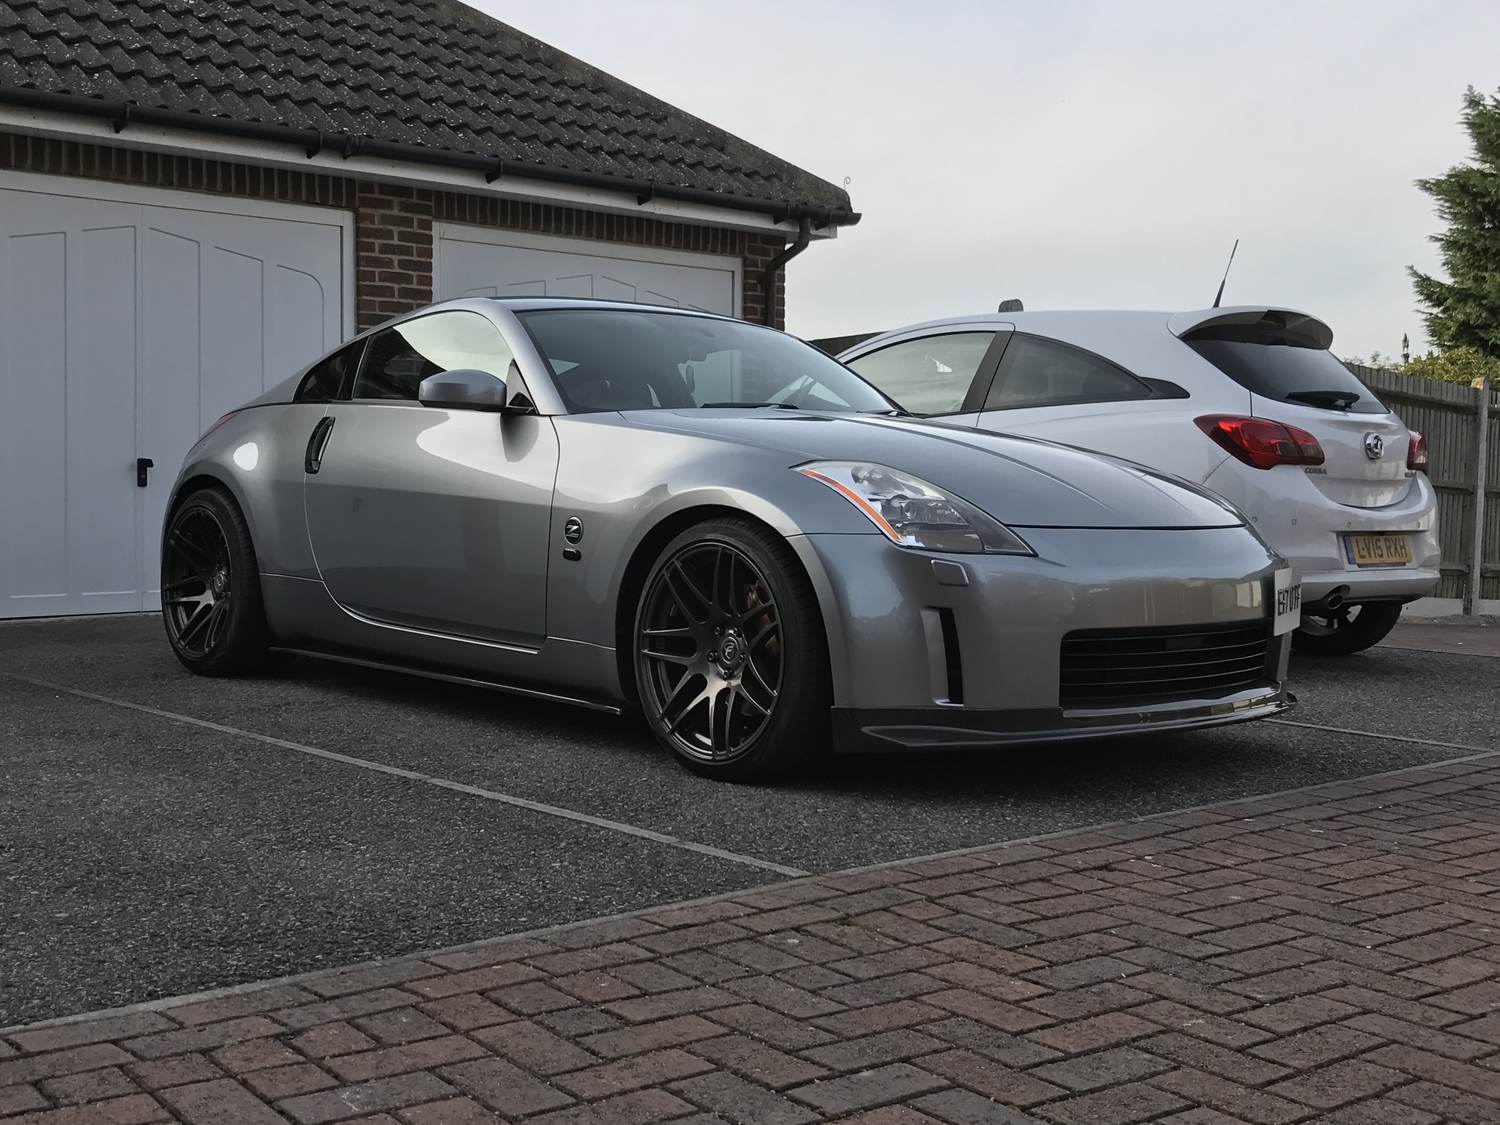
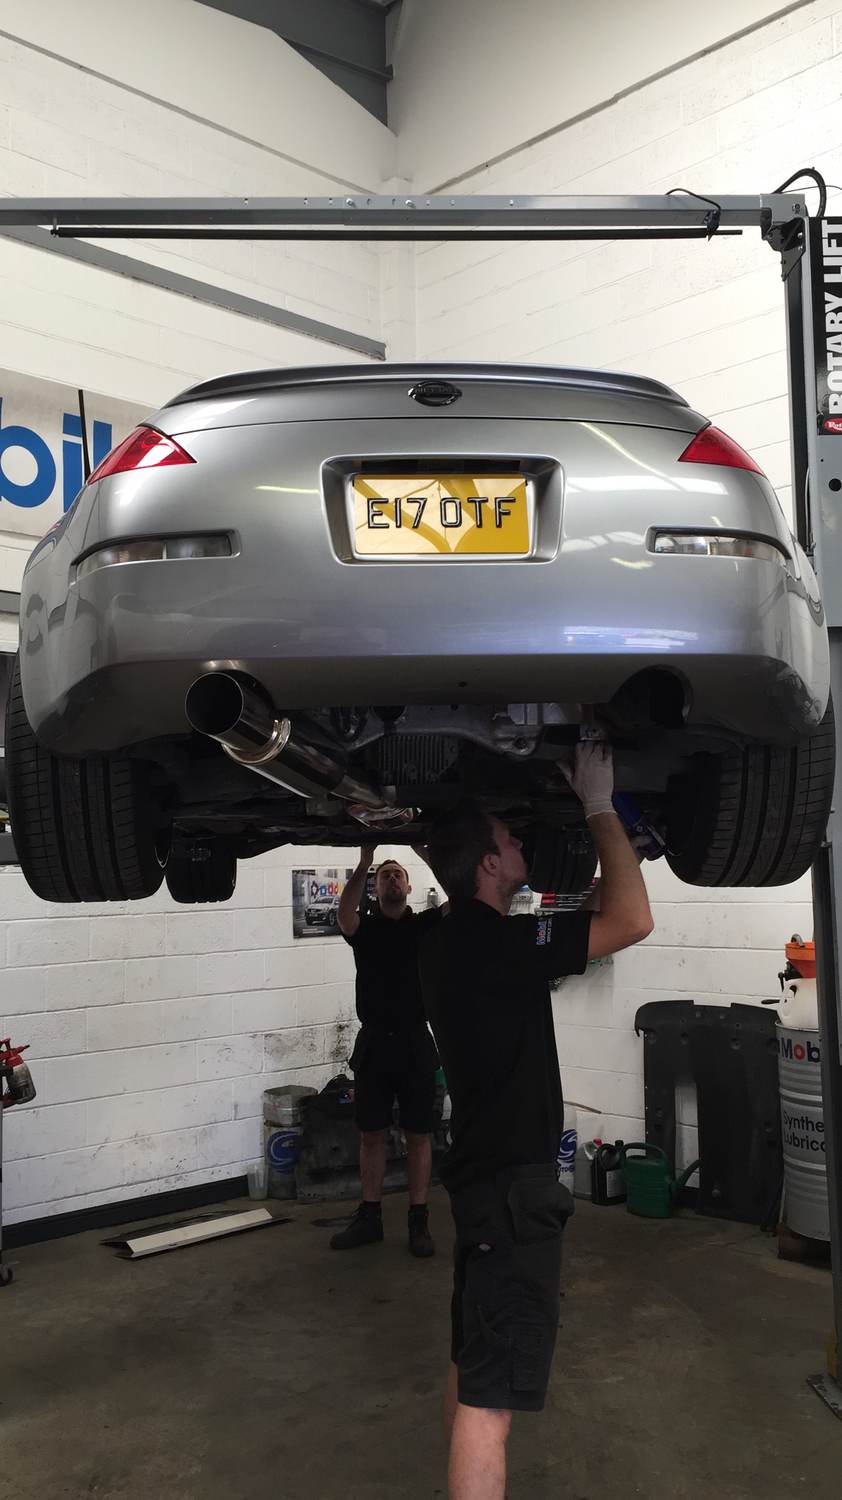
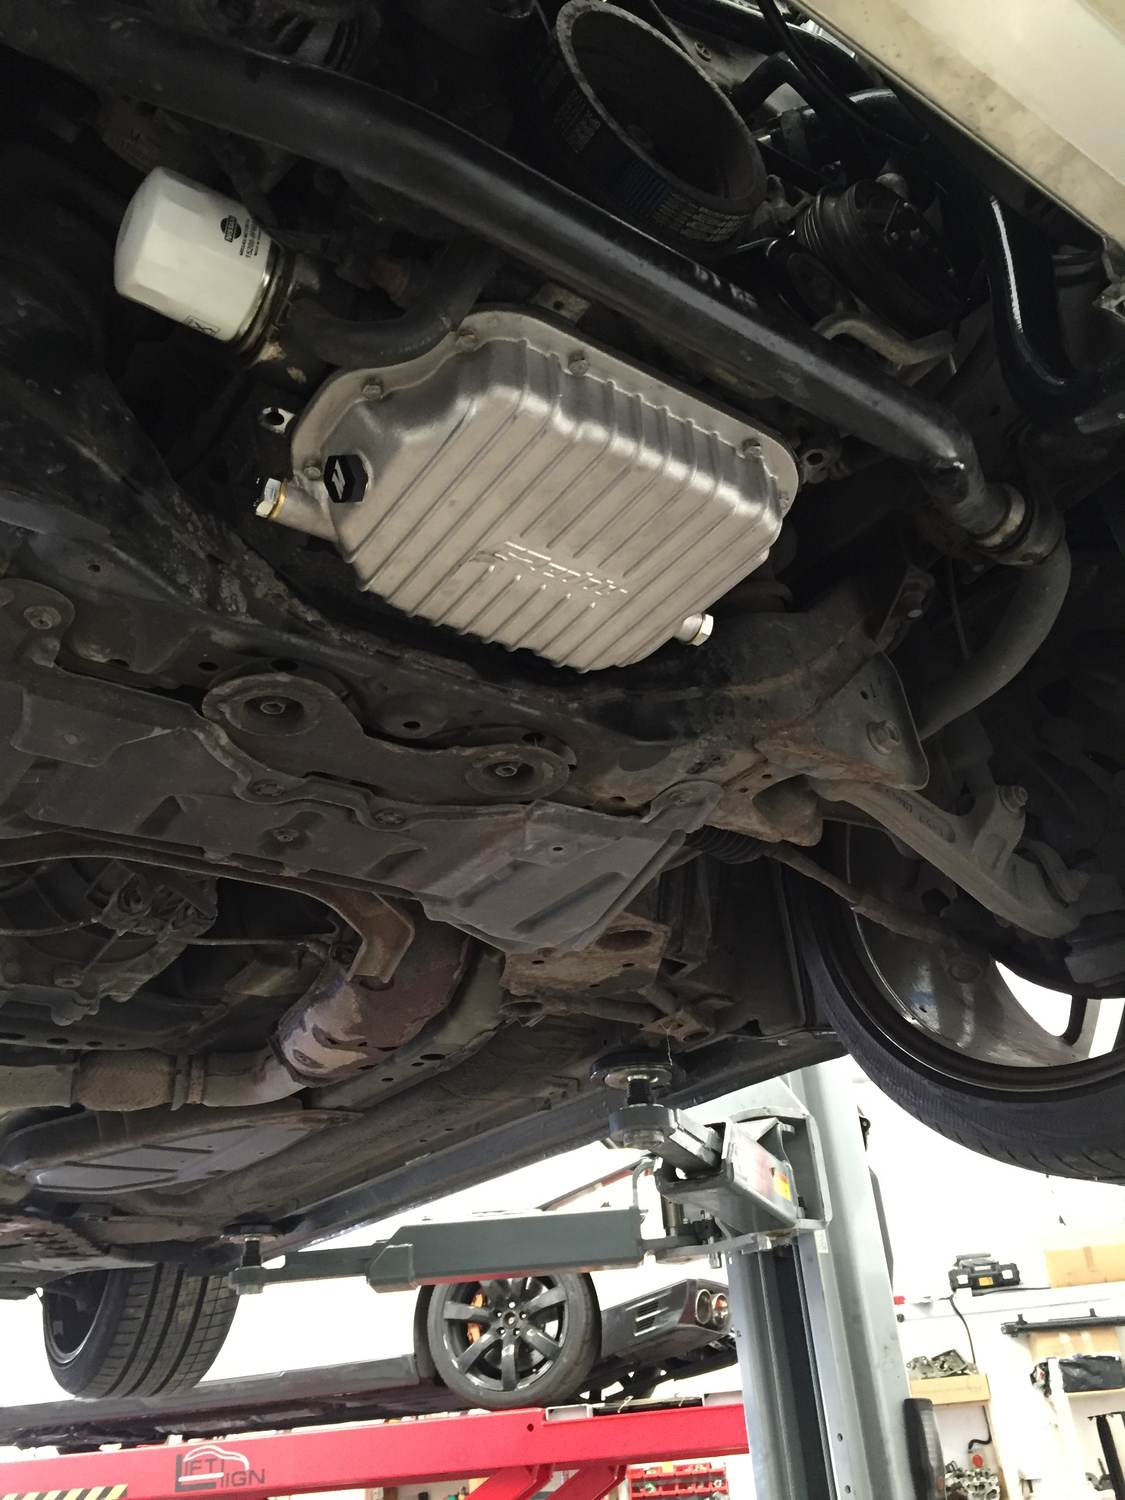
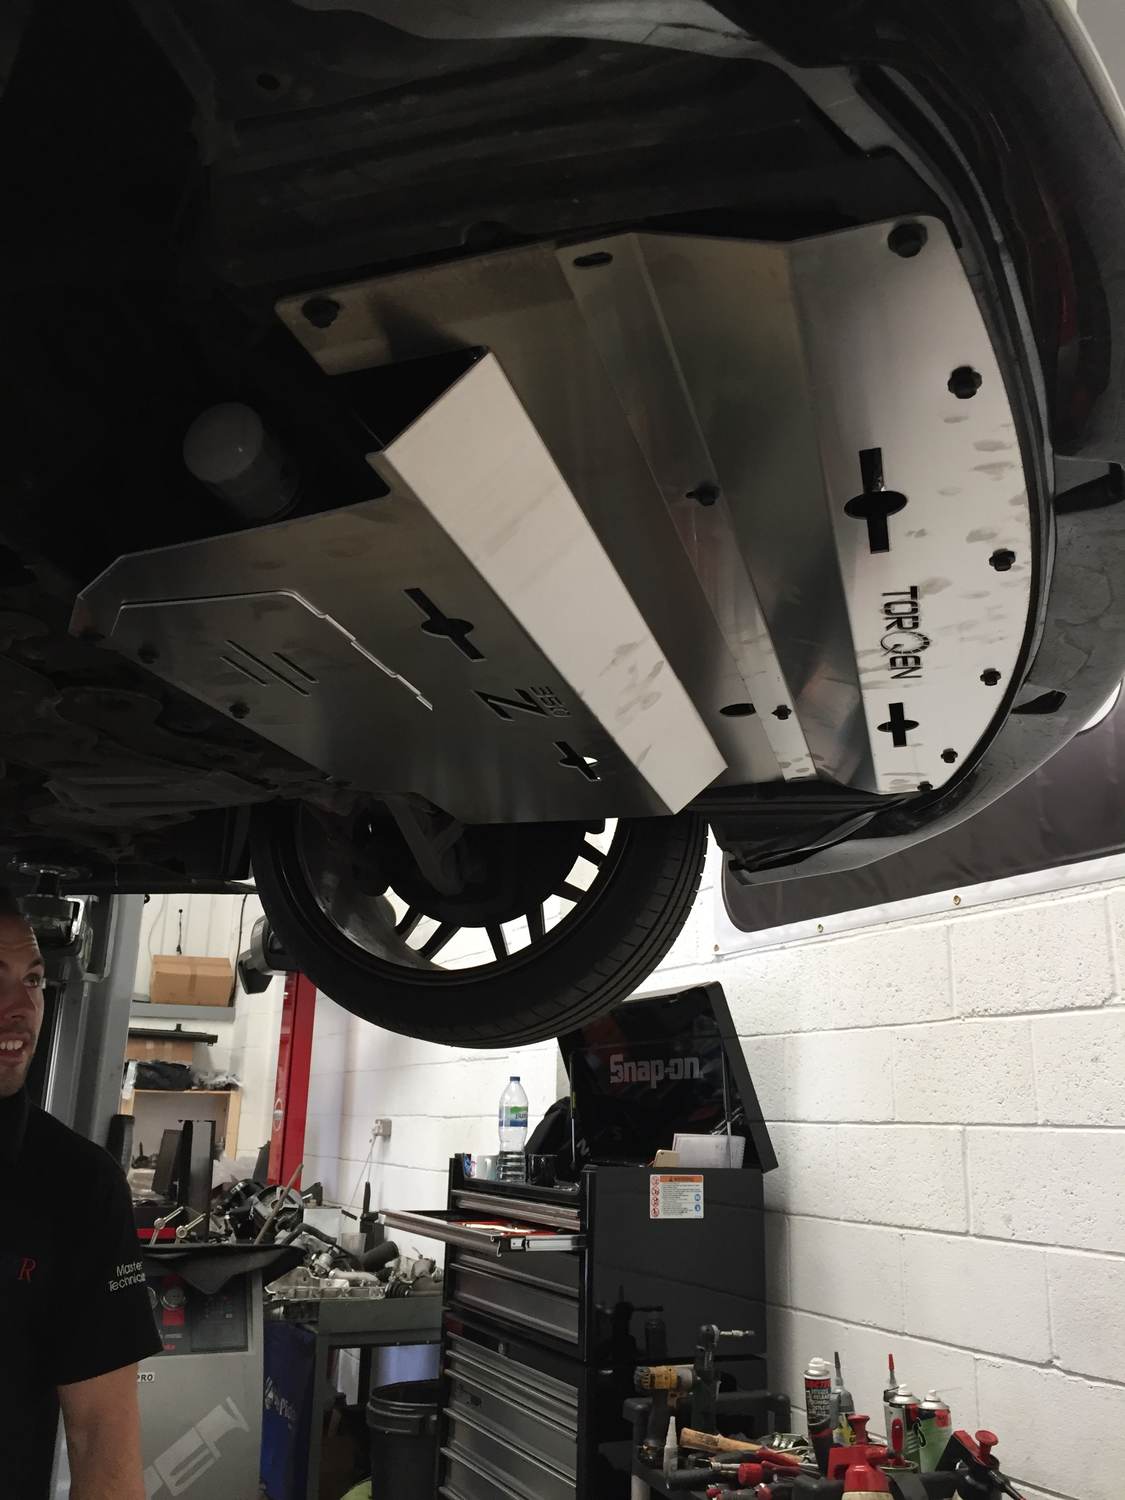
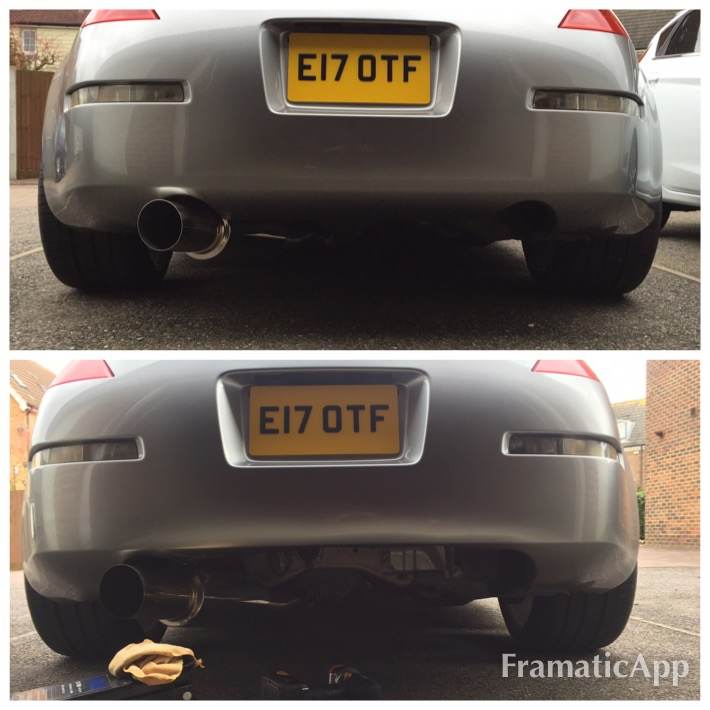
Hi guys, been a long time since I've updated this thread so it must be about time I put some new stuff up. Way back last year in September I took the car up the road to Sly at kaiser motors for a service and a couple of other bits. While it was there they fitted a Greddy sump, torqen undertray, new rear droplinks, carried out I believe a p3 service and sorted an MOT out. Top work by the guys! Heres a few progress pictures, car on the lift and the guys in action. after a bit of TLC and progress the car then sat in the garage again for much of the winter without much being done. Having fitted a single exit ISR exhaust on the car it was crying out for a bumper tuck, I understand single exit isn't to many Zedders tastes but I'm quite a fan, and like the JDM look that it gives the car; which I'm kind of going for. More to come guys! Cheers Elliot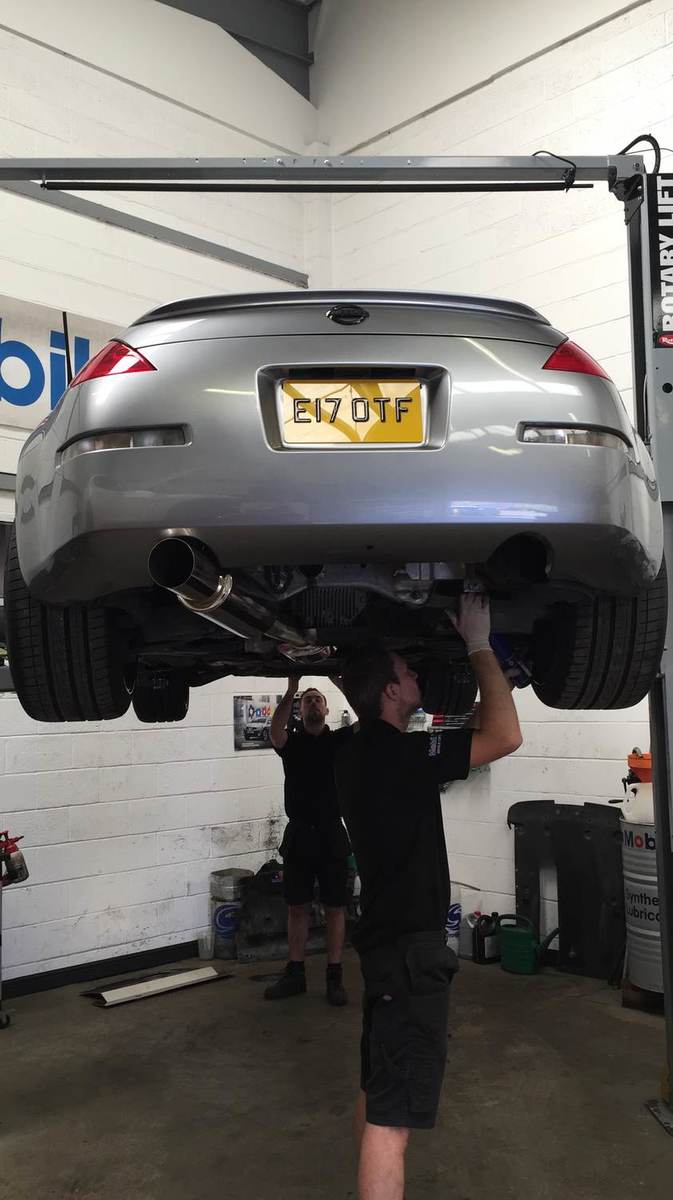


-
Put me down for a black one for 2004 pre-facelift 350z Adrian
-
http://www.350z-uk.com/topic/66319-inevitable-going-the-fi-way-now-done-update-13052013/page__st__280#entry1044113 Look here I believe the 8th picture down in part 1 is what you're after. Simply loop one side in to the other where the two pipes would normally shoot off to the opposite side of the car to the other bottle.
-
custom d.i.y single turbo build? whos done it??
Elliot350 replied to LDUNKZ18's topic in Forced Induction
Snjur, the wastegate pipe will be routed back in to the exhaust downpipe. When I mentioned screamer pipe I meant the wastegate outlet pipe. As you say screamers are all well good but I personally prefer the more subtle side of things. -
custom d.i.y single turbo build? whos done it??
Elliot350 replied to LDUNKZ18's topic in Forced Induction
I am in the process of building my own single turbo kit. Basically going to be copying the soho Motorsport design regarding pipe work etc. have been quoted for the fabrication of the boost and exhaust pipework at a price of 2.5k that's all made from 316 stainless steel and includes a catback single exit exhaust system. Screamer pipes; all the piping required. As it stands I have a precision 6266 gen2 billet wheel dual ball bearing tutbo, 1000cc ID injectors, greddy sump, CJM stage 0 fuel return, uprev maf, tial BOV, precision 44mm wastegate, one stage colder plugs, twin plate OS giken clutch, Mishimoto radiator and fans, treadstone intercooler, braided oil feed and return. Some parts have been fitted already others are waiting to be fitted. I want to get the car to the stage where its 100% ready for the fabrication guy to crack on. Hoping for it to be completed early next year and aiming for around 420bhp on 6-7psi of boost. -
350z Carbon Fibre Ducktail rear spoiler £750
Elliot350 replied to Tarmac@TarmacSportz's topic in Tarmac Sportz
Too aggressive for me..... The carbonsignal one on the other hand would have been perfect! -
OsGiken TS2BD Twin Plate Clutch and Flywheel
Elliot350 replied to Jetpilot's topic in 350z Parts For Sale
You have a pm -
Gunmetal 350z build, 04 plate gt pack
Elliot350 replied to Elliot350's topic in Member Build Projects
To top off the recent updates, a little job that had been really niggling me was that with the strut brace installed I couldn't tighten or undo my password JDM oil cap. Out came the hacksaw and some neat modifications..... It just about wouldn't fit under!!!! Cut in half on the mould join line Now fits like a glove! Another job ticked off the list and no need to remove the brace when doing an oil change in order to remove the cap! -
Gunmetal 350z build, 04 plate gt pack
Elliot350 replied to Elliot350's topic in Member Build Projects
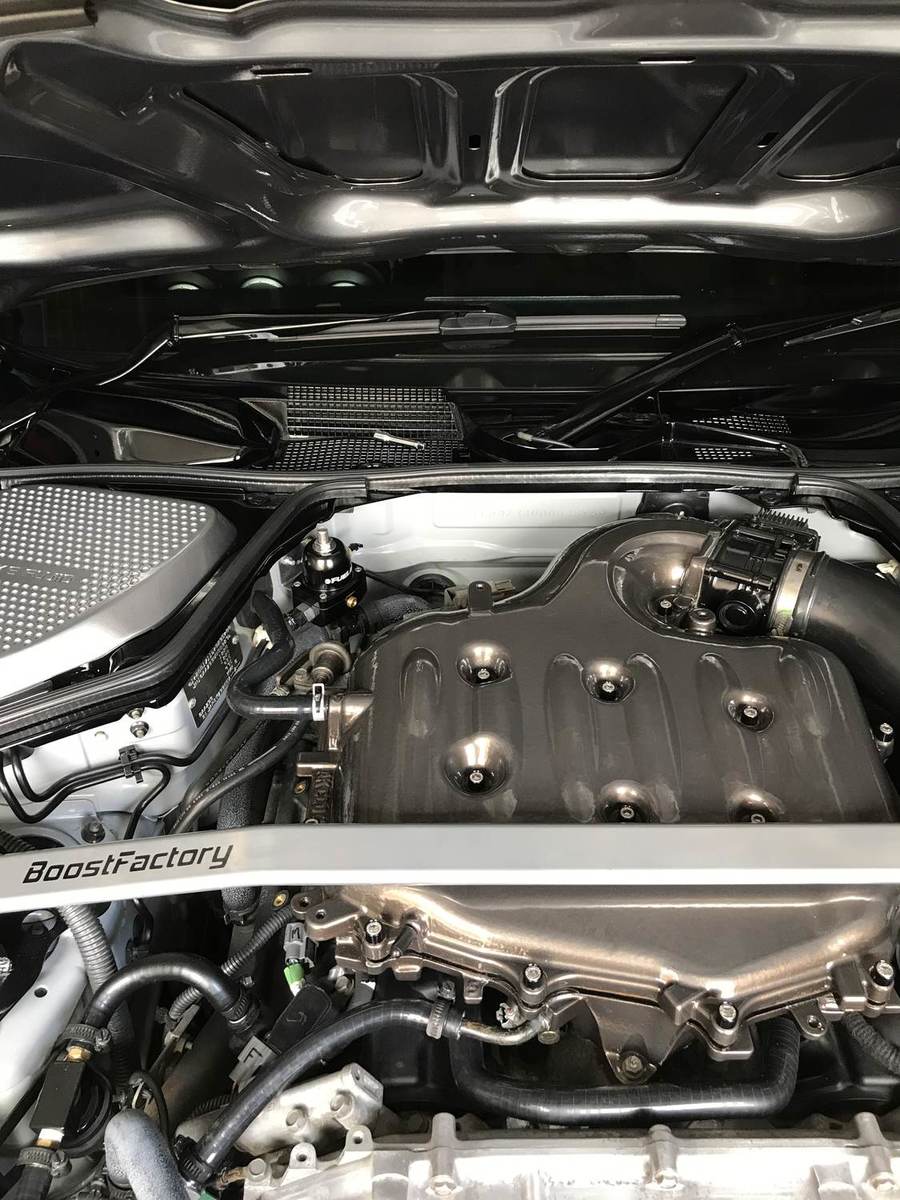
So the OCD clean freak stuff has still been happening in the engine bay. This time with the overhaul of the bonnet latch mechanism. It was removed from the car, stripped down and degreased, sand blasted and etch primed and finally finished in gloss black. The springs were cleaned and regreased before being reinstalled prior to refitting to the car. Stages of overhaul Finished product Before and after After this was completed it was time to fit my new mishimoto radiator and fan shroud, along with a full black silicone hose kit all supplied by Torqen. New rad and fans installed Some assorted pictures showing the black hoses, including a Rutland oil catch can set up in preparation for the turbo install. Last but not least the header tank was given a much needed scrub up! Hope you guys enjoy the progress! -
Gunmetal 350z build, 04 plate gt pack
Elliot350 replied to Elliot350's topic in Member Build Projects
Been a long time since the last update, so here goes! With the wiring tuck complete the lower and upper plenums were re-installed with a black spacer courtesy of Ian (Wasso). Here's some pictures of the finished article for now and a before and after.... P.s the only wire I'm not happy with is for the MAF but that will most likely be changing position once the turbo is fitted. -
Looks very nice! The colour suits the car down to a T. Out of interest how did you fit your roof spoiler on? I have a carbon one im considering fitting.
-
Gunmetal 350z build, 04 plate gt pack
Elliot350 replied to Elliot350's topic in Member Build Projects
back breaking work it is indeed! It would have been easier to remove the bonnet but realigning it again would have been a pain. Thanks for the comments guys -
Gunmetal 350z build, 04 plate gt pack
Elliot350 replied to Elliot350's topic in Member Build Projects
So here goes on to the pictures of how the loom is run behind the engine, it was initially wrapped in self amalgamating loom tape, but just for piece of mind I went over it again with cloth loom tape as well; this is meant to be high temperature proof and vibration proof and some other bits I've forgotten. I would have liked to secure the lambda connections a bit differenly and may revisit them, although they look quite neat cable tied to the main loom. And here is an overall shot with the plenum placed on top of the engine. Just to show that the plenum hides most of the coil pack wiring nicely and the engine looks a lot tidier now the wiring has been moved. All in all probably took me around 8 hours mainly due to taking a bit of time and wrapping the loom twice. The only wire that had to be extended was the Earth/ground for the coil packs other than that no wires have been cut and rejoined. Hoping to get the plenums back on in the next week or so and Fire up! Hoping all goes well. If anyone is wondering the turbo is going to be fitted on to the car but was just sitting in the engine bay looking at space and fitment etc. enjoy guys, much easier to get a harness cover which was my original plan but has been quite enjoyable to do and very pleased with the results. Cheers, Elliot -
Gunmetal 350z build, 04 plate gt pack
Elliot350 replied to Elliot350's topic in Member Build Projects
So guys time for a bit of a catch up regarding progress! As mentioned before I have been carrying out a wire tuck of the main engine harness, nothing as crazy as some tucks more just re-routing the wires from the front of the engine to the rear for a much cleaner look. I started off wrapping every plug in maskin tape and labelling them so everything went back as it should. With the passenger side all unplugged I began to strip the conduit and sheething off of the loom and seperate the plugs as best I could, it's not possible to competelt seperate them as some wires cross each other's paths but you can get the pretty well separated and in good order. Here's a quick before and during picture, you can already see how much cleaner the front of the engine will look without the harness there. My strut brace was ready at the powdercoaters so gave that a quick test fit, you can see the bundle of wires at the back waiting to be finished up. I was probably around 4 hours in to the tuck at this point. -
not a problem moving the bumper for you mate. Have to meet up once its out of the bodyshop
-
Gunmetal 350z build, 04 plate gt pack
Elliot350 replied to Elliot350's topic in Member Build Projects
cheers guys is slowly getting there. Am currently doing a wire tuck of the engine harness as part of the engine bay dress up/tidy up. pictures and details to follow -
am intrerested dibs! i understand its first come first serve so no worries if i dont get it il have to use your guide