


cs2000
-
Posts
2,628 -
Joined
-
Last visited
Content Type
Profiles
Forums
Events
Gallery
Store
Everything posted by cs2000
-
As with previous years im super on the ball and have the South Mimms convoy up and ready for people to add their names too
-
Hi all, For the fourth year running, im trying to organise what usually turns out to be a small-ish convoy of vehicles from London and the south east area to travel to Japfest together, this really helped me during my first show as i was nervous about where to go and the exact steps to get in. Every year so far we have had around 8 vehicles from the Kent and Essex area meet at South Mimms services and we travelled up to Japfest together. As a first timer in the past this was amazingly helpful so I wanted to take the lead and organise it again. So, the meeting place is the South Mimms Services on the M25/A1(m) Junction. Bignells Corner, Potters Bar, Herts, EN6 3QQ The meeting place is the car park of the BP petrol station on site (NOT the main South Mimms parking area) as it means any lowered vehicles don’t have to contend with the main car parks speed bumps, so let’s meet there again. Feel free to arrive at any time you want as long as its ---before--- 6:40am. Any vehicles meeting at this location will be leaving at 6:40 am sharp due to the early entry requirement for Club Stand cars into Japfest. (we need to be in before 8AM) If you’re late then you’ll have to catch up. On The Day Notes/Tips The guys at the BP station have never given us any trouble for meeting in there as nobody else meets there, at least they haven't in the previous years we have met there, we don't clog up their site as we usually meet on the left hand side as you drive in, the parking bays there are usually empty at that time of the morning. Worth checking on this forum post if you struggle to find us, il be checking in, trying to find anyone that gets lost, or if we have to change locations on site. For large sections of the M25 and M1, there are speed cameras on the side, or above the motorway gantry's, so, drive how you want, but just be aware they're there. Whoever ends up leading (i have for most of the previous years) needs to remember that too. My sat-nav tells me the locations so if I just to happen to doing 71mph, its "safe" to do so. Also, once we turn off of the M1, you'll know, it looks like you're turning into a services, just cool it WAY down. There will be a police speed gun in almost every single lay-by in the last few miles to Japfest, there has been every single year When you get close to the circuit, ensure you have you car club stand tag hung on your mirror or visibly on your dashboard and everyone in the vehicle has their entry tickets to hand to ensure you don't hold up the queue! We haven't (yet) been allocated a club stand number, but these are Txx and Bxx (Tunnel or Bridge). If we have Tunnel (fingers crossed, tunnel is fun!), you turn Left after getting through the ticket gates, if we have Bridge, you turn right. Il update this section as and when we get stand allocation provided to us. Sorry if i sound like your mum i just don't want anyone's day to be ruined by points and a fine! Any questions please ask , but il start the list! (Added my registration so you guys can find me as there’s usually a lot of cars meet at South Mims) This does depend on my car actually working properly before Japfest, right now she's … a little sick... But if I drop out, I'm sure someone else will step in and handle things @Paul K 1. Cs2000 (OO04 MYZ) EDIT: Please see my post further down. Due to the impending sale of my Z, and the uncertainty of who's going to be attending this October event, i have cancelled the convoy for now unless someone else wishes to take the lead.
-
@karlh was spot on, fuse number 34 inside the relay box (in front of the battery) was blown, Visually, it looks fine, however when checking with a Multimeter i showed a crazy high resistance, swapped it and got power to Pin 16 on the OBD plug. This let me go in and reset the ECU's learning, clear the NATS codes and the car fired up, however, the cut throttle is still there, revving up slowly is fine, using anything around 50%+ throttle causes the engine to bog and feel like a throttle cut. I took some data logs of RPM, AFM Volts, Accelerator pedal Volts and Throttle position sensor. Where the TPS sensors go up to 4v+, thats full throttle and as you can see, the RPM's fall off, then recover to 1200 RPM + when i let off the throttle. Time, RPM, Air Flow V, Accel P1, TPS 1 000.078, 962, 1.38, 0.78, 0.66 000.156, 950, 1.38, 0.78, 0.66 000.203, 950, 1.38, 0.78, 0.66 000.265, 950, 1.38, 0.78, 0.66 000.328, 962, 1.38, 0.78, 0.66 000.406, 962, 1.38, 0.78, 0.66 000.468, 962, 1.38, 0.78, 0.66 000.531, 962, 1.38, 0.78, 0.66 000.593, 962, 1.38, 0.78, 0.66 000.687, 950, 1.39, 0.78, 0.66 000.750, 950, 1.39, 0.79, 0.66 000.828, 950, 1.38, 0.78, 0.66 000.875, 950, 1.38, 0.78, 0.66 000.953, 950, 1.38, 0.79, 0.66 001.062, 950, 1.4, 1.84, 0.67 001.187, 862, 2.92, 4.6, 4.13 001.265, 775, 2.35, 4.6, 4.13 001.343, 700, 1.94, 4.6, 4.12 001.421, 775, 2.62, 4.6, 4.12 001.500, 738, 2.98, 4.6, 4.12 001.593, 650, 2.18, 4.6, 4.12 001.687, 750, 2.27, 4.6, 4.13 001.750, 688, 2.3, 4.6, 4.12 001.828, 638, 2.41, 4.6, 4.13 001.890, 600, 1.82, 4.6, 4.12 001.968, 538, 1.79, 4.6, 4.12 002.062, 675, 2.56, 4.6, 4.12 002.140, 650, 2.46, 4.6, 4.12 002.250, 700, 2.68, 4.6, 4.12 002.328, 638, 1.91, 4.6, 4.12 002.390, 662, 1.95, 4.6, 4.13 002.484, 662, 2.46, 4.6, 4.12 002.562, 588, 1.8, 4.6, 4.12 002.640, 638, 2.34, 4.6, 4.13 002.703, 700, 2.67, 4.6, 4.13 002.765, 662, 2.09, 4.6, 4.13 002.875, 725, 1.94, 4.6, 4.12 002.984, 700, 2.52, 3.52, 4.06 003.078, 875, 1.62, 0.78, 0.88 003.171, 1125, 1.4, 0.78, 0.69 003.265, 1212, 1.48, 0.78, 0.69 003.359, 1188, 1.5, 0.78, 0.69 003.437, 1200, 1.52, 0.78, 0.69 003.546, 1262, 1.51, 0.78, 0.68 003.609, 1250, 1.52, 0.78, 0.68 003.703, 1262, 1.48, 0.78, 0.68 003.765, 1262, 1.5, 0.78, 0.68 003.859, 1275, 1.5, 0.78, 0.68 Im now (from the code i got the other day "P0113 which is Intake Air Temperature Circuit High Input" thinking i have a damaged MAF, maybe i sprayed the contact cleaner in a little too vigorously? The MAF may also have been hot from being recently ran, so spraying freezing cold contact cleaner may have just snapped one of the tiny heated wires. From some further reading on exactly how important a MAF is This is what im seeing! Im getting no CEL or ANY codes on ANY of the cars systems, but the RPM will not rise and it "feels" like a misfire. I really should have taken logs of both long- and short-term fuel trims and the oxygen sensor. The fuel trims would show you if the ECU is compensating for inaccurate airflow measurement, and the oxygen sensor readings show you if that compensation is successful (which...it wont be!). During a full-throttle acceleration, the O2 sensor would normally report a rich A/F ratio, but it won’t if the MAF is dirty/broken/not reading for whatever reason. Any thoughts on this one? Still waiting for my new BCM to arrive to hopefully fix the NATS issue once and for all.
-
Shame to see you step down mate, but life always moves on I guess
-
Nissan Datascan 2, replicates most of the functions of a Consult II
-
Yeah, thats kinda why i need the OBDII to be working again, i have had P1610 before and i know this software can reset the lock. I have 3 keys, including 2 remote keys and one dumb key direct from Nissan, i fail to believe that they've all gone bad in the space of a week as ive performed that reset and cannot escape NATS lockout. The ECU/ECM must be good as i know if its disconnected/dead the rad fins spin up full speed when you turn the car to on, mine doesn't do that, so im almost set on a intermittent BCM, one is on the way This, along with hopefully a simple fuse swap should have me working again. Il keep you updated.
-
Not one for me due to finances, but having seen this car in the flesh at various shows, its seriously impressive and always has a crowd, looks stunning in the flesh. If I had the cash burning a hole in my pocket id snap it right up. Theirs easily 3-4x the price of the car in parts alone (and probably more), its a absolute steal. The photos don't do this thing justice, its a stunner. GLWTS
-
All info about stickers linked above mate.
-
Thanks mate, really appreciate your advice, il check when the time becomes available. Should be able to check continuity with my multimeter, could be a dead fuse or a damaged wire I guess, if its straight connected it cant be much else! Failing that il wire something direct from the battery to the OBD plug to get me connected (removing the current power wire obviously, i dont know if it will like being back-fed with power) I have also picked up a replacement good BCM from eBay for £30 of the exact same model. I was reading a TSB from Nissan this evening (doesn't apply to my car) but it confirms " The ECM and BCM do work together, but the BCM now controls the information necessary to tell the ECM to start the vehicle". With my seemingly random P1610 key lockouts, im betting on a failing BCM. Intermittent faults are the worst. Once i have the OBD port working again, il swap the BCM, then perform the NATS key relearning procedure to add all the keys to the BCM/NATS system and i should (fingers, toes and everything else crossed) be off to the races.
-
Right ok, so I have something else to check tomorrow/Tuesday. i did swap IPDM fuse 89, so I’m suspecting fuse 34 now. I did pull that one earlier, but didn’t check it with a meter just visually. another question then. Does power to the OBD connector ever go through the BCM? The reason for asking is I seem to keep getting a P code (forget which number) which is the NATS system locking the car when it detects a bad key. I know the BCM has some say in this too as the BCM and ECU both talk during key verification. im possibly thinking a bad BCM would be causing my intermittent key recognition failure and this new OBD lack of power issue.
-
Hey guys, seems like ive hit another issue. Ive created a new topic as I think this is a separate thing from my other (kind of solved) issue linked below Following on from that long running saga, today I sprayed the MAF (gently) with electrical contact cleaner and also did the Crank Position sensor on Bank 1 (Drivers side), started the car up and went for a quick drive about. Once up to temp, I gave it some boot and the car kinda cut throttle, it stayed at whatever RPM it was at. Gently rolling into the throttle didn't cause the same issue, even with higher RPM's I got home and connected my laptop and read code P0113 which is Intake Air Temperature Circuit High Input, the IAT in these is in the MAF sensor, so I figured maybe the contact cleaner hadn't flashed off before I started the car, cleared the codes and then my software disconnected, never to be seen again.... The only odd thing was I told the software to perform an Idle Air Relearn, this ran for 90 seconds and showed no sign of finishing, so I stopped it by closing the software. I grabbed my generic OBD scanner which ive used on the car before and it didn't power up, seems I have no power at all to the plug! Ive checked all 3 fuse compartments and pulled all fuses, none are blown. The ECU should be ok as the fans don't kick in when you turn ignition on (I disconnected it as a test and all the fans kicked in straight away which is a sign of a bad ECU) The car now wont start either, despite me literally getting home, clearing codes and trying to start it, but that's likely due to some fault that I cant read right now! Any idea how I can go about resolving the lack of OBD power? As a temporary fix, could I take a 12v feed from the battery directly so I can connect the scanner and clear the codes which should let me start at least? ive looked at the service manuals, it looks like the OBD port gets power from IPDM fuse 89, it looks ok but I changed it anyway and no difference still. The wires on the back of the OBD connector are well inserted and look ok too
-
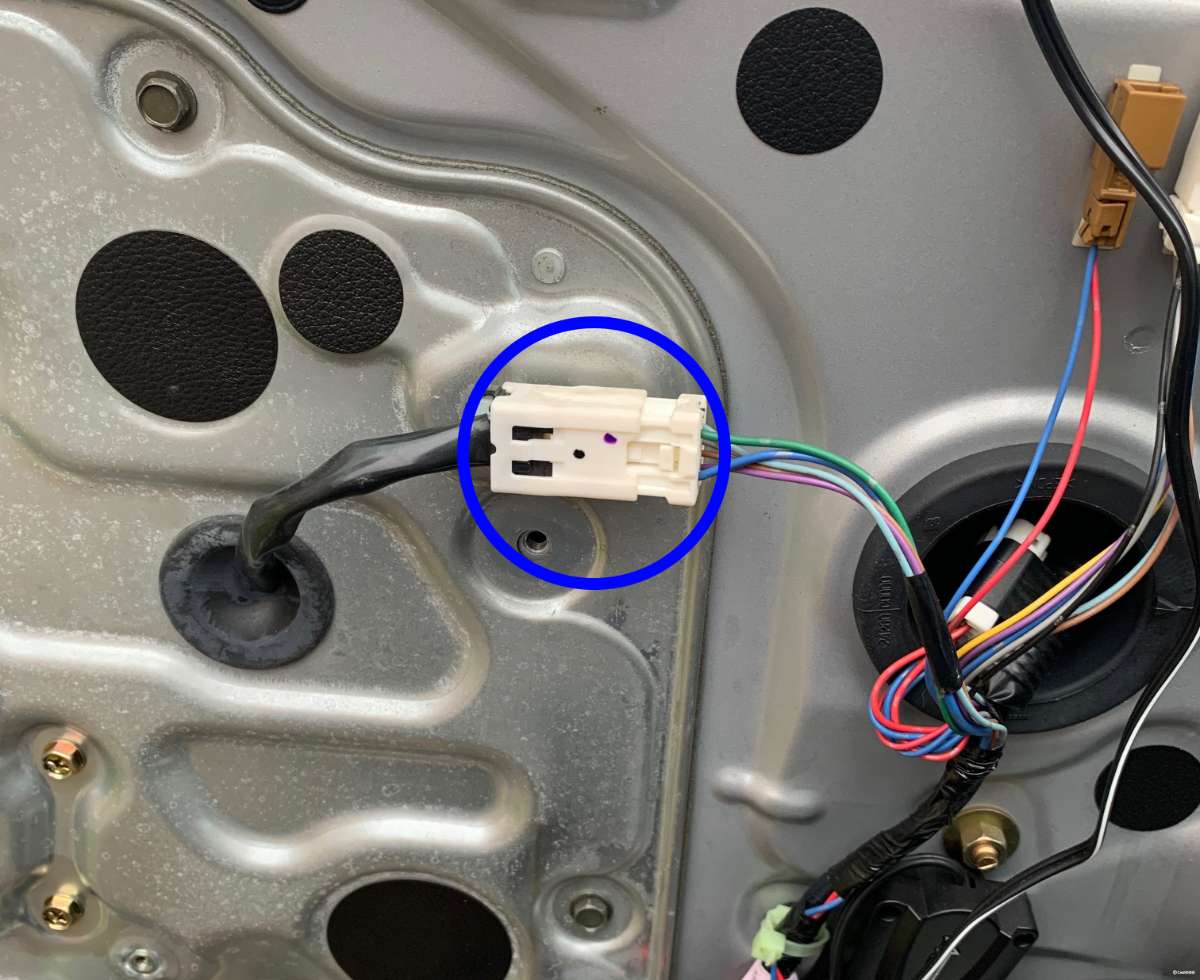
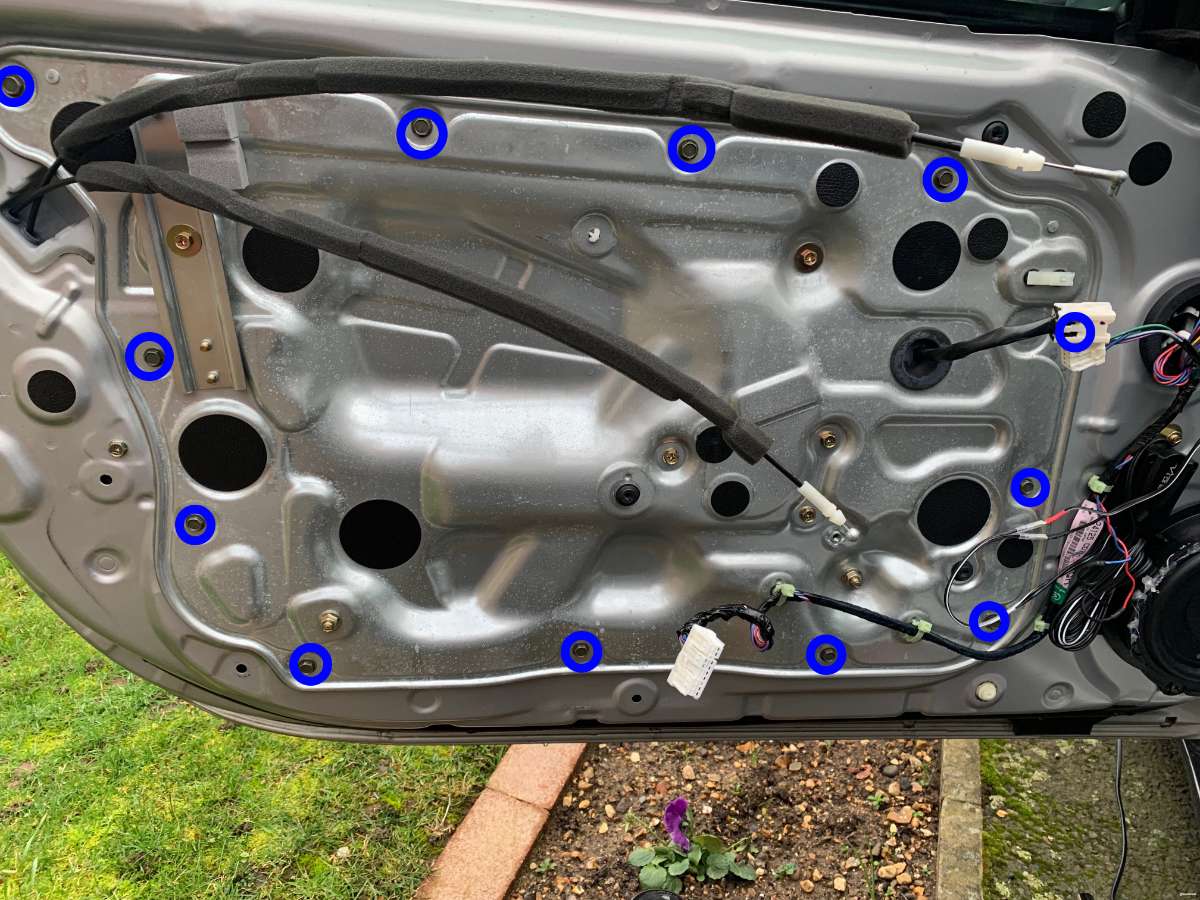
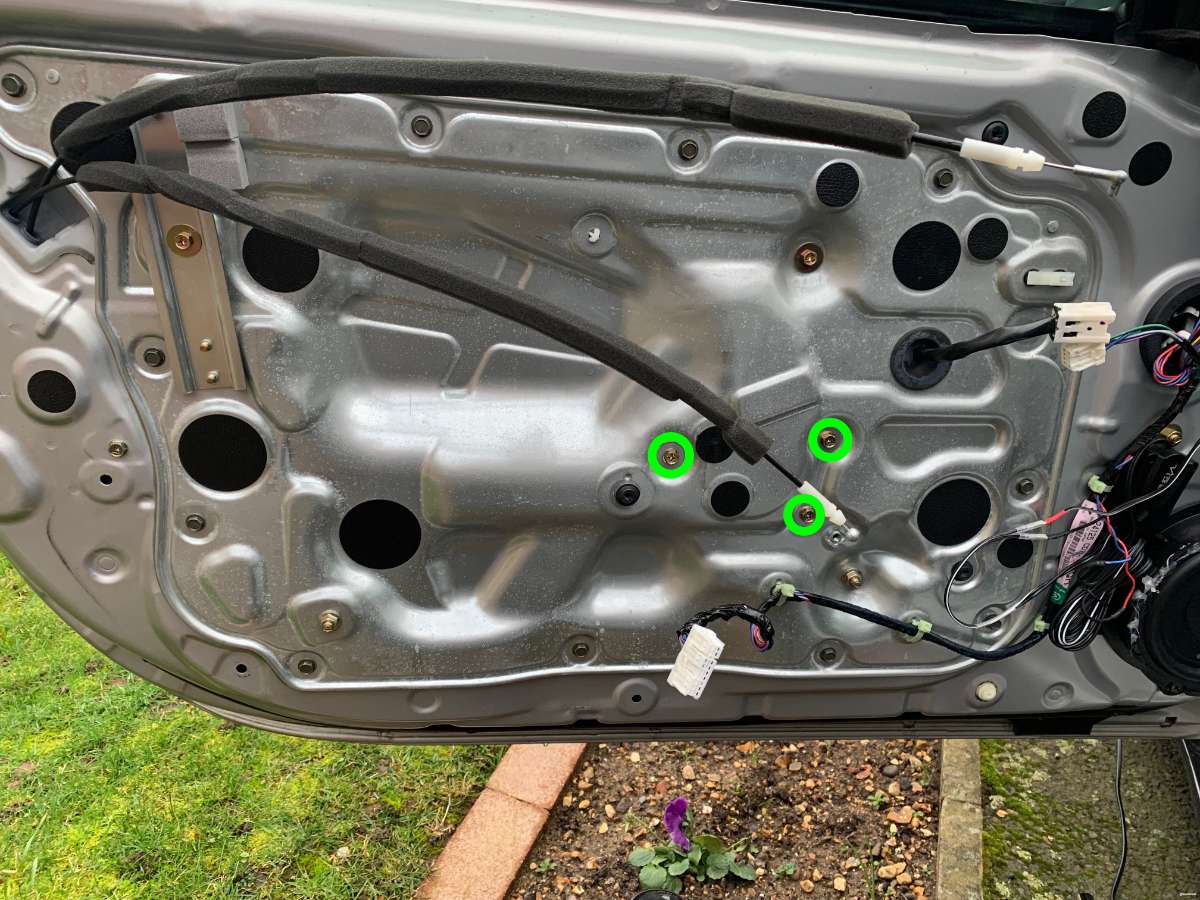
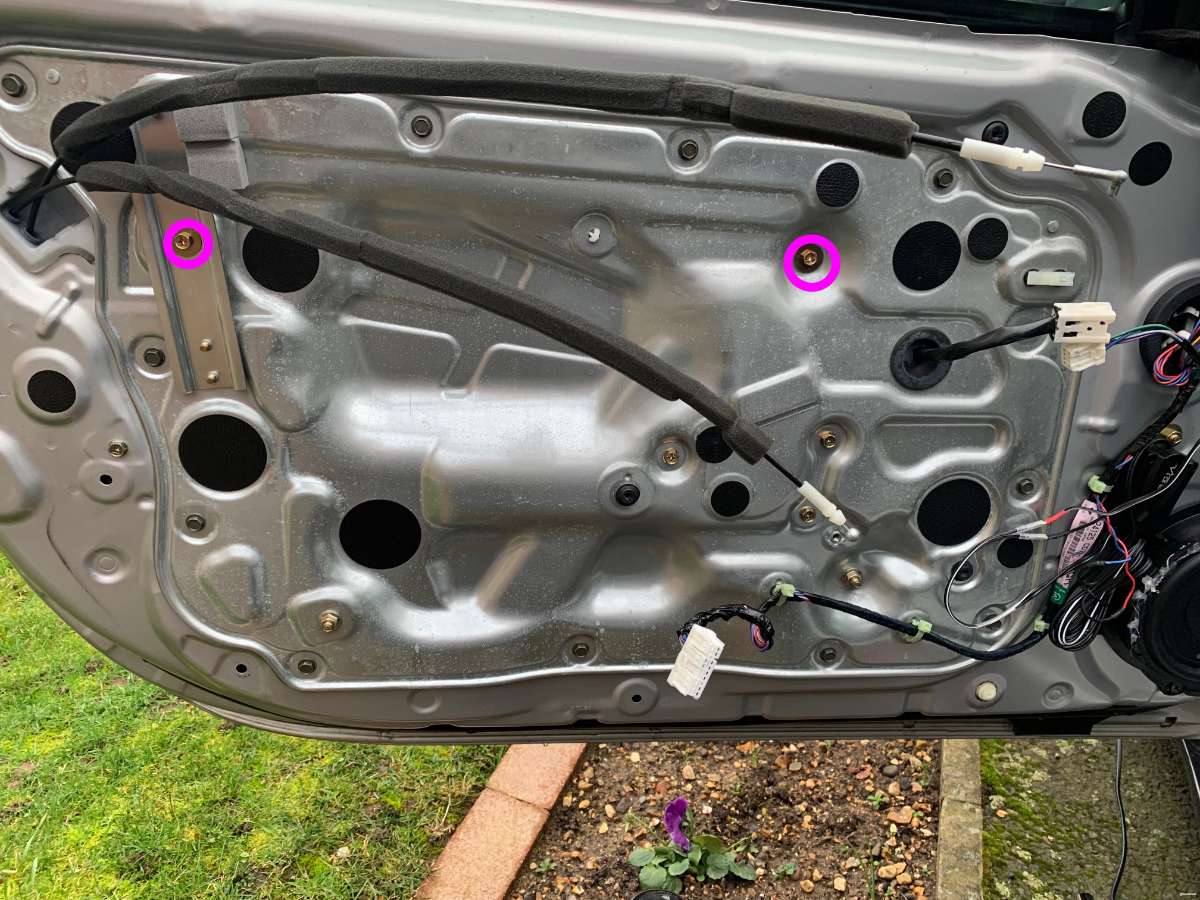
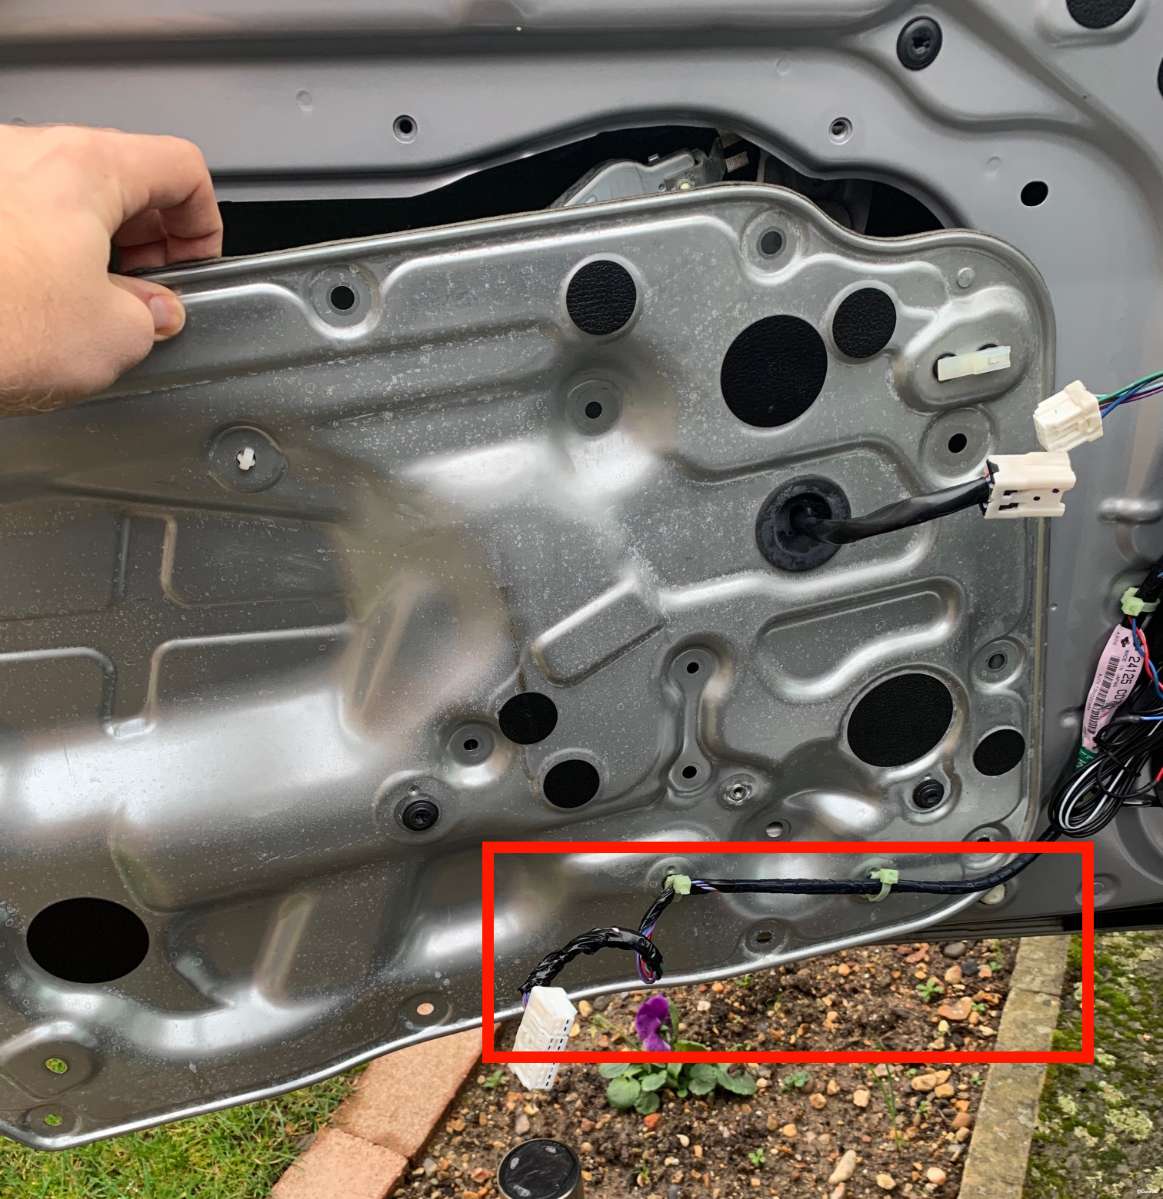
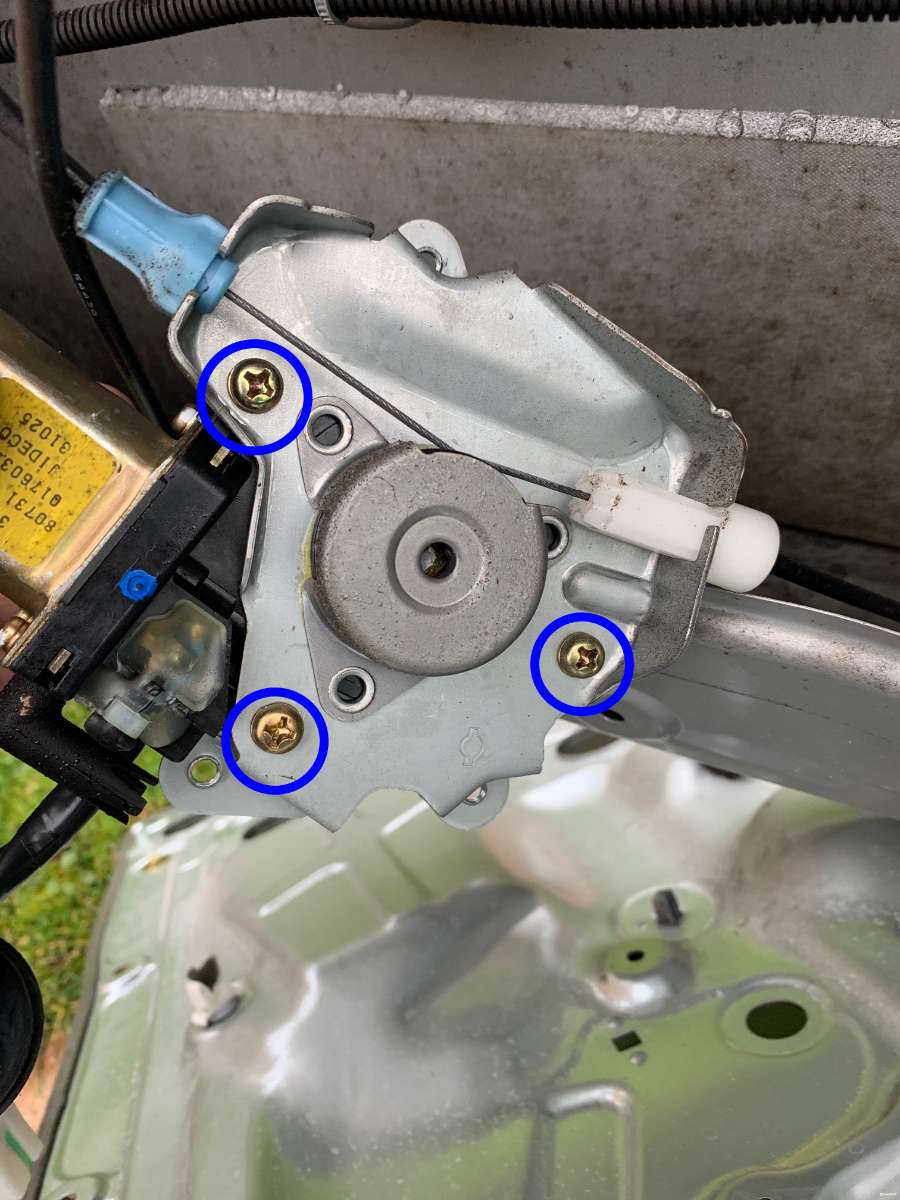
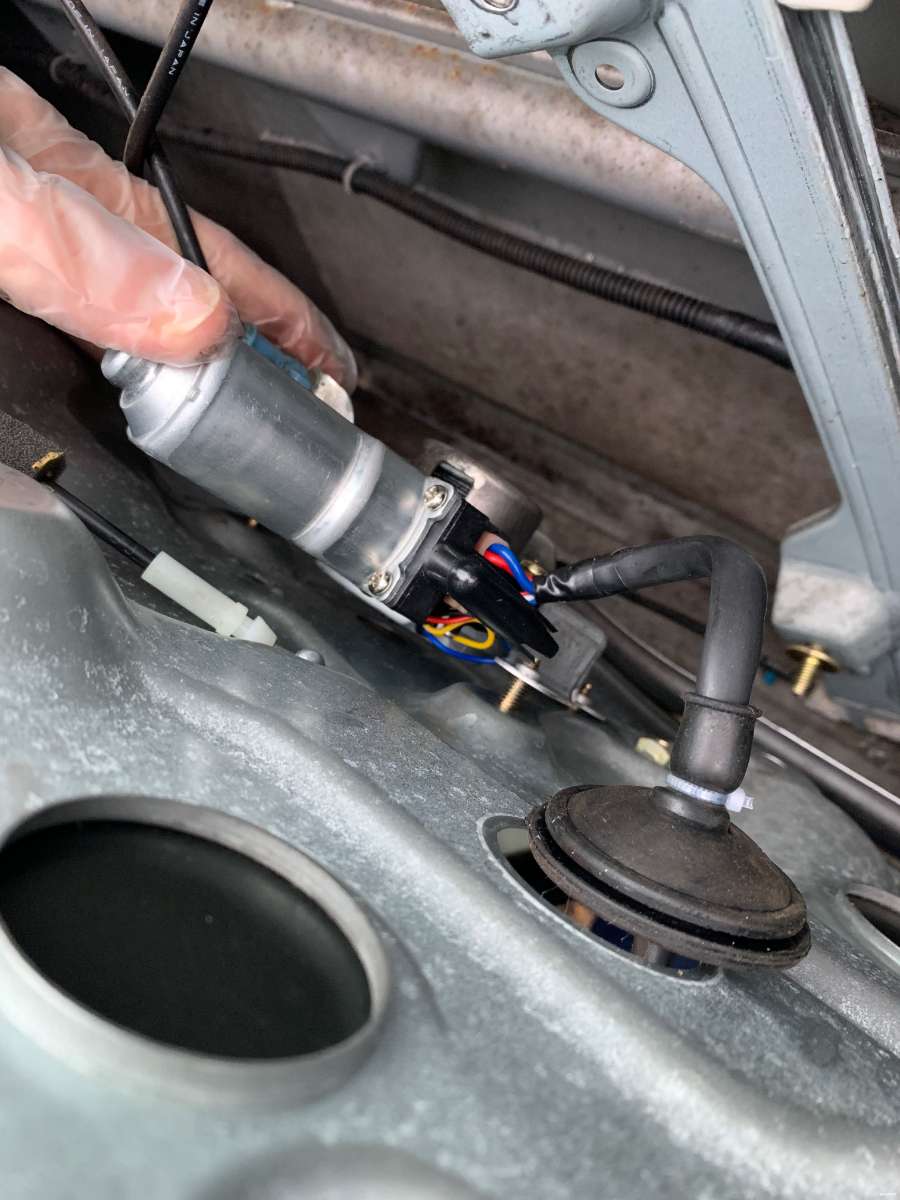
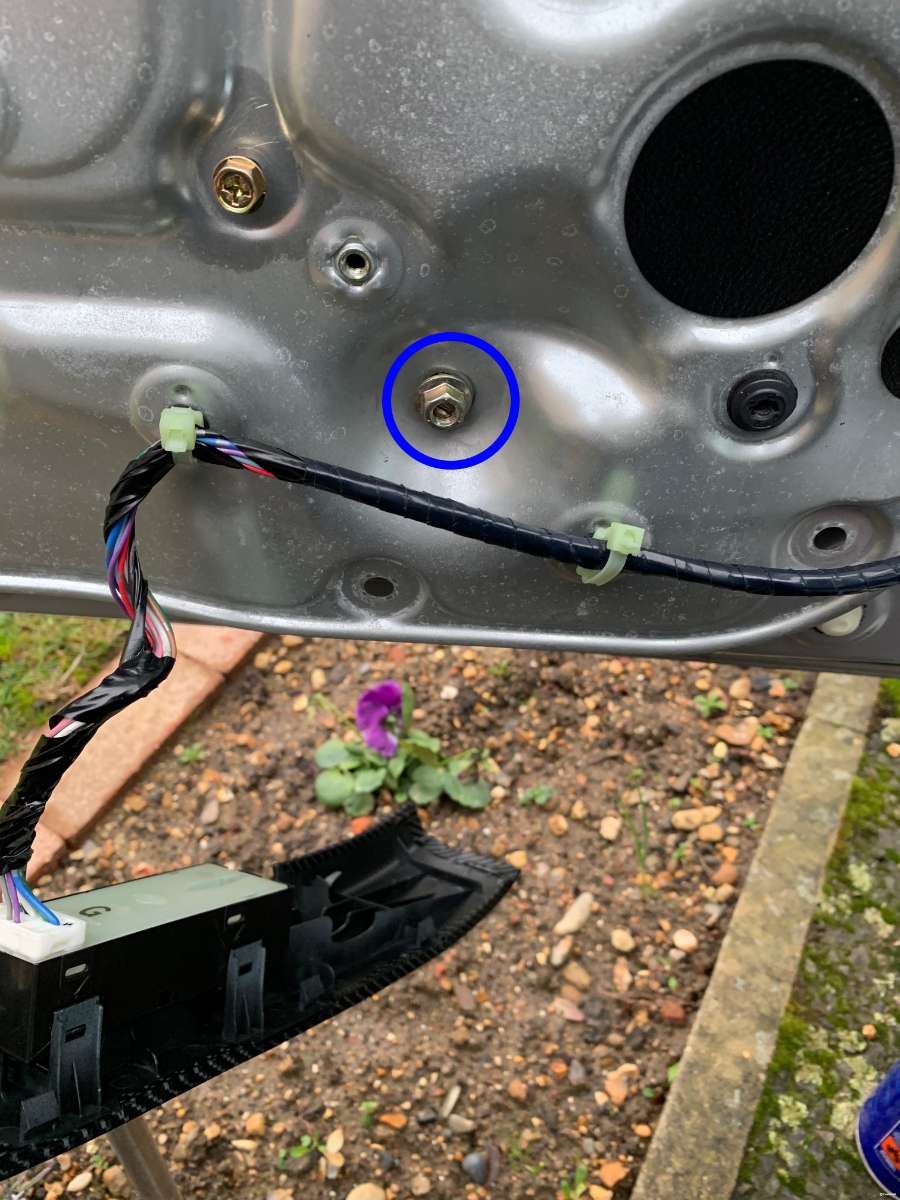
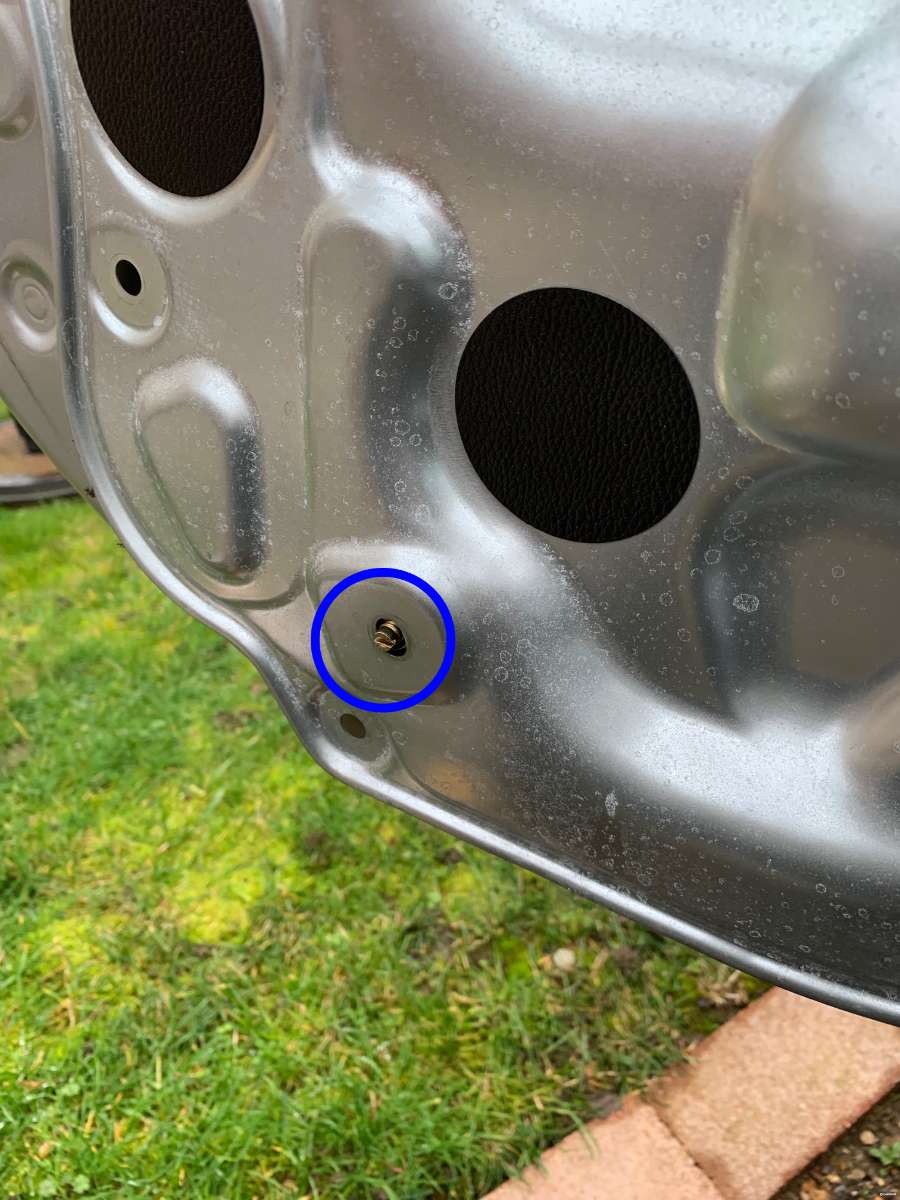
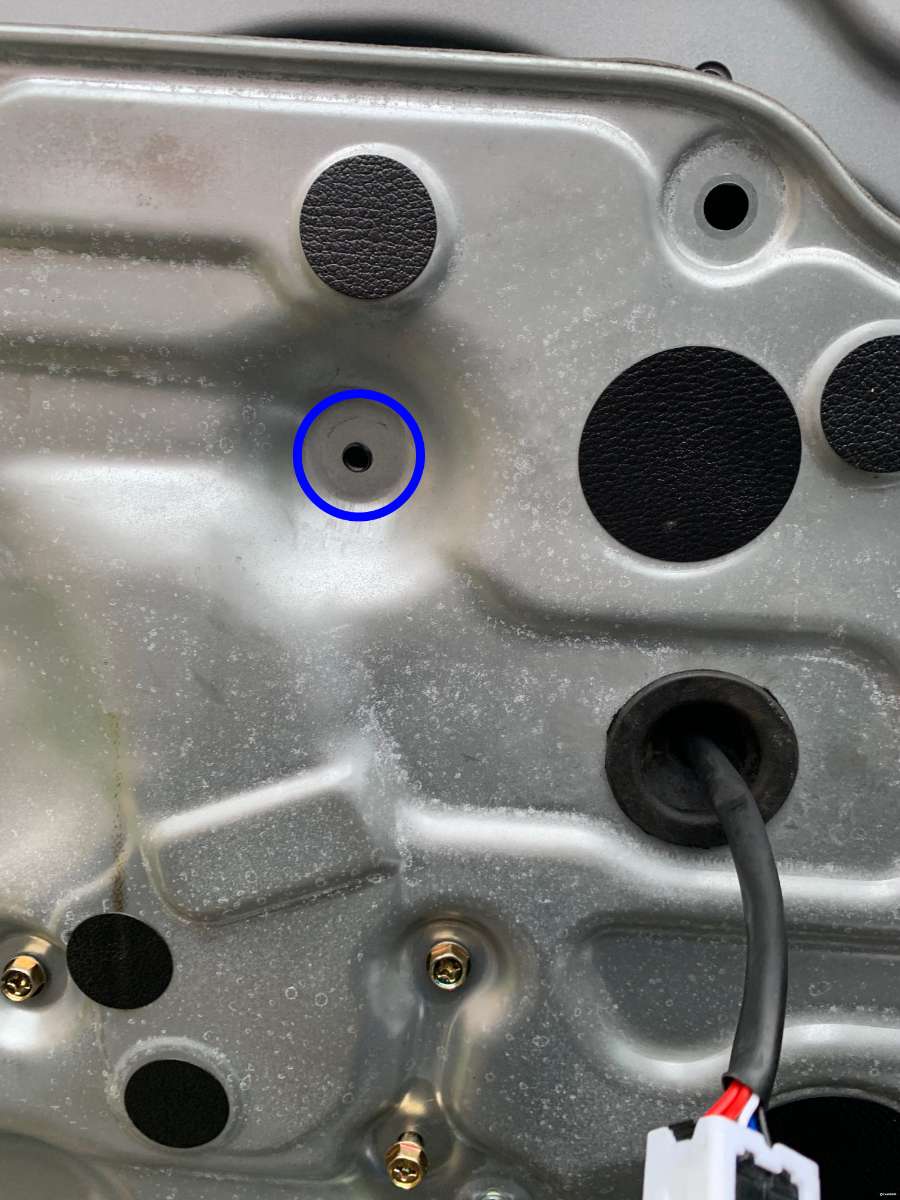
Hi guys, we don't seem to have a good guide for this on our forums, so as I performed this job today, here's the guide for it The entire process is around a 30 min job Parts Nice and simple, you need one part, either a left (Passenger) or Right (Driver) side window motor. These have come down hugely in price and are available brand new for under £20-30 nowadays, links below to Amazon and eBay parts, as usual, Amazon seem to be more expensive for these things with no added value IMO. Passenger Amazon Passenger eBay Driver Amazon Driver eBay Both Motors eBay Tools Again, super simple install, you need: 10mm socket (with extension bar) 12mm socket Philips PZ3 Sized Screwdriver Duct Tape (yes, really) Step 1 - Door Card Removal There's no photos here, its very simple 1) Open the door handle and pop out the black trim behind the handle, undo the screw behind that using the PZ3 screwdriver or the 10mm socket on an extension bar. 2) Pop off the silver trim (very carefully) on the door handle using a screwdriver/butter knife. Undo both screws you can now access at the top and bottom again using the PZ3 screwdriver or the 10mm socket on an extension bar. Remove door grab handle. 3) Remove the electric window switch/arm rest trim, it just pops off by lifting up the back first. Disconnect the plug from the window switch buttons and remove the new screw (or two, depends which side you're working on) you can now see, again using the PZ3 screwdriver or the 10mm socket on an extension bar. Note: If working on the drivers side, remember to remove the screw hidden under the plastic cap inside the ashtray in the door 4) Pull the door card from the door starting at the bottom left, its take some pulling pull will pop off bit by bit. 5) Then, you need to tilt the card by pulling the bottom slightly towards you and lift up to unhook it from the top of the door. Step 2 - Prep 1) Take your Duct/Duck tape and tape the window CLOSED. By this, I mean run some tape all the way along your window glass and rubber trim on the outside of the door. This ensures the window stays up and fixed into place which makes later re-assembly a whole lot easier without a piece of glass flopping around inside your door skin! 2) We need clearer access to the inner door, so we need to remove those flexible springy wires that attach to the inner door handle. On the inside of the drivers door card, follow the black springy things back to the door handle on the door card. Life UP on the white pieces, popping them free of the retaining clip and wiggle the ball on the end of the cable out of its socket. 3) Remove fully and set aside safely. Step 3 - Panel Removal Ok, photo time! 1) Unclip the window motor cable by pressing and pilling on the connectors shown in blue. Once unclipped, CAREFULLY but forcefully shove the whole white connector block towards the car, at some stage it will release off of its plastic retaining clip and strip a chunk of skin from your knuckles, that's your sacrifice to the car gods meaning the rest of your work is now blessed and will go smoothly. Lastly, poke the rubber grommet back inside of the door. 2) Undo the 12 bolts shown here in blue with a 10mm socket and keep them all together as theyre all the same. 3) Next, undo the 3 bolts shown here in Green with a 10mm socket, keep these in order as two are the same and one is different. These hold the window motor in place. 4) Undo the 2 bolts shown here in Pink with a 10mm socket, and put aside, they're the same. These hold the top section of the window rails in place. 5) Lastly for now, undo the 2 bolts shown here in Red with a 12mm socket, and put aside, they're the same. These hold the bottom section of the window rails in place. 6) This will be tough as the inner panel is sealed with some adhesive goop to the door skin, but find somewhere where you can get your fingers and start lifting the metal panel away, it will only come so far due to the wires shown at the bottom in red still being attached. You just need to pull it from the door enough so that it drops down and gives you access to the inner door skin. Don't use anything sharp as you don't really want to damage the sealant. Step 4 - Motor Swap 1) When you pop off the metal panel, you'll see the window motor, cable spool and bracket just laying there. Flip it over and undo the three gold screws as shown in blue with the Philips PZ3 screwdriver. These will be exceptionally tight, make sure you have a good solid grip and use some penetrating spray if required. The screws are all the same, so set them aside. 2) Remove the old motor and insert the old one in its place, re-attaching with the same screws. NOTE: The motor is on what's called a "Worm Drive" meaning if the shaft of your new motor isn't in the right place to fit unto the spool holder, you cant just turn the shaft to get it to line up. You will need to connect your window motor and window switch controls for whichever side your working on and press the window up/down button to get the shaft in the correct spot for installation. In my case, it was off by a tad, so a tiny blip on the window switch made it spin just enough so I could pop it into the spool holder. Kinda hard to explain, but you'll figure it out. Step 5 - Re-assembly. Reassembly can be fiddly, so il do my best to explain the order I found works best. 1) Push the rubber grommet attached to the window motor cable through the large hole in the inner metal skin. 2) With the new motor attached to the bracket and cable spool, lift up the metal inner door card you removed earlier and whilst holding the motor with your arm inside the door from the top, place it roughly over its three mounting holes and hand-thread in the three mounting screws so the motor doesn't disappear into the door somewhere. 3) Next, with your fingers and hands squeezed in wherever you can, attach the lower front window rail with the 12mm bolt, again, just hand tight, but otherwise this thing is IMPOSSIBLE to screw in if you don't do it now, this is the bolt shown in Red in the earlier metal skin bolt removal fest. Don't worry about the rear one, its nut protrudes much further and can easily be accessed later. 4) Look to where you removed the Pink bolts earlier in the removal guide, you should see a hole now visible, insert the bolt into here and hand tighten it. 5) Now onto the Rear rail, again, look for the protruding bolt at the bottom of rail, locate this with its hole in the inner skin and re-attach with the 12mm nut removed earlier 6) Follow this up and as with the Front rail, you should see a hole ready to take the one remaining gold 10mm bolt that you have, thread this in 7) Now go around and tighten up all of the gold bolts. There are no torque specs I could find, so the usual, hand tight with a 6 inch ratchet is plenty tight enough. 😎 Almost there! Lift the entire inner skin up and shove it around until all of the 12 outer edge bolt holes all line up. The inner skin does have some little bumps that kinda click into place on the actual door when its in the right location. Insert all of these 10mm bolts and tighten up with the same 6 inch ratchet, that's plenty enough torque. 9) Reconnect the window motor electrics and slide the connector back onto its clip. NOTE: Now is a GREAT time to test to see if your motor works and the window is smooth. Temporarily connect up the window switch to its plug and test window operation. Worth saying that if you replace the passenger side motor, the window switch on the drivers side for the passenger window will NOT function without the passenger side window switch actually being plugged in! 10) Grab your interior door card and re-hook it over the top of your actual door. Line up all of the connectors and tap the door card firmly so the connectors all pop back into the door. Ensure your window switch control wire is poking through the gap where the armrest goes so you can plug it in!. 11) Plug in the switch controls, fit them back into the door and attach the Armrest pad. 12) Re-insert the two 10mm bolts here that hold the inner frame of the door card to the door itself using the ratchet or PZ3 screwdriver 13) Re-attach the grab handle and re-install the two 10mm bolts using the ratchet and extension or PZ3 screwdriver. Note: If working on the drivers side, remember to insert the screw and plastic cap back inside the ashtray in the door 14) Open the door handle and insert the screw behind that using the PZ3 screwdriver or the 10mm socket on an extension bar. Pop back in the black trim in behind the handle, Step 5 - Testing & Calibration Get inside the car and turn the ignition to On, try the window motor you just replaced to ensure it still works. You now need to re-calibrate the window motor so it does the "auto drop" when you open the car door and isn't triggering "pinch detection" 1) Pull up on the window switch till the window stops. It may drop due to being un calibrated and the "pinch sensor" being triggered. 1a) If it did drop, pull up on the switch again and let off. The window should stay up this time (you just over-rode the pinch protection.) 2) Now with the window fully closed, pull up on the switch and hold for approx. 3 seconds. 3) Now push the window switch all the way down until the window stops then let off the switch. 4) With the window all the way down, push the switch down again and hold it for approx. 3 seconds. Note: The bottom limits of your windows travel are now calibrated 5) Pull up on the switch till the window goes all the way up. 6) Now with the window all the way up, pull up once more on the switch and hold it in the up position for approx. 3 seconds. Note: The upper limits of your windows travel are now calibrated And you're done! Super simple hardware wise and a very cheap fix. I did mine today for a grand total of £16.00 and 30 mins of my time, all ready for the summer!

-
@Mopedmark have you (since you obviously have the equipment) considered developing a cheaper ultra racing style w brace replacement? I’m amazed there are no alternatives out there.
-
Hoping somebody else fancies coming on track at the same time as me. if you’re even half considering it, seriously just go for it, it’s good experience and you don’t have to drive the thing at 100%, I did it a few years ago and was at 70% attack mode for insurance and self preservation reasons , just there to enjoy the atmosphere!
-
Il have a dig through the archives and see if i have any decent images for this year, used my best one up last year in May 1.SuperStu (two) 2.KevT (one) 3. Andy_Muxlow (one) 4. andy James (one) 5. NeeZ (one) 6. wvSTUwv (one) 7. Woodzman (one) 8.Ricochet (one) 9. Paul K (one) 10. cs2000 (one)
-

350z ONLY Full TCS & VDC Disable With Brake Bypass (Burnout) Mod
cs2000 replied to cs2000's topic in Member Traders
Sent mate! EDIT: 2 left now, sale has ended now so back to full price. Just remember, there was a rush on these early in the year so if you want one, grab them now! If anybody fancies a Group Buy on these, il do the same 10% off for groups of 5+ and 20% for groups of 10+ -
1. andy James PAID 2. Sebastian PAID - Track 12.40 3. Stephanie 4. Andy_Muxlow PAID 5. SHEZZA PAID 6. Silverthorn PAID 7. Cs2000 PAID - Track 14:40 Decided to take the plunge, car seems to be running currently, fingers crossed it all stays this way. Looks like track time slots are pretty sparse too, I was only able to select from two timeslots! Book sooner rather than later if you definitely want track time (and seriously, its WELL worth it!)
-
Odd issue that. I highly doubt any will show up, but I’d check for fault codes, also pull and check your fuses to see if any are blown.
-
Pretty sure that was a US thing, a lot of USDM vehicles have separate "dumb" keys with an immobiliser fob like that. I haven't tried it, but id doubt the other 2 buttons would work, likely a difference of code in the ECU/BCM to control the boot pop and horn. Also, the programming instructions they show 1, wont work(theyre wrong) and 2, wont program it to start the car even if they did work (it would just program the remote locking).
-
I know im not close to you, but if you fancy a drive down to the land of fake tan, I can add a key to your car for £20 as long as your new key has a immobiliser chip in it already (it looks like a little black piece of plastic shoved into one corner at a 45 degree angle in the keys inner housing, open up your old and new keys and you'll see what im on about)
-
Hey guys, I know this will only be a small percentage of people who want this due to my location, but thought id offer it anyway. With a few pieces of paid software on my laptop some cables and some time in research, im now able to code any compatible Nissan key to the NATS/Immobiliser system on 350z DE vehicles. The only caveat's are that I need the vehicle with me, theirs no way to program keys remotely as the key is paired with the NATS system directly in the vehicle. You will just need to acquire a compatible key with a transponder chip in it, have it cut by any locksmith so it physically fits into (and turns, just don't try to start the car with a unprogrammed key) your ignition and then come to me with all of your keys and I can add the new one into your system. All keys get erased when you program NATS, so you need to bring ALL the keys you want to work on the car so they can ALL be added in with the new one. Key blanks with program-ready chips can be found online in the usual places such as https://www.ebay.co.uk/itm/163429277525 Im based in Harlow, Essex, but im also in Ipswich, Suffolk 3 days per week. The whole process takes around 30 mins as I have to get some numbers off of your Immobiliser Control Unit which is under the steering wheel cowl/plastics which i need to remove (4 simple screws). If anybody wants this doing, the price is £20 per vehicle for as many keys as you want registering, want 1 key, or 10 keys (ok, ok, the maximum number of keys the Z can remember is 5...), makes no difference to me! Prices from local specialist locksmiths and Nissan main dealers range from £110-£200+ depending on your location and if they have to order you a key. They also have to send off for the codes they require to program to NATS from Nissan HQ which takes a few days. So you can have this done for 10% of the cost by me the very same day Drop me a PM if you're interested.
-
Yeah, it has me truly confused. I know the new sensors I got just were not correct, the car flat out through error codes with them, but the old sensors it didn't, odd! Im going to get some more contact cleaner and really give them a good clean out. I believe the oil was actually from when I had the all too common spark plug O ring leak which I fixed a long time ago, I cant see any new sources of oil and that connector (Camshaft Bank 1) could have gotten dripped on over time I guess. Still not 100% confident in the car, but did manage to take it on a short drive to the shops today, started up first time every time, so fingers crossed she's OK now I can also code new keys to the NATS system with my new software, so that's something il be offering as a service
-
Righty-o. So, im baffled, but happy for the first time in several days... Today's tasks went as follows: - Drill pilot hole in sheared Crankshaft bolt, snapped 4 2.5mm drill bits doing this, but got there, bolt extractor got her straight out, wooooo! - Swapped battery from work van to 350z - Connected to the ECU with Nissan Datascan II (NDS II) and reset the ECU using the "Reset Learning" button - Then connected my bog-standard code reader, nothing showed up, but reset codes anyway, why not. - Reset the NATS system by turning the ignition to ON for 5 secs then OFF for 10 seconds 3 times - Try to start car, no crank at all, same symptons as a low battery. - Swapped back to the battery that was already in the car, Cranks but no start, same as before. - Someone also said the NATS antenna could be at fault and try flipping the key the other way around, same result for me here, no start... - Reconnected NDS II and scanned the ECU, this gave me codes P0340 (Cam Bank 1) and P0335 (Crank), however P1615 (NATS) issue had gone, progress at the very least. - Removed the NEW Cam sensor & used electrical contact cleaner in the old sensor's socket and the plug & then installed old sensor again - Reset codes using NDS II, car cranks but no start - Code scan again only showed P0335, so more progress! - Removed the NEW Crank sensor & used electrical contact cleaner in the old sensor's socket and the plug & then installed old sensor again - Borrowed bolt from Cam Sensor and installed to Crank Sensor bracket (Cam sensor is VERY firmly attached, crank is kinda loose and i needed it to be solid). - Cleared codes & reset ECU again. - SHE STARTED UP!!!! I then measured and found the bolt for the Crank and Cam sensors was M6 in size, nipped in the shed and got a M6 machine screw of a random length, this fitted straight in! So for future reference, the Crank and Camshaft bolts are both M6 x 20mm (roughly) but the Nissan bolts have around 5mm of bolt thread shaved off at the end to form of a taper. I bought some M6 x 10mm bolts and they tightened up perfectly, 15mm may also work, but if you feel any resistance before the bolt head is against the sensor, dont force it, your bolt is too long. Tried to turn on and off the car 3 times with my Day-to-day key, and also with the dumb little key from Nissan, both worked absolutely fine. I think the P1615 (NATS not recognising the key) was caused by me trying to start the car with my secondary Nissan OEM key which was on the same keyring as an aftermarket non coded key, rookie mistake. Soooo. what the heck happened? The car is now literally back to stock and works just fine. The only thing i have really done in essence is an ECU reset and cleaned the connectors for Cam Bank 1 and Crank sensors. Remember, this happened after running the car with an almost dead battery which seems to have recovered. Genuinely confused, but it seems like a clean sorted it... very very very strange. In other news, ive gotten a refund from the eBay seller who sold the sensors. Lesson learnt, dont buy cheap sensors (but i did have no other choice, couldnt get any locally/quickly) Im still...nervous about the car, i wont be doing any long journeys in it for a while until i regain confidence in it. Id also like to spray some more contact cleaner into the sensor plugs as id ran out and i can see more dirt/oil/grime in them, but if thats all this was....... One super useful resource i found. ALmost all of the sensors and some of the electrics on most Nissan's are made by Hitachi Automotive. It would have been cheaper to get the sensor directly using Hitachi's parts code rather than Nissans part code. All Nissan do is purchase the parts, do some quality assessment and add their stamps onto it. Take a look at the (very large) pdf for everything from these sensors, to throttle bodies. http://www.hitachi-automotive.us/download/catalog/currentcatalog/hitachinoamericacatalog.pdf The 350z parts start on page 309
-
That would be super helpful if you do! From my reading, there seems to be some early years where they were indeed the same. I used the Nissan parts system, stuck in my VIN, found the particular bolt and it did show as being used in the three places in my case (both cams and crank sensor), so thats a start. Ive got to pick up some bolt extractors tomorrow and try to get the old one out. I dont think it will be too difficult, i just turned it the wrong way , dont think its actually seized or anything. Il also try the new battery from the van, see if that helps, and i have a license for Nissan Datascan II too, so i can do a ECU reset without the very finicky pedal dance routine to do the reset, ive done that about 7 times, had it work once... It should if all goes well, read me the codes that my basic OBD2 reader cant (the ones that show in the video posted earlier) so i can double check, then clear them, try a start and see what happens. I have the old sensors to replace too if thats required. Also going to check the BCM for water ingress, apparently thats a thing too. My passenger side window has also stopped working in recent weeks, i put that does to a faulty regulator/motor as its a common thing, but could be a BCM issue. All of this of course depends on the weather which currently forecasts rain. all day... yay for this country...
-
Its a Renault, so..fitting I suppose , il give that a shot tomorrow. Currently trying to work the bolt situation out for the Crankshaft sensor too. Ive found the bolt, but nowhere seems to list the thread, pitch and length, I have spare bolts around of various sizes, but the car isn't at my house, makes it difficult to "trial and error" things

