


evest
-
Posts
733 -
Joined
-
Last visited
Content Type
Profiles
Forums
Events
Gallery
Store
Posts posted by evest
-
-
Received my suspension and brake parts from Clarke Motorsport yesterday - 1st class service; many thanks to Ewen and the team. Got my little bag of Haribo too!!

-
 1
1
-
-
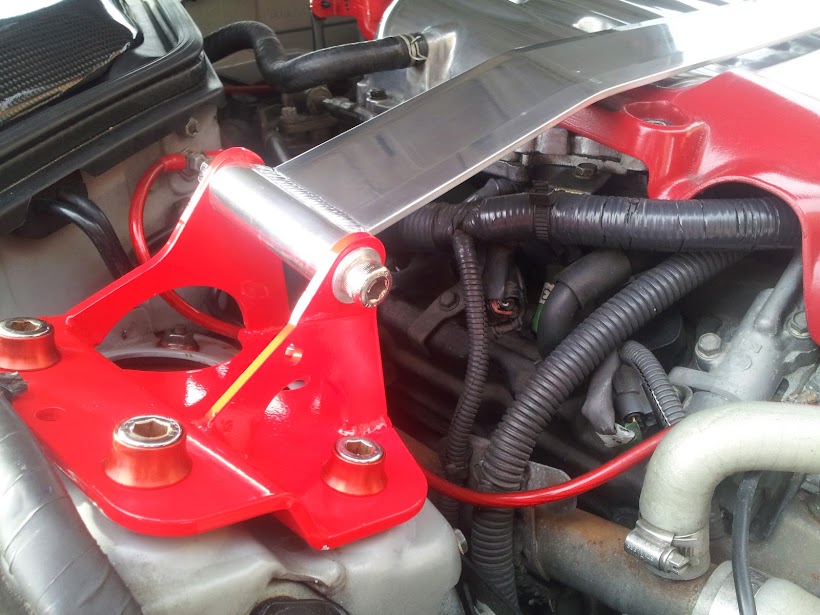
Job done! Here's a brief write up with some tips for anybody else replacing their power steering gear bushes.
(I agree with GT4 Zed that this is possible without completely removing the steering rack, if you have enough room to hammer out the old bushes in situ. They do come out fairly easily, but in my case being on the driveway it was easier for me to take the rack off so as to have enough room to swing a hammer!)
I generally just followed the FSM to do this job, which was easier as the rest of the front suspension assembly was already off the car. But rather than securing the steering wheel with string, I just used the steering lock. So for the power steering rack I was left with four bolts that hold it to the car, plus the lower joint that connects the lower shaft of the steering column to the steering gear.
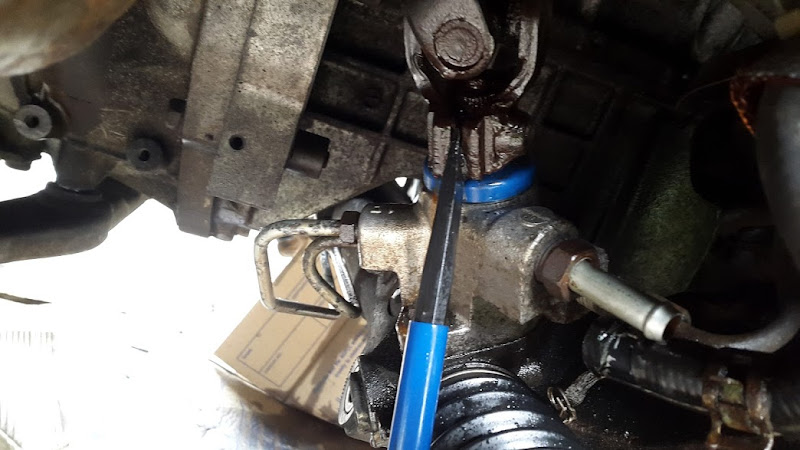
Hard parts were one slightly tight mounting bolt and the lower joint. The FSM rather nonchalantly states:
"Loosen the bolt on the upper yoke of the lower joint and remove the bolt on the lower yoke of the joint, then slide the lower joint into the lower shaft. Separate the steering gear from the lower shaft".
Yeah right... not so easy when it's been on there for 12 years!
I had to wedge a chisel in the slot to lever the joint open a little (see pic below), put a gallon of WD40 in it and set about undoing the rest of the steering gear bolts. Supporting most of the weight of the gear on axle stands so as not to damage the joint, with some gentle(ish) tapping and using some of the gear weight, it slowly separated from the lower joint.
(Note - it may be necessary to turn the steering wheel in order to rotate the joint and get at it from the right angle. This is fine as long as the steering wheel is locked again before you separate the link.)
Finally...!

Now to work on the bushes...
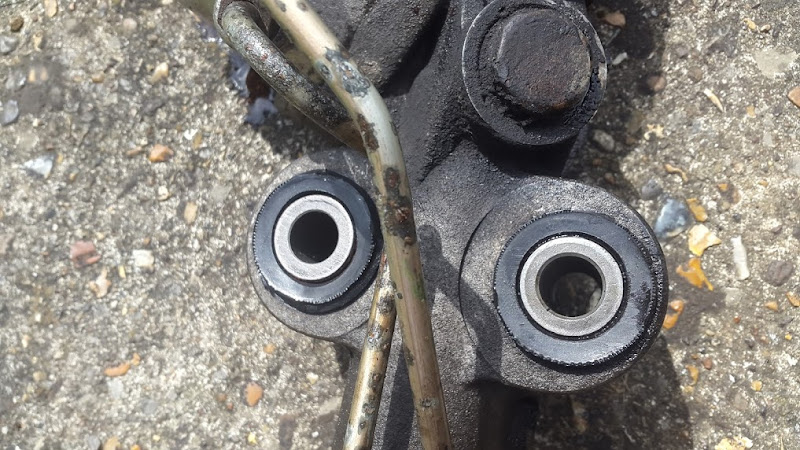
Old insulator bush:

Easy swap:

Old mounting bushes:
Came out easily using a hammer and socket to drive them out
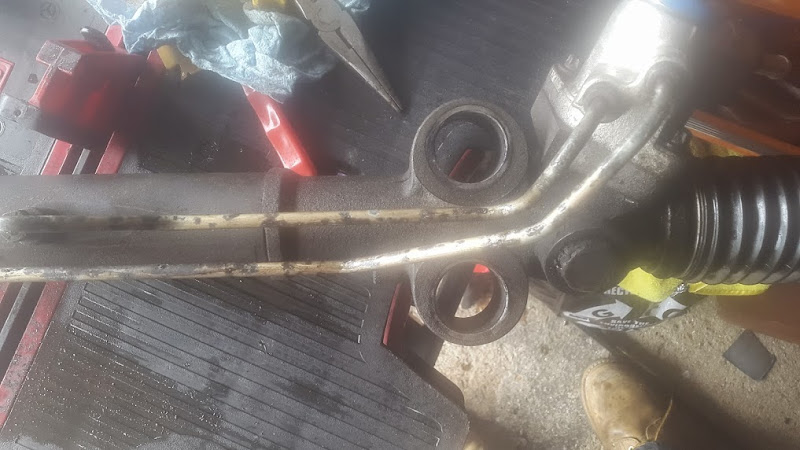
bits of old rubber stuck inside
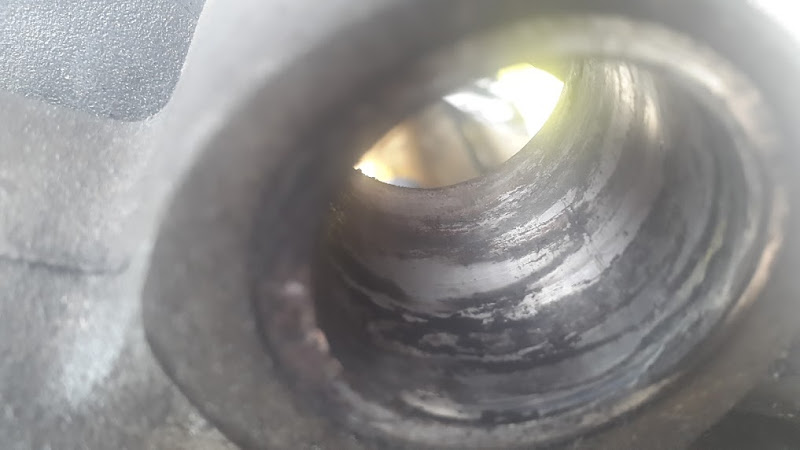
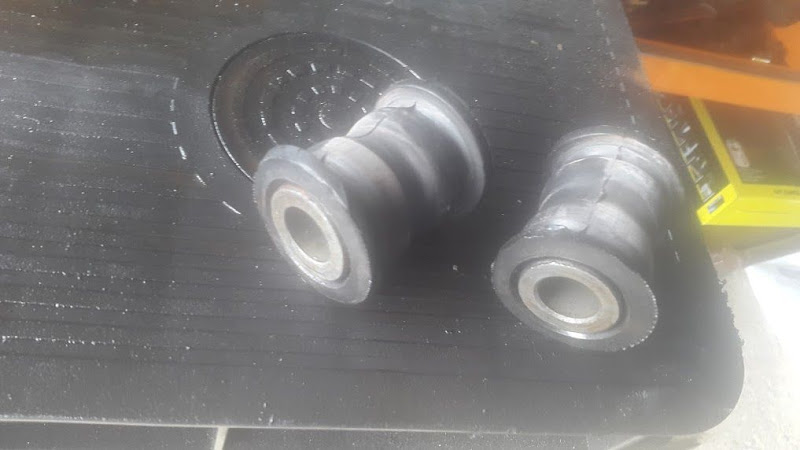
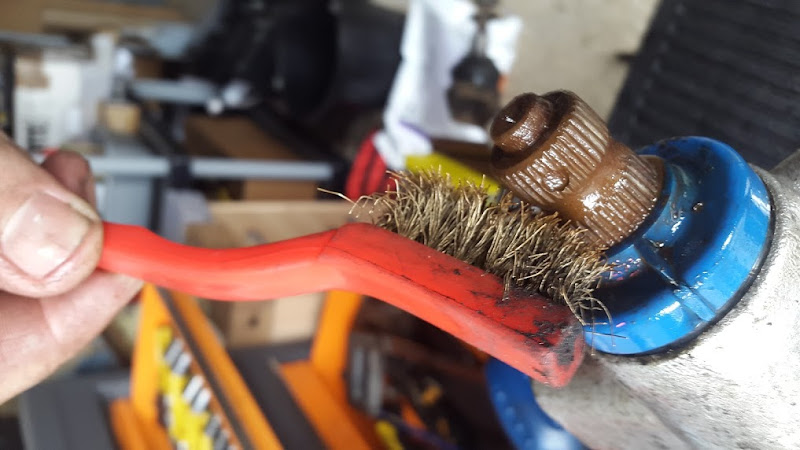
Cleaned up ready for new bushses using some medium and then fine grit sandpaper with lubricant:

New bushes push in easily by hand using grease supplied:

Cleaned up the joint on the steering gear
Everything then reinstalled in reverse order relatively easily (bit of tapping again for the lower link to re-engage) lined up and torqued up correctly, new power steering fluid put it. Will still have to air bleed it a few more times as the fluid is a bit frothy, but that should settle down okay. Job done!
Meanwhile I've got a little goody bag from Clarke Motorsport (great service, cheers to Ewen!) to be getting on with...

-
You will be so happy when this is done.
So will Mrs evest so she can see me again!!

Not doing the rear subframe - just the dampers/springs and arms.
Thanks for the advice about the steering rack - might think again about removal. I'm on the driveway at the moment, so I'll have a go at them in situ but not sure I'll have enough room to operate effectively, otherwise I might just leave them in until I can get it on the ramp. Should at be able to get the insulator bush on there without removing the rack.
Cheers
-
Cheers Alex.
I don't think it is locked, but so far I've only disconnected hoses and drained the fluid, will it still lock anyway or do i need to refill? (Hubs and everything off the car too).
-
Hi all,I'm in the middle of replacing all the suspension bushes with the Superpro PU versions, plus new dampers and springs. The front end is currently stripped of all suspension arms, dampers and springs, plus the steering knuckle, discs, calipers, etc... (doing brake lines too whilst I'm in there). After that I'll do the back end. Although I'm doing all this myself, once everything is back together again I'll take the car to a professional suspension alignment garage to have it all balanced and set up correctly.For now, my next bit of work is to remove the power steering rack to replace the bushes. I'm confident enough with following the factory service manual to remove the rack, and the re-installation also also looks fairly straightforward, presumably as long as I keep the steering wheel in the same place once the rack is off, and then and line up the lower link the same as I found it when it goes back on.Question 1 - Am I missing any gotchas with the power steering rack?Question 2 - Once everything is re-assembled (front/back suspension, brakes, etc), I can test drive the car on relatively private roads (military base). The nearest alignment specialist is 40 miles away, which I plan on driving to slowly and with relative caution... provided the 'test' drive was satisfactory. Would anybody advise against this in favour of having the car towed there?Cheers all
-
Cheers Alex,
I'll take your advice on that and just keep an eye on the ball joints then - I know it will be an arm replacement when do they do start to wear down... (gulp...)

-
Cheers guys - the stock ones look like they're somehow bonded to the arms/knuckle so wondered what was used.
-
Hi all,
Have removed my front suspension ready for installation of new dampers, springs and PU bushes all round. I've noticed that my ball joint boots are worn and leaking grease. The ball joints themselves seem fine, no problems driving, no knocking, etc... and never been mentioned at service or MOT. Car has done 130K.
However, I want to replace the rubber boots and flush out the old grease. They seem easy enough to source but my questions are:
- What's the best product to use to attach the boots to the arms/hub assembly - will standard super glue do it?
- What is the correct grease to use?
- Any issues with jet-washing out the old grease out? (want to ensure joint clean of dirt/grit prior to new grease)
- Any recommended suppliers for the new boots?
Many thanks!
- What's the best product to use to attach the boots to the arms/hub assembly - will standard super glue do it?
-
wow! That was quick! Provisionally sold to Luke0549
-
Hi folks,
Brand new Hel braided brake lines with clear red tube finish.
Box opened but parts never fitted, also includes bag of extra P-clips, in case you need them.
£55.00 (includes P&P).

-
Hi mate, it's a satin Z badge but I've since put the Nissan burgers back on a while ago. I think I've still got the satin Z badges somewhere - they go a wee bit green in places after a while but nothing a tidy up or quick re-spray wouldn't sort out.
-
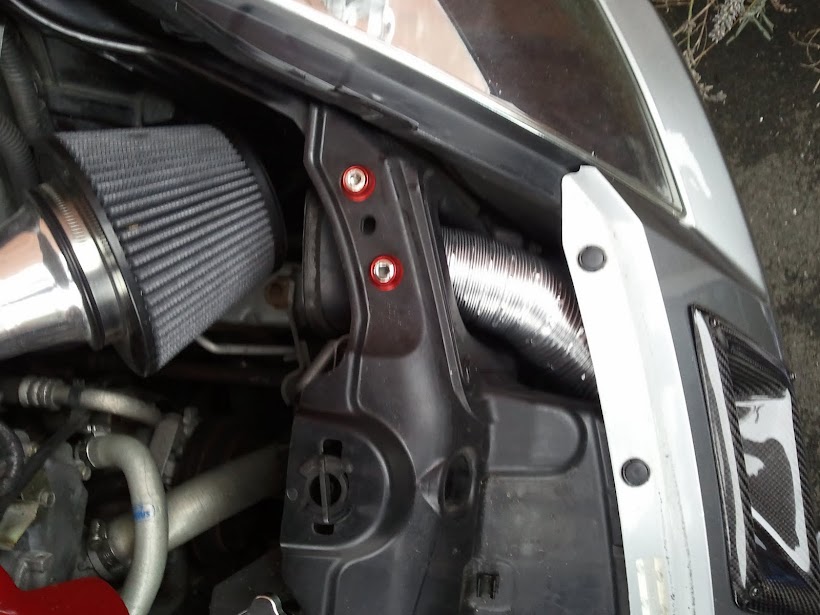
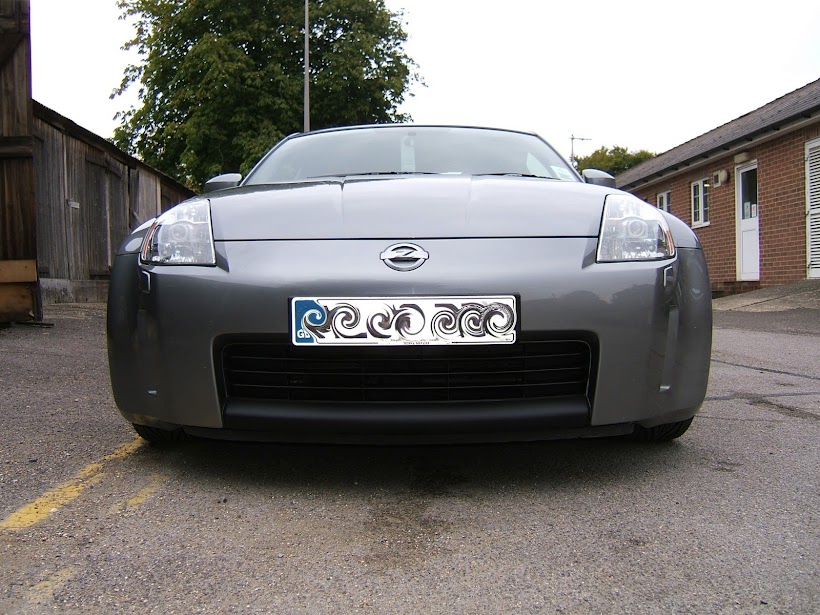
I like that bumper intake snorkel. Did you fit it? Thoughts on it?
yeah I put the nostril in a while ago. Was a bit scary taking to the bumper with a stanley knife, but it turned out well. The theory is that it will funnel more cold air into the intake, I installed a tube inside to help with this, particularly as my short ram doesn't have a heat shield - but I doubt there is much proper data to back-up any claims of power gains.
ref the eyelids - I'm going to stick with them for a bit but I do agree they will look better if matched to the body colour along with the lip that I have to go on there as well.
-
Went for the eyelids, good fit and practically welded on with 3M acrylic tape. Not sure whether to keep them tbh, so will leave them for a while and see how I feel. I like the shape they give, but these are fibreglass covered with CF vinyl wrap and to be honest I think the effect looks cheap (which it was) - if I do keep them I will either get proper CF ones or else paint the FG ones to match body:
.jpg)
Next job will be the front lip - again colour scheme will be either body matched in full or I may keep the centre section black... actually quite tempted to get the eyelids, nostril and lip all done in matching body-colour paint.


-
Here is the effect from when I did mine - did it with spray can, easy job for such a small section:


-
Just a quick review for anybody intending to bleed their brakes or replace fluid using one of these kits:

They're £5 from Halfords and allow you to bleed the brakes by yourself. I used this kit successfully to do mine , working alone.
Normally using the 'two-man' method, your mate has to keep his/her foot on the brake pedal while you work the bleed nipple. If they release the pedal whilst the nipple is open, the system will suck old fluid and air back into the lines. This bit of kit has a little one-way ball valve on the end of the tubing, so you can hook it up, open the bleed nipple and then jump in the car yourself to work the brake pedal. The ball valve prevent anything being sucked back in - so you can then release the pedal and go to tighten the bleed nipple back up when ready.
I used this system for all 8 bleed nipples, topping up the reservoir after each one to ensure it didn't run dry. Job done, very easy and brakes are now much better. The kit worked as described so pretty happy for a fiver.
Pros
Cheap
Works well
Means you can work alone
Cons
Tubing is quite short and a bit coiled so you'll need to raise up your disposal bottle
As you're working the pedal, you can't monitor the fluid/air coming out, except for the driver side (you just have to get out inspect the tubing after pumping the pedal)
When finished, you will have fluid vacuum-trapped in the tube. There is probably a way to get it out without pulling the valve off the end of the tube and wrecking it like I did - but for a fiver, happy to just buy another one next time.
-
I ripped that piece off my zed last week too!
-
1
-
-
Job done!!
Before...
After...
.jpg)
It's in there somewhere...

And from the front... stealth mod!!

Well it was fun doing it and also put new gaskets in - went for the Cosworth Thermal Phenolic(?) Intake gasket so should be good for another 50bhp....!!!
-
Bolts founds! Stuck on top of a bracket near the wheel arch where the fuel lines are (i think). Now I can crack on...!
😥
-
1
-
-
Just saw a set of 18" Rays on eBay - usually popular so may be worth a look for somebody.
http://www.ebay.co.uk/itm/350z-rays-alloys-/321685262133?pt=LH_DefaultDomain_3&hash=item4ae5ef8f35
-
Cheers keyser - pm sent!
-
Cheers mate - I'll try again to find them again tomorrow. Was getting cold and frustrated, plus the light was fading. Hopefully with some careful probing I might get lucky! If not I'll try removing the IM to get more access. If it's to much of a pain I'll get some new ones instead - might work out the quicker option!
-
Definitely not anywhere internal I had the covers in place before bringing the bolts over, and the IM was covered up (just took the cover off for the photos) - I was trying to put them into the lower edge of the driver side cam cover when I dropped them, twice on the same hole! Heard them clunking down through the engine bay, but didn't land on the driveway. So frustrating!
-
Saw this post way back and have wanted to do it ever since:
http://www.350z-uk.c...red-cam-covers/
Well I'm half way through the job. Work has stopped as I've dropped two of the cam cover bolts and can't find the little b@stards. Had the car up on stands, taken of the under-tray and had the magnetic probe for almost an hour - where do they go? where?? WHERE?!?!?!
Does anybody has a couple of cam cover bolts going spare...?
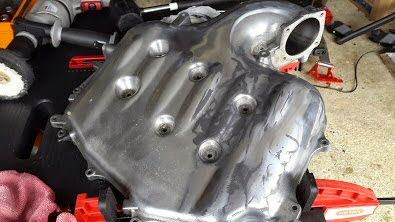
Anyway - here is what red cam covers look like in the engine bay.
.jpg)
.jpg)
They look a bit orange in the photo but are a darker matt red to the eye.
Took the opportunity to re-polish the upper intake manifold whilst it's off the car. Why not?
-
Cheers mate, will go through the tests again tomorrow. Unfortunately I don't have the kit to do a full leak-down test.
Does anyone know what the compression should be when brand new?
Power Steering Rack Removal/Installation - Success! ***pics***
in Suspension
Posted
Some if that might be the WD40 I sprayed on the bolts. The insides were dry when I pushed the bushes out.
Could the gunge you have just be excess new grease working its way out?