


evest
-
Posts
733 -
Joined
-
Last visited
Content Type
Profiles
Forums
Events
Gallery
Store
Posts posted by evest
-
-
Oh forgot to mention - if you put your doors back together and the passenger window has stopped working, then BEFORE you strip the entire door, take the window out, remove the mechanism; remove, dismantle and clean the motor, to then put it all back together again only to find that the problem persists.....
... just spend literally 1 second checking that your big fat clumsy hands haven't pressed the passenger window lock button on the driver side switch panel...

-
 5
5
-
-
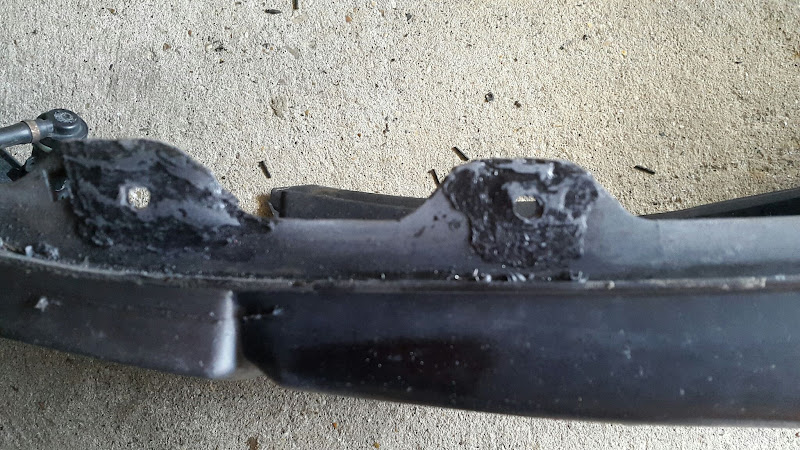
Having had the undertray off a few times the condition of the underside of my bumper has deteriorated, due to rusted bolts and the captive nuts pieces graunching the soft plastic. Shamefully, an increasingly elaborate system of tie wraps had found their way under there but the whole thing got so weak that the wheel arches came into contact with the tyres and had to be replaced. So time to do a proper job...
I used a plastic welder, some flexi plastic welding rods and some aluminium bodywork repair mesh. All in about £80 inc the plastic welder. Some much better video guides on how to do this are on youtube (not zed specific but doesn't matter).
Bumper off and example of the sort of damage (worst case below) - about four of the bolt positions needed repairs:

Cut mesh to shape (one piece seen here but best to go double thickness) - heat up area with welder to make it tacky and press it the mesh:


Apply flexi plastic wleding rods to build up material around mesh - bonding with existing bumper:


Leave to dry and cool and than sand smooth and drill holes - I lined up the 'kerb scraper' trim against the bumper to get the positions right:
Neaten up as desired. Re-installed along with some new wheel arch liners and now strong as new. Only drawback it that as you will have increased the thickness slightly so the captive nut clamp things need a bit of encouragement to go on - I found that a few gentle taps with a rubber mallet worked well.

-
5
-
-
Well this all started off with a new HU, which led to a spruce-up of the centre console which led to.... a full interior re-trim...
Sort of Aston Martin DBS inspired but clearly I'm not really going to achieve the same quality, but I'm pleased with how it turned out for a DIY job. Lot of work, mistakes, learning and there are still a few little finishing touched and neatening up needed. If you spot any issues - don't worry I already know, believe me! Haven't photographed every single stage as too many, but it's a quick canter though the project.
I purchased and learnt to use a sewing machine! Then I gathered materials and glue and vinyl wrap, etc... Didn't keep track of the total spend so far, but not more than a couple of hundred quid (including the sewing machine). I've used viynl instead of leather because it's cheap as chips and still looks great. Leather would be too difficult to work with as an amateur - besides, I'm a vegan so kind of against the rules!
I fully stripped out the dash (removing steering wheel not essential but easy to do and makes things massively easier, in my case I wanted to re-do the switch panels anyway - you need security torx bits to remove the steering wheel - must be the security ones with the little holes in the end), centre console, HU, dash right back to the windscreen.

Believe me this is not as daunting as it looks and everything somes out fairly easily. There are other guides out there on the internet, but all I would say is - if you attempt this, just go in a logical order and don't force anything - if something isn't coming out easily there will be a bolt of screw still attached somewhere. Try to remember where all the bolts and screws go or bag them and label them.
I purchased used door cards to work on. I did some designs on my computer and eventually settled on one. The idea was for things to flow nicely and fit in with the Zed's general shape.
I started with the two top and two bottom dash panels. Took a few attempt actually as didn't get the stiching lined up and due to the thickness of the material being added, I had to trim down the dash panels themselves so that everything would fit back together. The passenger side was relatively straighforward but the driver side was a bastard due to the dish that the steering column sits in and all the buttons. Haven't got a photo but I couldn't do it in one piece of material - however, the join lines are blended quite well and almost entirely hidden by the steering wheel and control stalks, etc...


I then tackled the front grille panel. This was a bastard - especially the vented section - wasted a lot of vinyl wrap trying to solve this. In the end I chopped out the little crossmembers of the grille, wrapped it and then plastic welded some aluminium mesh that a mate had spare to replace the grille. Worked out really well and looks much better.

Sanded under supervision!


Plastic welding - very handy tool to have for other repairs too. Basically a sodlering iron with a big pate tip and rods of flexible plastic to use.


The centre console was sanded, painted black and then lacquered. Could do with a bit more fine snading and polishing to get the shine perfect. The pods were painted matt black (simply due to them previously being silver) with red rings to fit the theme. (See finished pics below)
Steering wheel pieces wrapped. Haven't bothered to replace lettering - I know what everything does!


Then... the door cards.... days of my life......... these took an age to get right but hopefully worth it. The idea is that they flow into the dash coners whilst adding a more interesting shape and detail to the interior. The diamond pattern most prominent on these and it is also repeated in the lower side panels of the foot wells.


And the finished effect with everything back together....!


Looks better in the flesh - honest!
Next steps are the centre armrest console (probably carbon vinyl wrap), A-pillars and headliner - black alcantara with maybe a centre section/strip of the diamond pattern repeated on the headliner. I will also make new gearstick and handbrake gaiters with the same red stich accents. And some new floor mats!
-
6
-
-
Cheers Alex ☺
-
Hi folks,
Haven’t got my manual handy so: Question on the axle nuts – can they be re-used?
Recently had an MOT fail due to excessively wheel play = worn rear wheel bearing – however I’ve not had any noise/symptoms of it, even though I’m on 136K miles! I did have a slight “wubwubwubwub†noise and on stripping down the hubs to get them ready for new bearings I noticed that on the corner in question the axle nut was barely more than finger tight (whereas had to heave on the breaker bar on opposite side).
Had everything stripped a while back when I redid my bushes, etc and pretty sure I torqued everything up correctly – concerned the nut may have worked it’s way loose hence my question. On the other hand if they can re-used / re-torqued safely then I guess it’s possible that I must have not tightened correctly last time.
Â
For now have re-torqued and the noise has gone away – while get the MOT re-checked this week to see if the wheel play has definitely gone.
Cheers!
-
Hi folks,
Anybody know if the stock space saver will fit a Nissan Juke?
I believe the stud pattern is the same, rolling radius slightly bigger than juke wheels but should be ok for a short rescue drive. Just need to know if the offset is an issue? I'm guessing if it clears the Brembos then it shoul be ok on the Juke - but if anybody knows for sure I'd appreciate it.
Cheers,
S.
-
I think the big petrol stations let you fill out a non-payment form so you can pay later. Of course its all on CCTV. Don't think indie garages generally allow it. I expect that the jokers I met already had a full tank!
Probably will still stop for people and just rely on experience to guide me!
-
I'm sure many of you may have already heard about this sort of thing, but I hadn't and I was targeted by a roadside scam yesterday, so I'm guessing there will be somebody on here who may not have read about them.
So pulling onto the A1 at Letchworth, there's car on the hard shoulder of the slip road with a guy waving frantically - so I pull over to help. He says he's run out of fuel and is asking for money, promising to pay it back, etc - he's starts thrusting his 'gold' rings into my hand as a deposit (hallmarked 18K...
 ) and a very ropey looking business card.
Since his car was still running, I told him there was a petrol station literally less than 2 miles away and offered to show him the way. So we drove there, and our conversation continued. By this stage, he and his dad are asking me for £100+ to get them to Manchester, where they then need to fill up a 'truck' with diesel to take another car to a client... blah blah blah, more gold coming my way. They are promising to come back next day and pay me £500, etc...
So.... they're on a business trip from London to Manchester to sell a car that is on the back of a flatbed. They've made it as far as Letchworth and run out of petrol. Their flatbed is also out of fuel. They have no money and their bank cards don't work and they have no breakdown cover. Then they're gonna drive all the way back up here tomorrow to give me a fortune (thought the gold rings were worth £000's?? Just leave me with those then??) Good luck with the business guys...
Anyway, whilst I'm good natured and like to help people, I'm not stupid and suspected this was a scam. I didn't give them any money and suggested that they go into the petrol station and explain that they are genuinely 'stranded' - I'm pretty sure you can come to some arrangement in these circumstances. They chose to drive off. Wish I had phoned the police sooner so they could catch them in the act - hindsight!
I called the police and reported everything so hopefully they will be able to trace these guys. Apparently this kind of thing happens all the time and unfortunately people can get tricked into giving out money - especially when the tricksters claim their family has just died and they're desperate to get home.
Worse thing is - I'm probably less likely to pull over to help people now.
It's a general warning, but if you live in Bedfordshire/Hertfordshire - here are the details of the ones I encountered:
LX55 KGZ
Silver Ford Focus
2 Asian guys, mid 30's and mid 50's - wearing suits, they weren't threatening. Can seem very genuine at face value.
Bogus business card and gold rings offered in return for various amounts of money.
-
2
-
-
Hi Jerrick,
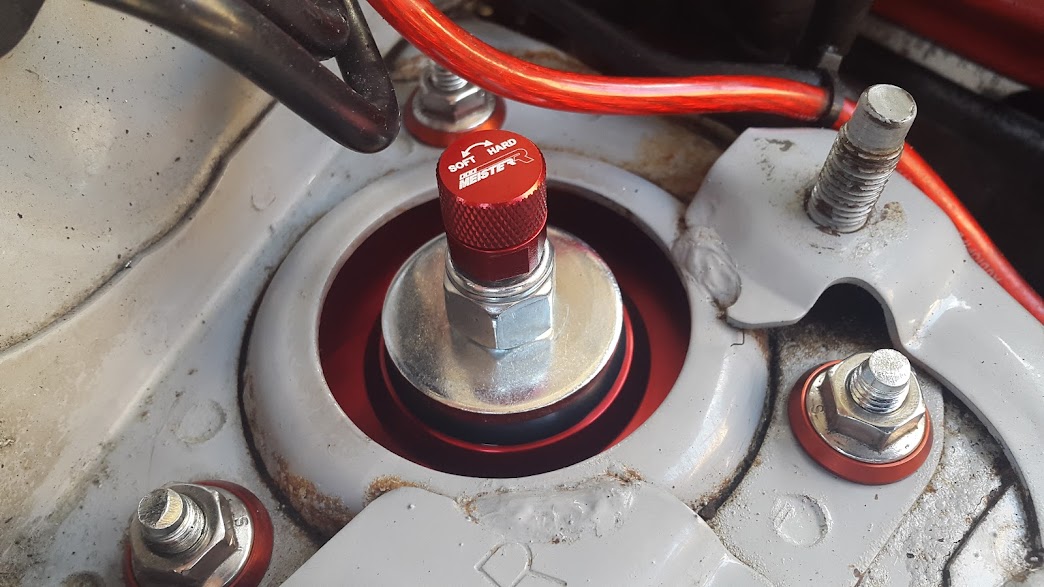
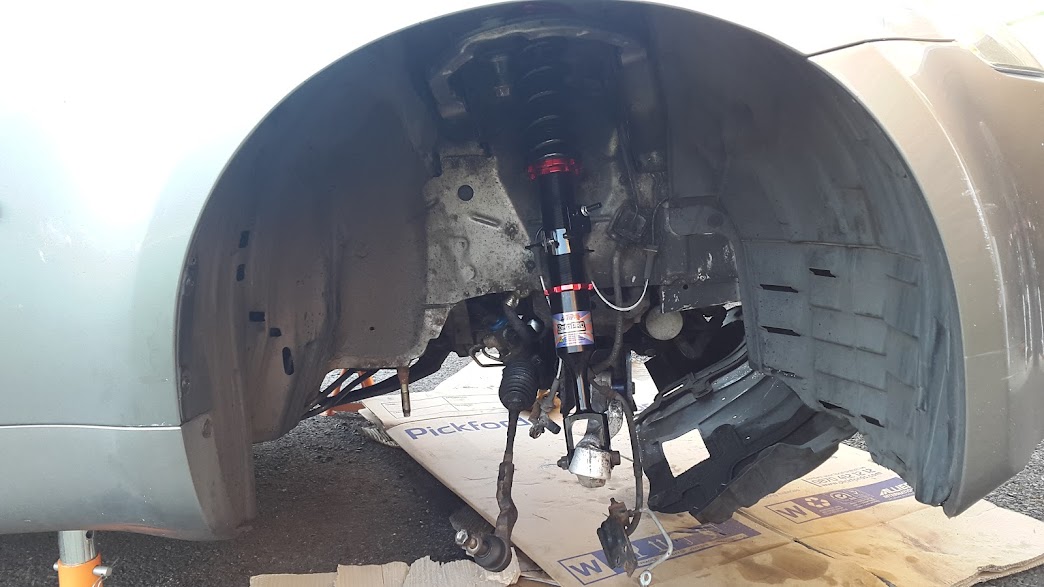
I'm very impressed with them. It's still early days so need to experiment further with the firmness settings and ride height. I'm no expert - but the car feels superb in the corners and very planted - I'm a lot more confident accelerating on both straights and corners, just on roads so far, I haven't tracked it. The rear is nice and firm even on the softest setting - I still need to modify my rear strut brace in the boot so I can attach the adjustment cable to the top of the damper. I have the fronts set at about the 1/3 point between soft/firm (favouring soft) and this feels good so far. Steering feels more responsive than before, not that it was bad to begin with, and I've got rid a slight 'wandering' feel that was starting to creep in.
As you can see, I've also done all the bushes and put a little more negative camber on the fronts. I've had the car corner weighted but following some further adjustments it needs to go in for a final alignment. This has no doubt also contributed to the overall improvement too, but I think the MeisterR coilovers have been an excellent upgrade. Sorry this short review isn't more scientific!
-
1
-
-
Here are some fitted pics in my car (and a vid) - same intake but mine has a different sticker and a red coupling hose (my choice - original came with a black one) - really good looking and sounding intake!:


youtube vid:
-
Dibs mate!
Will pm shortly, cheers!
-
A1 Northbound near Sandy. Overtook me but politely pulled up alongside long enough to exchange wave/thumbs up - then he was gone!
Cheers :-)
-
Ok so rear bushes and drop links are all done - quite awkward as there are 4 bushes on the hub assembly which are difficult to get at. But I've hammered, drilled, burnt, sawed, sanded and heaved my way to completion. Everything back on the car so now all that is left is to set up the ride height the way I want it and then it's off to the suspension specialists (Northampton Motorsport) to do the alignment and corner weighting.
Brakes
Okay so had a few problems with the new SS brake lines - well not so much the brake lines as my bleeding of them! Looks like I let some air into the master cylinder during the first bleed, and oh yeah - put the front callipers back on the wrong way round
 Beware nipples that point south...
 So today I had to remove the master cylinder and bench bleed it - bit messy but sorted it. Callipers swapped over and everything reinstalled and bled again. Driving is satisfactory but there is a little play in the pedal, so I may need to bleed again.
The handbrake is firm but making a 'clunk' when applied so something not right there. Also got some noise from the rear - at first I thought this may be the handbrake shoes touching the inside of the disc, but following a dual carriageway run I stopped to see if that part of the disc was hot - however it wasn't nearly as hot as I would expect be for that to be the cause, so I suspect the noise may actually be part of the dust shield touching the brake disc - they did get bent a little when swapping the bushes so just need a little more prodding back into the proper shape. Will investigate both when I jack it up for the ride height setting.
Overall it's been hard work and I've had to do a lot of learning along the way, but despite a couple of schoolboy errors I seem to have mostly succeeded and hopefully when the suspension is tuned and the couple of brake niggles are sorted the car will feel great!
-
1
-
-
Hey folks,
Am dismantling the rear suspension assembly to replace the bushes and the eccentric bolts for the lower control arm needed a lot of encouragement to depart from the car! So, best to get some new ones with the nuts as well.
Cheers


-
Inside your engine bay there will be a plate with the chassis number etc on it - paint code is on there. The plate is at the back of the bay on the left near the hose that goes from the upper manifold through to the brake cylinder area.
-
1
-
-
I had mine out today (ebc yellow stuff) and a very slight lip had formed due to the painted area surrounding the pad material. I would have thought the brake disc would easily break it off as the pads wear... but there it was...
Mine don't squeal but ciuld your's be a similar issue?
-

Well after a full day's work the front end is almost done. The re-assembly was interrupted by having to drill/punch out the old cotter pins on some of the joints and also to clean up the rusty sway bar brackets and re-paint them. But after that everything was gradually re-assembled and I was lucky enough to have a keen neighbour help me out with an impact gun on the ball-joint nuts (also aided by ZMANALEX's tip of using a brace and jack to apply sufficient pressure on both sides of the joint - worked a treat!).
So:
- sway bar and new bushes installed
- New drop links installed
- banana arms and brace re-installed
- Steering knuckle installed and everything connected and torqued
- New brake lines installed
All that is left to do is bleed brakes (once rear is done) set up the ride height and drop links (standard settings for now) and put the wheels back on! Oh, and having caved to peer pressure.... get some new sway bars...!

Cleaning up the sway bar brackets

Whiteline drop-links (ended of stock sway bar rust free and painted - only had red Hammerite in garage!)

Brake lines done!

sway bar, brackets and bush (oops scratched it a bit)

- sway bar and new bushes installed
-
I agree too guys - just might need to leave it a month before doing the sway bars - and since they're relatively easy to get at I don't mind putting the stock one back on for now. Got the adjustable drops link ready to go.
I mentioned the same with bushes for the diff at least if you don't want to go the full hog with the subframe. This will not improve handling directly but better launches from standing starts or out of corners.They've been in and out of the 'shopping cart' a few times! To be honest I just had to draw the line somewhere money-wise for now...
Will likely drop the diff (necessary to get the bush out I believe?) when I do the rear end as I also had that previous err... issue with the filler bolt that I'd like to resolve ...
When all this is done, it will be going in somewhere for Uprev...

-
1
-
-
Great work
Would it not be worth getting some protection on those arches while it's nice a clear under there?
Good point mate, I think I have tin of waxoil in the garage so will get it in there.
-
They've been in and out of the 'shopping cart' a few times! To be honest I just had to draw the line somewhere money-wise for now...
-
The work continues to get all my bushes replaced and new Meister-R Zeta S coilovers set up. So far have managed to strip everything off the front of the car and have installed the power steering rack bushes other post:
http://www.350z-uk.c...n-success-pics/
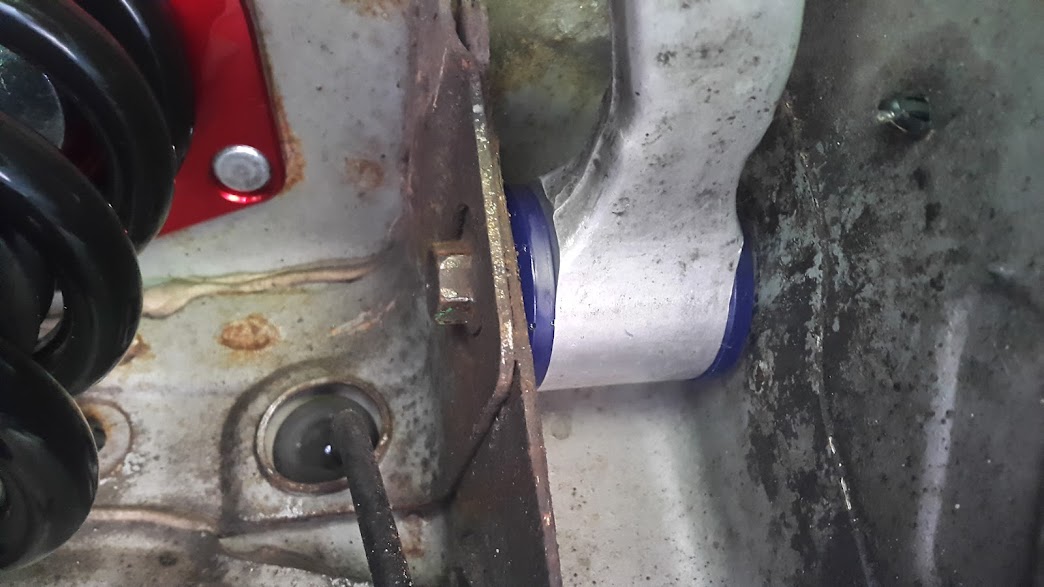
I'm fortunate to have a fully equipment workshop on the base where I live, and for a packet of biscuits the blokes in there helped me out with a 12 ton press to put the new Superpro PU bushes into the banana arm and lower control arm... upper control arm ones went in easily by hand.
New bushes in:

So... anti-roll bar off and took the opportunity to clean it up and get rid of some rusted paint, will coat with new paint tomorrow:

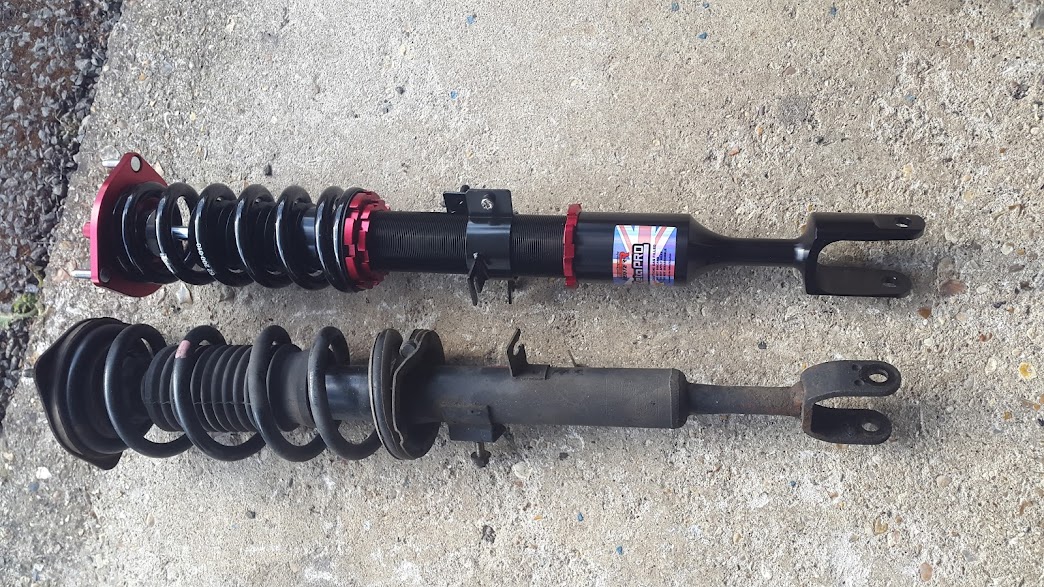
Shiny new dampers and springs

So tomorrow it will be setting up the ride-height (for now), the anti-roll bar to paint and re-install with new bushes along with new Whiteline drop-linksa nd put the rest of the undercarriage back together, Hosetechnik brake lines, clean up the calipers, bleed brakes and might as well t and then get the rear jacked up...!
-
2
-
-
I'm going to order all my parts one at a time from now on - more sweets!!
-
1
-
-
Ah yes - I see what you mean now.
I cleaned that up as well whilst the rack was off but that bolt/port doesn't appear to be a serviceable item from the FSM. All I can see is an O-ring that goes between the gear sub-assembly and the gear-housing assembly. Just guessing here, but from my pic the muck seems to have collected more at the top than the bottom of it, so it makes me wonder if its a case of moisture and grime collecting in the recesses of the gear sub-assembly above it (also quite mucky) and collecting downwards over time? That port would be a natural dripping point for anything travel downwards from above it.
-
As far as I know the steering rack just bolts to the front sub-frame, no other gaskets etc involved.
nice compliment
in 350Z General
Posted
Had a few over the years, but think the best I've was a simple head-nod and thumbs up from a guy at the lights straddling a Honda Fireblade (no I didn't even try to keep up with him...)
Apart from those who like the looks, it's a very well respected car by petrolheads in general.