

bc1987
-
Posts
492 -
Joined
-
Last visited
Content Type
Profiles
Forums
Events
Gallery
Store
Everything posted by bc1987
-

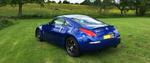
Something to waft around in - X5 4.4L Estoril Blue :)
bc1987 replied to Adrian@TORQEN's topic in Other Cars
is it weird that i bought exactly the same car to be my daily run around to preserve my z?! -
Does it come with box or any film? Congrats btw!
-
Need your help - Customer Pics Requests - Pretty Please
bc1987 replied to Tarmac@TarmacSportz's topic in Tarmac Sportz
Thought i would join the club King Style Front lip Tarmac Sportz DRL's Tarmac Sportz Side Steps Tarmac Sportz sourced Berk HFC's Scorpion exhaust (available from Tarmac Sportz.... awkward) Tarmac Sportz Wheel spacers Tarmac Sportz TS style diffuser (Nismo spats in the garage waiting for a day i can be bothered to fit them. Tarmac Sportz Transfer (adds 30BHP+ and increases penis size) Tarmac Sportz MotorDyne plenum spacer Pop Charger Berk polished intake And last but not least Tarmacs purlple knob -
Carbon style LED bumper reflector offer
bc1987 replied to Tarmac@TarmacSportz's topic in Tarmac Sportz
Here are the daytime pictures... i got tired of pulling leaves off! -
What classifies as sensible?
-
Carbon style LED bumper reflector offer
bc1987 replied to Tarmac@TarmacSportz's topic in Tarmac Sportz
Fitting 350z Reflector Daytime Running Lights. Equipment Required 1x Set of Tarmac Sport Reflector DRL’s 1x Auto DRL switch - http://www.ebay.co.u...=STRK:MEBIDX:IT 2 x In line wire taps (available from Maplins 10mm Socket Short posi-drive screw driver Impact gun / Tyre Iron Car Jack Axle stand Fine flat head screw driver. Time required About 1 hour. Disclaimer I accept no responsibility for damage you cause to yourself or your car when fitting to these instructions. Take time and take care. Process Disconnect Battery Jack up front end of the car and place on stands. Remove the front wheel. (note that if you don’t have an impact gun you should loosen your wheel nuts on the ground) Remove the wheel liner – this requires removal of one screw panel clip and 3 other panel clips which can be levered up with the fine screw driver. I didn’t remove the ones under the car and simply bent the wheel liner out of the way. Then you need to undo the front bumper (two 10mm hex heads under the arch liner) and remove all 6 of the plastic clips in the engine bay which hold on the bumper. At this point you can lever the bumper forward just enough to get access to the reflectors without removing the whole bumper. using the small posi-drive, remove the reflector by unscrewing the two screws. This image is taken after i had removed the reflector. Push the new DRL’s into place and check the fitment. If the fit is good, screw them in. I had already wired up the auto switch to the manufacturers instructions and led the cable out above the head lights I also took this opportunity to fit LED side lights On one side you also have to tap into the side light positive. I did this with the inline tap from Maplin electronics. I wired mine to the main head light. Technically you should wire to the side light but i thought it looked way cooler this way. Once you have done this i would check it all still works by attaching the auto switch to the battery briefly, then reverse the process to put the bumper back on. I also took this opportunity to fit some Tarmac wheel spacers and bleed my brakes. (I had to steal the pipe from the hoover to torque them up!) Repeat the above for the opposite side. When both DRL’s are fitted, you have to wire the auto switch into the ignition of the car. After a bit of research i found that the yellow wire at the back of the plenum turned positive when the ignition was on. I used another maplins conector here. Those of you into engine dress up will probably want to find a neater way of doing this. I earthed the switch to the bracket which holds on the wires that i tapped into. Reattach the battery and check it all works. Remember that the lights must turn off when you turn on your headlights. Here is a picture of the finished product, more to come on the weekend when I can do something cool. -
That's what I said. great minds and all that...
-
Carbon style LED bumper reflector offer
bc1987 replied to Tarmac@TarmacSportz's topic in Tarmac Sportz
In, more details and pictures to follow.<a href="http://s1323.photobucket.com/user/bcantor7/media/Mobile%20Uploads/20141114_215811_zpskhlp6uvw.jpg.html" target="_blank"><img src="http://i1323.photobucket.com/albums/u584/bcantor7/Mobile%20Uploads/20141114_215811_zpskhlp6uvw.jpg" border="0" alt=" photo 20141114_215811_zpskhlp6uvw.jpg"/></a> -
for that money you could have a GTR...
-
I have a unit for sale if you want it. Drop me pm if interested
-
Carbon style LED bumper reflector offer
bc1987 replied to Tarmac@TarmacSportz's topic in Tarmac Sportz
Can anyone tell me if it is front arch liners out to access? -
It was seriously cold!!
-
I love my one of these (from tarmac). Just remember to keep a pair of gloves in the car as on a cold morning it is really cold!
-
I also have a spare
-
Carbon style LED bumper reflector offer
bc1987 replied to Tarmac@TarmacSportz's topic in Tarmac Sportz
Hey, 2600 people are getting fired... I couldn't get caught on 350z - uk.com! I had to rush it. -
Carbon style LED bumper reflector offer
bc1987 replied to Tarmac@TarmacSportz's topic in Tarmac Sportz
If I can get the Chris I can fit Friday evening hopefully. -
Carbon style LED bumper reflector offer
bc1987 replied to Tarmac@TarmacSportz's topic in Tarmac Sportz
Quite like these. Are they super new or are there pictures? -
ZSPEED UNDERTRAY GROUP BUY2 - YOU NEED ONE !!
bc1987 replied to Tarmac@TarmacSportz's topic in Tarmac Sportz
So the attachments that my plastic undertray use are all fubar. does that mean this wouldnt fit? -
Wheels - looking for peoples opinions.
bc1987 replied to Tarmac@TarmacSportz's topic in Tarmac Sportz
I have a unique idea though... I will take one for the team and allow you to fit each kind of wheel to my car and I will write up a quick review of what each one looks like and how it drives :-) -
Wheels - looking for peoples opinions.
bc1987 replied to Tarmac@TarmacSportz's topic in Tarmac Sportz
You are about to get everyone's opinions as everyone will like it differently. Surely best option is picture of them fitted to a car with price for individual/set/set plus tyres? -
Tarmac Sportz 2nd annual pre season BERK HFC Group Buy
bc1987 replied to Tarmac@TarmacSportz's topic in Tarmac Sportz
Fitted mine this evening. Cold wet and miserable but totally worth it. Couldn't get the brace off my old cats as they were so rusty so have to go back and fit that another time. -
350z / 370z Owners - Introducing Vordoven Wheels
bc1987 replied to Tarmac@TarmacSportz's topic in Tarmac Sportz
Out of interest do they come with centre caps or do you have to manufacture something blue Peter style out of bottle tops? -
Zed Shed Bargain Bonanza (and some free(ish) stuff)
bc1987 replied to Keyser's topic in 350z Parts For Sale
I never fitted them - I think it was supposed to be 6K - no oil leaks seals appear good and they are dibed sorry. If it falls through then second dibs please. Noted sir third??
