V1H
-
Posts
320 -
Joined
-
Last visited
Content Type
Profiles
Forums
Events
Gallery
Store
Everything posted by V1H
-
Can't find right now what I'm looking for, but I can show you a video of my car when it was recently dyno'd. The industrial fan noise overlaps the exhaust sound but you can get an idea. The live exhaust sound was brutally loud, my iPhone won't replicate that.
-
Yes I'd say so. the rod should be higher than the cylinder so no oil can leak out. Check the Z's rear hatch gas struts, they are the same orientation.
-
Thx m8. While you can get the gauge pods of course, the boost gauge is home-made. Did I inspire you to a DIY winter project for your very own oil pressure gauge?
-
Now onto some dashboard enhancers and gadgets. I thought a lot about where to mount any additional gauges to the dashboard. After all, the SatNav area is occupied. I thought I could fit two gauges at either side of the instrument panel roof as long as it's done nicely So I went for two all-metal 52mm GlowShift Gauge Pods [#GS-U01B]. Into one I fitted an AEM Wideband UEGO AFR gauge [#30-4110], which features the latest Bosch LSU 4.9 sensor. This will keep track of my A/F ratios once boosted I realise the 370Z comes stock with two wideband AFR sensors called A/F sensor 1 in the Service Manual. But I'm not aware of many aftermarket products offering a direct read-out of these. The AEM UEGO sits in the left hand side pod. The right-hand side pod houses something unique I will come back to in a moment I also have a GReddy Infometer-TOUCH [#16001604], which is an engine monitor and diagnostic tool with touch screen, attached to the right side of the windscreen. Just above it on the windscreen sits my brand new GReddy Profec Electronic Boost controller [#15500214]. (not in the picture) For now it's only hooked to power. I leave the routing of the data cable that runs to the boost controller in the engine compartment to Torqen, since they'll determine the exact mounting location of the controller The centre console is touched up with a gloss black Mishimoto weighted shift knob [#MMSK-BK]. It weighs 363 g and I absolutely love the feel in my hand In order get the stock knob off I advised to use a rubber strap wrench. Before I tried a pipe wrench with cloth - hopeless. The stock knob sits über-tight. Back to the right-hand side gauge pod. When I planned F.I. on a stock block I knew boost will be limited to roughly 8-9 psi. I went to search for the perfect 52mm Vac/Boost gauge. It had to both be accurate and high-resolution (0.1psi) since my boost numbers would be "small". To help things the total range should therefore be 10-15 psi. I searched forth and back and found none on the market. the "smallest" gauges go to 30 psi with coarse dials... Having built many electronic gadgets for my Prelude, I thought why don't I build my very own perfect Boost gauge. No sooner said than done! Here we go: First I selected a high quality temperature compensated Bosch MAP sensor [#0 281 002 487] found in many Mercedes-Benz. It's the lowest above-atmosphere MAP for "reasonable" money I could find. No point having a 5 bar boost sensor when we want high resolution up to 10 psi. This sensor still costs over £60. It's got an absolute pressure range of 20...250 kPa (up to 1.5 bar boost). The sensor outputs a corresponding 0...5 V signal. My aim was to devise a circuit that would convert this voltage into an LCD reading of -1.0...-0.0 bar for the vacuum range, and 0.0...10.0 psi for the boost range. The resolution would thus be 0.1 bar/psi with a final accuracy of ±3%. I wanted the readout be accompanied by a 20-LED bar graph - white LEDs for Vacuum, orange LEDs for Boost. ... Time-jumping a few months of spare time design and development, this is what I came up with As gauge housing served a stripped empty Ebay gauge with smoke lens. The gauge face I drew in PowerPoint and printed on a Laser printer on clear film (eg. for overhead projectors). Now I will be teasing (shocking?) you with what's inside All I need now is BOOST!
-
Thanks, yup, will carry on A few words to my current exhaust setup.The Motordyne Shockwave))) [#0004] was soon coming through from Abbey Motorsports and already went on before the body kit.This is the exhaust with some dimension verification. The Y-pipe is 2.5" and the rest is 3". Total weight 26.36 kg. I swapped the default blue-burnt Ti tips with IMO much more beautiful 42 Draft Designs brushed S/S double-wall tips [#EX-91-62CBR]The exhaust currently mates to a pair of non-resonated metallic core Berk HFCs (2.5", 200-cell) [#BT1407-HFC-MET]. Each HFC weighs 2.7 kg vs. stock 5.1 kg.But with my AAM TT kit the Berks will become obsolete. The kit comes with 3" downpipes with HFCs. A.t.m. AAM added me 400cell cores into the downpipes but am considering a swap for 200cells before of the install approaches. Would help gas flow and should still pass emissions test. If not I'll have to find a friendly M.O.T. :lol But I will also have to upgrade my 2,5" Y-pipe to fit the future 3" downpipes. Tony@Motordyne told me they are currently developing a full 3" Shockwave))). Estimated lead time 3 months. It should be available just in time for my TT install The intake upgrades comprise a popular Stillen Generation 3 Ultra Long CAI [#402852], dry filter version (which doesn't need regular oiling). Added Z1 Motorsports Silicone Side PCV Breather Hoses [set] and wrapped in Mishimoto Gold heat reflective tape [#MMGRT-235]. Naturally, this pretty intake got to go soon, too. The CAI is complimented with a Z1 Motorsports modified intake plenum [#7267]. For this Z1 takes a stock i/plenum and sands and files the inside surface slightly. I compared my stock and the Z1 i/plenum side by side. The differences appear minute, IMO; the surface is roughened. Still, it's part of their 400 bhp kit. Fortunately it is compatible with the TT kit, though, in a boosted setup the power gain will become nil. At the same time I swapped the heavy stock crank pulley for a Stillen Lightweight crank pulley [#400338-01] made from CNC machined Billet 6061 aluminum and 304 S/S sleeves. Weight 600 g vs stock 2.14 kg. The reduced inertia recovers some otherwise lost HP. The install was "relatively" simple. Once the radiator fans were removed I had good access to the belt and crank pulley. The hardest was unbolting and re-bolting the crank pulley. That SOB sits so bloody tight you keep thinking something is gonna snap any moment, either the breaker bar or the bolt or both. I used a long 1/2" ratchet (had no proper breaker bar) and extended it with a long alu pipe. I stood with my feet against the garage wall and pushed the crap out of it. The rear end of the car started to lift off It is quite something to do. lol Inertia will be further reduced with my CompetitionClutch clutch [#6073-2100] and lightweight flywheel [#2-630-6ST] mentioned in the first post. The weight reductions will be:CC clutch 7.2 kg vs stock 8.6 kgCC flywheel 8.0 kg vs stock 14.5 kgI was conscious not to choose a too light flywheel, which will cause noisy rattling. Hence I decided for CC's 4140 forged steel flywheel with the added benefit of being much stronger than an aluminium flywheel (which will be fine for NA applications).
-
LOL, you are absolutely right, technically my tint is not legal. But i said I'd consider the law, not adhere to it What it is, I used to be pulled over coz i had my side window tinted way too dark, perhaps 30% total transmission. No way the officer would have let me off the hook. But now at 61% it looks borderline Luxury class OEM and in dayline the tint is not dark enough to draw attention to the law and cause suspicion, IMO. A police officer can hardly tell 61% from 70% by naked eye to have reason for a check. So, I am prepared to risk it this time
-
Above pics also include tinted rear, quarter and side windows. Again I considered 3M but decided for the better priced and good quality The Black Box Tint Alpine Series™ Automotive Window Film, which come computer pre-cut. I used this tint chart as guide and also considered the law (having been pulled over in the past by tinted side windows) First thing i did was measure the factor tint of the 370Z with a Lux meter. My data on the glass transmissions: windshield ~85% side windows ~75% quarter windows ~85% rear window ~85% The law limits are: windshield min. 75% side windows min. 70% I wanted the Rear and Quarters tint rather dark when seen from the outside but still easily see-though from the inside. Thus, I picked 20% VLT. Theoretically the result should be 0.85*0.2=17% overall transmission. I estimated 12% with the lux meter. For the side windows I could legally not have added any tint.. pfff, come on! So I picked the lightest tint available: 50% VLT. Theoretically I should yield 0.75*0.5=38% overall transmission. But I measured 61%, and I think that's a great outcome - legally speaking What other exterior mods have I done: LED for Bulb swaps all-round including ballast resistors where needed. Can all be found my webpage. Painted calipers in gloss Lime green using E-Tech Brake Caliper Paint [#EBCP-GR]. As many do, I did decide for a color theme for my Z, which is white | black/carbon | lime green. I removed the calipers for the paint job and when I put the back on and refilled the brake fluid I came to a point of near despair coz I couldnt get the pedal firm yet didn't see any remaining air trapped.. until i realized this car got bleeders on the front AND on the bloody back of each caliper! LOOL. Well, end good all good. I kinda regret I put Brembo stickers on them, but come next chance I replace them with actual Akebono Then there are my beloved home-made Gas Strut Bonnet Props I did some calculations to estimate angles and forces on the bonnet after I decided mounting points. Then i bought a pair of Nitrider® Gas Struts [#W06JAS0350] with following parameters: Tube∅: 15 mm Rod∅: 6 mm Stroke: 150 mm Total lenth: 366 mm Load: 350 N End fittings: Welded eyes I made a pair of mounting brackets from S/S. Et voilà ! Sweet as hell Note, some cutting into the plastic trim is needed. More descriptions another day.. BBQ is waiting
-
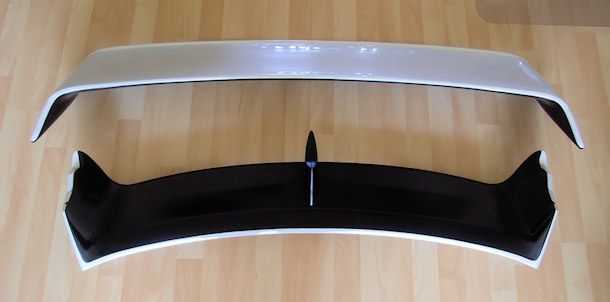
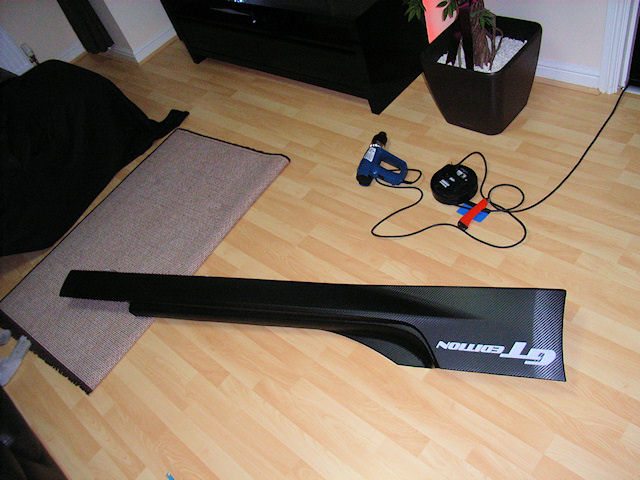
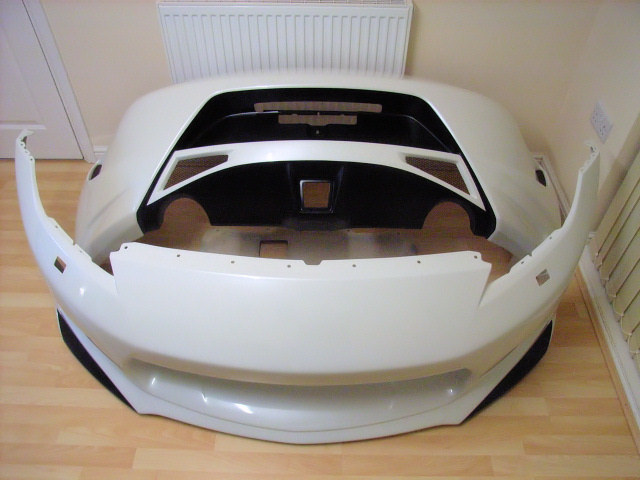
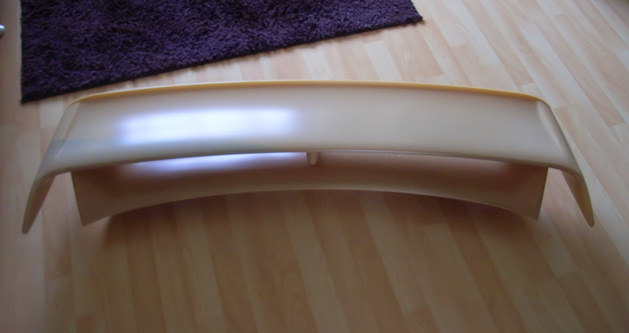
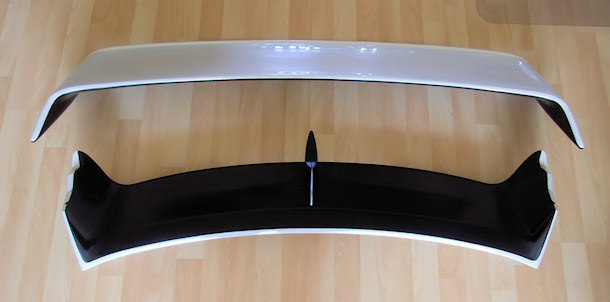
Now that I already mentioned front bumper mods I go straigh to the yummie body kit parts. I didn't want to go for the full Amuse Vestito Aero kit but instead combine the front [#AMUSE370Z13] and rear [#AMUSE370Z15] bumpers with a NISMO wing, albeit for cost reasons not the genuine part but made by EVO-R and sold by theZstore [#50-1885]. Also, I wanted it painted exactly the way theZstore advertised it, it looks exceptional. Got my parts painted locally and fitted everything at home. I documented the install over here already. The side skirts I wrapped in 3M Di-Noc Black Carbon [#CA-421] with the help of some 3M Primer 94 adhesion promoter, a heat gun and the second pair of my wife's hands The front bumper, though, I customized with the addition of said DRLs. I went for the HQ Auto Lighting #DRL-HQ-V12 (bought though Ebay) because of their excellent quality and truly brilliant light output - no flimsy glow á la Halfords but OEM style brightness (6-LED Cree, 2x6W, 2x600LM, 6500K). Secondly, I added home-made skid plates cut from 3mm aluminium and Hammerite Metal painted (aluminium color). And with that little addition of a racing tow hook for that little cheeky look (painted in lime green, just like my brake calipers) Whereas the rear bumper I customized with a Formula 1-style flashing brake light. I replaced our stock fog light with the EVO-R Flashing LED Rear Foglight [#50-3084 Smoked]. Once wired in it would fully light up when "fog light" is switched on and flashes even brighter when pushing the brake pedal (the install sheet destribes how to route a wire from the rear brake light to the second input). For the fog light operation an 18Ohm 50Watt power resistor is needed or else the ECU will strike. Now, I did however brake open my EVO-R light and de-soldered all LEDs. Why? I wanted brighter LEDs So I soldered in 42x 2200 mCd 70° Hi Bright LEDs. But I had to re-adjust the drive currents for the new LEDs. For this I had to first reverse-engineer the circuit board in order then to calculate replacement resistors. No big deal for a physicist, it ain't rocket science For the interested, the amendments are here. Flash in action:

-
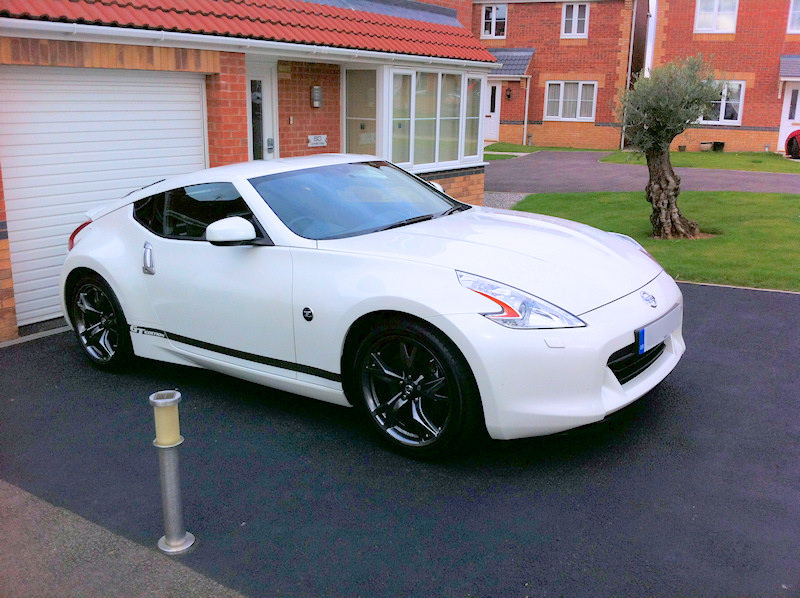
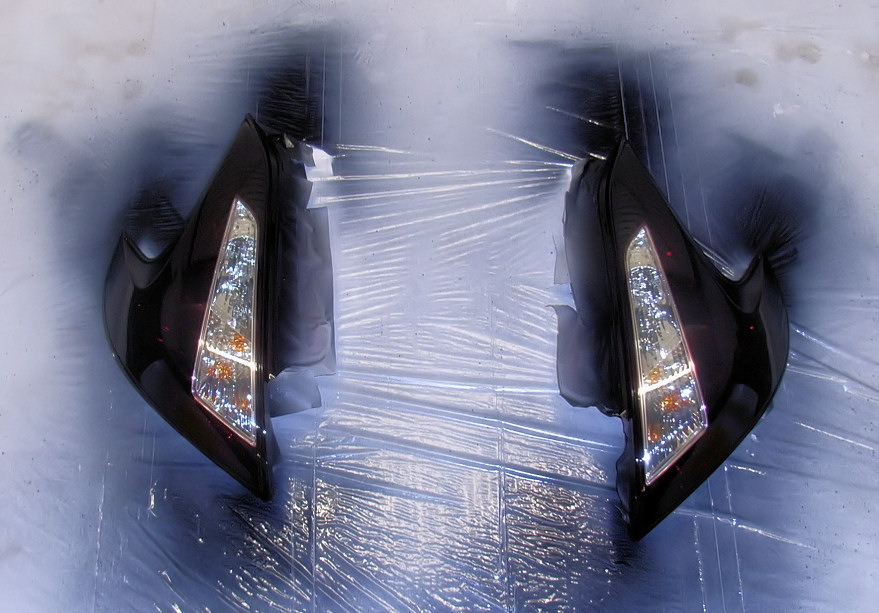
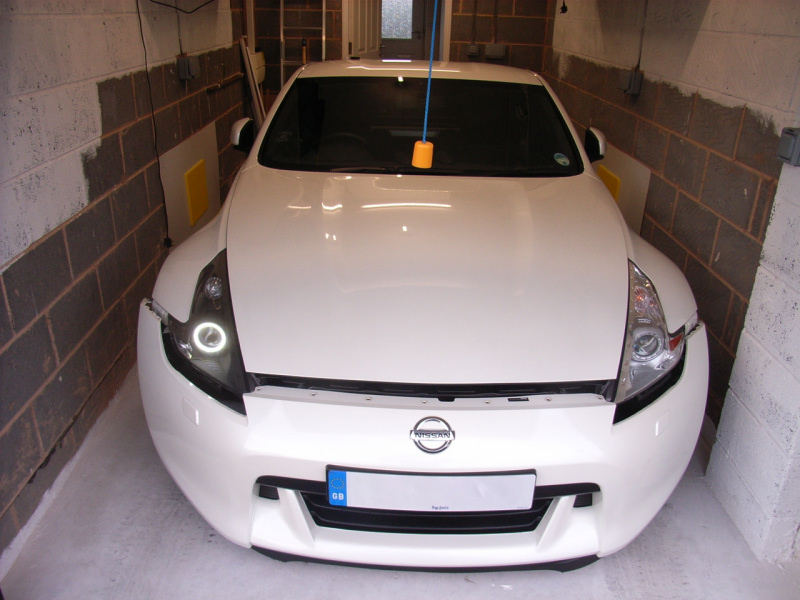
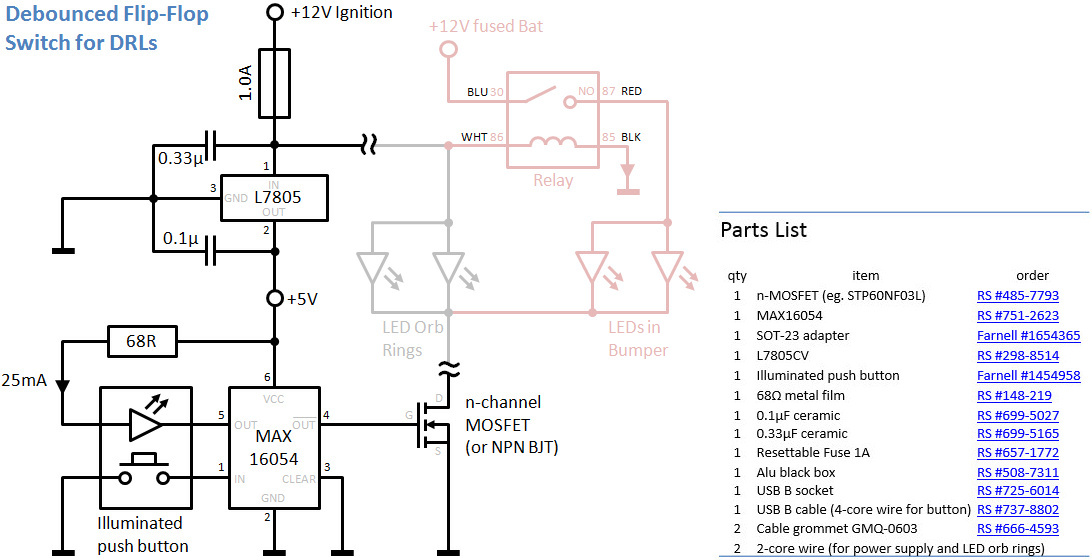
With Torqen currently anticipating work on an AAM TT 350Z HR, I thought I'm gonna gap the time with detailing some of my other mods. I bought my pearl white 370Z GT Edition in Sept 2013 as an ex-demo car with an age of a mere 6 months and hardly 6000 miles on the clock. Got a significant discount for her being virtually new What I loved from the moment I saw her for the first time is the pearl effect shimmer with the contrasting gloss anthracite alloys with that gorgeous design and the rumbling transmission noise filling the cabin at low speeds. I likened it a little to the way the GTR feels when I test drove one (gently). The GTR was my initial choice for its all out performance but the price tag made me quickly look at the Z... and I never looked back. In terms of looks the Z wins 3x over and in terms of performance I already decided to F.I. it one day. What I didn't like on the stock Z were the super quiet exhaust that nowhere near complements its potent engine, the unsightly front and rear bumpers and the empty wheel arches - all of which I was about to remedy first thing So i had Abbey Motorsport order me the Motordyne Shockwave))) 2.5-3" hybrid exhaust with tuned Helmholtz resonators because I was aiming to create a rather screaming yet not droning exhaust note (blame my nitrous infused VTEC blasts from the past ). Also, I had Bulletproof Automotive order me Amuse Powerhouse Vestito bumpers, which took a good while to ship from Japan to Los Angelas, to U.K. in an effort to greatly reduce shipping costs.. huh? Meanwhile I got busy with tinting the tail lights with a can of VHT Nite-Shades Black [#SP999]. and, inspired by ONEighty° on the370z.com forum, blacked out my head lights and added orbs (a.k.a. angel eyes). For the matte black paint I got myself a can of Krylon Fusion flat black [#KO2519], which after some research to my knowledge is the only way to do it right (primer-less plastic paint). But it's hard to come by her in the U.K. I sourced mine from here. The orbs I've sourced from Luce Produkt Innovations, which is where ONEighty gets theirs from, but the page seems to be down. You can get them directly from them now [LED Orb rings]. I added some innovation to the LED Orbs, though: a home-made controller to switch them on the dashboard with a visually suiting orb-style S/S push button My circuit for the so-called Debounced Flip-Flop Switch is below. Black drawings are inside the "black box" stowed underneath the dashboard, grey drawings route to the LED orbs, and pink drawings are vertical LED DRLs powered in parallel to the Orbs that I added later onto my Amuse front bumper. At that point my Z looked like this, with my Mrs inside


-
Awesome, been waiting for the web page to come online to browse countless products and fuel my Zeditis Great clean design Adrian. Please keep it this way. Cheers!
-
Thanks all, should become something great Right now I am enjoying a few holidays. Back this Friday. It's only been 1 day and I already can't wait to get back under my car Have a good weekend!
-
______________________________________________________________________________________ NOTE: Chrome v81 and newer is forcefully auto-upgrading mixed content to https and as such blocks images in this thread (loaded from my http:// web space). Please go to your Chrome settings chrome://settings/content/insecureContent and Allow 'https://www.350z-uk.com'. ______________________________________________________________________________________ Project: WeaponiZed The purpose of this thread is to document the modifications on my 2013 Nissan 370Z GT Edition (M/T, MY12) that will culminate in an aam Twin Turbo conversion. It will in itself be a first-of-its-kind: my car serves as test vehicle for TORQEN to modify and fit the prestigious AAM TT kit to a RHD 370Z. The conversion should be completed by winter. My pride & ride A complete list of my mods is kept on my personal web space. But the F.I. specific and supporting upgrades are as follows: Turbo kit - AAM Competition TT Tuner kit (Borg Warner EFR 6758 turbos) - optional 3" down pipes with HFCs - RHD conversion and install [by Torqen] - GReddy Profect EBC [#15500214] - EcuTek tune [by Horsham Dev] Fuel upgrades - CJ-Motorsports Stage 1 fuel return system [#S1] - DeatschWerks DW300 fuel pump [#9-301-1020] - Injector Dynamics ID1000 injectors [#1000.48.14.R35.6] Drivetrain upgrades - ClutchCompetition Stage 2 - Street Series 2100 Clutch [#6073-2100] - ClutchCompetition lightweight flywheel [#2-630-6ST] - ZSpeed HD CSC [#ZSP2006] - ZSpeed insulated S/S clutch hose [#ZSP2006-IH] Cooling upgrades* - Mishimoto radiator (incl. AC condenser) [#MMRAD-370Z-09] - Z1 external oil cooler kit (25-row core, thermostatic plate) [#4135] Intake/Exhaust* - Z1 modified intake plenum [#7267] - to be replaced by AAM Performance Intake Manifold [#AAMC37M] - Motordyne Shockwave))) with optional full dual-3" [#0004] * These are upgrades I've already done in the past, while the TT kit and remaining upgrades are sitting in my home ready for installation. With Torqen not yet quite ready for my install I decided to test-fit the FMIC and modify my Amuse front bumper as needed. The modifications required turned out to be a little more extensive than I assumed and I am glad I've been working away on that issue, which will be saving Adrian some precious time later on. Here are the details. According to the AAM TT kit install guide the front end should look like this: Tweak #1 The top of the FMIC is attached to the two hood lock brackets where the two horns are bolted onto. As advised by the manual, the horns need to be bent backwards in an S-shape to create enough clearance for the FMIC. But those bolts have hardly enough spare thread to accommodate the beefy FMIC top mounts. And because those bolds are welded to the brackets they cannot be swapped for longer ones. One side of these mounting points was crimped (presumably an alignment guide for the horns), which I simply filed off/sawed off. Now the FMIC top mounts lie flush against the bracket and the bolts have enough remaining thread. Tweak #2 Also, AAM intends to relocate the stock P/S cooler and mount it vertically to the right hand side of the FMIC via two mounts welded to the FMIC core. This mod does not work on my car! My stock P/S cooler is much longer than the pictured P/S cooler on AAM's test car. The FMIC cooler mounts will not accept my stock P/S cooler. I have been searching for alternatives and found the perfect mounting place. The stock location! Albeit, the cooler is too far forward to sandwich between FMIC and radiator. So I fabricated mounting brackets that resemble the stock brackets but move the P/S cooler closer to the radiator by 45mm. Note, I needed to trim a little bit of plastic from the radiator core support. Now the P/S sits snug between FMIC and condenser. As we can see, I've already re-routed the P/S hoses as per install guide. Because, the stock cooler hoses were routed around the bottom left corner of the radiator core support but that's where the intake charge pipe from the FMIC is going to go round. However, I chose a slightly different route than the install guide. Firstly, AAM routes the hoses past the crash bar mount, but that's where my external oil cooler hoses pass through already. Thus I routed the P/S cooler hoses slightly below and in between the two washer reservoir mounts. Secondly, AAM replaces the top hose all the way up to the P/S fluid reservoir with a new rubber hose, whereas I deliberately re-used the stock hard pipes (after some trimming) so the P/S pipes remain secured to the stock mounting point. See below: Tweak #3 The install guide does not account for any external oil cooler. Due to the FMIC position my oil cooler needs to find a new location. I found people mounting theirs to the left or right side of the crash bar, in front of the wheel well. But my Amuse front bumper won't supply this area with any air. Alternatively, people bolt the oil cooler onto the underside of the crash bar. Unfortunately this only works for small 19 row coolers, my 25 row cooler is too tall. I might have cut half way into the crash bar, reducing its height, to give me the missing 4cm height clearance. But then the FMIC would be partially blocked, probably unevenly, considering the FMIC is internally split in two, one for each turbo. I read an ideal arrangement should stack like this: Air -> FMIC - > Oil cooler -> Condenser/Radiator. Hence, I was determined to squeeze the oil cooler into the gap between FMIC and condenser (where my P/S cooler already resides). With a cooler core thickness of 2 inch that's tricky, given the fact that I sport the significantly thicker Mishimoto radiator. Stock radiator would've been easy. But it's not impossible! I figured the FMIC needs to come forward by about 14mm. So I increased the two 19mm M8 spacers (see below) that come with the TT kit to 33mm, as well as, use longer bolts. This will increase the gap between FMIC and condenser to about 57mm - enough to harbour my 2" thick oil cooler. But for this to work the crash bar needs to come slightly forward, too, to allow the FMIC to come forward by said 14mm. Using 4mm thick M8 washers where the crash bar bolts to the car, as well as, filing away a small amount of material from the inside does the trick. See below: Back to the oil cooler. I re-installed it pretty much exactly where I've had it mounted before (default Z1 Motorsports install location). Except, I am moving the cooler as close to the condenser/radiator as possible (just millimetres away) using 15mm long M6 spacers for the two lower mounting bolts. Because of this slight relocation the left oil inlet port now interferes with the hood lock stay assembly (vertical centre bracket with the temperature sensor on it). But it's safe to cut a bit into this, structurally speaking. This is how it looks now: Finally the FMIC can go back on, neatly sandwiching the P/S and oil coolers. Tweak #4 The Amuse front bumper needed minor trimming to accommodate the new FMIC.
-
Thanks for the explanation, Adrian. Btw, hope you've had a nice holiday. Welcome back
-
Same here Another UPS delivery today. ZSpeed Heavy Duty CSC and AAM oil pan spacer arrived. This completes all my TT parts. Big thanks!
-
That's a good one
-
That's great news! Wasn't it John's 370Z Stillen SC? He gotta let us know how she drives now
-
Before it's my turn at Torqen, though, we'll be seeing the completion of the installs of an AAM TT 350Z and a Stillen SC 370Z. Of course I'll keep you updated. Exciting months ahead
-
thx m8
-
Hi Adrian, as you already know your shipment of the AAM TT kit is now safe in my hands and boy, what a marvelous kit this is! I wrote my first impressions over here. After what I've been through with my past GTM TT kit order where 6 months later I had to involve my bank to get my money back after I never received a single part, I got to say I am well impressed by Torqen and AAM. After I put down the money AAM begun manufacture and Torqen handled everything for me. It took just 3 weeks until i got delivery. Meanwhile, I bombarded Adrian with turbo-related questions and he would always get back to me asap and kept me up to date with the progress, despite his busy schedule. I feel so confident dealing with Torqen. Many thanks, you guys rock!
-
Received a huge delivery from Torqen weighing over 50kg and am now proud owner of the first AAM TwinTurbo Kit for the 370Z RHD EDIT: Just to be absolutely clear, my kit is a standard LHD kit and will be adapted to fit RHD by Torqen, here in the UK. It will function as blueprint for future RHD kits. Modifications will most likely involve redesigning and casting a new Driver side (UK) manifold and work will commence soon. The Kit is very comprehensive, containing well over 100 parts. Apart from the TT Tuner kit it also contains a set of ID1000 injectors, DeatschWerks DW300 fuel pump kit (340 lph), CJM Stage 1 Fuel Return System and GReddy Profec Electronic Boost Controller. The quality of the entire package is overwhelming, the parts selection top notch. I am particularly intrigued by the small size and beauty of the boost controller Also, I am amazed by the beefiness and weight of some of the parts. The Turbos and ExhManifolds plus Intercooler sum up to 35.5kg alone! Their refinement and built quality really is exceeding my expectations. Adrian, you mind I lock up the turbos in my glass cabinet instead? Here some photos, behold in awe The manifolds in particular are incredibly solid and compact. As you know, they are tubular cast stainless steel and very smooth inside. The wall thickness is considerable! If anything is ever gonna break, those manifolds will go last The 3" downpipes with optional HFC are bazooka super-size. Intriguingly, they are not identical, showcasing the level of customization and refinement of this kit. Now it's waiting until Torqen is ready for the install, which will extend to installing a Competition Clutch Stage 2 - Street Series 2100 Clutch and lightweight Flywheel, plus ZSPeed Heavy Duty CSC and S/S Clutch Hose upgrade Yee Haa!
-
***TORQEN*** LOWEST PRICE 370z GT with sport Akebono - Brakes upgrade kits
V1H replied to Adrian@TORQEN's topic in TORQEN
Hi John, great to hear that! I'll be looking into this wheel protector. Thx. -
***TORQEN*** LOWEST PRICE 370z GT with sport Akebono - Brakes upgrade kits
V1H replied to Adrian@TORQEN's topic in TORQEN
Thx for the input David, much appreciated -
***TORQEN*** LOWEST PRICE 370z GT with sport Akebono - Brakes upgrade kits
V1H replied to Adrian@TORQEN's topic in TORQEN
Yes of course, that's a fair point Was curious about Centric Posi-Quiet pads, specifically the Ceramic ones whether they'd make a dust difference and still retain the bite, compared to OEM. vs. -
Adrian, can u explain what the "PVC upgrade", included in the AAM kit, comprises of? Is it just a check valve to stop the PVC valve from seeing positive pressure when the intake pipes are under boost? I've been contemplating adding a (dual) oil catch can ever since, and with the TT kit even more so. Will a normal catch can be compatible with said "PVC upgrade"? What's your take on using an OCC at all? Needless to say, I like things clean and gunk-free Thx m8
-
thx for the update, just when I was wondering how things come along