


jumping350
-
Posts
3,334 -
Joined
-
Last visited
Content Type
Profiles
Forums
Events
Gallery
Store
Posts posted by jumping350
-
-
If thats the case then im loving it Veilside
 dont mind doing the edges and peeling spots and sanding/keying the rest of the white paint ready for primer.
So il work through 400-1200 sandpaper in one area and see how I get on
Il update in here thanks for info so far
-
He lives miles away and is literally spraying for nothing if I do all of the prep work so literally dropping it off to him 90% done and leaving it to be finished off and sprayed as he doesn't have time ether unless I book it in properly
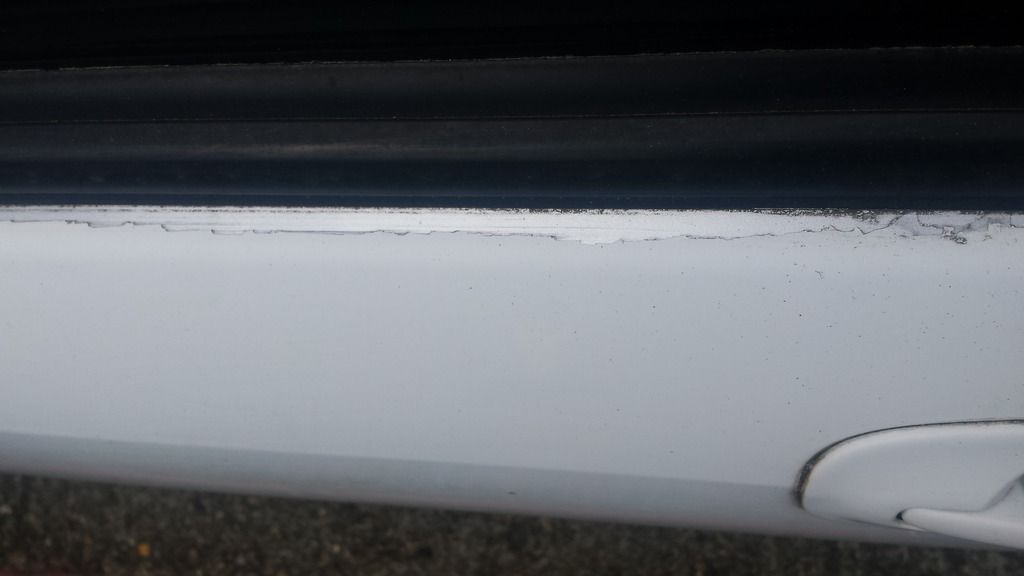
Heres a couple of pics, car is filthy as expected

So the area around the lights is coming away at its on accord, but can see the shiny silver underneath
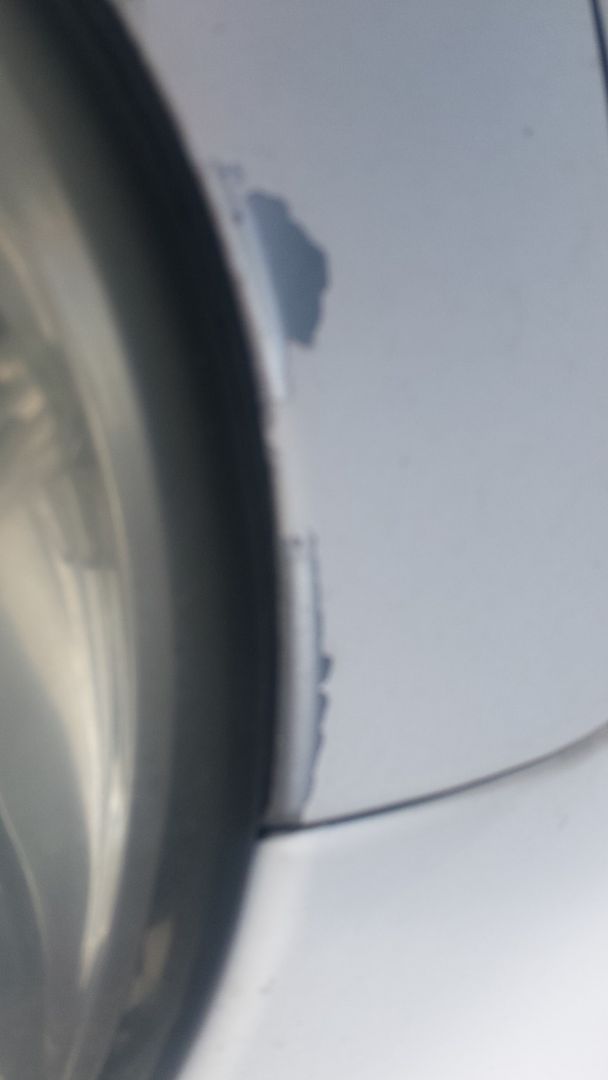
And this is the passenger door but the rest of the door panel appears to be ok but as I say the paint just picks away so easily so not sure if sanding the edges down would be to no avail?
Im a pretty patient guy have you not seen how long my supercharge build went on for
Im in no rush so panel at a time is the way im approaching it, my other mate will help me out too, so not completely on my ownJust need to know what tools to use now im itching to go buy something today and start or at least try
-
Thanks for replies guys
I fear if I do as you said Veilside and just do the edges and spray over the paint that's still there its going to lift after a while and cause me a second paint job problem later down the line but may do a test area and see what happens.
It is a dilema, ive seen a few videos of people using a really sharp scraper on really crap peeling spray jobs to get the old paint off, that seemed to do a speedy job whilst leaving original paint underneath in a workable state so so will do a test area of that as well.
Its probably the cheapest/laziest spray job ive ever seen so doubt any decent paint was used either for the job.
We went round this morning and there is not one panel on the car (except for the scoop) that hasn't got peeling on it I pretty resided to the fact that I have got a major job on my hands here to get old paint off. Il post some pics in a bit
So is there a better less time consuming way to get that top layer of paint off?
Will an orbital sander with an 80 grit pad be ok or does it have to be a DA?
I almost took my angle grinder to it this morning but then read some horror stories and the fact it would heat the panel up too much 
-
That is immense amounts of clay

Awesome skills though, I know I would wake up in the morning to a pile of crap fallen off the car on the floor
-
Im now in-between two projects one being the zed the other being my subaru.
When I bought the car some of the paint was peeling from around the edges on panels where previous owner had done a respray. This has gradually got worse over time as the douche didn't appear to lacquer it at all!!
So whats happening is I can literally peel away the paint with finger in most areas/panels and see the silver underneath which is smooth as hell which means he didn't even key the surface before painting!
My friend has said he will spray the car for me however I have to prep it as best I can before taking it down to him. (Im respraying it black)
Question is then what is the best method to get this top layer paint off??
Do I need to sand the whole car back to original silver colour?
If so what is the best method to do this with the paint I have bare in mind no lacquer on it and wasn't keyed underneath either so falls off at will
Electrical sander??
Literally every panel on the car has some sort of peeling on it so expecting to do the whole car just trying to find out the easiest way to get this paint off
Any help appreciated
-
The ring claims a lot!
was watching this the other day
This was quite amusing though
-
Thats one hell of a deposit, if it were me I would go for a cheaper house keeping my LTV at the same rate and buy a lambo
Sorry to hear the dramas buddy hope all works out but at least you have a great starting point with job offer and the deposit you got
-
 2
2
-
-
When I did mine not long ago I put an even bead around and didnt smear it and made sure I went all around bolt holes then put it on straight away as didnt trust it
My mate was there to help to make sure sump went on as even as possible as we didnt want to loose any sealant by sump hitting or brushing something elseYea, that's the tricky bit to put it up withou smearing. Especially with spacer as that makes 2 movable parts. I might use couple of studs to keep it aligned
I took a razor blade to bottom of block to make sure all the original gunk and stuff had gone to get a flat surface
We got two studs in each end asap, as soon as we mated with bottom of block you could tell it wanted to slide to the left or right, and as Alex said went round a torqued straight away after hand fitting all bolts,I left mine without oil in and to dry for 3 weeks though just to be sure
-
When I did mine not long ago I put an even bead around and didnt smear it and made sure I went all around bolt holes then put it on straight away as didnt trust it
My mate was there to help to make sure sump went on as even as possible as we didnt want to loose any sealant by sump hitting or brushing something else -
Whoops! Bet that'll be expensive...
The really expensive bit will be what the Council charges for replacing the lampost I suspect......
based on its final resting position looks like Rich got out the way just in time, but yeah the car is probably the least of his worries with that bill looming
-
ah I thought I wrote it
390 at hubs 430bhp waiting for the dyno graph to be sent then will upload
It drives amazing now and picks up like anything, thanks to everyone at Abbey for sorting it
-
1
-
-
so spent a while messing around with everything doing some checks and tidying/tightening up as much as I could on the car and took it for its M.O.T
As normal and thankfully she sailed through without any problems and a few garage admirers along the way

I then checked everything again and rebodged the undertray and bumper back on and then this happened.......................

-
1
-
-
err amazing wheels

-
great work and write up
love the rear zed lighting up -
watch you dont trap the rubber oil filler surround inbetween the plenum also, you will see what I mean when you get there
-
1
-
-
love this car looks great
-
1
-
-
I have one knocking about in my garage drop me a PM if interested
-
as Ilogikal has stated change your fronts to correct size as your rolling radius is out now
-
I have one to if all else fails
-
1
-
-
Taxed the car today
 bumper, wheel and undertray back on by end of today m.o.t next week.....getting close
 -
i meant which ones did you replace to end up with the oem ones? just seeing if any can use as lost loads of mine recently from my build
-
Big Dip where have those bolts come from if you know? also hope all is well
-
someone will correct me if im wrong but dont believe you need any modifications to fit front bumper it should go straight on just have to bear in mind washer jets and if you are having them or not and all the bits that go with it if you are
-
 Just seen this! No worries if both are taken let me know if any fall through


help with paint issue
in Other Cars
Posted · Edited by jumping350
So had someone take a look at it and all the paint has to come off
Im buying a dual action sander...unless there is a better method? Does it have to be dual action or will variable speed one be ok for this?
Can anyone recommend what grade of sandpaper/disc I should use to get peeling paint off?