


Tuck
-
Posts
301 -
Joined
-
Last visited
Content Type
Profiles
Forums
Events
Gallery
Store
Everything posted by Tuck
-
I'm not selling the badge, the lad can have it as it'll just end up in the bin! Sent from my potato using duct tape
-
Sooo I've a Kuro black 350z and the paint work has swirl marks all over, and the usual stone chips on the front end. Also a scuff on the rear bumper (not through the lacquer). This was all nicely covered and filled in from a layer of wax when I was buying the car. So instead of re-waxing every couple of weeks I decided to get myself a decent DA polisher (G220) to minimise any chance of burning! A friend gave me a few Menzerna detailing products. Got myself a few de-contamination products and some polishing pads. Usual 2 buckets with grit guards and a noodle mit! And a bottle of Iron X is on its way. So I'm told the Zed has very soft paint. I don't want to fire ahead with anything until i've some advice for fear of possibly damaging something or wasting products! I'm not after a show stopping shine but its currently so dull, So if anyone has advice or an idiots guide with the items I have and any other products I need would be great, cheers guys! Sent from my potato using duct tape
-
So closest to the passenger? I already don't like having the handbrake on the passenger side, I had a passenger put the handbrake on slightly with their hand bag and I didn't notice until I smelled burning brakes. (I've changed brakes since then anyway). Noo closest to the driver, sits too close to the seat for you to hit it with your elbow. Plus the light comes on if you were to hit. Did the light not come on to say your handbrake was on? Is there a light? Sent from my potato using duct tape
-
Im away to de-badge mine. You still need a set? Sent from my potato using duct tape
-
Ill also take these if the sale falls through Sent from my potato using duct tape
-
I'll take them if it falls through Sent from my potato using duct tape
-
A garage would be ideal in this weather! Yeah i've emailed them too, seem to take a little while to reply then its back and forth. Sent from my potato using duct tape
-
Cool thanks! So what colour wire is the Fog one then that I need to splice into? Thinking just to do this on the right side, as that's where the wire is I imagine. The fog light on the car I don't have clue, it will be on the right hand side indicator connector. There should be a wire in the right loom that is different from the left loom, try using a multimeter to figure out which is which. Sent from my potato using duct tape Fair enough, if a wire is there on the right side that's not there on left I will try that, otherwise I'm just gonna run them both with the brakes, and get my mate up north to do my MOT's from now on haha Ill have a look tomorrow and try and wire up mine so they work with the fog light instead of the running or brake lights Sent from my potato using duct tape
-
Cool thanks! So what colour wire is the Fog one then that I need to splice into? Thinking just to do this on the right side, as that's where the wire is I imagine. The fog light on the car I don't have clue, it will be on the right hand side indicator connector. There should be a wire in the right loom that is different from the left loom, try using a multimeter to figure out which is which. Sent from my potato using duct tape
-
I'll Pm you buddy Sent from my potato using duct tape
-
Yeah thats definitely not good, i'm away out to check mine. Sent from my potato using duct tape
-
It's on for a fair while pal, just email carlab and they'll sort you out! Sent from my potato using duct tape Hi ya buddy, thankyou.. I did indeed e mail them and they gave me the same deal as part of the group buy :-) Great pal, they are do look really good in person. I was worried they'd look very halfords but they actually look very OEM+ with led running/braking rear lights. Post a picture once they are fitted! Give me a PM if you need any help installing them. Clark Motorsport have the original brake/running lights with LEDs in stock just now. Sent from my potato using duct tape
-
Personally, that's something I'm more than willing to sort as these do look great! Thanks Tuck again for sorting Cheers pal, Been meaning to get a video up! Sent from my potato using duct tape
-
Blitz spoiler & CF roof spoiler (BOTH SPOILERS SOLD)
Tuck replied to TheBigRJ's topic in 350z Parts For Sale
😩😩😩😩 Sent from my potato using duct tape -
Blitz spoiler & CF roof spoiler (BOTH SPOILERS SOLD)
Tuck replied to TheBigRJ's topic in 350z Parts For Sale
Already sent a PM about the roof spoiler 😉 soon as he sends me his PayPal details it's all mine, ALL MINE! Muhaha Sent from my potato using duct tape -
If anyone's still looking for this than I've a great recommendation from pristine auto detail in pitmedden. Great guy and really takes a passion in what he does. Reasonably priced too! Sent from my potato using duct tape
-
Still can decide between these two! Sent from my potato using duct tape
-
I'll be uploading one soon as I can, cars undergoing modifications 🙄 Sent from my potato using duct tape
-
Updated original post ðŸ‘🼠Sent from my potato using duct tape
-
Thanks! For those looking for it - http://www.350z-uk.com/topic/104429-fitting-carlab-rear-led-indicators/ Cheers bud, forgot about that! Sent from my potato using duct tape
-
Guide is up, not the most comprehensive of guides but it's really not a hard job at all! Sent from my potato using duct tape
-
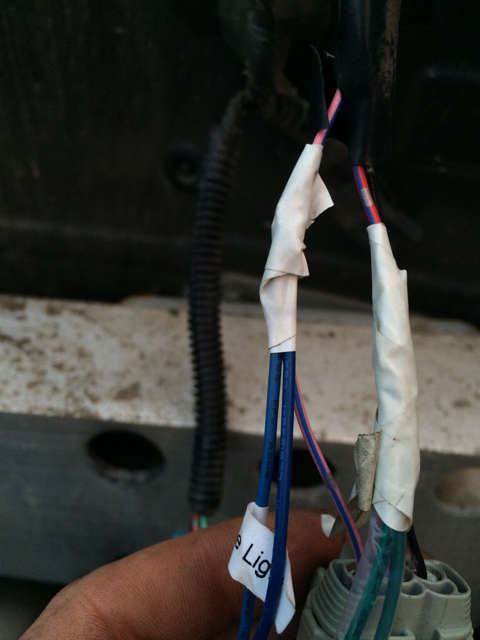
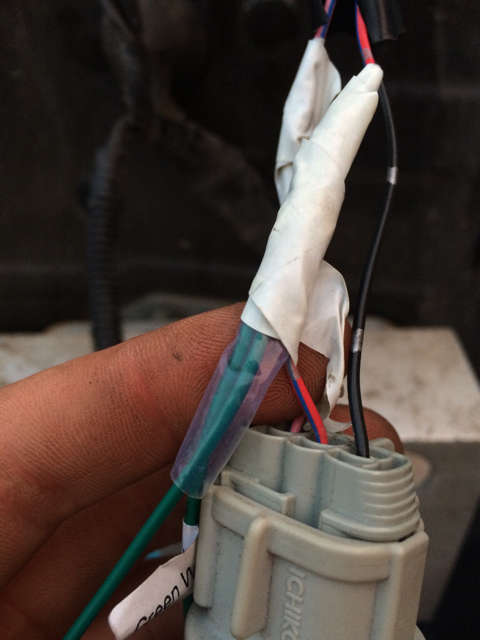
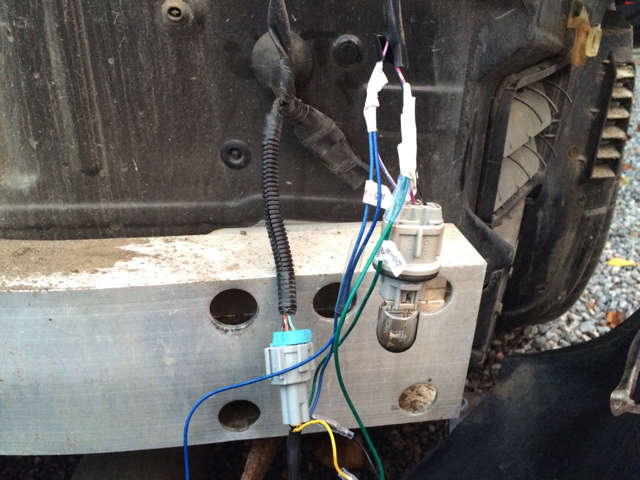
So I said I'd make a guide for setting these up. They are easy enough to set up but come with no instructions at all. So tools you'll need; 10mm socket with as many extensions as you have Flat head screwdriver Patience of a saint Philips head screwdriver So to begin with you'll need to remove the rear bumper, use this as its a very good guide! http://www.350z-tech.com/zwiki/Rear_Bumper_Removal Okay so next remove the electrical clips and screws from the existing indicators and put them to one side/Ebay/gumtree. Screw in the new indicators, it's obvious to which way they go round. Peel the sticky patch on the resistors (gold thingys) and stick them to the back of the indicator, plug in yellow to yellow and black to black. Plug in the new indicators and your good to go ðŸ‘🼠*Optional (Brake lights and running lights)* There are a green (running light) and a blue (brake light) wire that come from each indicator. These need splicing to the wire that runs to the bulb. GREEN - RED BLUE - PINK Once you've taken a section of the insulation back either twist on or much preferably solder on to the wires. The right hand light has a stripped connection and the left a pinned connection. Plug the left hand pinned connection into the supplied extensions and wire them to the right hand side, solder the other end of the extension to the spliced wires. Test everything is working and put the bumper back on using the guide ðŸ‘🼠Pictures below to help Sent from my potato using duct tape
-
Mine came as well on Wed - no duty or tax either. Thanks for sorting Tuck! A guide would be much appreciated as I didn't see any instructions provided. I'll get a guide sorted out tonight as I took plenty pictures. Trying to get a few more orders as if there's enough interest they'll make more products, etc! And the quality wasn't bad at all, I was surprised at how well built they were for £100 odd ðŸ‘🼠Sent from my potato using duct tape
-
It's on for a fair while pal, just email carlab and they'll sort you out! Sent from my potato using duct tape
-
My lights came last week by the way lads, no duty or tax to pay! So £103 posted to your door, wiring them up as soon as I've sobered up from the festive period 🻠I'll make a guide for fitting as well as a video of the finished product Sent from my potato using duct tape
