

bizz
-
Posts
718 -
Joined
-
Last visited
Content Type
Profiles
Forums
Events
Gallery
Store
Everything posted by bizz
-
Bizz's LS3 6.2l V8 350Z Drift Car Project - IT CAN DRIFT!! :)
bizz replied to bizz's topic in Member Build Projects
Cheers buddy, I will Can't wait to get some proper pics up of it all done and some vids of it being driven in anger. Keep watching -
Hi All, As most of you know I don't really have any of the original Nissan wiring left in my car but I want to wire in the electric windows for a small bit of comfort. I had a look at the plug on the window motor and had a look at the wiring diagram but it doesn't seem very straight forward how to get the windows to function. Does anyone know how to wire an aftermarket switch in to this motor? Or which wires I need to pick up? Cheers Bizz
-
Bizz's LS3 6.2l V8 350Z Drift Car Project - IT CAN DRIFT!! :)
bizz replied to bizz's topic in Member Build Projects
Fresh out of the booth (slight change to the original design, with a little bit more purple so hope it works) Modded rear bumper ready for the rear diffuser And the V3 Front Enjoy! -
Bizz's LS3 6.2l V8 350Z Drift Car Project - IT CAN DRIFT!! :)
bizz replied to bizz's topic in Member Build Projects
It was pretty sweet considering it was thrown together quickly and is only using similar suspension settings to a standard car but is definitely a good start. I'm not sure about the weight saving yet but I will be taking it home in early july back to my parents farm and will put it on the weighbridge so I'll get a good idea then -
ok Cool I'll give it a quick go tonight, also got the bodywork guy coming over to pick up my doors so will see what he reckons. Might get one of those 3m kits sent to him that bradders recommended
-
nice one I will give it a bash later Cheers guys Fingers crossed it works
-
Ok that looks pretty decent Think I'll get the bodywork guy to do it though Does it have to be Colgate 3-stripe matt?
-
Oh really?? What is it then? polish or a new cover? I'll give it a look in a sec I hope it's easy to do lol
-
Hi Guys, Last night I was working on the car when I noticed that half of the headlight looked white. I touched it and a big flake, of what looked like clear vinyl, flaked off. The rest of the light peeled like that as well. There was no scratching or anything it literally just flaked off. The light now looks awful The surface under what ever flaked off is perfectly smooth but foggy. This is all on the outside of the light Has anyone had this issue before or know what the hell has happened?? Can it be polished off? The other light is fine. Someone please help
-
Bizz's LS3 6.2l V8 350Z Drift Car Project - IT CAN DRIFT!! :)
bizz replied to bizz's topic in Member Build Projects
I wi be man but not in time for the show. She'll come in as a trailer queen haha. I'll then set up next to Tarmac and you boys -
Bizz's LS3 6.2l V8 350Z Drift Car Project - IT CAN DRIFT!! :)
bizz replied to bizz's topic in Member Build Projects
Thank you for all your comments I think I was just as happy as you guys were to see it running haha Please keep the comments coming. I will add more pictures as the painting and vinyl work gets completed and fingers crossed all will be ready for Lake-Z meet at the end of June. Make sure you come along and say hi Arr man, it has been hard, I still feel exhausted now but I haven't slept as well as I'm doing now for ages -
Bizz's LS3 6.2l V8 350Z Drift Car Project - IT CAN DRIFT!! :)
bizz replied to bizz's topic in Member Build Projects
Hey bud great to meet you too You're a gent. glad you like the car and the cage hope to catch up with you soon -
Bizz's LS3 6.2l V8 350Z Drift Car Project - IT CAN DRIFT!! :)
bizz replied to bizz's topic in Member Build Projects
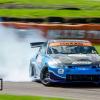
Hello, hello, hello I am back lol. Feels like I haven't slept in a month, which is probably quite accurate, but I hope you like the results... So let's start off at the source of some issues... the prop.. It ended up being made from scratch with the flanges at each end being made to measure, incorporating a UJ and slip joint which the original didn't have. Finished in 3" tube to take the torque and speed Unfortunately there's quite a jump here as I was racing to get the engine in ready for the dyno session on my birthday (19th May) But at about 11pm on 17th I was ready to lift the engine in On Sunday 18th my mate came round to help me finish the last few bits off. We were ready to start about lunchtime, turned the key and engine did one rev and then stopped. We worked on it for a while and it sounded like it was a bad earth on the starter so doing all of the usual troubleshooting. Ant then went home so I thought what else could it be so took a plug out of no 2 and it looked pretty wet. Took out no 4 and fuel poured out of the cylinder I took all the plugs out and it was the same on no 3 and 5. I barred the engine over by hand and luckily there was no contact so the engine hadn't sustained any damage. With all the plugs out I pump the rest of the fuel out of the cylinders by the starter. It was getting pretty late in the day at this point, I needed to meet Tarmac Chris on the way down to Norfolk for my birthday present so I loaded the car up, with its issue and headed off as I was far too tired to carry on troubleshooting I met Chris at Derby where he gave me this.... A really nice addition to the car So I arrived at 9am at Emerald with the car and the guys there started to help with fixing the injection issues. After a big boom and a change of pants later from fuel igniting in the exhaust system we worked out the coils were working as injectors and vice versa. Note to you all don't work tired!! lol So we got that all sorted and the car ran we then backed it on to the rollers got ready to start and the drive by wire throttle pedal went down. Another 1.5hours later checking wiring, changing connectors etc. I found a pin was snapped in some heat shrink on the pedal making an intermittent connection!! ARGH!!! but we got to the point where we could actually start mapping. 3 hours later we got to this 550bhp and 525lbft thanks to Project Touge for the vid. A massive thanks must go out to the guys at Emerald. Brilliant service!! tech support is great, very good price and fantastic work. I would rate them very highly!! So from the dyno I set off back up North to drop the car off for its second attempt at paint This meant that the car wasn't going to be vinyled in time for the event if it is ready at all. I eventually got to see it with the cage painted this is the purple that is going to be used on other parts of the car I love it. At this point I picked the car up from the paint shop with all the other unpainted bits and started to build it again. I would like to point out at this point it is Friday evening and it is to be on track on Sunday morning lol The windscreen was fitted when I got home as well as the rear lexan window I had made My mates Jack and Mark came round and we put in another late night not finishing until 2am leaving it with doors on and a brake system fitted Saturday morning soon came round and the car was back on the trailer to be taken for 4wheel alignment. Seeing as I've never driven a 350 before we set it up with the standard settings so I had a good datum to work from. The same guy who fitted my windscreen came back to fit my Tarmac supplied side vents. I made frames for these out of lexan so they would actually work as vents instead of sitting on top of the glass. A good heat treatment later I formed them to the car so they fitted well At 11pm the night before the event she looked like this I was exhausted So here she is at the track, in all her patchwork glory I think she looks awesome Next up is practice. Baring in mind I had never driven this car or drifted for about a year I was pretty nervous haha. After nearly spinning out on the straight trying to get a feel for her I put in a decent lap. At the end of the lap the coolant pipe burst off due to a poorly tightened jubilee clip Second session is where the fun really started The LS350Z is a great drifter considering she was thrown together by some very tired people and driven by an out of practice driver haha Spot the LSZ if you can A bit wobbly but we can iron that out. Here are some more pictures of the installation as she looks now. Bits of over spray will be sorted Love my new seats and harnesses courtesy of Corbeau A look from my view This pretty much brings up all back up to date. Thank you all so much for reading and your support. Look forward to meeting you all at Lake-Z Cheers Bizz -
Bizz's LS3 6.2l V8 350Z Drift Car Project - IT CAN DRIFT!! :)
bizz replied to bizz's topic in Member Build Projects
Ok I've been away for a while again, this time trying to collect some energy for the next few days ahead and in true LSZ fashion I'm facing some serious issues The car is still at the paint shop and is not complete This is the underside in gunmetal grey And this is what it looked like last night There is more colour on it now, the roof is black, the engine bay and cage is grey. So tonight he is doing the remaining parts of the interior so I can pick it up at 7am and get it ready for the dyno on Monday Tomorrow and Sunday are going to be long days I just hope it all works out in the end. Will have to take the entire car back to the paint shop on Monday for Gary to finish the job and then off to the Vinyl Company. If anyone wants to drive my car at Extreme Torque next week feel free. I'll be asleep under my truck lol -
Arr boooo will get you the dimensions this week all being well Excellent thanks man hope we hear something good
-
Cheers guys Lexx whose plotter are you using for the 350z logos? would they be up for this? Should hopefully have a couple of quotes arriving tomorrow. Please keep the suggestions coming
-
Bizz's LS3 6.2l V8 350Z Drift Car Project - IT CAN DRIFT!! :)
bizz replied to bizz's topic in Member Build Projects
I hope if we do it, our cars will be more reliable I know when it first came over it was in the pits more than on track. Loving the noise it makes though, Lets do it Chris!! -
Grundy North East not south west ^^^^ lol that really made me chuckle. Been on the phone to AM lettering and sent them the design so fingers crossed. Keep 'em coming! No worries my man I appreciate the suggestion
-
Are those guys based in Southampton or am I checking out the wrong guys?
-
Bizz's LS3 6.2l V8 350Z Drift Car Project - IT CAN DRIFT!! :)
bizz replied to bizz's topic in Member Build Projects
glad you approve Stevo, need my team mates to like it lol -
Layered will be fine Base blue layer, then lines and designs on top etc. not a problem
-
Bizz's LS3 6.2l V8 350Z Drift Car Project - IT CAN DRIFT!! :)
bizz replied to bizz's topic in Member Build Projects
Hi All, I'm after your help if possible please check out the link http://www.350z-uk.com/topic/85428-car-vinyl-required-in-north-east-next-week/ This will hopefully be the last hurdle (or one of the last) any help or suggestions would be great Thanks everyone -
Hi All, I hope you're going to be able to help me, I need to find somewhere that can do the deisgn on my car next week, for a realistic price. I've had some quotes for what I thought was a simple design but they have been astronomical so any help would be greatly appreciated. Here is the design again so you can see what we've got to do and to help with giving some suggestions. There are a couple of small changes to the design, like the Diemax and Clark Motorsport logos are swapping positions on the side of the car and Chris has already given me the Tarmac logos. What requires doing is the blue that goes around the outside of the car, the lines which go with it and some of the logos. Cal has kindly made vector files for each of them and for the design on the car so hopefully that will help Hope to hear from you soon, I need the help to push this over the line Cheers Bizz
-
Bizz's LS3 6.2l V8 350Z Drift Car Project - IT CAN DRIFT!! :)
bizz replied to bizz's topic in Member Build Projects
Cheers man :-) Lol liking the latin wasso ;-) I was toying with the idea of having it high but thought the low look worked well so going to stick with that for the time being
