BJMax
-
Posts
26 -
Joined
-
Last visited
Content Type
Profiles
Forums
Events
Gallery
Store
Everything posted by BJMax
-
Hi, looking for Crank Shaft DE engine. who? thx Johan
-
as in the title.. who can help me or knows a shop here in the UK who has it in stock of fast in stock? thx Johan
-
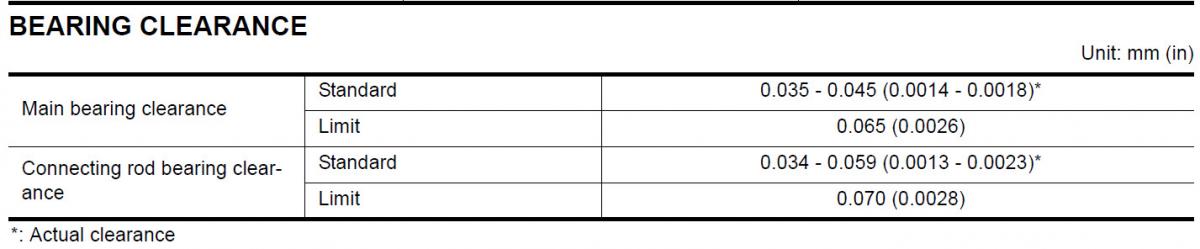
Hi, Who can help me.. i looking for people that has been building vq35de for high pwer (500 hp +) and know te clearance on the bearings thats used and the oil to run on. standand is in the attachment. i had a bearing fail on the rod on10W40 and .00020 on he rod 630HP and 2000 mls thx

-
As I have an VQ35DE.. i can't use them. If you are looking for connecting rods that can take whatever you can throw at them, look no further. Carrillo connecting rods are forged and use only the strongest materials to ensure they will hold massive amounts of power. They are run through a thorough inception process once finished to ensure each rod is made to the highest quality standard. These rods are for enthusiasts that require the absolute best and will not compromise on quality. Carrillos's Pro-Super A beam (Pro-SA) rods are lighter than the traditional H-beam style rod, yet still unbelievably strong. Pro-Super A beam rods bridge the gap between Pro-H and standard Pro-A rods, designed for use in mid to high horsepower and high boost turbocharged and supercharged applications. Pro-Super A beam rods allow for more horsepower and higher RPMs with the advantage of a reduced windage design. Pro-Super A beam rods for the 350Z / G35 ship with standard 3/8th inch WMC cap bolts and are rated to 800whp, they are great for cars that see both street and race driving. Note: These rods are for the VQ35HR only. FITMENT: Infiniti G35 2007-2008 with VQ35HR Nissan 350Z 2007-2008 I will let them go for 730 excluding UPS/DHL.... or make me a offer..
-
Thanks for the info.
-
Hello Anyone have experience with these rims from this supplier? They are not expensive compared to the original, and how is the quality of these rims? it's for a mate of mine. http://www.varrstoen.eu/ Iám thinking about these? Style: VarrsToen® ES 2.2.2 (19″) Front: 19×9.5 +et0 € 336,13 Rear: 19×10.5 +et0 € 336,13 Vehicle: Nissan 350z (Z33) Finish: Matte Black
-
Yep. À good upgrade for my TT project.
-
Sold to me Thanks Johan
-
I saw it for the first time..
-
http://video.kenblockracing.com/flash/small_player/preloader.swf?vendor_id=204&media_id=9183&bgcolor=FFFFFF&autoplay=0
-
tru.. they were thinking i was a pimp or so..
-
its a seibon LINK EBAY
-
Yep.. easy when you need it.
-
who knows.. here another one.
-

One to consider when choosing that xmas gift.
BJMax replied to martinmac's topic in Off Topic Discussion
Fun.. -
Just a year ago we had a little foto shoot.. It was a little cold that day.. so... this was in june. made with my phone. the originals are coming. gr bj
-
Start by opening up your hatch and saying good bye to the ole' girl. I then moved on to removing the rear wiper assembly. The very end of the wiper arm has a plastic cap covering the one nut that holds the wiper arm to the wiper motor assembly. Very simply snap off the plastic cover and remove the nut. I think it is a 12mm nut. Then pull off the wiper arm. Giggle it if necessary. Done. Next open up your hatch and remove the inner plastic trimmings to expose the wiper motor and harness. To accomplish this you could use a flat screwdriver or a pry tool. The latter is better. You will find altogether about 12 or so snap buttons holding the wide lower end of the trim to the actual hatch body. Once the widest and largest piece is removed, you will be left with 3 small thin trim pieces to remove. There are 2 (middle) pieces...One on each side of the glass...BE CAREFUL to pull them inwards as to avoid breaking them, I tried pulling them in the direction of the rear bumper and almost broke them. They must be pulled in the direction of the glass. The final top trim piece just clips out of the way, revealing the third brake light. There are about 4 small screws holding a black plastic shroud that covers the actual light assembly. Remove the 4 screws. See here: And here is the third brake light: PAY ATTENTION TO THESE TABS, YOU DON'T WANT TO BREAK THEM BE GENTLE WHEN TRYING TO REMOVE THE BRAKE LIGHT!!!!! Once you have removed all of the trim pieces, you will find the wiper motor to the right side. Remove the 3 bolts holding it in place and get it out. It looks like this: And with it removed looks like this; What is left is the wiring harness see here: Pay attention to the harness and how it is routed. It passes inside the hatch on the left (driver) side, through an inner sleeve or hollow passage way. Most of the wire harness anchors will not be re-used, simply because the Seibon hatch does not have all of the necessary pre-drilled holes, but if you are inclined to drill them to make everything perfect, feel free. I just used zip ties to secure the harness through whatever holes were available in the CF hatch. Here is the harness that leads to the third brake light. There will be 2 similar looking connectors that activate the rear defroster. Simply disconnect them as seen here: Pull the harness out of the original hatch to the edge as seen here; Until it is completely out and free of the actual hatch: This odd looking piece is a weight that gets transferred: Don't forget the latch to lock also gets transferred: Don't forget to disconnect the hose for the water jets that wash the rear window...see below: Before we can let go of the old hatch, you have to go inside the car, towards the rear and look for 4 plugs in the roof liner that hold the liner up. Remove all 4 plugs. After doing so, you will more easily be able to pull the liner down a bit from the rear of the car to make room for a ratchet. You will need this extra space to fit you hand and a ratchet to remove the 4 nuts that hold the hatch to the roof of the car. Before just hacking at it, I would suggest some tape and something to protect your roof from any mishaps and scratches. Trust me on this one! Now that the roof is protected and you can access the 4 nuts, you may want some assistance in holding up the hatch while you unfasten it, or else it will come off at an awkward angle and tilt and crack the glass. Remember the glass has to be kept straight or any stress could easily crack it...It is not made to flex much at all. OFF WITH THE OLD HATCH! Also VERY IMPORTANT IS THE ORIENTATION OF THE SHOCKS. Please note that the bracket is curved down, making it look like it is upside down. Remember this, when you fasten the new CF hatch to the car. If you mount it incorrectly the hatch will not close properly and you could damage the CF. In the photo below you should note that the pop up "doohicky's" that prop the hatch up when you hit the release are twist on devices. Also it is easier to fasten the shocks to the new CF Hatch when it is OFF of the car. This is to avoid stripping the CF side. You don't want to strip the CF or its finished. You fit the bumpers in the slot seen in the pic below and twist them off/on. Feed the wire harness through the new hatch as seen here: You also have to transfer the water jet nozzle. Before mounting any glass, try to make sure that the water jet fits properly or else it could lead to leaks or other problems. Then, just do everything in reverse. The only thing I can remember doing differently is the fact that the old hatch served as a ground for the rear defroster and the wiper motor. Without a metal hatch to ground to, I had to improvise a metal ground, by attaching the rear defroster and the wiper motor to the metal of the wiper assembly. It was the only metal available in the trunk. That is about it. Finished product: Perfect fitment: Good Luck.
-
it feels like
-
new Neesan 370 Zee by edmunds inside line
BJMax replied to lilsheepshagga_turbo's topic in 370z General
a nice 360 http://autoshow.autos.msn.com/autoshow/LA2008/360viewpopup.aspx?cp-documentid=11909772&photo-number=1 -
You like to read... here about Sway Bars No, these aren't the things that are bolted inside the car in case you turn it over - those are rollover cages. Anti-roll bars do precisely what their name implies - they combat the body roll of the 350Z on it's suspension as it takes corners. They're also known as stabilizer bars or anti sway bars. Almost all cars have them fitted as standard, but there is usually room for improvement. From the factory the 350Z's sway bars are biased towards ride comfort in order to serve the mass population. Stiffer aftermarket bars will increase the road-holding but you'll get reduced comfort because of it. It's a catch-22 situation. Fiddling with your roll stiffness distribution can make a car uncomfortable to ride in and extremely hard to handle if you get it wrong. The anti-roll bar is usually connected to the front, lower edge of the bottom suspension joint. It passes through two pivot points under the chassis, usually on the subframe and is attached to the same point on the opposite suspension setup. Effectively, it joins the bottom of the suspension parts together. When you head into a corner, the car begins to roll out of the corner. For example, if you're cornering to the left, the car body rolls to the right. In doing this, it's compressing the suspension on the right hand side. With a good anti-roll bar, as the lower part of the suspension moves upward relative to the car chassis, it transfers some of that movement to the same component on the other side. In effect, it tries to lift the left suspension component by the same amount. Because this isn't physically possible, the left suspension effectively becomes a fixed point and the anti-roll bar twists along its length because the other end is effectively anchored in place. It's this twisting that provides the resistance to the suspension movement. This means that the suspension is effectively stiffened, but only when cornering. If you hit a bump in a straight line that lifts both wheels simultaneously, there's no twisting force as the wheels are doing what the swaybar is trying (and failing) to do in the above situation. This means that you can maintain a comfortable ride by running a softer spring, as the anti-roll bar augments the spring's resistance to compression only when turning....which is when you want it stiff. As for the effect of stiffening one end of the car relative to the other, the stiffer you go the more that end of the car wants to "push". If you stiffen the front anti-roll bar more, the car will want to understeer more. Stiffen the rear more, and the car will oversteer. As such, some manufacturers will choose a swaybar that makes the car more neutral than the understeer-prone OEM. While it seems like anti-roll bars are negative-free roll stiffening parts, that's not the case. You might be tempted just to leave the factory springs and use ultra-stiff swaybars to give yourself a comfortable ride along with flat cornering. Remember that an anti-roll bar connects the two sides of your suspension together, which means you lose suspension independence. And we all know that independent suspension is far better for ride and handling. What a stiff swaybar means is that bumps affecting only one side of the car get transferred to the other. Hit a pot hole in a straight line, and the car will be more likely to crash through it. One wheel drops into the hole, and instead of just the suspension on one side absorbing it both sides react. Hit a curb in the middle of a corner and you could lift a wheel. If you run your front and rear swaybars too stiff, you may lose the ability to turn in and put power down. Your car will stop rolling onto its suspension, affecting your suspension geometry's ability to work. This means your tire cannot retain an optimal contact patch onto the road, as the engineers designed it. Net result is that the car feels too skatey. gr Johan
-
Here some pictures.. gr Johan
-
Remove door handles. Very simple, pop out the 2 black rubber pieces Use a 10mm socket and remove 2 bolts. Pull the handle out a ways, and unbolt the lock.
-
It is very easy. I have done it myself also. 90% of the the time there is a manual with it.
-
At the paint shop around the corner.. they are easily removed, and sprayed. you can get a carbon look also.