M1 6RYF Posted October 7, 2015 Author Posted October 7, 2015 I had a test fit of the nismo style front bumper before it gets sprayed. As i was fitting it, I decided not to get it sprayed before going on the car. I decided that I am going to get the whole car sprayed in a month or two. I will just have to look silly for a few months. Quote
M1 6RYF Posted October 7, 2015 Author Posted October 7, 2015 Sorry for the photos. I can't rotate them on my tablet Finally fitted the bumper again, along with twin canards. Stupidly went over the top with tiger seal. Oops, oh well leason learnt. I bought some quick release bumper fasteners, but forgot about them. By the time i realised, I had put the bumper back on. They will just have to wait until i next take the bumper off. Tomorrow's plan is to install my side diffusers and take all the wheels off ready to paint. Quote
M1 6RYF Posted October 8, 2015 Author Posted October 8, 2015 Today, I started with a simple but effective mod. I swapped the number plate bulbs for white LEDs. They look much better for about £2.50 off ebay. It was too light to take a picture of what light they produce unfortunately. Quote
M1 6RYF Posted October 8, 2015 Author Posted October 8, 2015 Next, I installed my side diffusers, bought from Tarmac spotz. They were a great fit, came with detail instructions and didn't take long too fit. The photo isn't great. I'll have to take some proper pics when I get chance. Quote
ZeppoJeff Posted October 8, 2015 Posted October 8, 2015 Today, I started with a simple but effective mod. I swapped the number plate bulbs for white LEDs. They look much better for about £2.50 off ebay. It was too light to take a picture of what light they produce unfortunately. You able to send me the link for them. I bought some a while ago and they were just to long. Quote
M1 6RYF Posted October 8, 2015 Author Posted October 8, 2015 Oops, they were a bit extra than what I thought, but they are UK based and a quality product. I received ttem the next day. http://www.ebay.co.uk/itm/230340228158 Quote
M1 6RYF Posted October 8, 2015 Author Posted October 8, 2015 Finally, whilst saving for a set of new alloys, I thought I would try few different colour on my current Rays. Because I want to try a few different colour options, I bought a plasti dip aerosol from Halfrauds for a tenner. The picture was straight after the first coat. Once it dried, there were no marks or running. It was very simple to do. It also dried with matt finish which I think looks great. I plan to run all black or few months to see how the plasti dip holds up before trying new colours. Maybe Matt lime green, Red, Highlighter yellow? The paint looks terrible in the picture, but i'll take a picture once its fully set in the morning. Quote
M1 6RYF Posted October 11, 2015 Author Posted October 11, 2015 After the paint dried, I am pretty happy with my first attempt at plasti dipping. Bargain at £20 for 4 wheels. 1 Quote
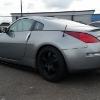
M1 6RYF Posted October 11, 2015 Author Posted October 11, 2015 A quick picture outside Costa before I went to the Ace cafe meet. Quote
M1 6RYF Posted October 11, 2015 Author Posted October 11, 2015 Unfortunately, I am back to work tomorrow after over 3 weeks off work. It will slow down my progress quite alot. My plans for next weekend: Install bumper fasteners Give the car a good clean Paint the front lip and tidy up the front bumper Install all the goodies I buy over the week. Quote
M1 6RYF Posted October 12, 2015 Author Posted October 12, 2015 No pictures today unfortunately, bu I'll take som tomorrow in daylight. 2 quick and easy jobs done today. Dewipered the rear windscreen and removed the boot weight. It looks alot better in my opinion and the boot opens much easier! Pictures to follow tomorrow! Quote
M1 6RYF Posted October 22, 2015 Author Posted October 22, 2015 Due to being back at work, I have not really had much time to update the thread, or even use the forum fullstops. I still haven't had chance to take some photos of the dewier. Anyway, I have been buying a few goodies for the Zed. The first thing I bought was purely to help me use the forum better. Worth every penny. Next is a few pictures of goodies I bought to go into the Zed. Quote
M1 6RYF Posted October 22, 2015 Author Posted October 22, 2015 I also treated myself to some new seats Quote
M1 6RYF Posted October 22, 2015 Author Posted October 22, 2015 Because it gets dark early, i am not having as much time to get things done. So here is a sneak preview of the seats fitted. I will take a lot of pics this weekend to upload. Quote
ZeppoJeff Posted October 22, 2015 Posted October 22, 2015 I also treated myself to some new seats Genuine brides? Quote
M1 6RYF Posted October 22, 2015 Author Posted October 22, 2015 No they are replicas. But the price i got them for, I couldn't of said no! Quote
ZeppoJeff Posted October 22, 2015 Posted October 22, 2015 Little bit jealous...seats look good though of what I can see. Quote
M1 6RYF Posted October 22, 2015 Author Posted October 22, 2015 Little bit jealous...seats look good though of what I can see. I'll upload a picture tonight pal. Trade link is selling some replicas in red with rails for £350. Quote
ZeppoJeff Posted October 22, 2015 Posted October 22, 2015 Yeah I saw that but can't see red going to well with the purple paint job Quote
M1 6RYF Posted October 22, 2015 Author Posted October 22, 2015 I managed to take a quick photo just for you Zeppo Quote
M1 6RYF Posted October 22, 2015 Author Posted October 22, 2015 I have quickly realised due to the high thigh supports on bucket seats, you really need a quick release wheel too make getting in and out easier. plus, I think it completes the 'race' style look. Don' get me wrong, I can get in and out now but sometimes its a squeeze! I wanted to add a sparco style wheel, with a quick release option. Ian made a brilliant guide on everything you need and how it all works. this helped me out a lot. I decided to go for a NRG short hub with a D1 spec quick release system. So, I went to get a tamper free T30 bit which I needed. (had to buy a whole screwdriver kit to find the one piece i needed.) I took of one screw find. It was tight but it came out easily enough. When I got to the 2nd screw i came across a problem which annoyed me enough that I had to walk away and leave it until another day. The security pin was ben and i couldn't straighten it out. I'm going to have another go at it tonight and see if I can get it out. I might have to try drill it out or find a tool that someone suggested. Wish me luck! Quote
M1 6RYF Posted October 23, 2015 Author Posted October 23, 2015 Good news, I have managed to get the wheel off and put my new one on. I didn't have chance to connect the horn up so that is my next job. The wheel sits a few degrees of centre as well but that is easily sorted. I still haven't had chance to take any pictures during day lights hours, but once I get the car cleaned I will upload some. Here are a few so far: The seats sit very low which is nice, the wheel feels great. Unfortunately the traction control light is permanent, so hopefully I can sort that ASAP. I also need to install all of the airbag resistors to get the airbag to stop flashing. Quote
M1 6RYF Posted October 26, 2015 Author Posted October 26, 2015 A quick update, no pictures sadly! The steering wheel is now on straight, my OCD was kicking in. I managed to get the horn working, and most importantly the traction control is now working! Just have to sort out the airbag light now! Quote
parello9 Posted October 27, 2015 Posted October 27, 2015 Have you now lost cruise control then? Quote

Recommended Posts
Join the conversation
You can post now and register later. If you have an account, sign in now to post with your account.