

Toothy
-
Posts
217 -
Joined
-
Last visited
Content Type
Profiles
Forums
Events
Gallery
Store
Posts posted by Toothy
-
-
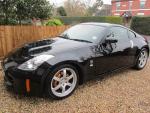
Fitted a 10" easy in stock location. Reckon you could put a 12" in there without too much bother.
Check my build for my enclosure

http://www.350z-uk.com/topic/86359-toothys-audio-upgrade-install/
-
Fitted mine at the weekend. Took power for the DC jack from the reverse light (light green cable) and earth onto Bose amp bracket. The red cable on the phono cable is there so you dont have to run a separate sense cable to your headunit. One end goes onto the reverse wire same as DC jack. And then onto the reverse sense on the head unit end. Hope that makes sense. I can explain better if not
-
Deffo would be grey for me. Looked sleek
-
I live in Coventry and would be all over this if I wasn't going to London that weekend! Sorry

-
Mine whines / whirs in neutral with the clutch engaged. Tends to get quieter as it warms up. Can sometimes feel minor vibrations through the clutch pedal too.
08 with 50K miles.
-
Correct, the headunit I installed has an inbuilt Garmin satnav. One of the things that put me off doing the install was the fact I already had satnav and that it would be a pain to get it working with a new head unit.
However, due to the age of the navigation unit, not being able to use post codes, etc. I rarely used it anyway. Maybe once or twice a year. I always found myself using google maps on my phone, especially for short journeys. The in built sat nav is now mostly redundant, but I can return the car back to stock and have full functionality of it still.
People have made circuit boards to mute audio when the satnav sends a voltage. Have a search, I'm sure I remember seeing some detailed info somewhere.
-
Completed most of the finishing touches to my build now. I drilled holes in the document tray, wired up the amp and have it sitting in there nicely.
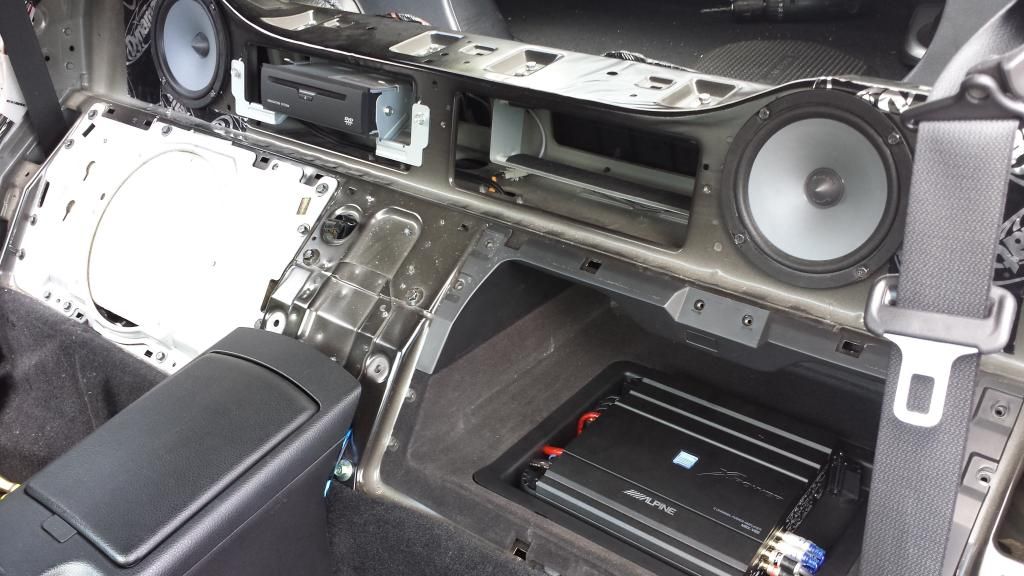
Headunit is now in too. Just started fine tuning the sound to my liking. Still waiting on my reverse camera
so will have to removed a lot of this to fit it at a later date.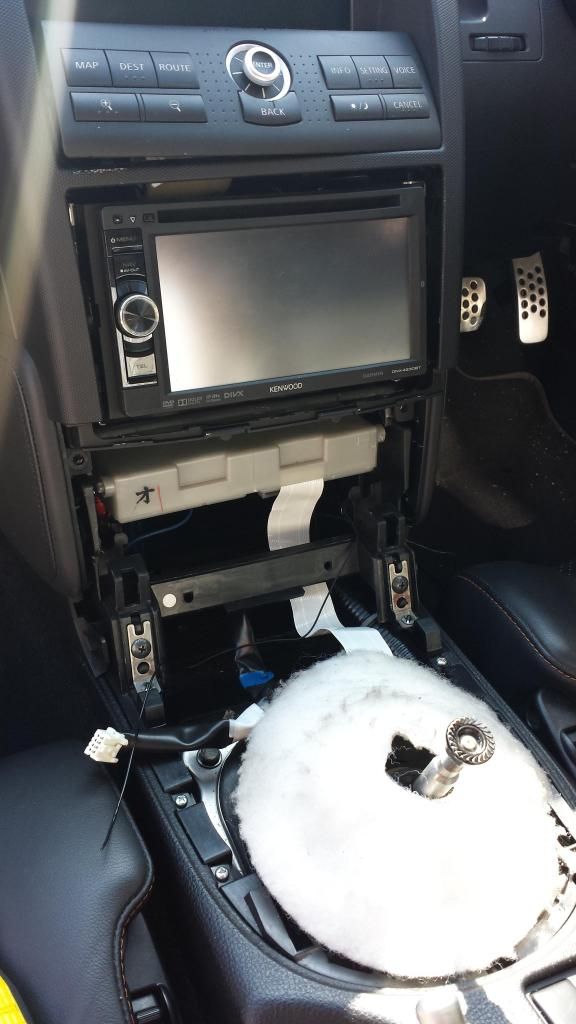
-
Bump - Still for sale. Will be going on eBay soon if no one wants it
-
Decided Just to buy a new one in the end. £30 for a bit of plastic :/
Mods please close.
-
Yeah would be good to see the footage
-
Put me +1 down for this Ian.
I would be interested in a tour over the paintballing
-
 1
1
-
-
Looking for a head unit fascia. For an 08 Zed. Incartech sell "50-306D Nissan 350Z(06>) Double Din Facia". Hopefully someone will have one lying around? Or similar.
-
Should be ok with burned discs, but might not play MP3 discs...
I'd reccomend attaching a 3.5mm audio lead to the headunit, I followed a guide on here, has served me very well.
-
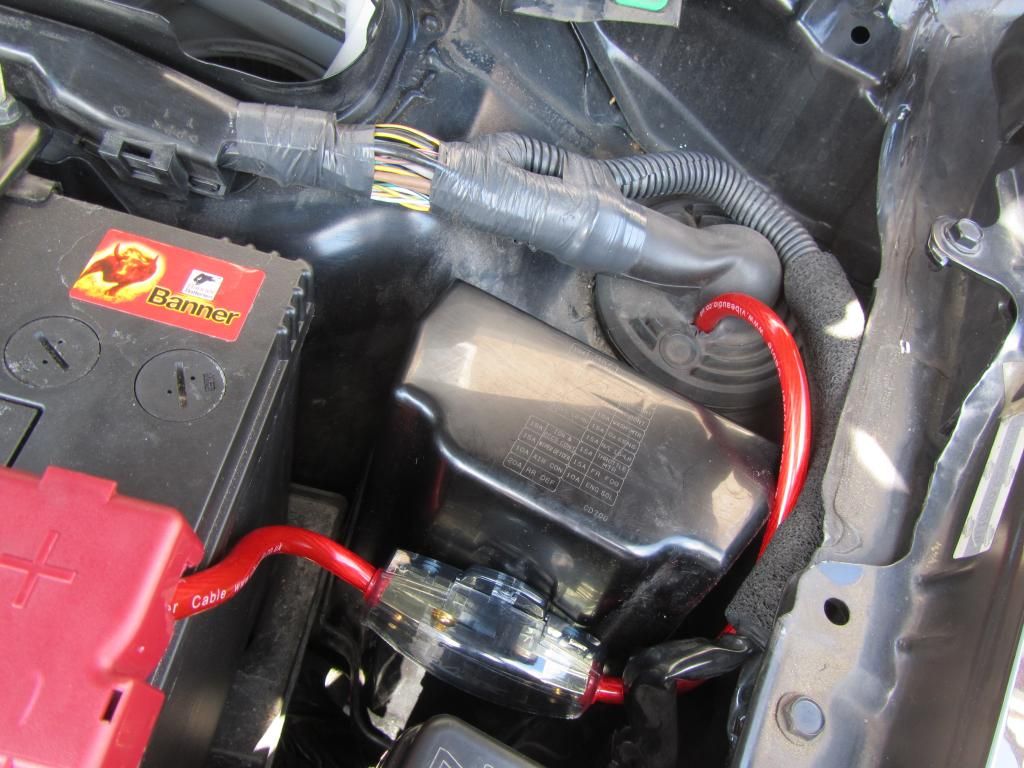
Bit of an update, however I've not been taking many photos sorry! Just been doing bits here and there when I get half hour to spare. I have installed the fuse holder and ran 4 gauge power cable through the bulkhead and down the left sill, next to the existing wiring loom. Hoping this wont cause any interference with the front speaker cables which I have also ran down both sills to the rear bulkhead. I will re-route the power cable down the tunnel if it does. All the bulkhead trim has been removed, as have the kick plates and sill trim to do this.
I've ran the front speaker cables through the door wiring grommets and installed both front component speakers. Running the cables through to the door was the hardest job so far, it's very tight to get in the shut gap of the doors. My hands have the battle wounds to show for it! I was very nervous in drilling the connections to pass the cable through. One false move and I could have ruined the connections for all the door hardware! Top tip: use a small amount of washing up liquid on the cables when pulling them through any tight gaps, makes them slide through a whole lot easier! I'm keeping all the bose kit so I can return the car back to factory if I so wish. Therefore I haven't cut the front speakers apart to use them as spacers, instead I purchased some Nissan Micra spacers which fitted perfectly. See my comments on this thread for where to and where not to buy from, I had a bit of hassle! http://www.350z-uk.c...20#entry1288931 Tweeters were mounted in the stock location using a glue gun
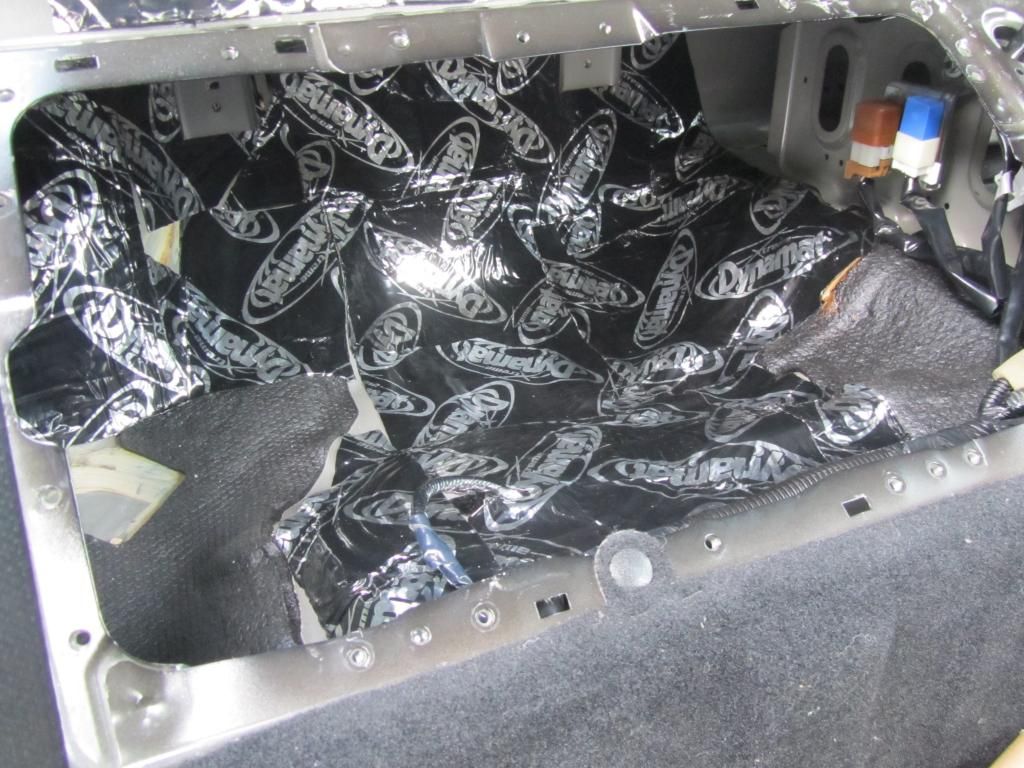
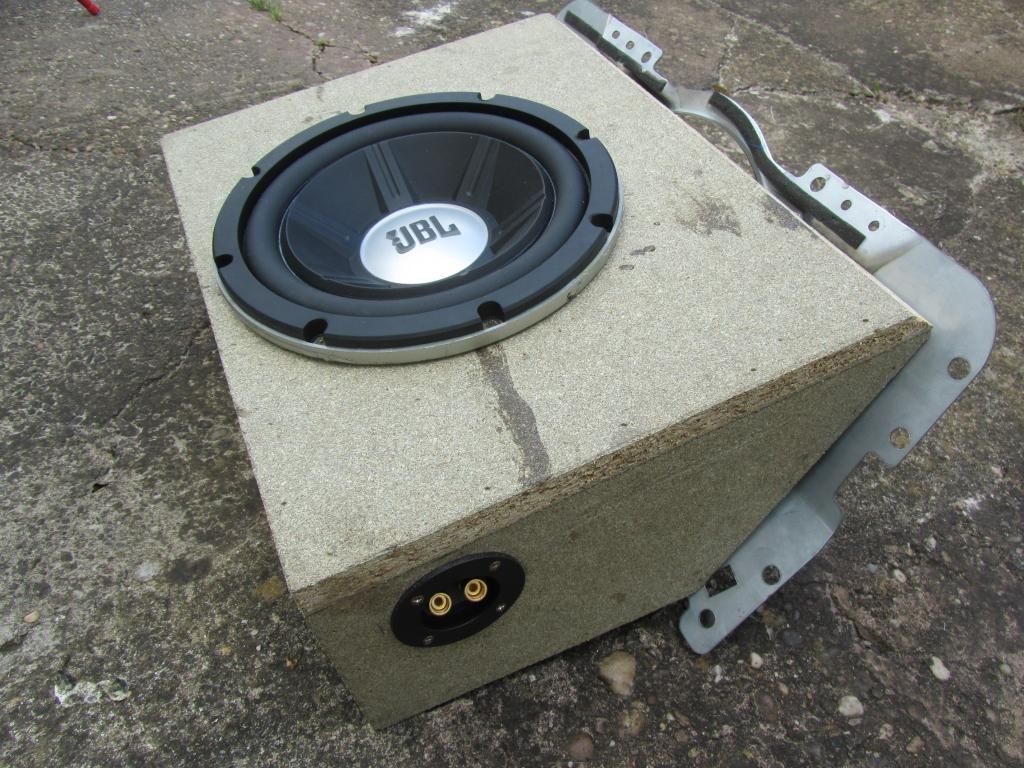
I got two sheets of Dynamat for around £15 each delivered off ebay. I put around a A4 sized section behind each front speaker, on the door skin. Hopefully this will help sound quality a little.With the rear bulkhead stripped I added sound deadening material around the rear speakers and crucially all in the subwoofer area too. I also wired the earth cable to the chassis and drilled holes in the plastic document tray to pass power, speaker and RCA cables through. The Alpine amp is a perfect fit for this tray, so will be placed inside the passenger glove box, which I'm sure you'll see in time.
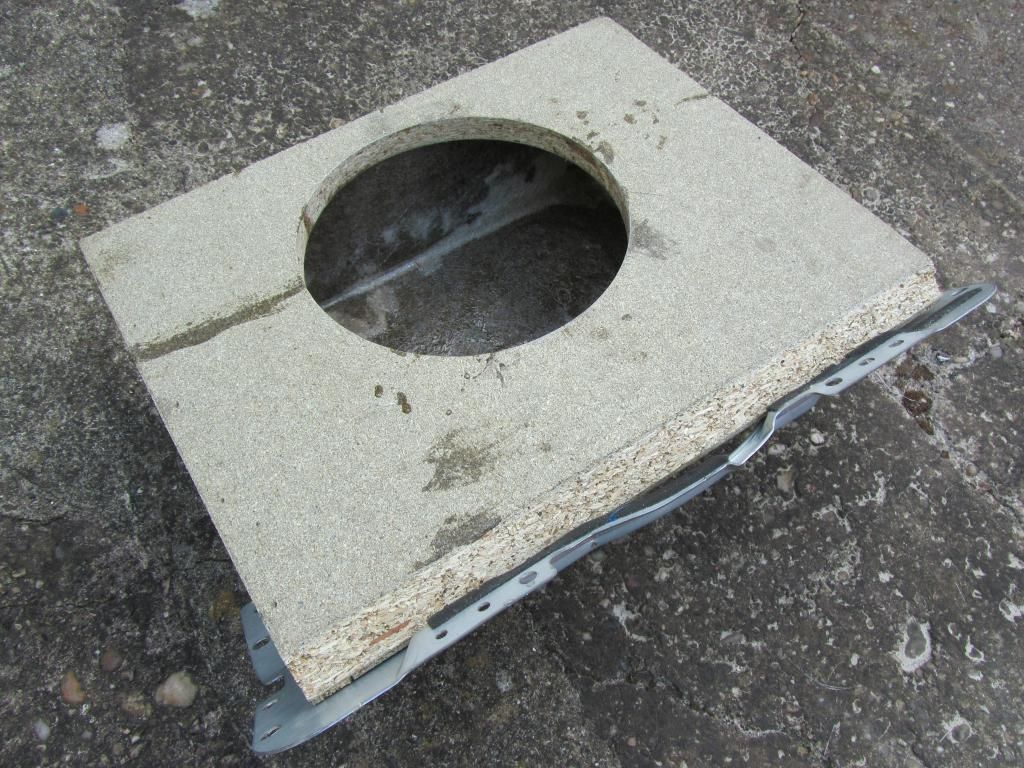
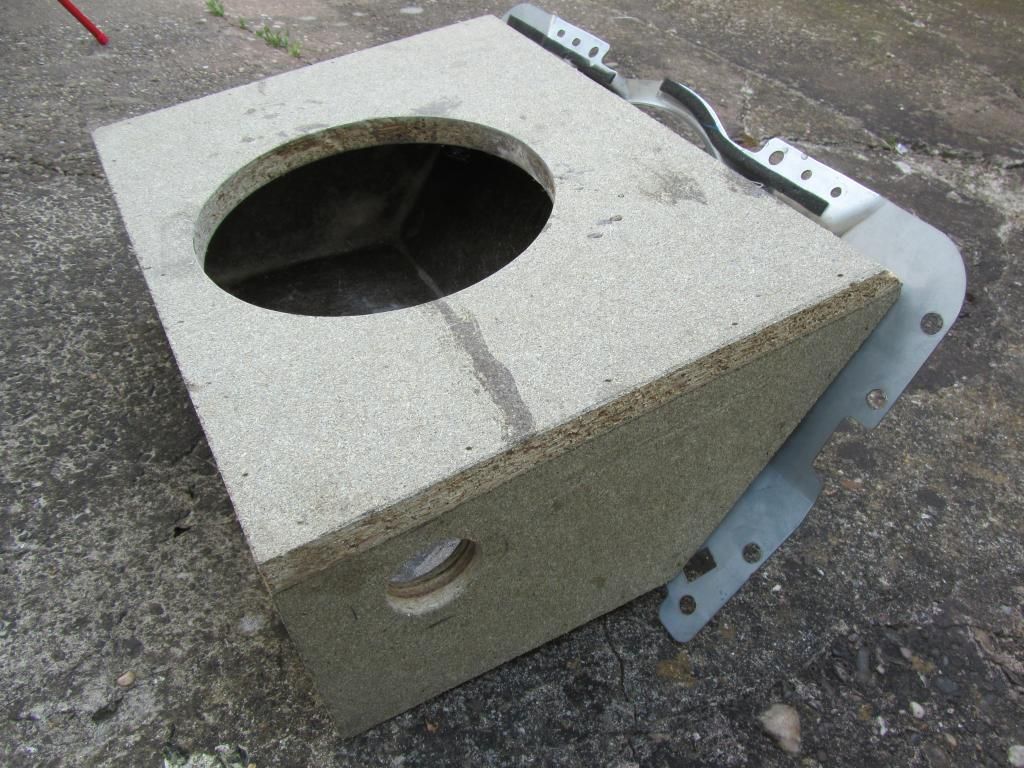
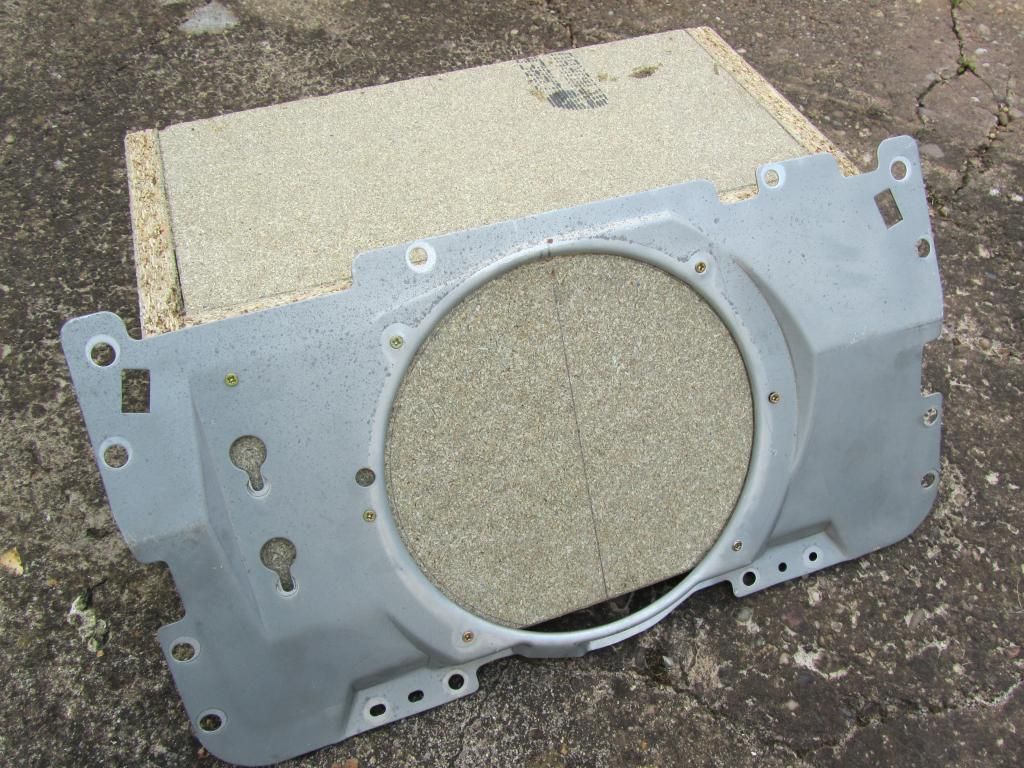
I have also built my subwoofer enclosure! Best way seemed to make the sub downward firing. The dimensions of the passenger glove box happened to create the exact volume require for the JBL sub in a sealed enclosure. Using the glove box as a template, I cut inch thick fiber board to size. Then glued and nail gunned it together. I used a router to cut the subwoofer hole and hole saw for the terminal plate hole. The terminal plate cost a few quid off ebay. Afterwards I fiberglassed the inside to seal and give it even more strength. I re-used the metal bracket which holds the standard Bose sub in place as a mounting bracket for my new sub box. I hope it sounds good!
Plenty more to do. One thing left holding up my build is a reverse camera ordered from China. It's been over four weeks since I ordered it and it's still not come. Hoping it will come soon! I dont want to install the HU before then, else I will have to take it all back out to plug the reverse camera feed in.
-
Late as usual adding my photos


-
1
-
-
I ordered a set but none of the holes matched up,there to far away and the old gaitor has square bits to the surround also,have I ordered the wrong one I did but the set for a 2004,is there a guide?
No problems with holes matching up for me. Double check you are getting it the correct way around and then contact the seller if you still have a problem. They have possibly sent you the wrong one.
-
Pinned on top of this sub forum:
http://www.350z-uk.com/topic/56481-kenwood-ddx-4028bt-rear-cam-install-%E2%80%93-superguide/
-
Managed to try this yesterday afternoon... SUCESS! Window drops better than ever, no more issues with the auto close.
Did take me a couple of attempts to realise you only need to hold the button the way down, and not on the way up though. But got there in the end!
Many thanks for everyone's help!
-
Thanks Ian! Glad you said I'd have torn it to bits and not thought about looking under the patches. I'll let you know how I get on. Hoping to take a look Monday, weather permitting. Off to Download festival in the mean time


-
1
-
-
I read a guide somewhere and was able to do the passenger door the other week for a new speaker. Should be almost identical to the right hand.
Assuming I will need to remove the module plate to get access to the door mechs though. Trouble is not having a garage to do this work. The summer showers we keep having make for slow progress!
-
Thanks guys. I'll be taking off the door card next week to install a new speaker so prime opportunity to give this a go.
-
I've got an issue with the auto close on my drivers door. Every time I bring the window up it closes fully then reopens around an inch. I have to manually hold it to close the window fully.
Seems like the anti trap is kicking in by mistake.
It does this if the door is open or shut. I don't have issues with the glass going up and down when opening and shutting the door. And I have also tried the reset procedure holding the switch up and down in all manner of combinations.
-
Saw this and was about to post the same link. Would be great if there was plenty of interest. Sounds awesome
-


D1 Spec Throttle Controller for HR
in Performance
Posted
Anyone know if there was ever a D1 developed for the HR? Last time I checked it was DE only?