

hicksi
-
Posts
70 -
Joined
-
Last visited
Content Type
Profiles
Forums
Events
Gallery
Store
Everything posted by hicksi
-
Guys this info is priceless thankyou. No joke intended 😄 I too have been told the Falkens are a great tyre. Pretty much by anyone I've asked the question to. Azure, your not alone, I do like the look of those side walls!
-
Morning guys, thank you both for the honest responses. I've always wanted to ask the question, but have a clear answer now. I've always driven the car since I bought it on PS4s and I am just used to the predictable grip and handling I don't know any better as I have never tried anything else. It's an obvious no brainer, if for a few quid less the car is just going to start moving around... Do you guys run PS4s or a different tyre?
-
Evening team, hope your all good! Currently sporting a MPS4 with a huge circular gouge on the wall, due to me running the Zed up the road to blow the cobwebs off and running that wheel practically flat... ouch. I know. Tw@@t All other corners are Nice and healthy, so ill be replacing with a fresh PS4. But it has me thinking... Is there a cheaper alternative to the PS4s, I am well aware quality and grip are sacrificed for cost, I do not expect the same tyre just cheaper. I don't drive the Z as much as I used to, and its certainly not driven as if it was on a track. Is there a tyre that is more wallet friendly, aimed at spirited Sunday drives and the occasional blue lit razz to tescos? My logic is if there are reliable tyres at below the 85-95 make, I may be tempted. If we only talking a reduction to say 100-120 I'd just give up and stick with the PS4s... Thanks in advance all!
-
Hey chaps and chapettes, After a set of 20mm front and 25mm rear spacers. Going on my stock 18inch rays... Thanks in advance!
-
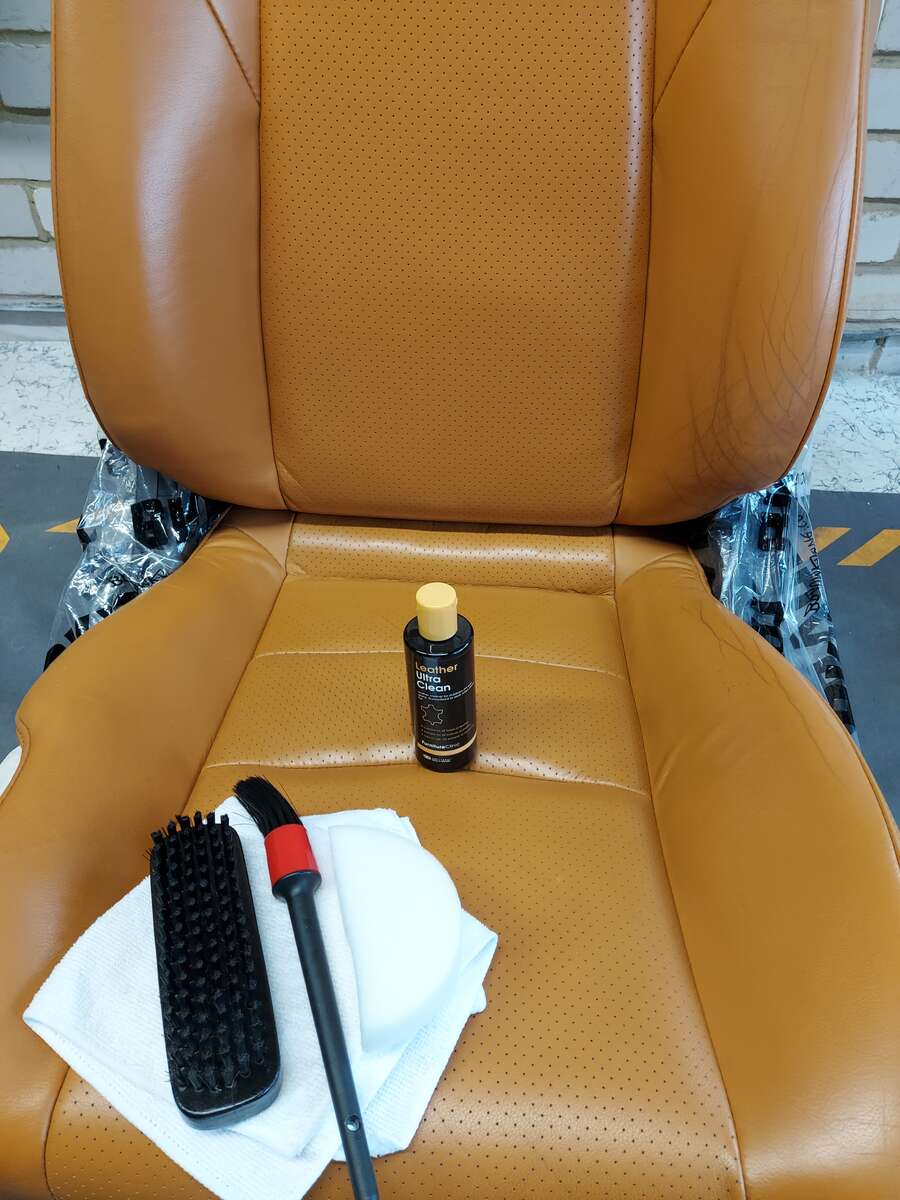
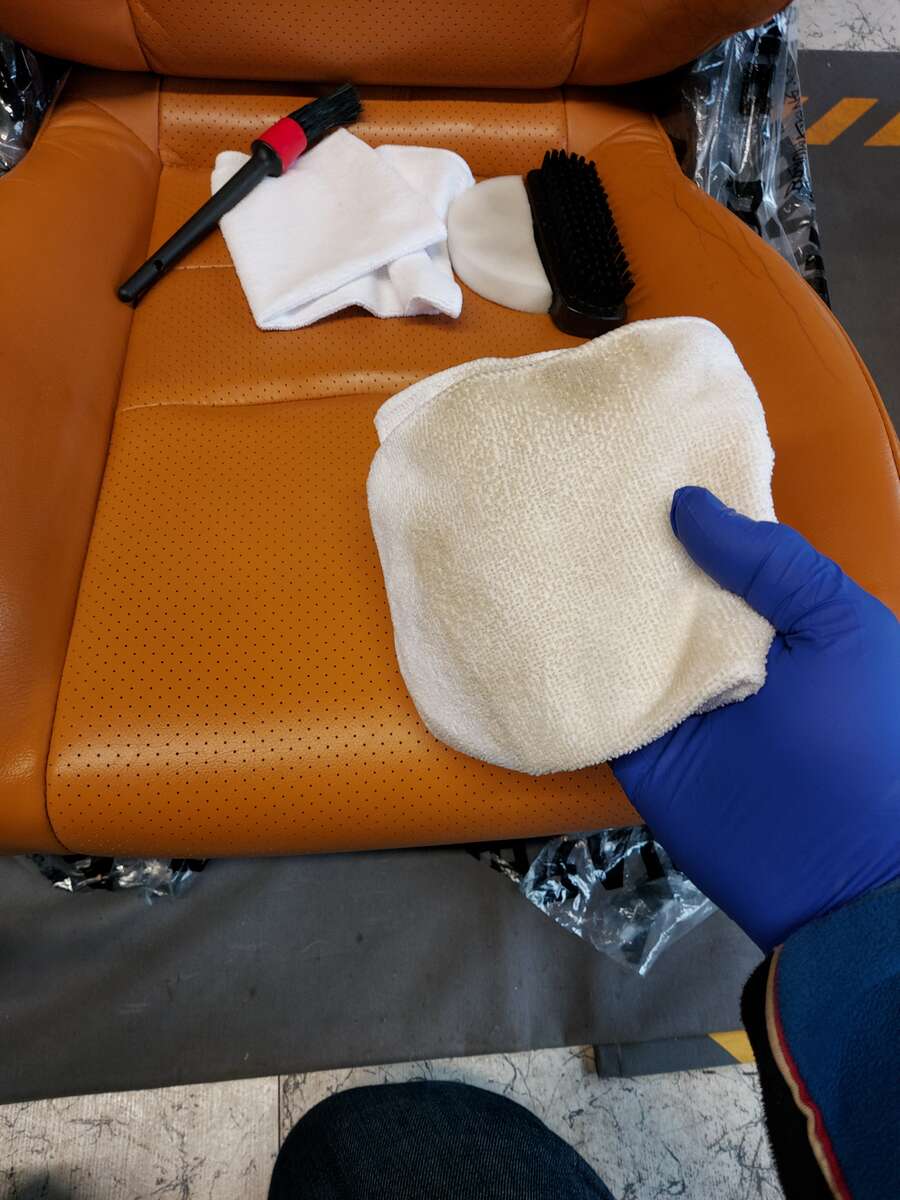
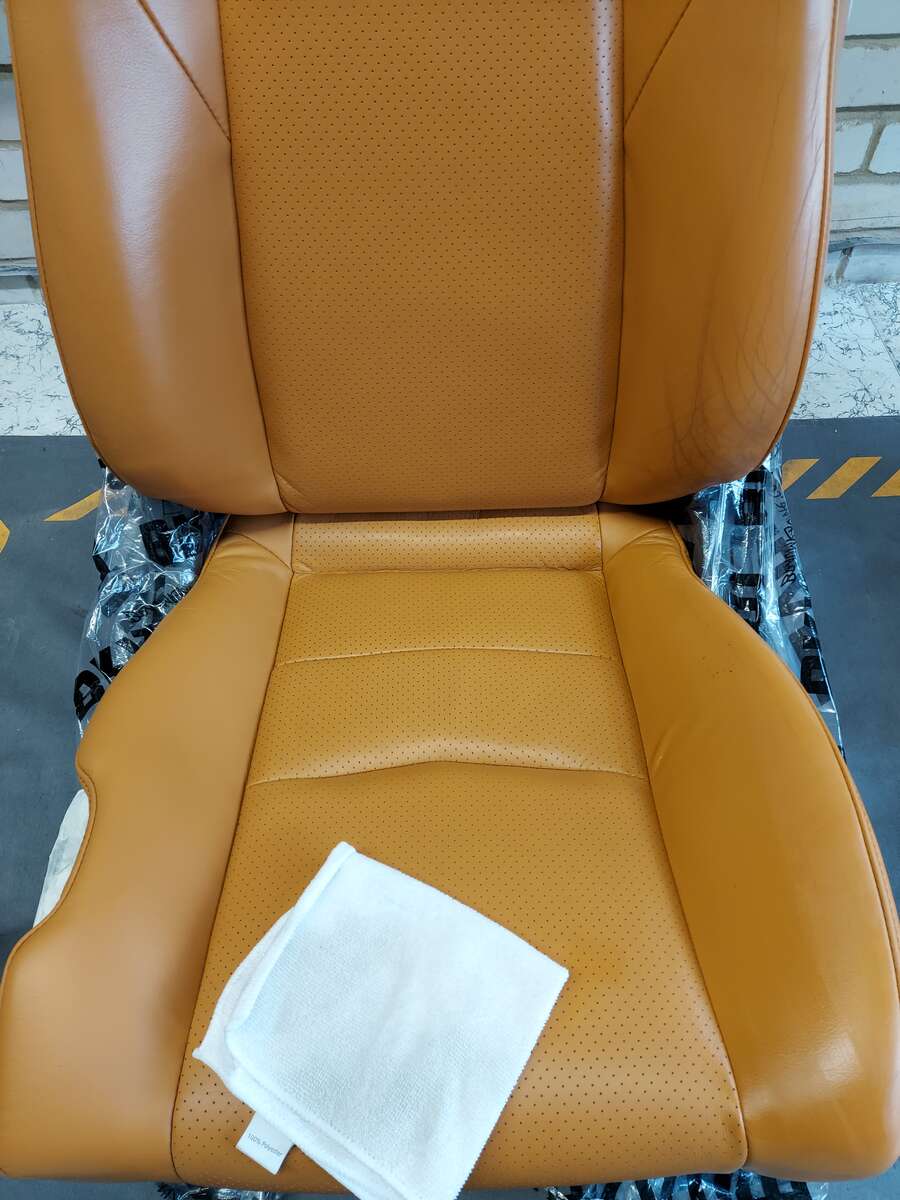
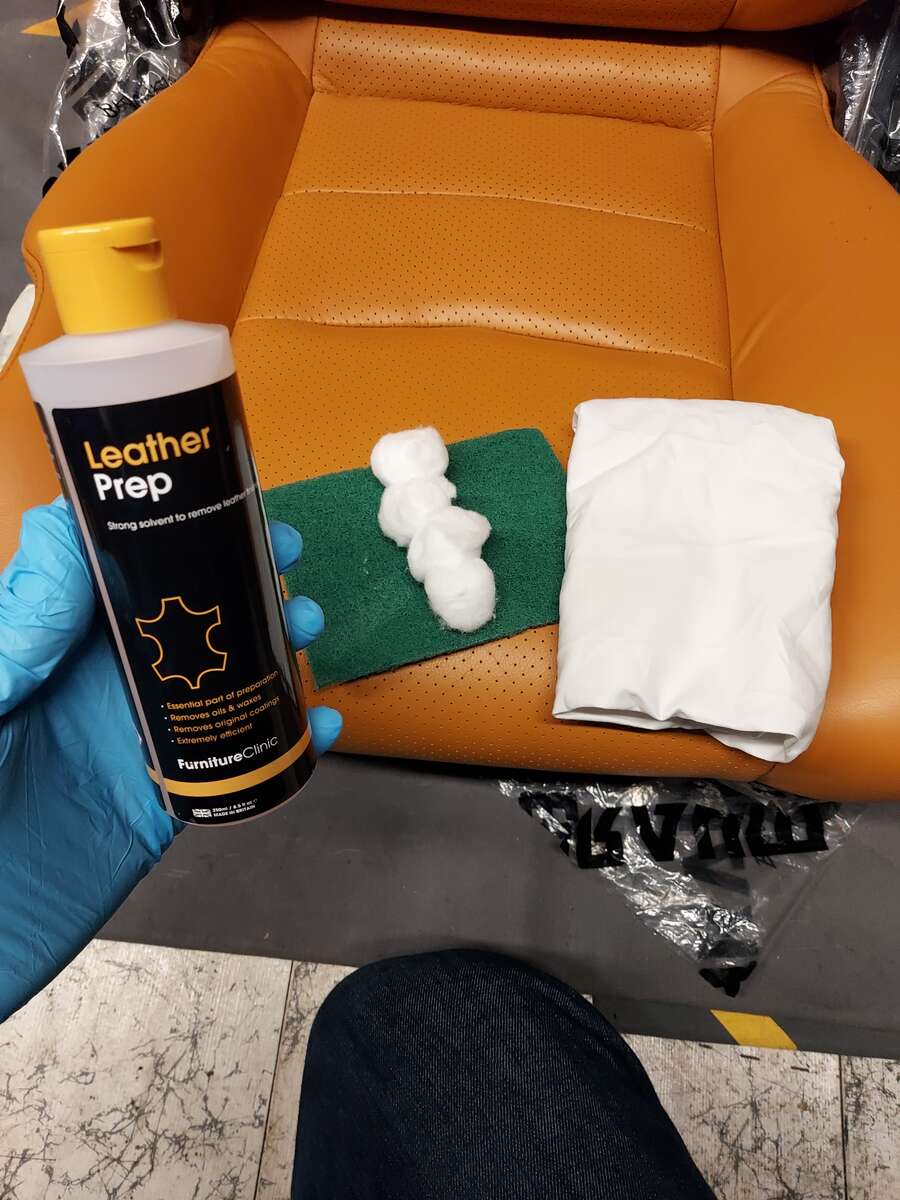
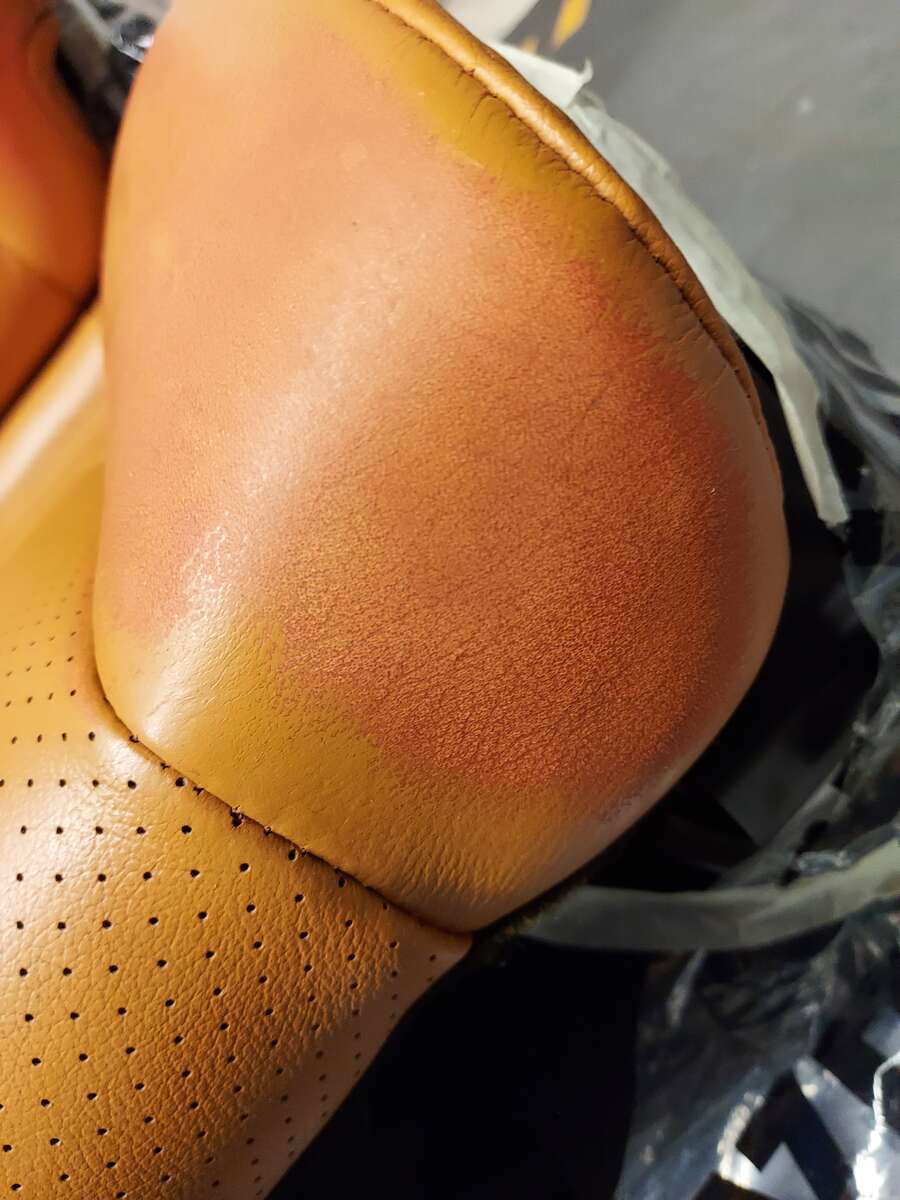
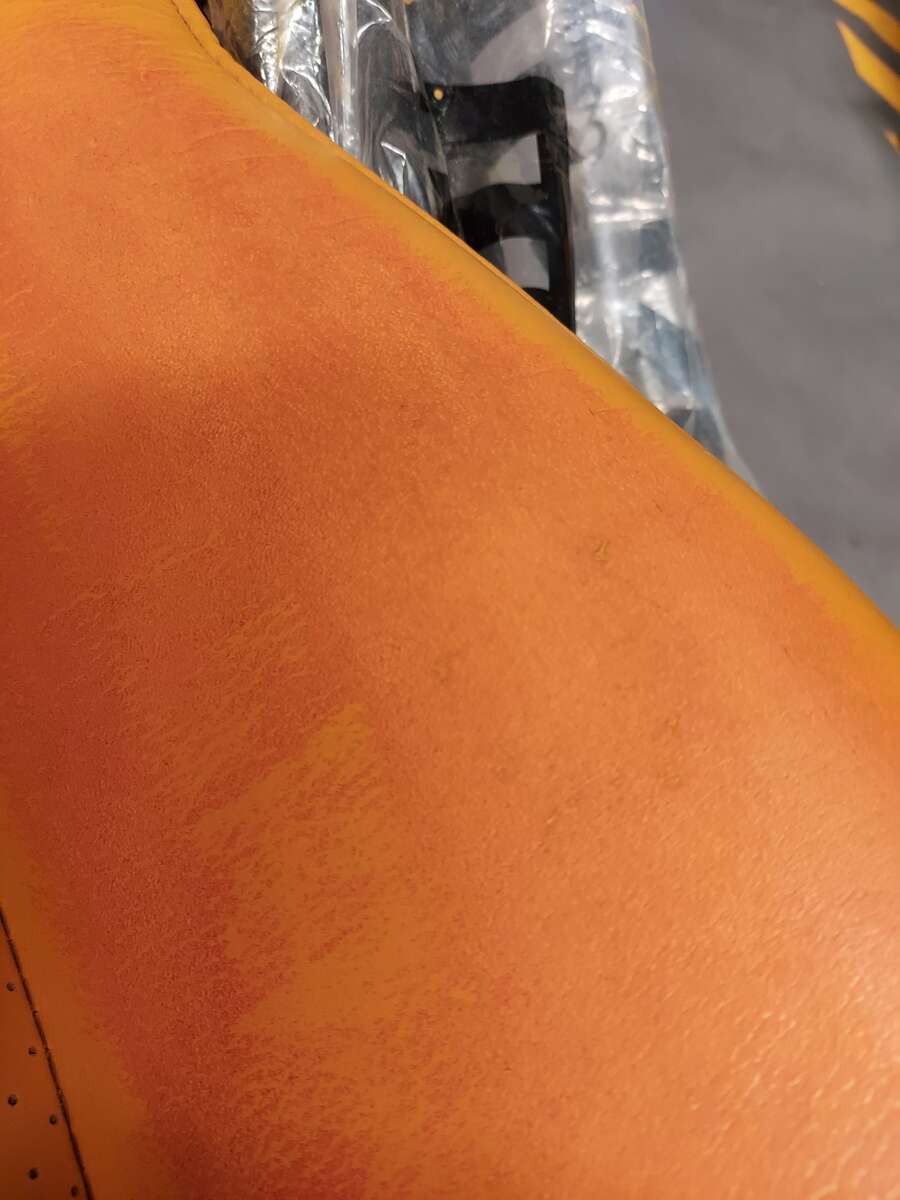
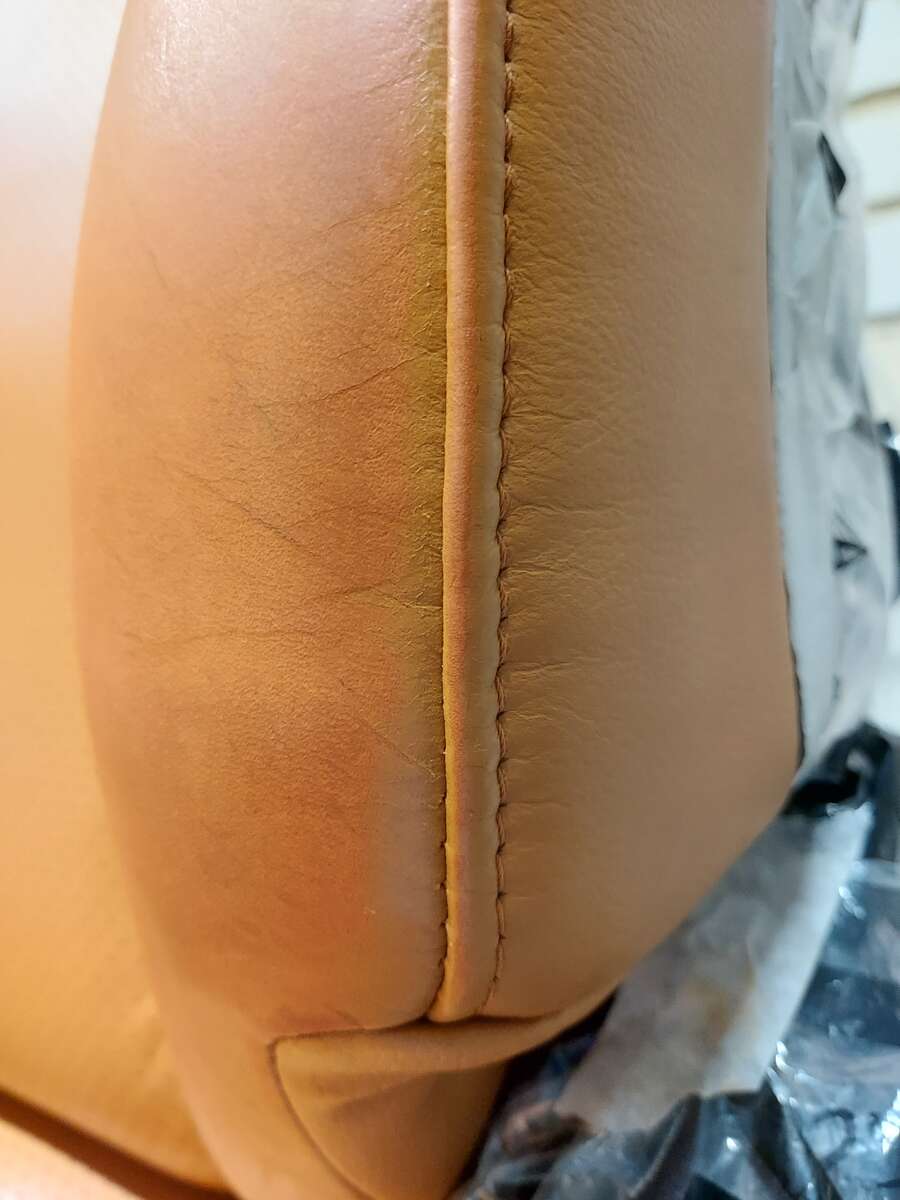
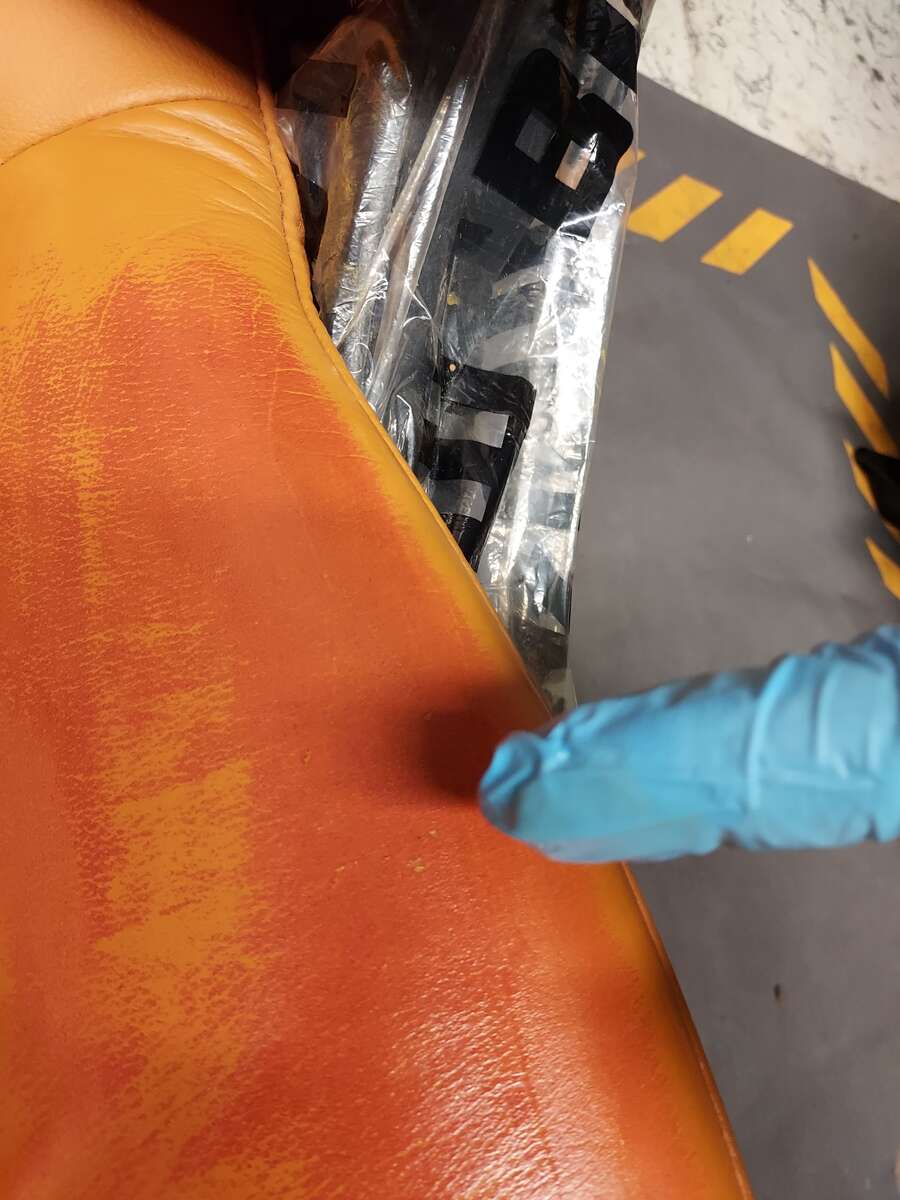
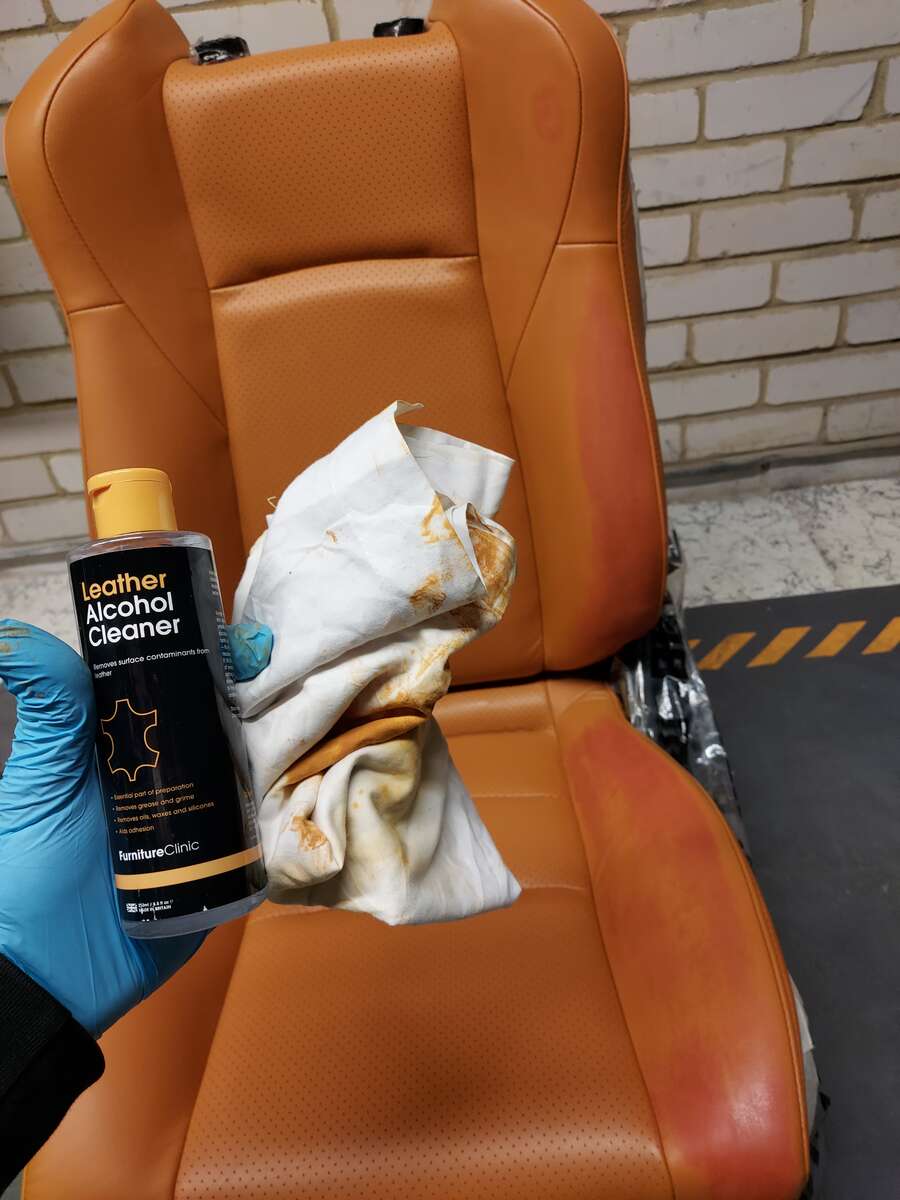
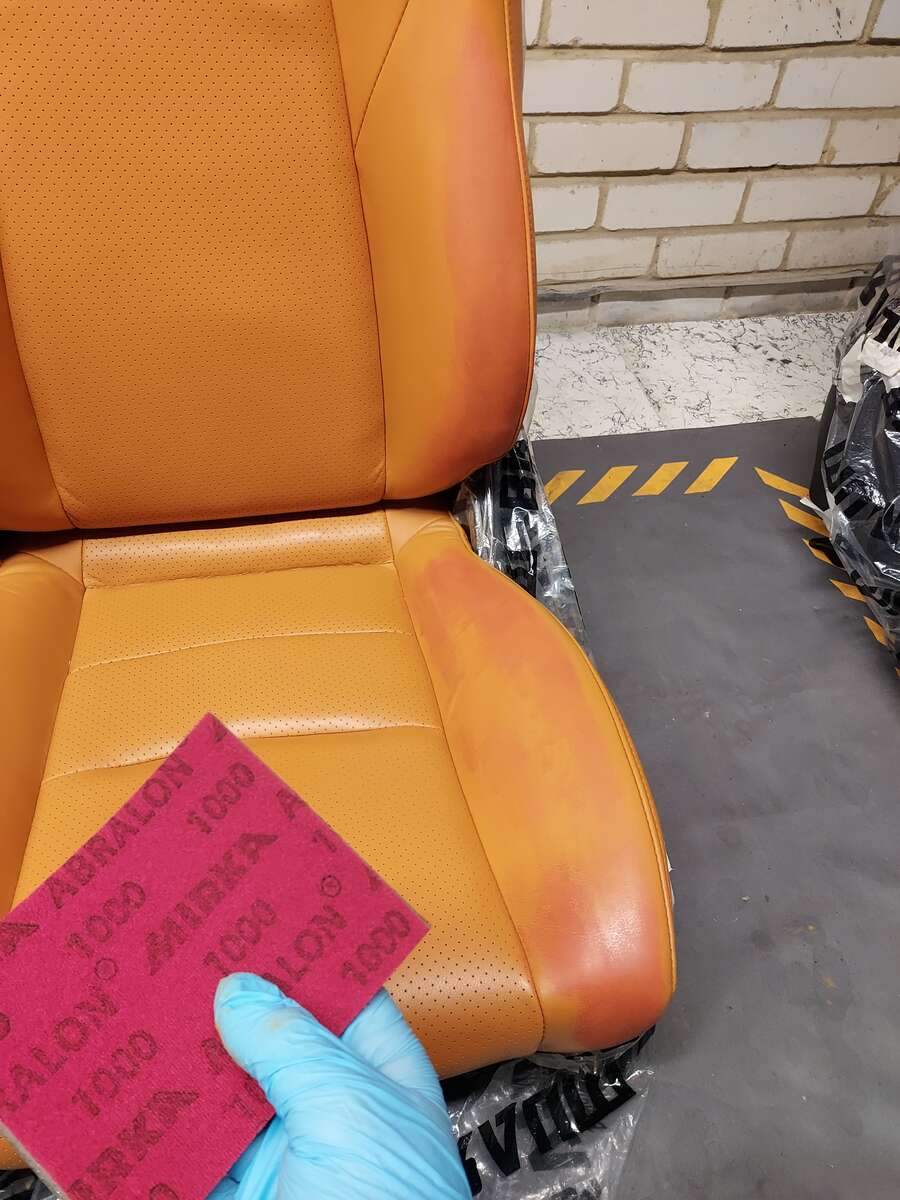
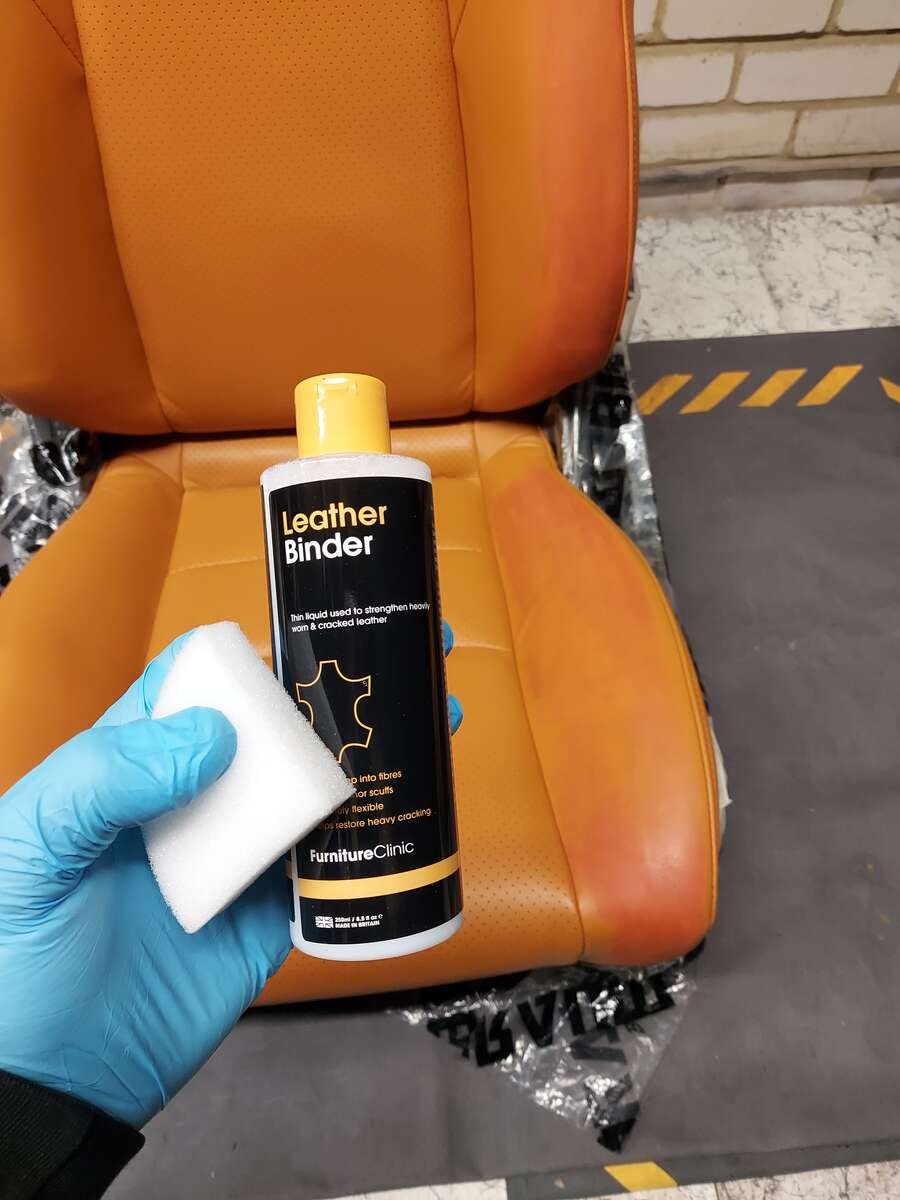
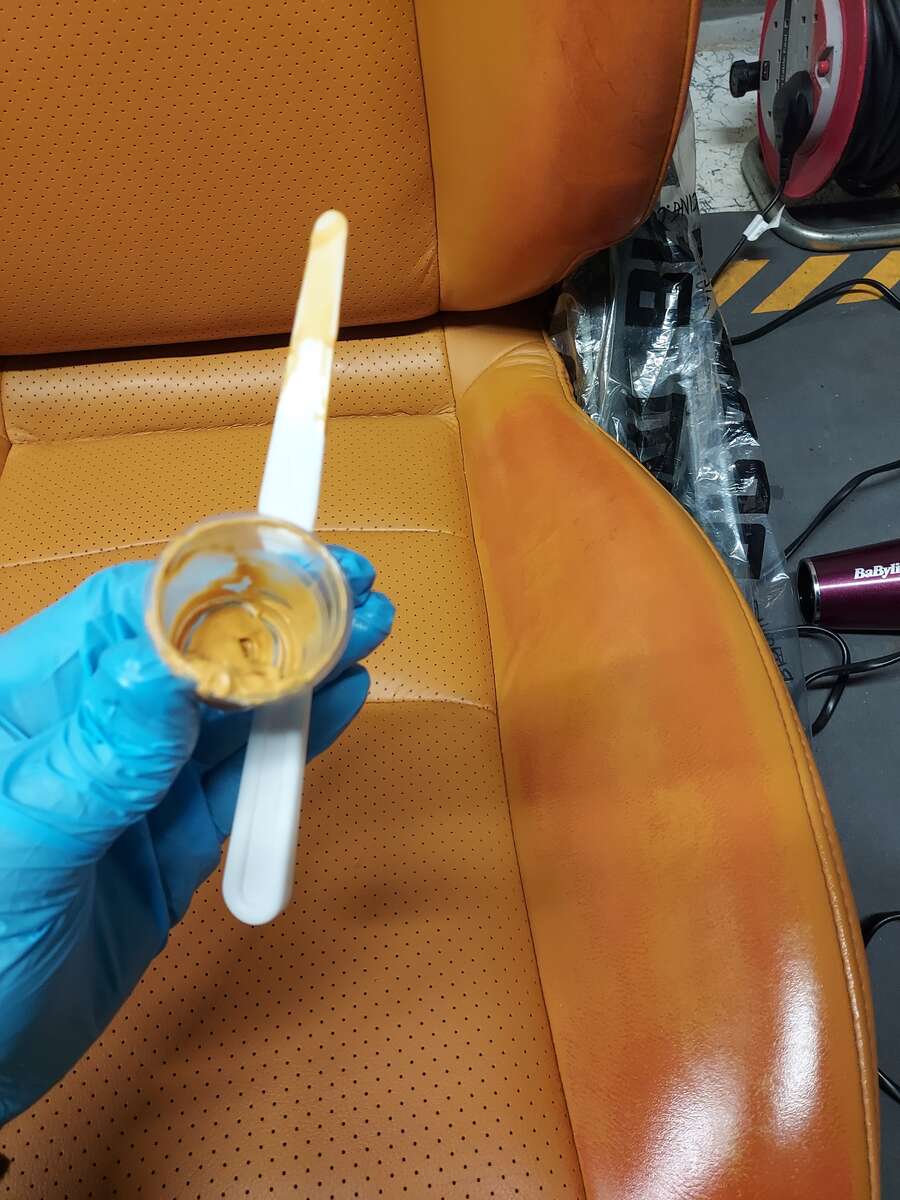
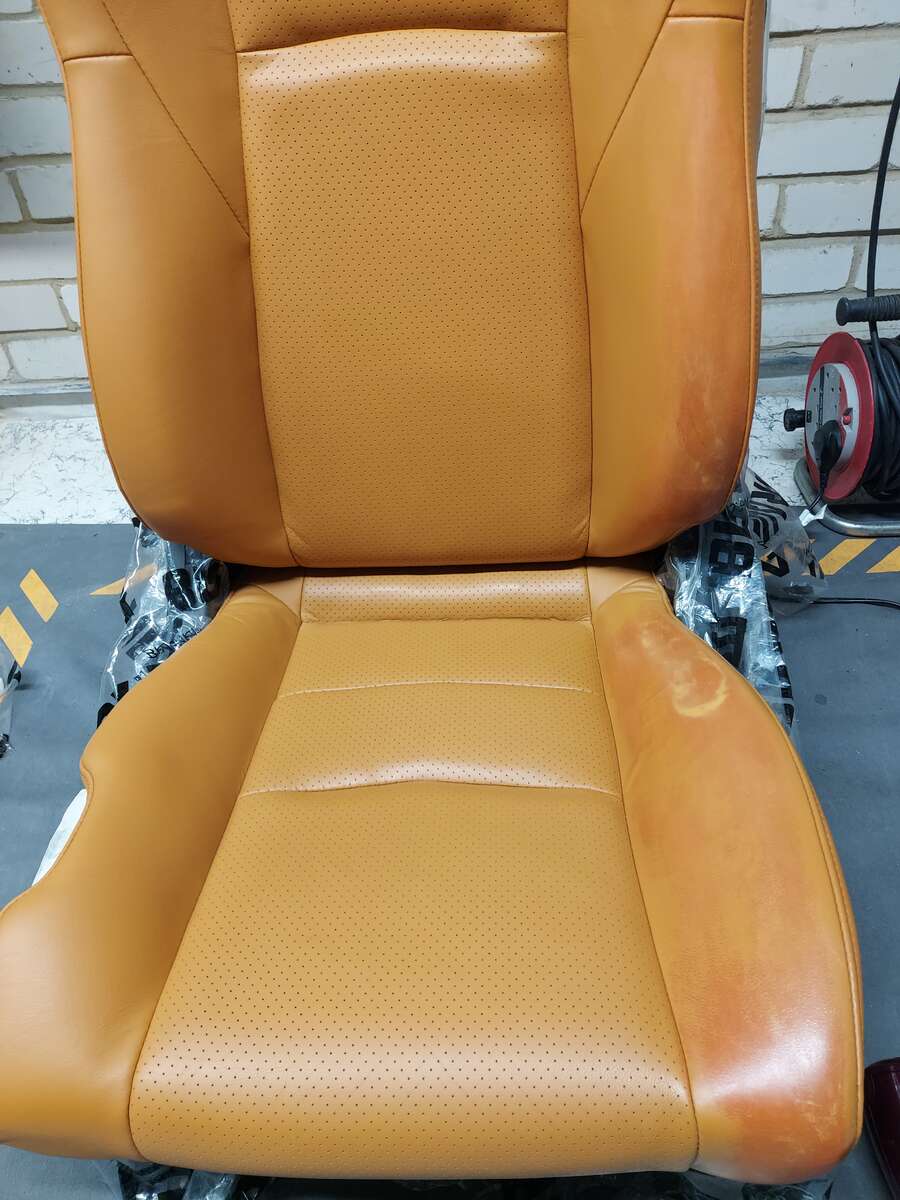
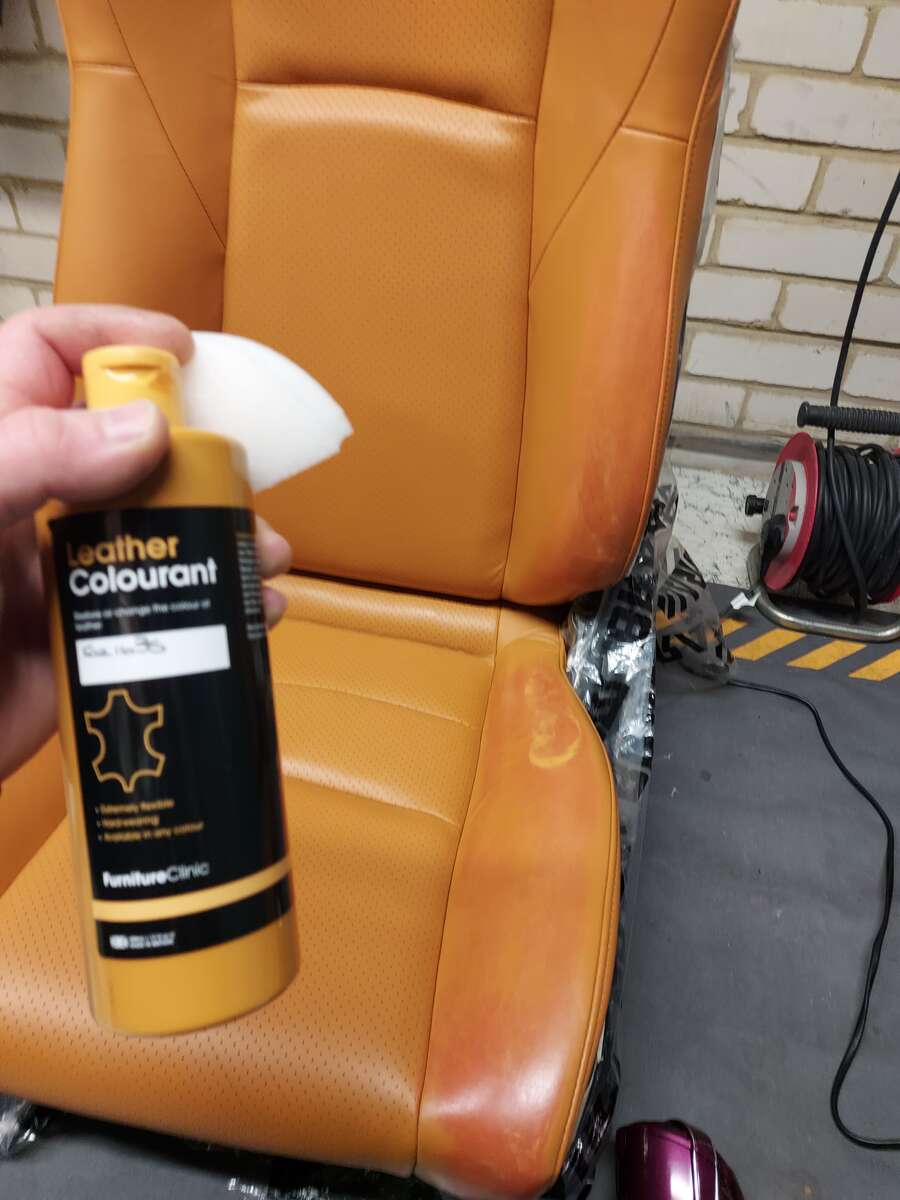
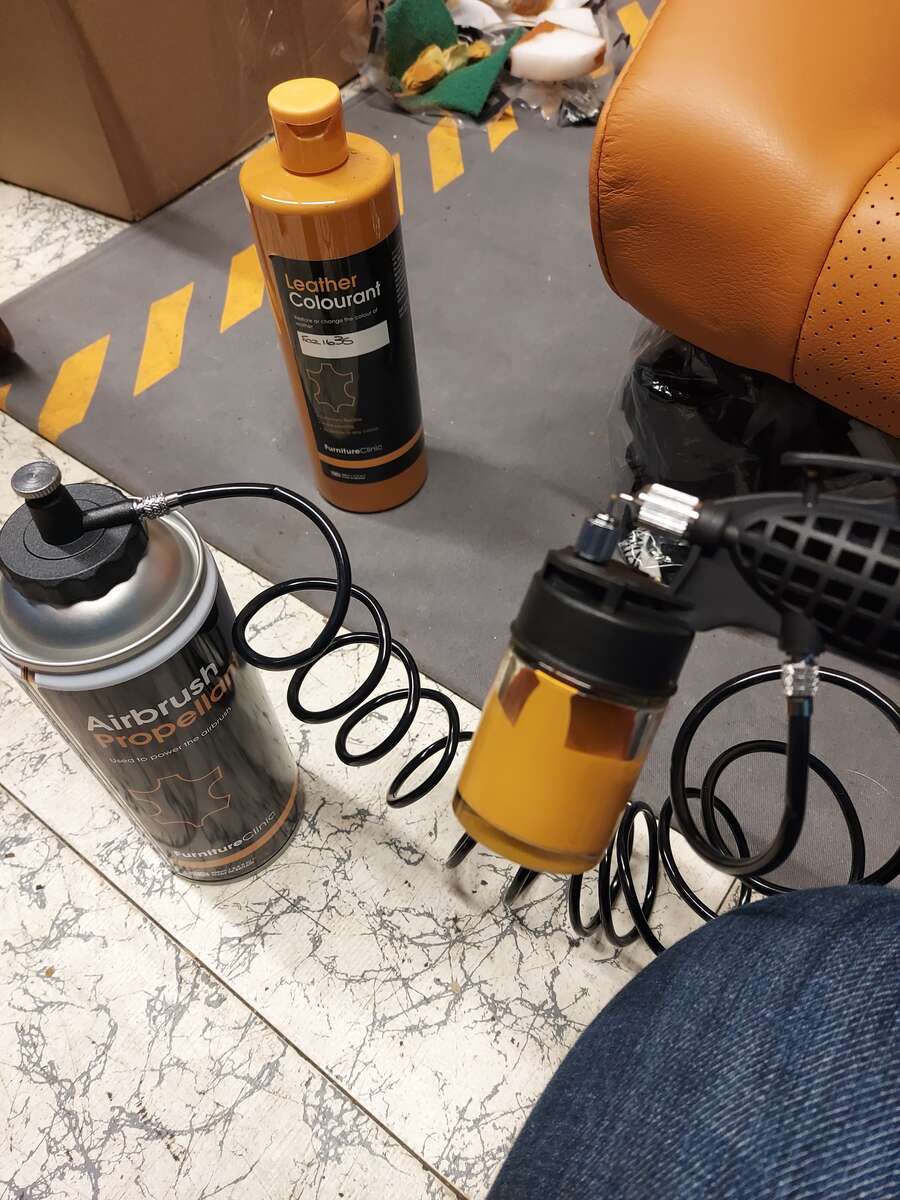
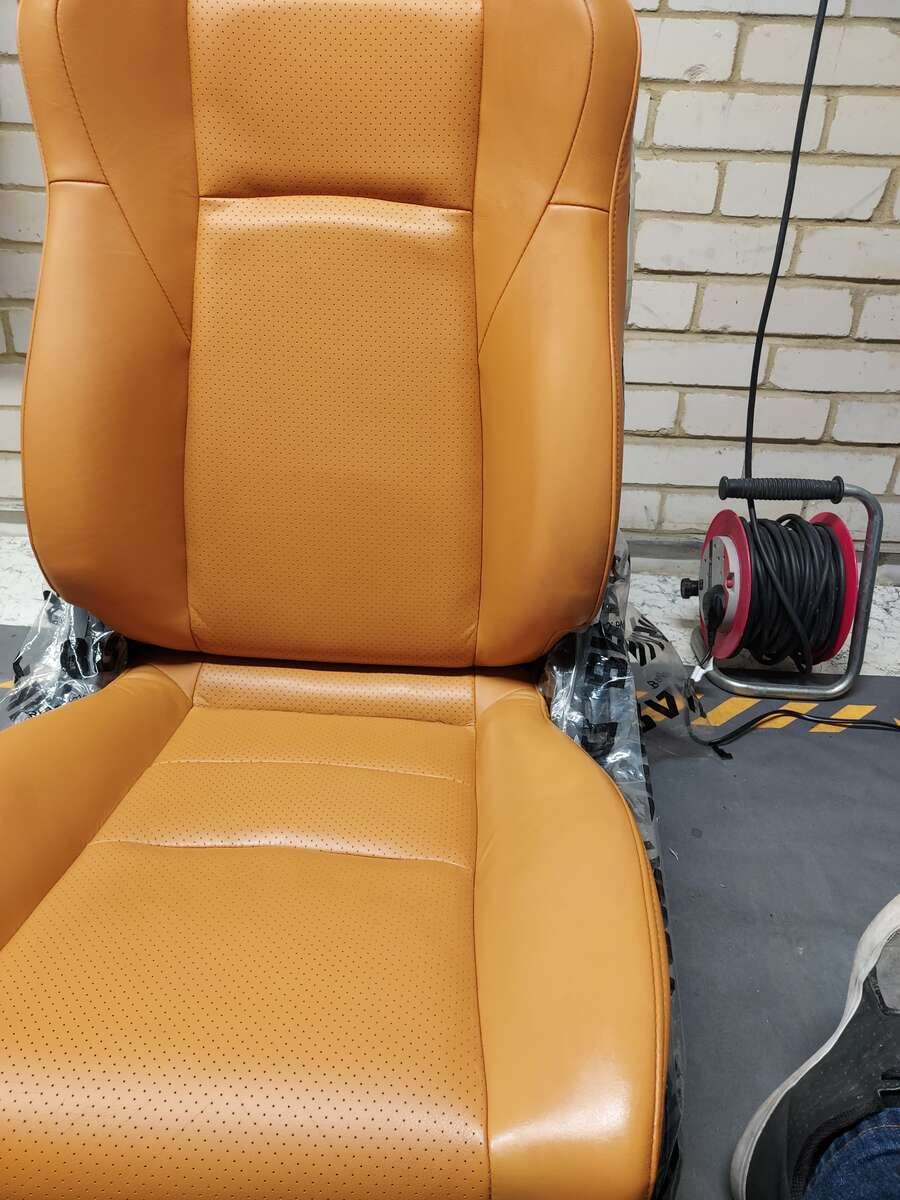
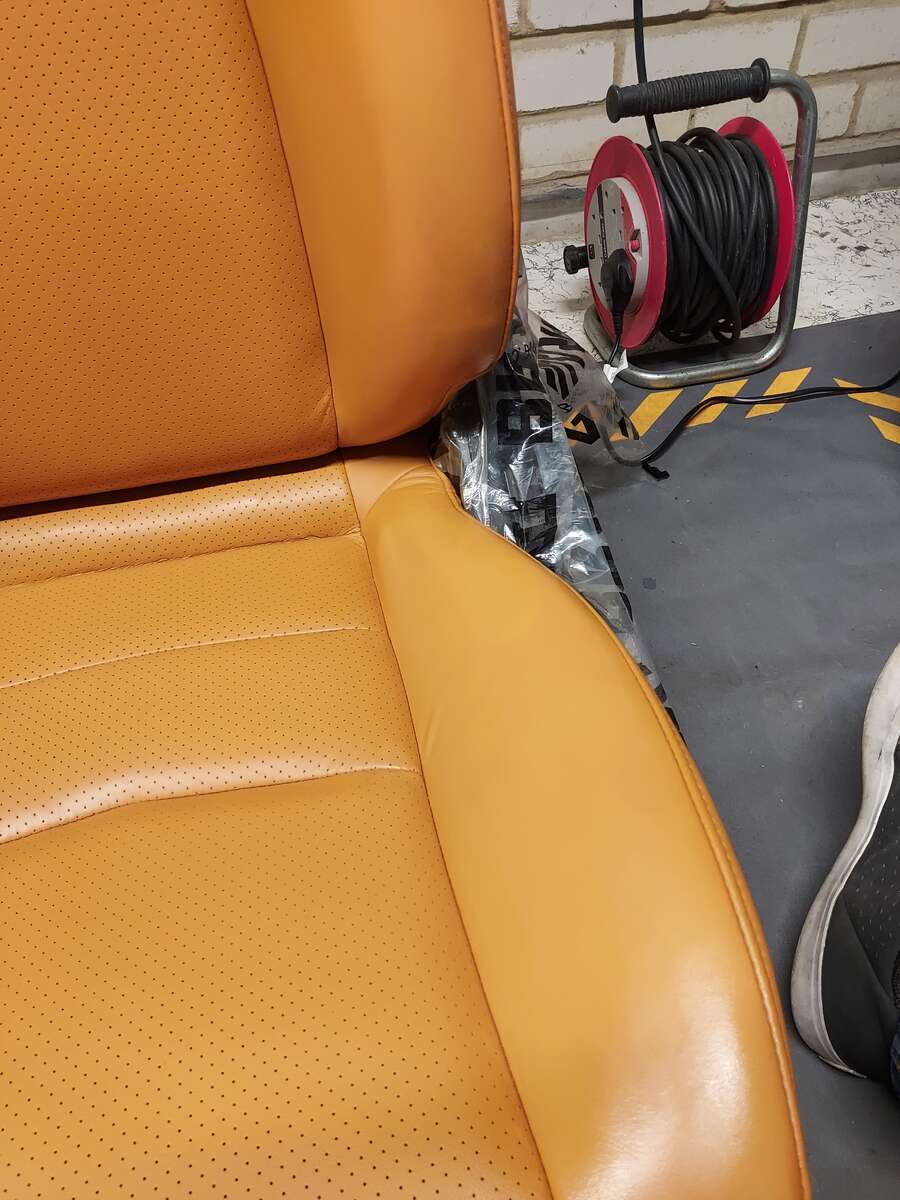
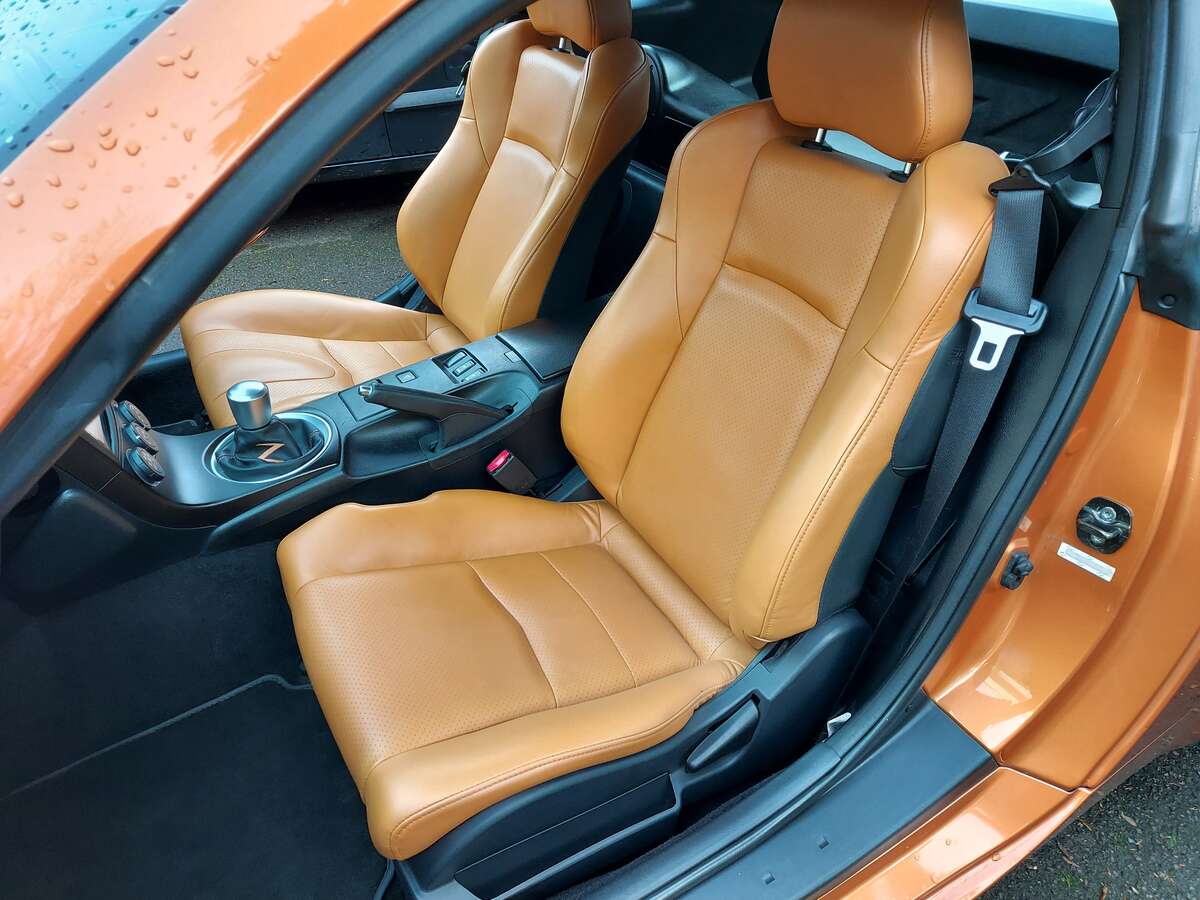
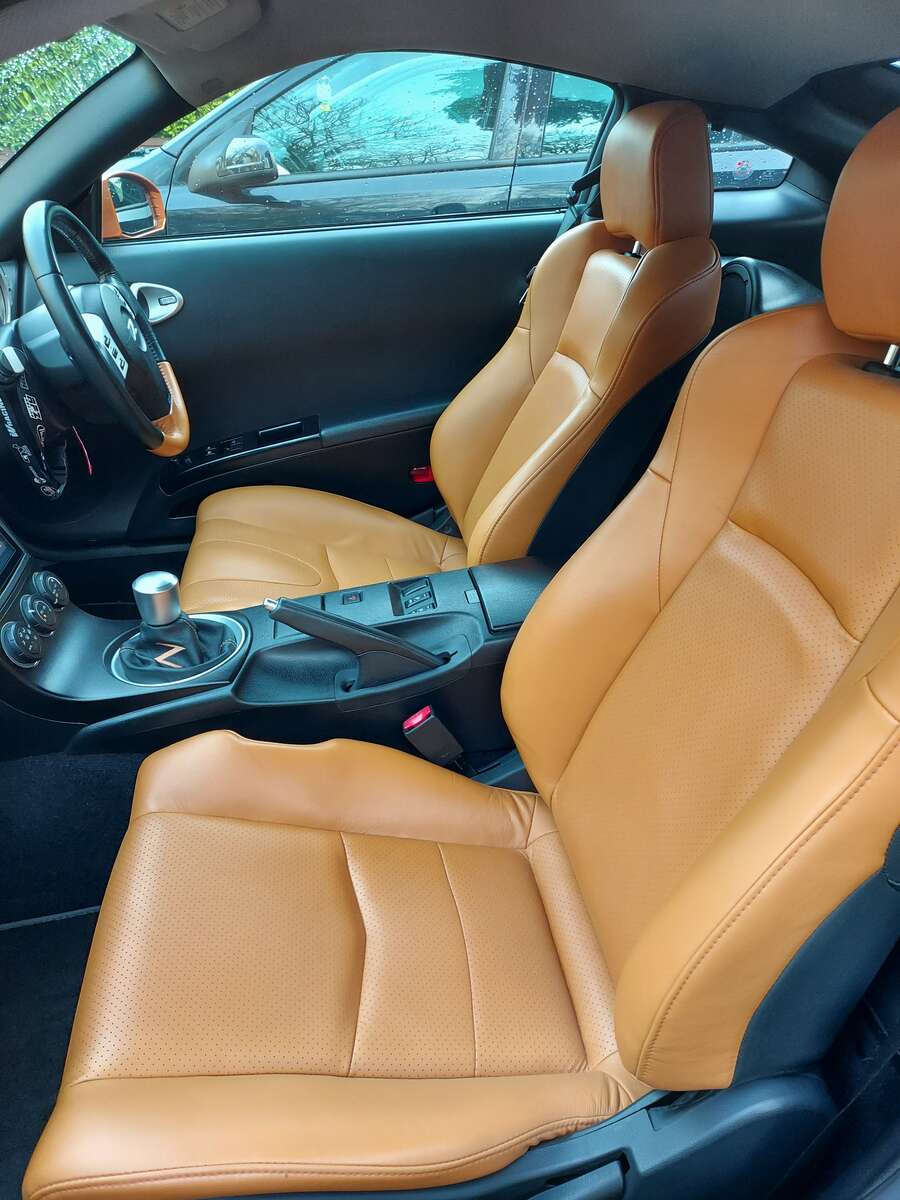
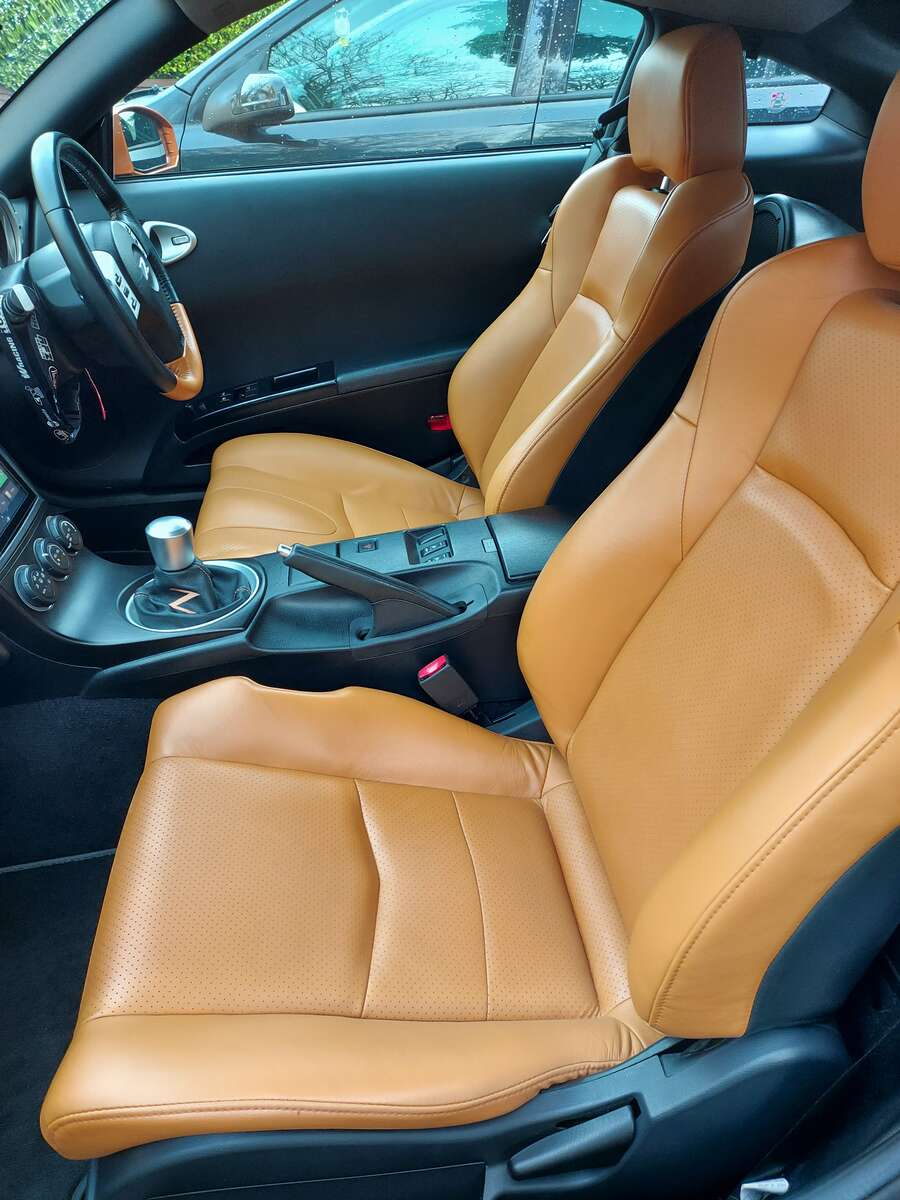
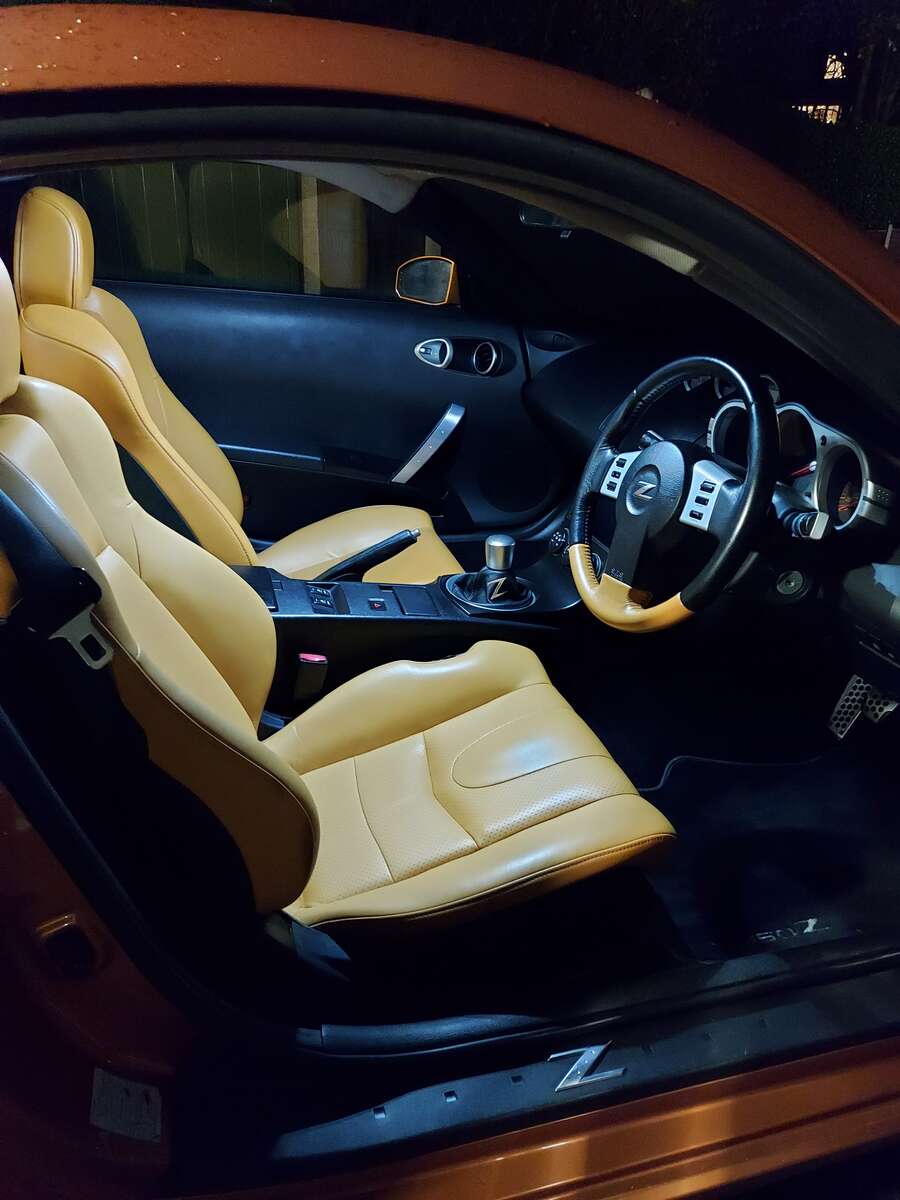
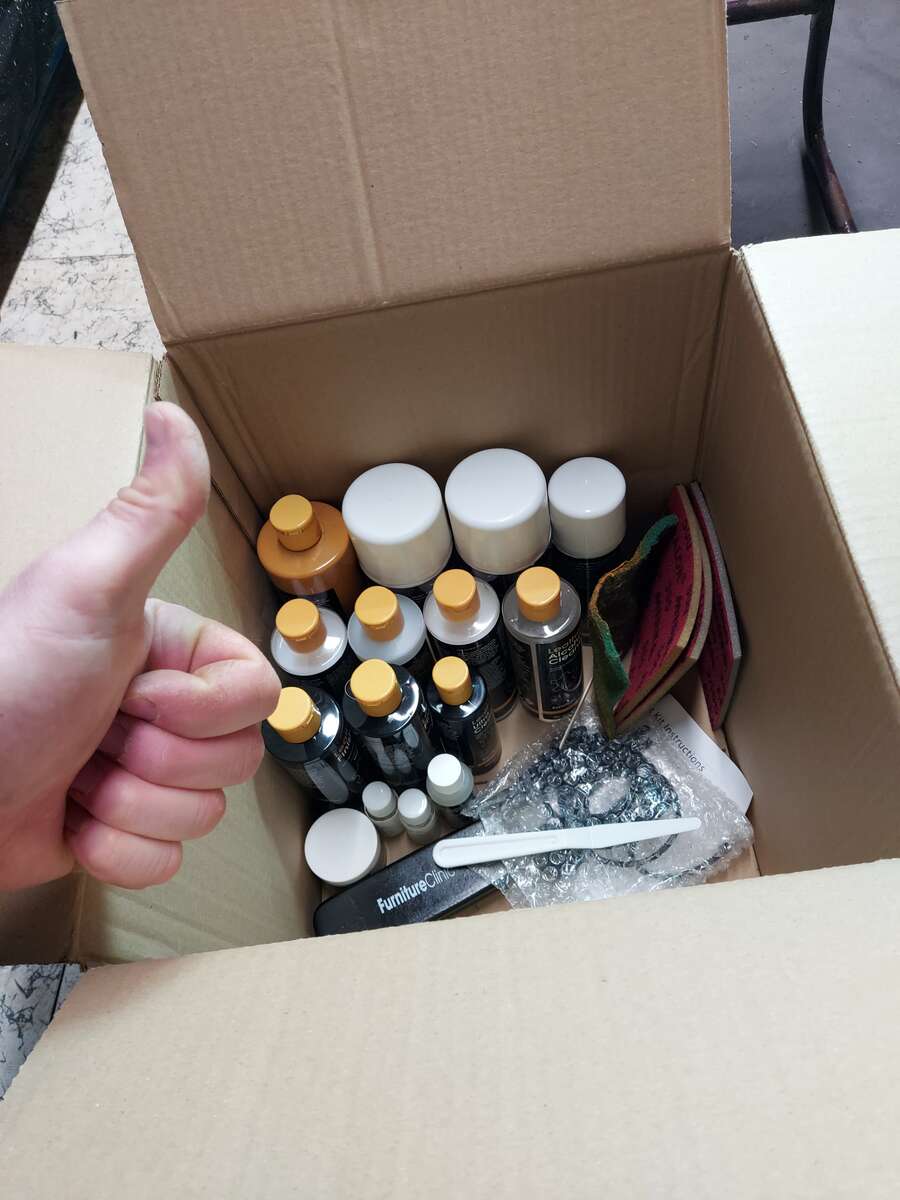
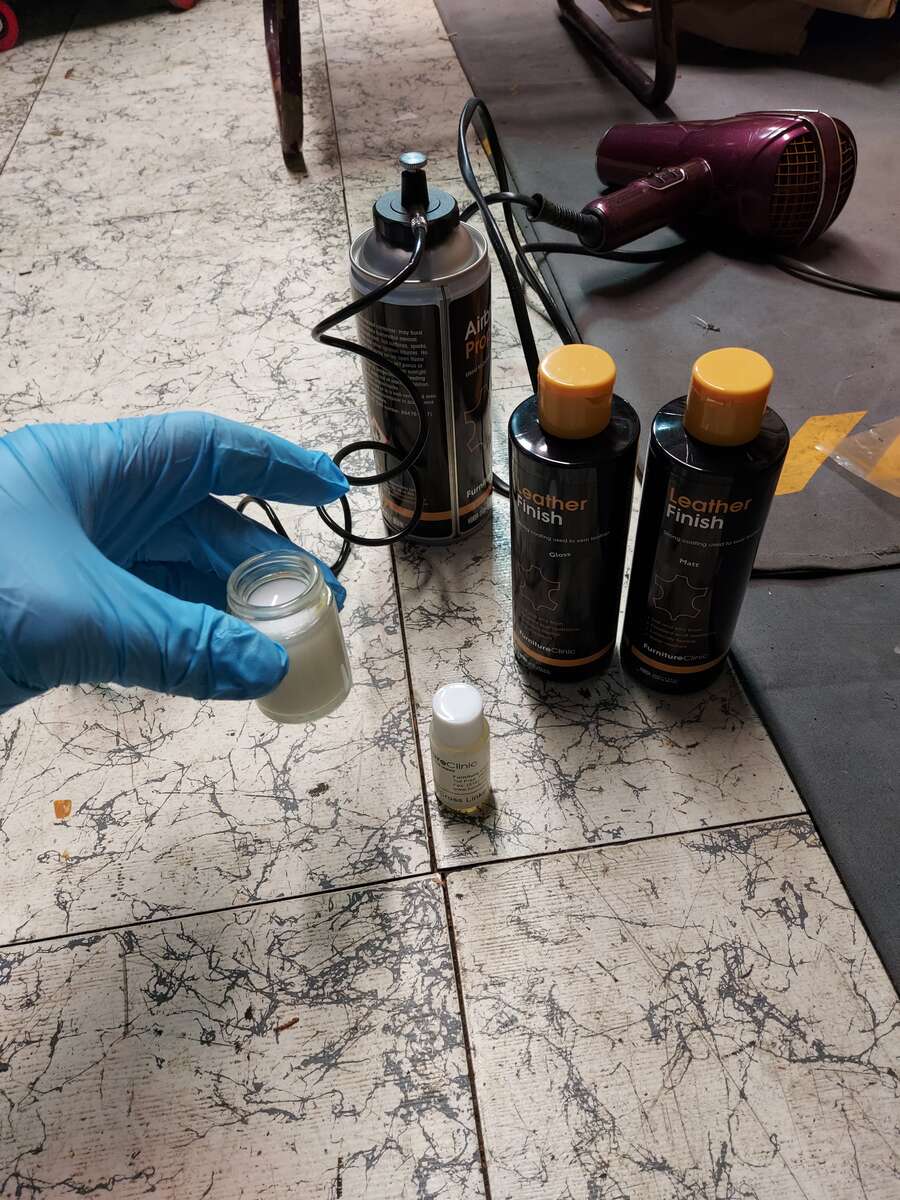
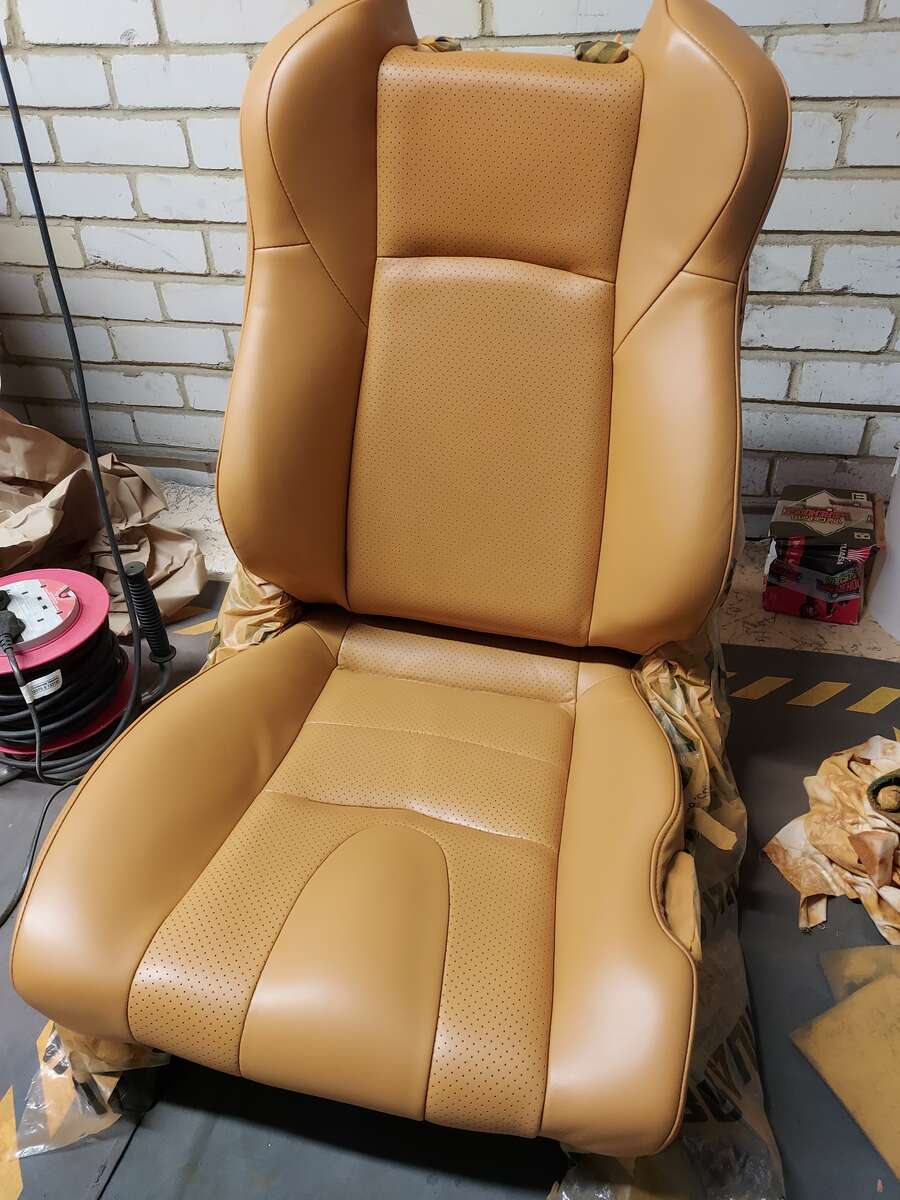
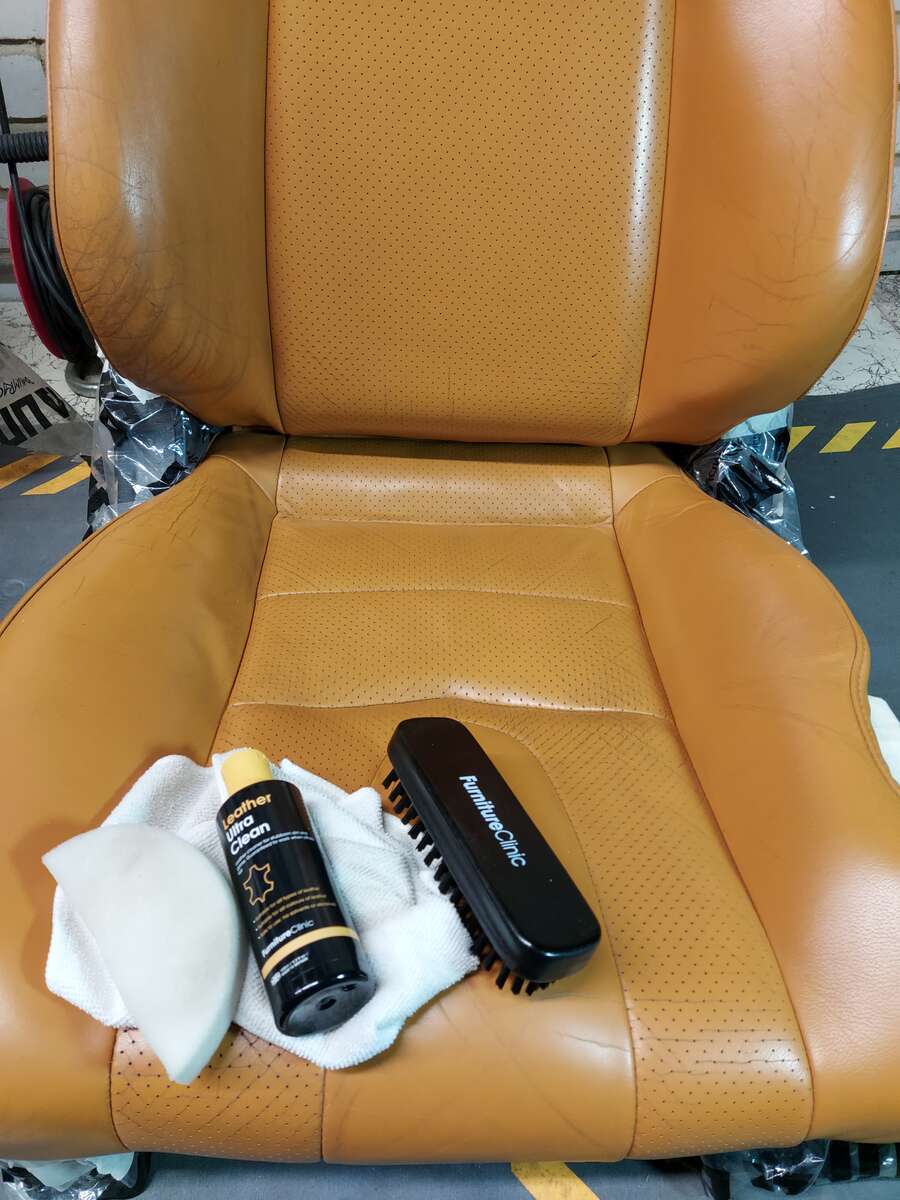
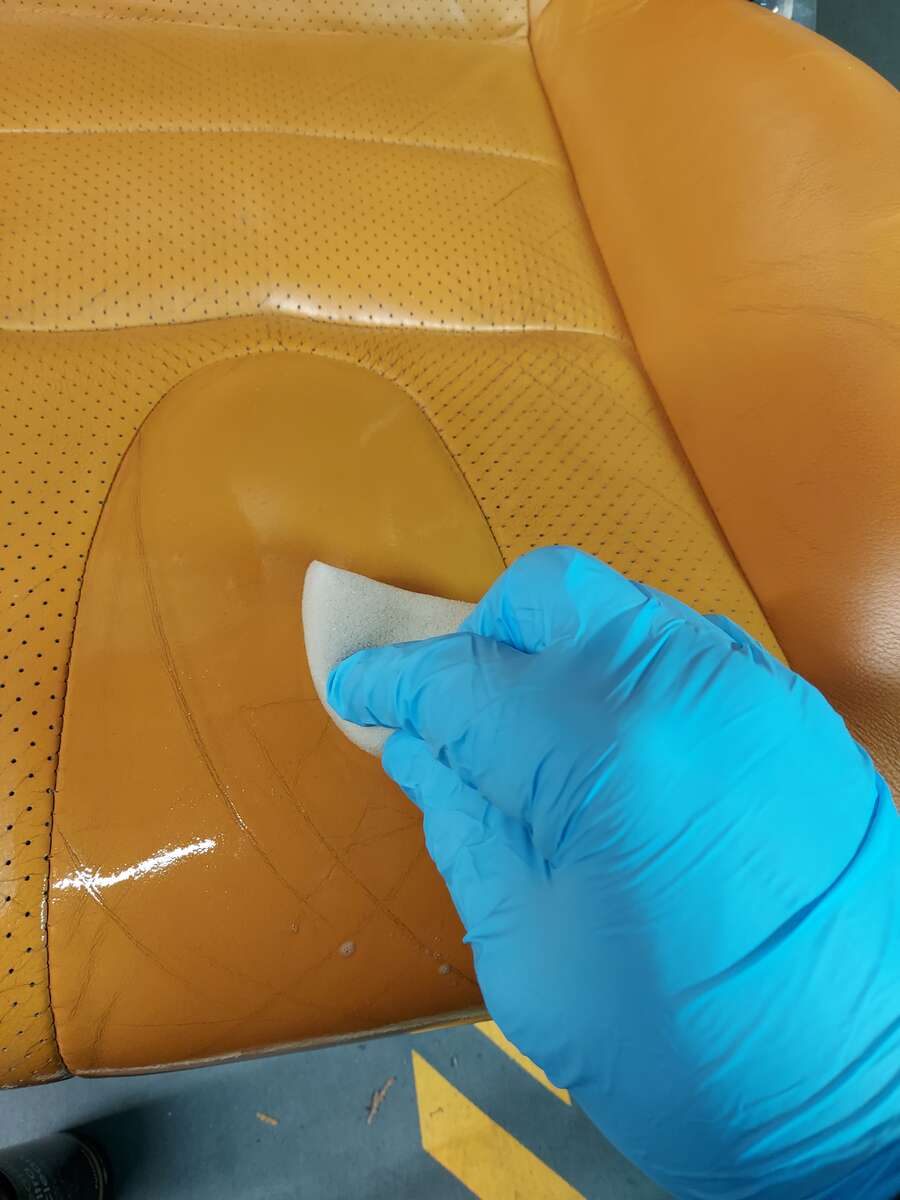
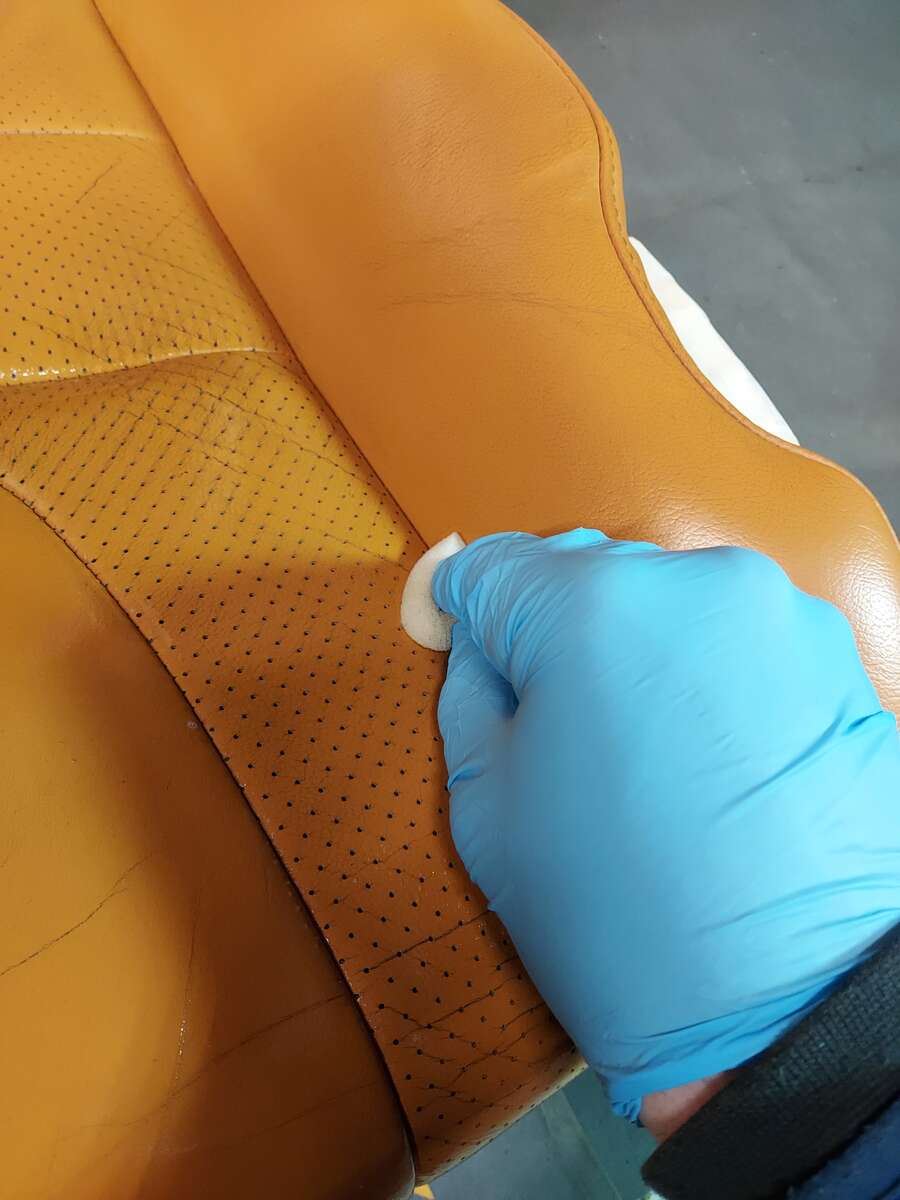
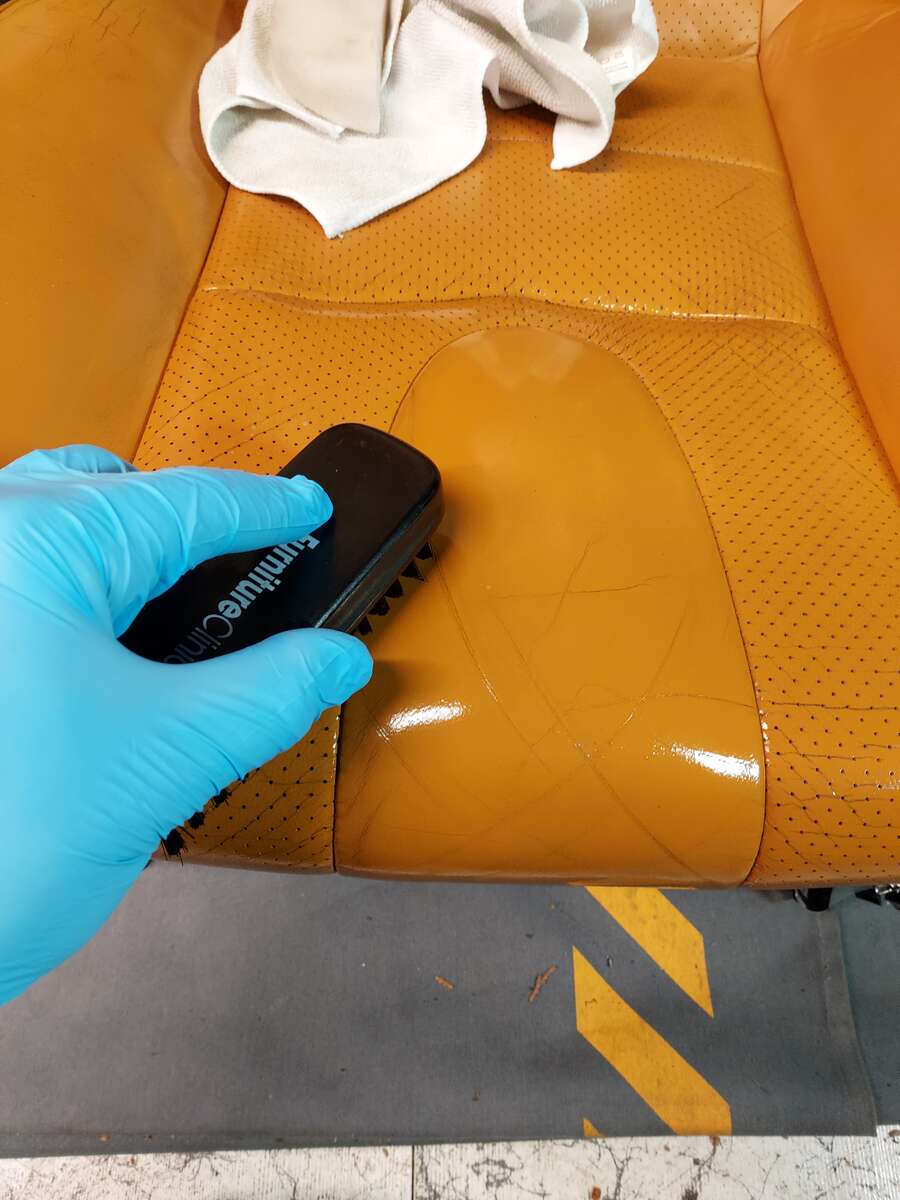
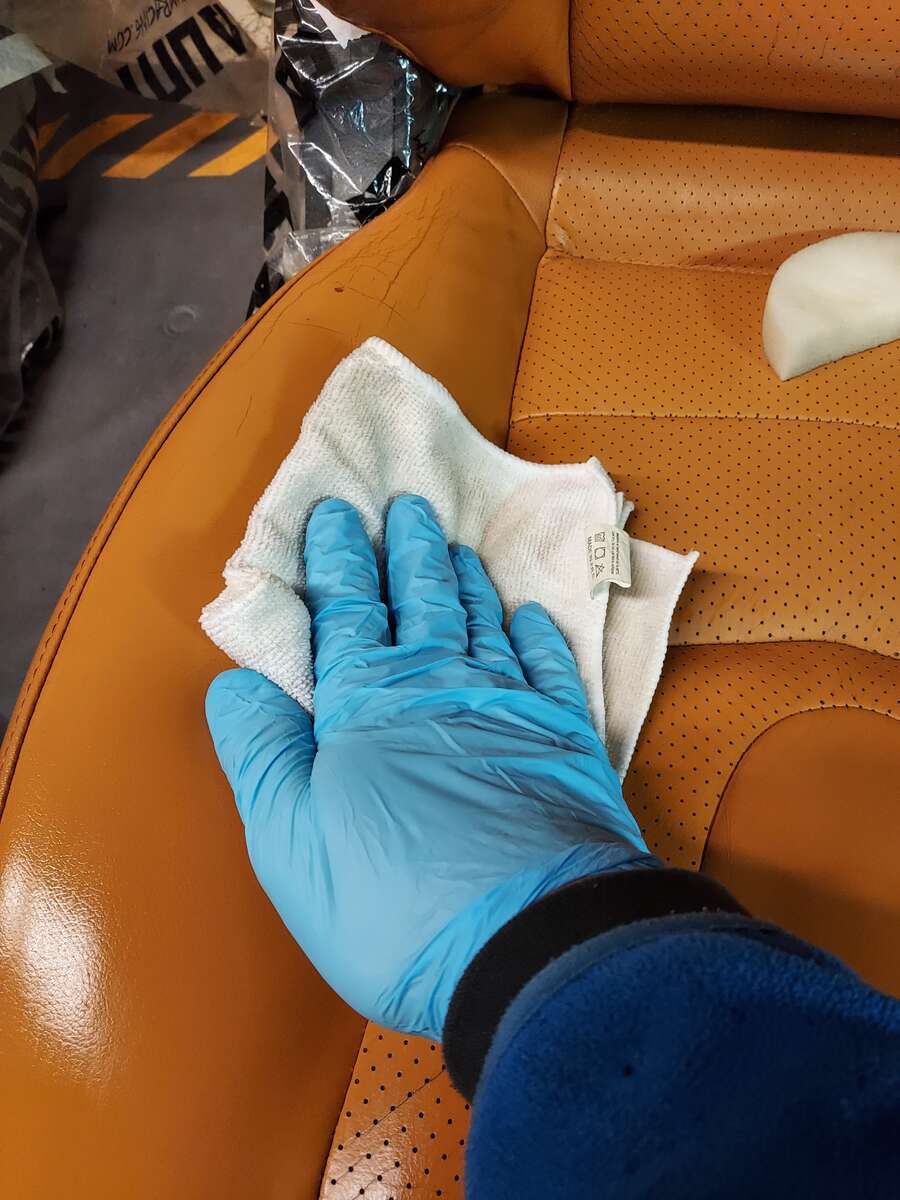
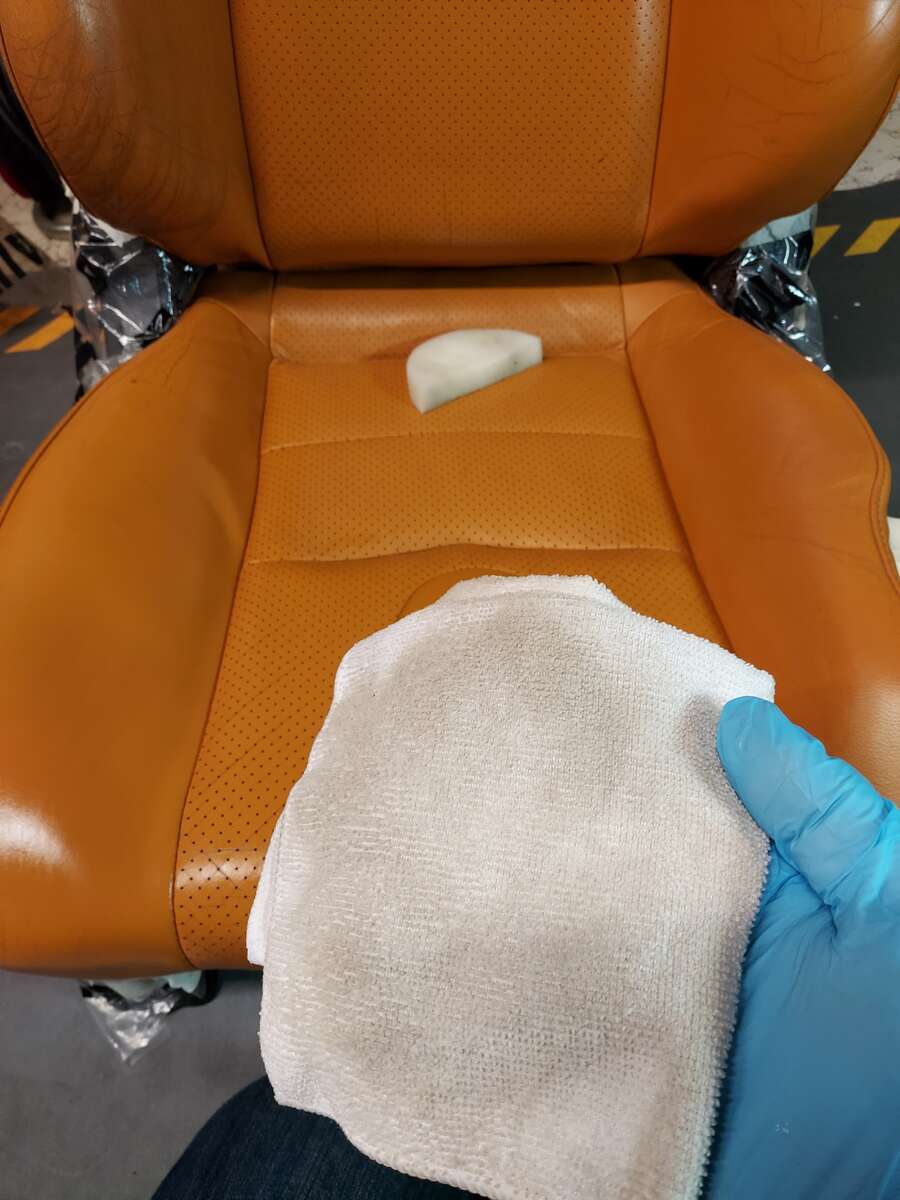
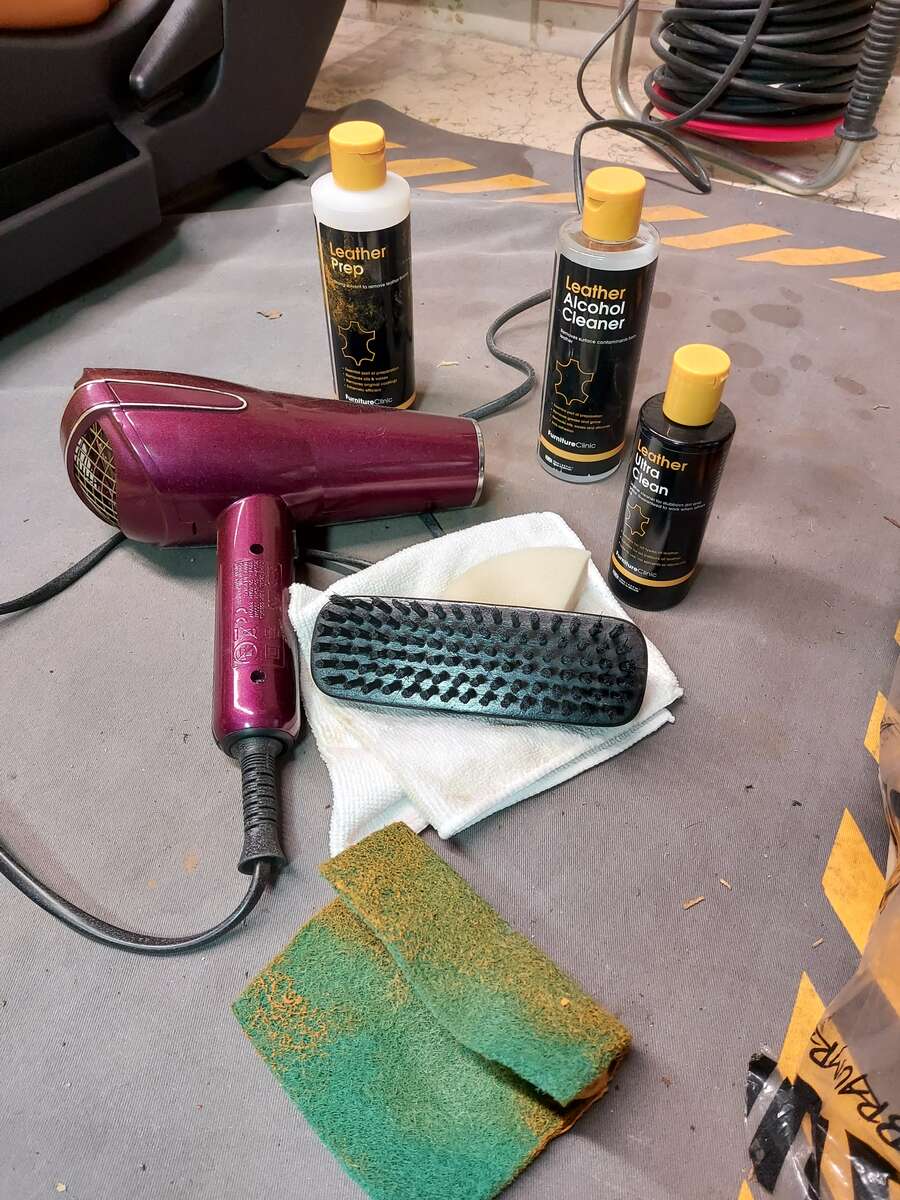
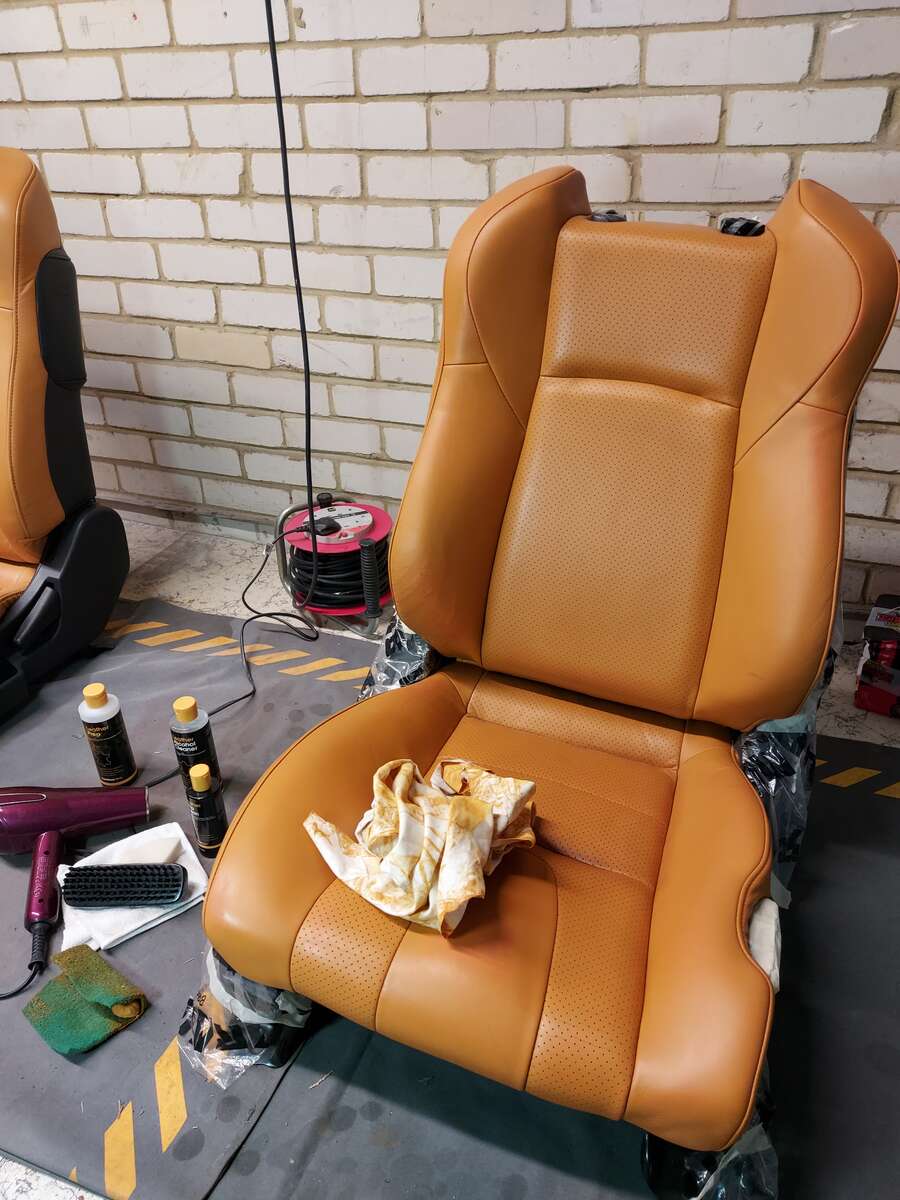
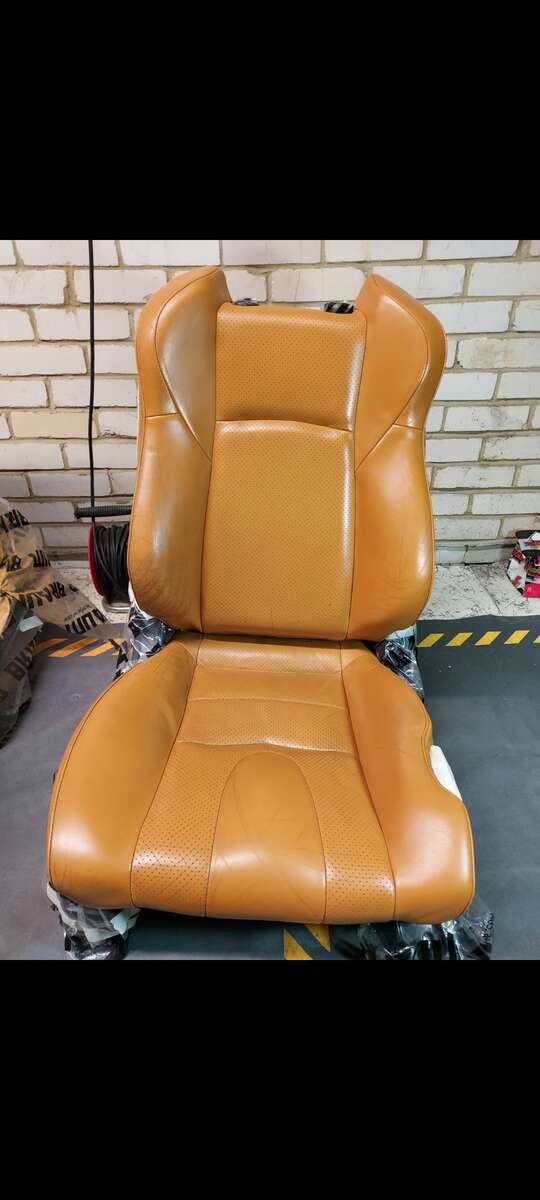
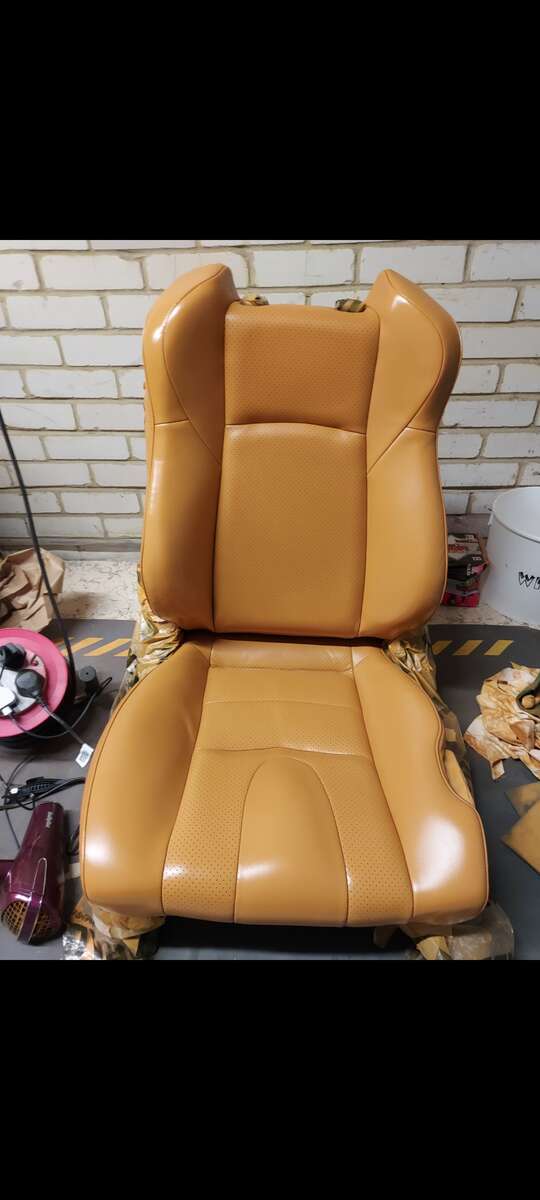
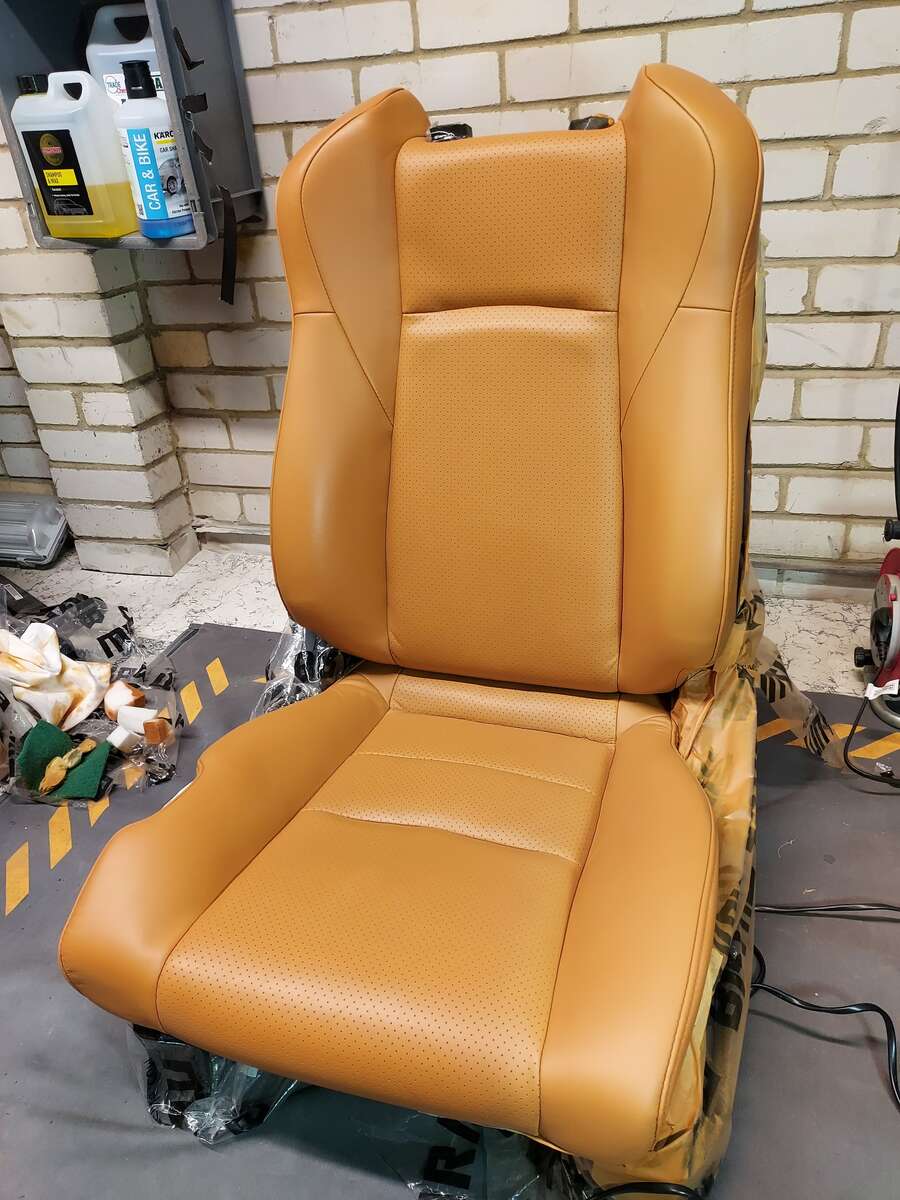
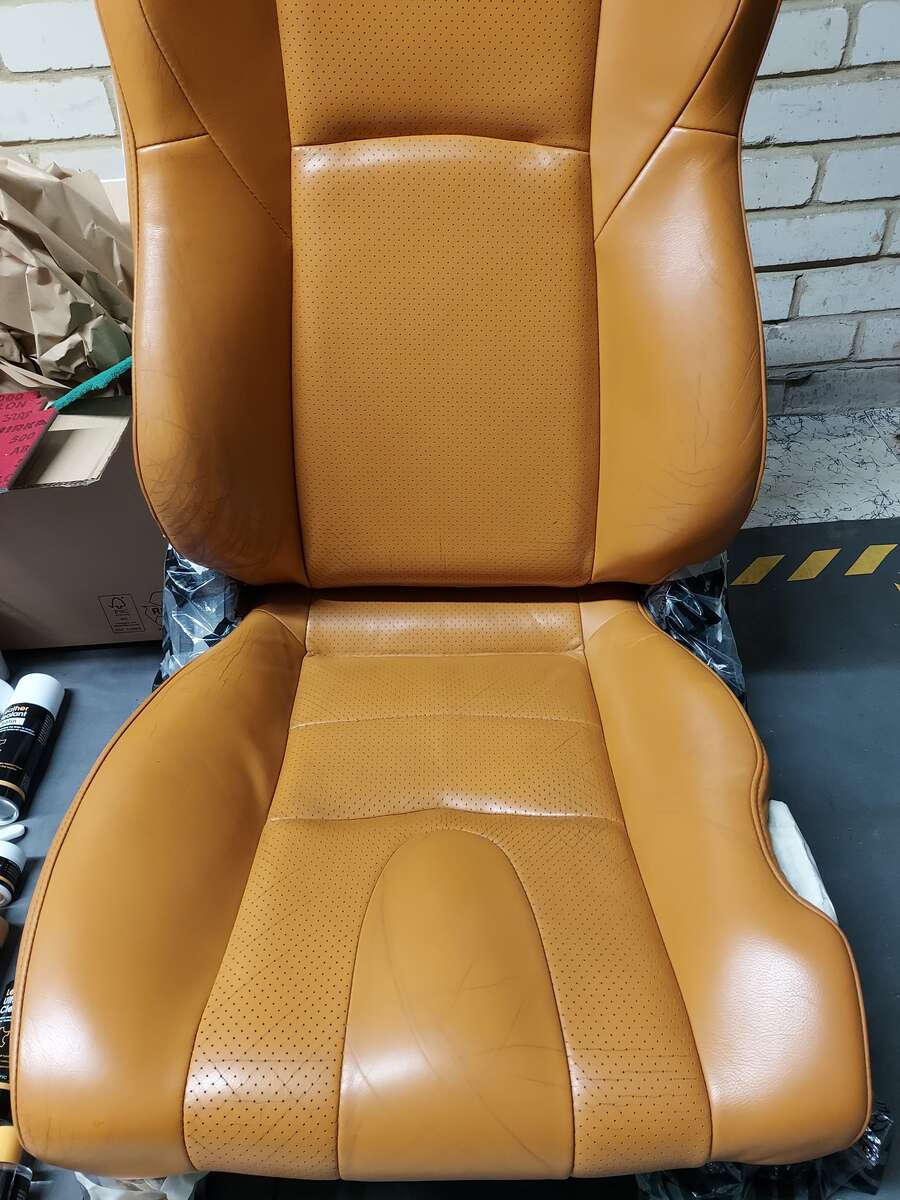
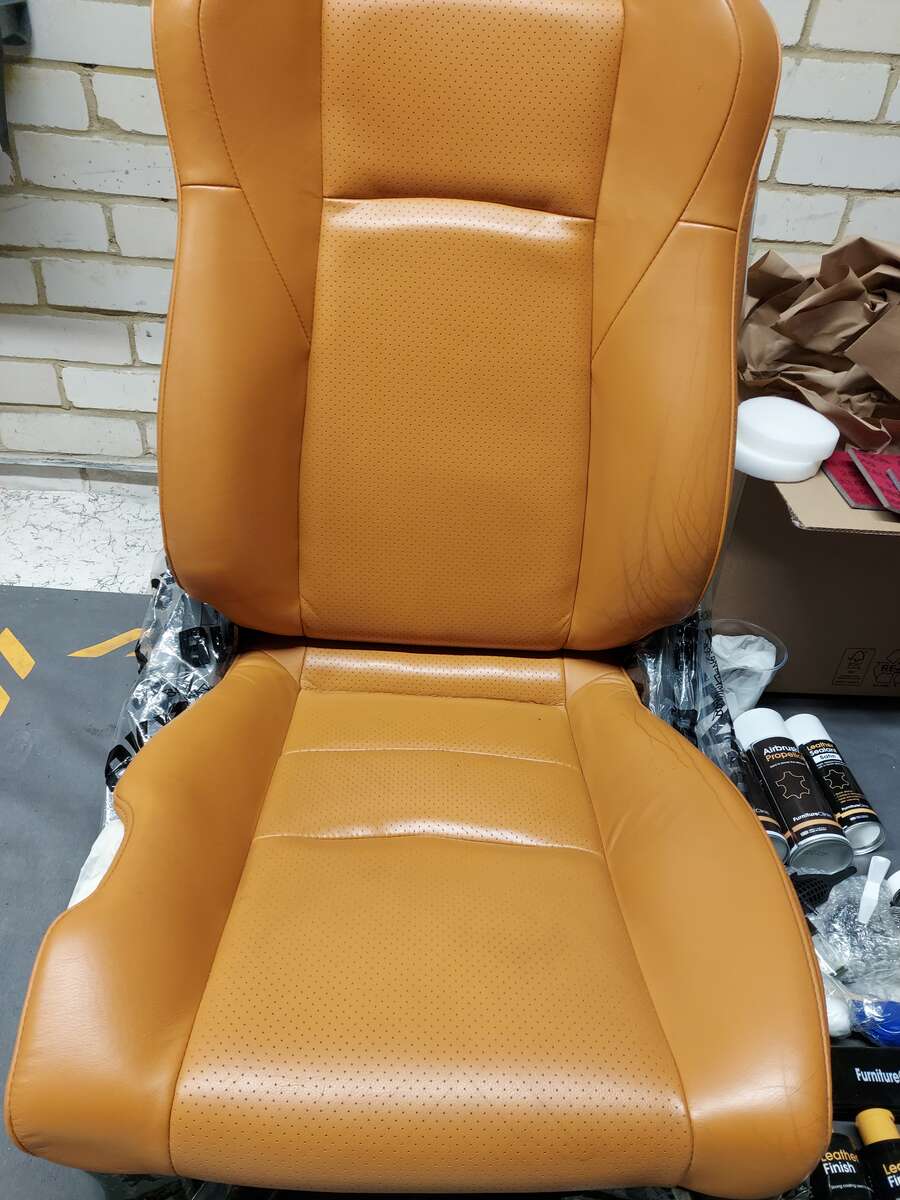
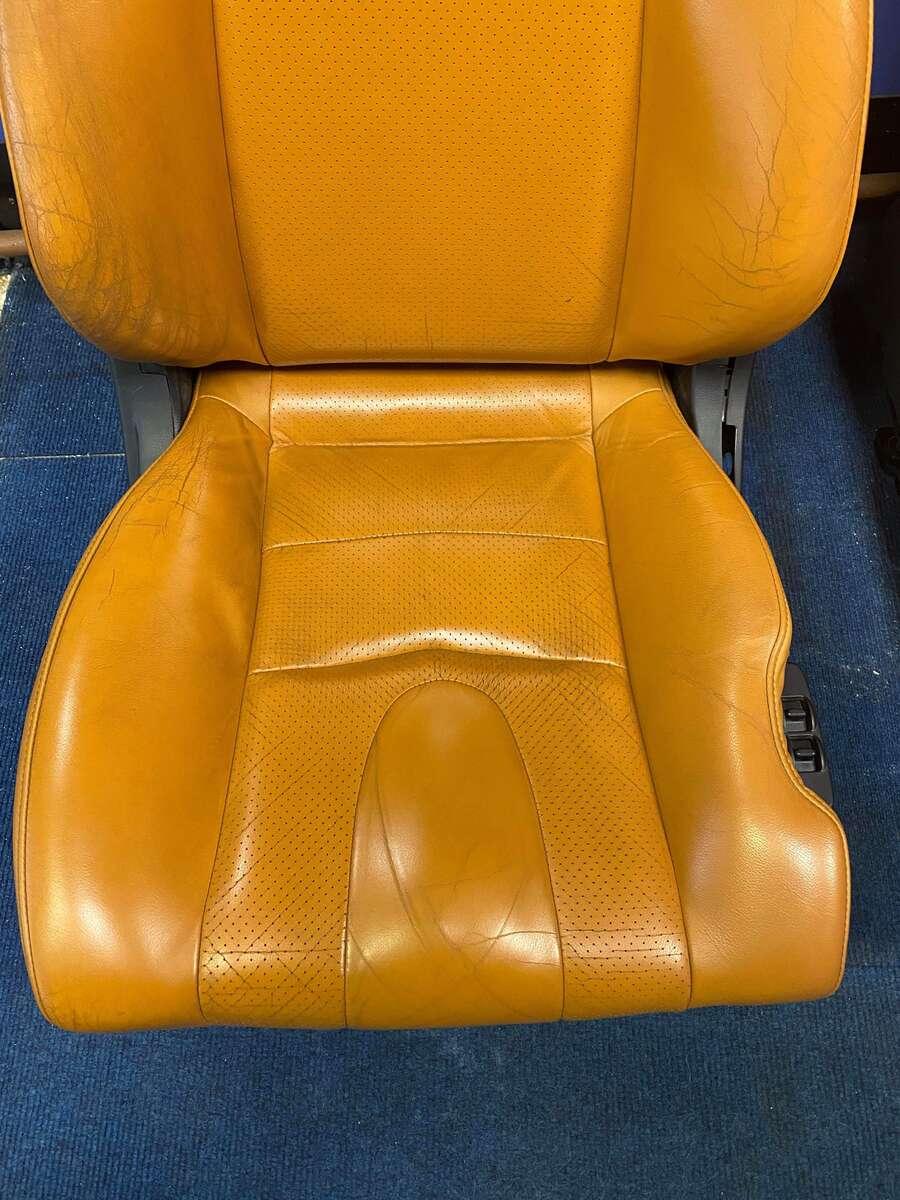
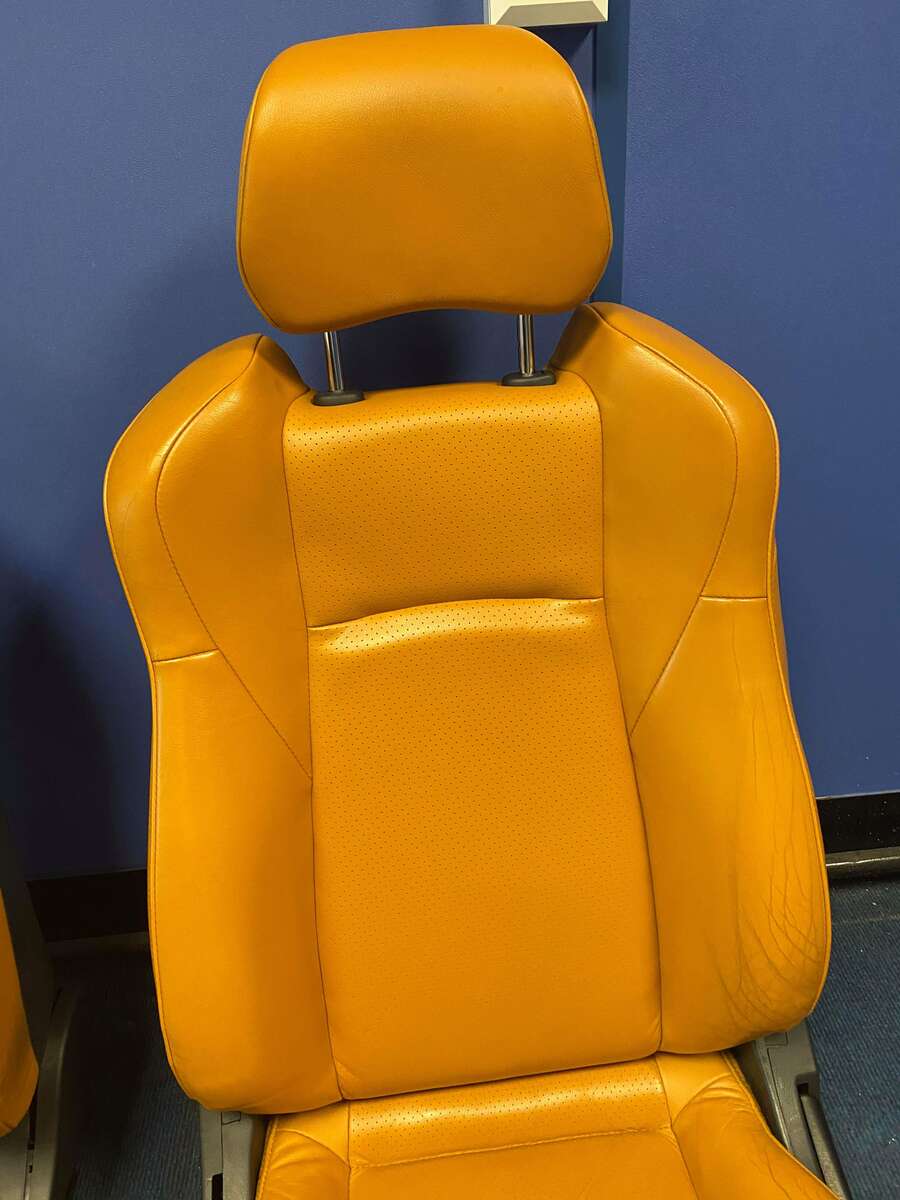
Evening all! So here goes, bare with me... **PICTURES OF FINISHED PROJECT AT THE BOTTOM** As discussed above, I had purchased a set of Alezan orange seats (Stock) to replace the black set that came with the car. The orange seats were showing some pretty visible wear, but the golden ticket was that they had no rips or tears... The black set were worn, however a great thread by @HEADPHONES pointed me in the direction of Angelus leather dye. This is an easy, quick fix for worn black interior and I highly recommend taking a look. That thread can be found here: https://www.350z-uk.com/topic/119925-leather-repair-paint-from-angelus-now-with-7-month-update/?tab=comments#comment-1768281 Moving on! I knew before the purchase that both seats would need restoring/work to look their best. So I needed know how and products. This is where @Ricey came in, and a massive shout out to you buddy! Thank you again for your help. Guys RICEY does this professionally, from what I've experienced these seats (although painted badly from factory) respond well to resurfacing, so definitely give RICEY a shout for a professional job! I may have saved some cash doing it myself. But i don't think I will ever be %100 happy with the job... Scared ill get in after the gym and walk out with nappy rash up my back So, recommended brands to purchase restoration products from: Furniture Clinic (This is who I went for) Colour Lock Buffalo Leather All three of these brands come highly recommended and sell restoration kits. However read the descriptions, the kits vary in their 'coverage'. I ended up purchasing a medium sized kit from Furniture Clinic and supplementing it with additional products as recommended by @Ricey. Products in my kit (Not all of this is required, however they extend the longevity and quality of the finish) UltraClean - Used with the leather brush and a microfibre cloth. This is an effective 'pre-cleaner', this product works surprisingly well on its own with a good scrub. 'Tired seats', well worth trying this first! Alcohol Cleaner - A mild based alcohol cleaner, similar to isopropyl alcohol. Leather Prep - Strong solvent based cleaning fluid, helps remove factory polyurethane coatings (IMPORTANT) (Solvent soluble silicones etc) Binder - Helps loose/freyed/worn fabric material bind together, think of it as a liquid filler. Can be used in multiple coats to 'build up' areas not bad enough for filler. Heavy Filler - Used with the Furniture Clinic filler tool can reduce major cracks. Very flexible. Adhesion Promoter + Crosslinker X - Think of it as a 'primer'. Used for 'high use' large areas. Gives the colorant a better surface to bond too. The Crosslinker is a chemical reactor, needed to start the curing process. Leather Colourant - Furniture Clinic offer a colour matching service. I sent my headrest in for matching. BE CAREFUL, if your seats were like mine, the headrest may be lighter than the worn seat fabric. There is surplus fabric underneath the seats that can be cut, however same warning. This fabric will be a different colour than the seat fabric. Leather finish MATT/GLOSS + Crosslinker eco - Both of these bottles come in the restoration kit, they allow you to make a matt to satin to gloss finish. Crosslinker eco is a chemical reactor, starts the hardening process when added. Satin Sealant - This is an aerosol version of the Leather finish. Pre mixed for a satin finish. Air Propellant - This is for the air brush. I ended up using 1 and a half tins. Air brush kit - A very useful tool for restoring the seats, very prone to prolonged use and clogging. But use mindfully for a great result. An HVLP spray gun/compressor is a much better option. ABRALON 500/1000/2000 foam sanding pad - Great tools for leveling the working area. Cotton towel - Really useful for rubbing excess products away from the working area, allot of the products can be quite 'tacky' so its worth trying to avoid microfibres where possible. Right then, onwards... This is by no means a 'step by step', as I will probably leave something out, but hopefully this shows what to expect visually through out the project. 1. CLEAN - Grab a cloth, the leather brush and Ultra Clean and get filthy with it! 2. Leather Prep - You will need the abrasive pad, cotton balls (To hold the product) and the 'prep'. Your trying to remove the factory PU coating, waxes, grease etc. You will have colourant transfer onto the pad at this stage. This product dries FAST, so if your slow like me, be generous. Failure to work with the product can literally move/deposit existing colorant. This can be rectified over the next few stages, but easier to avoid. 3. Leather Alcohol Cleaner - This product is similar to using Isopropyl alcohol to remove surface contaminants. Any of the product that was not removed by the leather prep (dried on surface etc) should come off with this. Again being a solvent this product dries FAST. So work accordingly. 4. Sanding - Grab the 1000 foam sanding pad and work the cracks and worn areas. For really bad damage you may want to use the 500 grit pad, but this is very abrasive. Following a sanding session, grab the alcohol cleaner and wipe down the worked area. Remove the dust created by sanding. SAND / WIPE / REPEAT if necessary. 5. Binder - Think of this as a liquid filler. I think after the project this was one of my favourite products. For the Z seats the cracking (at least on mine) is not deep. One of the main things to remember is allot of the damage we see on these seats is actually damage to the layer of paint NOT the leather, so the binder really helps to smooth the surface ready for colorant. Grab a sponge and apply to areas that need strengthening or appear 'frayed' like the bolster piping. From this point in the finish will be 'tacky', don't worry this is normal. The final finish layers will rectify this. 6. Filler - This heavy filler is super flexible and speeds up repairing visible cracks and creases. Remember when this stuff dries is can shrink a bit like poly filler, So give it time to dry and it may need a top up. Also, 'tinting' the filler will help when painting as you don't have such a white product to cover up. A couple of drops of colourant will be enough to 'tint' your filler. REMEMBER TO SAND AND WIPE DOWN WITH ALCOHOL CLEANER AFTER EVERY FILLER APPLICATION 7. COLOURANT - Layers the game! Grab a sponge and be sure to get colourant in all the cracks and creases, following seam lines etc. A good base coat is essential for the sprayed layers to adhere to. When using the sponge be sure to 'dab' rather than wipe. This will help with the finish. COLORANT / AIRBRUSH KIT - Ultimately an HVLP (High volume low pressure) spray gun and air compressor would be the best tool for the job. But the air brush kit is simple and effective if used correctly. The air propellant cans get very cold after long use and can clog the nozzle. You can place the cans in a bucket of warm water. If your stopping in-between coats rinse the kit out with hot water under the tap. REMEMBER AFTER A SPRAYED LAYER, USE THE 2000 GRIT FOAM PAD TO ENSURE A SUPER SMOOTH SURFACE, WIPE DOWN WITH ALCOHOL CLEANER BEFORE THE NEXT COAT 8. LEATHER FINISH - This product restores the 'factory style' finish to the layer of colourant. It should reduce the 'tack'. Many finishes can be achieved with the kit. The gloss and matt bottles are mixed for the desired finish, crosslinker eco is used to start the hardening process. Most car interiors come in a 'semi-gloss' finish, this is what i went for. 25% gloss and 75% matt. So thats pretty much it Team. This is not a crazy difficult process, however it is very time, labor and patience orientated. Read the instructions on the back of the can, take your time, and definitely practice/try products in an inconspicuous area before committing. I guess what everyone is wanting to see, the final pictures. Enjoy guys. Any questions just shout!

-
Cheers for the support guys! Very happy with the results so far, thank you again to all that helped with advice. A little update, I'm half way through the drivers seat. Took aggggges to prep, but I've applied the first few coats of color. Hopefully get this seat finished over the weekend. Then I can focus on the write up!
-
Evening all. I know i won't be able to get the full write up straight away. So I thought I'd share some progress. Passenger seat has just had its final coat of finish (semi-matt). Will leave it a day or two, then spray over with the aerosol sealant. Onto the driver seat now. Wish me luck.
-
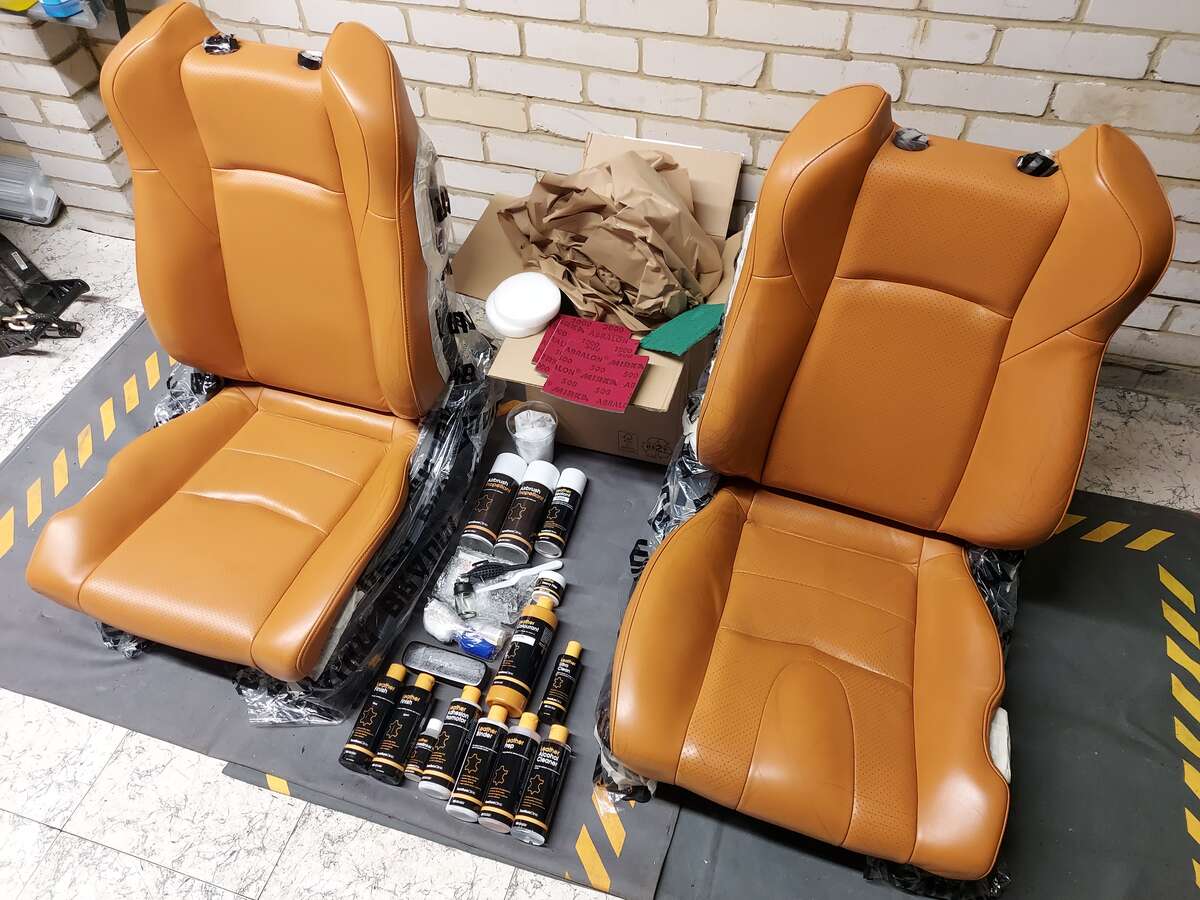
Evening all, happy Friday. So the package from Furniture Clinic arrived. Took a week, not bad at all, and I had to send the headrest off for a color sample. I've included some pictures of the seats before any work starts. They have been wiped down with a cloth before and taped up. Just in time for the weekend... Massive shout out to Ricey, super helpful at a moments notice. I guess its now just wish me luck Keep you updated along the way!

-
I love that the buggy has a better dash than any Z Great work mate! And beb!
-
Spot on bud. Let the Ricey hunt begin
-
Spot on lads. Thanks for the Ricey nudge. I've seen him mentioned in several threads. Ill go look him up on insta! Just buzzing now to get these seats. Anyone know if there is 'spare leather' on the underside on the seats to cut off and send as a sample? Not really sure how I'm going to get a color match without sending a headrest lol. In the mean time. I did come across these guys. https://www.colourlock.com/colourlock-leather-repair-kit-with-leather-dye.html I follow forensic detailing on YouTube, and these guys are always doing stuff together. Looks like a great kit, a little bit more expensive and no air gun. I've emailed them to see what products they recommend for the job.
-
Ah the man himself! Mate just want to say thanks for posting about the Angelus dye. Really sorted my black seats! I've been hammering the search, but its not massively forthcoming in results. This thread is a bang on write up. https://www.350z-uk.com/topic/81278-new-seats-sort-of/ Buffalo products are mentioned again. So deffo leaning towards them. As my seats will be out the car. Thought its the best time to restore now. Avoid overspray etc. I'm reasonably handy. Engines and exhausts etc I'm fine. Ill be taking my time and researching as much as possible. Hoping I'm not going to screw some 'good condition seats up with strip, filler etc...
-
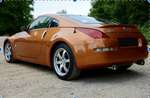
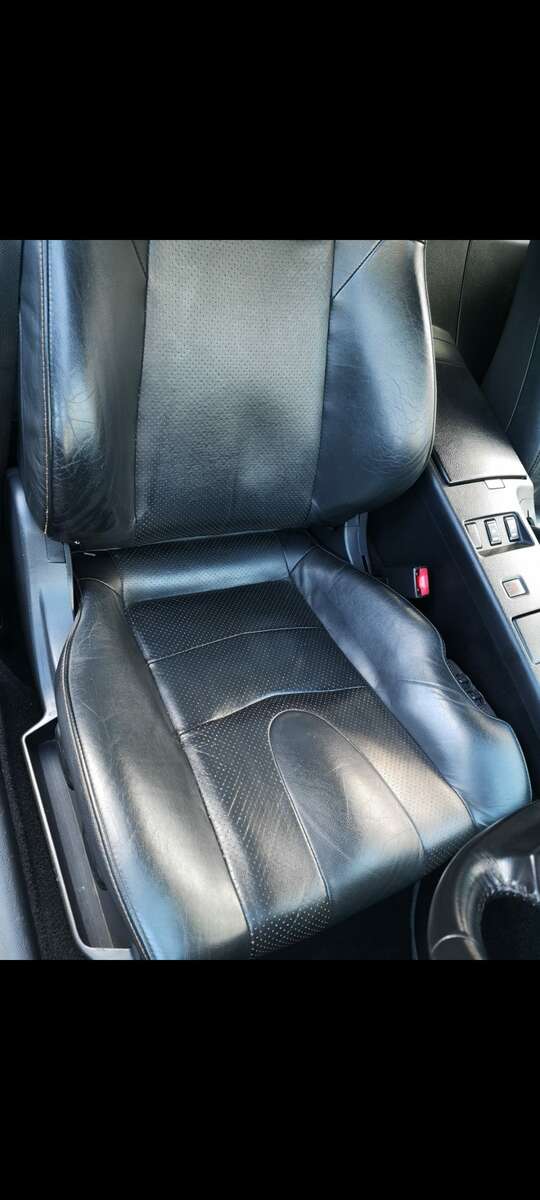
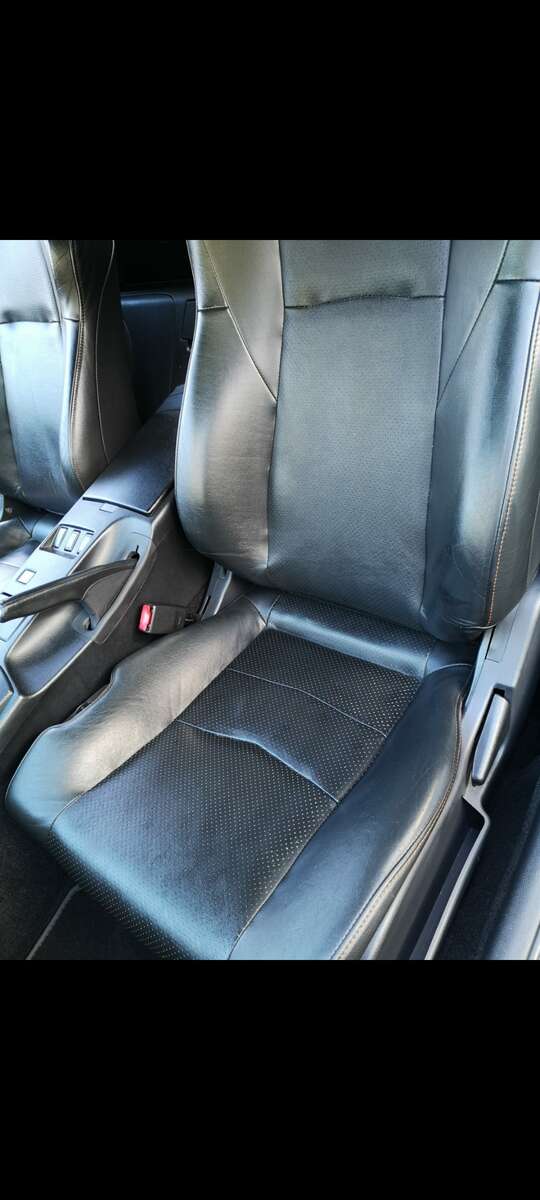
 Hey team, hope your all good. So, to start, owned a Z for coming up to a year now. Can't stop spending money. LOVE this forum. With the bodyshop pushing me back a 3rd time (we both agreed to this) I'm focusing over lockdown on the leather interior. Car sporting original black steering wheel and seats. Its an orange Z, so I feel she deserves the Alezan interior. Spent Friday installing a really good condition Alezan bottom steering wheel. I've got two Alezan seats on the way (thanks paisley freight). So now the fun begins, they will need a light to medium restoration. So let's start with the black seats. As I got my first helping hand from this forum. I want to share some of that help back out. I got the Z on 69k, black seats were in 'ok' condition. No tears, faded seam piping, cracked paneling and the perforated areas were 'opened up' and showing un dyed leather color. Searching on this forum I came across HEADPHONES post using Angelus Leather Dye. It worked bloody wonders on the black seats, results were very impressive and GREAT value. Unfortunately the Alezan seats are going to need allot more work to be 'pleasing to the eye'. Link to HEADPHONES post, and I've attached pictures of my 'repaired' black seats. Stupidly I didn't take any before pictures. Sorry team. https://www.350z-uk.com/topic/119925-leather-repair-paint-from-angelus-now-with-7-month-update/ SO, once these Alezan seats turn up. Ill be looking to purchase a restoration kit. I've scoured this forum (probably missed a definitive thread), spoken to a few suppliers. This is a basic list of what I believe needs to be done in order to restore these seats at home. - clean/strip old dirt and grime and any protective wax layers etc off the old leather. - key/sand badly worn areas and try to smooth the physical surface of the leather - use a primer/promoter on the leather ready for filler. - use filler to smooth the surface, repair cracks and worn areas. - paint new dye (most likely color matched) onto seats - use sealant on the new paint and seats to increase longevity of the repair. Obviously to do all this, I'm going to need a good kit, and any and all advice I can get from you guys. So far I have found the following recommended products off this forum; Scratch doctor http://www.thescratchdoctor.co.uk/leathe-repair/ Furniture clinic https://www.furnitureclinic.co.uk/leather-care-products/leather-repair/leather-repair-kit Buffalo Leather Repair https://www.buffaloleather.co.uk/car-leather-repair-kits.htm/product228-buffalo-leather-colour-restoration-kit.htm Glipstone https://www.liquidleather.com/car-shop.html From what I have seen/read personally I am leaning towards the buffalo kit. It is 80 quid. But its got everything. The stripper, primer, dye, air gun etc etc. I have spoken to them and they are ready and willing to match the color, just need to send them a physical sample. So team, over to you for now. What advice do you have on the process? Any success stories with your own restoration? What kits do you recommend? Very keen on doing a picture documented thread on this when I get to it.
-
cheers bud
-
Evening all, Exactly like the title says, I was driving to H Dev for some exhaust work when the Z decided to throw a wobbly. Its had zero issues since purchase. Running Berks, plenum and uprev. Pulling onto the motorway, foot down 5th pull the car immediately started to hesitate and climbed slowly in smooth and jittering lumps. (Best way I could describe it) No codes thrown, oil pressure, voltage, temp all normal. Somehow and probably very foolishly i limped it to H Dev. It sat fine weirdly at 70 on cruise. But where the car had to change load and revs to maintain speed it would faulter. Still no EML. And manually scanned with torque Pro and BT OBD2. Next day, H dev struggle to start car from where I parked it. 'Rough as f**k'. Did some testing: A FAILED MAF SENSOR So, rather than a question, hope this might help someone on the forum... H Dev thanks for jumping straight on it and sorting it out. This previous thread also comes up on search, MAF is suggested but never confirmed, but the symptoms are almost identical. There are some other suggestions in the thread just incase its not the MAF. https://www.350z-uk.com/topic/82933-help/ Hicksi
-
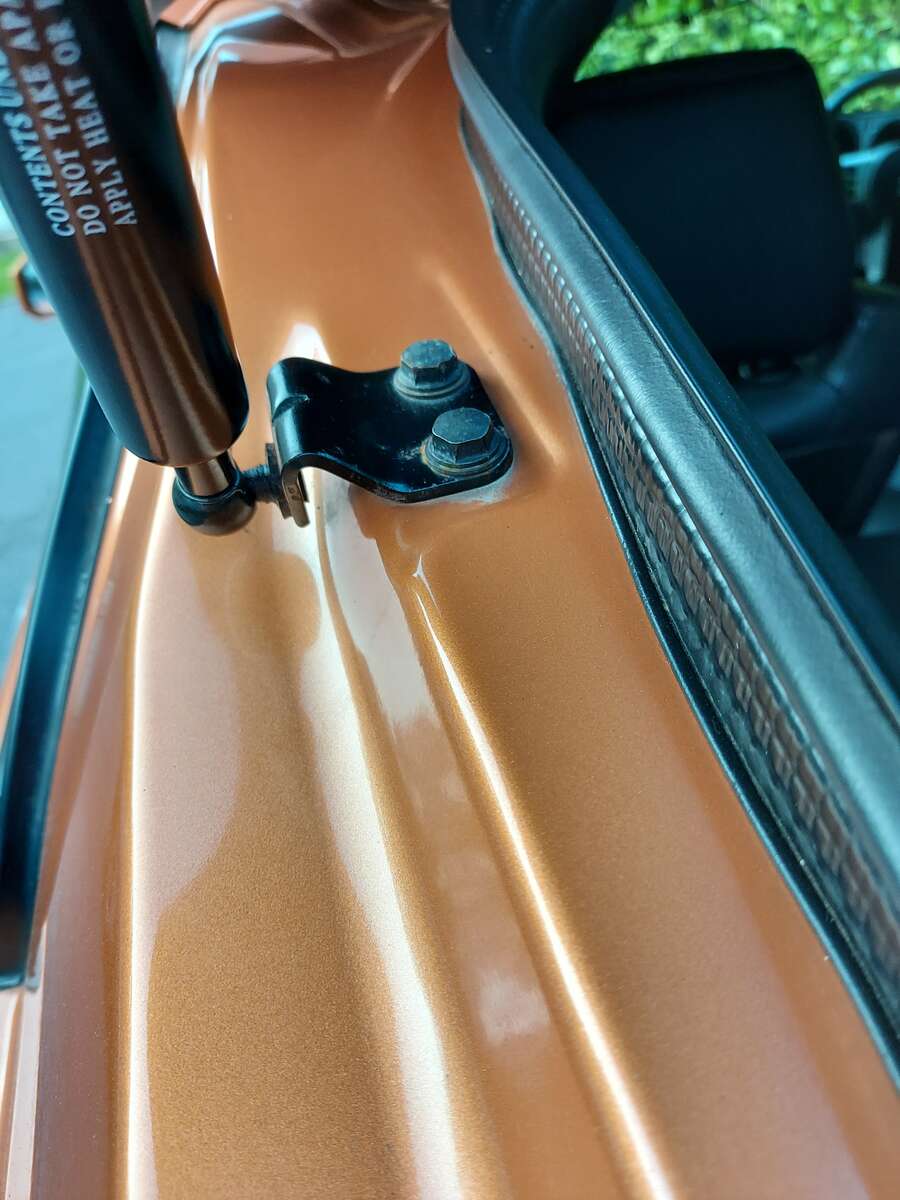
Thanks guys, spot on. I assume one of the previous owners made this mistake when fitting new gas struts. Luckily it hasn't damaged the car. There are some marks but the bodywork hasn't deformed on the other side...
-
Hey all! Right I need some help. Since I've had the car I've noticed (looking from the rear forwards) the right hand side of the tail gate is higher/out of alignment. Noticed this today. (See pics) I have a suspicion feeling the right hand side strut bracket is the wrong way up. The bend should be facing up like the left, not down. Can anyone tell me which is right? Thanks so much in advance!

-
Hey Adrian, Spot on buddy thanks. PM'D
-
Hey all, As the title says i'm after a Gemini system, as I feel personally berks and my miltek and just a little too quiet. If there aren't any around I am prepared to buy new. And I will be selling my full miltek catback system. Installed around 45k and now just passed 70k so in great nic. If anyone is interested let me know. Cheers Hicksi
-
-
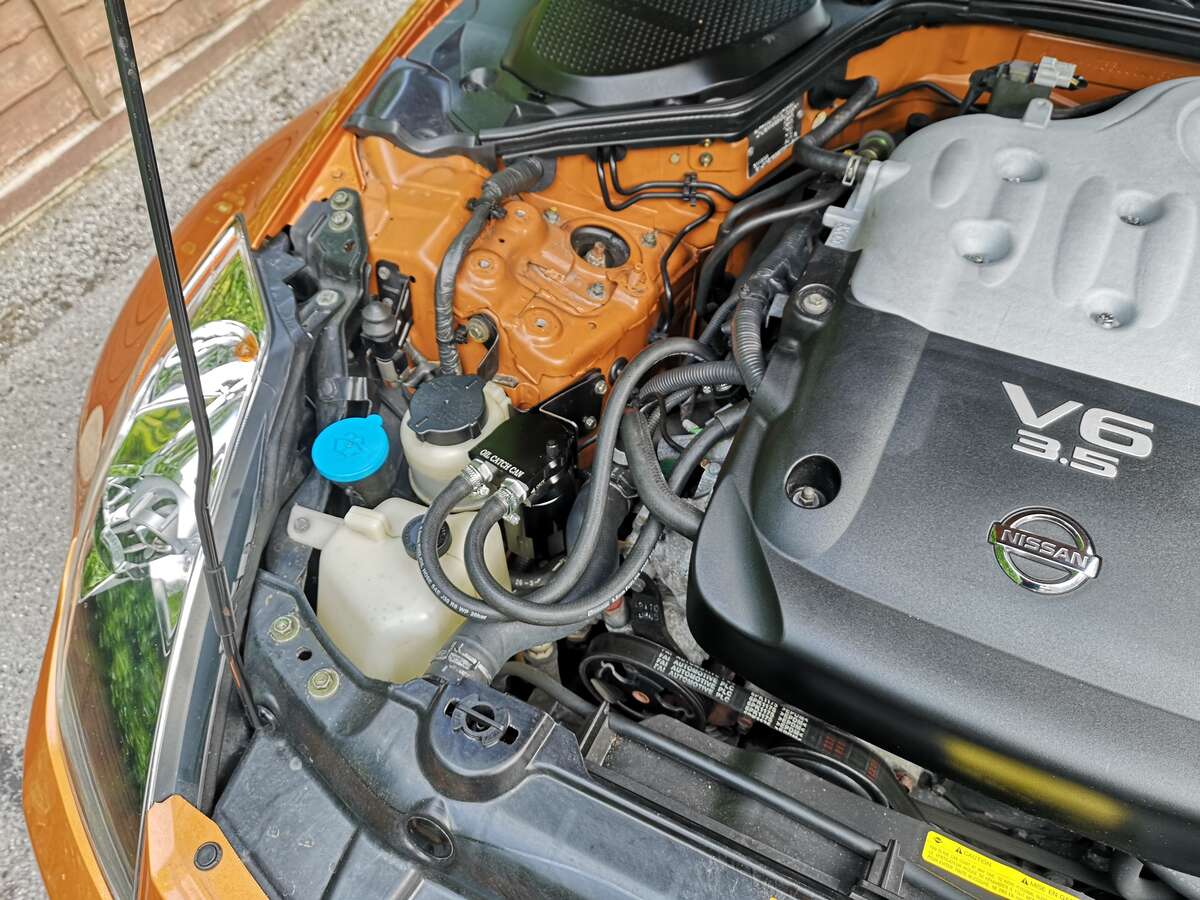
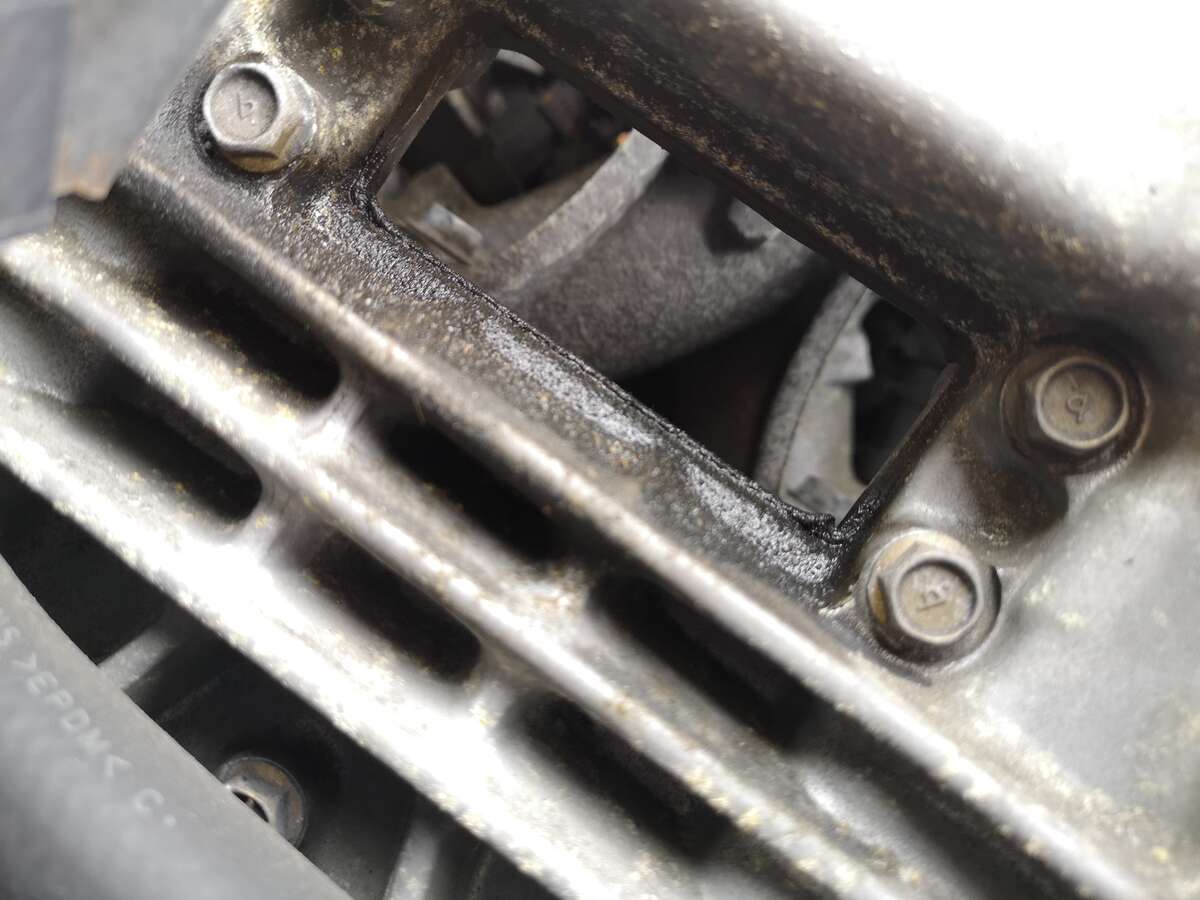
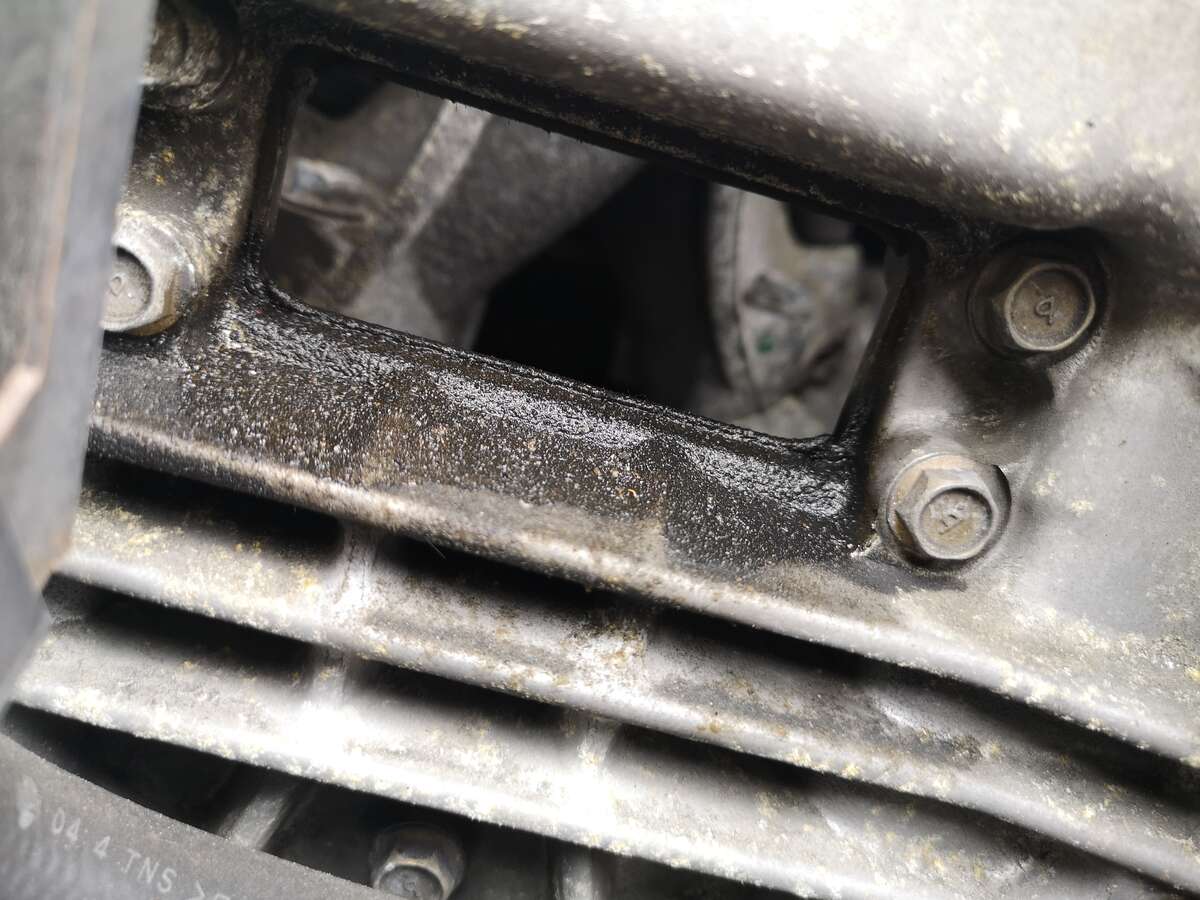
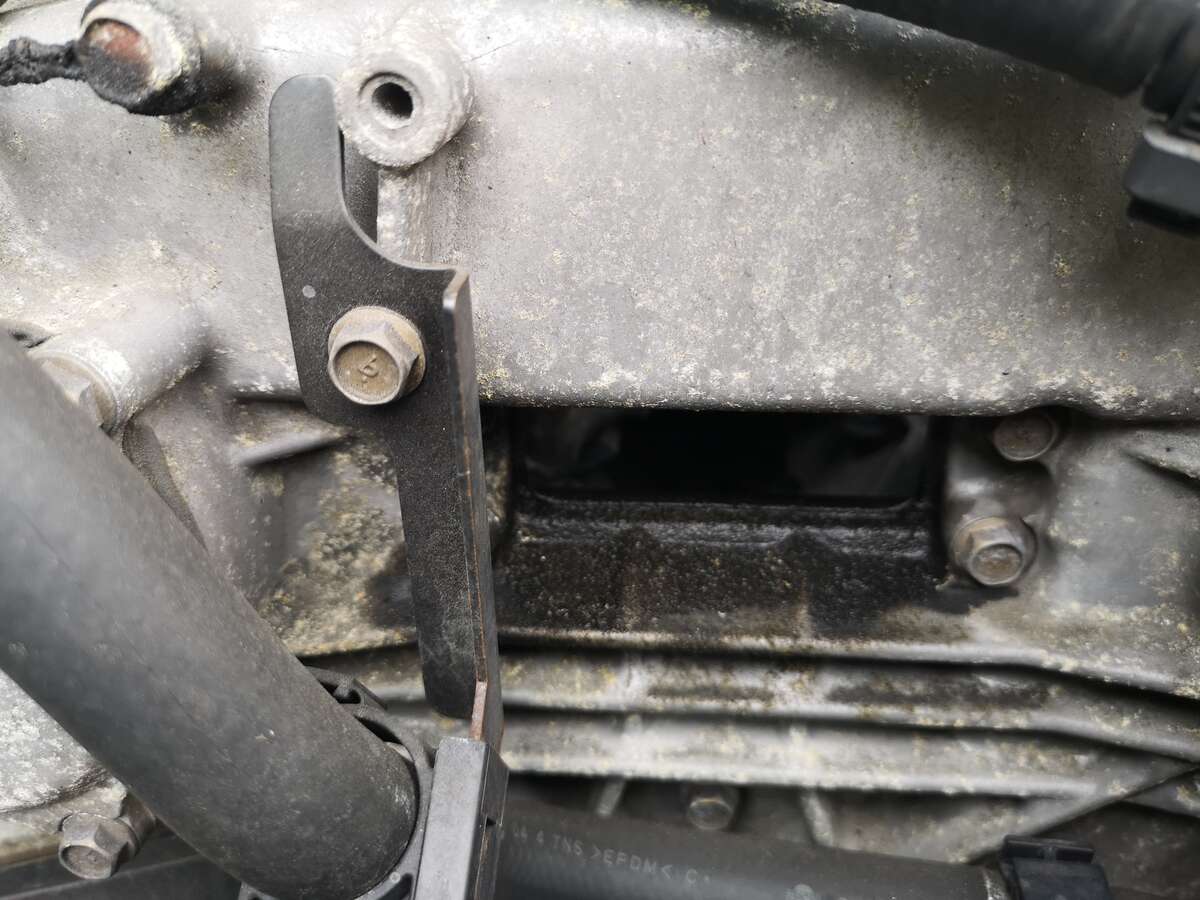
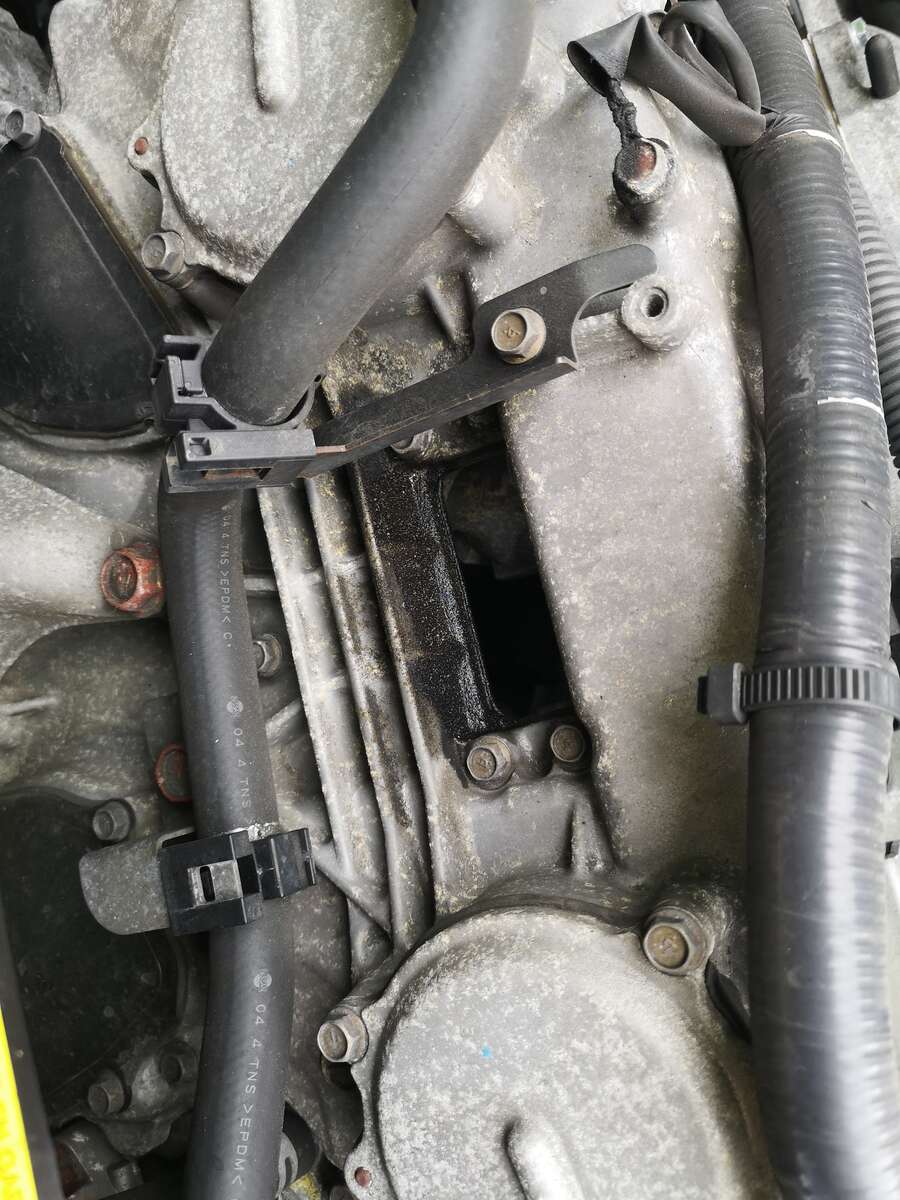
So before we start, yes this is an ebay special OCC. Bought a few to check out the design, this one is internally baffled, sealed with o rings blah blah. Testing it over the next few weeks. Anyway with the strut bar and engine cover off i found this... Btw. 06 DE engine. 73k on the clocks. Should i be concerned? Ive read about oil gallery Gaskets etc etc. But my oil pressure is stable and consistent. Never had any issues... Nothing on the ground in the morning...
-
PM'd bud
-
Hey team, Trying to find a velocity stack airbox. Beleive 06 onwards? For a DE. Thanks in advance!
-
All done buddy. Thanks again
-
So sorry mate. Will get this up shortly

