

.jpg.c086fea22f20090f14d79d7ed155d1b8.jpg)
Mikey_S
-
Posts
226 -
Joined
-
Last visited
Content Type
Profiles
Forums
Events
Gallery
Store
Posts posted by Mikey_S
-
-
Hey Napp, sent you a PM about the spacers
Cheers
Mike
-
advice also noted
")
-
Aye just heard the sad news. Great innings considering the era in which he raced
-
On 30/07/2011 at 09:20, D4XNY said:
Hello all, and thank you for taking time to read this.
Since I got my Z 2 yrs ago, I have always loved the car, but one thing has always annoyed me, and that is the high biting point of the car. Makes pulling off very tricky and amateurish, often very bumpy, and not good for my street cred, lol.
Shortly after buying the car, I replaced the clutch, which was much better, but still that biting point felt too high, and with a grippier paddle clutch, this made taking off all of a bigger problem. And I love smooth getaways.
So after some research, I found out how to adjust my clutch pedal, and oh my god, it makes the Z a whole lot more pleasurable to drive, im not nervous about pulling away at lights anymore, and I can drive the car how I want to again!
Always been used to cars with low biting points, so the Z has been hard to get used to, and I still struggled, a high biting point, just isnt my driving style.....
So anyway, I fixed it, with a few guides from the net, and thought I would add my own one here.
At this point can I point out, that your not adjusting the actual biting point of the clutch, just the position of the clutch pedal. Therefore you wont be "riding" the clutch, nor burning it out. Its simply a mod, to lower the pedal, so the biting point appears to be lower.
Before I started, I noticed that my clutch pedal was a good inch higher than the brake pedal, when i finished, it was about 10mm lower than it.
Tools I found I needed, were a 12 mm spanner, a work light and some nose pliers

Now this is the tricky bit, accessing the part....
You basically have to get on your back and slide in, under the steering wheel, so that your looking up at the pedals, and behind the steering assembly ( Now im 6'2 20 stone, and i managed it) I found that if you push the seat back and as low to the ground as possible, you could perch your bum on the end of the seat, and rest your legs on the shoulders of the drivers seat... lol
When you look up, this is what your presented with...
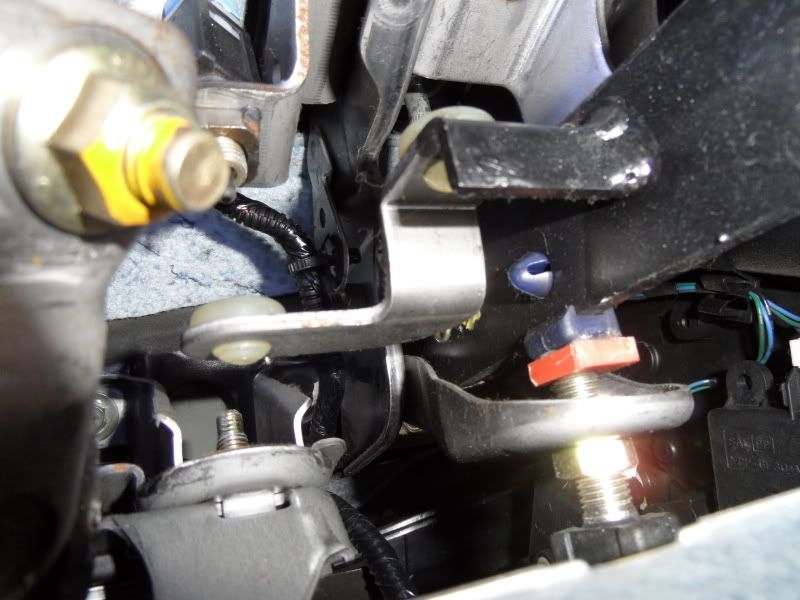
Now there are 2 sensors on the clutch pedal, when its released (normal position) it touches the sensor that operates the cruise control
NOTE: If you adjust the clutch pedal too low, when the pedal is released, it wont touch this sensor, therefore cruise control will not work, i been told, after a few days the engine check light comes on because of this, so even if you dont use cruise control, please dont upset the car. This sensor can be adjusted with a 12mm bolt, but I found it easier to stick a red 5mm spacer onto the pedal, as you can see. ( YOU Dont have to do this) Only reason I done this, is because I like my biting point low.
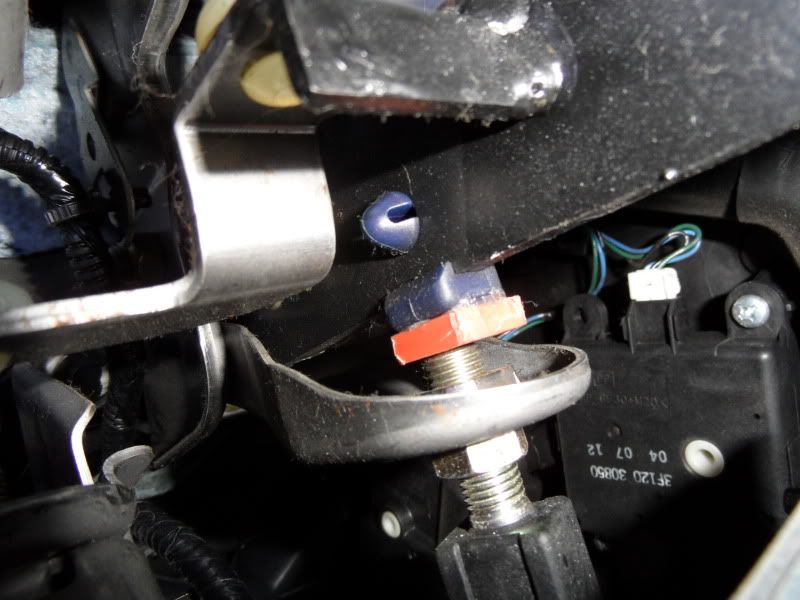
The other sensor activates the engine start, and works when pedal is depressed, so shouldnt interfere with what we are doing.
Now the bolt we are aiming for, is a long silver bolt, with a lock nut on it, attaching to a gold U bracket, which attaches to the clutch pedal, it has spines down it, so not hard to spot.
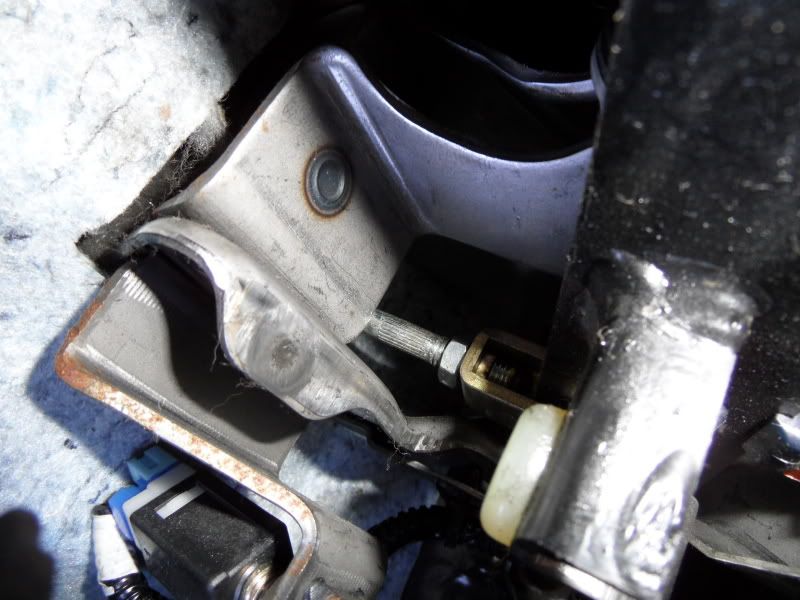
You need to get your 12mm spanner up there, and twist the lock nut loose, I didnt find mine hard at all, but some people wedge a screwdriver into the U bracket, to stop it twisting when you force the lock nut loose.

Once its loose, get your nose pliers, and adjust the silver bolt to your desire. Most people agree 2 turns is about normal. When I first looked at mine, I had about 2 lines of thread showing through the Gold U Bracket. As you can see now, I have nearly 4 lines of thread.
Please note, when turning the main Silver bolt, its very hard, with nose pliers, I was only moving it about 1-2mm at a time cos of the restricted space, just be persistent with it, it will come. Make sure you turn it the right way, the more thread you see in the U Bracket, the shorter the pedal throw will become, and the less thread you see in the U Bracket, the longer the throw of the pedal, please dont unscrew it out though, god forbid I dont know how you will get it back in!!
Once adjusted, depress the clutch a few times with your hand, making sure it hits the sensors, before tightening your lock nut back up again. Or do what I do, take it for a spin, see how it feels, make sure your cruise control works, if it dosent feel right, than just readjust.
Job Done!
Now my clutch pedal sits like this, compared to my brake pedal
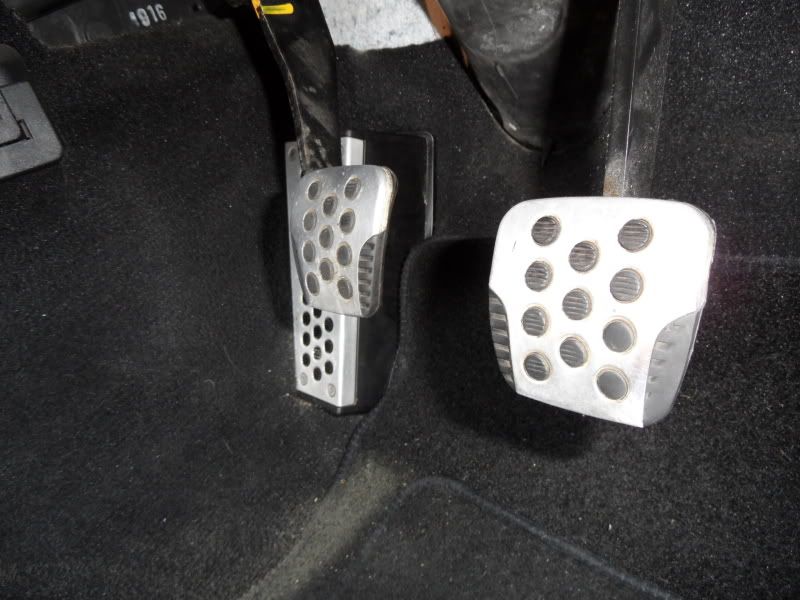
Your pretty much aiming for the pedal to sit level with the brake pedal, mine sits about 10mm lower than it, but thats my personal taste.
Summary
1. Tools needed, 12mm spanner, nose plier, work light (WD40)
2. Release Lock nut above Gold U Bracket
3. Turn Silver Spindle bolt to suit (2 turns) and please make sure you dont twist it the wrong way, so it comes out of the U Bracket!!
4. Once adjusted, tighten lock nut back again.
5. Repeat procedure until you have desired feel of your clutch pedal.
6. Takes about 20mins, 10mins once you know what your doing.....
DISCLAIMER: All mods are taken at your own risk. This is purely a guide. Nor Me or http://www.350z-uk.com take any responsibilty for your own mods, and if your break anything, You do this all at your own risk
Thread Revival.... Just did this and wow, what a difference its made.
Hardest part was getting down there but OPs method worked best.
Out of interest, were there any lo G term effects found by doing tgis as per that last post in this threat about pedal travel etc
I have a new clutch and flywheel ready to be fitted when this is all over so I'm not concerned about my current clutch but would be interested to know if anyone had any issues after doing this?
-
On 30/07/2011 at 09:20, D4XNY said:
Hello all, and thank you for taking time to read this.
Since I got my Z 2 yrs ago, I have always loved the car, but one thing has always annoyed me, and that is the high biting point of the car. Makes pulling off very tricky and amateurish, often very bumpy, and not good for my street cred, lol.
Shortly after buying the car, I replaced the clutch, which was much better, but still that biting point felt too high, and with a grippier paddle clutch, this made taking off all of a bigger problem. And I love smooth getaways.
So after some research, I found out how to adjust my clutch pedal, and oh my god, it makes the Z a whole lot more pleasurable to drive, im not nervous about pulling away at lights anymore, and I can drive the car how I want to again!
Always been used to cars with low biting points, so the Z has been hard to get used to, and I still struggled, a high biting point, just isnt my driving style.....
So anyway, I fixed it, with a few guides from the net, and thought I would add my own one here.
At this point can I point out, that your not adjusting the actual biting point of the clutch, just the position of the clutch pedal. Therefore you wont be "riding" the clutch, nor burning it out. Its simply a mod, to lower the pedal, so the biting point appears to be lower.
Before I started, I noticed that my clutch pedal was a good inch higher than the brake pedal, when i finished, it was about 10mm lower than it.
Tools I found I needed, were a 12 mm spanner, a work light and some nose pliers
Now this is the tricky bit, accessing the part....
You basically have to get on your back and slide in, under the steering wheel, so that your looking up at the pedals, and behind the steering assembly ( Now im 6'2 20 stone, and i managed it) I found that if you push the seat back and as low to the ground as possible, you could perch your bum on the end of the seat, and rest your legs on the shoulders of the drivers seat... lol
When you look up, this is what your presented with...
Now there are 2 sensors on the clutch pedal, when its released (normal position) it touches the sensor that operates the cruise control
NOTE: If you adjust the clutch pedal too low, when the pedal is released, it wont touch this sensor, therefore cruise control will not work, i been told, after a few days the engine check light comes on because of this, so even if you dont use cruise control, please dont upset the car. This sensor can be adjusted with a 12mm bolt, but I found it easier to stick a red 5mm spacer onto the pedal, as you can see. ( YOU Dont have to do this) Only reason I done this, is because I like my biting point low.
The other sensor activates the engine start, and works when pedal is depressed, so shouldnt interfere with what we are doing.
Now the bolt we are aiming for, is a long silver bolt, with a lock nut on it, attaching to a gold U bracket, which attaches to the clutch pedal, it has spines down it, so not hard to spot.
You need to get your 12mm spanner up there, and twist the lock nut loose, I didnt find mine hard at all, but some people wedge a screwdriver into the U bracket, to stop it twisting when you force the lock nut loose.
Once its loose, get your nose pliers, and adjust the silver bolt to your desire. Most people agree 2 turns is about normal. When I first looked at mine, I had about 2 lines of thread showing through the Gold U Bracket. As you can see now, I have nearly 4 lines of thread.
Please note, when turning the main Silver bolt, its very hard, with nose pliers, I was only moving it about 1-2mm at a time cos of the restricted space, just be persistent with it, it will come. Make sure you turn it the right way, the more thread you see in the U Bracket, the shorter the pedal throw will become, and the less thread you see in the U Bracket, the longer the throw of the pedal, please dont unscrew it out though, god forbid I dont know how you will get it back in!!
Once adjusted, depress the clutch a few times with your hand, making sure it hits the sensors, before tightening your lock nut back up again. Or do what I do, take it for a spin, see how it feels, make sure your cruise control works, if it dosent feel right, than just readjust.
Job Done!
Now my clutch pedal sits like this, compared to my brake pedal
Your pretty much aiming for the pedal to sit level with the brake pedal, mine sits about 10mm lower than it, but thats my personal taste.
Summary
1. Tools needed, 12mm spanner, nose plier, work light (WD40)
2. Release Lock nut above Gold U Bracket
3. Turn Silver Spindle bolt to suit (2 turns) and please make sure you dont twist it the wrong way, so it comes out of the U Bracket!!
4. Once adjusted, tighten lock nut back again.
5. Repeat procedure until you have desired feel of your clutch pedal.
6. Takes about 20mins, 10mins once you know what your doing.....
DISCLAIMER: All mods are taken at your own risk. This is purely a guide. Nor Me or http://www.350z-uk.com take any responsibilty for your own mods, and if your break anything, You do this all at your own risk
Thread Revival.... Just did this and wow, what a difference its made.
Hardest part was getting down there but OPs method worked best.
Out of interest, were there any lo G term effects found by doing tgis as per that last post in this threat about pedal travel etc
I have a new clutch and flywheel ready to be fitted when this is all over so I'm not concerned about my current clutch but would be interested to know if anyone had any issues after doing this?
-
Cheers for the tips, greatly appreciated!
Yeah due to no pressure washer I didn't want to spend a lot on a pre wash until I could pick one up. The Magifoam was only a fiver and I only bought 500ml so no great loss there.
-
Ohhh that finish is perfect
Had a limited budget so found some deals online:
Dodojuice Microfiber Cloths x 6
Dodojuice drying towel
Dodojuice applicators
2 buckets with grit guards
Lambs wool mitts x 2
Autobrite Magifoam
No pressure washer so got a 2ltr pressure sprayer
Chemical guys Citrus wash
Bilt Hamber auto clay (soft)
Dodojuice born slippy
Meguires Deep Crystal all 3 steps
Gtechniq C6
Microfiber Glass towels
Simmonz glass cleaner
Budget hosepipe
Already had new air fresheners, demon juice fallout remover, a few glass cleaners etc
I skimped on some stuff due to budget constraints. I've never detailed a car before so it's all a learning curve. I've been scouring the forums for everyone's comments on what they use, how they do it etc but it's a lot of info to take in! Hence the meguires 3step for starters!!
Just need an overcast day now! I'll get some before and afters up.
Paid for a detail last year which left mine looking decent but no where near your finish.
-
Car looks awesome. I've been inspired so Just shelled out on a bunch of detailing products
-
21 hours ago, napp said:
same mate , 25mm rear and 20 front.
If you do decide to list them I'd be very interested
-
What size are the spacers? I may be interested. I assume no difference between vert and coupe?
-
3 minutes ago, Shunter8 said:
Gearbox oil, diff oil, brake fluid, clutch fluid and coolant flush? Often overlooked fluids that also require a change every few years generally.
Recently finished purchasing everything i need to do a full service, found the diff oil and coolant cheapest on ebay (genuine) along with the Belts. Gearbox x 3 was cheapest on Torqen.
Everything else was Opie
-
at least it's not turbo charged though eh
")
-
If you know of a specialist, i would offer them a few quid to come and look at the car with you (if that's an option) before you buy.
May be a daft question but have you checked the service history and MOT History? Everything been done when it should have etc
-
47 minutes ago, The G Man said:
I’d certainly be doing the card detection hack
Cardboard under the car?
-
Thanks for the advice, will start a log after the oil change. Much appreciated
-
On 13/03/2020 at 11:56, scobie140 said:
Put your reg in to opie oils and they will give a list of recommended compatible oil. They're delivery is pretty quick and I'm sure the club still gets a 10% discount from then aswel.
If your going with motoul oil in your service and your cars using a lot of oil then prob best just to get 5L of motul for your top ups.
Are you addressing the oil consumption? or just going to keep feeding her oil?
Opie came up with the standard 10w-30 but had read a few threads where the thicker oil (although only until warm) seemed to reduce oil consumption by some what.
I try to check the oil regularly but car is not regularly parked on flat surfaces (surprisingly) so it's not always easy for me to get correct readings. I don't think its overly excessive oil use but not really had the time to investigate the issue. What would be the recommended route?
>Monitor current top up over amount of miles covered?
>Compression test?
I'm assuming any garage worth their salt can typically perform these?
I do notice that during a rev heavy sprint (i have a long, straight and relatively quiet bypass close by) i do get a burning smell sometimes in the cabin, it doesn't last long, there's no smoke so i've always put it down to a small bit of oil burning off.
-
Hi, hoping for some quick advice as i need to buy some oil tonight. Rev-up that's munching oil. Want to top it up until end of March when i'm getting a P3 done. Looking to buy a cheap stand in for the next 2-3 weeks until it gets a fresh 5ltrs of Motul.
Halfords is close and i saw a comment in the big fluids list that suggested a semi synth 10w-40. Oil is low so would you recommend either of the below as a stand in for a few weeks?
Would appreciate some sage advice here
Thanks
Mike
-
Car looks great!
I need to do a full/P3. I'm slowly collecting all the various fluids. I've got the Engine Oil, Brake Fluid, Spark Plugs, Filter, crush washer and magnetic sump
Interested to know if you had any good deals on the below fluids. (My opie oil basket is pretty expensive currently with multiple bottles of redline stuff in there to make full quantity)
Coolant
Belts
Diff Fluid
Gearbox Oil
Steering Fluid
-
ah ok, no worries, thought you were looking to import. My bad.
Below are purely assumptions based on the advert
In the picture i cant see any flashes of orange so i'm assuming no brembos ,
it also doesn't have cruise control from what i can see, can't see any steering wheel buttons. (advert says it does)
Does have heated leather seats though - at least the buttons are there,
Decent looking car though. Car would probably hold value +/- £500 or so if in good nick for the next year or two, plus you can probably get the dealer down another 500
.
-
May I ask how much you are paying for the car, import costs and all?
Is there any specific reason you are going for an import and an auto gear box?
-
On 23/01/2020 at 20:24, HEADPHONES said:
On the original PlayStation it has to be Wipeout
Enjoyed GT4 on the PS2.
Never really got into Gran Tourismo as much on the PS3 as the PS2, but I really enjoyed Race Driver Grid on the PS3.
That was the last racing game I ever bought so I'm not really qualified to say anymore

loved Grid. The online touring car races were amazing and so much fun if you got a good lobby. Then a random would join and block the start finish after the first lap. Carnage
-
As the title, before i go buying new, just wanted to put my interest out there if anyone has some for sale.
Cheers
Mike
-
to point out on your post you are after a 40K miler - this requirement will push you up to and over £8K plus, mainly because there aren't that many around anymore, however i would keep yourself open to higher miles, even 70-80K and above but pay attention to the service history, a well cherished (previous enthusiast owned) Z with a packed service history is equally as valuable as a low mileage Z and key to happy and relatively problem free Z ownership in my humble opinion.
-
I would also hold fire and keep an eye on the market. As we hurtle towards spring you're likely to see more listed
-
 1
1
-
First things you would do after buying a 350z?
in 350Z General
Posted
If the clutch travel distance is annoying you, adjust the clutch pedal, I recently did this and made my Z a lot nicer to drive.
A friend of mine also replaced his side indicators with juke or quasquai smoked ones that light up similar to the back of new vw's and audis, - - - -, he picked these up cheap On ebay but look great.
Inexpensive mods")