


Scully
-
Posts
285 -
Joined
-
Last visited
Content Type
Profiles
Forums
Events
Gallery
Store
Posts posted by Scully
-
-
Hi, you might remember from such nights out like
Cardiff, Leicester Sq and BUTLINS
SMASHED

-
 1
1
-
-
Just got back from Tenerife

-
Hi do you still have the bushes for sale? I'm after one as just had one fail
-
Haha yeah it's the spacers at fault, but like I said will have to see what JDM-R have to say on the matter. I'm just glad no drilling was involved.
-
Its often worth upgrading to mcgaurd ones.
The standard ones are mcguard, my lock key has it stamped on it
-
Well just had a stroke of luck, as the nuts tightened onto the bolt instead of the alloy, when they sheared, the shaft that was left was loose to the touch so they just spun off!
Problem solved, all that I'm doing now is taking it up with JDM-R, the least the can do is change the stud length in there designs and pay for a new set of nuts
And no they are not new at all, look like the original lock nuts
-
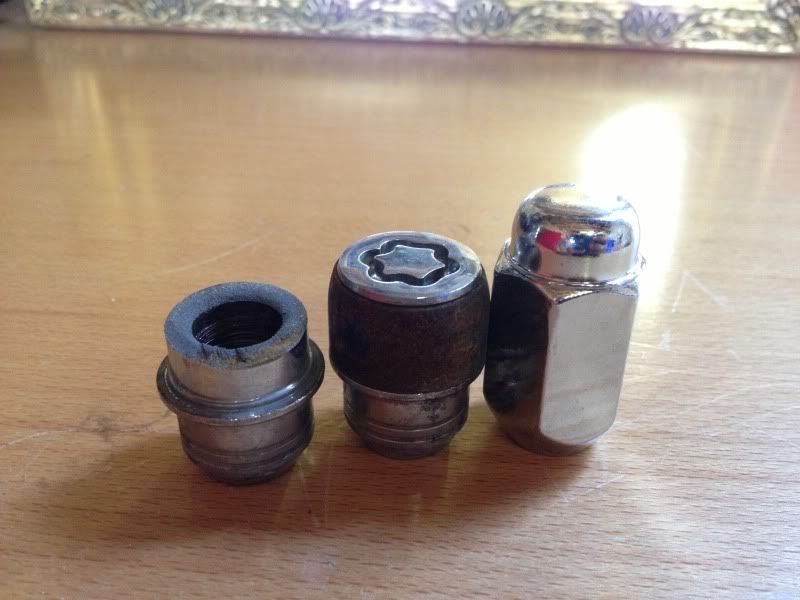
Its the OEM lock nuts that failed. I even have the packet that they come in from Nissan,
KE409-89950 ND
If anyone is interested in the part #
Edit- it does say on the nissan packet "made in the USA".... I blame the yanks haha
-
Ddcboyle They provide nuts to attach the spacer to the car, and you use your original to attach the wheel to the spacer like you would normally.
Don't get me wrong these appear to be decent spacers, just non standard stud length unfortunately.
Well just had a stroke of luck, as the nuts tightened onto the bolt instead of the alloy, when they sheared, the shaft that was left was loose to the touch so they just spun off!
Here's a pic of 1 of the sheared lock nuts, the last surviving lock nut and a new bolt which there was a set of in the boot. Notice the big difference in the size between the lock but and the normal nut.
-
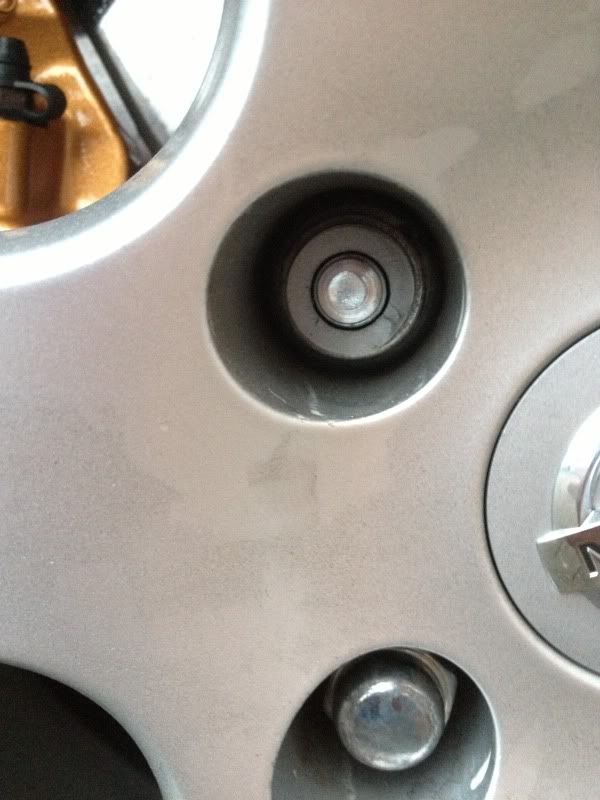
Just got the car home and had a good look. It's the studs in the spacers, try are a fraction longer that standard.
For the normal nuts that was ok as they have plenty of extra depth in them, but for the lock nuts they are too long and I'm only talking maybe half a mm but that's enough for them to be tightening onto the end of the stud rather than the wheel.
I've got some nut extractors but as they are really for rounded hex heads I'm not sure how well they will work on something that is circular in the first place. I really don't want to have to be drilling out studs.
Yes definently will be sending off and email to the supplier.
They are from JDM-Revolution who are primarily an eBay based company. I'm not going to form any biased opinion of them just yet as I will see how JDM-R want to play it from here. I'll keep you all updated... Thanks for the quick replys though
-
So, last week I fitting my new wheel spacers... Awesome!
Putting the lock nuts back on I sheared one fair enough I could have over tightened it in my excitement (I don't have a torque wrench).
Now got back the my car after work a week later and I see the head of a lock nut just lying there next to the car, odd. Upon closer inspection it was exactly like the one I sheared last week. I checked the wheel an it seems it has just decided to pop off whilst I was at work! Turns out all but 1 have done this.
I've never had this before... But now I'm stuck with 3 sheared nuts!! Does anyone have any possible solution?
-
Unfortunately I'll be on holiday, hope it goes well though... Also a meet that I got a PM about, doesn't appear to be in any of the meet threads...
I'll be going to that one
-
Welcome along! I'm only in Bedford so would be up for Mini meet some time... I'll keep an eye out on the east anglia section
-
We've all seen a stubby and a cargo net before so I didn't get a picture, but they arrived the same day as my spacers so got a snap. I was strangely attracted to the texture of the stubby *weirdo*
Cheers Steve
-
1
-
-
Sorry for the very late reply, I forgot I even posted this. I'm still looking for clear ones without having to pay full wack for them... Got a holiday coming up so will see how many monies I can not spend in the sun
-
Payment sent via PayPal cheers
-
Payment sent via PayPal cheers
-
Man I want so bad! But then I'll have no spending money for my holiday in 3 weeks
-
-
Saw this in the cinema on Wednesday, it was epic! Had to tell my girlfriend to be quiet as she started talking half way through! No respect
-
2
-
-
Love the sound
-
haha awesome!
-
Tried those clear lamps from eBay, turned out to be exactly the same as OEM.
Next option was to tint them with a little blue window paint, I played around with varying amounts, couldn't get an exact match to the LED's but it certainly has improved it alot - this is the best match I could get
-
Cheers, As I'm changing them all to white, for a more OEM look, I'm giving those clear ones ago, not sure how much they will match the hue of the white LED's but we'll see - ill post results up when they arrive
I'll send you 1 for Xmas haha
-
Cheers Flyboy.... It didn't even occur to me to think that this was a case with a bulb/LED.
Upon closer inspection there was a small runner case that just simply pulled off. A colour filter perhaps... So I tried it back in the switch with out it but it was still the standard amber colour, just alot brighter.
After a quick minute to realise how the the legs were wrap around, I unbent them and got the bulb out. Yes bulb! It makes sense now as there was no specific orientation for to be housed in switch, which LEDs can't do (that whole cathode/anode business)
Just a 3mm bulb in the end
I'd like to thank the members of 350z-uk throughout this endeavour x

How to - 'Clear out' UK OEM fog light
in 350Z Guides
Posted
Read this guide this morning and jumped straight in. I'm just going to put a couple of low res pics up of the process as we have all seen it before...
1. Start
2. Tail lights off
3. Bumper unscrewed and eased back, plenty of access if you are dextrous
4. Rear cluster out
5. Prepared on baking tray
6. Baking - I did Gas Mk.6 for 1 minute, 45 secs & another 45 secs
7. Then pealed back completely
8. Red lense just pulled out (a bit gluey) and the mirrored reflector was just 2 plastic studs with melted heads.
9. Back together and baked for another minute, squeezed it on all edges then another 30secs, ready to go back in
10. All back together
I did have one problem though which the cause happened before I owned the car. In the year and a bit I've had the car I had always noticed hair line fractures in the paint just below the rear cluster. A small impact of some sort - no major damage.
When I got the cluster out there was a crack across it and the electrical connector was broken.
The crack was behind the metal part which is now removed. Sealed up the crack with a hot glue gun and all good, the connector still 'clicks' in so ok there.
The eagle eyed of you will notice the crack through the lense but only if your looking for it.
I'm happy for now, but a new rear cluster has been added to the ever growing shopping list!