AFTERSHOX
-
Posts
124 -
Joined
-
Last visited
Content Type
Profiles
Forums
Events
Gallery
Store
Everything posted by AFTERSHOX
-
SOLD - Mods - please lock thread ! Thanks !
-
to the forum fella !
-
Welcome mate. I agree Silver is best!!!
-
My wife bought me an RC Skyline R34 tuner for Xmas. A day or two later I went car shopping and bought my zed 1:1 scale
-
to the forum Keith. I'm West Mids as well mate, and quite a new member. Post some pics up, and let us know whereabouts in the West Mids you are.
-
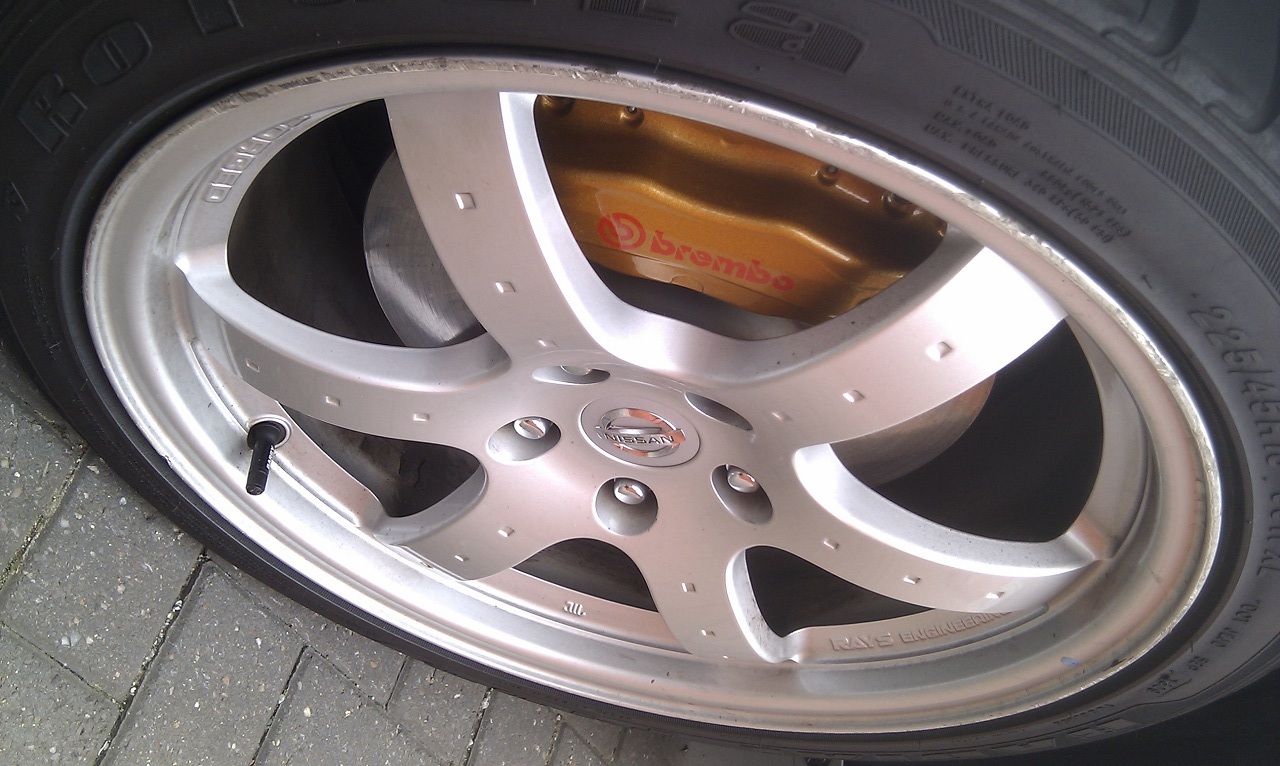
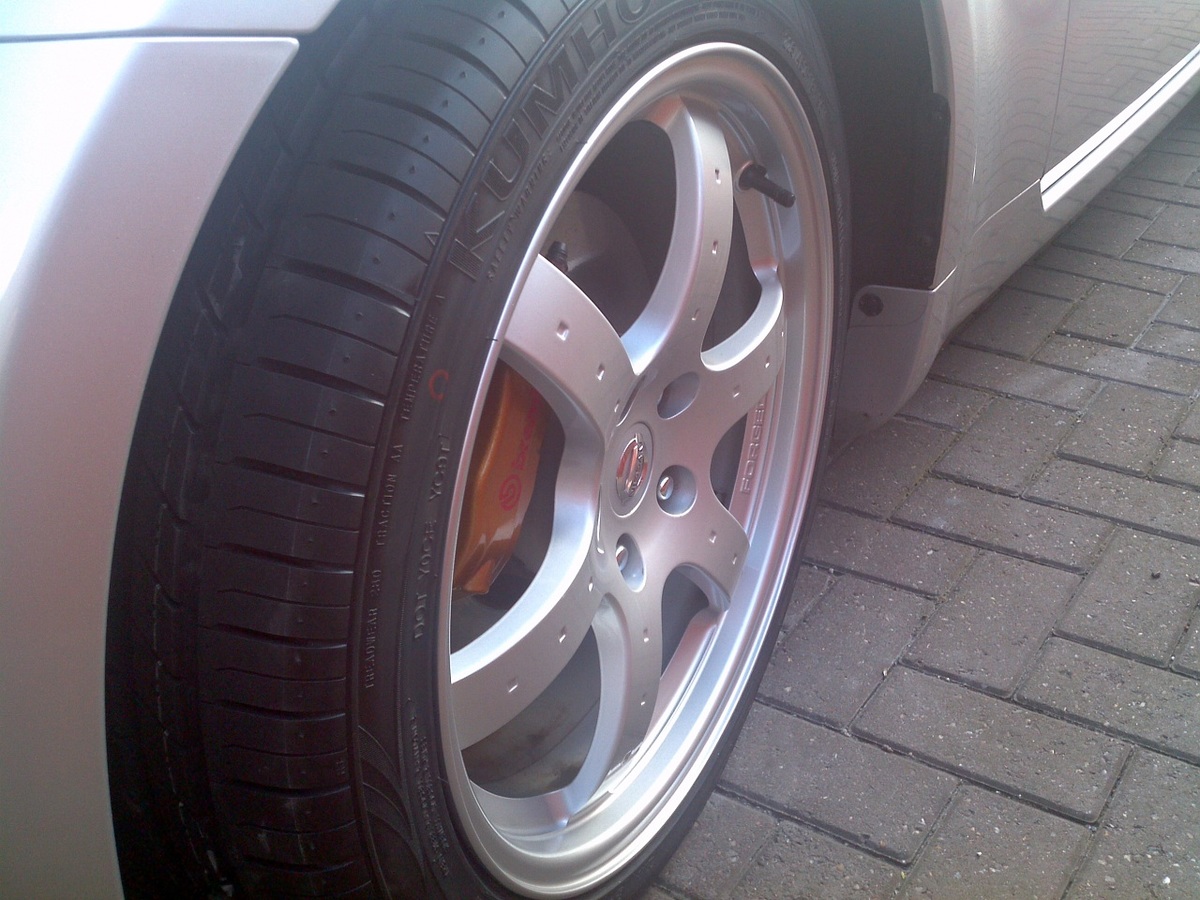
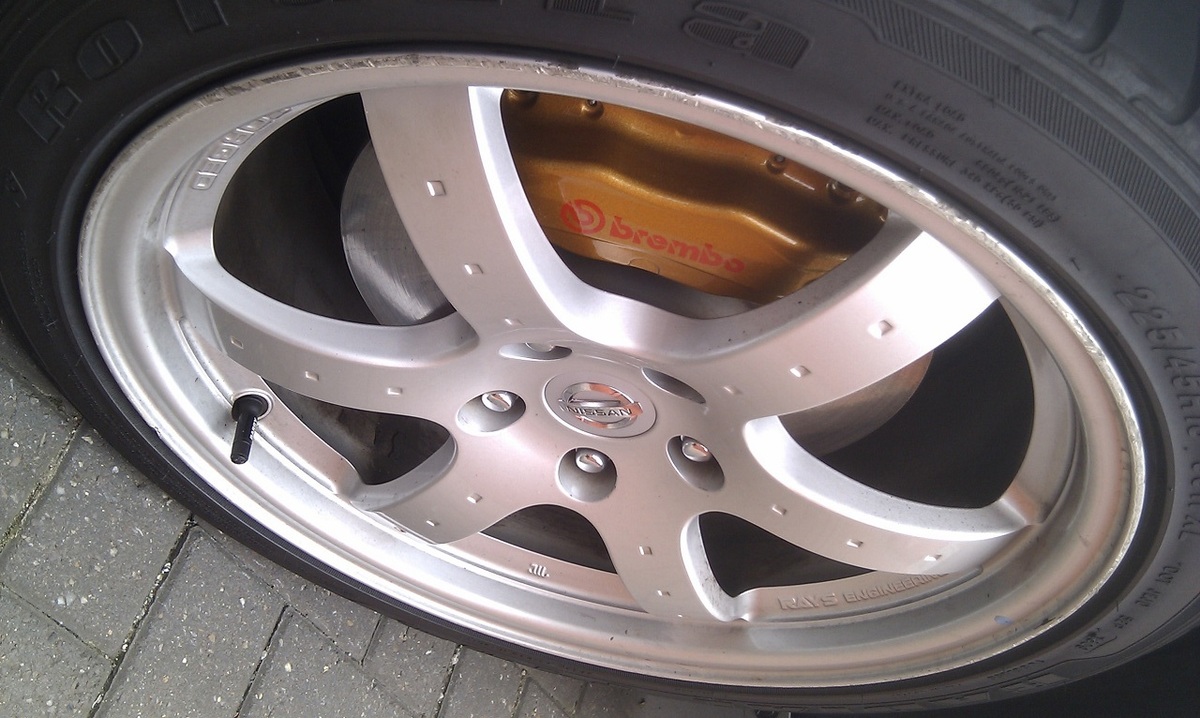
Evening Just wanted to recommend the Midlands M.A.R.S chaps who did a stunning job of sorting out my kerb damaged RAYS 18"'s If you are located in the West Midlands, and you are looking for a couple of great guys to consider for most repair / reconditioning jobs - then I would highly recommend them. http://www.midlandsmars.co.uk/ Tony Mountford was my assigned repairer for the day, and I'm sure you agree he has done an awesome job of repairing the kerb damage on my front wheels (this damage was done by the previous owner, and as it made my ZED look scruffy - I decided to get them done!) The repairs were done without removing the wheels or tyres; and you get 350z-uk.com club discount !!!! Credit where credit is due - I'm pleased with the result (...and its loads cheaper than lashing out on a set of new rims!) Pictures below: BEFORE AFTER I threw on a couple of new BLACK CIRCLES as well (prior to the repair) - went with KUMHO ECSTA LE SPORT (KU39); So far, I'm impressed with them; ...more to follow - once they've been run-in ! Comparable to : Competitor Products (Bridgestone Potenza RE050, Continental ExtremeContact DW, Goodyear Eagle F-1 Asymmetric, Hankook Ventus V-12 evo, Michelin Pilot Sport 2, Pirelli P Zero Nero) If you want to know anything more - send me a PM. Cheers Mark
-
Nice job ! What sort of lacquer did you use? Matt finish or high gloss?
-
Tidy looking Z !
-
Siman350z - I've sent you a PM mate.
-

Does the Qashqai reversing camera fit the Z?
AFTERSHOX replied to slimjim's topic in I.C.E & Electronics
Let us know which one you get... I've seen a few on eBay; some look better build quality than others.... I've found a couple of modules / options that work with the UK Birdcr@p SatNav as well; (supposed to be plug and play) - with dual PAL AUX (where you press either ENTER or some other button) to switch between the CAMs [you can have two - one front / one rear] or just one; the other type supposed to switch when you select reverse gear. I'm still investigating though.......... If you have any suggestions / solutions...... I'm all ears.... -
Need help identifying this fitment - pressure wash
AFTERSHOX replied to AFTERSHOX's topic in Car Detailing
+1 Cragus ! Better make some more room for my 'extras' Do you think they eat much? -
If you are in the United States - you could get one of these... http://www.quikcenter.com/ I tried to get one for an awkward bolt removal task (...but I'm in the UK) - and there are no distributors for Quikcenter in this country. It's a shame, because this is very cool / useful device. For our friends over the 'pond' - you can order from their online shop.
-
Need help identifying this fitment - pressure wash
AFTERSHOX replied to AFTERSHOX's topic in Car Detailing
Cragus - you were not wrong mate! I've ordered now...... there will be snow in July ! -
Need help identifying this fitment - pressure wash
AFTERSHOX replied to AFTERSHOX's topic in Car Detailing
I would concur..... just ordering from your E-Bay now ! Thanks Mark -
I purchased a pressure washer last year from LIDL - it is a PARKSIDE PHD-150 Now, I'm looking to buy a snow foam lance - and I need to buy it with the right fitment.. I've had a good search of all sorts of forums - and the jury seems to indicate that this is the "LAVOR" connector. The attached photo shows one of the tools / accessories that came with the pressure washer. Supposedly, the unit (PHD-150) is a re-branded LAVOR one (built by Grizzly in germany!) - http://www.grizzly-gmbh.de 150 bar. Just need one of the "detailing gurus" to confirm if this is correct or not? Thanks in advance.
-
midweek *bump* Anybody interested?
-
Break out the OARS, daddys going boating !
-
If you are looking to buy a new OEM part - drivers side exterior door handle - I have one for sale... link below. viewtopic.php?f=32&t=51703 If you need a How To: guide - step by step removal of the drivers side door handle (the side with the lock / key hole); then you can find this tutorial on the link below. viewtopic.php?f=35&t=51749
-
Wow - cracking bit of kit for the money jollyranchers ! Top specification 4CH DVR for an excellent price ! You can't go far wrong with this... nice find !
-
Hi guys; AFTERSHOX here.... with my first "how to" guide; "Removing / Replacing the exterior drivers side door handle" THERE ARE QUITE A FEW PHOTOS IN HERE, SO BE PATIENT WHILE THEY LOAD UP; TOOLS required:- Small Flat Blade Screwdriver PH3 screwdriver / Bit MAGNETIC PREFERRED T30 (Torx) Screwdriver / Bit MAGNETIC PREFERRED Small PENLIGHT TORCH Small piece of thin / flexible but stiff paper or card (OPTIONAL) Small tub or container to keep the screws safe. Small Japanese fingers (helpful) Replacement DOOR HANDLE (If you are replacing it); +------------------------------------------------------------+ Before you begin; you will need to make sure that you have done the following:- a) UNLOCK all doors Roll-down the Drivers Window (FULLY) - You'll THANK ME later if you need to ASK WHY; c) REMOVE Keys from ignition STEP 1) Remove the TWO RUBBER GROMMETS (as shown in the photo); You can use fingers; they are quite easy to remove. STEP 2) PH3 screwdriver bit - Remove the TOP screw STEP 3) PH3 screwdriver bit - Remove the BOTTOM screw; CAUTION : Be careful not to drop the screw inside the door panel; (This can easily be avoided by using my TIP below); TIP : Using your small piece of thin card; create a rolled tube and insert into the door cavity; now remove the BOTTOM screw with confidence; You have LESS CHANCE of dropping / losing the screw down the hole inside the door panel; STEP 4) TORX 30 bit - Now remove the screw securing the lock barrel. STEP 5) The handle will now be 'loose'; but it is not ready for removal (just yet)! The next step is to manipulate the handle sufficiently so that you gain access to the locking mechanism 'electrics'; Try and create a gap (about as large as you see in the picture below); Using the SMALL FLAT BLADE screwdriver; gently lift the plastic clip off (seperating the electrical connection from the key / lock barrel as shown in the next 2 photos) This CABLE is tight, and needs to be disconnected. CLIP ATTACHED CLIP REMOVED Once the CLIP is removed (..and the electrical connection is free of the key / lock barrel mechanism) - you will have a little more 'shuffle room' to perform the next step; STEP 6) Now you have a little more room to manoeuvre the handle; what you need to do is to manipulate the handle so you can gain access to the FINAL SCREW which secures the lock barrel to the handle PH3 screwdriver bit I found the easiest way to remove the FINAL SCREW is to rotate the handle slightly outwards - as shown in the picture below; YOU MAY WANT TO USE A PROTECTIVE CLOTH AGAINST THE DOOR EDGE when unscrewing the FINAL SCREW to save damaging your paintwork; Once you have unscrewed the lock / barrel from the handle - the handle is free to be removed ! GENTLY LIFT the handle OUTWARDS and UPWARDS - diagonally (There is a SHORT METAL LINKAGE still connected to the HANDLE [this is normal - do not PANIC - this is ATTACHED and REMOVED along with the handle) IF you are only removing the handle - you may now SKIP the next steps - and read the FINAL STEPS (Re-assembly!) +------------------------------------------------------------+ HANDLE REPLACEMENT +------------------------------------------------------------+ If you are REPLACING the HANDLE; you'll need to 'steal' the LINKAGE from the OLD HANDLE - and fit it on the new HANDLE; As per PHOTO below; rotate the white clip downwards whilst roatating the LINKAGE upwards - then remove from the hole; Photo below shows LINKAGE removed - and ready to transplant to the new HANDLE +------------------------------------------------------------+ FINAL STEPS (RE-ASSEMBLY) +------------------------------------------------------------+ Before replacing your handle - you may wish to clean any dirt / debris around where the handle attaches to the door; RE-ASSEMBLY is quite straightforward (BASICALLY, do everything you have just done, but in reverse!); HOWEVER; There are TWO tricky parts to RE-ASSEMBLY; Tricky #1) Ensure the LINKAGE on the handle is INSERTED correctly into the door opening mechanism. The picture below shows you the DIRECTION of where the LINKAGE goes; VERY IMPORTANT : ENSURE the LINKAGE is inserted into the centre hole of what looks like a PLASTIC (funnel) - MINE was BLUE PLASTIC; I couldn't get close enough with the camera to show you exactly where this is; USE A TORCH - and you will see it; just ENSURE that the LINKAGE goes into the hole into the BLUE PLASTIC FUNNEL.... and you'll be OK. (If you miss the HOLE - the door handle will not open the door [from the outside] - once you have re-assembled it; SO, if your have messed this up, you'll have to disassemble and start over) - THAT is why you need all doors unlocked, and windows open [at the start]. Tricky 2) Once the LINKAGE is back in, and the lock / barrel is re-attached to the handle; the next awkward part is re-connecting the WIRING (electrics) to the lock; This is really quite fiddly, and where you need your little japanese fingers; once the electrics are back on; just proceed with re-assembly; I find *swearing lots* helps with this stage. +----------------------------------------------------------------------------+ CONGRATULATIONS - You are DONE ! Stand back and admire your handiwork. Now check that everything works; including checking that the KEY also unlocks / locks the car; +---------------------------------------------------------------------------------------------------+ Hope you found this guide useful; if you feel it needs improvement - let me know and I'll consider revising it. Thanks. Username : AFTERSHOX Forum : http://www.350z-uk.com +---------------------------------------------------------------------------------------------------+
-
Another update : I'll be fitting my new handle either tonight or over this weekend (CD70B); I'll take photos of the steps, and post a guide / how-to; (hopefully, somebody will find it useful) The handle that is incompatible (80606-CD40B) will be for sale in the appropriate forum soon. Cheers
-
Hi I have a new OEM Drivers Side Door Handle (RH Drive 350z - keyhole side) - for sale. In original UK OEM Nissan packaging. NISSAN PART CODE# 80606-CD40B This was purchased from eBay to replace a badly damaged one on my Late 2006MY zed; but this particular handle is not compatible with the late 2006 model (I believe it is for earlier models 2003-2006). As I have now purchased another handle from my Nissan Dealer; I'm just looking to get my money back for this item; it has never been fitted to a vehicle (as you'll see from the photos) Looking for £50 (plus £5 for P+P which will be sent 1st class signed-for / insured) and well packaged in protective bubble-shell. Collection in person also possible; PM for details; There are a few tiny cosmetic marks on the item; Thanks for looking. If unsold after 1 week; I'll be selling it on Ebay.
-
Hey jollyranchers What make is that DVR? I seriously doubt that a sub-£1500 RRP DVR can handle 4 x D1/25fps (That's Casino grade CCTV); many of the cheaper DVRs are made in Korea - and 'claim' to do full D1 @ 25fps across 4 channels (on a 4 CH); but in reality they don't. D1/6fps across 4 cameras would consume 6.1/4 Gigabytes of Data (per CAMERA per DAY); so at a constant bitrate (CBR) for D1 - 4 cameras would eat 500GB disk space in 20 days. D1 (...or 4CIF) is 704x576 resolution - hence the massive amounts of data required to support D1. If you lower the recording quality to CIF (352 x 288 pixels) or even 2CIF (704 x 288) @ PAL standards (625 lines) then maybe possible for 4 x cameras @ 25fps (real time); When you stream the CCTV feeds over the internet (..or remote view via iPhone / Android) - it usually transmits in a much lower resolution known as extra-stream (usually the QCIF quality (176 x 144 @ 6fps) - because at the higher quality / bitrate - you'd 'eat your mobile data tariff' in minutes; Let me know what make you have, and I'll check it out.
-
I have to say that I've never used regular unleaded in the zed; as GT4 Zed is saying, the car is tuned from factory to run on super (recommended 98 RON if memory serves); and using regular is not advised (unless you use it as emergency fuel to get to the nearest SUPER pump!) I was told by a 'reliable source' that all fuel comes from the same place anyway; it's the amount of additive that goes in to the tanker when they are filling it up pre-delivery; Tesco's fuel is supposed to be 99 RON (which is why it poss came out TOP in the fuel compare); whereas Sainsbury's is labelled 97 RON [at the pump], but is officially rated as 98 RON. Even when you switch loyalties to another brand of fuel - it is suggested that it would take 2 - 3 TANK fulls of the same fuel before you may even notice a slight improvement in smoothness; if you put rubbish fuel in your tank, and you will notice almost IMMEDIATELY; pink pink pink My tuppenny-bits worth
-
Yikes ! That looks a nasty one. Hope you figure out what happened / who did it...