


Red_rider
-
Posts
35 -
Joined
-
Last visited
Content Type
Profiles
Forums
Events
Gallery
Store
Posts posted by Red_rider
-
-
On 26/07/2012 at 18:00, Lexx said:
The link to the original location for this dies a while back.
So below is what Nissan dealers use as a check sheet when servicing your 350z.
Also available via this link: http://metafaq.nissan.co.uk/resources/n ... 190605.pdf
Any one have an updated link
-
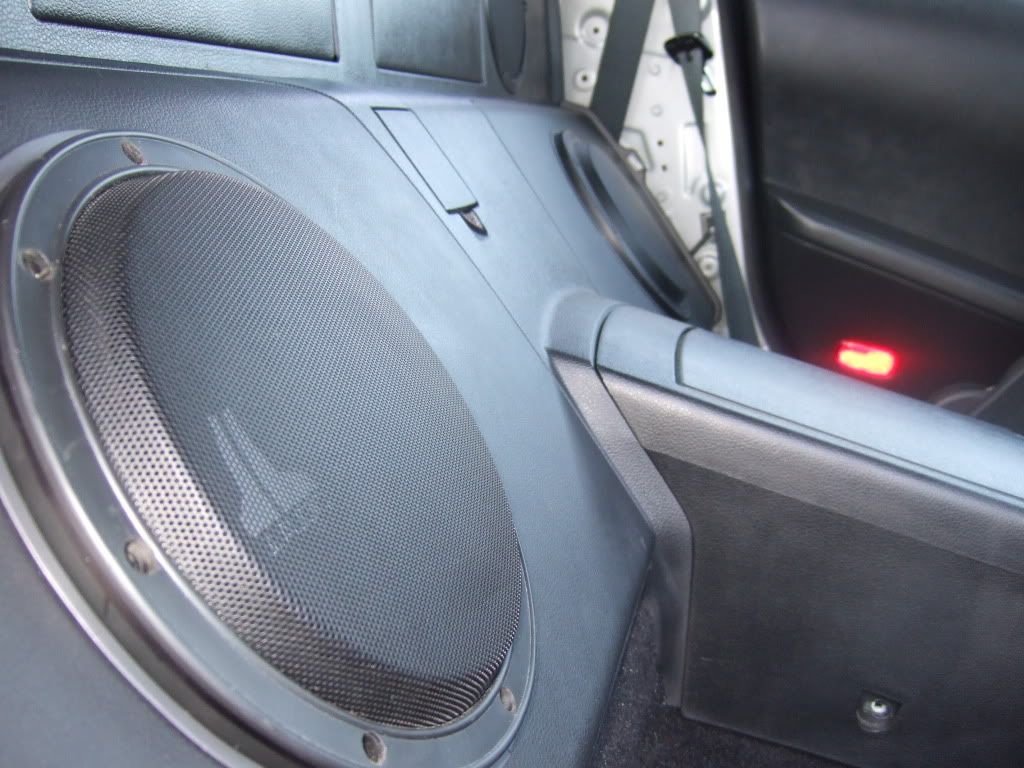
Hi folks I have a 2007 350z roadster in which I am looking to replace the crappy sub with a hertz c250. Powered by an external amp. I am think of just adding sound deadening to the existing chamber and swapping out the subwoofer for the hertz sub. Hertz recommends that the enclosure is 385x355x180 or 0.57 cub ft. Now, I belive space in the 350 chamber is large then .57.
My question is would this be okay or should I use baffles to reduce the chamber size . So that it is in keeping with recommendations.
Or just make the right size chamber out of MDF.
-
Hi dynamat still up for sale?
-
16 hours ago, Mikey_S said:
Had my interior handle parts resprayed by a local plastic moulding company in a hard wearing, scuff resistant Matt black paint. Not a mark on them after a year or so use before I sold it. Worth seeing if there are any around who may do it for a cash in hand hobble. Also had a guy in who specialises in interior restoration to redo the inner cups of the door handles and the centre console, again, did a great job for small price.
It's safe to say the guy who had the car before me was either Mr T in the ring department or had the touch of a rhino
Thanks I'll search locally to see if there is one
-
On 27/05/2018 at 20:12, MDMetal said:
There are some other posts around, I can't recall the specifics but it amounted to if you mess it up you at best need a new dome light and at worst the body control module goes pop. I had to replace the dome light when I shorted it with some duff leds luckily the body control module was fine.
Depends what you fancy doing, your going to need to I clip the headlining anyway and if you've already fitted an aftermarket head unit then you've had the centre console out. I opted to do that and run the reverse wire up so it works as intended but as long as it works anyway you choose is fine!
Hi were did you take the reverse light supy from?
-
What year are they out of. I want to put them in my 2007 hr version
-
On 04/06/2022 at 19:31, pintopete58 said:
Hi all selling my my 370z convertable seats.
I nearly put front seats haha.
Pictures are crap but seats are very good.
Selling as when I sell it long time yet I will not swop everything back to stock. £250.
Also selling 370z coup drivers seat very good for spares no heated seat equipment but airbag still in tact. Plus seat adjustment
£100. I've missed headrest for the coup
By the way when I do sell what you see is what you'll get this will be a bargain to someone


Hi are these for sale and what if so what version are the out of
-
18 hours ago, polaris said:
I was planning to do something like this. M539 is a well-known BMW resto. channel.
Thanks, I like the video. I will try it on the door handle it can't look worse then it does at the moment.
I will kep you guys posted.
-
3 hours ago, HEADPHONES said:
If I couldn't find a replacement for the original sub and had to go for an enclosure
THIS would be top of my list
I forgot to say mine is a roadster. So this won't work for me
-
4 hours ago, HEADPHONES said:
Post up pics of your efforts

Will do.
-
Long shot but u s have the. For sale:)
-
On 25/10/2018 at 21:01, HEADPHONES said:
Hi I have order the product you used. Though, for those interested, the second didn't work. But if u search for it the product will come up. Hope it helps
-
 2
2
-
-
Hi all the leather seats on my 350z are starting to show their age. The black paint is starting to chip away in places. Nothing major just a few dots here and there . Is there any way I can clean them and touch up the fade paint. Other then this the seats are in good condition.
-
On 18/01/2020 at 23:47, Mixification said:
Things needed
Navara D40 auto dim mirror (Can also use a GTR mirror too but they will cost more and look identical)
Multi meter
Crimpers
Wire strippers
Wire cutters
18-22 AWG wire (I used 20 because I already had it lying around, I would recommend 18)
Trim tools
T20 Torx bit
Assorted crimp connectors
Soldering iron (optional, can use crimp connectors)
Heat shrink
Heat gun (can also use a lighter or hairdryer)
Electrical tape
7-pin JST connector VH type with pins
Various tools such as screwdrivers, sockets ect
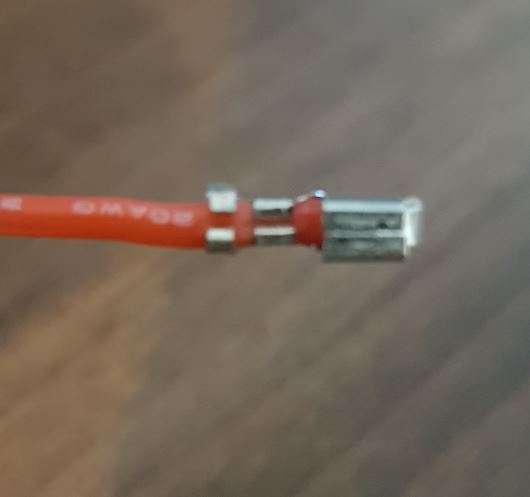
Get your wire of choice and start stripping one end. Once stripped trim any excess wire so you have about 4-5 mm of exposed wire. Put the exposed wire into the pin and crimp it ensuring that the wire insulation is being crimped not the wire itself, I found that it was easier to place the pin in the crimper first and then feed in the wire. Once crimped it should look like this.
Looking at the back of the 7-pin connector the pins are numbered from left to right in this order 7 6 5 4 3 2 1. We only need pins 7 & 6 you can use 5 if you want the mirror to disable anti dazzle when in reverse but I chose not to do this as I can just press the on/off button anyway.
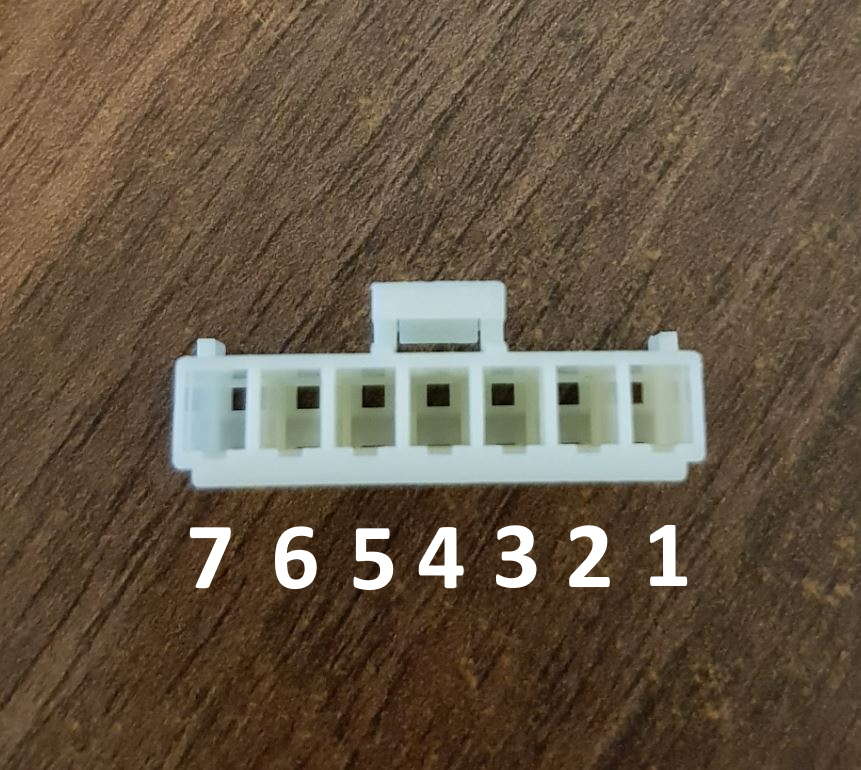
Now insert your crimped wire into the connector as follows;
Pin 7 – Positive ignition live
Pin 6 – Ground
Pin 5 – Reverse feed
You should hear an audible and satisfying click which means its seated correctly.
It should look like this
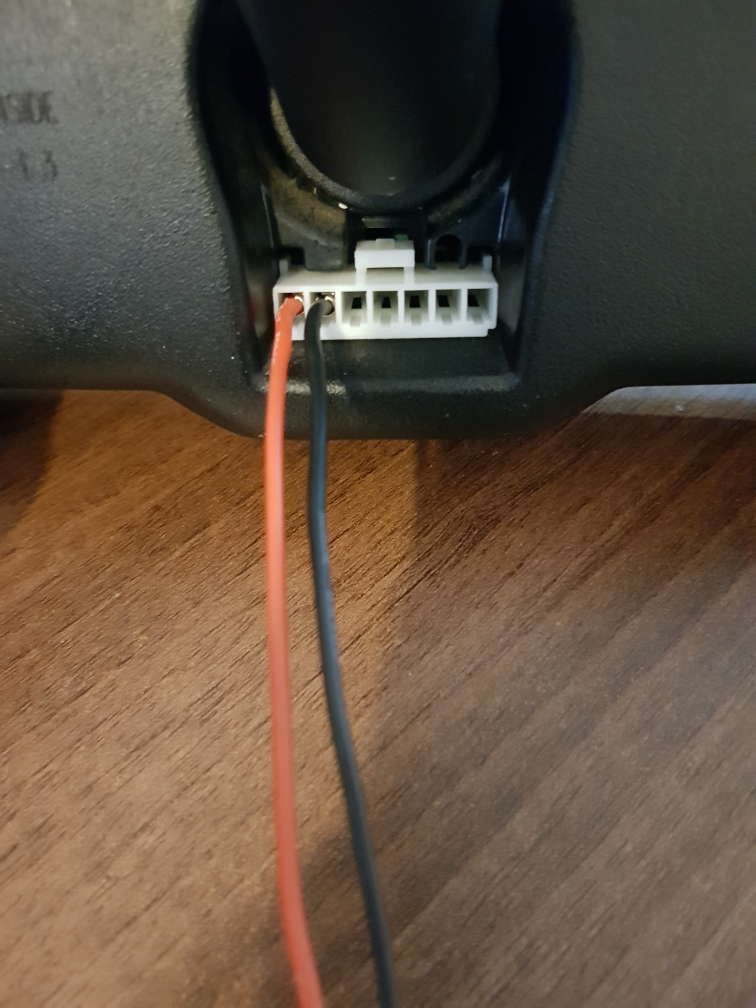
Now its time to move onto the car to remove the old mirror and install the new one.
My old mirror was held in place with a clip. To remove the old mirror, you need to insert a small flat head screwdriver into the cut out on the base and push up towards the roof with one hand on the screwdriver and one on the mirror, it does need some force but should come off. You should be left with a metal mount on the windscreen.

Now you can mount the new mirror which simply slides onto the metal mount on the windscreen. Then tighten the T20 screw to secure it in place, it doesn’t need to be super tight just tight enough to stop the mirror from moving.
Slide some heat shrink over the wires up to the connector and see how much you will need to hide the wires from view, heat it up and shrink it down I used a heat gun for this.
You can use electrical tape but heat shrink looks cleaner. Now start to tuck the wires into the headliner.
There’re multiple places to get your positive and negative feed from but from the research I’ve done the dome light area isn’t advised as the module controlling it isn’t great.
I’m going to be using my head unit for the power supply. That way I’m not splicing into factory wiring as I will splice into the adapter harness for my head unit. You can also use an Add a fuse for a positive or one of the cigarette lighters. For a ground any bolt on bare metal should suffice, you can also splice into an existing ground. I am going to use the bolt method as there is already a grounded wire for the head unit in that area.
After removing everything to get to the back of the head unit you will now want to run your wires from the mirror to the head unit. Start by tucking the wire into the roof liner all the way to the passenger A pillar. Remove the A pillar with a trim tool and put it aside. Get some electrical tape and tape your wires to the existing loom so that they can’t pop out of the trim.
Now the tricky bit, you need to feed the wires down to the passenger footwell this is where having 18 AWG would make things slightly easier or if you have an old wire coat hanger you can tape your wire to it and feed it that way. I didn’t have one so I had to feed them using gravity and patience. Once you have got both wires into the footwell, tape them together to make it easier to zip tie them down so you don’t have wires dangling in your footwell, leave enough for the ends to move around a bit though. Now feed the ends into the head unit area.
Now to check what wire you need for power. In my case it was the red wire in the adapter harness but it could differ so use a multi meter to check what wires have power when the ignition is on and also make sure that they don’t have power when it is off.

Disconnect the battery and splice your power wire, make sure you have good wire strippers as mine just pulled the wire apart!
Now you have 3 options
1. Wrap the power wires around each other and electrical tape them. (not recommended)
2. Use a butt connector
3. Solder the wires together (recommended)I used a butt connector at first but it wasn’t very reliable so I went back and soldered it.
For the ground use an eyelet connector and crimp it to the ground wire, there is a few places to mount it in the head unit area so just pick a bolt/screw and mount it there.
Now to test if everything is working, if you have done everything correctly then the mirror should have a green LED lit up and if you shine a light on it the mirror should darken. If the mirror doesn’t do this recheck your wiring and try different grounds. If it does do this then it’s just a case of putting everything back together.
There you have it, a 350Z with an auto dimming mirror which should have been fitted from factory.
Hi great write up. I was thinking there got to be a way to add auto dim to the mirror. I stabllex across ur post. I have tow question
1 why didn't u take the feed from the cigarette lighter port. Instead ot the audio set up.
2. If I wanted to wire the reverse pin could i connect that to revers switch on the gear shift.
-
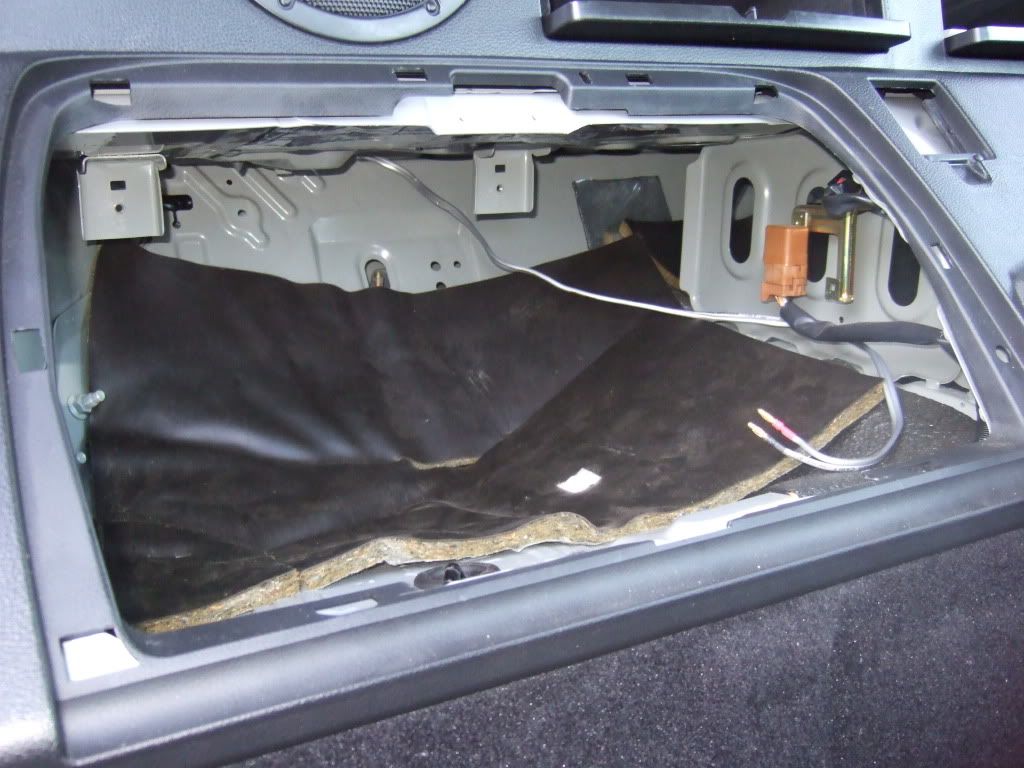
On 03/04/2020 at 10:43, Cn12345 said:
Hey guys,
Im looking at completely upgrading the stereo in the 350z. I have recently bought a new pioneer headunit, JL audio c1 rear speakers and JL audio c1 components for the front. I’m looking at getting a new sub as my JL 10” sub annoyingly won’t fit in the existing cubby behind the drivers seat. Do any actually fit perfectly in the cage?
Thanks
Hi would be interested to know of you found a solution fir the sub?
-
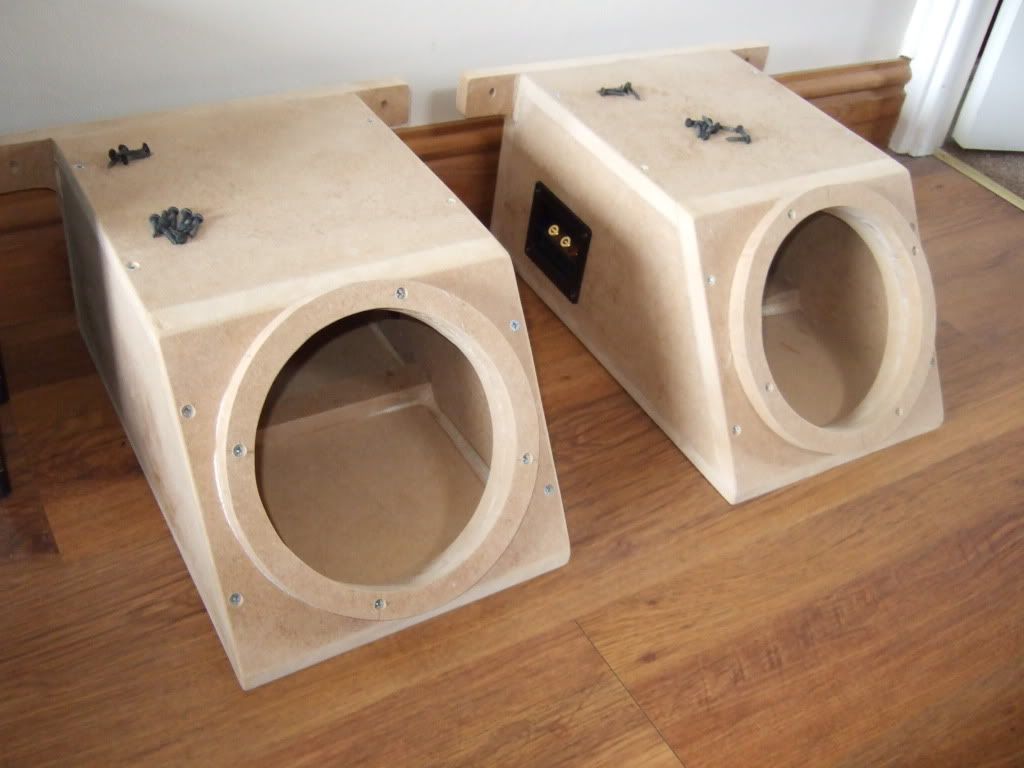
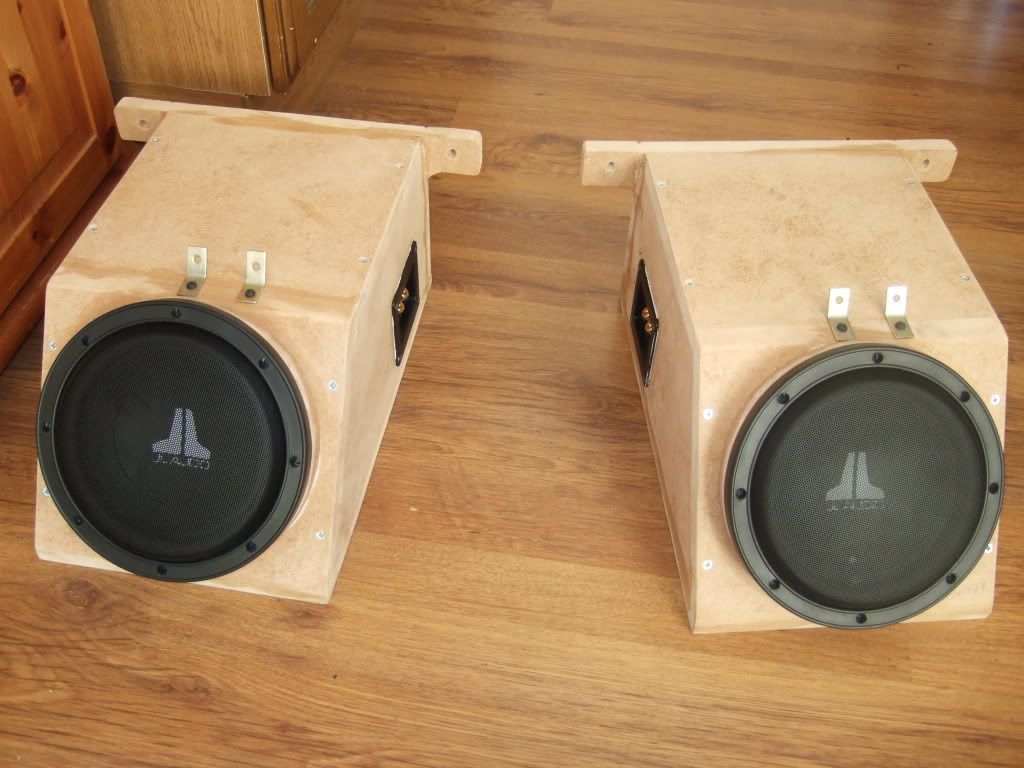
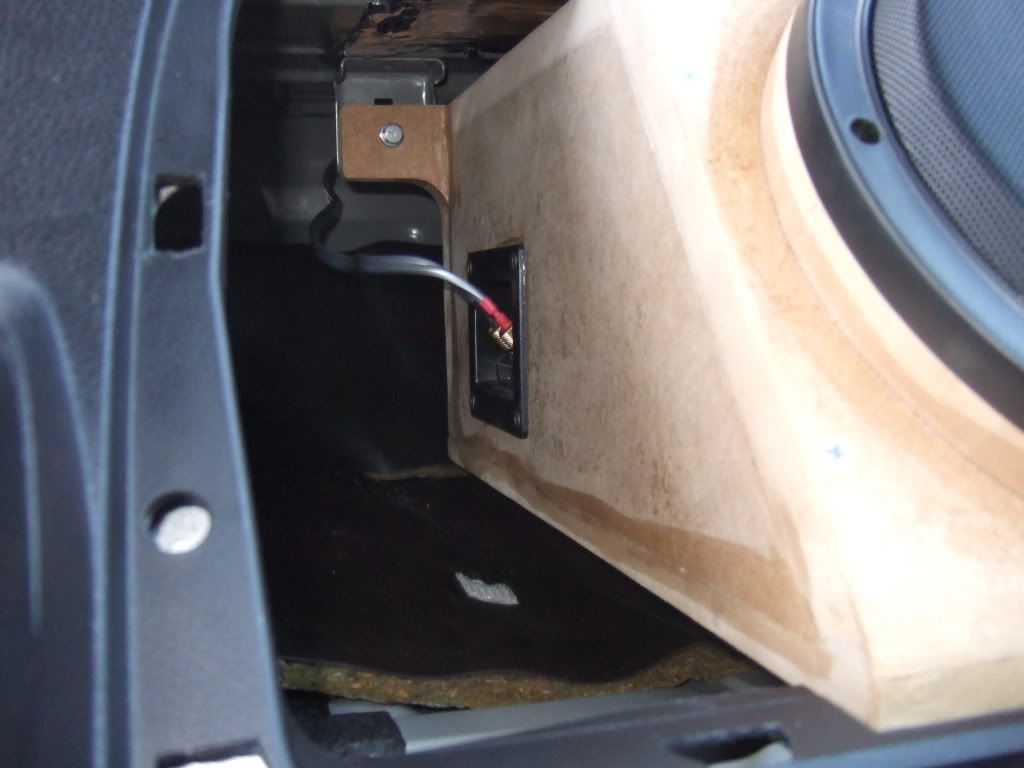
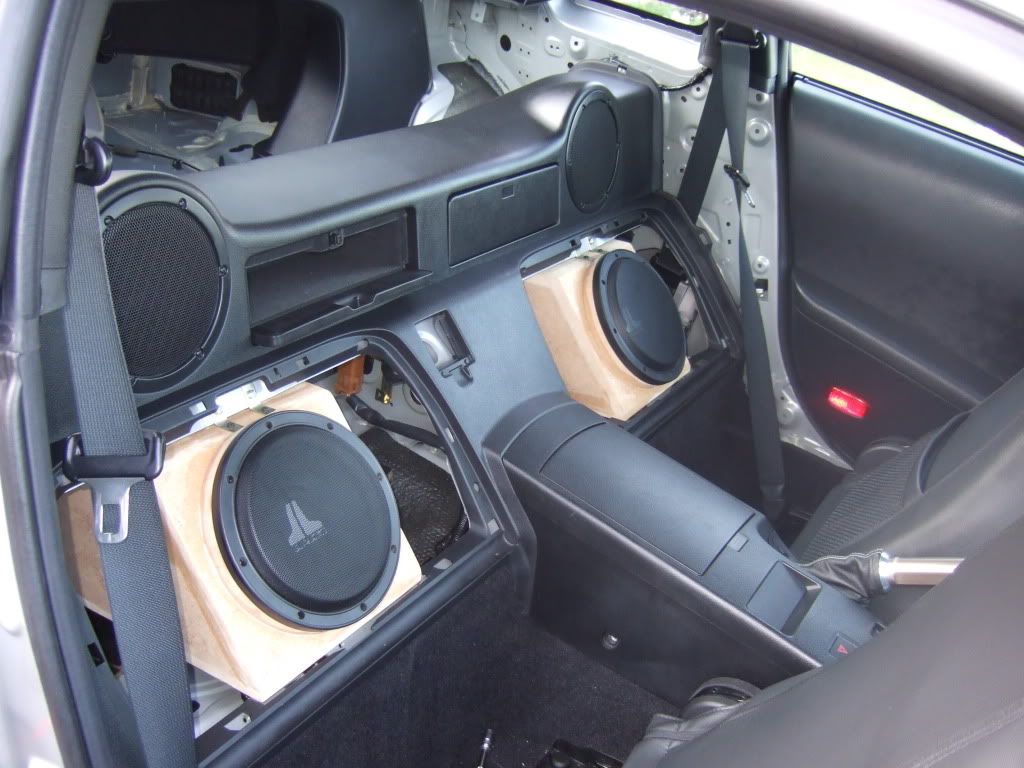
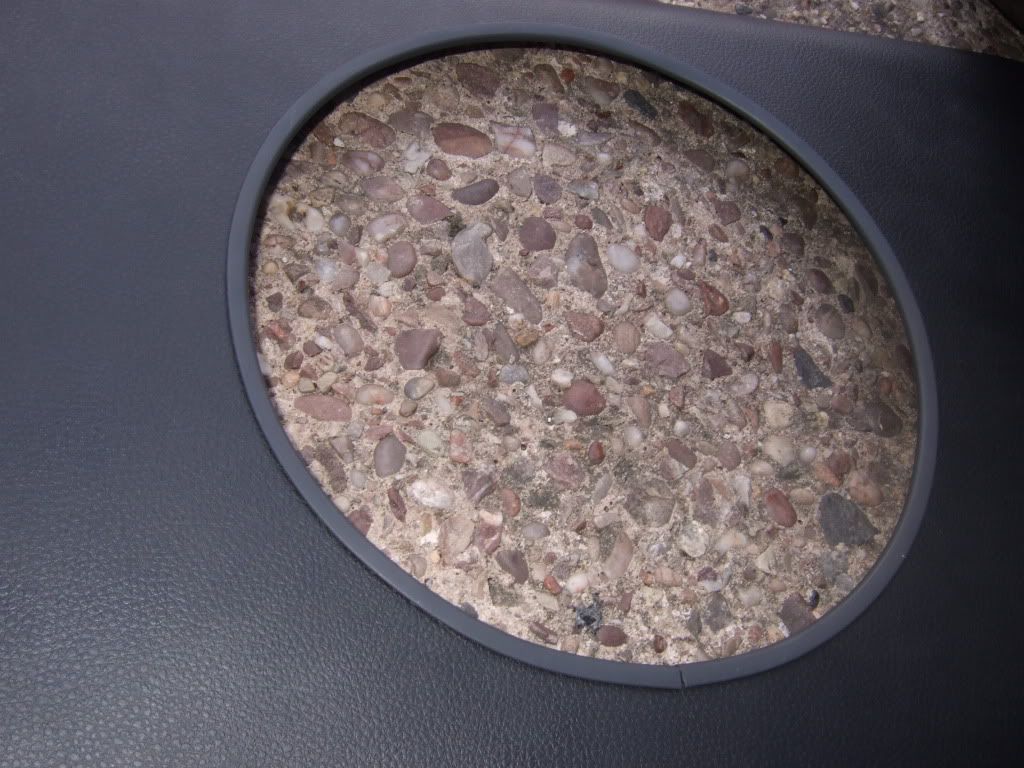
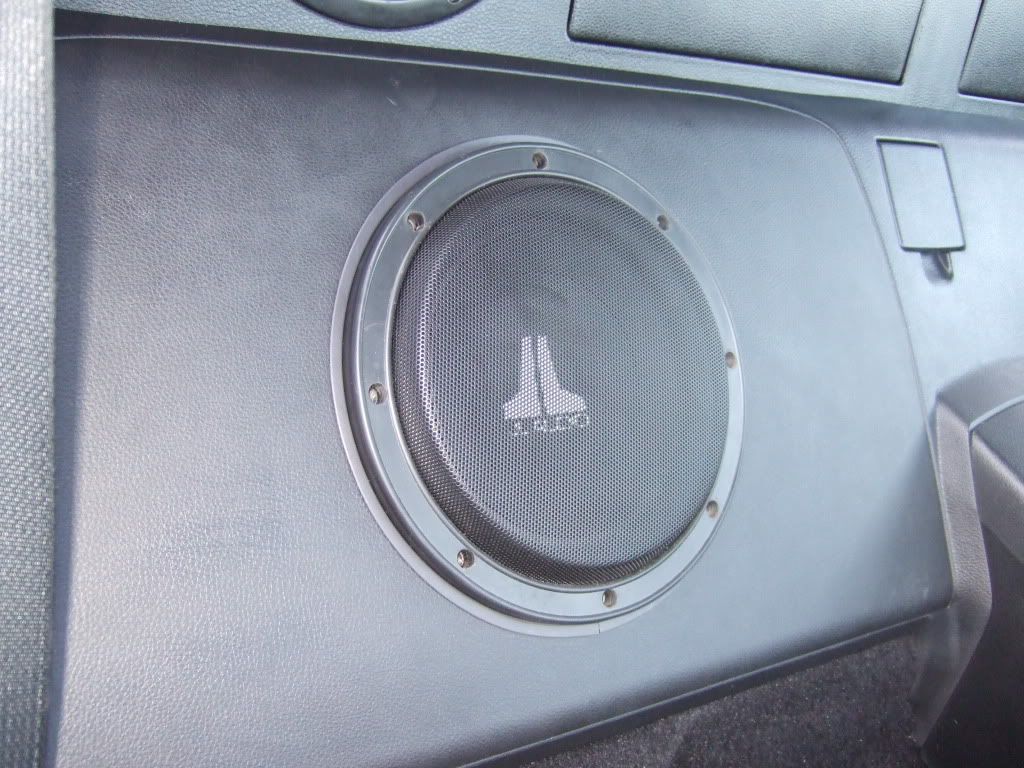
On 09/03/2010 at 06:25, ikarus said:
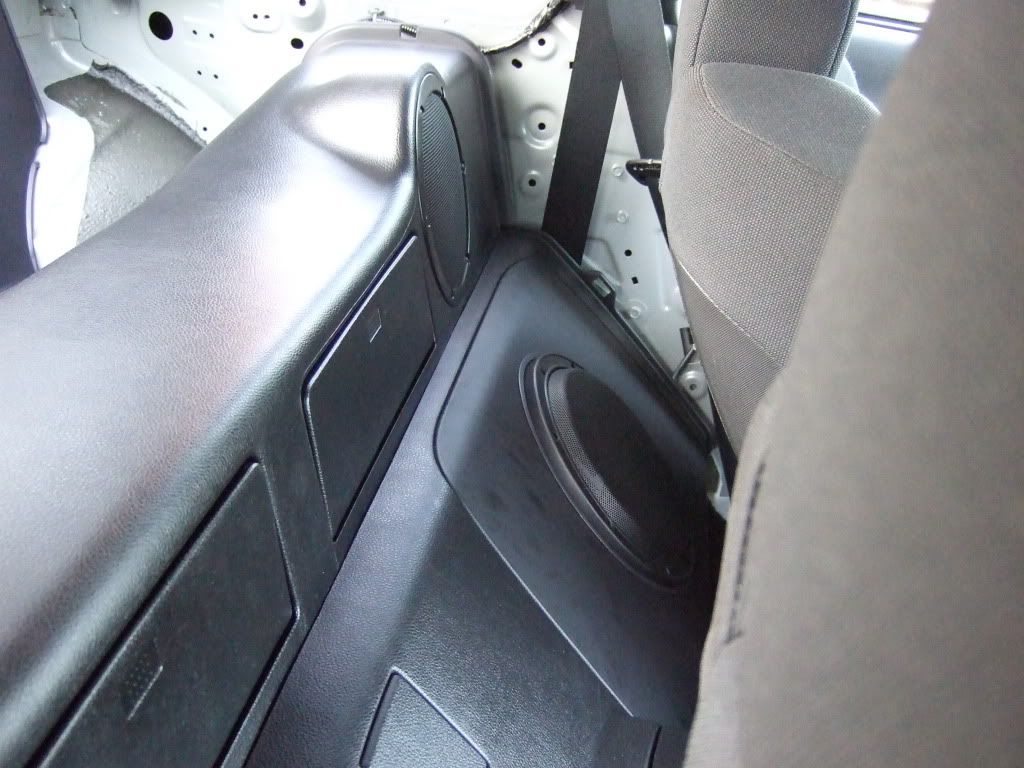
Here are my enclosures. I designed them and built them myself and are sized to volume match a sealed 8in JL8w3v2 subwoofer. The volume for each box is 10.6 ltr (0.375 ft3). The design of these is such that the can be removed easily, with only 4 machine screws and 2 bolts per unit. I had to purchase another blank cover from Nissan to finish the side which had the glove box, but it wasn't expensive and the end result was what i wanted. It actually took about a month to design and refine these untill the fit was just right, plus i used 3D CAD to ensure the volumes were perfect for the subwoofers. The idea at all times was to look 'in keep' with the car - ie not too much flash, but also get the build quality and volume spot on for optimum performance.
http://i254.photobucket.com/albums/hh85/dm_ikarus/350z/350zICE/CabinSubsFitted004.jpg
Space for encolsures
http://i254.photobucket.com/albums/hh85/dm_ikarus/350z/350zICE/cabinenclosures009.jpg
http://i254.photobucket.com/albums/hh85/dm_ikarus/350z/350zICE/CabinSubsFitted001.jpg
http://i254.photobucket.com/albums/hh85/dm_ikarus/350z/350zICE/CabinSubsFitted008.jpg
http://i254.photobucket.com/albums/hh85/dm_ikarus/350z/350zICE/CabinSubsFitted013.jpg
In location
http://i254.photobucket.com/albums/hh85/dm_ikarus/350z/350zICE/CabinSubsFitted015.jpg
Cut and edged Nissan trim
http://i254.photobucket.com/albums/hh85/dm_ikarus/350z/350zICE/CabinSubsFitted016.jpg
http://i254.photobucket.com/albums/hh85/dm_ikarus/350z/350zICE/CabinSubsFitted018.jpg
http://i254.photobucket.com/albums/hh85/dm_ikarus/350z/350zICE/CabinSubsFitted024.jpg
As per CAD design, total stealth no flash install
P.S. If you are intending to install a 10in or 12in sub in there check with the manufacturer what their recommended sealed enclosure volume is - there is not a lot of room

I just bought a roadster version and was thinking on updating g the sub for a bit more of a thump. At the same time I thought could I fit second sub and would it make an improvement. They I stumbled across your post. Great job by way. Do u find a major enhancement with dual subs.
-
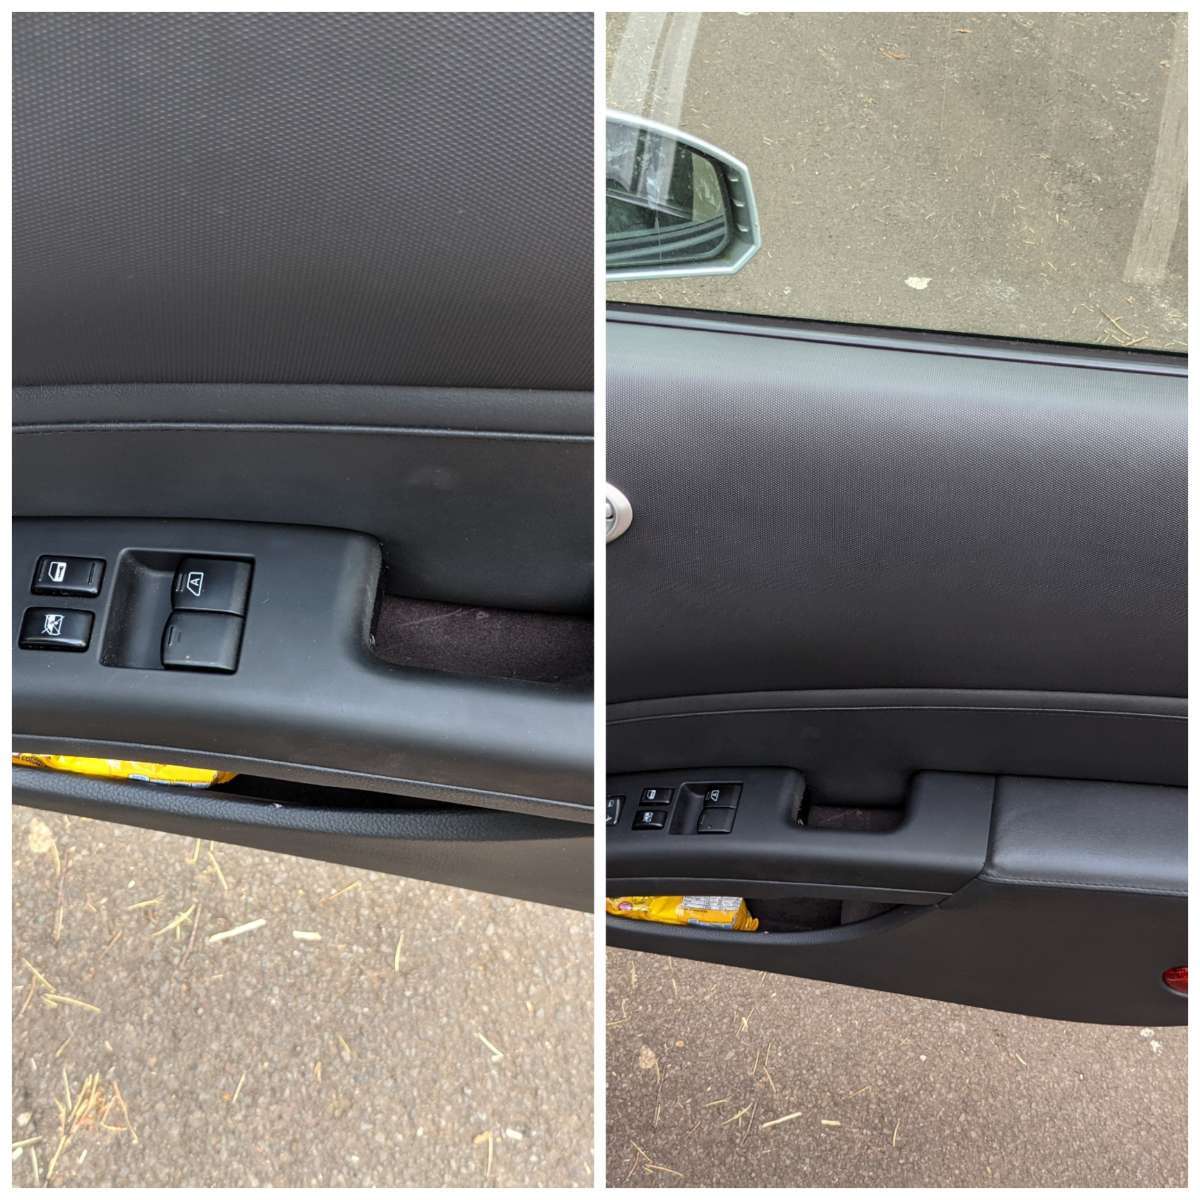
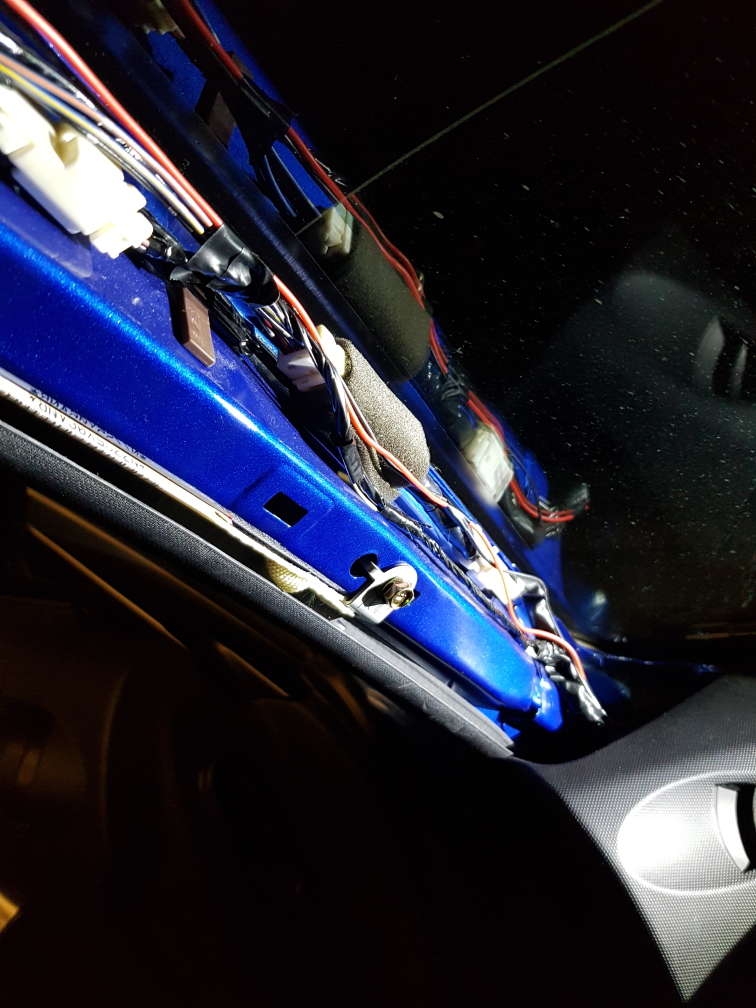
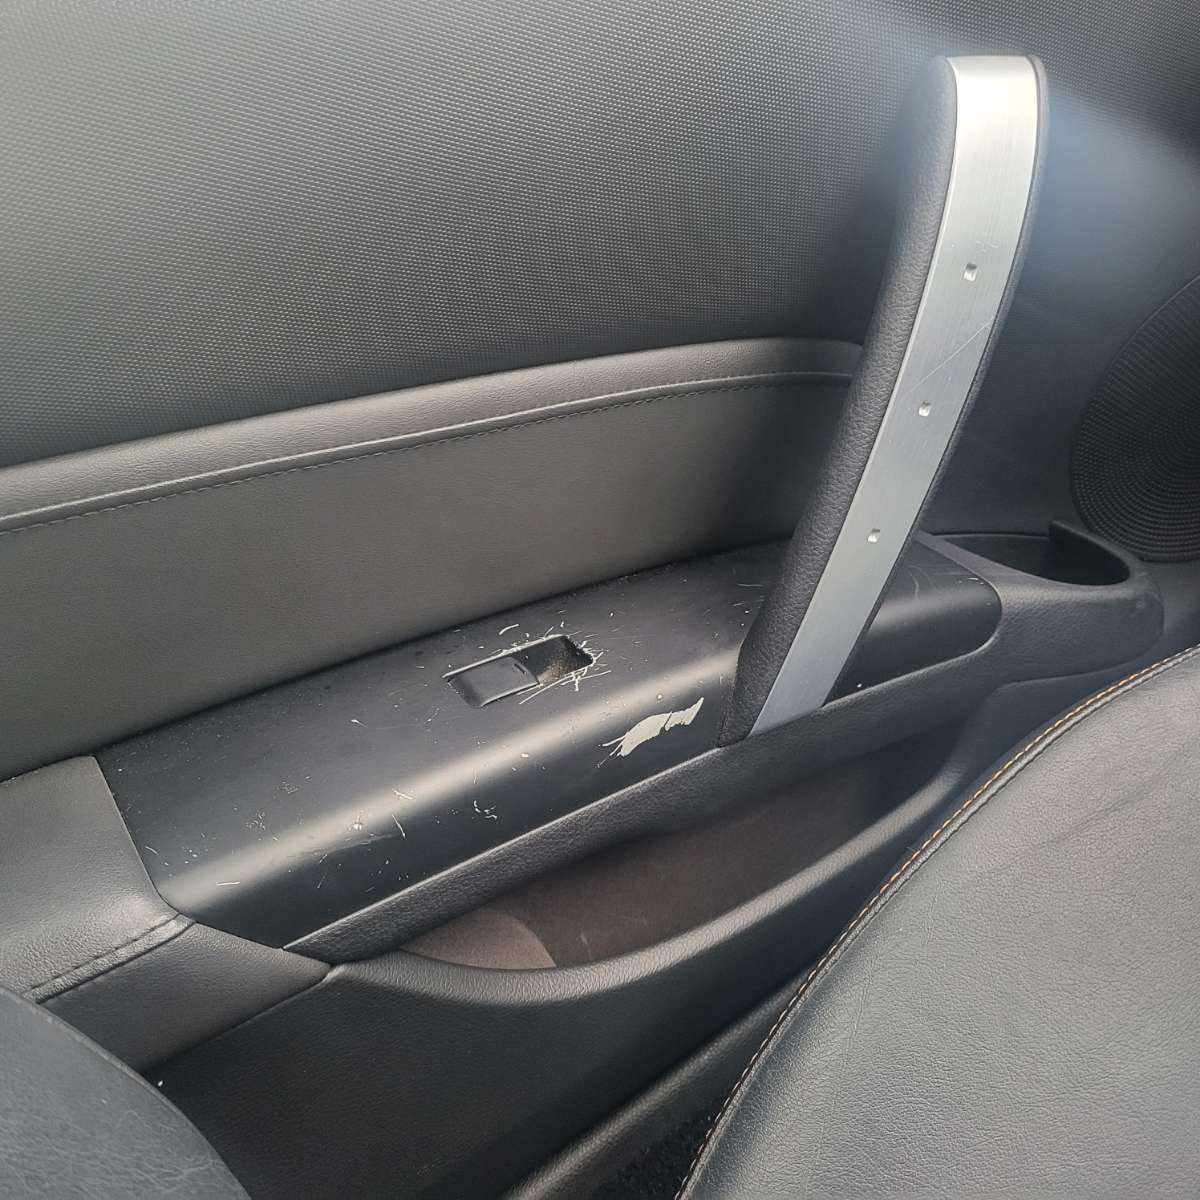
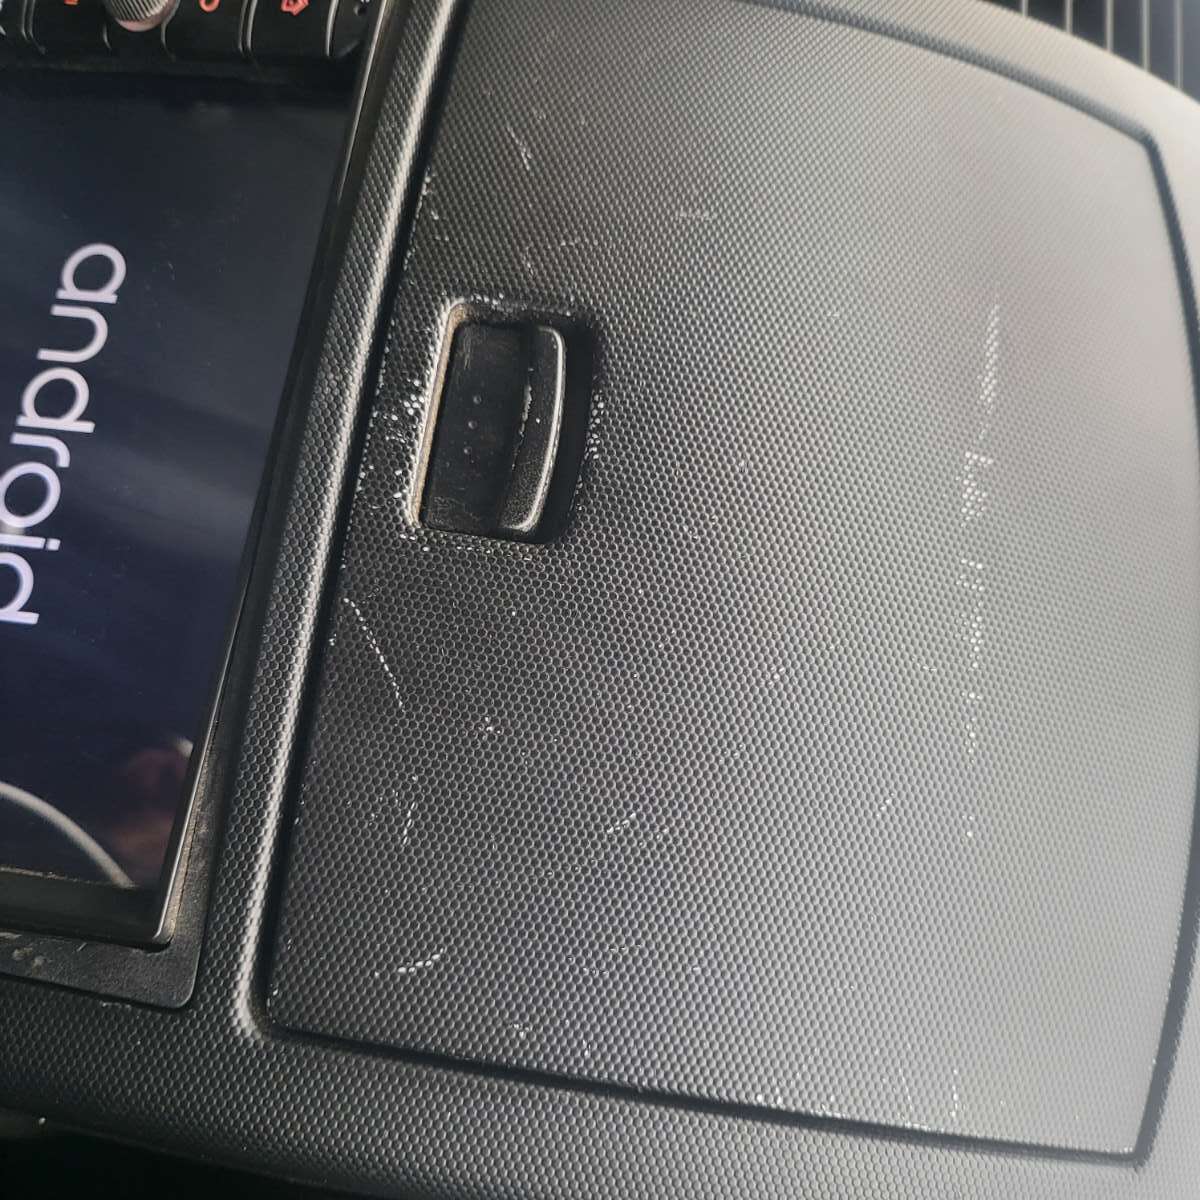
Hi guys I bought a my first 2007 350z. The car is generally in good nick but the inside dash need and door handle need a tidy up see pics. Ideally I'd rather rejuvenate then replace the parts.
What option or advice so you folks have.
-
On 28/01/2019 at 10:23, PPod said:
Seen this for £3k
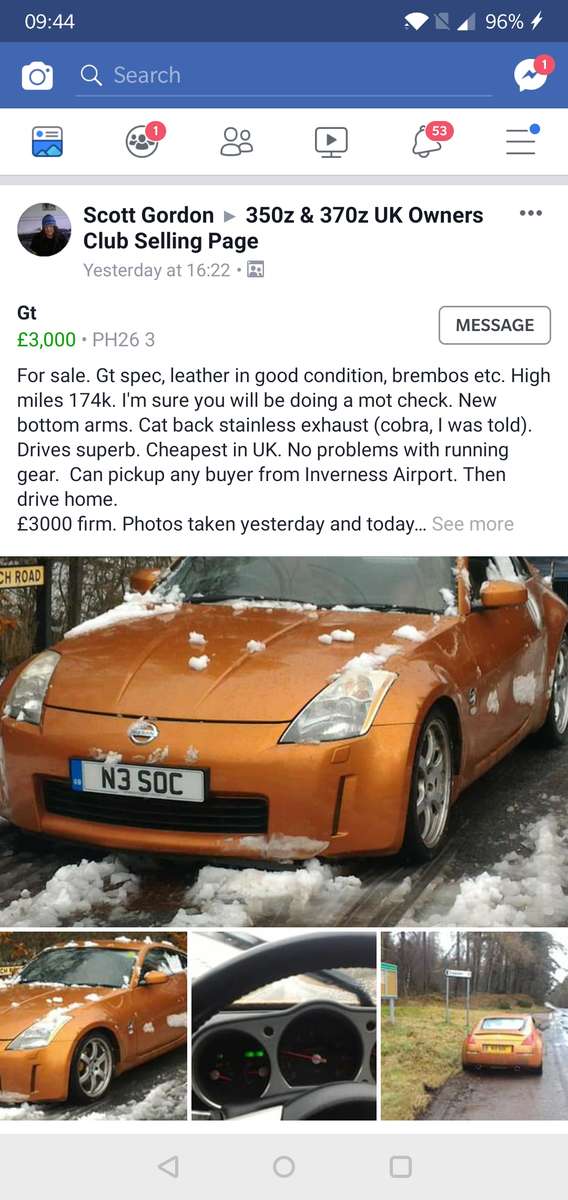
Ok this car in in Scotland... a flight away from me... I need something closer. Bit thanks.
-
13 hours ago, GranTurismoEra said:
5k is a better guide for a decent spec
Yeah I am coming to the realisation that i will have to up the budget, only question is, how do I sneak this past SWMBO...
-
On 24/01/2019 at 22:19, coldel said:
Don't worry about imports and insurance, its a bit of a myth that seems to still be doing the rounds. Go to a specialist insurer rather than some faceless generics ones like Admiral et al. and insurance is fine. A quick google shows autos as being around 0.3 to 0.5 seconds slower 0-60 sprint but to be honest if you are not tracking it then when are you ever going to notice?
An recommendation with regards to insurer... id rather go with a known name the a googled name
-
On 28/01/2019 at 10:23, PPod said:
Seen this for £3k
Thanks I'll have a look but the high miles do scare me... thanks for the heads up... roup seems to be locked so I've asked if i can be allowed access
-
On 24/01/2019 at 22:34, Jack94 said:
Rust on the rear arches is one of the main things I'd avoid if you can. Front wings aren't so bad because they're cheap/replaceable but the rear is part of the body so can be very expensive if rust has to be cut out and new plate welded in.
Thanks... I have passed on it but i will keep hunting for the right one...
-
I have seen one for around 4 that had new pads and clutch fitted.. But has a bit of wheel arch rust just bubbling up. From the pics I'd say no bigger then 5p on the rear arches... in side looks good though. It's a GT pack.
-
1 hour ago, Rikz2004 said:
Aren't Autos quite a bit slower than manuals? (Genuine question.)
I didn't think there isnt much in the way of difference... But have the advantage of not being thrashed. I could be wrong.
Running aftermarket speaker wire to the doors
in 350Z Guides
Posted
Hi was it worth doing, with all the effort