

Hodaka
-
Posts
661 -
Joined
-
Last visited
Content Type
Profiles
Forums
Events
Gallery
Store
Posts posted by Hodaka
-
-
Been super inactive recently due to personal stuff, but I've gone ahead and fixed the pictures for this thread. I've put them on my own hosting, so they shouldn't go down in the future.

Absolutely fuming about PhotoB***end's decision though... So much stuff to sort now....

-
Each to their own I guess. I bought my set for 58 pounds mid April last year and it's still sitting in my garage!

-
Black door handles
Pretty nice condition IMO. If I didn't already have a spare set for painting (bought it ages ago......) I'd definitely be tempted!
BIN: £69.99
Postage: £0.99
http://www.ebay.co.uk/itm/Nissan-350z-Pair-Of-Outer-Door-Handles-In-Black-/142272593563

-
Rays x4
Current bid - £0.99
# bids - 1
Ends - 9 days 21 hours
Location - Twickenham

-
No probs and enjoy your present!
-
New Z
in Other Cars
Woooooooo~ Look forward to seeing how it turns out

-
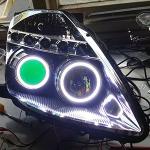
Gosh, lots of headlight talk in the last 1-2 days!
From the sounds of things, I take it you have a pre-facelift? If so, the high beam's powered separately from the low beam, and nope, it's not powered from a ballast. The ballast takes the 12v and ramps it up to very high voltage for the xenon, whereas the high beam will power directly from the 12v.
Also before I continue, when you say you checked the socket for voltage, did you mean the bulb socket?
 If so, I definitely wouldn't recommend you do that due to risk of shock!
Anyhow, to me it does indeed sound like a ballast issue. First thing would be to check the voltage at the connector, so I'm afraid it's a bumper & headlight off job as far as I know.
Once you've disconnected the headlight in question, take a voltmeter and carefully check the voltage for the xenon at the connector. Might be worth asking a friend to turn it on while you're checking with the voltmeter, so you can be sure you're happy you have the right connections before powering it.
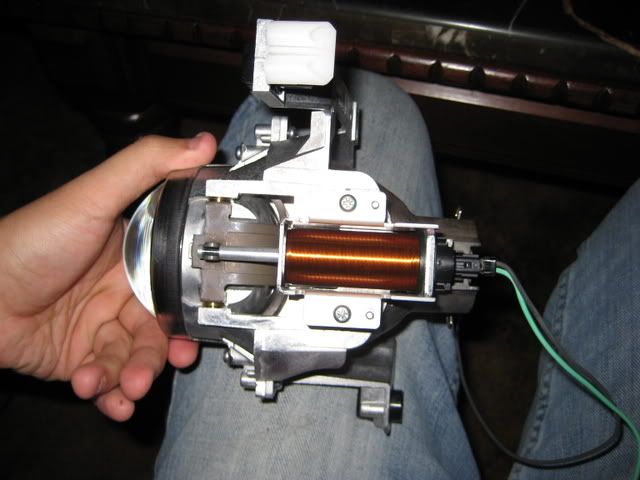
This is a pic of the connector on the headlight side on my 2004. You need to check the car side, so it'll be the mirror image (?) of the below. Also note the clip is on the bottom side of the pic.
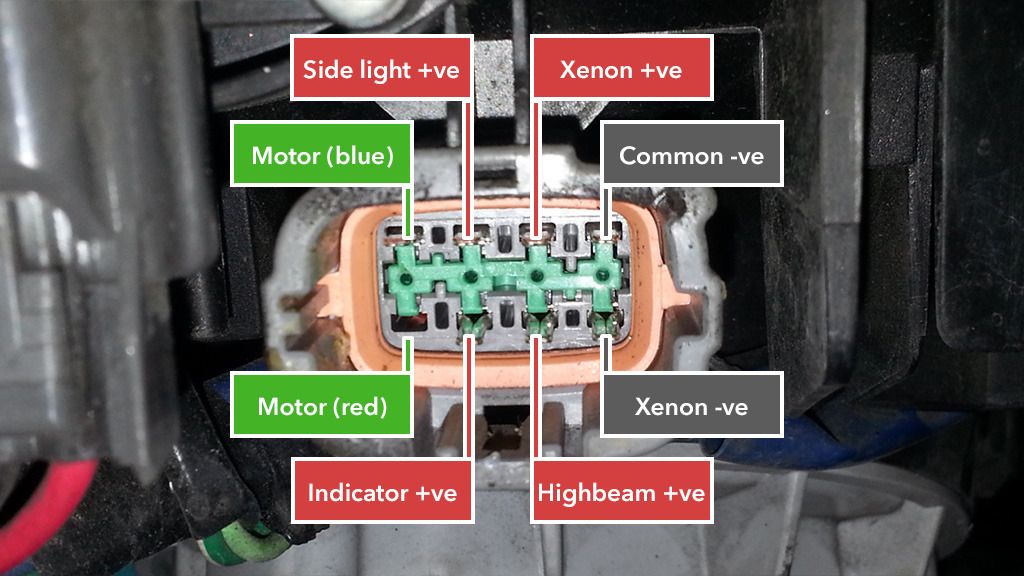
If you measure 12v at the connector when your friend powers it on (might be worth asking him to turn it on and off a few times and checking the voltage changes accordingly to ensure you're measuring the right thing), then it's a ballast issue as you've tested the bulb already.
If you don't measure 12v there, then the problem is on the car side and I have no idea how to fix!

In terms of your HID kit, you could use that if you're comfortable wiring it up. Just a few things off the top of my head you should be aware of:
- Unless it's a reputable brand (and maybe even if it is), your HID kit ballast will take longer than the OEM ballast to warm up
- It might be worth checking that the ballast has been potted properly, i.e. is properly waterproof. To be honest, I didn't bother with mine as I was being lazy and I thought I can replace if needed
- The OEM ballast sits on the bottom of the headlight and covers up a hole, so even if you use your own ballast you'll need to either keep the OEM ballast there, or seal up the (pretty big) hole.
- Related to the above, you'll also need to find a way to feed the wire in
- Obviously, the connectors will be all incorrect (H7 instead of D2S, the input wires being spade connectors etc...) so you'll need to sort those
- If you do need to add any wires, make sure they're rated to handle the current
- The above is under the assumption your ballast is a 35W one
Personally if you're not sure, I'd recommend getting a OEM ballast. They seem to be in the £50 - £80 range on eBay, which is better than the possibly hurting yourself!
- Unless it's a reputable brand (and maybe even if it is), your HID kit ballast will take longer than the OEM ballast to warm up
-
Yeh, I turn 40 in exactly 8 days, and that's about right on the budget for a pressie request from wifey. Then I'll finally have to figure out how to replug the loom on the lights (I have a base halogen model, to make things more fun. I've seen that US thread with the pinouts, I'll figure it out).
Definitely a nice present, I'd be very happy with those!
Just quickly concerning connecting it to your car. I'm not sure about validity as I didn't need to bother checking on mine (came with xenons from factory), but I heard some people saying that the stock wiring loom for cars with halogen bulbs can't handle the current required for xenons. If you do need it, I know there's xenon relay harnesses available that use relays and power the ballasts straight from the battery to minimise risk.
I think it's worth looking into.
-
No probs. Let us know how you get on
-
Pair of facelift headlights anyone? Spotted while replying to another headlight topic on here.
(cant link image, its huuuuuuge)
http://www.ebay.co.u...e-/162368001631
£700
Which topic would that be?
"Immaculate" headlights, sticks up a super bad picture to showcase them

-
The flaps are curved by the way to match the curvature of the glass lens so you cant turn them around as such. You would have to grind/cut them flat or (as i planned on doing) attach some aluminium foil over the the step to smooth it flat.
Just to add to Sargara's point, if you grind / cut them I'd still suggest you wet sand them and try make them as smooth as possible. As it's a projection, any imperfections are magnified and become super obvious!
@Sargara - Aluminium foil to flatten it would definitely work, but thought I'd mention that it would reduce the overall light output a bit. Also I'd personally opt for aluminium sheet rather than foil. Although it might be fine, I'd be worried that the foil would bend a bit from the solenoid movement.
Oh and I just remembered, some people use aluminium cans to cut shields out of, so you could use that! More sturdy than foil, easy to cut and as a bonus you get a drink out of it! Some people use scissors, but another method seems to be to run a scalpel over it a few times.
JVX is a guy who's very reputable on HIDPlanet. There's a guide here of him modding a Honda S2000 headlight. Not applicable for bixenons, but the way he used the can might be of interest.
-
*Edit* - Took too long to type so others have beaten me to it! Sorry for some repetition!

From my limited knowledge, I believe your main area of concern is the step. The output from the projector is set in a way so that it's lower on the side that faces oncoming traffic.
So for the UK for example, the output should be like this:
In Greece, it should be the exact opposite.
The thing which creates that shape is called the cutoff shield. It's placed in the middle of the projector, roughly (?) midway between the reflector bowl and the lens. These aren't my pics, but you can see it through the bulb "hole" below. This is taken from the back of the projector:
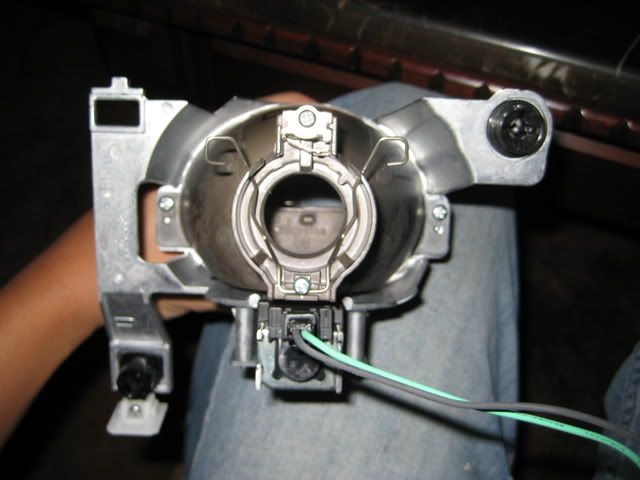
The cutoff shield will be hinged, and a solenoid attached so that when activated, it pulls the shield down exposing more light for your high beams. This is a pic taken from underneath, which shows the solenoid + shield:
So from the top of my head, you have a few options:
-
Mod the shield - This won't be an easy task for sure, but you could file + sand down the shield to remove the step, then add a new partial shield using a piece of aluminium sheet. These don't have to be thick, and can be cut with regular scissors. Potential issues I can think of:
- The piece of aluminium needs to line up with the rest of the shield (in terms of forwards/backwards) to ensure the centre of the beam is in focus
- The piece of aluminium needs to curve in the same way as the OEM shield to ensure a clean cutoff (i.e. focused) from side to side
- The piece of aluminium needs to be aligned vertically correctly, else you'll get a 'smiling' or 'frowning' output
[*]Replace shield - From what I hear, the bixenon projectors in the 350z are extremely similar to the Murano projectors. If you can get your hands on these projectors, you may possibly be able to transfer the shields over. This would probably be the easiest in terms of work needed, but challenging to find the donor projectors themselves.
[*]Replace the projector - Buy some headlights from another car and replace the 350z projectors with these. This will be a lot of work as you'll almost certainly need to create custom brackets, line it all up etc...
- The piece of aluminium needs to line up with the rest of the shield (in terms of forwards/backwards) to ensure the centre of the beam is in focus
Personally, I think modding the shield is the best option for correcting the cut off. Plus, if you want to correct the cut off, it's either mod or replace anyway, so you may as well try modding first.
A lot of work, that's for sure!
If you do go ahead with it, I'd look into changing the fresnel lens to a clear lens as well to get a sexy, sharp cutoff line. Could also do a "colour mod" as well, where you lose a bit of sharpness but gain a band of blue along the cut off. Obviously up to you though as it's personal taste!
Here be the colour mod:

Happy to bounce ideas if you do go for any of the above ideas, although my experience is limited to 1 set of headlights I modded.
-
 2
2
-
Mod the shield - This won't be an easy task for sure, but you could file + sand down the shield to remove the step, then add a new partial shield using a piece of aluminium sheet. These don't have to be thick, and can be cut with regular scissors. Potential issues I can think of:
-
Looking great!
-
Ill get another couple of pics tomorrow, also there is a further cog below the height adjuster...Thank you for taking time to reply
No probs at all, happy to help
As I say though, I'm no expert so just bear that in mind!It's hard to please Hodaka with headlight pics, I still havent been able to satisfy his exacting standards either
flat carpark, night-time, far enough away, non-coloured/brick wall thats smooth etc
Haha, sorry I'm a bit picky aren't I?
-
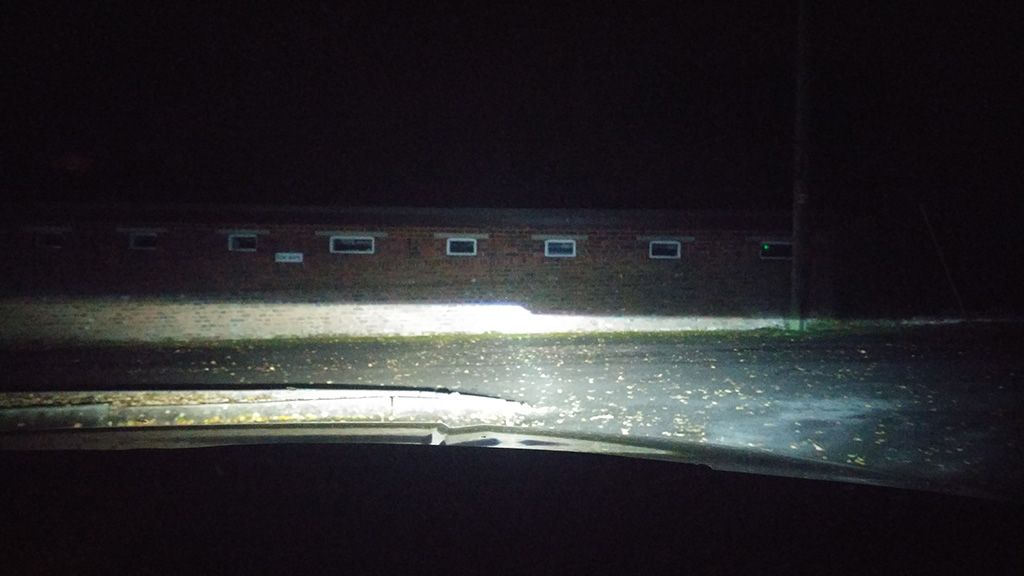
As Requested... Regards

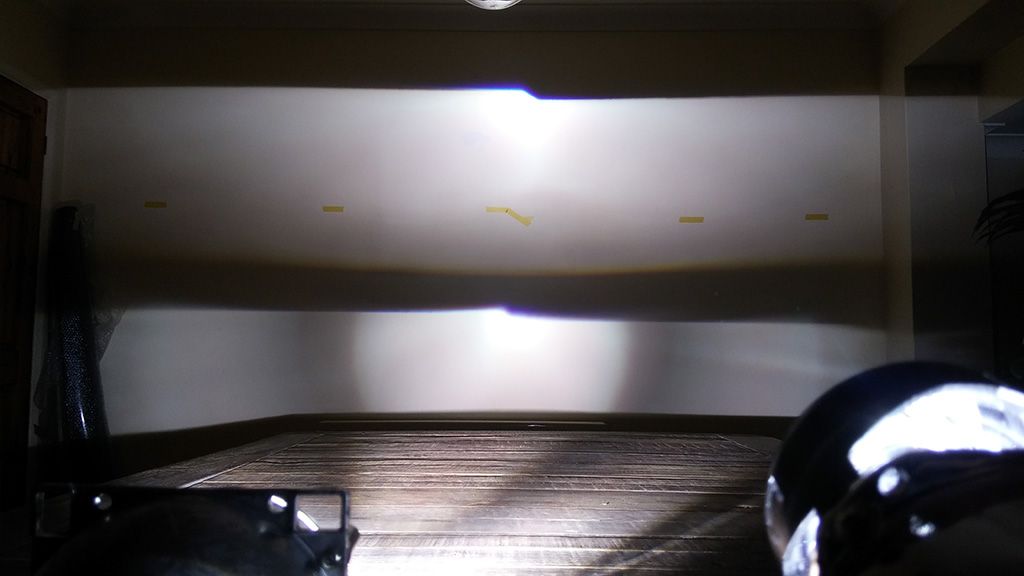
Hmmm... I'm afraid I can't really tell toooooo much from those, but it looks like you have an insanely intense hot spot. I say this not only because of the output on the wall, but also the light output on the ground. You can clearly see 2 beams, and they're both quite narrow. If that is the case, there isn't much that can be done. It's not due to bulb alignment, but more of the design of the headlight. It actually almost resembles the bad light beam that I showed you in my pic above (bottom of the 2), but slightly better as it doesn't have the circular dark patch.
Also it looks like the passenger side one is aimed very far right. I'd aim that further left if I were you.
Please take all of the above with a pinch of salt. I've been getting into headlights / projectors (weird hobby I know!), but I'm far from an expert!
In terms of pic, a little further back and against a flat wall would be ideal. Kind of like this but without bricks (if possible):
-
Ill post the MOT pass up in june
Ekona's right though. If your headlights are for LHD the beam pattern will be wrong, which would be a cause for failure.
 If you look at my pic above, the left hand side of the beam is higher than the right. If your headlight is for LHD, it'll be the exact opposite.
Poop picture as I couldn't be bothered to upload my own, but here's a pic from the MOT guidelines:

Or if you want to take a proper look it's in section 1.8 of this PDF.
Ill post the pics up shortly with lights against the wall and blue spot
Sounds good
-
No probs. You should be all set, but obviously just give us a shout if you do face any issues
One of the fastest mods I've done, but put a massive smile on my face afterwards

-
Mine were just plug and play on a UK car.I don't recall any extra plugs.
Yep, same here. I've installed 2 sets (on mine and another member on here) and can vividly remember there's 1 connector, which you literally disconnect from the old and connect to the new.
-
Yeah I do get the impression Depo is better quality than Spec-D / Junyan.
-
Depo? Or Spec-D / Junyan?
If it's the latter, it doesn't look like the bottom one on this does it?
-
You got a pic? Ideally against a wall from a distance of like 30ft.
-
-
Cheap Rays - £100 + £55 delivery (or free if collection)
Apparently badly reconditioned, so bear that in mind.
http://www.ebay.co.uk/itm/Nissan-350z-Rays-Forged-Alloys-/142245685775

-
its awful lol
Oh...
Well I guess I'll give it a go anyway, it's free after all!
*** TORQEN *** 350z DE, 350z HR and 370z High Flow Cats
in TORQEN
Posted
Please could you also plonk me on the list for DE? Will have to see how well fed (or more likely, empty) my wallet is when the time comes, but I'd definitely be interested!")