

CPhillips93
-
Posts
68 -
Joined
-
Last visited
Content Type
Profiles
Forums
Events
Gallery
Store
Everything posted by CPhillips93
-

Conor's Night Blue 350z 'Build Thread'
CPhillips93 replied to CPhillips93's topic in Member Build Projects
Thanks Although I have noticed in the sun there are a few 'buffer trails' left from the DA on the drivers' door which is a little disappointing. Perfect excuse to get the machine out again . I am also on the look out for some 25 and 30mm spacers to go with the new shadow chrome Rays that will be going on the Zed when mine sell! -
Conor's Night Blue 350z 'Build Thread'
CPhillips93 replied to CPhillips93's topic in Member Build Projects
Thanks mate, it is a big improvement but just wish I was a tad more aggressive! Go on to cleanyourcar.co.uk, there is plenty of choice and decent prices as well 👠I think the best price for them is on cleanyourcar.co.uk, got a good range of polishes and pads as well! I have been doing the same, can't beat black hole I swear by it 👠Yea much harder than using the machine -
Conor's Night Blue 350z 'Build Thread'
CPhillips93 replied to CPhillips93's topic in Member Build Projects
UPDATE As a keen 'detailer', one of the jobs that was at the top of the list was to give the car a machine polish to get rid of all the swirls and marring that the Zed had picked up prior to my ownership! I had previously attempted machine polishing before with a rotary on my old Clio 182 which I borrowed off of my mate, but decided to buy my own opting for the DAS6 Pro; a much safer option as opposed to the rotary alternative, especially with Nissan paint being so soft! Unfortunately, I picked the WORST day to clean the Zed, it did not stop raining all day! This forced me to skip my usual snow foaming step but it gave me the opportunity to try out a new product:- Essentially, CarPro's Trix is a combination of it's Iron X with a tar remover. Despite being stamped with 'new improved scent' it is the most fouling smelling product I have ever used... a horrid combo of perm and rotten eggs (hence my gloves)! Regardless, it is a very effective product, it removed the majority of what tar there was on the car, and from the distinctive run off that IronX produces it was clear that it also removed iron fallout. So as per the instructions I rinsed the car, sprayed (whilst shaking the bottle!) it all over the car and leaving to dwell for 5-7 minutes. I then agitated hard to reach spots. Due to the Zed's dark colour it was very difficult to tell whether or not the Trix was reacting but it was clear from the run off on the ground/wheels that it was working it's magic And rinsed before washing:- I didn't take many other photos from here as I was getting absolutely soaked and just wanted to get the Zed in the garage! Got the car into the garage and used another new purchase; Bilt Hamber clay which was very dirty after a pass on the bonnet Once I had finished claying I attempted to try and capture some of the worst bits of the paintwork I need a lot of practice in trying to capture the swirls and marring but I think to some extent the pictures do show how bad the paint was . And the weapon of choice:- I used Chemical Guys HexLogic Green pad combined with Meguiars #83 to start then finished off with Black HexLogic pad and Mezerna SF4000. Here is some afters:- And to top it off, used Dodo Juice Blue Velvet:- Overall I am glad I tried it out and although I don't think I have achieved 100% correction I still seem to have taken off the 'dullness' of the paint which hopefully I can keep on top of now and perhaps, if I feel brave, go at it with a bit more aggressive pad/polish combo I have also now put my wheels up for sale on eBay so that I can buy some shadow chromed Rays so watch this space Comments and suggestions welcome! Conor -
As the title says after some 25mm and 30mm for the zed to get a bit of 'poke' with the standard rays. Conor
-
Gtechniq C5 wheel armour - http://www.cleanyourcar.co.uk/wheels-and-tyres/gtechniq-c5-wheel-armour/prod_878.html May be £22 for 15ml but will be more durable than the cheaper wheel sealants out there. Here is a review on detailing world if you need persuading! http://www.detailingworld.co.uk/forum/showthread.php?t=189099
-
New black GT owner North Kernow
CPhillips93 replied to bencider's topic in Introductions & Welcome Messages
Welcome! I live in Par so will probably see you driving around 👠-
Conor's Night Blue 350z 'Build Thread'
CPhillips93 replied to CPhillips93's topic in Member Build Projects
Update (Albeit a small one!) Over the course of the last week I have scoured eBay long and hard to find LEDs to replace all the orange-tinged bulbs. I also was after a very very bright LED to replace the bulb the feeble excuse of a reversing light... Pictures speak louder than words Interior light:- Boot light:- Number plate lights :- Reversing light:- All in all, not the most exciting mod you will read on the forum, but in my opinion the LEDs make the car feel that little bit more 'quality'. The interior light now casts shadows on the cabin . Regardless the reversing LED is a big improvement, in the dark it lights up whatever is behind you, no doubt blinding anything with eyes in sight! For the sake of £10 for a LED it is well worth it. I have also got to get round to fitting LED sidelights as well as 'silver' indicator bulbs on the front and back but will get round to that soon. Conor. -
Just in case anyone else experiences this, I managed to fix it by leaving the fuse for the radio off over night!
-
After some help here and will try and keep it as brief as possible... I did the aux hack on Saturday to my Bose unit (07 model and is the clarion unit), and after finishing up the radio displayed "code in". I entered the incorrect codes 2 or 3 times (forgot in the end) and I had to wait an hour before it finally showed the "code in" again. However this time the head unit is not letting me enter anything at all which is frustrating as I have the correct code now. The owners manual isn't a great help and was wondering if anyone else has experienced these issues? For the moment I have taken out the fuse in an attempt to hopefully reset it. Any help would be appreciated!
-
Conor's Night Blue 350z 'Build Thread'
CPhillips93 replied to CPhillips93's topic in Member Build Projects
Thanks mate I will try, although like you, my mods are very much dependent on cash flow as I am attempting to save for a deposit for a house at the same time (bad idea I know!) Thanks I also called Nissan today (West End Motors in Bodmin for those curious) and it turns out that as long as you have the serial number and the model number of the stereo they can give you the code for free (yes you read that correctly ) so happy days! Also I will just leave this here... -
Conor's Night Blue 350z 'Build Thread'
CPhillips93 replied to CPhillips93's topic in Member Build Projects
Thanks mate, I don't want to go too overboard with it, more a oem+ look 👠Thanks I agree, make sure your battery is fully recharged. The radios aren't coded but they are paired to that vehicle's ECU I believe. Sent from my Zed using Nangkang tyres front, RE040's rear I have taken the car for a good spin now and the battery is sitting at about 13 volts on ignition now but the radio is still reading 'code in' so looks like a call to Nissan is in order tomorrow 👎 -
Conor's Night Blue 350z 'Build Thread'
CPhillips93 replied to CPhillips93's topic in Member Build Projects
Update - Aux 'Hack So today I set about finally getting an aux input into the zed. I followed the 'how to' guide on here ( http://www.350z-uk.c...pod-hack-guide/) but decided to put my own spin on it and bought a 3.5mm socket instead. The hardest decision was where to mount it in the car... at first I thought it would best to put it on the blank next to the heated seat buttons, but then I realised that as the aux would be pointing upwards it could be potentially broken. So next option was to mount it in the small glovebox by the seats, but again the 'false floor' that holds the bluetooth box would prove too difficult to mount to. In the end I decided it would be best to place it in the cup holders in the centre cubby . So following the guide I cracked on with removing the gear knob, which was too hard for my girly hands :- and hey presto the knob was off and so was the bottom of the centre console:- All four screws removed (although one was missing ):- Next on the GT models was to remove the plastic in between the satnav screen and the satnav controls revealing the screws holding down the controls:- Below these are two more screws (which I forgot to take a photo of ) and after a 'gentle' tug the whole console comes out to show 4 screws either side of the head unit which can be removed (also forgot to take a photo of this step, useless aren't I!). And out comes the unit, it looks bare! And just for good measure so did the centre 'island':- The next few steps were fairly ordinary and didn't really warrant any photos as it was fairly simple to get the tape deck out revealing the terminals on the circuit board. Onto the easy part... the soldering :- Obviously the photos skipped a few steps here as by the second photo I had already drilled out the whole in the centre 'island' ready for the 3.5mm jack socket. I also made sure I used a decent amount of insulation tape and heat shrink in order to keep the wires separate. I did however make the rookie error of not feeding the wires in behind the bar below the head unit so they just thread through between the bar and the head unit. If I have the unit out again I will use some crimps so I can thread it through and to make it easier to remove the head unit without removing the whole centre section. And the finished article:- I wasn't so sure at first on the positioning but it seems to be the best place to have put it but I will soon find out through using it. However before putting it all back together I went to test it and disappointingly the radio showed an 'Radio Code' message which at first I naively thought was no problem at all... I could not have been more wrong. It turns out that after searching through all of the documentation that I received I had no code for the radio whatsoever. So unfortunately both my radio is locked and I have no idea whether the hack is functioning or not. Also through leaving my door open (and consequently the interior light on) I have fried the battery and have also ruined the gear knob by trying to remove it So all in all a quite frustrating day But one slight positive, I managed to change over the heated seats switch so that they were on the 'right sides' Much better Comments and suggestions welcome Conor -
Conor's Night Blue 350z 'Build Thread'
CPhillips93 replied to CPhillips93's topic in Member Build Projects
I haven't seen many about, whereabouts are you based ? -
Conor's Night Blue 350z 'Build Thread'
CPhillips93 replied to CPhillips93's topic in Member Build Projects
Haha I tried my hardest to resist, honestly Thanks Thanks, I will make sure I keep everything up to date -
Hi everyone! My name is Conor, I'm 21 and currently living in Cornwall working as a legal secretary after graduating from uni this summer. I like to think of myself as fairly capable DIY 'mechanic' and so hopefully most of the plans I have for the car will be put in place by myself The reason I have put build thread in inverted commas is that I would refer to this thread as more of a culmination of pictures of the cars progress opposed to an actual car build! Anyways, here is a link to my original intro - http://www.350z-uk.c...l/#entry1375604 Update *PIC HEAVY* When I bought the car it had a few niggly things wrong with it; little stuff like scratched interior door handles and the drivers door vent was broken. So I immediately got on ebay and 350-uk in order to find an 'intact' door vent. Unfortunately there was only 1 available on ebay which meant that it would set me back £25 for my troubles... however I had more luck on here finding one for £15, ideal! And so got to fitting it! The 'culprit' To remove it I needed to remove the interior door handle (you can tell from the photo the extent of the damage to the door handle ) Under the handle it revealed two 10mm bolts Next to be removed was the plastic 'blank' under the door handle To reveal another 10mm bolt And then from there it was just a matter of prising off the door card! And once this was removed it was just a matter of removing wires for switches and the wires for the lock/exterior door handle leaving this mess! All that was left to do from here was to simply unscrew the vent from the back The new and the old and all in the reverse order to leave it like so Much better Plans In the short term I don't want to go absolutely mad with the ol' girl, I just want to enjoy her for the moment! But in the long term I have a few ideas Aero wipers (which have now been done, not really an exciting picture!) - Done Stubby aerial - Done 'Aux hack' - Done LEDs all round - Done Spray the interior handles - bit of a toss up with satin black and a metallic black any opinions? Parking sensors Clear front reflectors Get a weighted gear knob, replace the gear gaiter and get a handbrake gaiter 350z branded boot mat Get some braided lines, drain the fluid and up date the brakes all the way round Bonnet dampers Refurb the wheels - Done And potentially replace the exhaust when it falls off I intend to update this thread as and when the above plans happen, hopefully they will come thick and fast I will just leave you with a pretty decent beadage shot Comments and suggestions welcome Conor.
-
Hi guys, After a passenger side front wheel arch liner which sits on the door side not the side that sits on the bumper! Managed to have a stone rip through mine 😠Thanks!
-
New Z owner in Cornwall!
CPhillips93 replied to CPhillips93's topic in Introductions & Welcome Messages
Thanks everyone! The 182 had the cup Turini's, refurbed in shadow chrome! I also lowered it on Cooksport springs, which were the best ones available. Lowered it about 30mm and improved the handling massively -
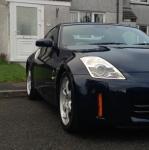
Hi everyone! So after months and months of deliberation I decided that it was time to sell my old car, a Clio 182. I had 2 good years with the old bird, and she treated me well. Anyways, I sold the 182 to a guy called Dan who came and viewed and bought the car on the same day, I was shocked to see her go after all the great memories she gave me! Here she is in new ownership Nonetheless, I felt the need to move onto something with a bit more about it... I looked at countless ads on Autotrader and Pistonheads, at s2000s, Evos, 535d, 335d, 350z, just anything with more bhp than the clio! I narrowed it down to either a s2000 or a 350z as I didn't fancy growing old before my time just yet! So I went ahead and test drove an s2k that was local and to be honest I wasn't all that impressed; it drove great but didn't have that low end grunt that I was looking for. The cabin was also very small, and I am only 5'12"! Aside from that it for the money you didn't get a lot of "creature comforts". So I looked at 350z's and fell in love! For the same amount of money you can get so much more! So I scoured the ads for exactly what I wanted; a low mileage example of the 313 HR model, with GT pack preferably in blue or black. I had found one for decent money in grey, but as always was too good to be true. But I kept my hopes up and managed to find a perfect example on Autotrader, a night blue, sitting on 55k miles, with full service history. It had the full GT pack with GPS, bose, black heated leather seats etc. MOT till September 2015 (shame about the tax). Only problem was... it was in Nottingham, a mere 10 hour round trip. But I thought f**k it, why not, if its as good as is made out to be then why not! So I took the trip scoped out the car and walked away with it after knocking alot off the price. . Here she is in a car park near where I bought it from: And it didn't take me long before I had it home for a good clean There wasn't much dirt, mainly just dirty water from the trip home: However the paintwork was a tad swirly : But I got cracking, and washed the car in the usual routine (sorry for the lack of pictures but got a bit carried away with the cleaning ) and then clayed the car. This was one pass on the roof : and after the whole car: The exhaust tips were also looking a little worse for wear, so used a little elbow grease with some Autosol (half assed attempt at a before and after photo haha. I did actually polish the top of the left tip!): Overall the car was filthy! But once washed and dried I used Poorboys Black Hole to hide some of those nasty swirls, even the misses got involved: End result: I have sinced washed the car again and polished it with Meg's Ultimate Compound and followed by AG HD Wax for some protection! Comments welcome! Conor.
-
Not sure if this is the place to post this but... I am looking to buy a 350z 313 with the following advisories:- Windscreen has damage to an area less than a 10mm circle within zone 'A' (8.3.1a) Nearside Front Road wheel with a slightly distorted bead rim (4.2.A.1a) Nearside front brake fluctuating, but not excessively (3.7.B.3) Exhaust flexys damaged General underside scraping Clutch not clearing Both front tyres worn on inside edges and slightly misshapen Would this be enough to put anyone off? Just for some more information the car is currently on 65,000, has MOT till May 15 and tax till December 14 and has had new brake discs and pads fitted on the front as well as a new clutch and flywheel fitted!
