


Hope4sun
-
Posts
79 -
Joined
-
Last visited
Content Type
Profiles
Forums
Events
Gallery
Store
Posts posted by Hope4sun
-
-
yes that one looks a lot better than the honda item, no overhang ... more original looking... where did you buy from? how much ?

e-bay about £10 shipped
 , http://stores.ebay.com/ktechmotorsports
-
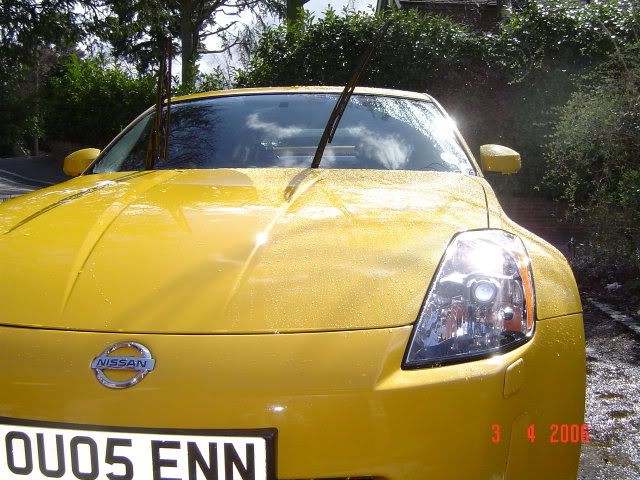
Just to confuse things further, sorry
 , i bought a JDM Lexus aerial about a week after fitting my s2000 one, i liked the fit better, hope you can see what i mean, i'm not saying its any better, but just looked more factory IMHO
S2000:
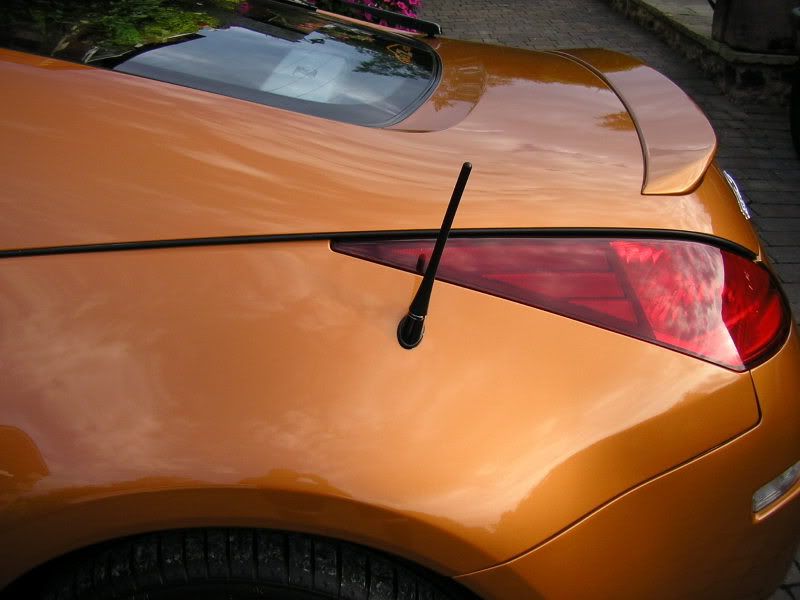
JDM IS300 Aerial :

Sorry for the poor pic, was taken on the phone..
Andy
-
I build my own too, not quite a sbling as the one above, but very expensive parts and a nice 24 inch dell flat panel. We will soon have a custom pc section on here

Thats the same case i built my beastie in
, looks a nice setup mate Lomota Watercooled (well i use fliuid XP which you could poor into a TV set and it would keep running, its nonconductive) is just the tip of the iceberg, some of the phase cooled and liquid nitro are just

Andy
-
If you really only want to spen around £400, Dell is one option, there customer service sucks, but you can get a PC with flat screen for around that and its not bad for what you get.
I build custom PC's for peeps from time to time, Below is a water cooled beasty i built for gaming and music mixing and video editting. Its got dual processor and 2 X graphics cards (SLI), plenty of memory to boot (forgive the pun
 )
)I treat them like a car, so lots of shiney things lol, i.e:
Bradied all the cables up

Ugraded the water pump from this

with this

to this

Coated the insdie of the massive case with black chrome

Hid all the cables so all you see in side pretty much is this

with a little red back lighting under the motherboard

Put the plumbing and radiator in


Then all fired up and running with a little neon and UV pigment in the coolant


-
When you say it tries to restart and then cuts off, are you seeing anything on screen?, do the led lights (i.e. the Hard Disk light, etc light up at all). Unforuntatley i'm an IT consutlant, its been a long time since i've done support but i'll try and help
That or i can spec you a machine for you exact requirements and most likely save you a few £££.
Andy
-
Mine comes from when i first joined a fourm for the MR2 Roadster, it was the US one (Spyderchat) and because of our usual lack of sunshine and my love of top down driving
Andy
-
Cheers guys, i'll make sure the any further meets are posted in both places, its a real pain having more than one fourm per car/pc/camera/mp3/ etc
But have to try to keep up with them all
, and i can understand history, having gone through it a little when we set up the MR2ROC, i just want to learn and share Peace

-
:blush: My Bad, i forget that the section the mini meet was created in was part of the membership pages, so many forums, i loose track
 .
. Also as i didn't organise the meet, just attended it. I wanted to share the thread as there were other pictures, etc and thought it was open to all to attend
Post amended and no provocation intended

-
Thanks Guys
, Damo's taken some really good ones too! I think he spent a little more time with the composition, i was very much just snapping away. The second picture would indeed be perfect with out the bods, but theres pleanty more on the SLR to go through and i'm sure there will be more meets Andy
-
So we meet up at the Rising Sun in the far east, east of England that is, the day was boiling and perfect for some A road action (bar the traffic!!!) Was good to meet some fellow owners and even see to other roadsters whilst on our travels. The S15 that came along was a very nice example, first one i've seen outside of a show.


And the grass got cut too

Andy
-
Now wheres the shiney pics
, shame i'm going to be out the country for the JAE  other wise i would have been happy to Zymol ya car Jacko. Still maybe at another meet
 Andy
-
Welcome to the gang Ming, if you only want a stock spoiler already painted, you can get one from here:
http://cgi.ebay.com/ebaymotors/Painted- ... 8034420868
and then just stick it on your self or a body shop will fit it for a few ££, it can be screwed on too.
Andy
-
What meet mate?
JAE is next weekend
You'll be on your own in a field if you go tomorrow
Neil
Theres a mini meet here in the Far East (East of England that is) at the apt named "Rising Sun" pub, as for JAE I'm off to Sinagpore and Malaysia on Thursday so going to miss it for the first time in my life -
Just what i've been looking for, thanks Nismo

Andy
-
Hopefully this should help, not all of it is relevant
Thanks mate, that was the link i was looking for and could'nt find again to follow tomorro, wether permitting, failing that, i'm helping put a Supra engine in over the weekend, so will have all the tools for a bumper off, but hope to avoid that one
Andy
You cannot avoid taking the front bumper off mate...it's easy though.
One pointer...the black plastic clips in the wheel arch and also on the top of the bumper in the engine bay require a knack to get them out (as I found to my cost!).
Lift the centre piece and then push it in a little (until it feels free) and then lever the outer clip out. Once you have done one you can see how they clamp together.
You do not need to disconnect the front washers by the way.
The attached might help you as well.
Neil
Thanks for the links and info Neil, had found the pdf already, but really appriate the information
, those clisp are little beggers, i remeber posting a guide on the GTRoc on how to remove them, then Nissan go and change the design slighty on the Z I'll let you know how i get one, hopefully i'll have time this weekend, maybe even at the meet tomorrow lol
Andy
-
In anticipation of my 350z converitable arriving next weekend and having never had a convertible before can anyone tell me what I should and shouldn't be doing to clean the fabric roof. I've heard that normal car shampoo is a big no no...... Help and advise would be greatly appreciated.
:bye: at Michael Bluff, were you on the MR2ROC mate? as for cleaning and protecting the top on the 350z, well you need only two products:
Firstly this link shows what the hood is made of (i.e: Poly Vinyl Chloride (PVC))
http://www.wolfsteins.com/imports.htm
And to clean and protect it there products wil do the trick, i got some in a few weeks back. I spent a lot of time resaeaching the same thing for the Porker and the MR2 Roadsters i had
, but normally just some warm water and gentle scrub will work wonders.Check this thread out for more info :
http://www.350zmotoring.com/forums/show ... hp?t=31642
There's also pletny of talk about it on the ZRoadsterowners (http://350zroadsterclub.com/) board, and after reading pages and pages from all the boards its the one for me.
Andy
-
Right going to get the install done this weekend if it kills me, after running out of time last weekend, but i did manage to get one wheel liner out and look at how much room there is, the water bottle is really in the way, so the bumper is coming off, just wondering after looking at the very helpful instructions (http://www.activetuning.com/pat/4/3/), That we have headlamp washers, which means as the bumper comes off, won't they need disconnecting or something, maybe the little washer cover will just unclip?
Anyone know, i'll be sure to photograph the whole thing though
Andy
-
Also you could use less fuel by not using cruise controll. I'm not sure about the 350's cruise, but its proven due to the ECU changing the fueling so many time a second that you get upto 2+ miles less per gallon.
Apparantly this is due to the fact that when you drive, you just hold your foot in the same palce so the injector cycle remains more constant. Obvisously this only counts for driving at a fixed speed (and on a long journey would be painful IMHO
)Be interested to know what peeps get on a constant drive, between the two?
Andy
-
They are really the same thing, though you can get them made from different materials, i tend to use Microfiber towels to dry as there very absorbant
, microfiber is mainly for polishing though as it saves on the elbow grease The other nice thing about using a microfiber towel to dry with is you know they have not been "sized"
Not all towels are created equal. Every domestically made towel is washed several times by the manufacturer to remove excess dye. Unfortunately, this leaves the towel looking limp and used. So, manufacturers then "size" the towel to make it look more attractive and new again. This "sizing" process uses a starch and silicone mixture that will scratch and contaminate your paint finish. Drying towels are not "sized".
Andy
-
Do Zymol not use any form of polish in thier range? Recently I have read a number people who use Zymol and they talk about cleaning, clensing and then waxing but there is no mention of polishing at all which is a vital part of cleaning a car.
As far as polishing goes, its only of the paintwork its self after clensing (with just a microfiber towel), then the rest of the shine comes from the wax, unlike most products made form chemicals, etc. They use high quanities of Carnauba wax, that when applied, cured and polished gives the deep wet look shine and coats the paintwork in barrier to protect further. So no need for extra polish. But i know where your coming from, it varies with product to product. I've tried most on the market, and the finish with this is as good as any 3 stage
Hopefully you can see the wet look here, its not a good pciture, bare inmind that the car is not acually black, but has gold flecks in it, but the finish is very deep

Andy
-
Ok, os i thought i'd add my methods
The main products i use from Zymol are listed below (also there sponges, applicators, Chamois , etc as they really do leave the wax on the car!!!)
Bug sponge

Zymol Sponges, Chamois, Microfiber towles, etc.
Clear - Auto Bathe

HD Cleanse

Carbon Wax

Glasur Glaze Wax (if its show time as a final coat)
Lehm Klay (though i use Meguirs an Detialer too)
Lehm-Lube 2


Treat Leather Conditioner
Vinyl Conditioner
Tyre Preserve
Heres a breif breakdown of my twice a year ritual and pre-show cleaning method (so most easy to remove parts are taken off, like number plates, bumpers, trim, etc)
I would normally take each wheel off for shows and:
Clean the wheels, i use Meguirs wheel cleaner and a few softbrushes, etc on them. Just work on one side at a time
Apply water
Spray Cleaner and leave
Brush the wheels and use buds/wheel brush, etc to get into wheel nut recesses and around the air valve.
Dry and apply wax.
All using clothes, sponges, buckets, wax and applciators that never ever go near the paintwork. Brake dust is garanteed to give you swirl marks!
Stage 1:
Rinse the car of with cold water
Wash car using Clear-Auto bathe (3 buckets and sponges, 1 for top, 1 for sides and then one for the underside/wheels so no grit, etc can scratch the car)
Rinse the soap of, letting the water flood the panels, rather then spraying them.
Dry and Chamois, some people find Shammeing a little hard on the paint, but i tend to stick to synthitic or cod oiled chamois as they leave less streaks on the car and are a softer.
Also i see them getting used like towels, the best thing to do is to wring it out, then lay it onto the paint work spread right out and just pull it off towards you. Any final drips can be dried off with a microfirbe towel.
Stage 2 (All done 1 panel at a time) :
Re-wash each panel with stronger mix of bathe and water, at this point i normally go around all trim, rubbers, joins, etc with cotton buds and tooth brushes.
Dry and Chamois
I used half a lemon on Tar (though Autoglym Tar remover is fine if removed quickly with clean water), I do use a bug sponge at this point and not a normal sponge.
Lubricate and then Clay bar the panel
Apply HD Clense using Pre-Wax Applicators (you think your car is clean, wait until you feel the paint after using this stuff)
Buff off the HD Clenser
Stage 3
Clean windows, rubber and plastic with applicable products, (Shoe polish is very good for wheel arches or a spray of foam based wheel tryer blackener)
Then apply 1st coat of Carbon Wax to each panel and polish as you go.
Then working on each panel, a second coat of Carbon wax and polish
Then a 3rd coat of Carbon Wax or Glasur Glaze Wax
Repolish (always use the microfirbe clothes, less effort and its what really brings the shine)
Sad i know, but i've just spent a lot of time cleaning cars I have even come up with a few mixes of products that i concocted for all sorts of things and i'm equally keen on the inside of the car and the engine bay.
Andy
-
Good right up Dave, pretty much my regime, except the prodcust i use require some slight vaartions, but excellent. Nice to see you've got a fanstatic hadnle on the cleaning, taken me over 10 years to get where i am now and that with detailer mates
A few helpful hints :
Rinsing
When using a hose, don't use a nossel to rinse the car, just let the water flow out of the hose across the paintwork from the top down, this helps cool the paint before waxing and also drawins the dirt/soap off the car and leaves less water to dry off too.
Heres a pic i borrowed from David (Fuku Fuku), to show the difference between half rinsed and half sprayed.
Andy
-
Does a clay bar remove the wax you've applied previously. I remember asking this ages ago and I think on autopia, it said it did (kind of) - might be wrong. I recall PMing Zaino king 'Dr Bonz' with the question, but he never got back to me

It will remove any protection built up on the paint, including wax, thats why cleansing and/or clay baring the paint work is so good at allowing the wax to bond. One of the nice things i like about Zymol products (accept for clay and cleanser obviously) there designed not to remove the wax you put on last time.
I've tried this by cleaning half my bonenct using normal car shampoo, sponge and shammey, against there own sponge, soap and shamey. I then applied water and it was still beeding off the side cleaned with there stuff.
Not that effects these thread, but one of the reasons i settled mainly on using it
I think we may be seeing some shiney cars soon lolAndy
-
Andy,
So does the product "Meguiar's quik clay detailing system" come with the bar and the detailer spray then?
reading your post above, you wash.... then clay bar, then polish/wax??
Yes mate, all you need in the box and you can even get it in Hafrauds, yep just wash/shamey/clay bar/polish & wax. Though i tend to wash after baring again, depeding on how happy i am with the finish and time depending. But you don't need too
Oh and its hard work as Dave said , but worth it, i find it quite relaxing
, you don't need to clay all the time either, once you have a good coat of wax on, it wil protect for a while.Andy
Spoiling her (sorry couldn't resist)
in Styling
Posted
Well slowly but surely the modding bug has started again (and she is just ment to be a stop gap ), parts arriving slowly and now just to get a decent body shop to fit it, could do it myself, but figured if a shop sticks it on the P then they can sort it out (any recommendations in this area, most of the lads i know in the good shops have all left)
Comments on this then (sorry about the pics, taken on phone )
)
Andy