Loki
-
Posts
43 -
Joined
-
Last visited
Loki's Achievements
Z Hopeful (2/7)
24
Reputation
-
 I have a 2009 370z with Nav and Bose system, I tried to fit an aftermarket headunit, it was a 12 inch touchscreen I imported from China, this was probably my first mistake. After fitting it, it switched it on but there was no sound and the air conditioning wouldn't work, the unit came with another loom, so I tried this and nothing happened. It didn't switch on at all. So I took it apart again thinking it's broken and put the old system back in, the CD part did power up because I heard the mechanism searching for CD's but apart from that nothing, no screen, no air con and on top of that the wing mirrors won't open either. I'm guessing/hoping it might just be a blown fuse or two but I'm kind of expecting something worse, in its current state I don't feel it's safe to drive, especially if the windscreen steams up and since I can't see behind either. Not sure if this is relavent but the brake pedal feels different when starting the car as well, there was a consistent feel before, now I press the pedal to start and I can feel the brake servo start working, the pedal drops a little and it feels like it did before. After a little bit of Internet research, it looks like both the stereo and mirrors work off the same fuse. If anyone has had a similar problem or has any advice I would really appreciate any help Thanks
 -
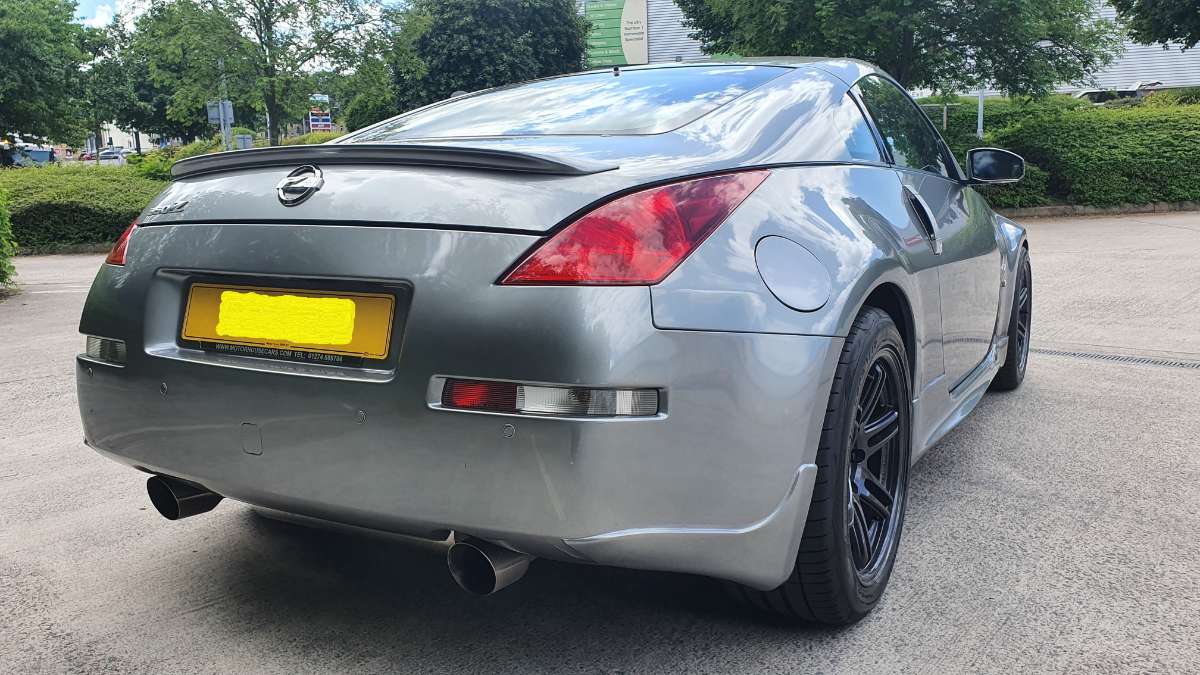
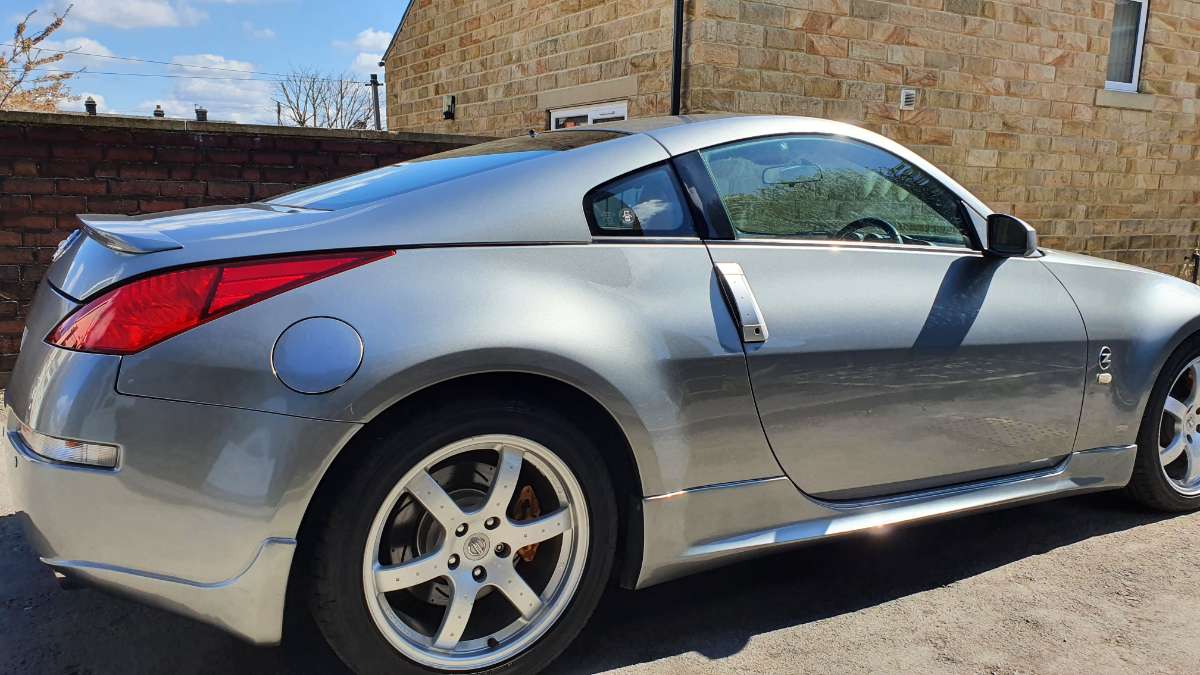
This is my Zed, there are many like it but this one is mine
Loki replied to Loki's topic in Member Build Projects
I think the modification I've most looked forward to has to be the remap, ever since I found out about the poor throttle response in the first three gears. I don't fully understand why Nissan did this, it would make more sense if the Zed didn't have traction control but since it does, why? If anyone has any idea please let me know. Not only is it my most looked forward to, it's also the one I've had to wait the longest for. I booked the appointment with TDi North in Warrington on the 15th April but didn't get in until 25th of May. They did explain that they where booked up with race cars before the new season starts and their usual wait is about 4 weeks. Anyway, eventually the 25th did arrive and I jumped onto the M62 in the hope I'd be driving back a completely new feeling car. When I arrived I was met with a line of Civic Tyre R racers, a Porsche Cayman race car, TDi's own GTR and a mint black MK4 2JZ Supra, I knew I was in the right place. I do want to say I didn't get exactly what I expected, when I choose TDi, I had read that they were able to give the Zed 5 select-able maps using the cruise control switch's on the steering wheel, including pops and bangs and immobilizer maps. Sadly I was informed they no longer offer this service and that it was actually risky to put pops and bangs on the car, I've had a look round this and other forums and couldn't find out one way or another but if they don't do it any more, what can you do. Okay enough rambling, lets get on with the numbers, it made 301bhp with 266.8 lbft torque, throttle response is immediate and the exhaust has even more of a growl to it and really sounds awesome when my foots buried deep in the carpet, which might explain the the poorer mpg but who buys a Zed to be economical. Over all I'm very happy, I got the 300 I was hoping for and the car rev's much quicker and just feels altogether more alive. If I was to say one negative thing about about getting the remap done, it has increased my clutch paranoia, as far as I can tell my Zed has never had a new clutch and I understand these usually only last about 40k, with mine on 80k it probably should of had two by now, so it's more than due to go. Could this remap push it over then edge? I guess we're going to find out, if it does I'll use the opportunity to fit a lightweight flywheel, so the revs drop as quick as they rise. Thanks for reading.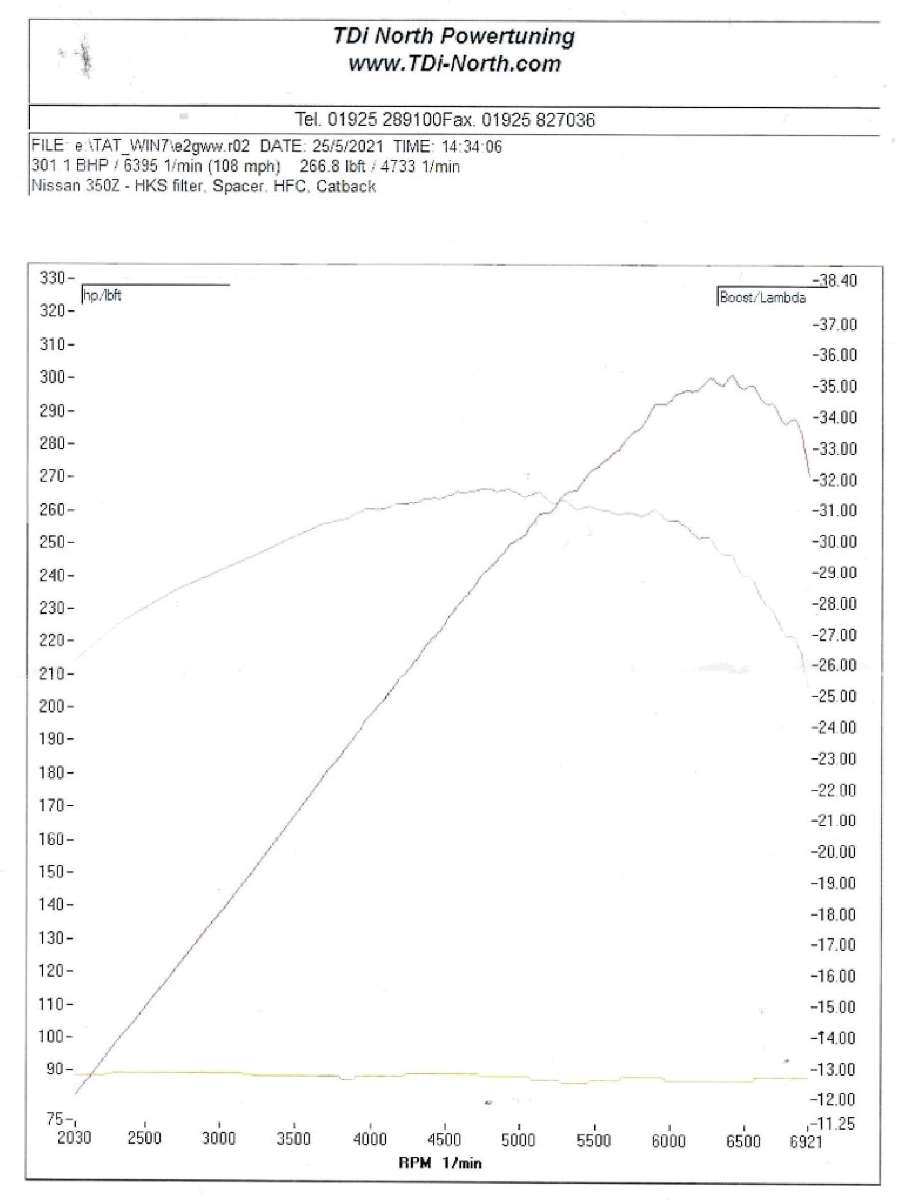
-
This is my Zed, there are many like it but this one is mine
Loki replied to Loki's topic in Member Build Projects
Thanks, I am enjoying the new rubber. I think your probably right, don't know if it's something I'll just get used to or not though, but I'll sure enjoy finding out. What's next? Well funny you should ask....*Spoiler Alert* It's a remap. See below 😁 -
This is my Zed, there are many like it but this one is mine
Loki replied to Loki's topic in Member Build Projects
Your welcome, glad your enjoying it. I had been looking at some Enkei RPF1 wheels but after spotting the 2Forge, which are very similar, I thought lightness would be the way to go.
-
This is my Zed, there are many like it but this one is mine
Loki replied to Loki's topic in Member Build Projects
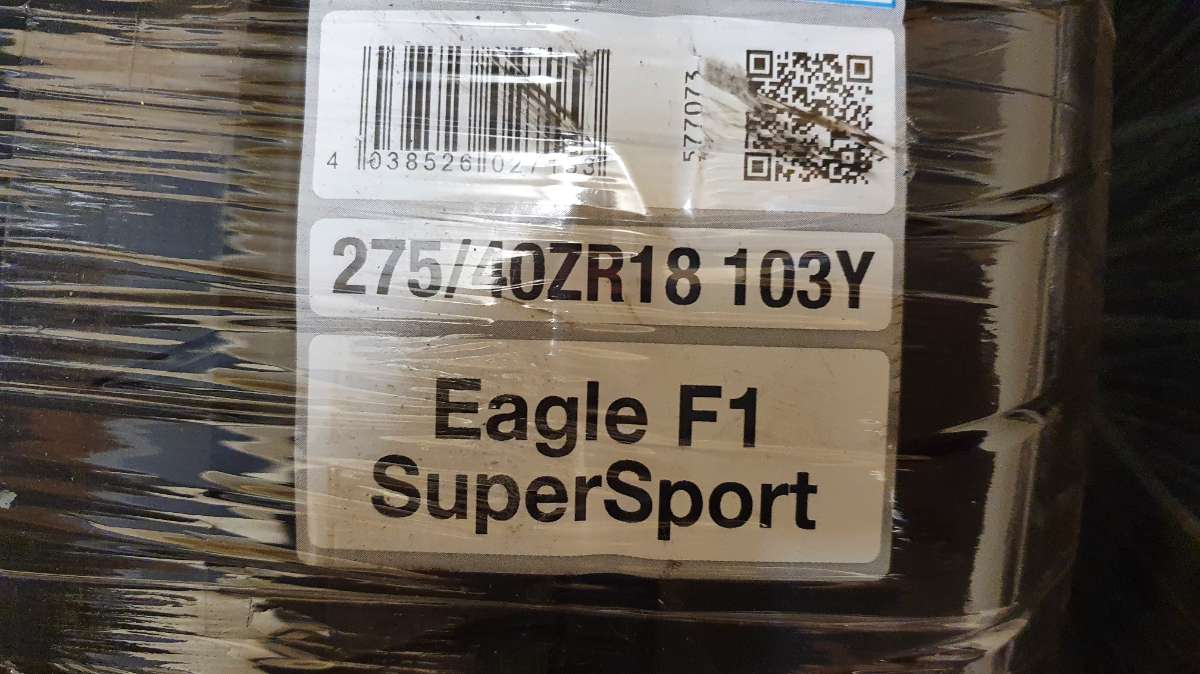
Thanks for posting and for the compliment, the reason I went with Goodyear is because of their performance in the wet. The biggest drawback of going wider is the drop off in the rain but the F1 Eagle Supersport are by far the best in this comparison/review video in slippery conditions. I'm hoping they will offset the loss from the wider track. There're also not far of the best Michelin and Continental in the dry either, possibly making them the best all rounder. Check out the video it's quiet interesting if your looking into some new ultra high performance rubber, they test most of the popular brands. -
This is my Zed, there are many like it but this one is mine
Loki replied to Loki's topic in Member Build Projects
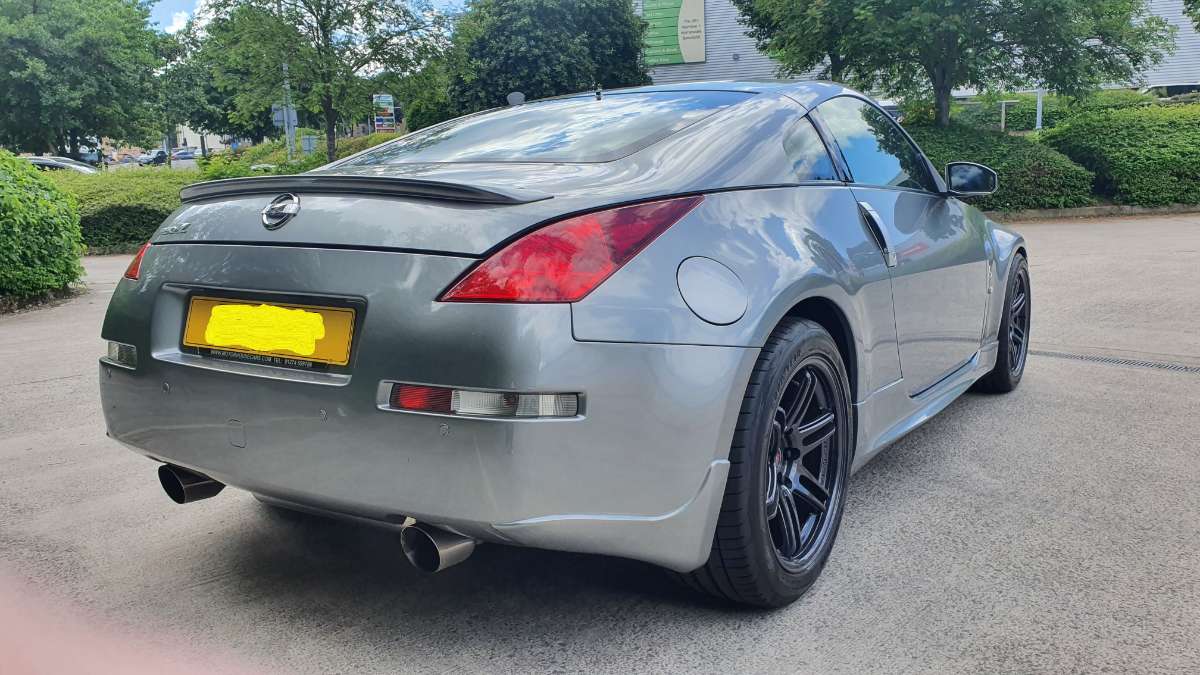
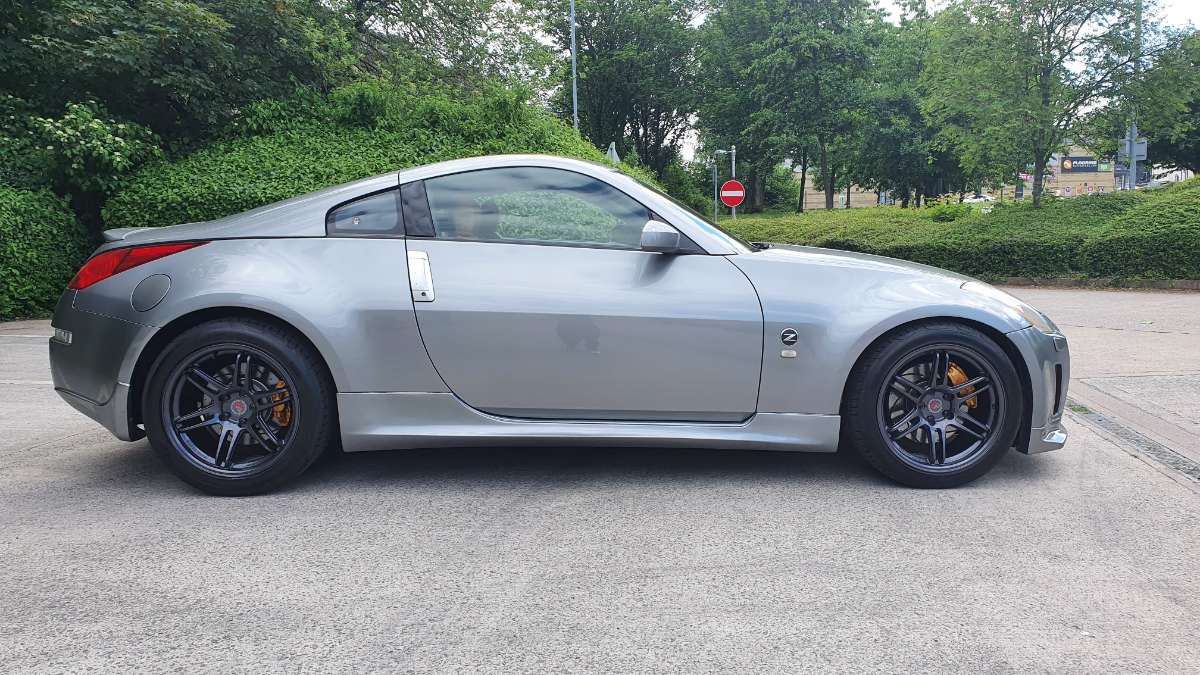
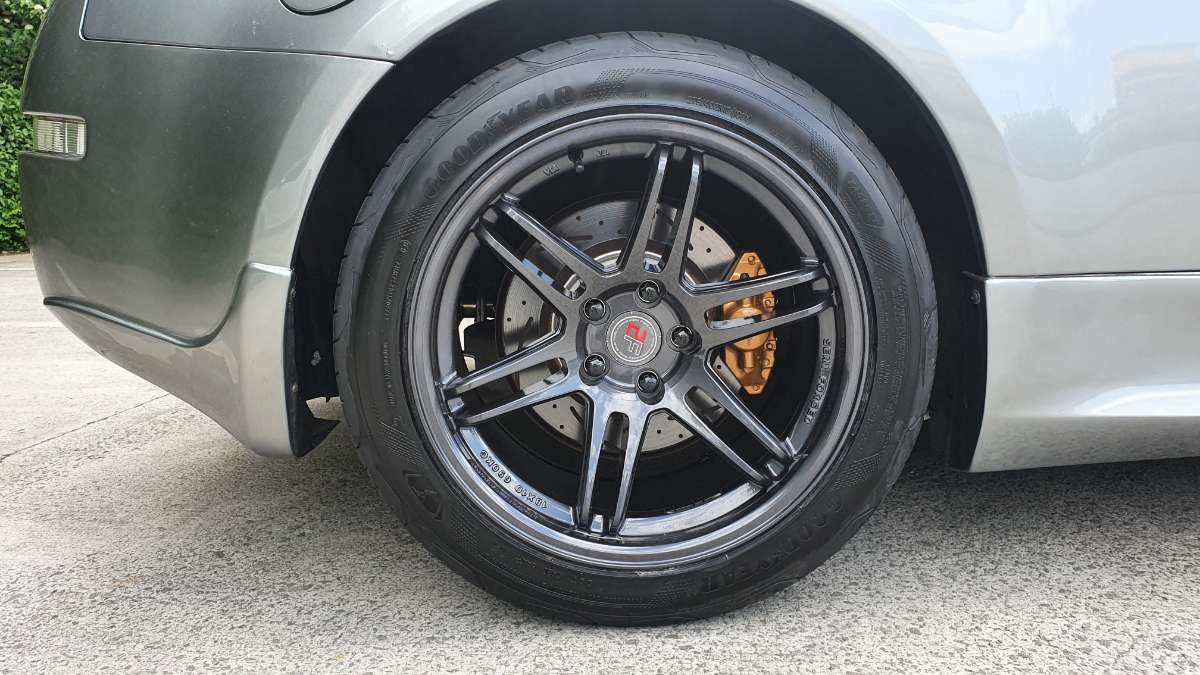
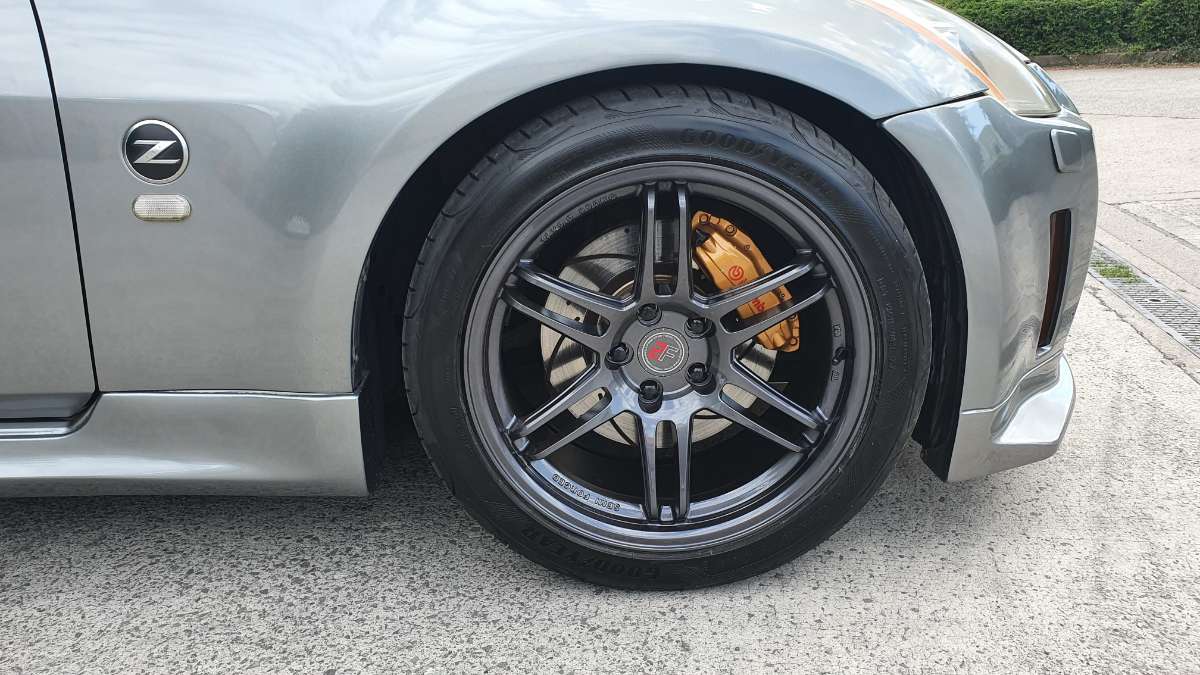
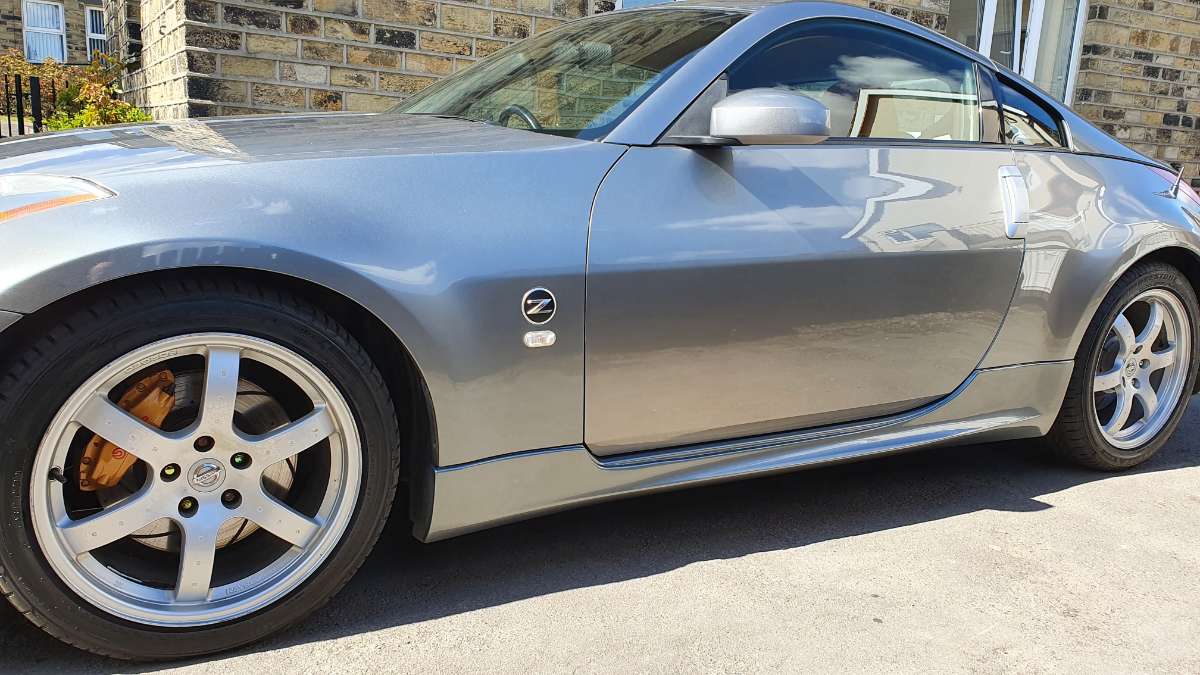
As promised I can finally post some pictures of my new wheels. Take a look and read this after, you know you want to.... They're 2Forge ZF5's semi-forged Gloss Gunmetal Front 18x9.0 Offset 17 8.4 kg (Approx) 255.40 Goodyear Eagle F1 Supersport Rear 18x10.0 Offset 25 8.8 kg (Approx) 275.40 Same as above (Rears have a deeper design) What makes these special is they are a rotary forged universal race wheel made to order, but to keep costs down they are designed to have custom PCD's drilled and offsets shaved instead of having to re-engineer for each individual stud patter, meaning I paid about £225 a corner for very light wheels. The weight is approx because it's what they weigh at full offset of ET35, but with the difference between the 9.0 and 10.0 being only 0.4kg I doubt it's far off. So, what do I think? Well I've had them on for a couple of weeks and I noticed the extra grip straight away, there's a almost cork screw like road near me and it's a good place to test both front and rear end grip and I can feel the extra "G" as neither end loses adhesion. Turn in doesn't feel quiet as crisp but once the lateral force is on the side of the tyre it just keeps holding on, I do think there's still grip on turn in, it's just feels numb some how, but not in a bad way because it only happens for a fraction of a second the it's back sticking to the road again. Looking forward to some wet roads to see if she still slides. I will admit I bought these mainly for the looks, the OEM Rays are alright but they just don't fill the arches and it does spoil the look ever so slightly, filling those gaps is probably the best cosmetic mod for the Zed and I have to say I am very happy with the result, especially the rear end, it's such an aggressive stance.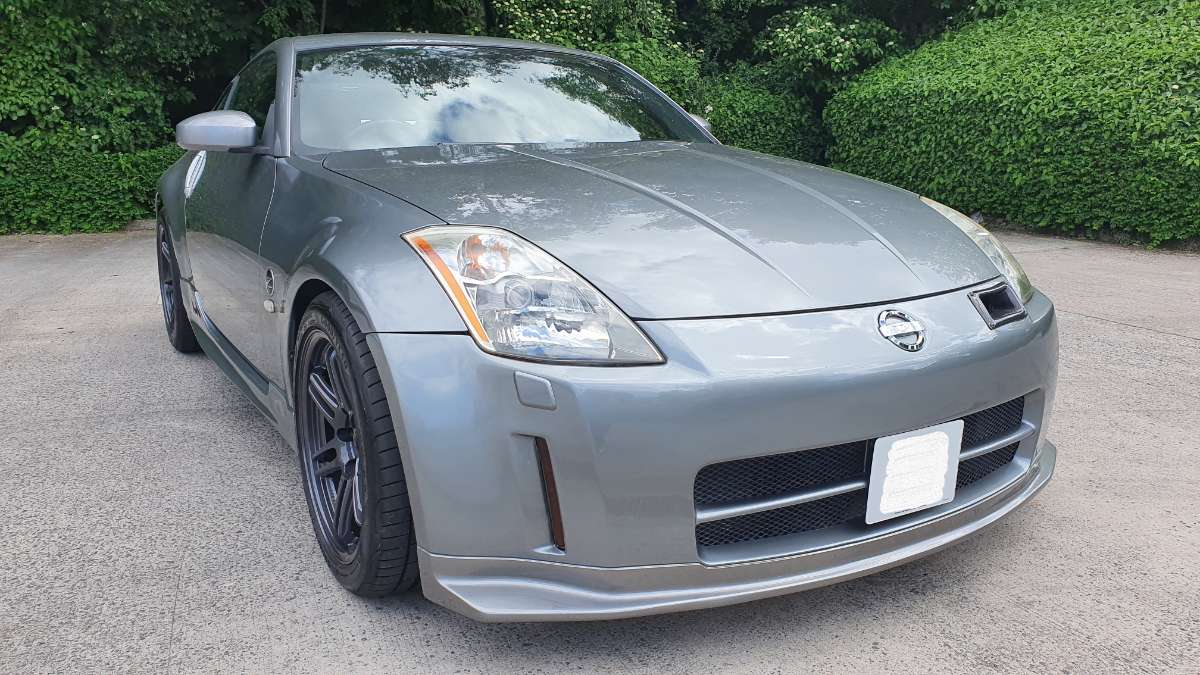
-
This is my Zed, there are many like it but this one is mine
Loki replied to Loki's topic in Member Build Projects
Thanks for reading, glad your enjoying the tread. Yeah got lucky with the exhaust, had been saving for a new one, then spotted that, really enjoy the sound as well, the more I modify the better it gets. -
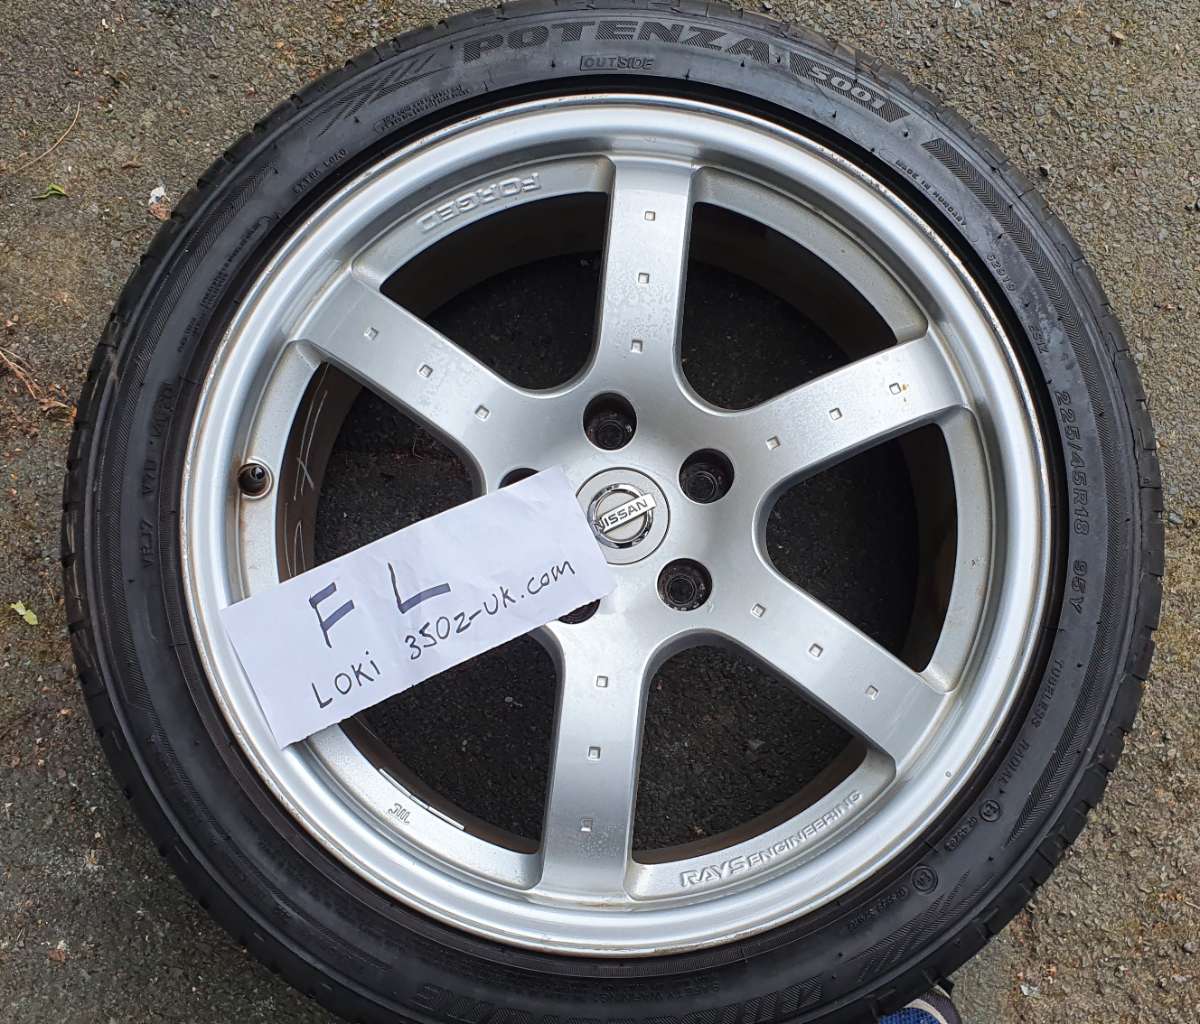
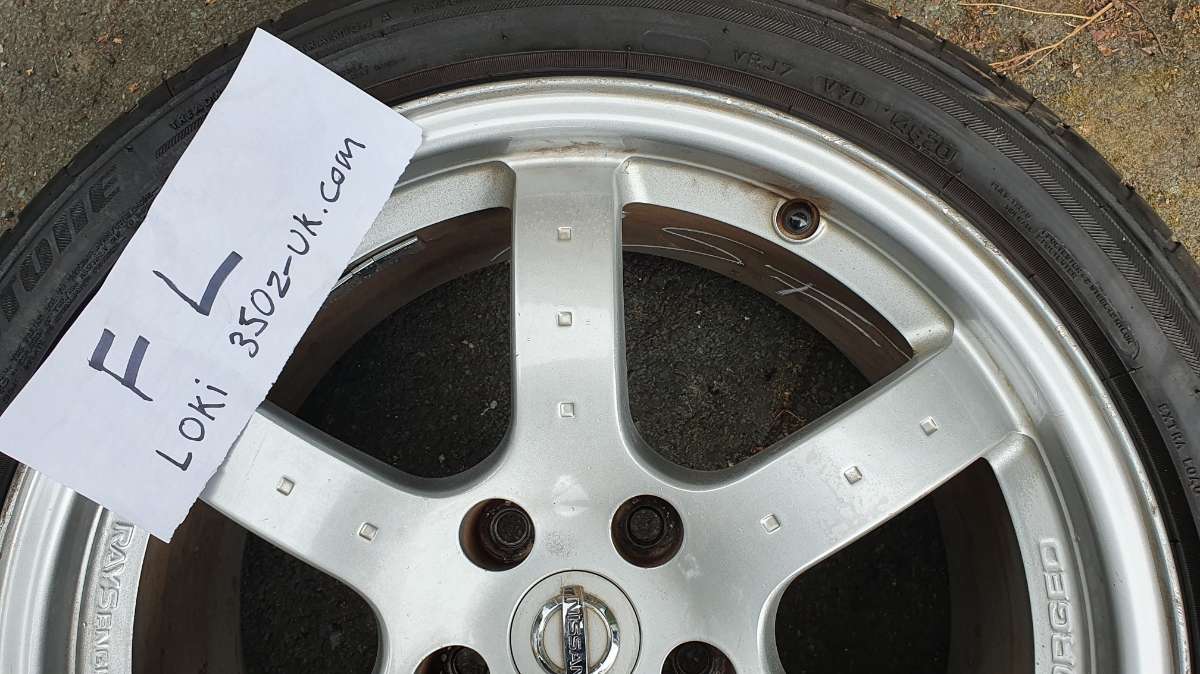
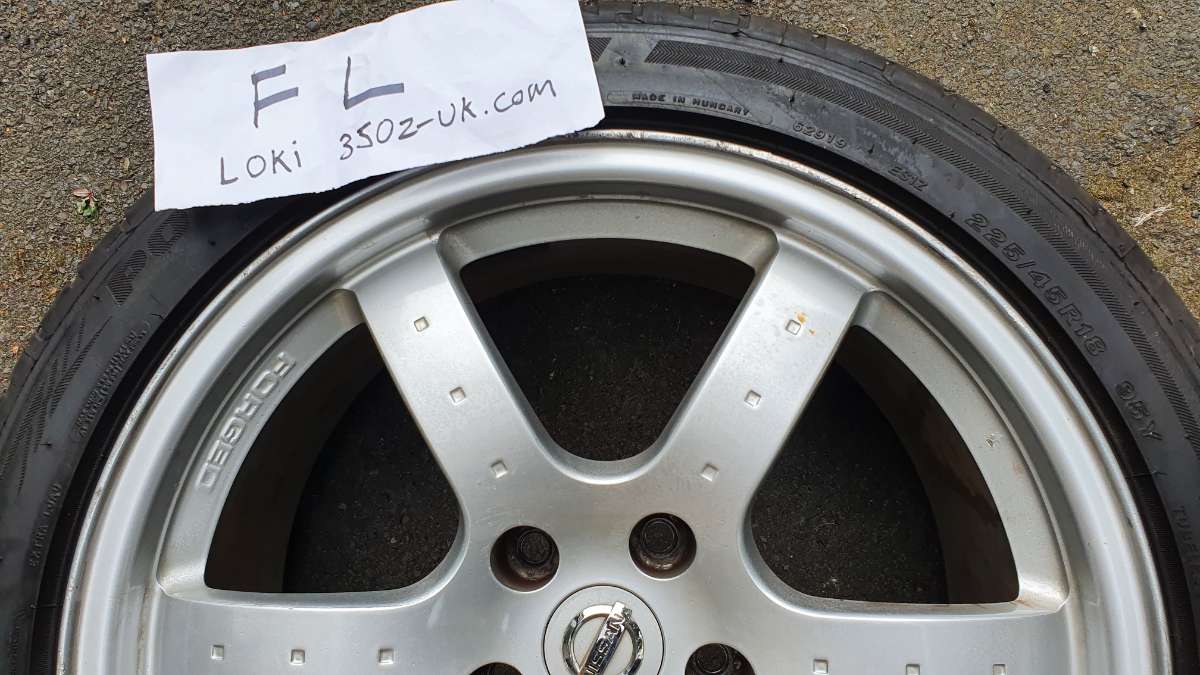
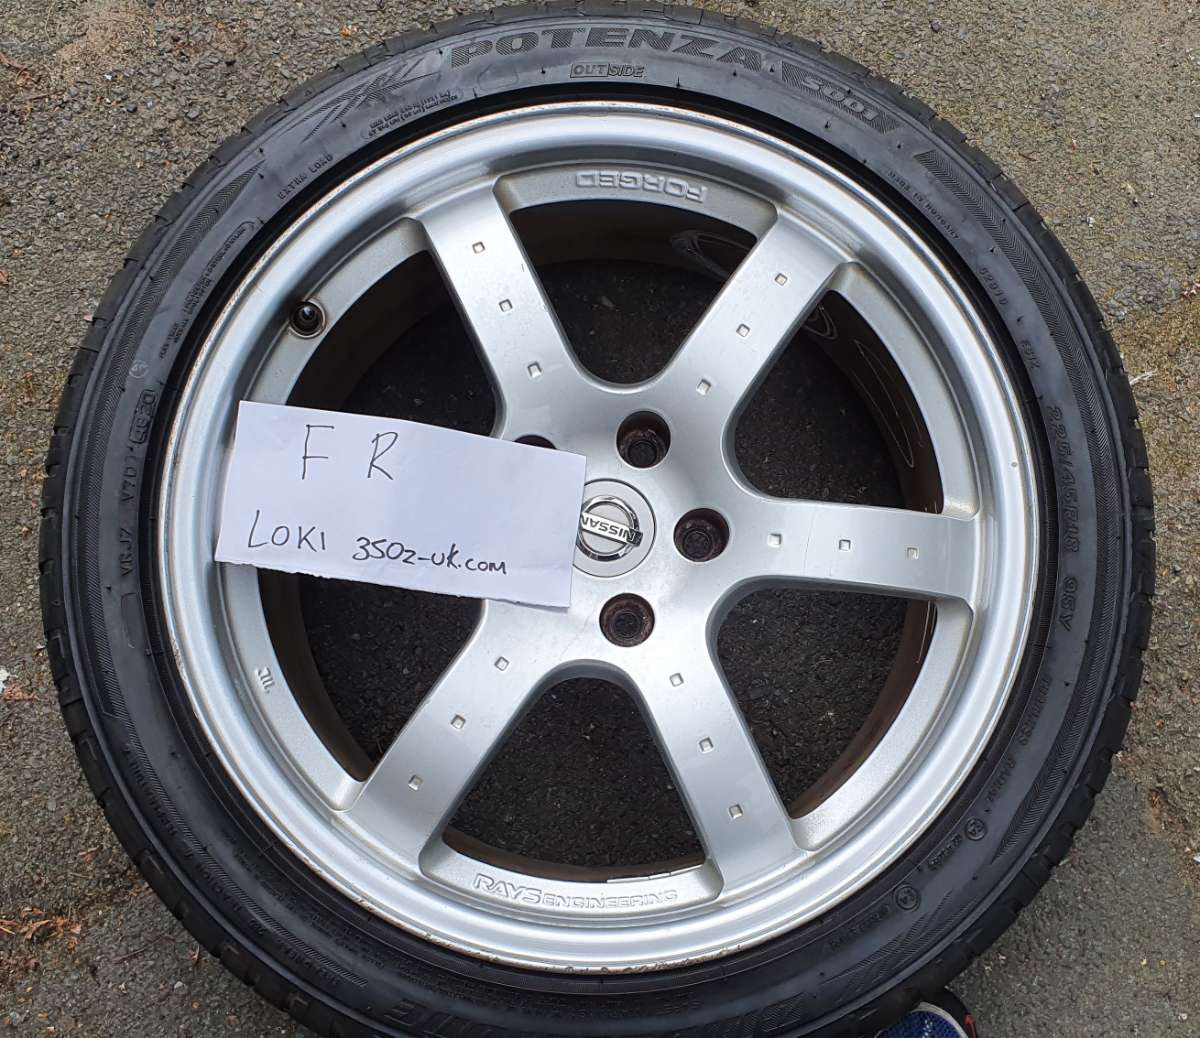
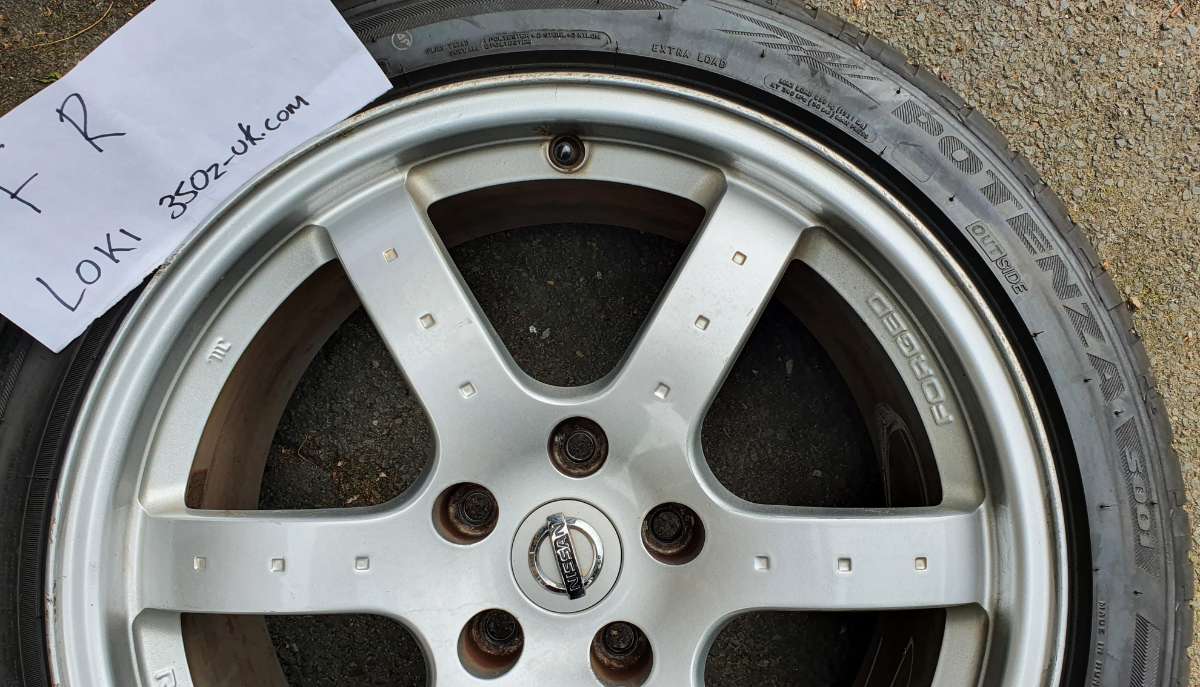
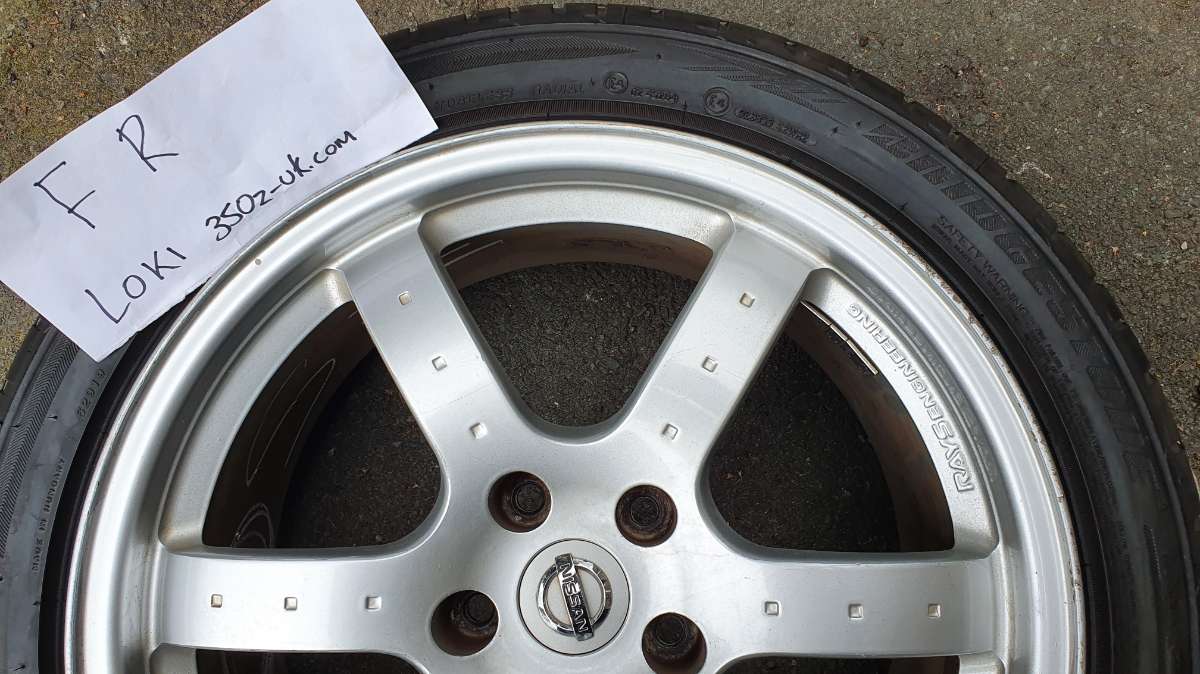
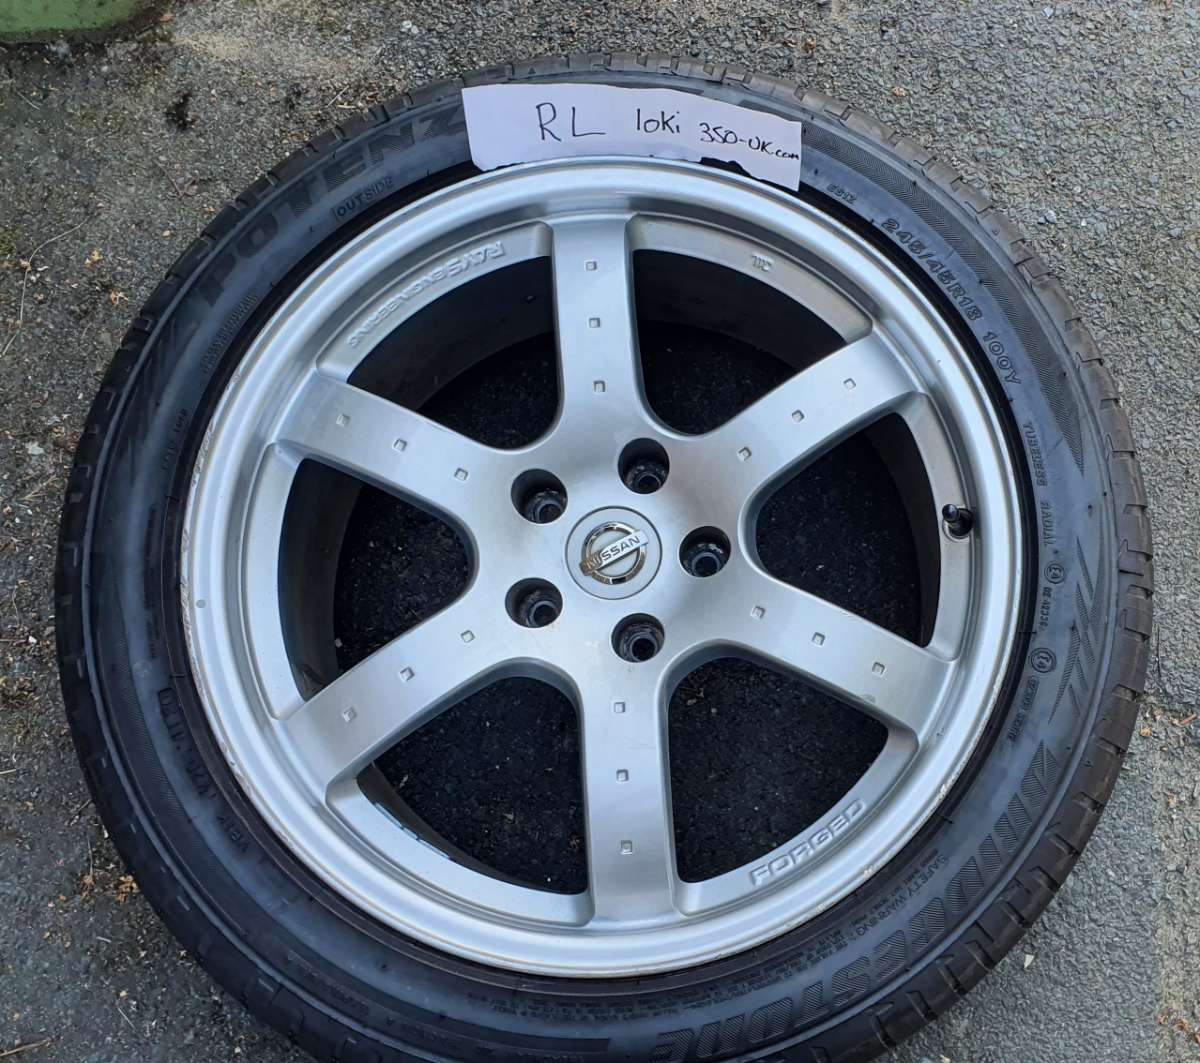
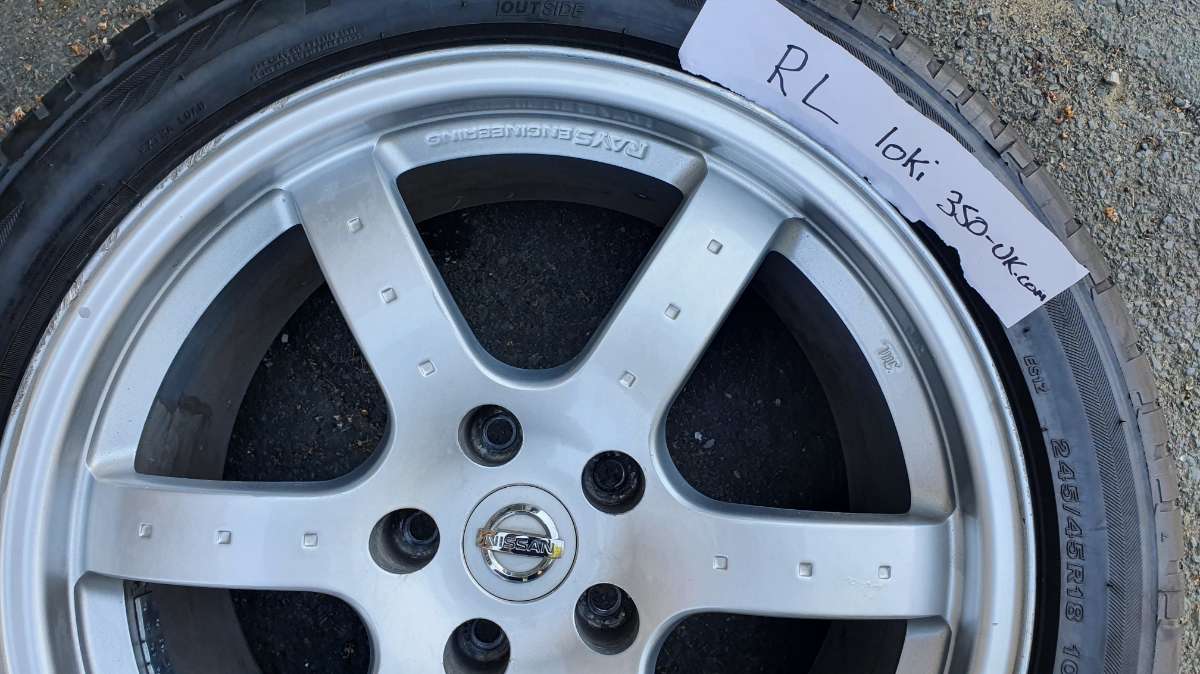
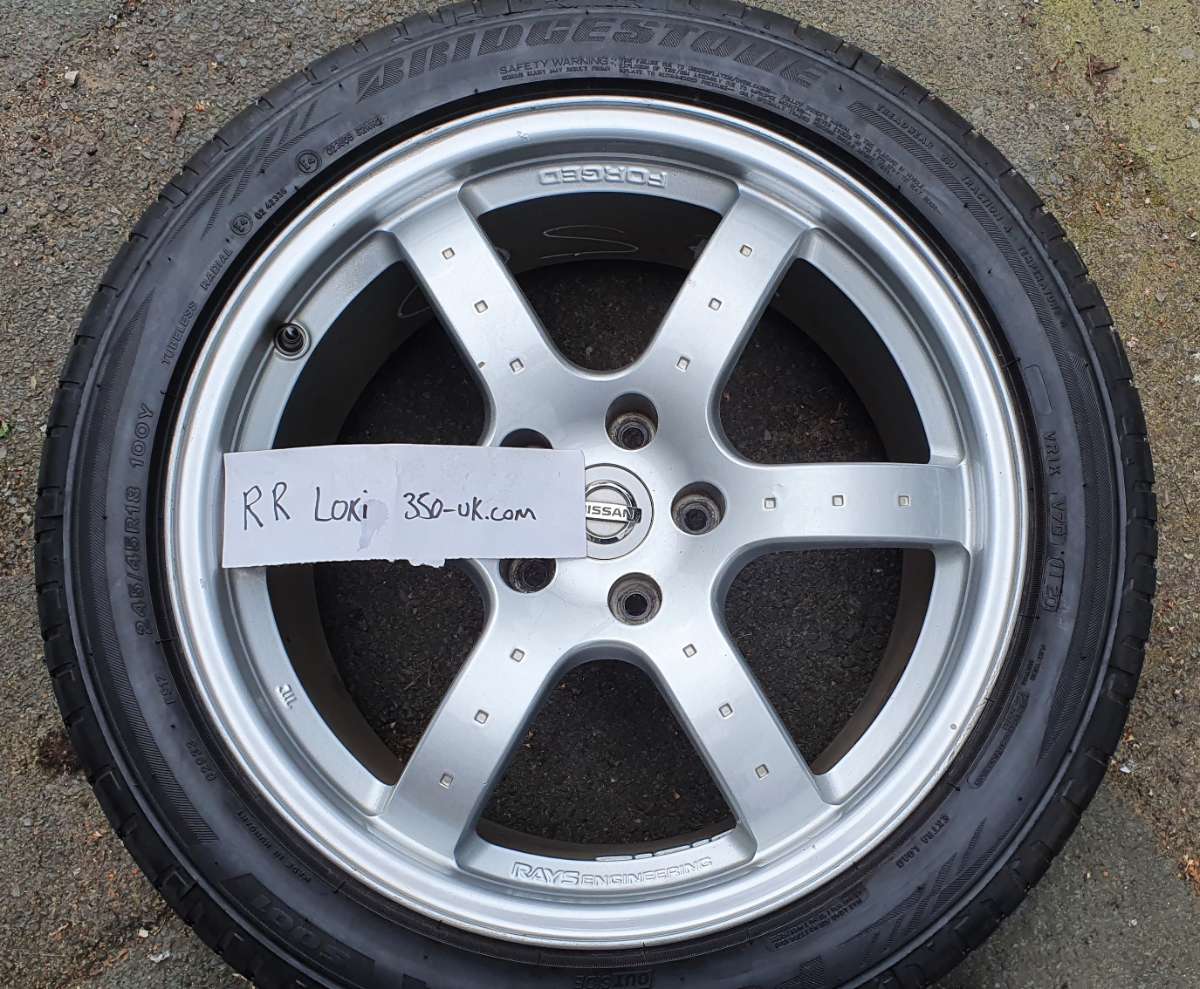
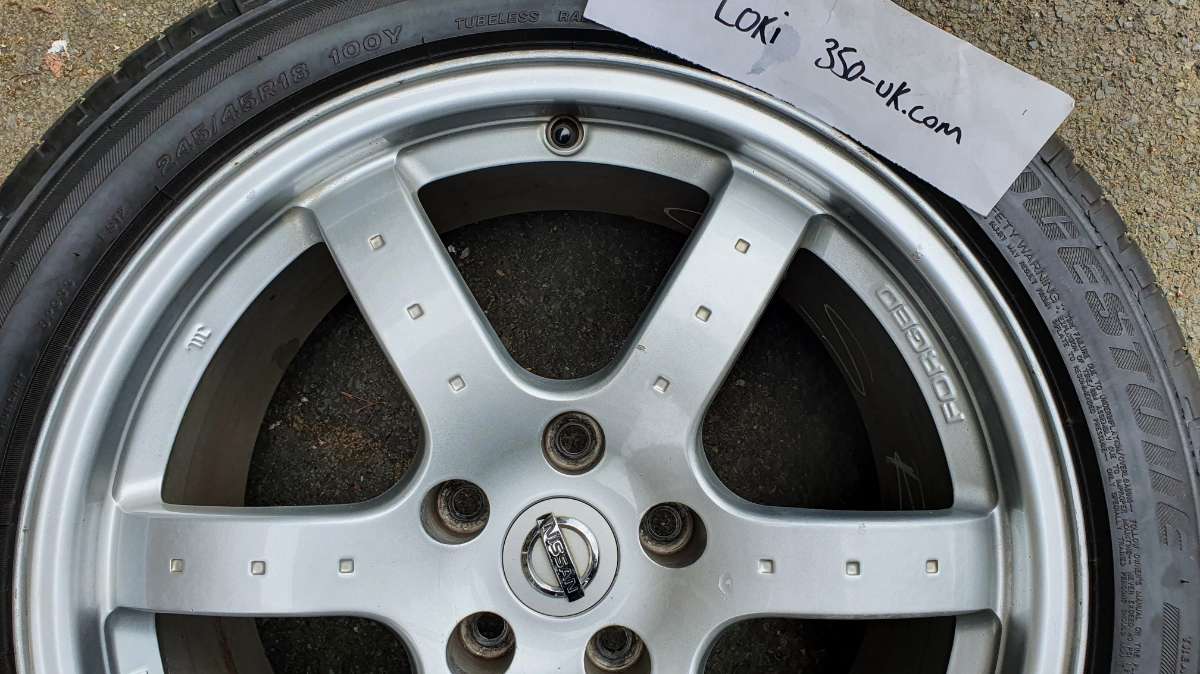
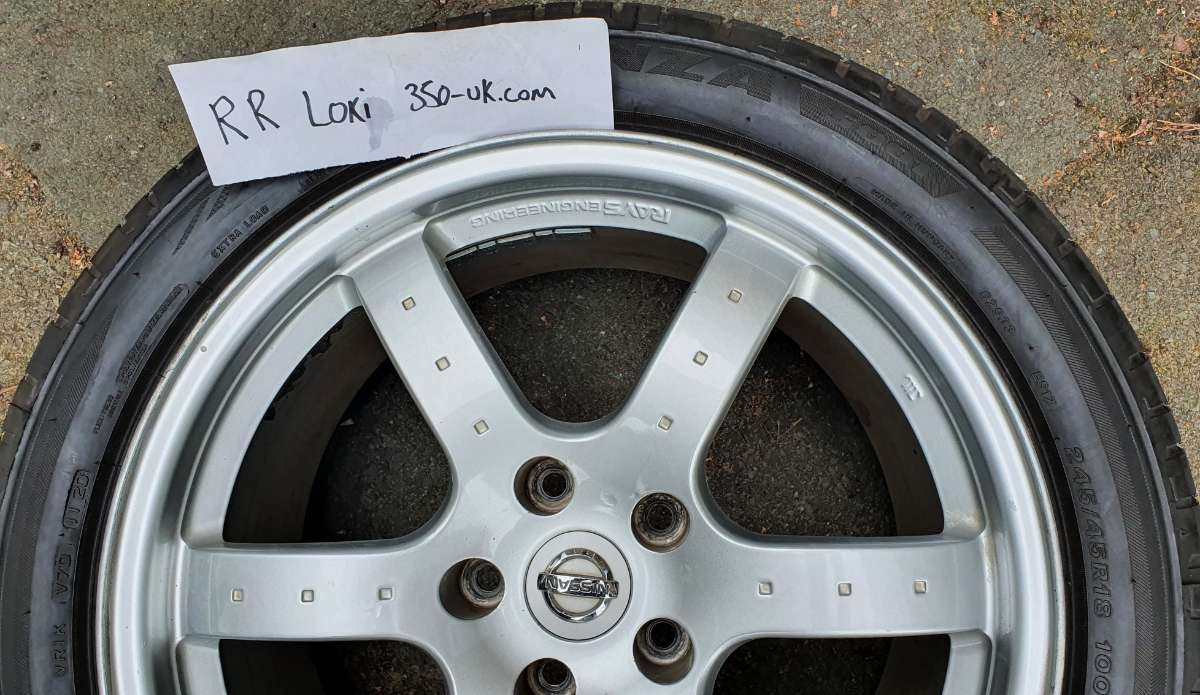
After changing to some aftermarket wheels, I now have my OEM Rays for sale. The alloys are in good condition, there are some curb marks as you'd expect, the left hand side is slightly worst than the right, with the FL wheel having light scuffing all around the rim, no big chunks missing. The FR and RL are roughly the same, a couple of deeper scuffs but generally look tidy. The RR wheel is the best of the bunch, no scuffs and good clean edge. There is same very small bubbling but I only mention this to give you full disclosure, it is only minor and is isn't really noticeable unless you get up close, I only realised when I was taking the pictures and hadn't seen it before. I wasn't going to refurb these, I don't think the need it, maybe in a few years but for now they'd be fine, also the tyres are pretty much new, the fronts have done about 500 miles and the rears around 1,000 of traction controlled miles, no burn outs, Bridgestone Portenza S001's F225 R245. Check out the photo's and please PM me or leave a reply if your interested and I'll get back to you. I've 2 prices so you can decide whats best for you. Delivery by Paisley Freight. Cash on collection £400 Paypal/Delivery £465

-
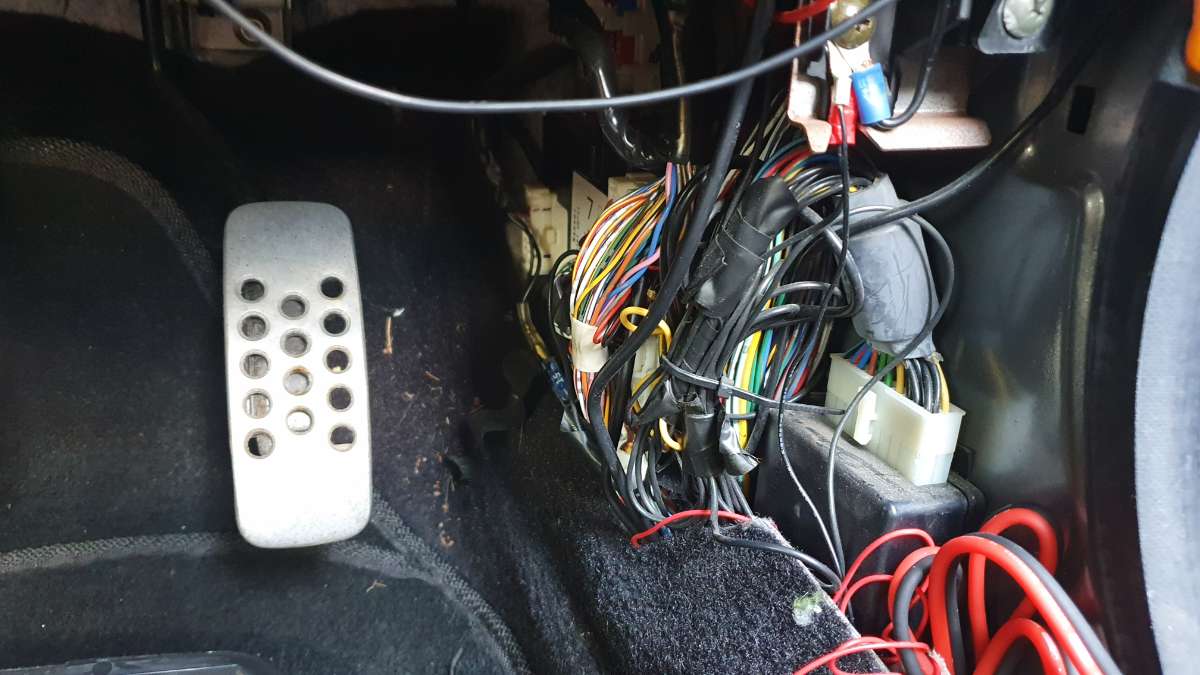
I'd like to say, and there you have it a successful build in a 350Z but this little scorpion has a sting in its tail. My aim was do do the job either alone or with a spare set of hands, which I needed in the end, when refitting the trim it was a lot easier with two to line it up right, I also wanted to help anyone else who might consider a similar job, to whom I now must apologise because when I saw this I shat myself. Some where in there are the wires I needed and I couldn't even begin to guess which one they are. I did find a switch though, no idea what it does but there is a loud beep when I turn it on and (what I had thought was an alarm sensor by the door, is actually) a light that turns on with it. I'm hoping to solve this mystery when I take it to the auto electric shop next week, yes you read that right, every thing is done but those door speakers I'm leaving to the professionals, makes me ill just thinking about it......
-
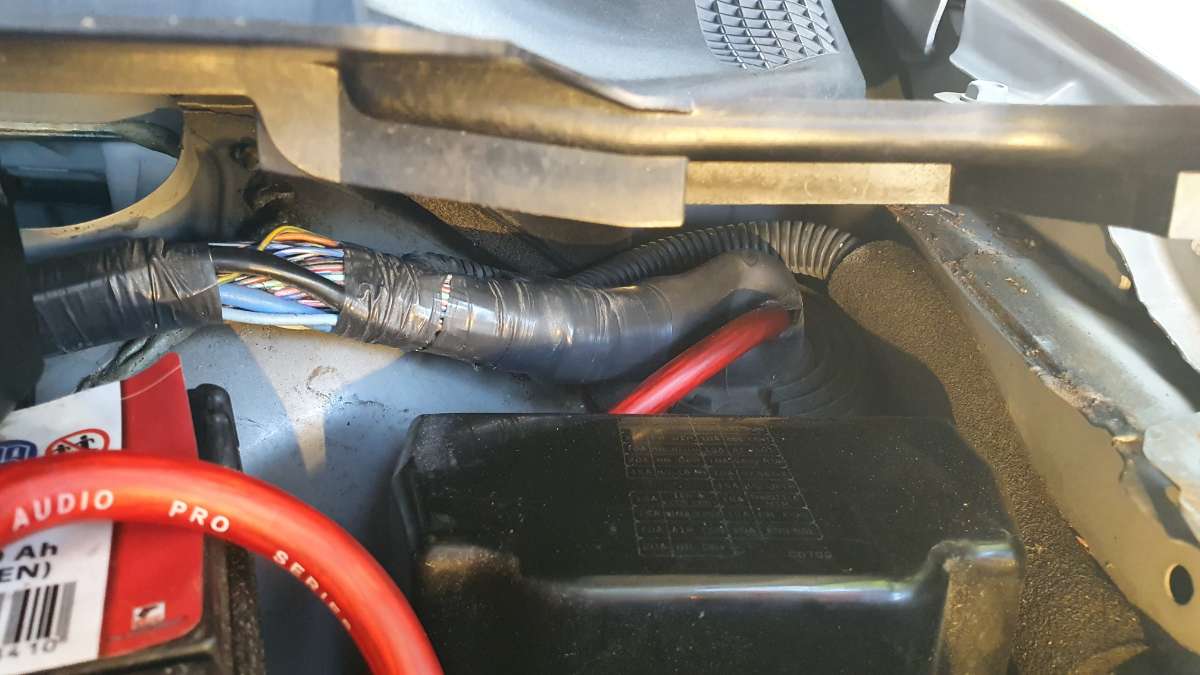
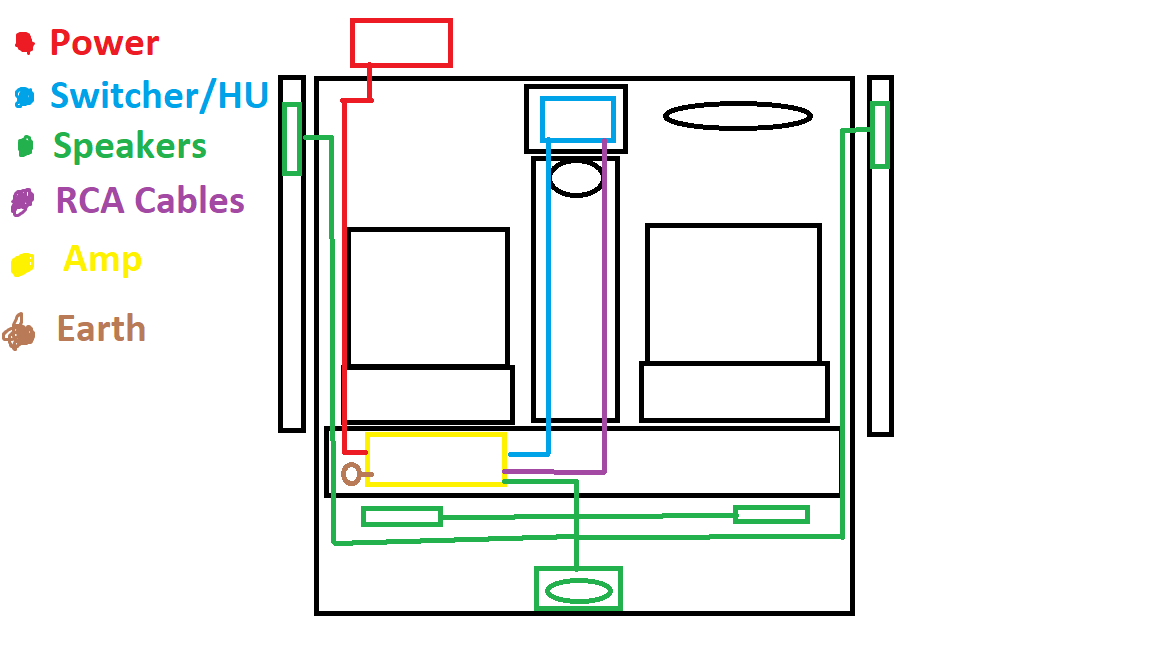
So here we are, it's time to get your hands dirty. The install. When first looking at the interior it can appear quiet daunting but really it's just a 3D puzzle where you need to remove the parts in order, this video will take you through it step by step. It's easy when you know how. What this video doesn't cover is how to run the power wire from the engine bay to the cabin. These are a couple of pictures of how I did it, be very careful not to damage any of the other wires when cutting the rubber gromit, that would be bad. Also even though you can't see it there is a fuse in the wire, this needs to be fairly close to the battery for it to work effectively. The cable will come out in the passenger foot well. Now we're going to look at how to run the wires through the cabin, there are two schools of thought on this, some say don't cross your power wire with any other, it can cause interference to RCA and speaker cables, others say that's a load of rubbish. I don't know for sure either way, but I reckon why risk it. With all the trim removed it's very simple just to run the power wiring under the carpet by the seat and the passenger side speaker cable along the edge of the door under where the rubber fits. The earth is easy to find as well, both sides have a unpainted earth point which can be used and the frame work has plenty of cutouts to run the wires through. As I said I'm using the glove box behind the passenger for the amp install, please excuse the basic diagram but this is how I ran my wires.

-
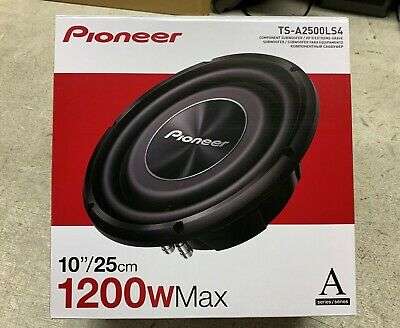
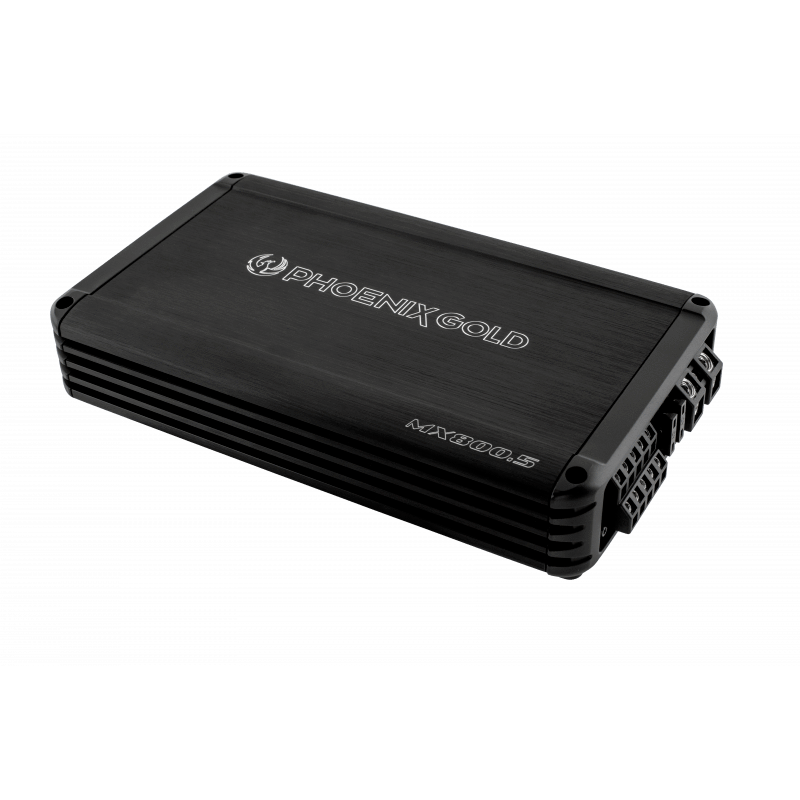
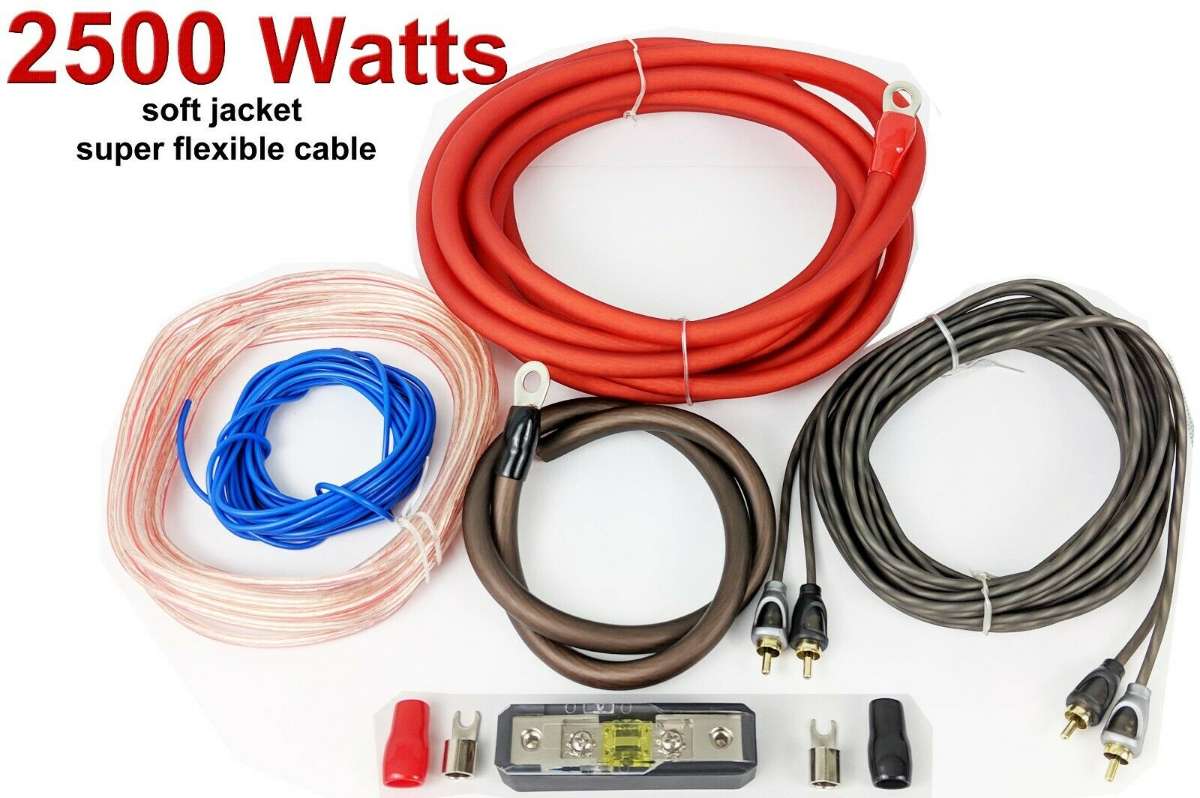
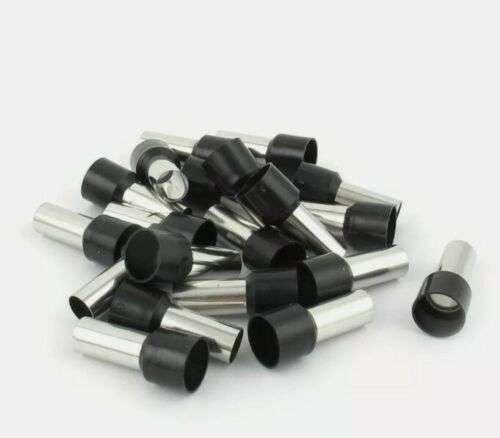
It's been a while since my last post, this is mainly because I hadn't actually done the install. So last weekend and with a little help, I set about the job at hand. Before I get into that lets talk about amplifiers, most importantly how to choose the right one for your build. Most modern amps can handle both 2 Ohm's and 4 Ohms, but if your reading this far, you'll most likely be interested in the 4 Ohms. For this project I have a 5 channel amp, 4 Speaker and 1 Sub woofer, before you buy one, check your speakers spec's first, specifically the continuous power output, the Pioneer TS-A1670F have a 70 watt C.P.O and the Pioneer TS-A2500LS4 sub I'm using is 300 watt C.P.O. The most important thing when buying a car amp is not to exceed the continuous power output of your speakers, being under is fine, I could run mine from a 50 watt per channel amp, it would be under powered and short of their true potential but would work without any problems. Of course running over the C.P.O. only has one expensive outcome, don't risk it. You've probably noticed I'm using Pioneer kit and are most likely expecting a similar theme with the amplifier and truth be told I did search the internet for a Pioneer 4x 70 watt + 300 watt Sub amp and I just couldn't find one. I did eventually find the perfect amp, a Phoenix Gold MX800.5. Now I have to admit I'd never heard of the brand, after googling and checking you tube for reviews there was nothing on the MX800.5. I dug a bit further and they seem to be okay, quiet big back in the day then went a bit crap for a while but are back at their best again, looking forward to putting it to the test. https://www.ebay.co.uk/itm/303848829035?epid=22034755059&hash=item46becd306b:g:ZIAAAOSwWU1gAa~m Now we have the all the required hardware, lets talk wires. The spec's will usually tell you which gauge wires and amp fuse you'll need, I'd also ask the seller just to double check and give you some leeway if there are any issues down the line. I bought mine form the same place as the amp after reading some bad reviews for the branded kits, usually the blue "switcher" wire is very low thread wire and the other wires are shorter than advertised. You should also invest in some ferrules, these fit to the end of the speaker wire and help prevent any stray wire from shorting on the amp, they do a really good job and are cheap, I can't recommend them high enough. https://www.ebay.co.uk/itm/264083657718?hash=item3d7c9cd3f6:g:ROQAAOSwWXRfa0SZ https://www.ebay.co.uk/itm/223246849307?hash=item33fa8c951b:g:6bwAAOSwm-Fb95zF
-
I have to admit I'd like a system similar to the multi sub set up but sadly that isn't the reality. It does look cool though 😎
-
This is my Zed, there are many like it but this one is mine
Loki replied to Loki's topic in Member Build Projects
Big things are coming!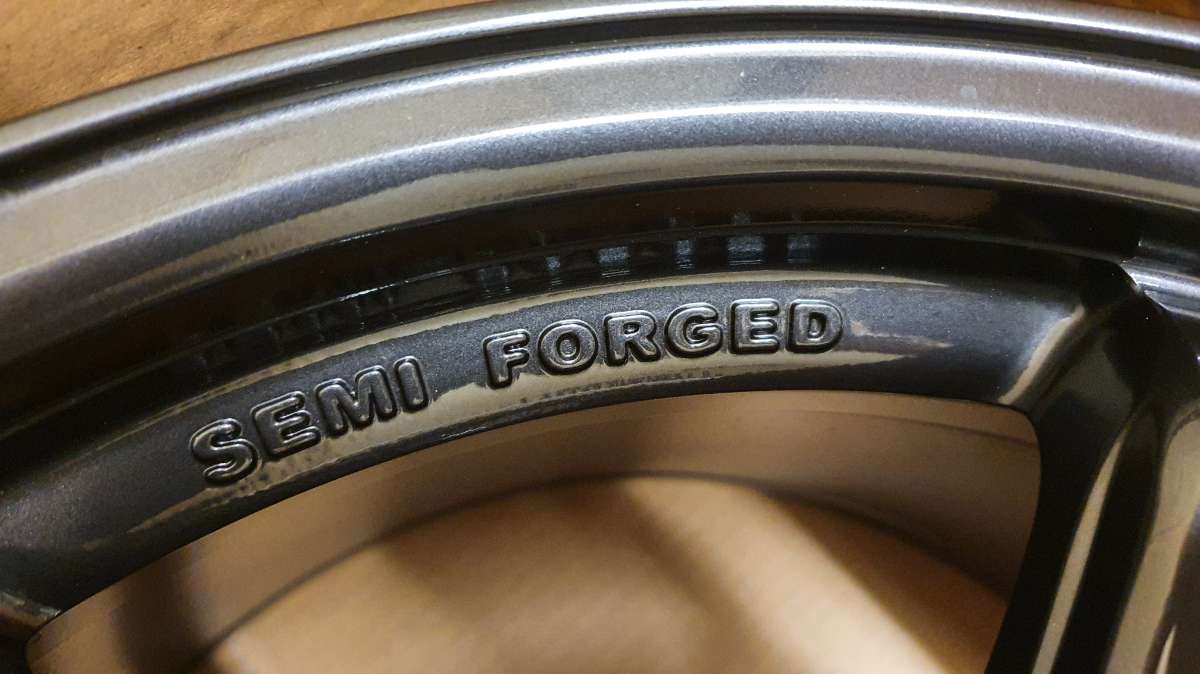
-
This is my Zed, there are many like it but this one is mine
Loki replied to Loki's topic in Member Build Projects
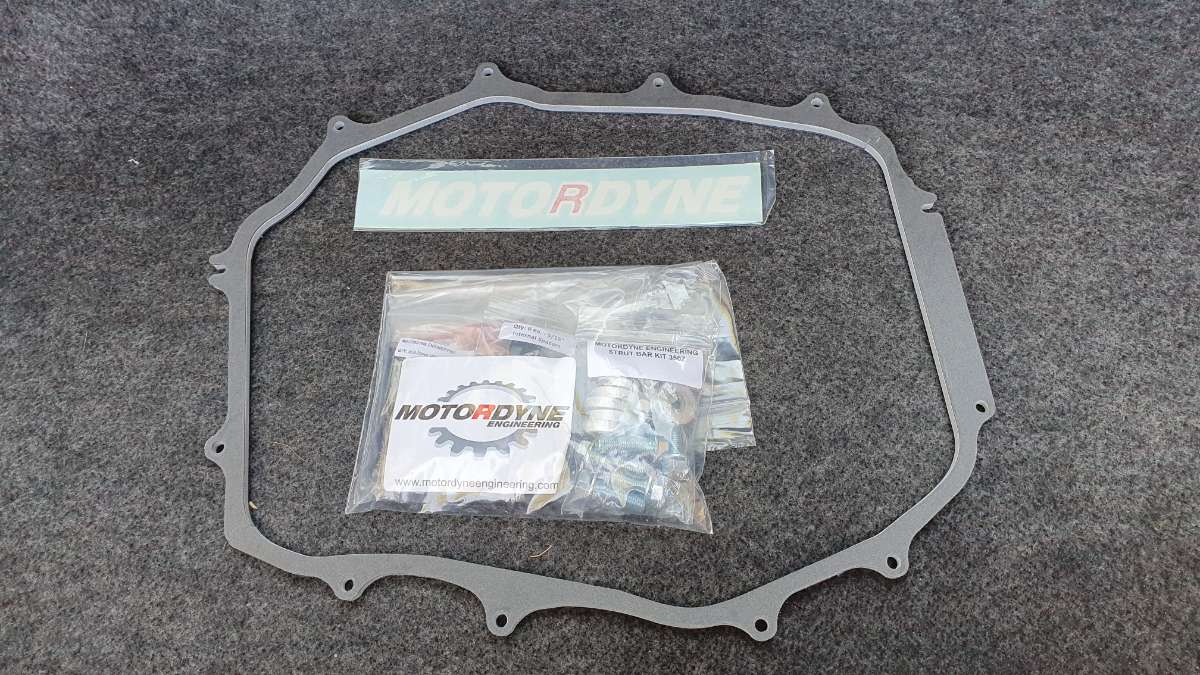
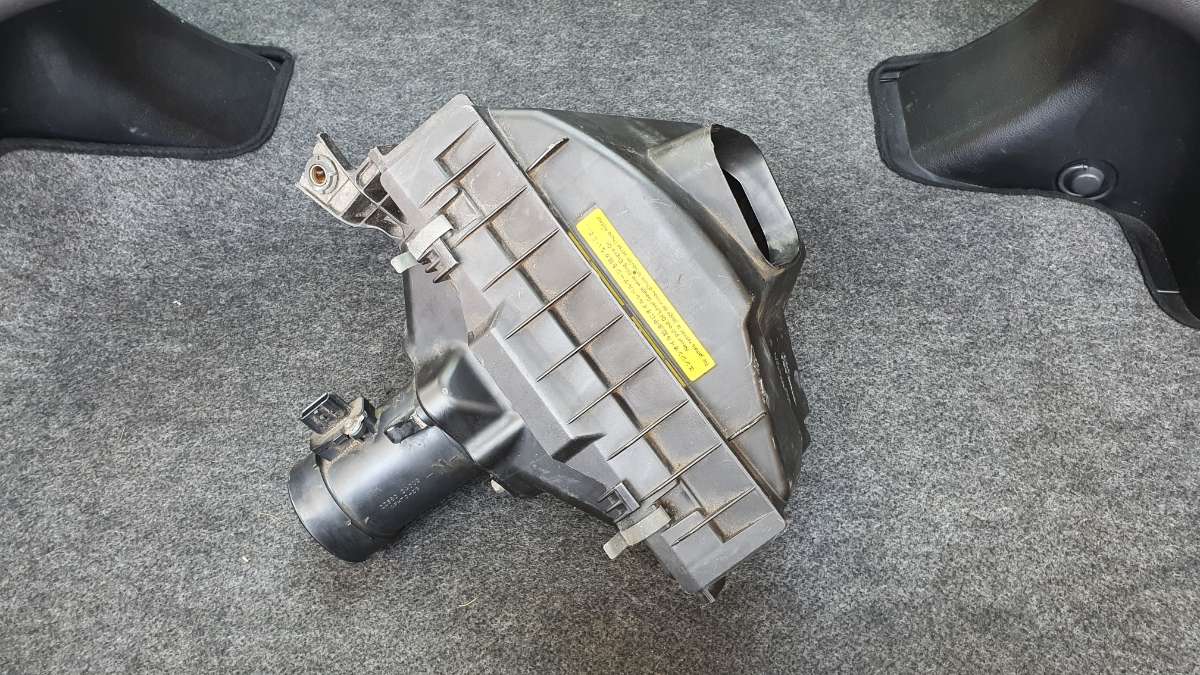
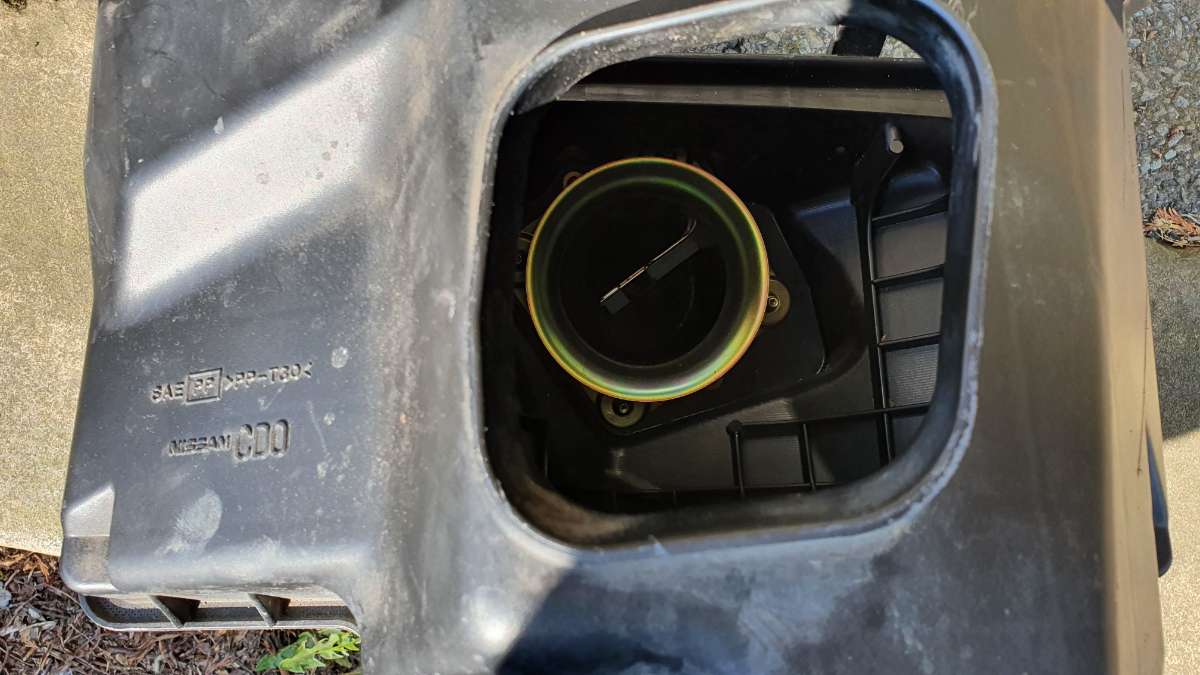
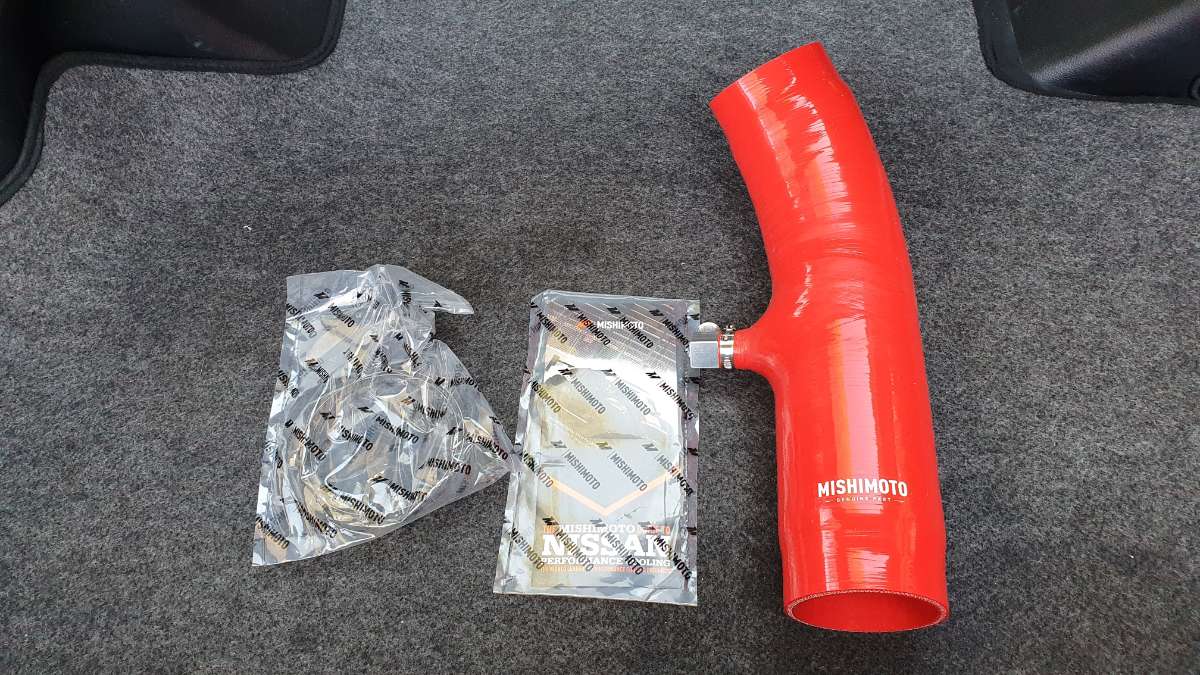
Now the initial issues with the Zed are resolved it's now time to bolt on some bits and get the motor in optimal condition for a future remap, and maybe gain a pony or two. So without further ado let's get into it. Firstly, servicing a few bit's can go along way when your wanting push the limits on a dyno, it definitely won't hurt. HP-1008 K&N Oil Filter fits Nissan 350Z 3.5 V6 2003-2009 https://www.ebay.co.uk/itm/381713555729?fits=Car+Make%3ANissan|Model%3A350Z&hash=item58dfe6a111:g:OUUAAOSwXN5amm6l DENSO IKH16TT IRIDIUM TT SPARK PLUGS https://www.ebay.co.uk/itm/163183041006?epid=19026917692&hash=item25fe7799ee:g:3u8AAOSwP4FaCrNW HKS Super Air Filter https://www.ebay.co.uk/itm/303349669616?fits=Model%3A350Z&epid=26035665498&hash=item46a10c9ef0:g:XdwAAOSwmlZfF-QX Castrol Edge 5W-30 LL 4L 4 Litres Full Synthetic Car Engine Oil Titanium FST (4.7 Lt needed) (Massive link, just search it) Since the garage already had some of the engine bay disassembled because of the spark plugs, it was the right time to gain some BHP Motordyne Nissan 350Z VQ35DE 5/16" Basic Plenum Spacer (Claimed 11-13 (W?)BHP gain) https://www.tarmacsportz.co.uk/motordyne-nissan-350z-5-16-basic-plenum-spacer.html A little thread about why I choose this spacer 2006-07 Rev up Air Box with velocity stack (Claimed 5 BHP gain) And just to help it breath a little easier Mishimoto Silicone Air Intake Hose Kit - fits Nissan 350Z VQ35DE - 03-06 - Red (Claimed 2-3 BHP gain) https://www.ebay.co.uk/itm/154368939052?epid=3012505299&hash=item23f11b142c:g:kY0AAOSweANgS4ko I choose this inlet pipe because it's silicon and won't be effected by heat sink like plastic and especially metal are, also it's ribbed (FHP😉) so it won't contract under load either. According to to manufactures I've gain as much as 21(W)BHP not including the supposed gain from the air filter which I'm not counting since it already had a K&N panel filter in. So whats the verdict now I've had chance to get some miles done, I have to say I haven't noticed much of a difference, it might rev a little easier, there's no dramatic change though, I know I'll need a remap before getting the best out of these mods and this has just been the ground work for whats to come. But I have to say I'm more excited about having the delayed throttle response in 1st to 3rd removed with the tune than I've been with these bolt on's, which to be fair with the Zeds ECU dialing out the upgrades gains, I've got pretty much exactly what I expected. The remap can't come soon enough. (Have my old '05 air box with K&N filter up for sale, if anyone's interested. Going to post it in the correct thread soon)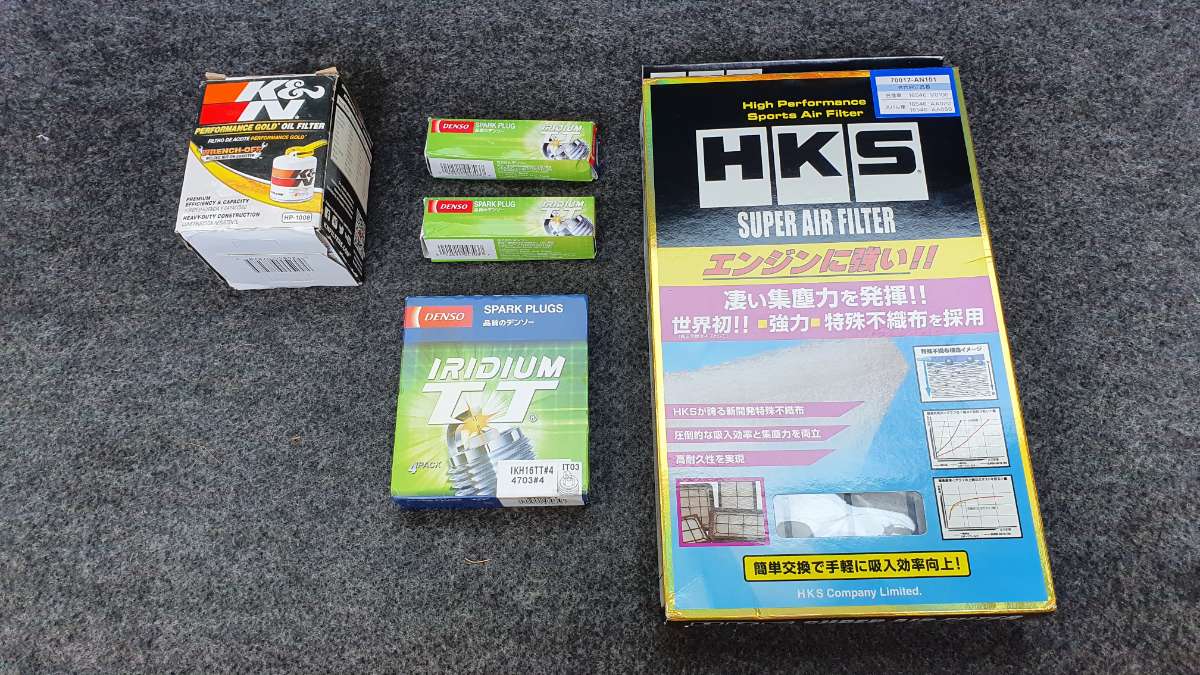

-
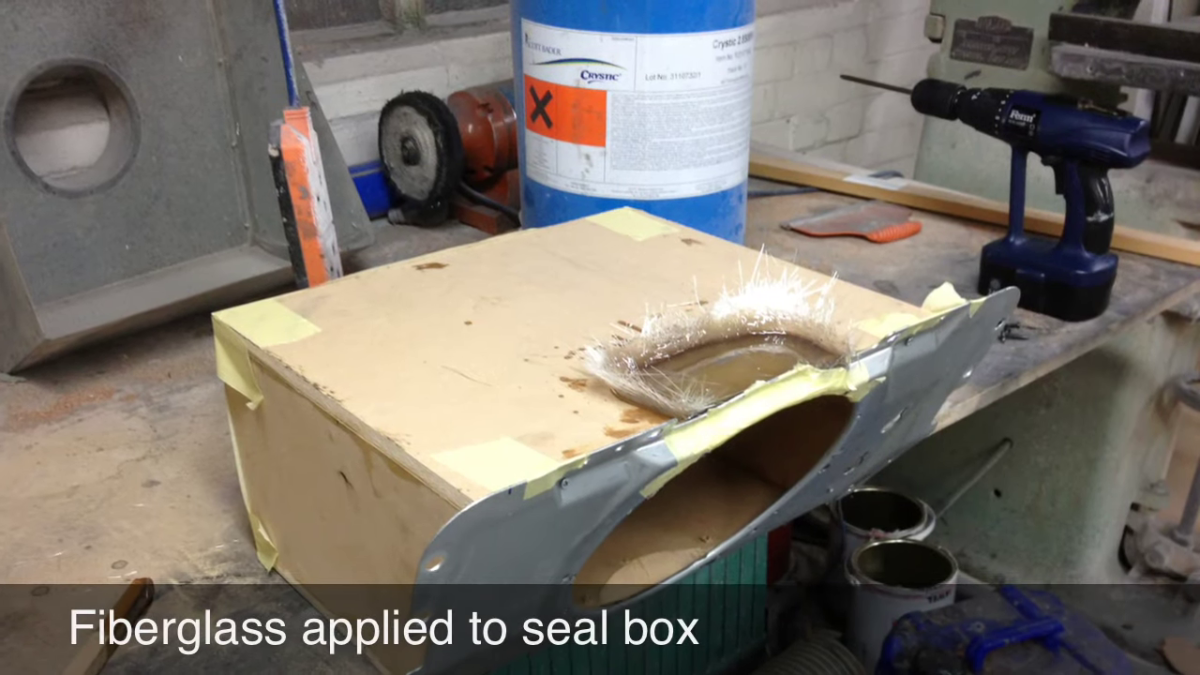
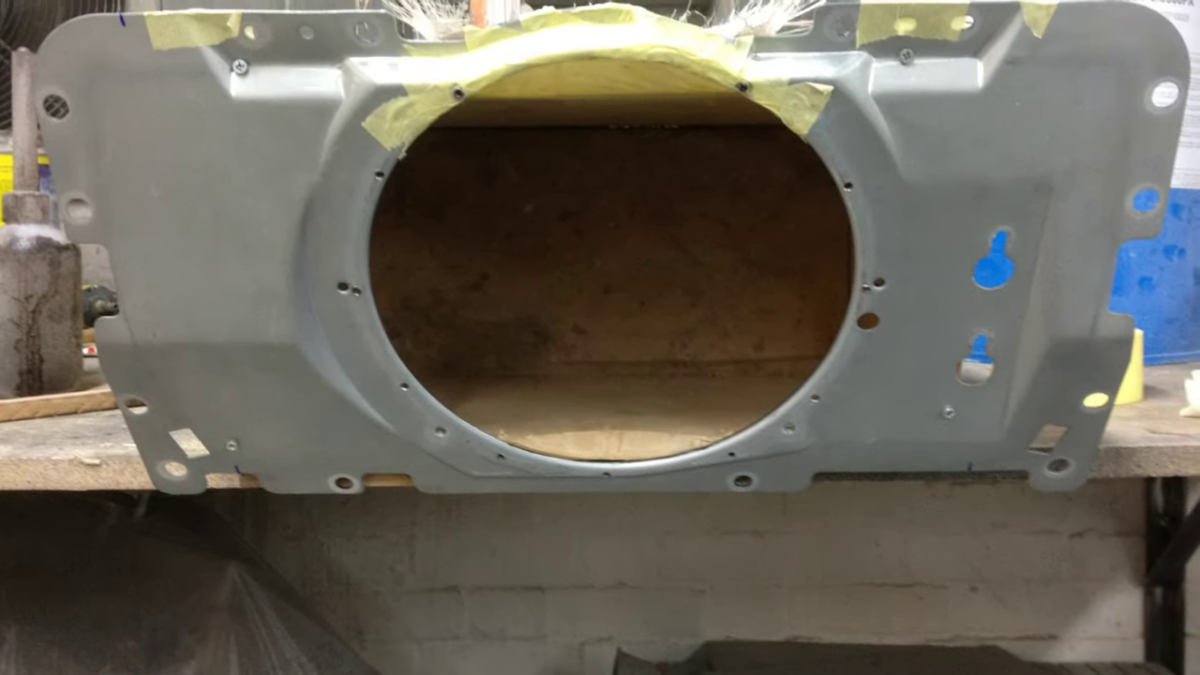
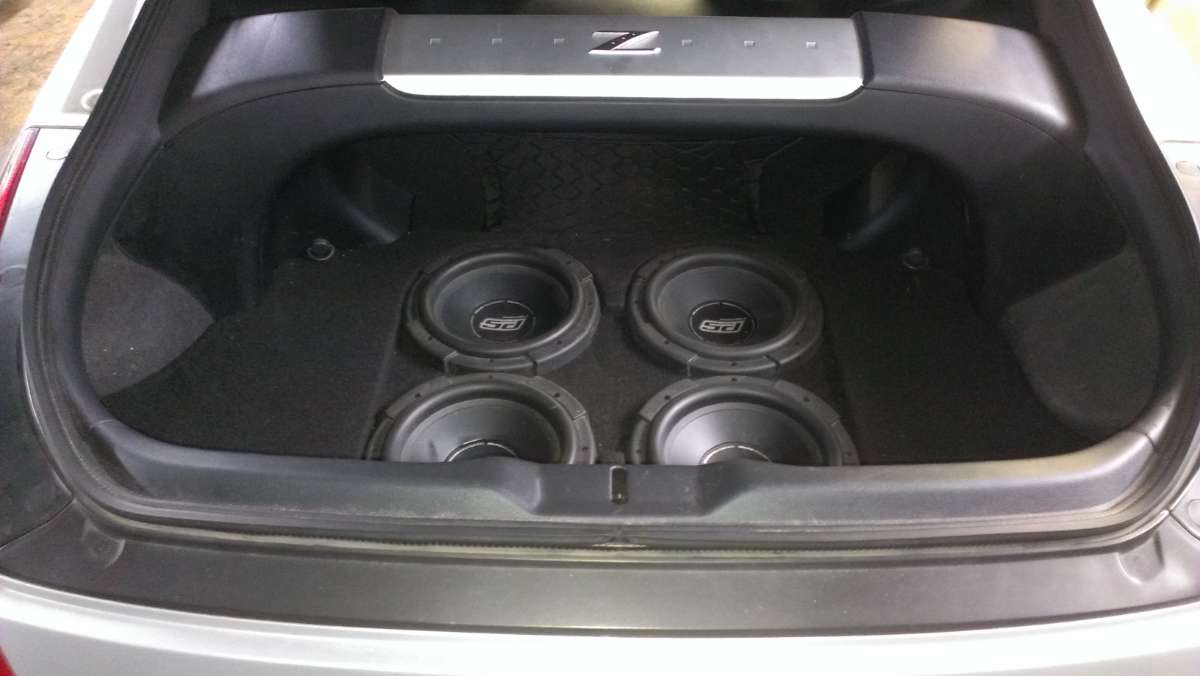
The 10 inch Subwoofer problem. When I started this build I always knew the sub would cause me the most trouble, it has but not in the way I originally thought. The plan was to get a custom box built just like the one in the professional build video, my only worry was the fabricated fibreglass section at the bottom of the frame. Which is needed because the factory sub is slightly larger than the frame and sticks out leaving a gap, this needs to be filled to made the box air tight. I couldn't help but wonder if there was a better way, so I decided to read a few more threads and see what other people had done. I guess the first thing I found was that the metal frame used to house the sub in the factory location is far from the best material for mounting a speaker, even if you use sound deadening the flex from the metal will spoil the sound, so that was out. I kept on reading and it seems the sub has been an issue for many people before us. I read stories of downward firing, upward firing and replacing the metal frame with MDF, but in every thread there were people saying the same, it'll sound terrible and that the factory location is the worst place for a sub. I was beginning to lose faith until I found a thread which I believed could solve the problem. The poster was using CAD design software, sound recording equipment, making prototype boxes and had easy access to the factory location, they also posted their plans for other people to copy, I thought I'd hit the mother-load. Sadly it wasn't to be, all the attempts the OP tried failed, the factory location as it turns out is a terrible place for a 10 inch sub. The only people to make it work, use 8 Inch subs in a enclosed box because they will fit into the factory slot allowing removal of the metal frame but getting a 10 inch to works it seems is a no go. So what now. For you there are two options and these depend if you want to keep your spare wheel or not. Custom subwoofer enclosure under rear strut bar or in the boot where the spare is. Both have their drawbacks, the "boot" is also only 15cm deep, so a shallow sub is necessary here and because I prefer bass below the ears and not above like it would be with the strut bar type I'm going to lose my spare. The truth is both will produce better sound and deeper bass than in the factory location. Which ever you choose, stay tuned because I still have the amplifier and rear speaker install to cover.