


ikarus
-
Posts
514 -
Joined
-
Last visited
Content Type
Profiles
Forums
Events
Gallery
Store
Posts posted by ikarus
-
-
Its also worth sticking some dynamat on the plate that holds the woofer.
Mark
+1
Dynamat is design to absorb vibration. You don't need to cover everything but stick it anywhere that looks like it might resonate (usually large flat panels).
-
PM'd - Payment sent, thanks

-
I'll try and make this one if i'm not working, any details yet other than the date?
1. Nurrish - Solihull
2. Ians16 - Redditch
3. Husky - Coventry
4. Rich5259 - Daventry
5. stichy- kidderminster
6. Maccaman - Stafford
7. Ikarus - Stafford
-
soo... is it still for sale??
only joking.. geez you guys are quick to judge - and persecute (i particularly liked the chip pic). It wouldn't hurt if the original poster updated the title though.. I misread this and thought Husky was selling them - thus not getting the whole 'its on my car' thing - i am a dumb a$$ yes i know, but i scan read on my way out to work.
Sorry Husky for spamming you fella
 ..soo... you don't want to sell it then..?
 -
 ..this still for sale?
-
I never cease to be amazed.
I won't be doing this.
-
Im after some uprated dampers / gas lifters for the rear hatch of my Zed - ings spoiler to heavy for OEM ones - keeps giving me a headache
any pointers
Where are you based? I'm going to sgs-engineering (http://www.sgs-engineering.com/pages/home) in Derby this Friday to have some fitted and gased correctly. I have a blitz spoiler and some sound deadening on the tail and so i'm in a similar situation to you. These guys will adjust the gas pressure on a pair of new uprated dampers to suit the car and give a 2 yr guarentee - for around 65 of my pounds. They do sell them direct from their website but its difficult to know the right pressure to buy, hence i arranged a visit to get them spot on.
Will let you know how it goes at the weekend if you want
-
Good thread, dangerous but good
Not sure about this one though:
Women will never be equal to men..until they can walk down the street with a bald head and a beer gut, and still think they are sexy.
Take a look around, we have the 'ladette' culture to thank for this actually becoming real. I mostly blame Lilly allen.
-
Cheers for the responses. I have to admit I'm shocked to hear the front windows are already done! You barely notice it. Therefore I'm starting to question whether more windows done like that are worth it as it still won't be noticeable!
I was also - the rear window is also tinted to the same amount (or at least mine was). You can check by putting a white A4 piece of paper behind the glass, you'll see the tint straight away if there is one. Putting a light tint on the rear adds to the existing tint and works well in my opinion, you can tell it's done but it's no where near blacked out. Helps keep the headlights (and fog lights
 ) behind you from blinding you at night too which is a bonus.
 -
Just had mine done on Firday. Rear window and sun strip only, side windows are already factory tinted to uk legal limit. Not sure if UK cars have a factory tint or not, mine is a JDM. Looks great now, very happy i did it.
Sun strip.
Negative.
Each to their own
-
Just had mine done on Firday. Rear window and sun strip only, side windows are already factory tinted to uk legal limit. Not sure if UK cars have a factory tint or not, mine is a JDM. Looks great now, very happy i did it.
-
Interesting thread.. what about traction though, what experience have people had running FI on the quarter mile? Just wondering if there is a 'limit' to how much power the zed will actually put down on a launch without spinning out? Most seriously fast cars run 4wd, but not all i know.
-
Just put mine up for in the for sale section, thread with images..
http://www.350z-uk.com/forum/viewtopic.php?f=32&t=31327
Neilp if you are still interested in these pls let me know asap, i have pm'd you but haven't had any reply
-
As per title,
For sale are standard wheels off an 04 zed. Tires are new on the front with less than 100 miles on them, and original potenzas at the rear with only minimal tread but passed MOT.


They are in very good condition compared to most, a few niks if you're up extremely close as you would expect but to be honest they're probably in better condition now than my newer wheels that i bought 5 months ago to replace them

Looking for £250 + postage
-
I would have thought going much cheaper than £3k is a bit of a risk as how good a job would you expect? I'm not questionning yours as you may know someone or get a discount but I would have thought a general rule would be to question sub £3k resprays...
Yes i agree that 3k is about the ballpark figure - and yes it depends on who you know too
. The risk comes in though only if you haven't done your homework.
-
why change it?

+1 white is nice but its not £3000 nice

I would say it is
+1
White imho suits the zed perfectly. Beware though as if i remember correctly nissan white (pikes peak?) is a pearl 2 coat finish which is a problem when you get stone chips and want them touched in.
PS it's not necessarily 3k to get a full paint job, just had mine done for quite a bit less
(yes, in white) - even less for a wrap i think? -
np. I hooked up my speakers yesterday and got the door cards back on, everything is working spot on
-
Very impressive work this. I've seen some modified cars in my time and it's all too easy to lose track of the theme and end up with a scitsofrenic car where things just dont gell.
This one is spot on fella, top marks

-
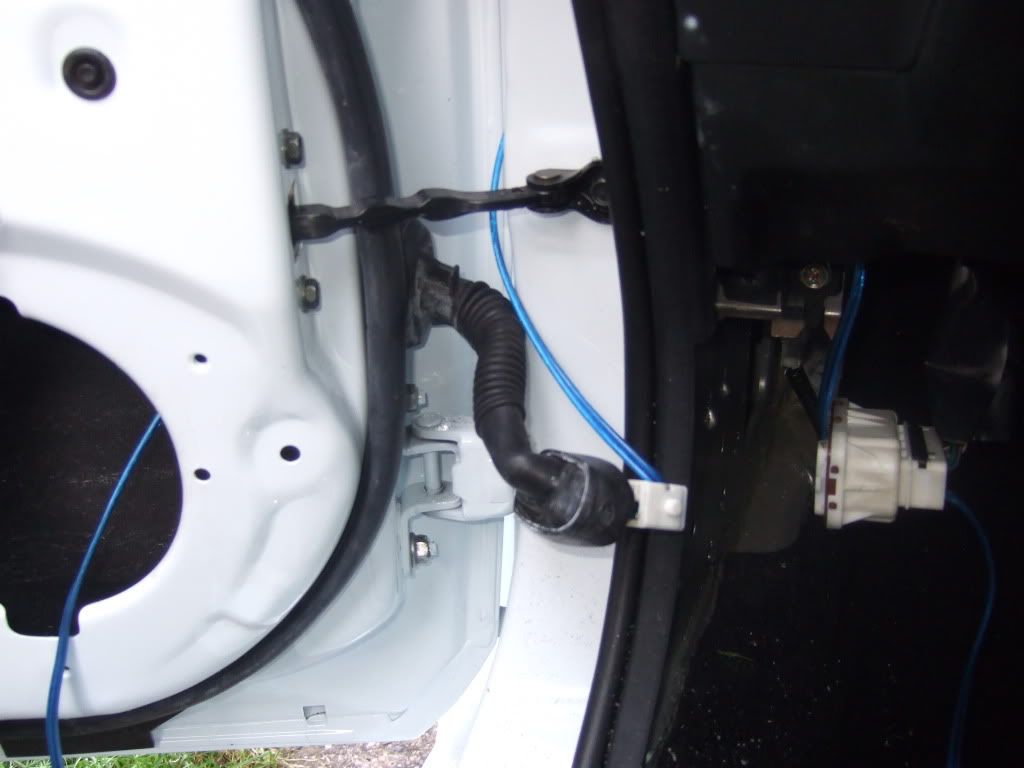
Ok, so here's my mini guide..
Open your door and you'll see the rubber gaitor and plastic clip, pull down the grey lever to release it. Tip, pull the door back (close) just slightly and you actually get a little more room.
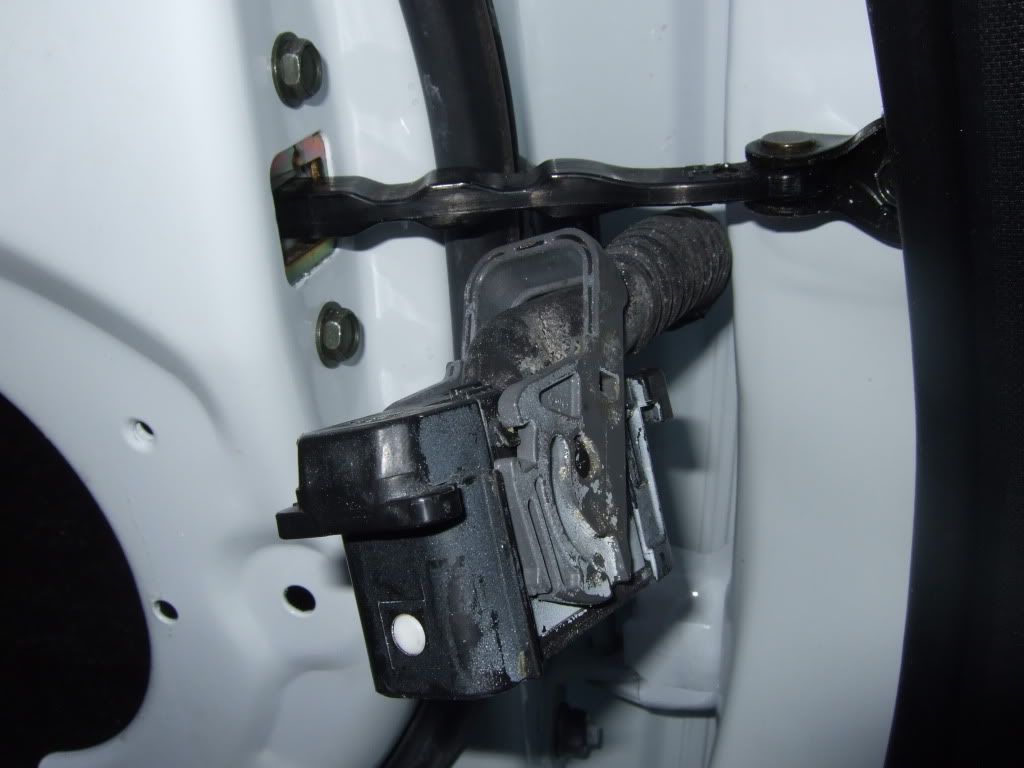
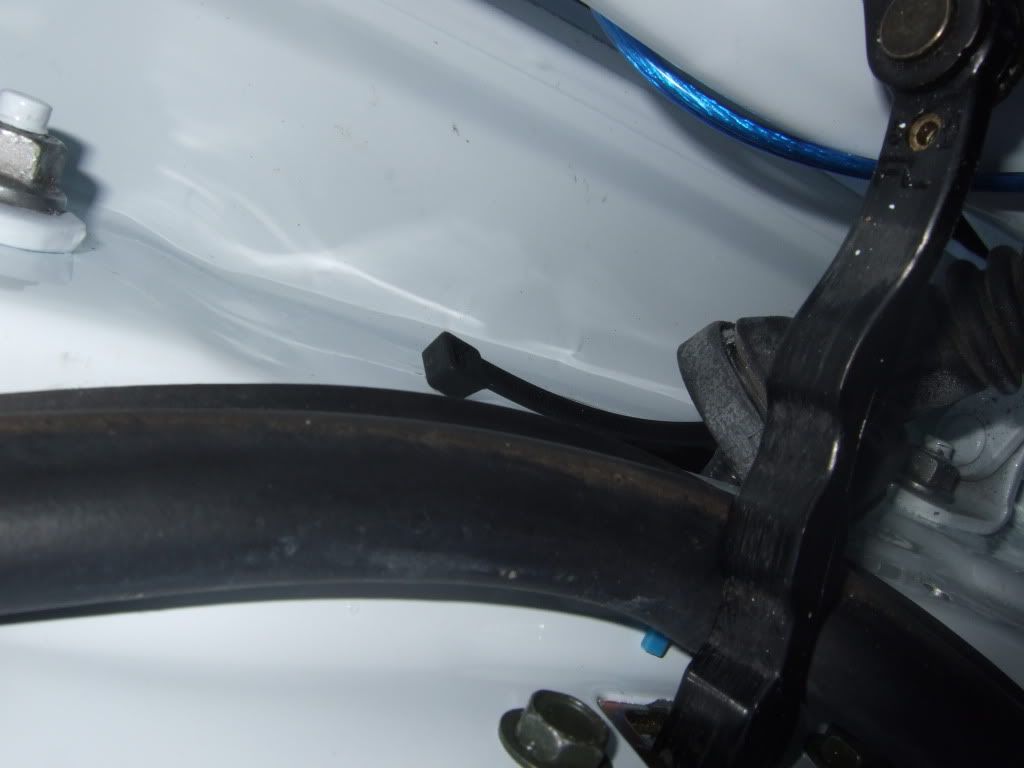
Pull the assembly down under the toor stop bracket.
Now with the clip in its open position you can remove the grey lever with a a little help from a flat blade screwdriver.
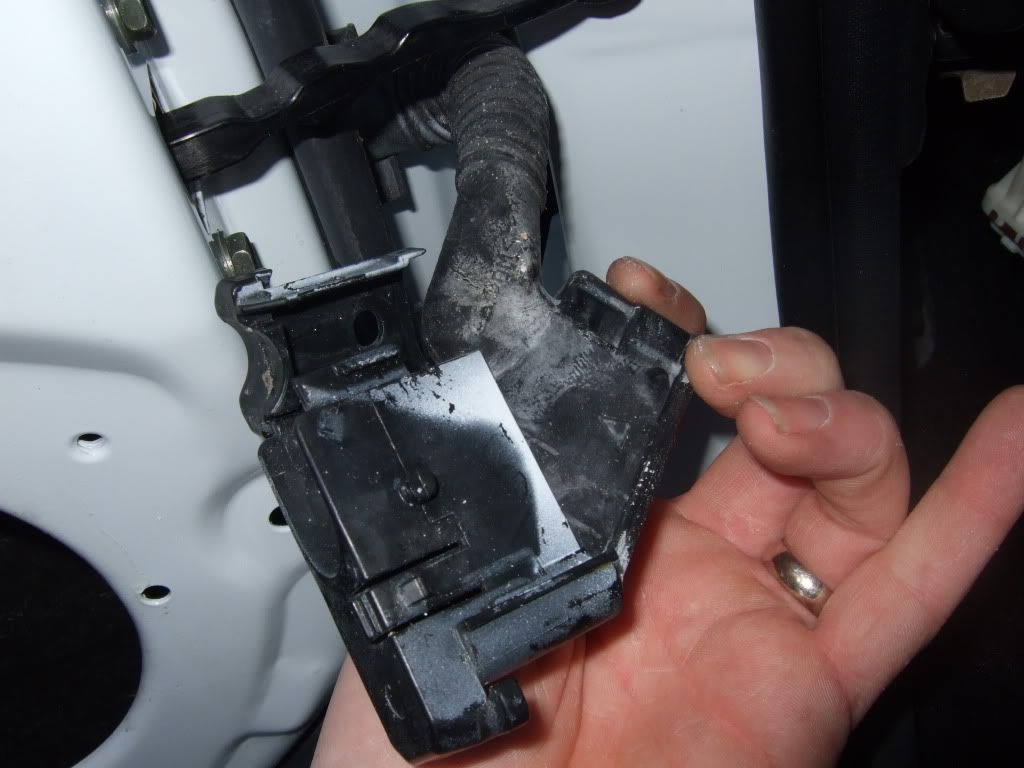
Now the black plastic cover also comes off by releasing the clip, you should just have a rubber gaitor now.
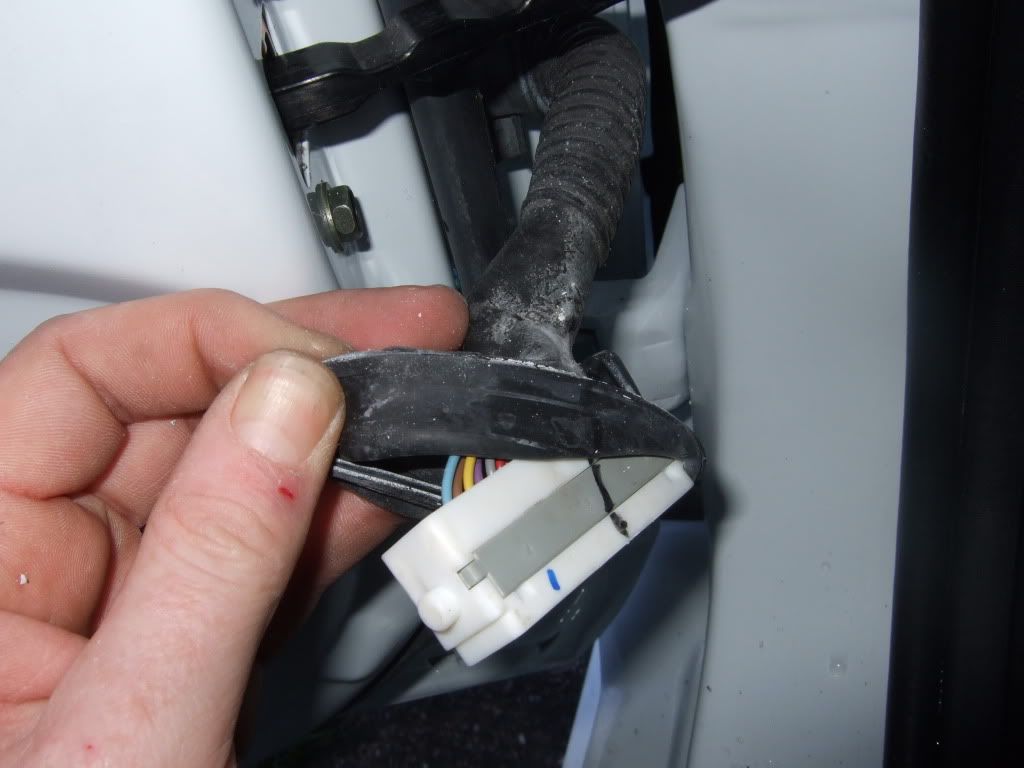
Roll back the rubber gaitor to reveal the wires.
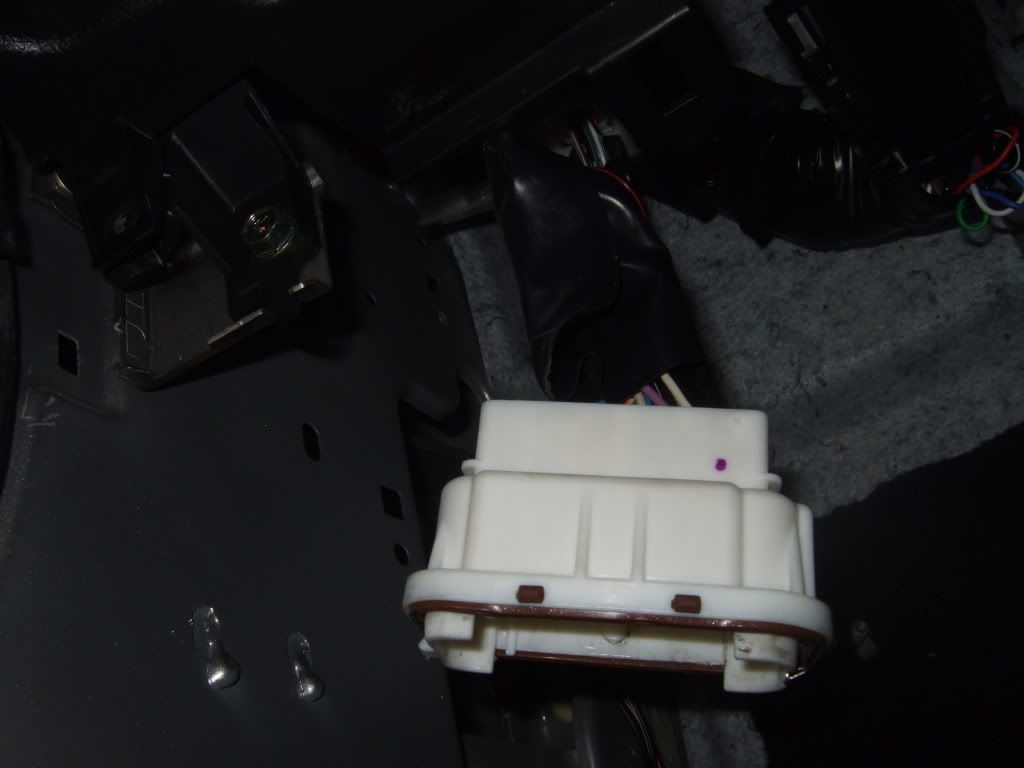
If you fish about inside the car just above the kick panel location (kick panel removed) you will find the other half of the assembly, unclip this from the bodyshell and pull it free and into the footwell where you can work on it.
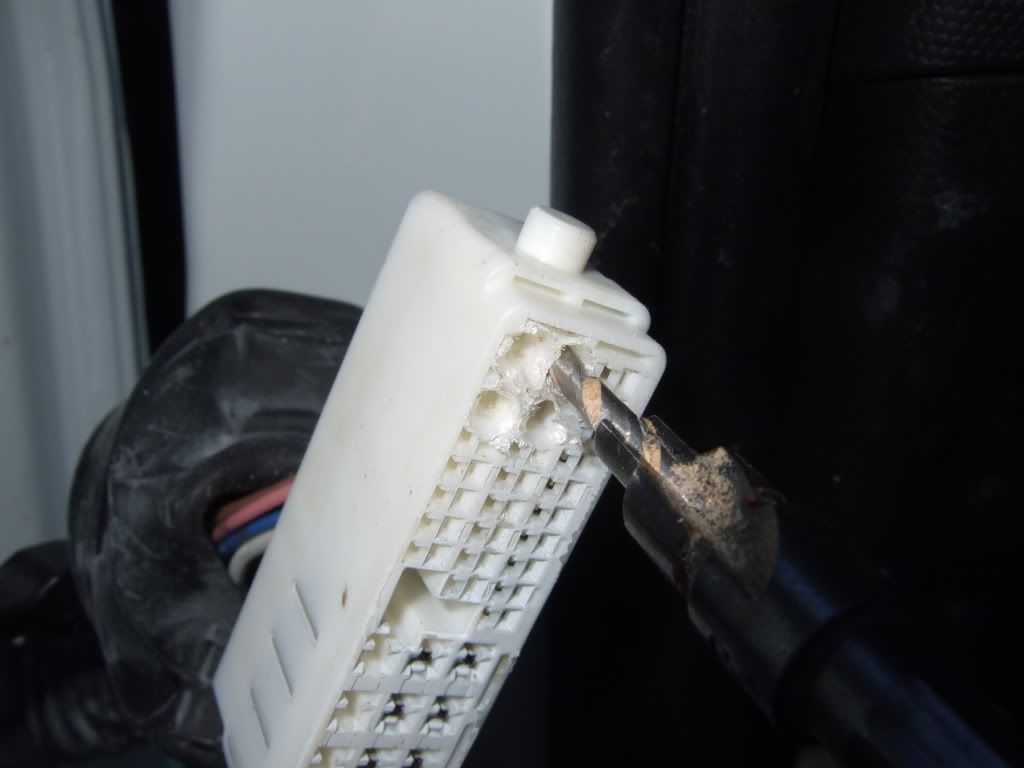
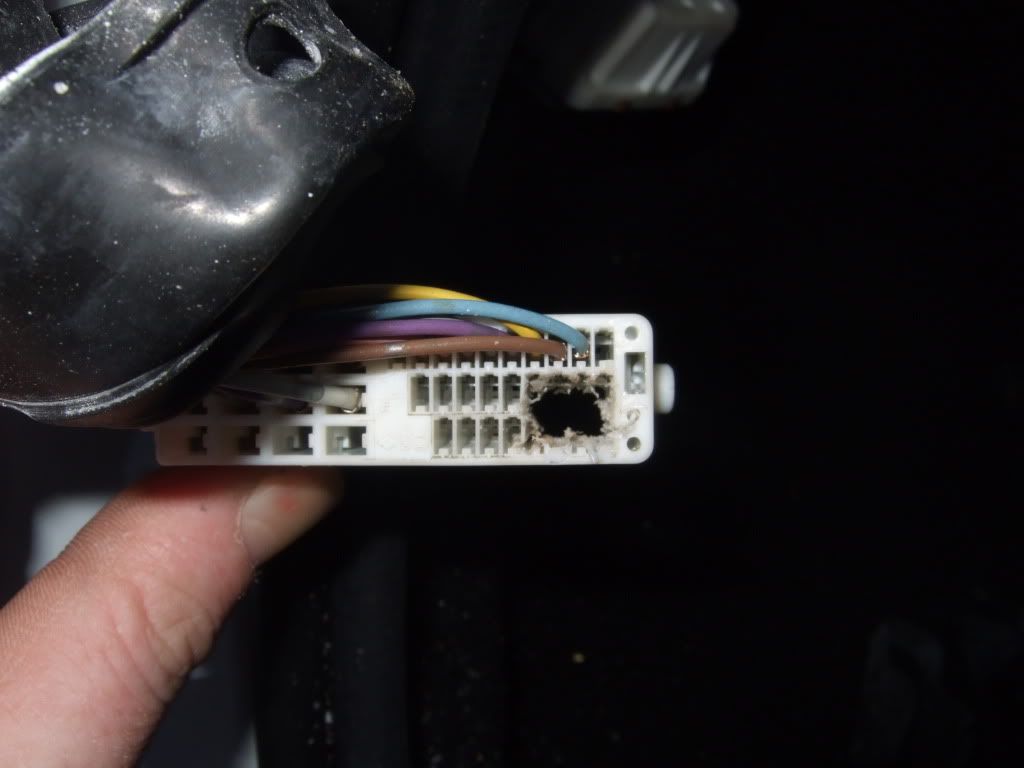
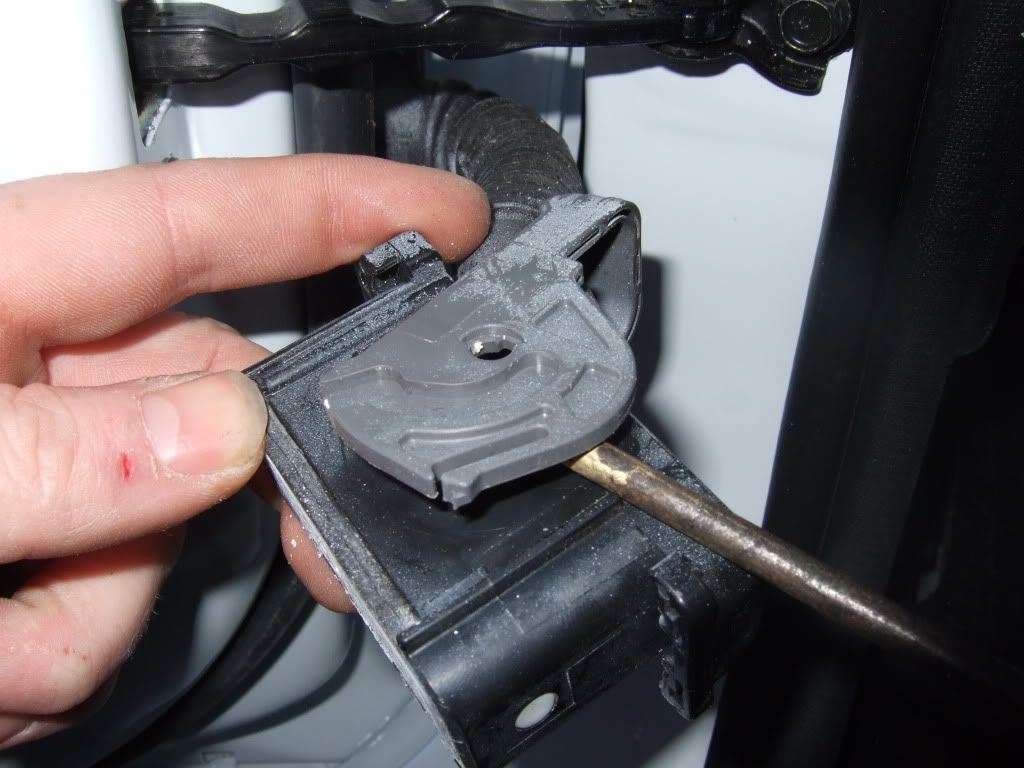
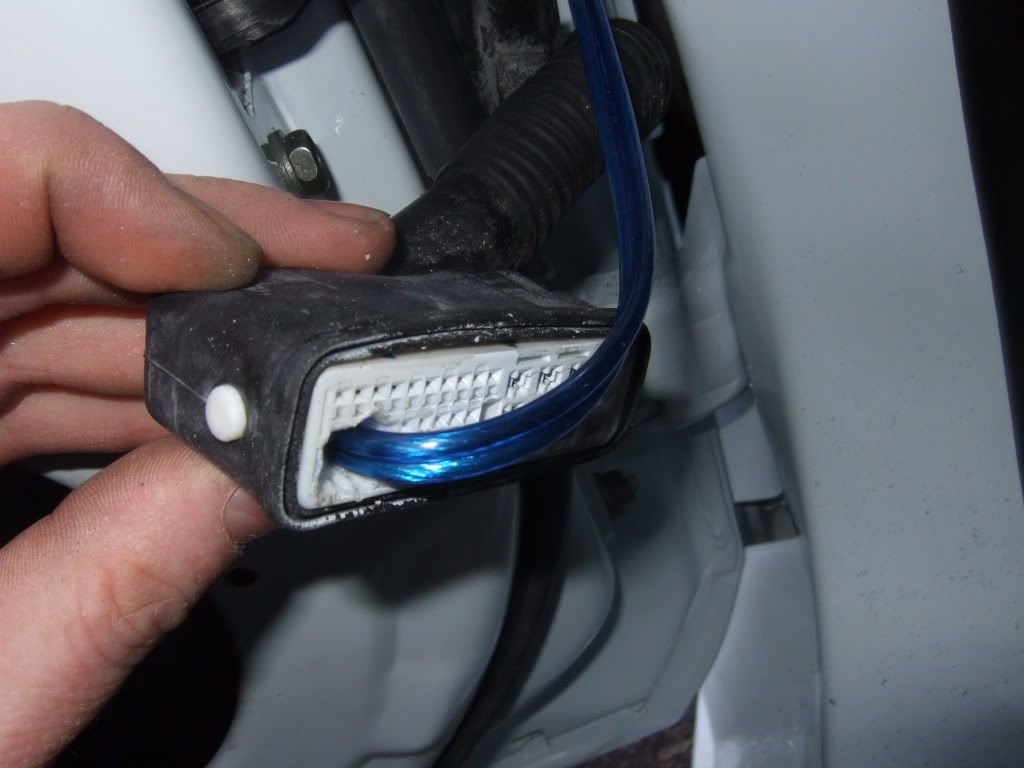
*This is the tricky bit! You need to create a hole in each of the plastic wire connectors for your new speaker cable to go through. Use some unused space away from most of the used pins. I used a knife, then a drill (about 3mm i think), then finally i used a soldering iron - there is no easy way to do this - you just need to be patient and take your time. If you mess up the neighbouring wired pins its all over - BE CAREFULL!!
*HINT - if it's cold (it was) run up your engine and put the heater on, it blows out straight onto your head while you work.
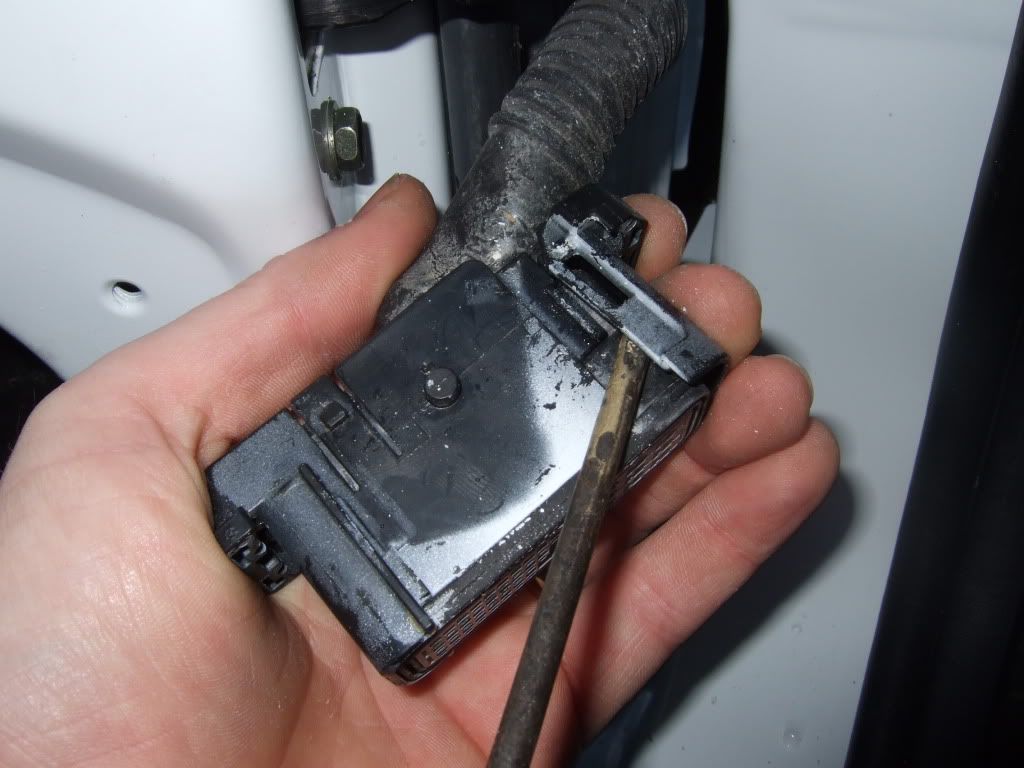
Once you have enough clearance for your new wire, clean up the connector and then it's on to the other half.
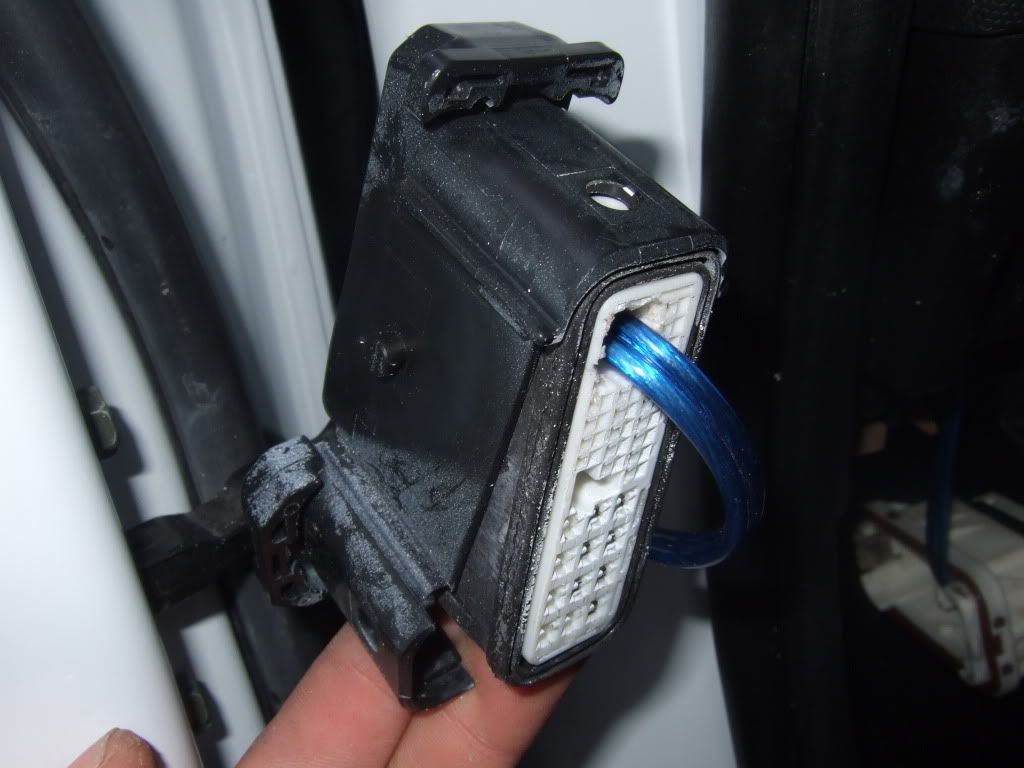
Do the same to the other half of the connector (now in the footwell). Make sure your new holes will align when you clip them back together - this is very important.
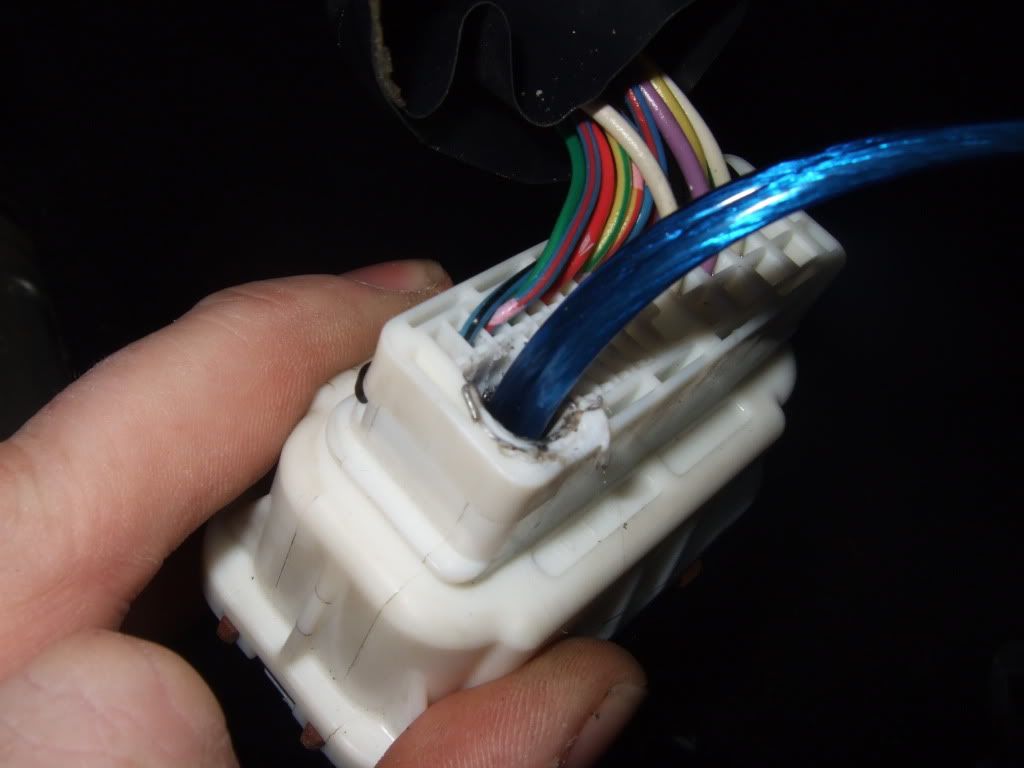
Next start to feed the new speaker cable through, i started inside the car and worked outward. Fee the cable through the plug and up through the hole in the body panel for the clip.
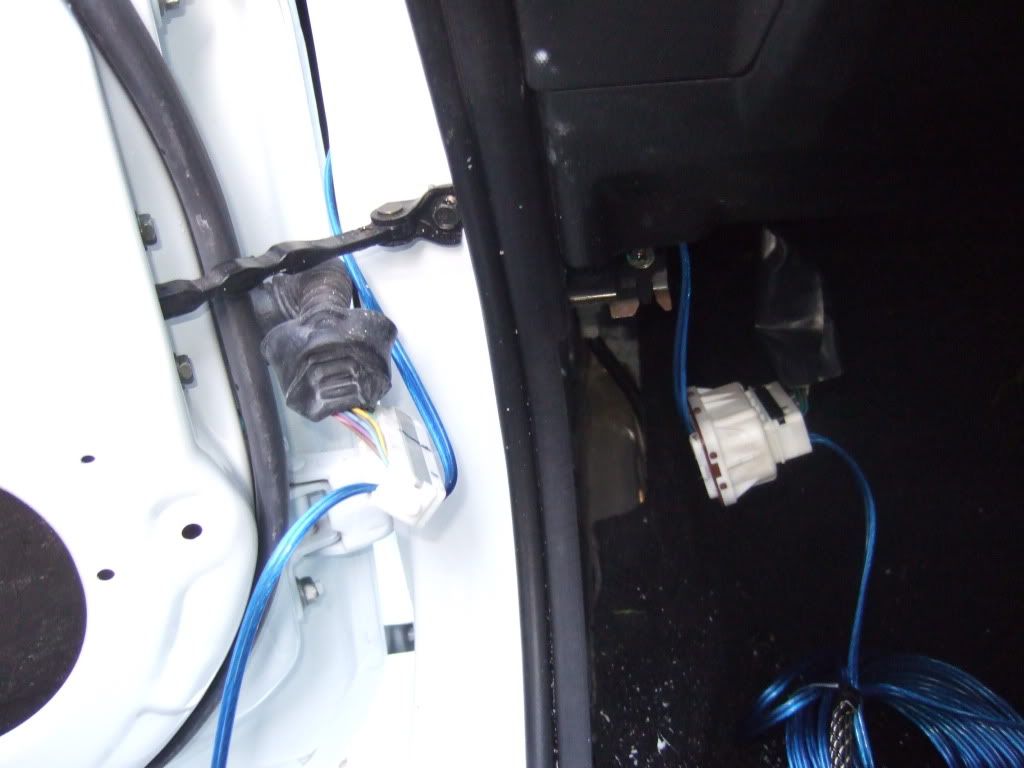
Next feed it though the outer clip ready to go through the rubber gaitor.
Next i pushed out the rubber gaitor from where it seats in the door. Then made a small slit in the part that sits inside the door so i could push through a large cable tie to act as a guide pull.
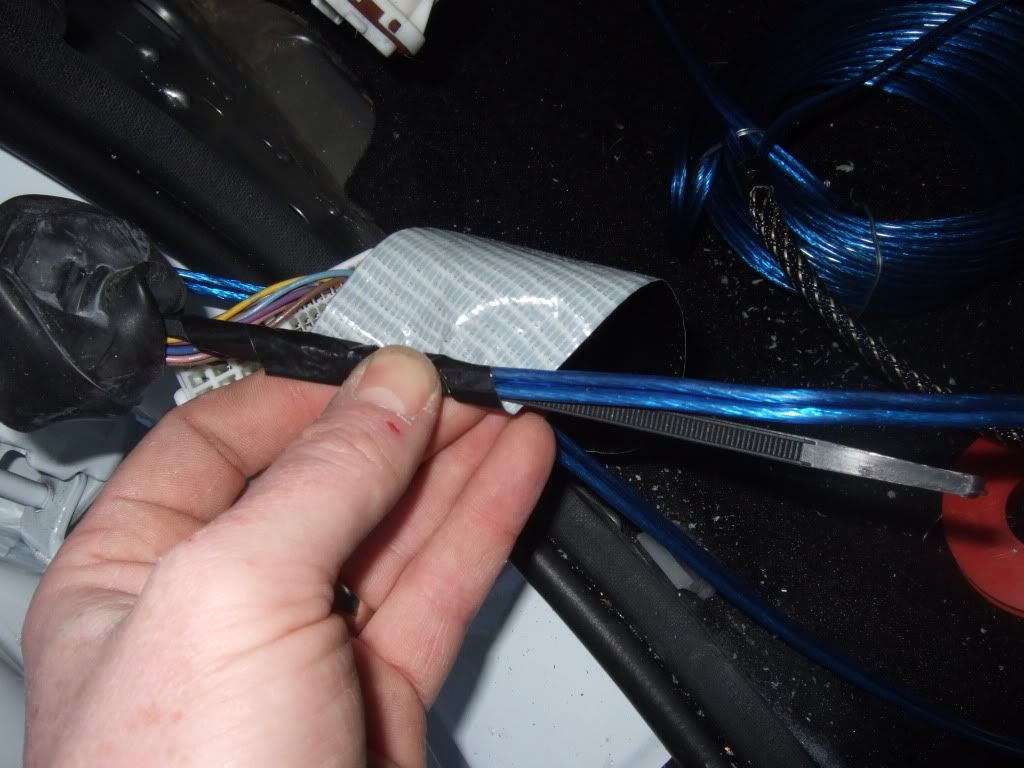
Now attach the speaker cable to the cable tie with a little gaffa tape (to too much - you dont want to make it too thick).
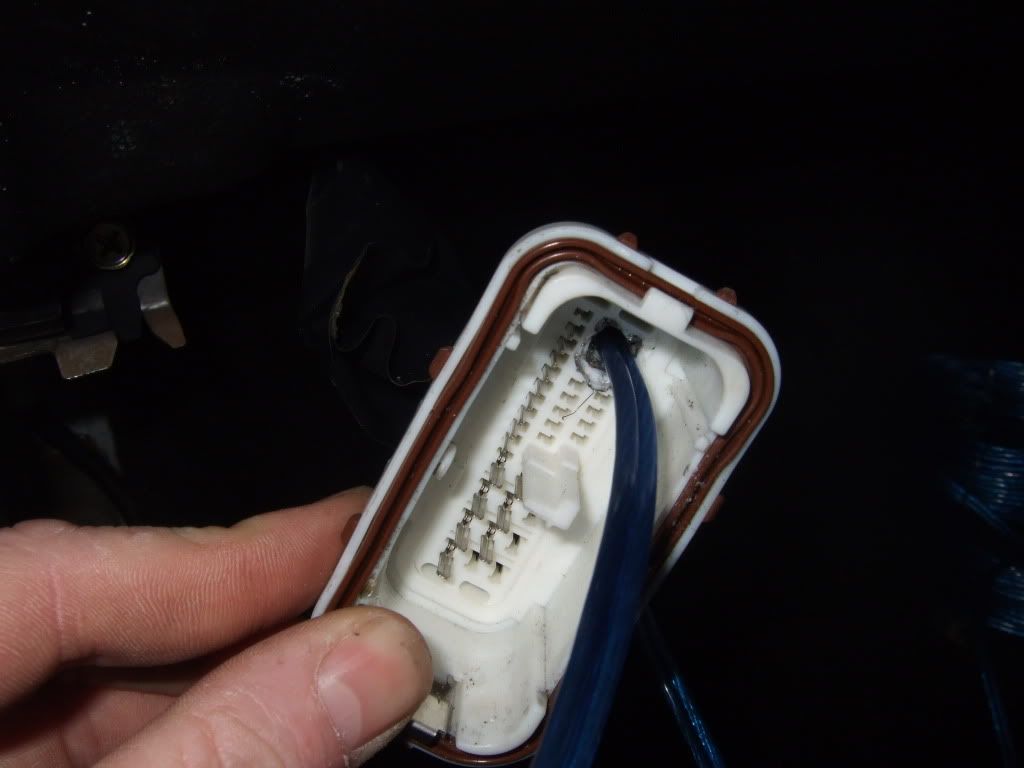
*HINT - spray a little silicon lube or 3in1 oil on you finger tips and coat the gaffa tape and cable - it will slide through easily now (it wont if you don't believe me!). Now pull/push the cable through the rubber gaitor.
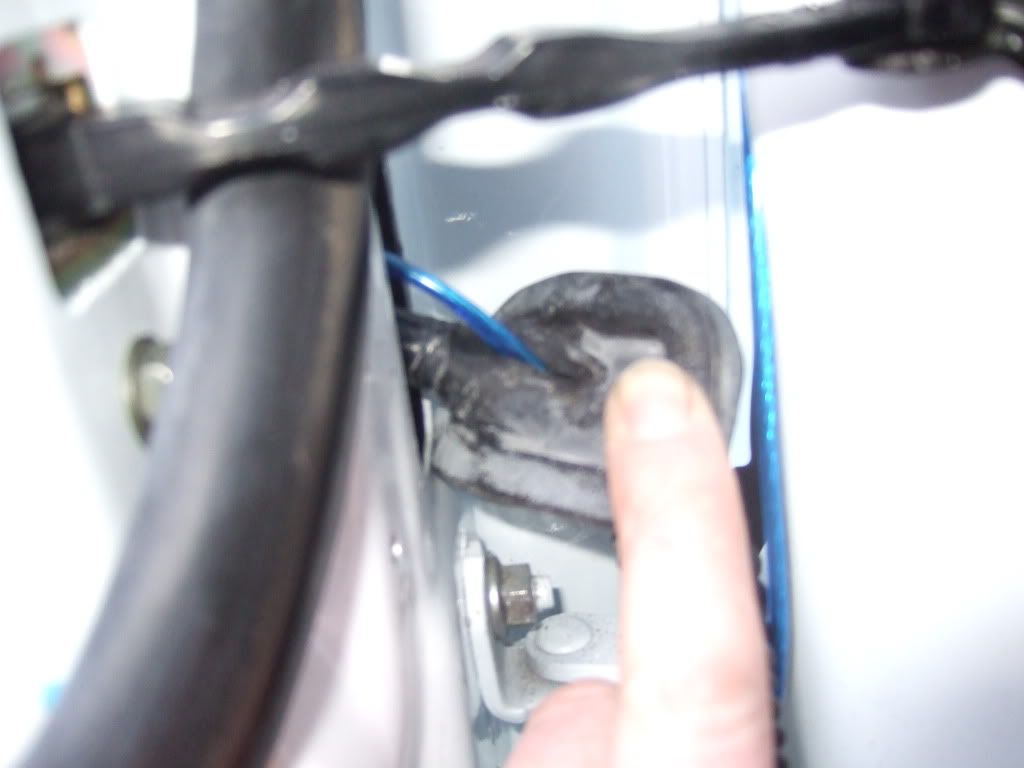
Once you have the cable through, feed it into the door with enough to reach your speakers, then reseat the gaitor into the door side.
Now re-assemble the clip in reverse order.
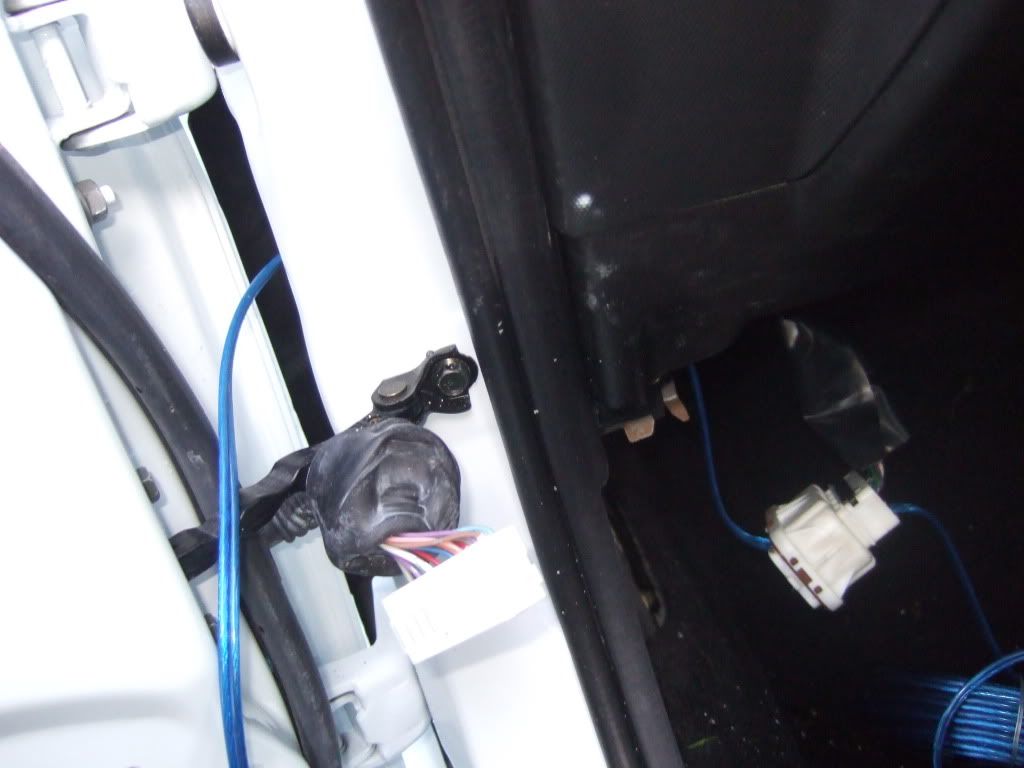
Next re-seat the inner clip above the kick panel in the body panel, you need to feed the top part in first and then pivot the bottom part in untill it locates.
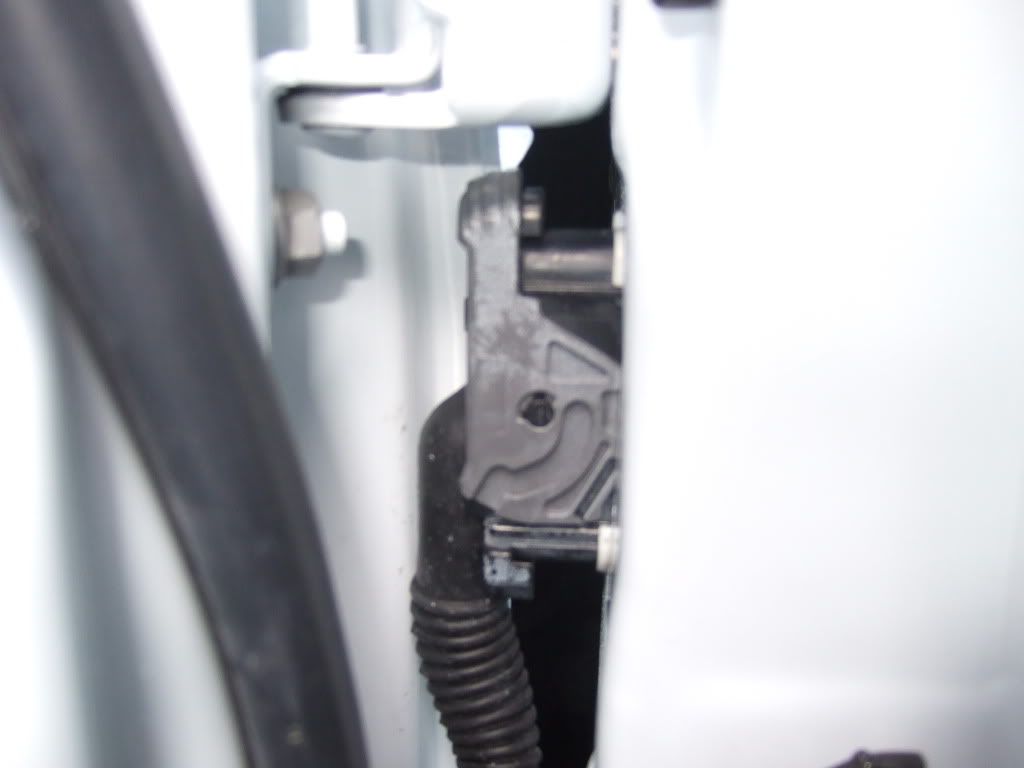
Next align the outer clip with the grey lever full down (not as photographed - i realised this after i took the photo) into position (again move the door slightly inward to give you the room to do this).
THIS IS IMPORTANT - from the inside simultaniously pull any speaker cable slack back into the car to avoid any bunching inside the clip assembly.
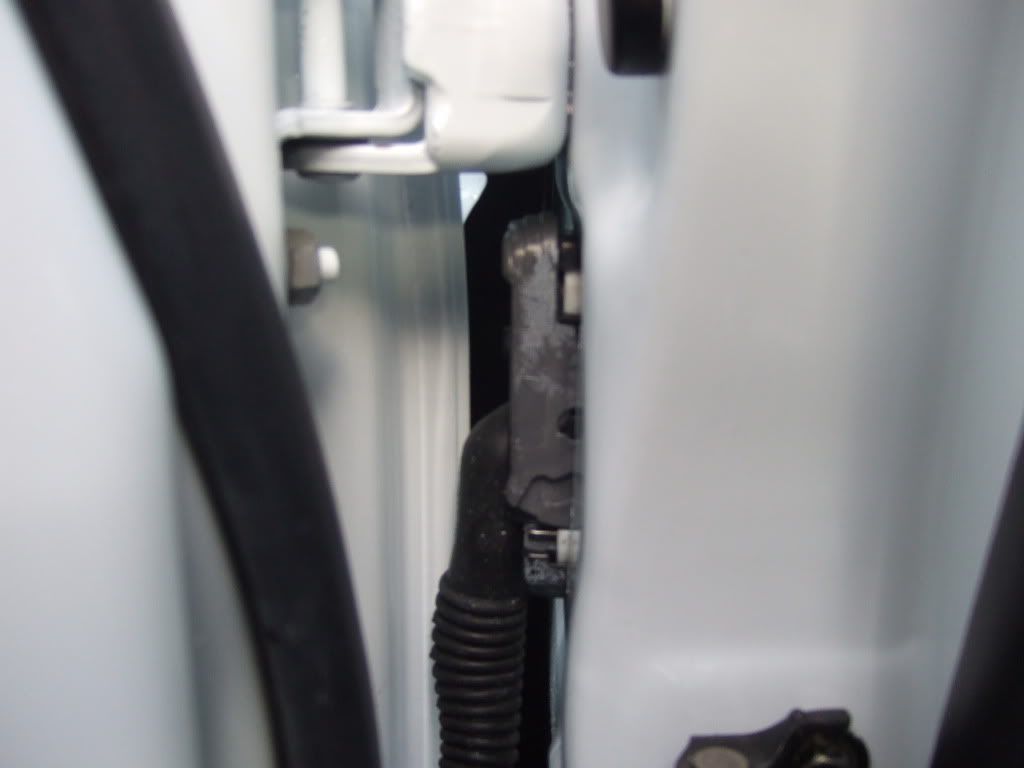
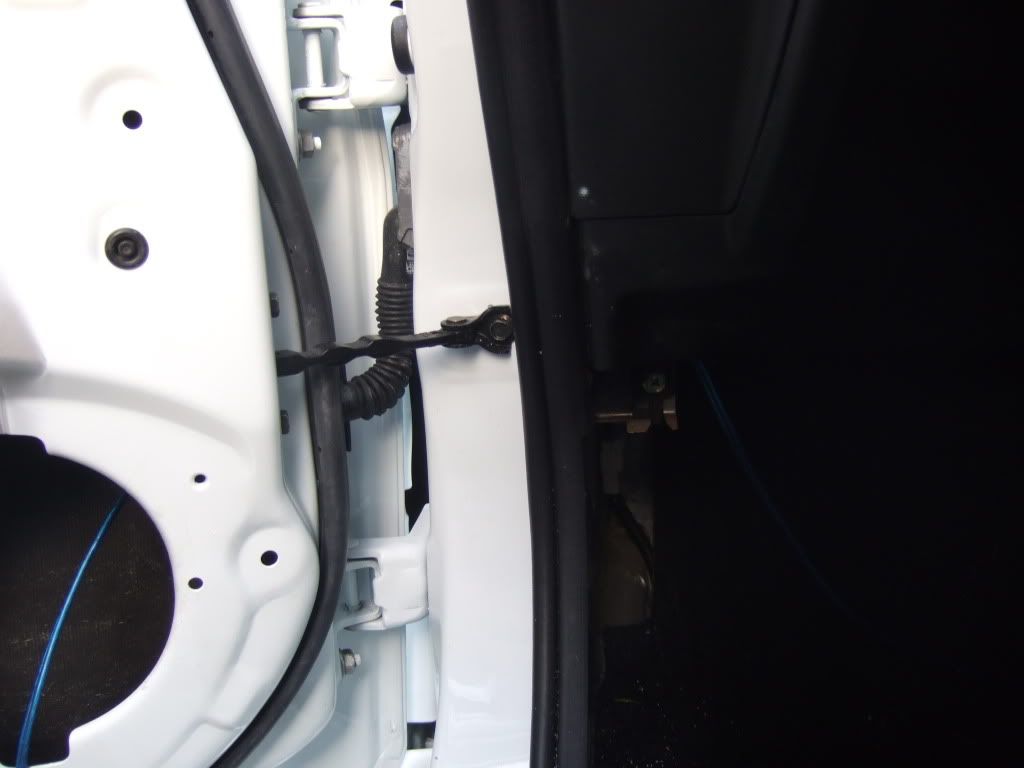
Next just move the grey lever back into it's locked position and there you go.
Before putting the door card back on, plug in the electric window control panel and just check everything is working ok.
*CAUTION - the two clips are male pins and a female socket, if you disturb any of the male pins significantly you could damage them when you try to re-assembly everything - they have to align on both sides.
*PS my car has been re-sprayed and there is some overspray on the clips, i could see how this might be confusing on some of the above images.
It worked for me, i now have decent cable running to the door speakers
Hope this helps
.ikarus.
-
I just did mine, it's definately a very fiddly job. Well worth starting on the passenger side though as the driver side kick panel is stuffed full of fuses and wiring which are right in the way - that might just be a jdm thing though as mine is an import. Also, i used a soldering iron to melt the holes through the plastic pieces, worked a treat
Takes about 45mins to an hour per side.I took some pics while i did the passenger side. I can upload them if anyone wants to see them. The guide on the other site actually is not that good i found.
-
I dont think there is an issue with mounting depth in the rear location, just the doors. If you dont mind cutting a simple mdf ring for mounting in the doors then you can pretty much fit sny 6.5in speakers.
-
It's not easy as there are plugs between the door and car body. Worth doing though.... Done it yet??
I'll be attempting this over the next few days. It sounds like you have to cut some new holes in the plugs for the new cable to pass through - could be a mare..
-
-
I wouldn't bother upgrading the rear speakers, you are best off spending the money on a good set of front speakers. Also a seperate amp to power the speakers will make a massive improvement over standard.
+1
Best bang for the buck - a nice set of comps up front. If funds available, powered through a good quality amp. Zed doors have a large volume too which means you can get decent midbase from good components
body work advice, hole filling the bootlid etc...
in Styling
Posted
Just had mine resprayed, I had the ariel removed and the hole smoothed. The bodyshop opted to weld it, they said it was the best way to proceed and i didn't argue.