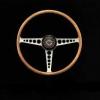
leonk Posted April 21, 2013 Author Share Posted April 21, 2013 (edited) Firstly thanks for all the words of encouragement, advice and offers of help guys! I managed to get the dismantled bonnet up to Preston this week to have the paint stripped as the first part of restoring it. The first stage is done by chemically stripping all the paint, filler underseal and seam sealer off the panels, they are then put through an oven and the bare metal is treated with a zinc phosphate solution to slow down any rusting of the bare metal. At this point the panels can be assessed and those needing it are ready to be taken away for repair. Once they have been repaired and any rusty metal cut out and renewed they will be treated to soda blasting, further chemical rust treatment, oven drying and then etch priming with a zinc rich primer. So when I went to collect the panels they looked very tatty in appearance following the first part of the process. Obviously until all the paint is off you never know what you are going to find. Fortunately the damage seems to be limited to various rust holes non bigger than a fifty pence piece. The worst 2 panels are the passenger door ( needs a new skin and lower repair) and the centre section of the bonnet ( 3 tennis ball size dents as if something has fallen on it ) Both of these have gone to a specialist panel beater as they are way beyond my limited bodywork skills. This guy hand fabricates old Bently, Aston Martin and Jaguar XK120 panels from flat sheets of metal. It's a cost I hadn't allowed for but the bonnet is an important part of the overall appearance. Some of the panels for minor repair In the meantime, I thought I would continue with the RHD conversion. For ease of production, the E type bulkhead was the same for RHD and LHD markets with various holes either used or blanked off. So far I have managed to source about 90% of the parts needed. Some more easily than others as not all are re manufactured. One of the first things that struck me when I got the car was just how heavy the steering was. There are two ways to attack this. Either fit later series 3 power steering rack and pump or fit the compact electric power steering that is now fitted to the majority of modern cars. The first option is cheaper and easier but widely believed to ruin the feel of the car. The second is very expensive but offers a discrete fitment, torque and speed sensitve and adjustable. Now I like a bit of research and an engineering challenge not to mention saving some money. That and bit of industrial espionage all triggered off by a fantastic write up that google threw up on drifworks. Turns out these guys have been fitting EPAS systems to their cars for years. Bellow is a combination of newly machined parts, reclaimed and original Jag. I have deliberately kept the original column and the new system is designed to be a bolt in replacement that can be removed to return the car back to original. Original column now no longer available and very rare / expensive second hand New manufactured by local engineering company and modified other Jag part Then I set to making one of the ends for the rotisserie And a new toy I've bought, not the first clue how to use it but it looks good. All the gear and no idea Edited April 21, 2013 by leonk Quote Link to comment Share on other sites More sharing options...
Stutopia Posted April 21, 2013 Share Posted April 21, 2013 I think the mystery machine at the bottom is for burning holes into polo mints. I continue to be enthrawled by this thread. The old metal has a fascinating history locked up in it. Quote Link to comment Share on other sites More sharing options...
Keyser Posted April 21, 2013 Share Posted April 21, 2013 A real restoration taking place here, looking good so far mate, different approach to me as I'm restoring but modifying. Luckily I don't have to worry about it being true to the original. Like the new toy I haven't got one of those to play with, not sure I can justify one but given the job your on it should get some heavy use. On a side note if you keep the updates coming I may stop giving you a hard time Quote Link to comment Share on other sites More sharing options...
DoogyRev Posted April 22, 2013 Share Posted April 22, 2013 A real restoration taking place here, looking good so far mate +1,000,000 It's coming along nicely Always best to take your time with "proper" restorations aye Keyser . . . . . . why do you think the tool box is taking so long More pics please leonk . . . . even if its just a nut or bolt 1 Quote Link to comment Share on other sites More sharing options...
leonk Posted December 5, 2013 Author Share Posted December 5, 2013 Well, it's been 7 months since my last update on this. Others have started and finished projects on here in less time. Some members have got married and others have had kids. What have I done, not a lot other than work to fund the bl**dy thing. Still a JAAAAAAAG is not something you rush, it is to be savoured and caressed..... The first major setback with body restoration came with the stripping of the bonnet. While the major panels were in remarkably rust free condition ( mainly due to it being a dry state US car ) a lot of the smaller flange pieces, brackets and infill panels did not fair so well. I wish i had known they would not survive as before, although rusty were still useable as templates to make new ones. Given that there are a lot more small parts to clean and blast, I came to the conclusion that the only way to have any control over the process is do it yourself! A bit of research and advice from Keyser, I have nearly finished this. Back to the Bonnet These parts are very hard to come by and so seeing a second hand bonnet on e bay I thought that would be the solution. Alarm bells should have rung when he chap couldn't send a better picture let alone more pictures because he didn't know how. I proceeded to rent a van (neither of ours are big enough ) and make the near 400 mile round trip to the Highlands of Scotland. An old run down farm in the middle of nowhere, and there it was in a field, where it looked like it had resided for the last 20 years. To cut a long story short I ended up chipping him a bit a buying it, driving home in a foul mood and wishing I hadn't. After a long time not even wanting to look at the rusty bonnet I decided, if nothing else it would be perfect to practice my limited bodywork skills on. I bought one of these, a shrinker stretcher.... This turns the lower piece of metal into the upper one in the picture below. Then you can tackle this.... Quote Link to comment Share on other sites More sharing options...
leonk Posted December 5, 2013 Author Share Posted December 5, 2013 Having made improvements to the swivel control of the rotisserie,,,, The car is now up on the rotisserie to start work on the floors Notice the extensive bracing of the body tub to prevent it bending. Hopefully a bit more to report over Christmas. Quote Link to comment Share on other sites More sharing options...
bizz Posted December 5, 2013 Share Posted December 5, 2013 Having made improvements to the swivel control of the rotisserie,,,, The car is now up on the rotisserie to start work on the floors Notice the extensive bracing of the body tub to prevent it bending. Hopefully a bit more to report over Christmas. I've done that Great restoration man you've got your work cut out there but what a fantastic machine to be working on. You're going to end up with a rear classic and it's nice to see something being brought back to it's former glory!! Looking forward to seeing the end product!! If I can help at all just let me know Quote Link to comment Share on other sites More sharing options...
Stutopia Posted December 5, 2013 Share Posted December 5, 2013 I get the fear when my car goes on a ramp! Love reading about the hardcore projects. This is going to be epic. Quote Link to comment Share on other sites More sharing options...
bizz Posted December 5, 2013 Share Posted December 5, 2013 lol Stu the first time you walk in and start working on a car thats in the air on its side is a bit worrying, not to mention the first time you actually turn it over but you soon get stuck in and not worry. Think Leonk will back me up on that Quote Link to comment Share on other sites More sharing options...
leonk Posted December 5, 2013 Author Share Posted December 5, 2013 lol Stu the first time you walk in and start working on a car thats in the air on its side is a bit worrying, not to mention the first time you actually turn it over but you soon get stuck in and not worry. Think Leonk will back me up on that Ha Ha, I was bricking it rotating it the first time, hence the over engineered locking mechanisms at both ends and paranoid extra welds and gussets. In the end, I was actually quite surprised how easily it does rotate. As I said in my pm it was your posts that motivated me to get it up on the rotisserie so thanks!!. 1 Quote Link to comment Share on other sites More sharing options...
bizz Posted December 5, 2013 Share Posted December 5, 2013 Lol if my teeny rotisserie could handle the mammoth 350z shell yours would defo support the lightweight E-type body but can completely emphathise. glad my build has helped you crack on with this Quote Link to comment Share on other sites More sharing options...
rtbiscuit Posted December 6, 2013 Share Posted December 6, 2013 coming along nicely, have to say I recognise that rust I had similar stuff in a similar place on mine Quote Link to comment Share on other sites More sharing options...
Wasso Posted December 6, 2013 Share Posted December 6, 2013 Looking good So when is the anticipated finished date, you must have a point in time in your head, but I guess like anything else, projects always over run. Quote Link to comment Share on other sites More sharing options...
WhackyWill Posted December 6, 2013 Share Posted December 6, 2013 Great build thread. always lover the E Type since I sold my 1970 Series 2, 4.2 Roadster in Rosso red. Always miss that car, but my bank manager doesn't..! Quote Link to comment Share on other sites More sharing options...
leonk Posted December 6, 2013 Author Share Posted December 6, 2013 (edited) Cheers guys, As regards completion date Wasso, I was hoping to have it done for next summer but I think that is unrealistic now. I am known to say at work on projects when people ask how long left, " It will go as fast as you throw money and men at it " These words are never truer than with this! I've started drilling the spot welds out of the floor panels this evening, a thankless task! As this is new to me, if anyone, especially the bodyshop guys know an easy method, feel free to speak up. And RT if you want to come and drill some out, be my guest, I'll even supply the biscuits! Edited December 6, 2013 by leonk Quote Link to comment Share on other sites More sharing options...
R35LEE Posted December 6, 2013 Share Posted December 6, 2013 Awesome project mate! I love old Jags Sent from my HTC One using Tapatalk Quote Link to comment Share on other sites More sharing options...
wizurd Posted December 6, 2013 Share Posted December 6, 2013 Excellent updates mate. Always like to see a full on project. Doesn't matter how long it takes really. Doing the work is part of the fun isn't it that rotisserie looks excellent. Quote Link to comment Share on other sites More sharing options...
Keyser Posted December 6, 2013 Share Posted December 6, 2013 Well now that's a first - you actually did an update before me Love the cabinet mate, nice to see some progress Few more months and I'll be back in the game Quote Link to comment Share on other sites More sharing options...
leonk Posted December 7, 2013 Author Share Posted December 7, 2013 (edited) Well now that's a first - you actually did an update before me :lol: I best slip another one in...... Got bored drilling floor spot welds, tried to bribe my son with beer to help, but " it's Friday night and no one works on a Friday night! I'll help you tomorrow" ( reality being that he will either be too hung over or found some poor unfortunate female or both ) So decided to finish the other side of the bonnet repair.. Before After Edited December 7, 2013 by leonk Quote Link to comment Share on other sites More sharing options...
wizurd Posted December 7, 2013 Share Posted December 7, 2013 That's impressive. How did you get it from before to after? Quote Link to comment Share on other sites More sharing options...
spursmaddave Posted December 7, 2013 Share Posted December 7, 2013 Quote Link to comment Share on other sites More sharing options...
leonk Posted December 7, 2013 Author Share Posted December 7, 2013 That's impressive. How did you get it from before to after? Cheers, if you go back a couple of pages there's a bit more detail and a few more pics of the other side. I've welded stainless sheet at work before, but this was a lot harder! Because the metal is thin and butted together it burns away when you try to weld it. That's why I'm using the green bonnet to practice on. Given that one of the major costs of restoration is the bodywork I figured I better start learning. Besided that I've actually enjoyed doing it. Quote Link to comment Share on other sites More sharing options...
wizurd Posted December 7, 2013 Share Posted December 7, 2013 That's the point I guess. As long as you enjoy the work required to fix the car up then it's not a labour at all. I was wondering about the welding and like you said how it burns away when your trying to weld. Good luck with it not that I think you need luck. Pretty impressed with those pics you've put up of the bonnet repairs you've done so far. Quote Link to comment Share on other sites More sharing options...
glrnet Posted December 7, 2013 Share Posted December 7, 2013 Outstanding work so far, love to see projects like this making progress @Keyser, anyone would think you were rebuilding your house Quote Link to comment Share on other sites More sharing options...
leonk Posted December 7, 2013 Author Share Posted December 7, 2013 Outstanding work so far, love to see projects like this making progress @Keyser, anyone would think you were rebuilding your house Don't worry, he's on the other end of the 24hr Restoration Crisis Line Quote Link to comment Share on other sites More sharing options...

Recommended Posts
Join the conversation
You can post now and register later. If you have an account, sign in now to post with your account.