cob1980 Posted June 16, 2016 Share Posted June 16, 2016 Will there be another one? Not in a hurry for it. Ta. Bearing in mind the response to this one I would think so , perhaps in a couple of months Great thanks. Looking to book mine in for a remap with you next April so as long as it's before then Quote Link to comment Share on other sites More sharing options...
Richf Posted June 17, 2016 Author Share Posted June 17, 2016 I can't open the fitting instructions doesn't seem to work. í ½í¸ Sent from my iPhone using Tapatalk Probably an issue with your phone , they open fine on pc. The instructions are supplied with the kit but if you pm me your email address i can send you another copy if you like . Quote Link to comment Share on other sites More sharing options...
Andy_Muxlow Posted June 17, 2016 Share Posted June 17, 2016 Yeah I did consider that last night I will have a look on the pc later on thanks. Sent from my iPhone using Tapatalk Quote Link to comment Share on other sites More sharing options...
Andy_Muxlow Posted June 17, 2016 Share Posted June 17, 2016 Received today and going to attempt fitting tomorrow 🙃 Sent from my iPad using Tapatalk Quote Link to comment Share on other sites More sharing options...
Paul K Posted June 17, 2016 Share Posted June 17, 2016 Received today and going to attempt fitting tomorrow 🙃 Sent from my iPad using Tapatalk It's not too difficult to do. Remember where the pipes go and make sure you don't trap the oil seal (it's the rubber piece around the oil filler cap) when You refit the plenum And don't over tighten the bolts !!! Have you got a torque wrench? Sent from my iPhone using Tapatalk Quote Link to comment Share on other sites More sharing options...
Andy_Muxlow Posted June 17, 2016 Share Posted June 17, 2016 Hi Paul yes my cousins husband has 1 so going over to theirs tomorrow to do it. The fitting instructions look fairly easy so watch this space. When you did yours do you have to reset anything afterwards? Sent from my iPhone using Tapatalk Quote Link to comment Share on other sites More sharing options...
Paul K Posted June 18, 2016 Share Posted June 18, 2016 Nope. Didn't need to do anything. Just be really careful not to move the butterfly in the throttle body Sent from my iPhone using Tapatalk 2 Quote Link to comment Share on other sites More sharing options...
Andy_Muxlow Posted June 18, 2016 Share Posted June 18, 2016 Fitted spacer today OMG Zeditus has begun 😂 Sent from my iPhone using Tapatalk 3 Quote Link to comment Share on other sites More sharing options...
AshbyJoe Posted June 19, 2016 Share Posted June 19, 2016 Managed to fit mine today! Wasn't hard really, instructions were easy to follow so anyone like myself with no mechanical background get stuck in! 👠1 Quote Link to comment Share on other sites More sharing options...
nievelc Posted June 19, 2016 Share Posted June 19, 2016 Did you notice any difference? I didnt get round to it this weekend, went fishing! Quote Link to comment Share on other sites More sharing options...
AshbyJoe Posted June 19, 2016 Share Posted June 19, 2016 Yeah definitely, I found when you give it some it sounds more excitable and also mine feels like it pulls through the revs easier. 😀 Quote Link to comment Share on other sites More sharing options...
Andy_Muxlow Posted June 19, 2016 Share Posted June 19, 2016 Yeah I found the same tbh more growly. Sent from my iPhone using hammer and chisel! Quote Link to comment Share on other sites More sharing options...
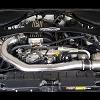
GrahameJ Posted July 15, 2016 Share Posted July 15, 2016 (edited) I fitted mine last weekend, along with a modified lower plenum and a DIY throttle body heater. I also used 1.5m thick Aramid insulating gaskets between the lower plenum and inlet manifold, and the upper plenum and the throttle body heater. Mods to the plenum involved shaving 2mm from the tops of the front two runners/trumpets, removal of all casting seams, blending and porting of the runners, together with some more work on the outer of the rear two runners to allow easier flow on entry to the plenum. The plenum was finally ceramic coated with Techline's Powercote thermal barrier which I obtained from Camcoat in Warrington. All this work was done to aid flow and to try and keep the mixture as cool as possible. When fitting I disconnected the battery, as there was a good chance I would disturb the throttle body, and I did have to drill out one of the allen bolts. These are very, very tight! Once assembled I then ran through the following reset procedures: Accelerator Pedal Release Position Learning Procedure Throttle Valve Closed Position Learning On Monday I wasn't impressed with any differences in performance, so that night while the engine was fully warm I then performed: Idle Air Volume Learning (Throttle Position Learning) Tuesday - I was impressed, finding myself on pole position at the traffic lights I floored it. A big improvement with the car howling away from the lights like never before, followed by a metallic thud. That was the sound of my Zippo lighter hitting the rear plastics, as it flew backwards out of the cubby. It had never done that before either! I guess the car is now ready for an Uprev on the ecu, before it realises there is now an idiot diving instead of the kind Japanese former owner, and ramps back the timing and fuel mapping. Lower plenum and H-Dev spacer: Upper plenum and throttle body heater: Fitted: Edited July 15, 2016 by GrahameJ 1 Quote Link to comment Share on other sites More sharing options...
Ollydykins Posted August 16, 2016 Share Posted August 16, 2016 DAM I missed it 😩 Quote Link to comment Share on other sites More sharing options...
james6583 Posted August 25, 2016 Share Posted August 25, 2016 Missed this too Quote Link to comment Share on other sites More sharing options...

Recommended Posts
Join the conversation
You can post now and register later. If you have an account, sign in now to post with your account.