Ogman Posted September 18, 2015 Author Share Posted September 18, 2015 Come on, catch up to 2015! I'm working on it Looks like he can only do it during his lunch breaks Hahaha you got it! Days over now though Quote Link to comment Share on other sites More sharing options...
Ogman Posted September 18, 2015 Author Share Posted September 18, 2015 March 2015 - Time to get down and dirty: My brother-in-law (pictured) and I gave the Zed some much needed TLC. Products consisted of: Carbon Collective Satsuma Snow Foam Carbon Collective Lusso Shampoo Carbon Collective Mammoth Wash Mitt Valet Pro Bilberry Wheel Cleaner Raceglaze Super Size Detailing Brush Carbon Collective Clay Mitt Dodo Juice Basics of Bling Clay Bar Dodo Juice Born Slippy (Lube for Clay Bar & Mitt) Poorboys Waffle Weave Towel Carbon Collective Panel Prep Surface Cleaner Silverline Silverstorm Rotary Polisher (1500W) Autoglym Paint Pro System (Two-Stage Polishing Kit) Carbon Collective Platinum Paint Coating Carbon Collective Platinum Wheels Coating Carbon Collective Platinum Glass Copious amounts of Microfibre Towels I won't go into too much detail about every step, I'll let the pictures do the talking. However, the steps were as follows: Whole car was snowfoamed to begin with using CC satsuma snow foam. The body was then washed using two bucket method and CC lusso shampoo. Wheels were washed using VP Bilberry wheel cleaner and Detailing brush. Shampoo then rinsed off and not dried (kept the water on the car for use of the clay mitt). Bit of Dodo Juice Born Slippy applied whilst using the clay mitt also helped. I used the clay mitt to do one panel at a time and was rinsing each panel as I went along. I started off with using the clay mitt with a fair bit of pressure on the windows to 'break it in' before using it on the bodywork. For the wheels, exhaust and smaller, more intricate areas I used some good old fashioned clay bar. Then the car was washed again after it had all been done with the clay mitt/bar. Car was completely dried and rolled up into the garage ready to begin polishing. Door handles, badges, rear diffuser, black rubbers and plastics were all taped up in blue 3M tape to avoid being damaged. First of all tried out the Stage 2 'Refine' polish and pad on a front wing to see if it provided enough 'cut' to get out the scratches and blemishes. It didn't quite provide enough in this case so we decided to use the Stage 1 'Renovate', which was then followed with Stage 2 afterwards. This method was adopted around the whole of the car, with many areas also having to be polished by hand. The bulk of the car was machine polished though. This left an amazing finish on the paintwork, but also a lot of excess polish, so the car was rolled back outside to be washed again. Whilst my brother-in-law took the reigns on the polishing I applied a coat of CC Platinum Wheels to each of the powdercoated rays and also to the cobra backbox and tailpipes. Following this wash, after the car had been dried, all the surfaces were 'cleaned' using CC panel prep to provide the base for applying the sealants. Every piece of glass had a coating of CC Platinum Glass applied to the exterior faces. The bodywork was then covered in CC Platinum Paint, one panel at a time. Leaving a beautiful finish and protected Zed. The end result: 4 Quote Link to comment Share on other sites More sharing options...
Ogman Posted September 18, 2015 Author Share Posted September 18, 2015 May 2015 - Japfest Time: This happened.... What can I say, amazing experience. Only problem being, now I have the bug A few shots whilst out on track anyway: Quote Link to comment Share on other sites More sharing options...
Ogman Posted September 18, 2015 Author Share Posted September 18, 2015 (edited) July 2015 - The Torqen Episode: And then.....I met Adrian sh*t got serious. More updates to follow soon Edited September 18, 2015 by Ogman 1 Quote Link to comment Share on other sites More sharing options...
Adrian@TORQEN Posted September 18, 2015 Share Posted September 18, 2015 AHAHAHHA!!! Sorry! 2 Quote Link to comment Share on other sites More sharing options...
Vlad Posted September 18, 2015 Share Posted September 18, 2015 July 2015 - The Torqen Episode: And then.....I met Adrian sh*t got serious. More updates to follow soon That's the part I don't like 1 Quote Link to comment Share on other sites More sharing options...
Adrian@TORQEN Posted September 18, 2015 Share Posted September 18, 2015 Well, that's because you're jealous! :p Quote Link to comment Share on other sites More sharing options...
Vlad Posted September 18, 2015 Share Posted September 18, 2015 Well, I'm only jealous of 1 thing so far - that he already fitted Quote Link to comment Share on other sites More sharing options...
Ogman Posted September 21, 2015 Author Share Posted September 21, 2015 Well, I'm only jealous of 1 thing so far - that he already fitted "so far" - hahaha Quote Link to comment Share on other sites More sharing options...
Ogman Posted September 21, 2015 Author Share Posted September 21, 2015 (edited) REPOST. Edited September 21, 2015 by Ogman Quote Link to comment Share on other sites More sharing options...
Kaveney Posted September 21, 2015 Share Posted September 21, 2015 I don't see any BBK on the build yet Alan Quote Link to comment Share on other sites More sharing options...
Kaveney Posted September 21, 2015 Share Posted September 21, 2015 Stunning car as well . Looks so nice I do love them in Black . Alan 1 Quote Link to comment Share on other sites More sharing options...
Ogman Posted September 21, 2015 Author Share Posted September 21, 2015 I don't see any BBK on the build yet Alan Sshhhhhhhh - Alan it's a secret I'm actually just writing the post at the moment! Thanks for kind words though! Quote Link to comment Share on other sites More sharing options...
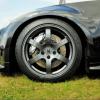
Ogman Posted September 21, 2015 Author Share Posted September 21, 2015 July 2015 - TORQEN Time: Soooo....after many messages back-and-fourth with Adrian, we finally composed my extensive list of goodies. The next few weeks the parcels started coming in thick and fast...much to the disgust of the better half - none were for her she understands though - definitely a keeper!! Many of these boxes are still left stacked up, ready for a tasty install at the start of 2016. However, the following modifications were all fitted in the week before Trax 2015. Two very long days in a buddys workshop and I was more than happy with the results: - TORQEN undertray - TORQEN BBK in Anodised Silver (8-pot front, 6-pot rear) - TORQEN R Coilovers - Invidia Gemini Titanium Rolled-in Tips (it will become clearer at a later date as to why I've changed exhaust systems ) A few fitted pictures from Trax: Quote Link to comment Share on other sites More sharing options...
Vlad Posted September 21, 2015 Share Posted September 21, 2015 Exhaust looks nice...but them brakes are horrible! I'm happily save you from misery and swap them for a set of nice brembos Great effort man...car looks clean and mean! Quote Link to comment Share on other sites More sharing options...
Ogman Posted September 21, 2015 Author Share Posted September 21, 2015 (edited) July 2015 - MOT & P3 Service Time: It was over to the trustworthy Mitz at Cougar Store again for MOT time and a P3 service. To find out the good ol' banana arm had failed on the passenger side. So I had to get a pair ordered along with the new bolts and cups to freshen everything up following the fitting of the coilovers. Luckily I didn't have to buy the bushes, however Mitz and I had to rummage through a box of bushes to find the one we were after After the MOT, it was time to have the Motordyne ART V3 test pipes fitted - what an amazing piece of kit. Top notch fabrication with a bit of science behind the design - Helmholtz Resonance, a rather interesting read for anyone interested in these pipes from the guys at Super Street Online. http://www.superstre...act-or-fiction/ The sound from these is immense, I noticed an increase in throttle response too. Would recommend them to anybody considering a decat or HFC - they don't throw up any errors on the dash either. BONUS! (Unfortunately, I don't have any fitted pictures but you get the idea ) Edited September 21, 2015 by Ogman 1 Quote Link to comment Share on other sites More sharing options...
Adrian@TORQEN Posted September 21, 2015 Share Posted September 21, 2015 Callum, who's the this Vlad guy that keeps spamming your thread with his jealousy? :lol: 2 Quote Link to comment Share on other sites More sharing options...
Ogman Posted September 21, 2015 Author Share Posted September 21, 2015 Exhaust looks nice...but them brakes are horrible! I'm happily save you from misery and swap them for a set of nice brembos Great effort man...car looks clean and mean! :lol: :p maybe one day my friend. Thanks buddy - roll on next year Quote Link to comment Share on other sites More sharing options...
Ogman Posted September 21, 2015 Author Share Posted September 21, 2015 Callum, who's the this Vlad guy that keeps spamming your thread with his jealousy? :lol: I don't know i found him lurking outside my house the other night.... Quote Link to comment Share on other sites More sharing options...
Vlad Posted September 21, 2015 Share Posted September 21, 2015 Haha yea, I was just looking another night...will be back with jack and spanners soon 1 Quote Link to comment Share on other sites More sharing options...
Ogman Posted September 21, 2015 Author Share Posted September 21, 2015 Haha yea, I was just looking another night...will be back with jack and spanners soon **goes out to fit BlackVue dash cam** Quote Link to comment Share on other sites More sharing options...
Adrian@TORQEN Posted September 21, 2015 Share Posted September 21, 2015 Callum, the photo shown here for the MotorDyne ART pipes it's for a v2 product. The current v3 product looks like here: Quote Link to comment Share on other sites More sharing options...
Ogman Posted September 21, 2015 Author Share Posted September 21, 2015 Callum, the photo shown here for the MotorDyne ART pipes it's for a v2 product. The current v3 product looks like here: Why thank you - original post updated (how I didn't notice the big flat faces on the J-tubes I have no idea) Quote Link to comment Share on other sites More sharing options...
Adrian@TORQEN Posted September 21, 2015 Share Posted September 21, 2015 Jaguar engineers, you can't trust them I heard! :lol: I should be organising a group buy on these really, amazing quality and superb sound with them. 1 Quote Link to comment Share on other sites More sharing options...
Ogman Posted September 21, 2015 Author Share Posted September 21, 2015 Jaguar engineers, you can't trust them I heard! :lol: I should be organising a group buy on these really, amazing quality and superb sound with them. Hahaha I'll try grab a video at some point as well to capture the sound too! Quote Link to comment Share on other sites More sharing options...

Recommended Posts
Join the conversation
You can post now and register later. If you have an account, sign in now to post with your account.